1 Hadoop overview
1.1 what is Hadoop
(1) Hadoop is a distributed system infrastructure developed by the Apache foundation
(2) It mainly solves the problems of massive data storage and massive data analysis and calculation
(3) In a broad sense, Hadoop usually refers to a broader concept - Hadoop ecosystem
1.2 Hadoop advantages
(1) High reliability: Hadoop bottom layer maintains multiple data copies, so even if a Hadoop computing element or storage fails, it will not lead to data loss.
(2) High scalability: allocating task data among clusters can easily expand thousands of nodes.
(3) Efficiency: under the idea of MapReduce, Hadoop works in parallel to speed up task processing.
(4) High fault tolerance: it can automatically reassign failed tasks.
1.3 Hadoop composition (key points of interview)
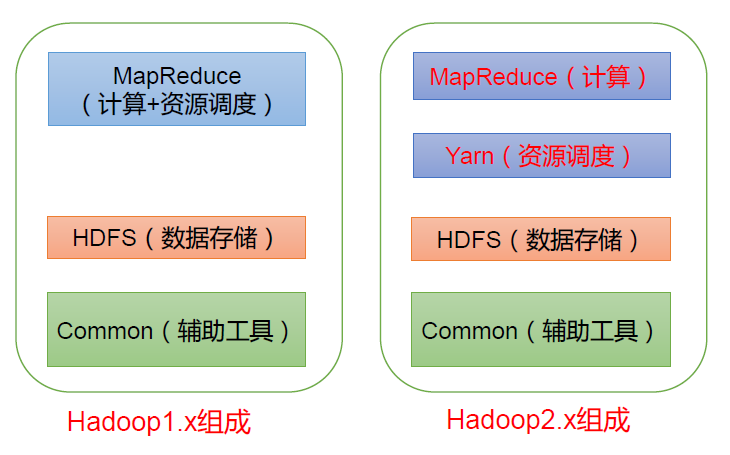
In Hadoop 1 In the X era, MapReduce in Hadoop handles business logic operation and resource scheduling at the same time, which is highly coupled.
In Hadoop 2 In the X era, Yan was added. Yarn is only responsible for resource scheduling and MapReduce is only responsible for computing.
Hadoop3.x has no change in composition.
1.3.1 overview of HDFS architecture
Hadoop Distributed File System (HDFS for short) is a distributed file system.
(1) NameNode (nn): stores the metadata of the file, such as file name, file directory structure, file attributes (generation time, number of copies, file permissions), as well as the block list of each file and the DataNode where the block is located.
(2) DataNode(dn): stores file block data and the checksum of block data in the local file system.
(3) Secondary NameNode(2nn): Backup metadata of NameNode at regular intervals.
1.3.2 overview of yarn architecture
YT another resource Negotiator (YARN for short), another resource coordinator, is the resource manager of Hadoop.
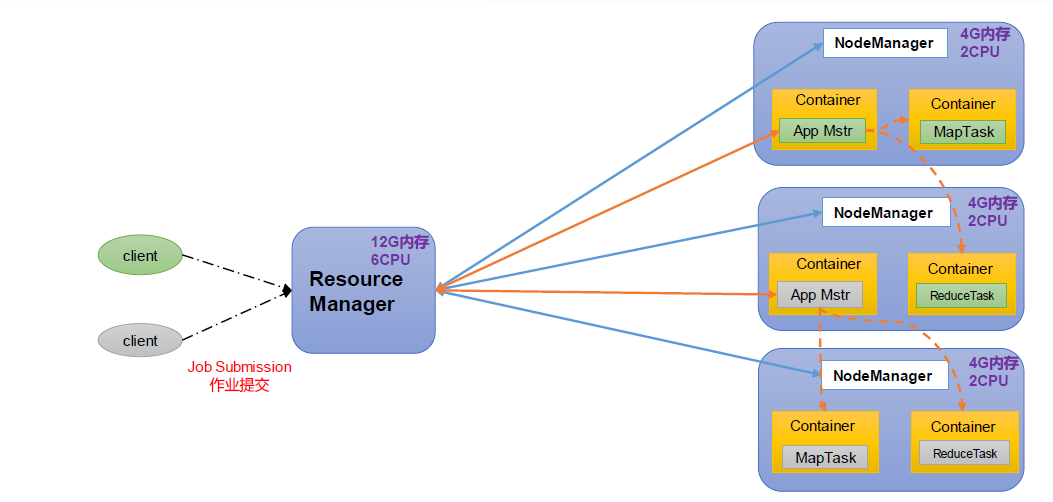
Resource Manager (RM): the manager of the entire cluster resources (memory, CPU, etc.)
NodeManager(NM): the manager of a single node server resource.
Application master (AM): the manager who runs a single task.
Container: container is equivalent to an independent server, which encapsulates the resources required for task operation, such as memory, CPU, disk, network, etc.
explain:
(1) There can be multiple clients
(2) Multiple applicationmasters can run on a cluster
(3) Each NodeManager can have multiple containers
1.3.3 MapReduce Architecture Overview
MapReduce divides the calculation process into two stages: Map and Reduce
1) The Map stage processes the input data in parallel
2) In the Reduce phase, the Map results are summarized
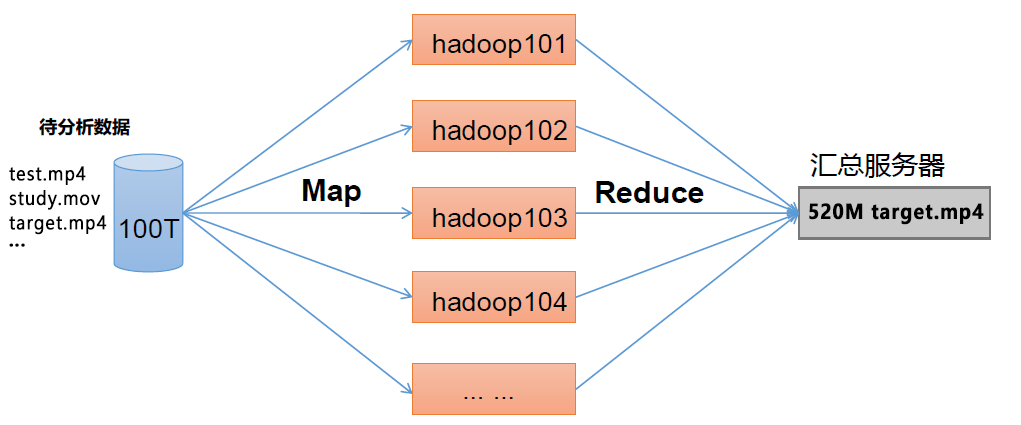
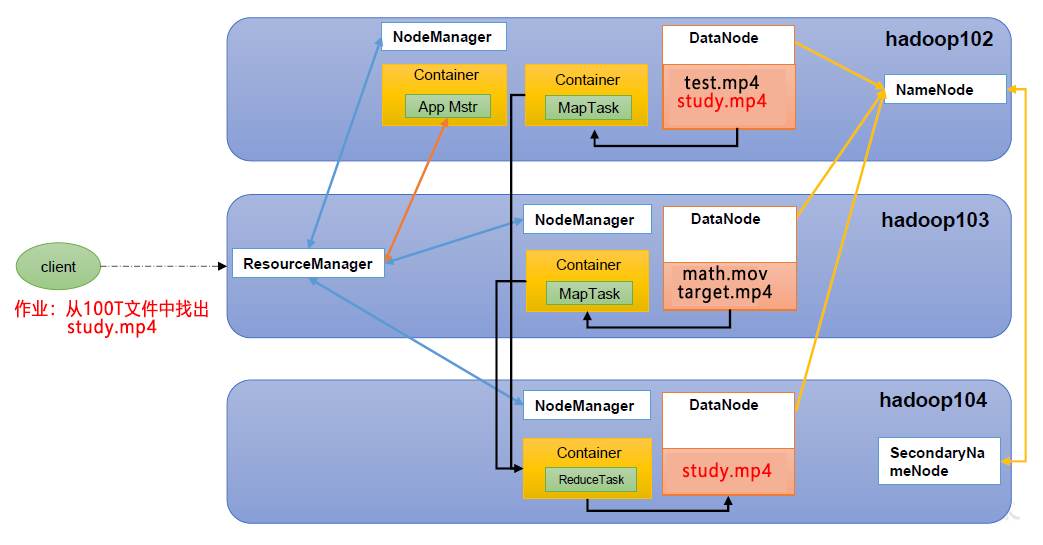
1.3.4 relationship among HDFS, YARN and MapReduce
As shown in the figure:
1.3.5 big data technology ecosystem
As shown in the figure:
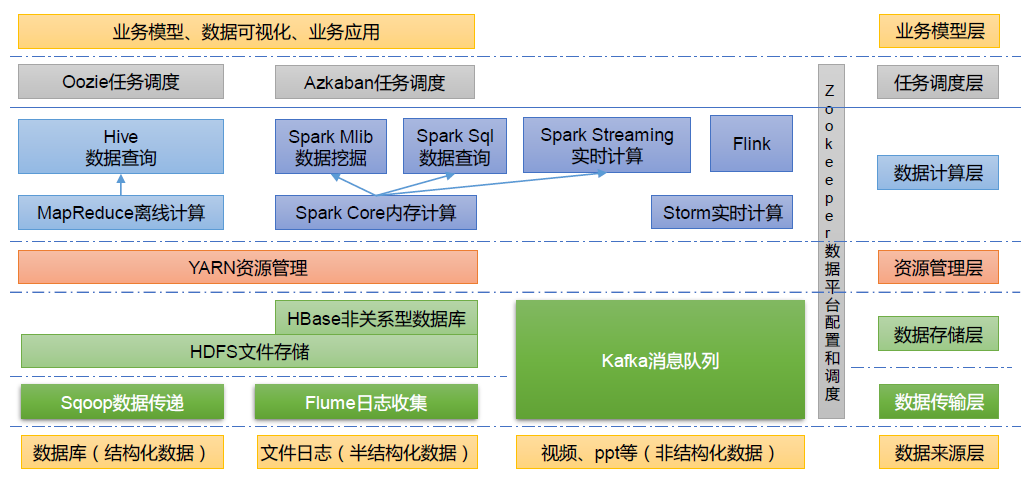
The technical terms involved in the figure are explained as follows:
(1) Sqoop: sqoop is an open source tool, which is mainly used to transfer data between Hadoop, Hive and traditional database (MySQL). It can import the data in a relational database (such as mysql, Oracle, etc.) into Hadoop HDFS or HDFS into relational database.
(2) Flume: flume is a highly available, highly reliable and distributed system for massive log collection, aggregation and transmission. Flume supports customization of various data senders in the log system for data collection.
(3) Kafka: Kafka is a high-throughput distributed publish subscribe message system.
(4) Spark: spark is currently the most popular open source big data memory computing framework. It can be calculated based on the big data stored on Hadoop.
(5) Flink: Flink is currently the most popular open source big data memory computing framework. There are many scenarios for real-time computing.
(6) Oozie: oozie is a workflow scheduling management system that manages Hadoop job s.
(7) HBase: HBase is a distributed, column oriented open source database. HBase is different from the general relational database. It is a database suitable for unstructured data storage.
(8) It is a simple SQL based tool to map the data of Hive: have into a structured database. It can map the data of Hive: have into a database based on SQL. Its advantage is low learning cost. It can quickly realize simple MapReduce statistics through SQL like statements without developing special MapReduce applications. It is very suitable for statistical analysis of data warehouse.
(9) ZooKeeper: it is a reliable coordination system for large-scale distributed systems. Its functions include configuration maintenance, name service, distributed synchronization, group service, etc.
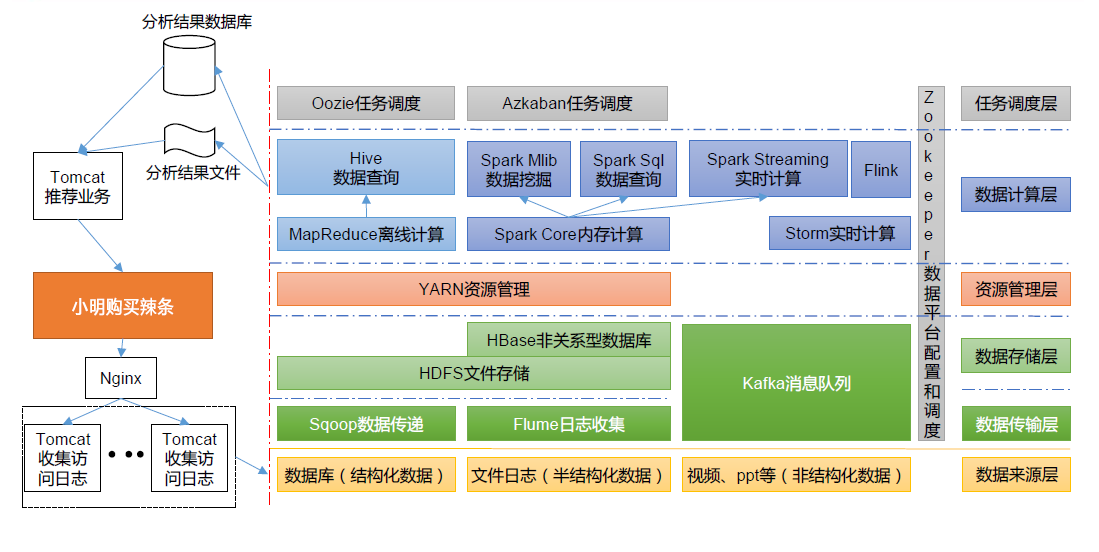
1.3.6 recommended system framework diagram
Recommended system project framework
2. Establishment of Hadoop operating environment (development focus)
2.1 template virtual machine environment preparation
2.1.1 Hadoop 100 virtual machine configuration requirements are as follows
(1) Using Yum to install requires that the virtual machine can access the Internet normally. You can test the virtual machine networking before installing yum
[root@hadoop100 ~]# ping www.baidu.com
(2) Install EPEL release
[root@hadoop100 ~]# yum install -y epel-release
(3) Note: if the minimum system version is installed on Linux, the following tools need to be installed; If you are installing Linux Desktop Standard Edition, you do not need to perform the following operations
Net tool: toolkit collection, including ifconfig and other commands
vim: Editor
[root@hadoop100 ~]# yum install -y net-tools
[root@hadoop100 ~]# yum install -y vim
2.1.2 close the firewall, close the firewall and start it automatically
[root@hadoop100 ~]# systemctl stop firewalld
[root@hadoop100 ~]# systemctl disable firewalld.service
2.1.3 create ordinary users and modify their passwords
[root@hadoop100 ~]# useradd Tom
[root@hadoop100 ~]# passwd Tom
2.1.4 configure that ordinary users have root permission, which is convenient for sudo to execute the command with root permission later
[root@hadoop100 ~]# vim /etc/sudoers
Modify the / etc/sudoers file and add a line under the% wheel line as follows:

Note: don't put the Tom line directly under the root line, because all users belong to the wheel group. You first configured Tom to have the password free function, but when the program runs to the% wheel line, the function is overwritten and requires a password. So Tom wants to put it under the line of% wheel.
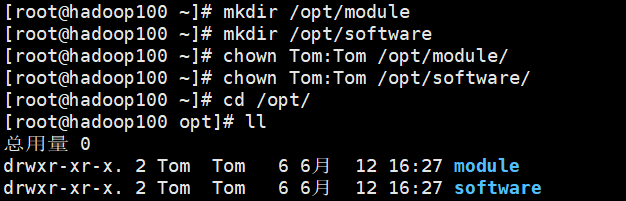
2.1.5 create a folder in / opt directory and modify the user and group
2.1.6 uninstall the JDK of the virtual machine
[root@hadoop100 ~]# rpm -qa | grep -i java | xargs -n1 rpm -e --nodeps
rpm -qa: query all installed rpm packages
grep -i: ignore case
xargs -n1: indicates that only one parameter is passed at a time
rpm -e --nodeps: force software uninstallation
Note: Note: if your virtual machine is minimized, you do not need to perform this step.
2.1.7 restart virtual machine
[root@hadoop100 ~]# reboot
2.2 cloning virtual machines
2.2.1 using the template machine Hadoop 100, clone three virtual machines Hadoop 102 Hadoop 103 Hadoop 104
Note: when cloning, close Hadoop 100 first
2.2.2 modify the IP of the clone machine and take Hadoop 102 as an example
(1) Modify the static IP of the cloned virtual machine:
[Tom@hadoop100 ~]# vim /etc/sysconfig/network-scripts/ifcfg-ens33
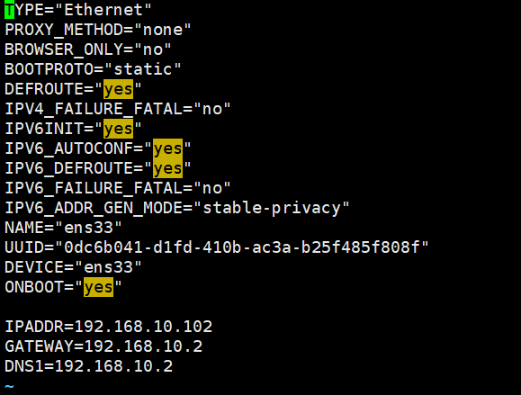
(2) View the virtual network editor of Linux virtual machine, edit - > virtual network editor - > VMnet8
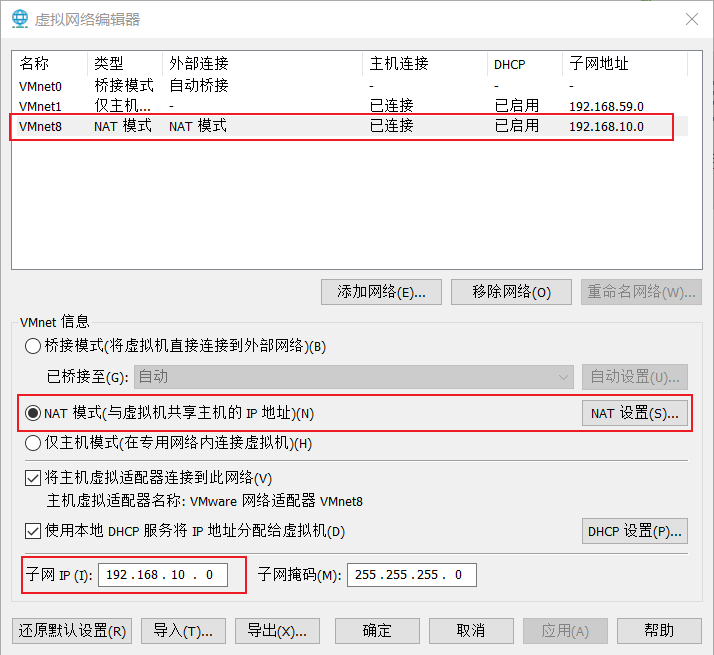
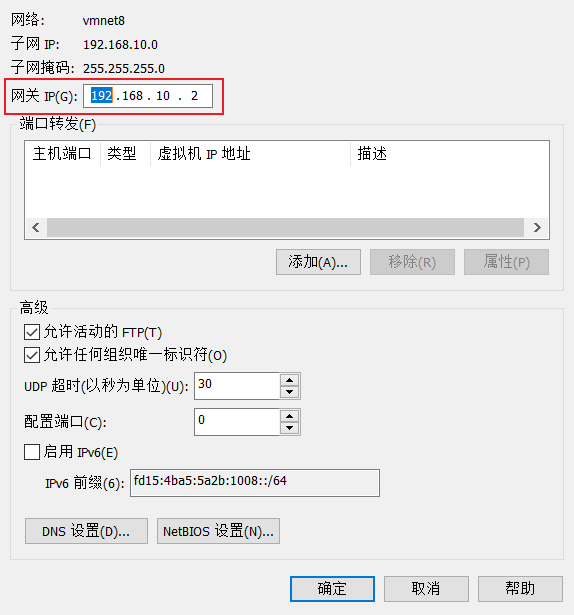
(3) View the IP address of Windows system adapter VMware Network Adapter VMnet8

(4) Ensure that the IP address and virtual network editor address in the ifcfg-ens33 file of Linux system are the same as the VMnet8 network IP address of Windows system.
2.2.3 modify the host name of the clone machine, taking Hadoop 102 as an example
(1) Modify host name
[root@hadoop100 ~]# vim /etc/hostname
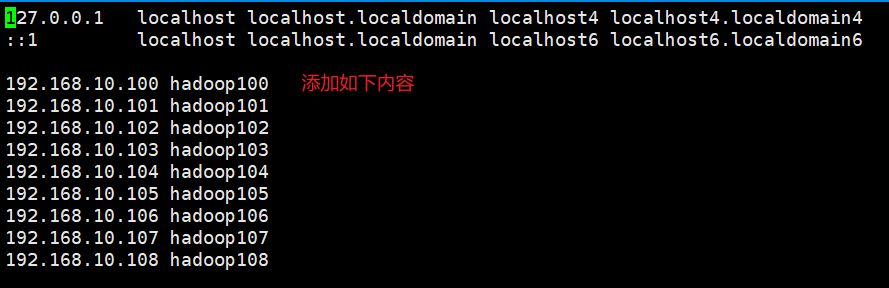
(2) Configure the Linux clone host name mapping hosts file and open / etc/hosts
[root@hadoop100 ~]# vim /etc/hosts
2.2.4 restart the clone machine Hadoop 102
[root@hadoop100 ~]# reboot
2.2.5 modify the host mapping file (hosts file) of windows
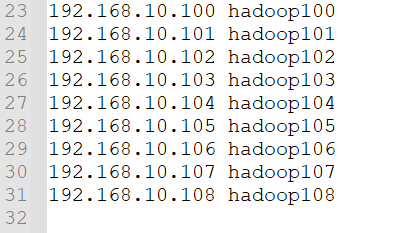
Enter the C:\Windows\System32\drivers\etc path, open the hosts file, add the following contents, and then save.
2.3 install JDK in Hadoop 102
(1) Uninstall existing JDK
Note: the virtual machine JDK must be deleted in advance.
(2) Import the JDK into the software folder under the opt directory with the XShell transport tool
(3) Check whether the software package is imported successfully in opt directory under Linux system
[Tom@hadoop102 ~]$ ls /opt/software/
jdk-8u212-linux-x64.tar.gz
(4) Unzip the JDK to the / opt/module directory
[Tom@hadoop102 software]$ tar -zxvf jdk-8u212-linux-x64.tar.gz -C /opt/module/
(5) Configure JDK environment variables
[Tom@hadoop102 software]$ sudo vim /etc/profile.d/my_env.sh

source click the / etc/profile file to make the new environment variable PATH effective
[Tom@hadoop102 software]$ source /etc/profile
Test whether the JDK is installed successfully
[Tom@hadoop102 software]$ java -version
java version "1.8.0_212"
Java(TM) SE Runtime Environment (build 1.8.0_212-b10)
Java HotSpot(TM) 64-Bit Server VM (build 25.212-b10, mixed mode)
[Tom@hadoop102 software]$
2.4 installing Hadoop in Hadoop 102
(1) Use XShell file transfer tool to transfer hadoop-3.1.3 tar. GZ is imported into the software folder under the opt directory
(2) Unzip the installation file under / opt/module
[Tom@hadoop102 software]$ tar -zxvf hadoop-3.1.3.tar.gz -C /opt/module/
(3) Check whether the decompression is successful
[Tom@hadoop102 software]$ ls /opt/module/
hadoop-3.1.3  jdk1.8.0_212
(4) Add Hadoop to environment variable
[Tom@hadoop102 software]$ sudo vim /etc/profile.d/my_env.sh

Make the modified document effective
[Tom@hadoop102 software]$ source /etc/profile
(5) Test for successful installation
[Tom@hadoop102 software]$ hadoop version
Hadoop 3.1.3
Source code repository https://gitbox.apache.org/repos/asf/hadoop.git -r ba631c436b806728f8ec2f54ab1e289526c90579
Compiled by ztang on 2019-09-12T02:47Z
Compiled with protoc 2.5.0
From source with checksum ec785077c385118ac91aadde5ec9799
This command was run using /opt/module/hadoop-3.1.3/share/hadoop/common/hadoop-common-3.1.3.jar
[Tom@hadoop102 software]$
(6) Restart if the Hadoop command cannot be used, restart the virtual machine
[Tom@hadoop102 hadoop-3.1.3]$ sudo reboot
2.5 Hadoop directory structure
View Hadoop directory structure
[Tom@hadoop102 hadoop-3.1.3]$ ll
 Total consumption 184
-rw-rw-r--. 1 Tom Tom     25 5 June 28-16:49 a.txt
drwxr-xr-x. 2 Tom Tom    183 9 December 2019 bin
drwxrwxr-x. 4 Tom Tom     37 5 October 29:54 data
drwxr-xr-x. 3 Tom Tom     20 9 December 2019 etc
drwxrwxr-x. 3 Tom Tom     18 5 October 29:53 hdfsdata
drwxr-xr-x. 2 Tom Tom    106 9 December 2019 include
drwxr-xr-x. 3 Tom Tom     20 9 December 2019 lib
drwxr-xr-x. 4 Tom Tom    288 9 December 2019 libexec
-rw-rw-r--. 1 Tom Tom 147145 9 April 2019 LICENSE.txt
drwxrwxr-x. 3 Tom Tom   4096 5 September 29-15:36 logs
-rw-rw-r--. 1 Tom Tom  21867 9 April 2019 NOTICE.txt
-rw-rw-r--. 1 Tom Tom   1366 9 April 2019 README.txt
drwxr-xr-x. 3 Tom Tom   4096 9 December 2019 sbin
drwxr-xr-x. 4 Tom Tom     31 9 December 2019 share
drwxrwxr-x. 2 Tom Tom     22 5 June 22:23 wcinput
[Tom@hadoop102 hadoop-3.1.3]$
Important catalogue
(1) bin directory: stores scripts for operating Hadoop related services (hdfs yarn mapred)
(2) etc Directory: Hadoop configuration file directory, which stores Hadoop configuration files
(3) lib Directory: the local library where Hadoop is stored (the function of compressing and decompressing data)
(4) sbin Directory: stores scripts for starting or stopping Hadoop related services
(5) share Directory: store the dependent jar packages, documents and official cases of Hadoop
3 Hadoop operation mode
Hadoop official website: http://hadoop.apache.org/
Hadoop operation modes include: local mode, pseudo distributed mode and fully distributed mode
Local mode: stand-alone operation, just to demonstrate the official case. The production environment is not used.
Pseudo distributed mode: it is also a stand-alone operation, but it has all the functions of Hadoop cluster. A server simulates a distributed environment. Individual companies that are short of money are used for testing, and the production environment is not used.
Fully distributed mode: multiple servers form a distributed environment. Use in production environment.
Construction steps of fully distributed mode:
(1) Prepare 3 clients (turn off firewall, static IP, host name)
(2) Install JDK
(3) Configure environment variables
(4) Install Hadoop
(5) Configure environment variables
(6) Configure cluster
(7) Single point start
(8) Configure ssh
(9) Get together and test the cluster
3.1 writing cluster distribution script xsync
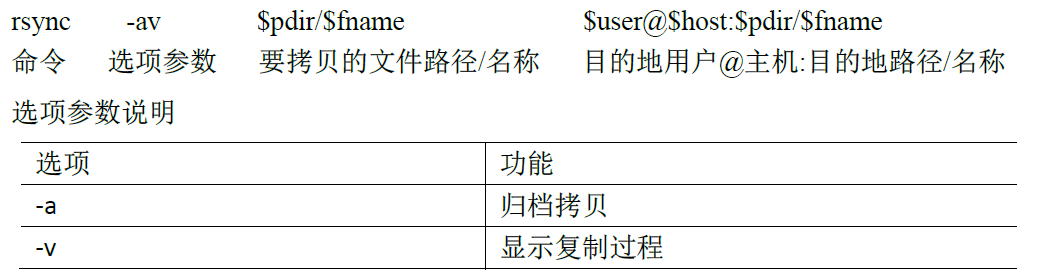
(1) scp (secure copy): secure copy
scp can copy data between servers. (from server1 to server2)
Basic syntax:

(2) rsync remote synchronization tool
rsync is mainly used for backup and mirroring. It has the advantages of high speed, avoiding copying the same content and supporting symbolic links.
Difference between rsync and scp: copying files with rsync is faster than scp. rsync only updates the difference files. scp is to copy all the files.
Basic syntax:
(3) xsync cluster distribution script
Requirement: copy files to the same directory of all nodes in a circular way
Demand analysis:
Original copy of rsync command:
rsync -av /opt/module/ Tom@hadoop103:/opt/
Expected script: xsync name of file to synchronize
It is expected that the script can be used in any path (the script is placed in the path where the global environment variable is declared)
[Tom@hadoop102 bin]$ echo $PATH
Script implementation: create xsync file in / home/Tom/bin directory
#!/bin/bash

#1. Number of judgment parameters
if [ $# -lt 1 ]
then
        echo Not Enough Arguement!
        exit;
fi

#2. Traverse all machines in the cluster
for host in hadoop102 hadoop103 hadoop104
do
        echo ==================== $host ====================
        #3. Traverse all directories and send them one by one

        for file in $@
        do
                #4. Judge whether the document exists
                if [ -e $file ]
                        then
                                #5. Get parent directory
                                pdir=$(cd -P $(dirname $file); pwd)

                                #6. Get the name of the current file
                                fname=$(basename $file)
                                ssh $host "mkdir -p $pdir"
                                rsync -av $pdir/$fname $host:$pdir
                        else
                                echo $file does not exists!
                fi
        done
done
The modified script xsync has execution permission:
[Tom@hadoop102 bin]$ chmod +x xsync
Test script:
[Tom@hadoop102 bin]$ xsync /home/Tom/bin/
Copy the script to / bin for global call:
[Tom@hadoop102 bin]$ sudo cp xsync /bin/
Synchronize environment variable configuration (root owner)
Note: if sudo is used, xsync must complete its path.
[Tom@hadoop102 ~]$ sudo ./bin/xsync
Make environment variables effective:
[Tom@hadoop103 ~]$ source /etc/profile
[Tom@hadoop104 ~]$ source /etc/profile
3.2 SSH non secret login configuration
Configure ssh
Basic syntax: ssh the IP address of another computer
No key configuration
Secret free login principle:
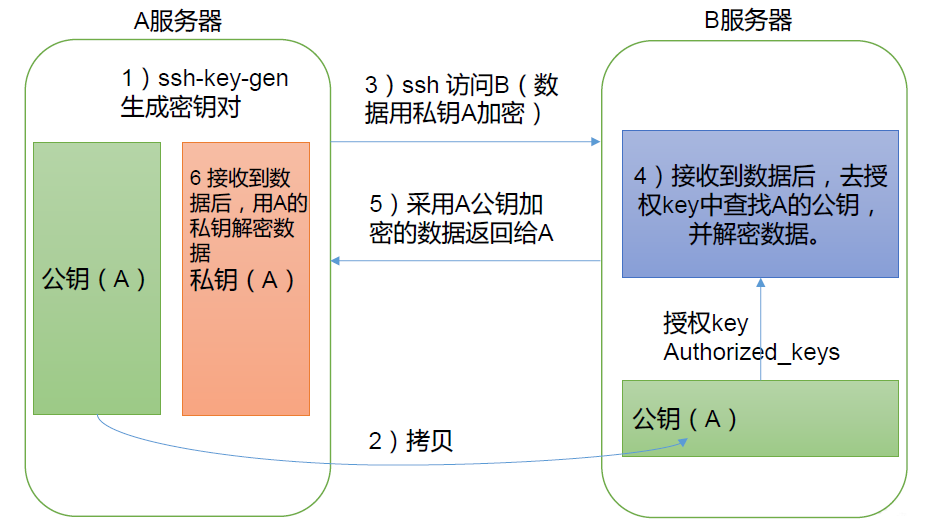
Generate public and private keys
[Tom@hadoop102 .ssh]$ pwd
/home/Tom/.ssh

[Tom@hadoop102 .ssh]$ ssh-keygen -t rsa
Then click (three carriage returns) and two file IDS will be generated_ RSA (private key), id_rsa.pub (public key)
Copy the public key to the target machine for password free login
[Tom@hadoop102 .ssh]$ ssh-copy-id hadoop102
[Tom@hadoop102 .ssh]$ ssh-copy-id hadoop103
[Tom@hadoop102 .ssh]$ ssh-copy-id hadoop104
Note: you also need to configure Tom account on Hadoop 103 to log in to Hadoop 102, Hadoop 103 and Hadoop 104 servers without secret.
Configure Tom account on Hadoop 104 to log in to Hadoop 102, Hadoop 103 and Hadoop 104 servers without secret.
Use the root account on Hadoop 102 and configure non secret login to Hadoop 102, Hadoop 103 and Hadoop 104.
Explanation of file functions in the. ssh folder (~ /. ssh)

3.3 cluster configuration
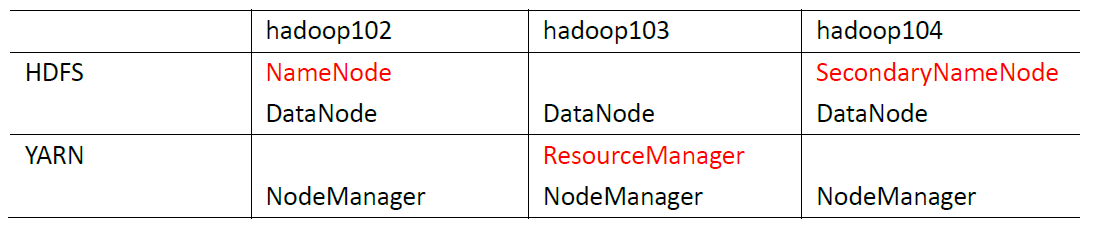
Cluster deployment planning
(1) NameNode and SecondaryNameNode should not be installed on the same server.
(2) Resource manager also consumes a lot of memory and should not be configured on the same machine as NameNode and SecondaryNameNode.
Profile description
Hadoop configuration files are divided into two types: default configuration files and user-defined configuration files. Only when users want to modify a default configuration value, they need to modify the user-defined configuration file and change the corresponding attribute value.
(1) Default profile
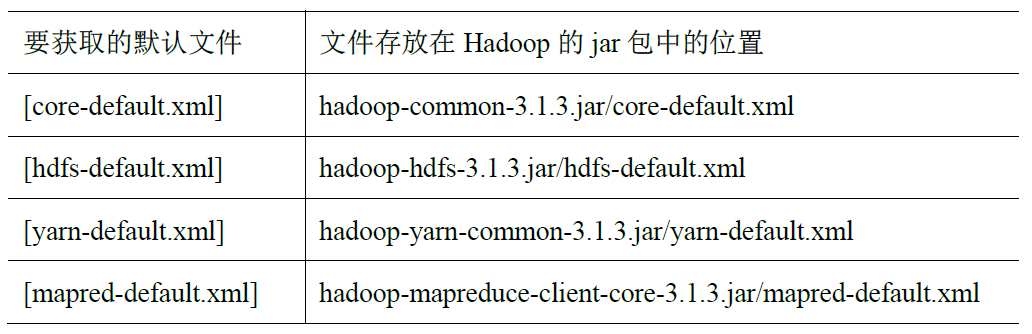
(2) Custom profile
core-site.xml, hdfs-site.xml, yarn-site.xml, mapred-site.xml four configuration files are stored in $Hadoop_ On the path of home / etc / Hadoop, users can modify the configuration again according to the project requirements.
Configure cluster
(1) Configure core site. From the core configuration file xml
[Tom@hadoop102 hadoop]$ vim /opt/module/hadoop-3.1.3/etc/hadoop/core-site.xml
<configuration>
<!--appoint NameNode Address of-->
<property>
        <name>fs.defaultFS</name>
        <value>hdfs://hadoop102:8020</value>
</property>

<!--appoint hadoop Storage directory of data-->
<property>
        <name>hadoop.tmp.dir</name>
        <value>/opt/module/hadoop-3.1.3/data</value>
</property>

<!--to configure HDFS The static user used for web page login is Tom -->
<property>
        <name>hadoop.http.staticuser.user</name>
<value>Tom</value>
</property>
</configuration>
(2) HDFS configuration file HDFS site xml
[Tom@hadoop102 hadoop]$ vim /opt/module/hadoop-3.1.3/etc/hadoop/hdfs-site.xml
<configuration>
        <!--nn web End access address-->
        <property>
                <name>dfs.namenode.http-address</name>
                <value>hadoop102:9870</value>
        </property>
        <!--2nn web End access address-->
        <property>
                <name>dfs.namenode.secondary.http-address</name>
                <value>hadoop104:9868</value>
        </property>
</configuration>
(3) The YARN configuration file configures the YARN site xml
[Tom@hadoop102 hadoop]$ vim /opt/module/hadoop-3.1.3/etc/hadoop/yarn-site.xml
<configuration>
        <!--appoint MR go shuffle -->
        <property>
                <name>yarn.nodemanager.aux-services</name>
                <value>mapreduce_shuffle</value>
        </property>
        <!--appoint ResourceManager Address of-->
        <property>
                <name>yarn.resourcemanager.hostname</name>
                <value>hadoop103</value>
        </property>
        <!--Inheritance of environment variables-->
        <property>
                <name>yarn.nodemanager.env-whitelist</name>
                <value>JAVA_HOME,HADOOP_COMMON_HOME,HADOOP_HDFS_HOME,HADOOP_CONF_DIR,CLASSPATH_PREPEND_DISTCACHE,HADOOP_YARN_HOME,HADOOP_MAPRED_HOME</value>
        </property>
</configuration>
(4) MapReduce configuration file configuration mapred site xml
[Tom@hadoop102 hadoop]$ vim /opt/module/hadoop-3.1.3/etc/hadoop/mapred-site.xml
<configuration>
    <!--appoint MapReduce The program runs on Yarn upper-->
    <property>
        <name>mapreduce.framework.name</name>
        <value>yarn</value>
    </property>
</configuration>
Distribute the configured Hadoop configuration file on the cluster
[Tom@hadoop102 hadoop]$ xsync /opt/module/hadoop-3.1.3/etc/hadoop/
Go to 103 and 104 to check the distribution of documents
[Tom@hadoop103 ~]$ cat /opt/module/hadoop-3.1.3/etc/hadoop/core-site.xml
[Tom@hadoop104 ~]$ cat /opt/module/hadoop-3.1.3/etc/hadoop/core-site.xml
3.4 cluster
Configure workers
[Tom@hadoop102 hadoop]$ vim /opt/module/hadoop-3.1.3/etc/hadoop/workers
Add the following contents to the document:
hadoop102
hadoop103
hadoop104
Synchronize all node profiles
[Tom@hadoop102 hadoop]$ xsync /opt/module/hadoop-3.1.3/etc/
Start cluster
(1) If the cluster is started for the first time, The namenode needs to be formatted in the Hadoop 102 node (note that formatting namenode will generate a new cluster id, resulting in inconsistent cluster IDS between namenode and datanode, and the cluster cannot find past data. If the cluster reports an error during operation and needs to reformat namenode, be sure to stop the namenode and datanode processes first, and delete the data and logs directories of all machines before formatting.)
[Tom@hadoop102 hadoop-3.1.3]$ hdfs namenode -format
(2) Start HDFS
[Tom@hadoop102 hadoop-3.1.3]$ sbin/start-dfs.sh
(3) Start YARN on Hadoop 103 node with resource manager configured
[Tom@hadoop103 hadoop-3.1.3]$ sbin/start-yarn.sh
(4) View the NameNode of HDFS on the Web side
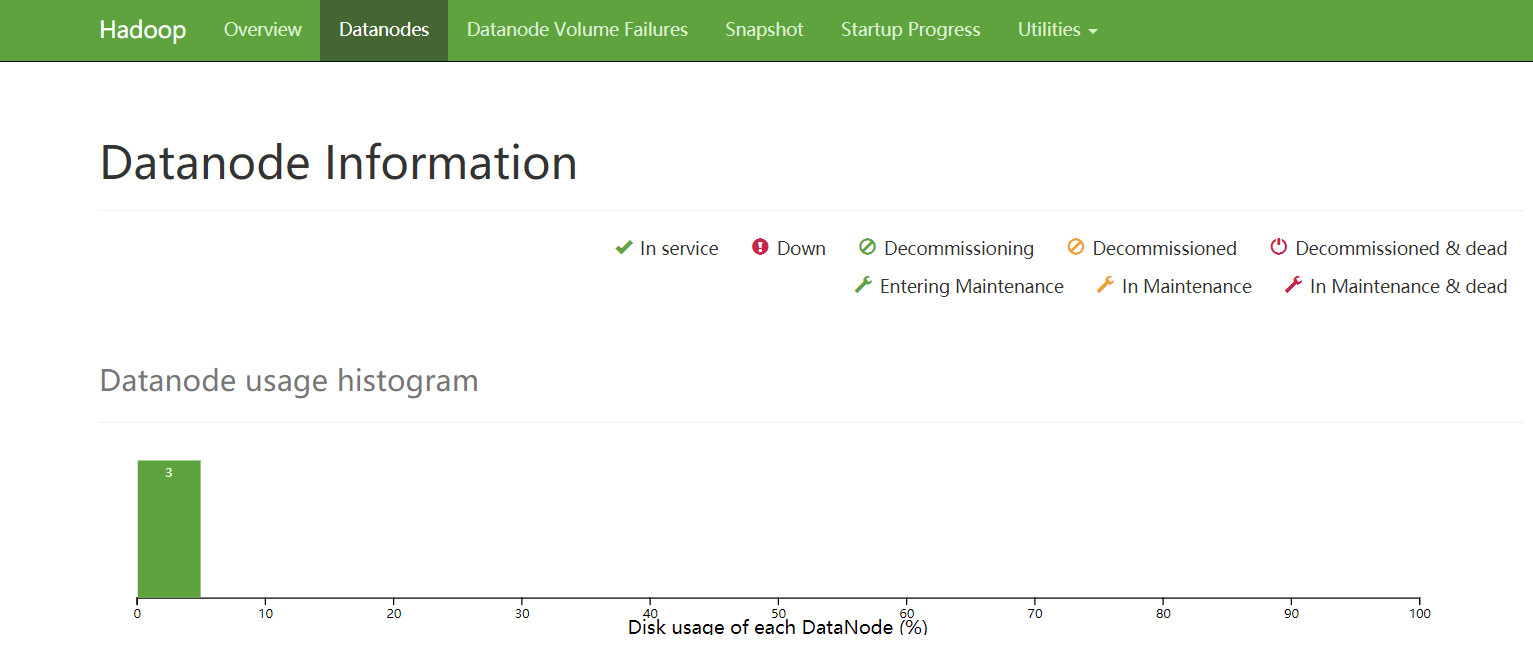
(a) Enter in browser http://hadoop102:9870
(b) View data information stored on HDFS
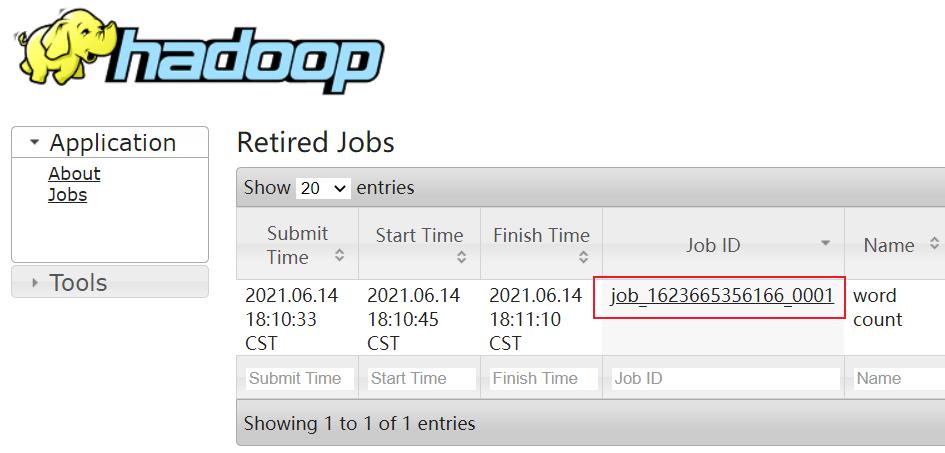
(5) View YARN's ResourceManager on the Web
(a) Enter in browser http://hadoop103:8088
(b) View Job information running on YARN

Cluster Basic test
(1) Upload files to cluster
[Tom@hadoop102 hadoop-3.1.3]$ hadoop fs -put wcinput/ /input
[Tom@hadoop102 hadoop-3.1.3]$ hadoop fs -put /opt/software/jdk-8u212-linux-x64.tar.gz /
(2) After uploading the file, check where the file is stored
View file storage path
[Tom@hadoop102 subdir0]$ pwd
/opt/module/hadoop-3.1.3/data/dfs/data/current/BP-572133316-192.168.10.102-1623663396433/current/finalized/subdir0/subdir0
[Tom@hadoop102 subdir0]$
View the contents of files stored on disk by HDFS
[Tom@hadoop102 subdir0]$ cat blk_1073741825
yes
ok
thanks
ok
you
yes
yes
[Tom@hadoop102 subdir0]$
(3) Splicing
[Tom@hadoop102 subdir0]$ cat blk_1073741826>>tmp.tar.gz
[Tom@hadoop102 subdir0]$ cat blk_1073741827>>tmp.tar.gz
[Tom@hadoop102 subdir0]$ tar -zxvf tmp.tar.gz
(4) Download
[Tom@hadoop102 software]$ hadoop fs -get /jdk-8u212-linux-x64.tar.gz ./
3.5 configuring the history server
In order to view the historical operation of the program, you need to configure the history server. The specific configuration steps are as follows:
Configure mapred site xml
[Tom@hadoop102 hadoop-3.1.3]$ vim etc/hadoop/mapred-site.xml
 <!--Historical server address-->
    <property>
        <name>mapreduce.jobhistory.address</name>
        <value>hadoop102:10020</value>
    </property>
    <!--History server web End address-->
    <property>
        <name>mapreduce.jobhistory.webapp.address</name>
        <value>hadoop102:19888</value>
    </property>
Distribution configuration
[Tom@hadoop102 hadoop-3.1.3]$ xsync etc/hadoop/mapred-site.xml
Start the history server in Hadoop 102
[Tom@hadoop102 hadoop-3.1.3]$ mapred --daemon start historyserver
Check whether the history server is started
[Tom@hadoop102 hadoop-3.1.3]$ jps
View JobHistory
http://hadoop102:19888/jobhistory
3.6 configuring log aggregation
Log aggregation concept: after the application runs, upload the program running log information to the HDFS system.

Benefits of log aggregation function: you can easily view the details of program operation, which is convenient for development and debugging.
To enable the log aggregation function, you need to restart NodeManager, ResourceManager and HistoryServer.
To enable the log aggregation function, the specific steps are as follows:
(1) Configure yarn site xml
[Tom@hadoop102 hadoop-3.1.3]$ vim etc/hadoop/yarn-site.xml
<!--Enable log aggregation-->
        <property>
        <name>yarn.log-aggregation-enable</name>
        <value>true</value>
        </property>
        <!--Set log aggregation server address-->
        <property>
                <name>yarn.log.server.url</name>
                <value>http://hadoop102:19888/jobhistory/logs</value>
        </property>
        <!--Set the log retention time to 7 days-->
        <property>
                <name>yarn.log-aggregation.retain-seconds</name>
                <value>604800</value>
        </property>
(2) Distribution configuration
[Tom@hadoop103 hadoop-3.1.3]$ xsync etc/hadoop/yarn-site.xml
(3) Close NodeManager, ResourceManager, and HistoryServer
[Tom@hadoop103 hadoop-3.1.3]$ sbin/stop-yarn.sh
[Tom@hadoop102 hadoop-3.1.3]$ mapred --daemon stop historyserver
(4) Start NodeManager, ResourceManage, and HistoryServer
[Tom@hadoop103 hadoop-3.1.3]$ sbin/start-yarn.sh
[Tom@hadoop102 hadoop-3.1.3]$ mapred --daemon start historyserver
(5) Delete existing output files on HDFS
[Tom@hadoop102 hadoop-3.1.3]$ hadoop fs -rm -r /output
(6) Execute WordCount program
[Tom@hadoop102 hadoop-3.1.3]$ hadoop jar share/hadoop/mapreduce/hadoop-mapreduce-examples-3.1.3.jar wordcount /input /output
(7) View log
Historical server address: http://hadoop102:19888/jobhistory
Historical task list:
To view the task running log:
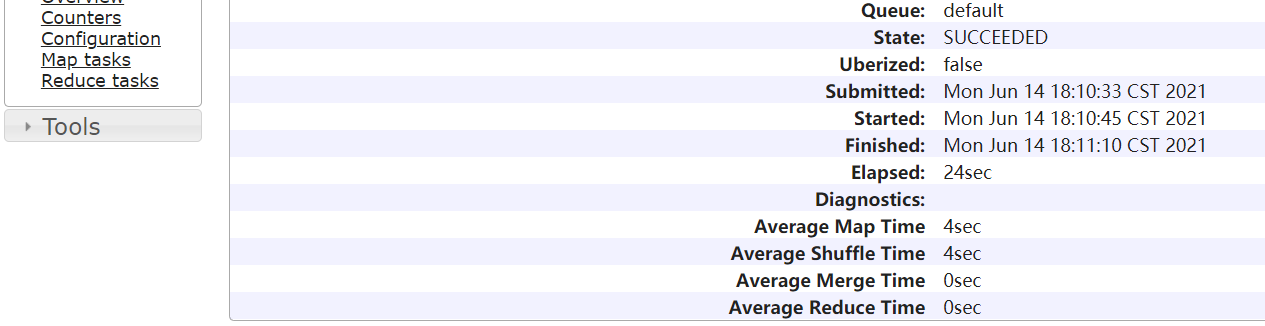
Operation log details:

3.7 summary of cluster start / stop mode
Each module starts / stops separately (ssh configuration is the premise)
(1) Overall start / stop HDFS
start dfs.sh/stop dfs.sh
(2) Overall start / stop of YARN
start yarn.sh/stop yarn.sh
Each service component starts / stops one by one
(1) Start / stop HDFS components respectively
hdfs daemon start/stop namenode/datanode/secondarynamenode
(2) Start / stop YARN
yarn daemon start/stop resourcemanager/nodemanager
3.8 writing common scripts for Hadoop clusters
Hadoop cluster startup and shutdown script (including HDFS, Yan and historyserver): myhadoop sh
[Tom@hadoop102 hadoop-3.1.3]$ cd /home/Tom/bin/
[Tom@hadoop102 bin]$ vim myhadoop.sh
#!/bin/bash

if [ $# -lt 1 ]
then
        echo "No Args Input..."
        exit ;
fi

case $1 in
"start")
        echo " =================== start-up hadoop colony==================="
        echo " ---------------start-up hdfs ---------------"
        ssh hadoop102 "/opt/module/hadoop-3.1.3/sbin/start-dfs.sh"
        echo " ---------------start-up yarn ---------------"
        ssh hadoop103 "/opt/module/hadoop-3.1.3/sbin/start-yarn.sh"
        echo " ---------------start-up historyserver ---------------"
        ssh hadoop102 "/opt/module/hadoop-3.1.3/bin/mapred --daemon start historyserver"
;;
"stop")
        echo " =================== close hadoop colony==================="
        echo " ---------------close historyserver ---------------"
        ssh hadoop102 "/opt/module/hadoop-3.1.3/bin/mapred --daemon stop historyserver"
        echo " ---------------close yarn ---------------"
        ssh hadoop103 "/opt/module/hadoop-3.1.3/sbin/stop-yarn.sh"
        echo " ---------------close hdfs ---------------"
        ssh hadoop102 "/opt/module/hadoop-3.1.3/sbin/stop-dfs.sh"
;;
*)
        echo "Input Args Error..."
;;
esac
Exit after saving, and then grant script execution permission
[Tom@hadoop102 bin]$ chmod +x myhadoop.sh
View three server Java process scripts: jpsall sh
[Tom@hadoop102 hadoop-3.1.3]$ cd /home/Tom/bin/
[Tom@hadoop102 bin]$ vim jpsall.sh
#!/bin/bash

for host in hadoop102 hadoop103 hadoop104
do
        echo =============== $host ===============
        ssh $host jps
done
Exit after saving, and then grant script execution permission
[Tom@hadoop102 bin]$ chmod +x jpsall.sh
Distribute the / home/Tom/bin directory to ensure that the custom script can be used on all three machines
[Tom@hadoop102 bin]$ xsync /home/Tom/bin/
3.9 description of common port numbers
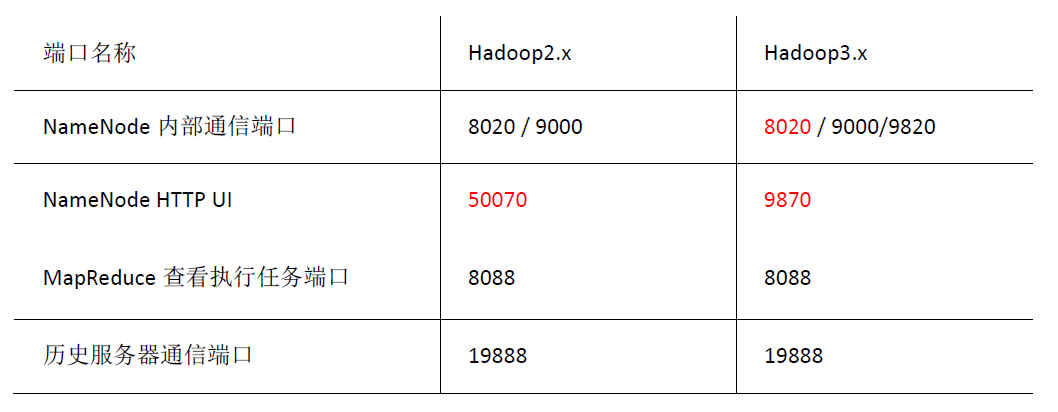
reference resources:
https://www.bilibili.com/video/BV1Qp4y1n7ENspm_id_from=333.788.b_636f6d6d656e74.7