- 📢 Blog home page: https://blog.csdn.net/zhangay1998
- 📢 Welcome to like 👍 Collection ⭐ Leaving a message. 📝 Please correct any mistakes!
- 📢 This article was originally written by God Y. and launched in csdn 🙉
- 📢 The future is long, and it is worth our efforts to go to a better life ✨
🍌 hit a plane
- ☀️ The sun is bright, the drivers are full, and the air is full of hormones. It's time for everything to start mating again~
- 😇 EH ~ wrong! Come again~
- 🙉 One day the weather was fine and I had nothing to do. I wanted to go out and recite poetry and Fu. I ran into a beautiful schoolgirl~
- 👩 The schoolgirl looked naive and said (y) ū e) : "senior geigei~, are you good at flying?"
- 😅 I was a little embarrassed and said, "cough, ok..."
- 👩 Xuemei said again, "people also want to learn to fly, otherwise you can teach them ~"
- 🤪 I said, "this... Needs talent! I don't know how talented you are. Can I test you first?"
- 👩 Eager to try, Xuemei said, "well, geigei~ just come!"
- 🧐 So I said, "what's the point of the big plane?"
- 👩 Xuemei looked determined and said, "first, be fast, second, be accurate, and finally be cruel!"
- 🥰 I said, "perfect pass! Then I'll teach you how to play a game of playing airplanes and become a player - playing airplanes!"

📢 text
The above is a short story before going to bed after the rain, and the following steps into the text
- Some time ago, I saw that a big man in CSDN made a game of playing airplanes with Java. Watching him play airplanes so well, I also want to make one.
- How can you play games without Unity, a professional~
- So recently, I used my spare time (fishing time) to play a game of flying
💫 Let's sort out our ideas first
Flying, as the name suggests, we should start thinking around the plane
- First of all, we need to create a game scene, that is, the scene where we are about to "hit a plane"! It's best to make the scene move to reflect the reality~
- Secondly, to create a leading role plane, of course, it should look different from the enemy plane. Our plane can move up and down, left and right, or launch shells to hit the plane! Naturally, you should also have blood volume. Otherwise, what fun is there for invincible to fight a plane? You can't enter the sage mode!
- Then there is the enemy. Fight the plane. How can you fight without a plane ~, then join the enemy aircraft and let them join the battle at random. Add some obstacles to make the scene of fighting the plane more thrilling!
- Then there is the destruction of the game object, including the destruction of the enemy, the destruction of bullets and so on~
- Finally, there should be a game controller to control the generation time and number of enemy aircraft, as well as the victory and failure at the end of the fight
Well, a simple game idea is completed, so the next step is to carry out the development plan according to this idea
🌟 Start making
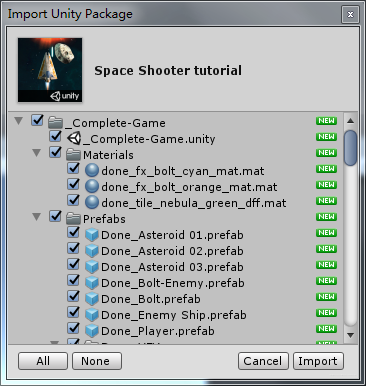
Here we import a resource package of Unity's official aircraft war, so we don't have to use a simple briefs to be an aircraft, so we can be a little taller.
After importing, see the figure below, and then operate according to the ideas we have thought out in advance.
Step 1: set the scene
After importing the resource package, the first step is to configure the game scene
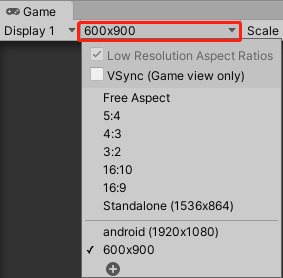
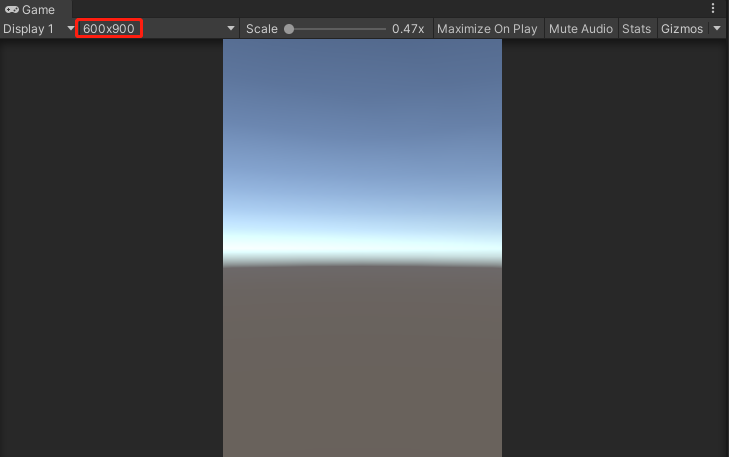
Click the place shown in the figure below in the Game view to configure the resolution of the Game view, that is, the Game screen when we play the Game, and set the aspect ratio to 600 × 900. Here is just a reference, a vertical version of the Game screen.
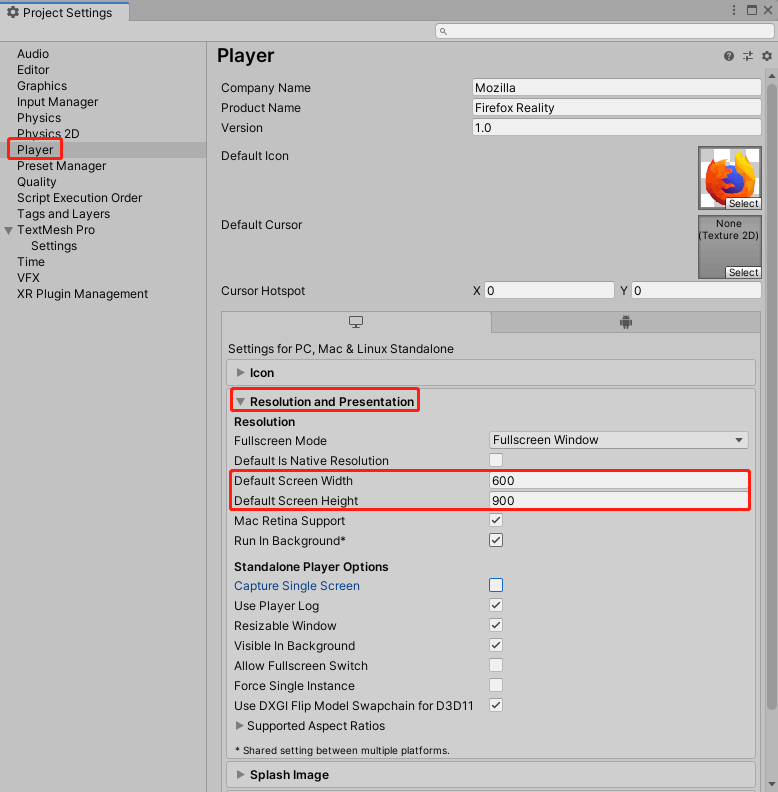
Also open Player Setting for configuration
Player Setting can also be opened in Edit - > project settings - > player, and the aspect ratio is set to 600 × 900. Both methods are OK
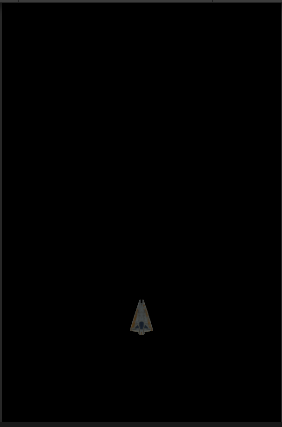
After setting, the Game view is like this ~, and a simple Game screen space setting is completed
Step 2: configure our aircraft
There are already aircraft in this resource package, Assets/Module/Player
So we dragged the plane to the Hierarchy window and renamed it Player
Add rigid body: add component - > physics - > rigibody
Collider: add component - > physics - > mesh Collider
These two components are added to achieve collision effect, so it is necessary to add them
Set the component properties of the Player. We don't need the aircraft to have gravity, because it will fall, so turn off the UseGravity option of the rigid body, so we don't use the gravity effect.
The following figure shows the final panel properties of the aircraft Inspector

Then there is a particle effect of jet from the tail of the aircraft in the resource package. We add it to the tail of the aircraft and directly drag the particle effect file to the aircraft. As shown in the following figure (the background of the game is in the next step, so I'm too lazy to change the screen ~):
Step 3: set the camera and lighting effect in the scene
act at sb.'s own discretion
- We need to put the camera in a suitable position to better experience the game. Lighting is for better game effect
- Directly use the data to set it - the data is dead and people are alive. You can set it in any way. Here is just a reference value~
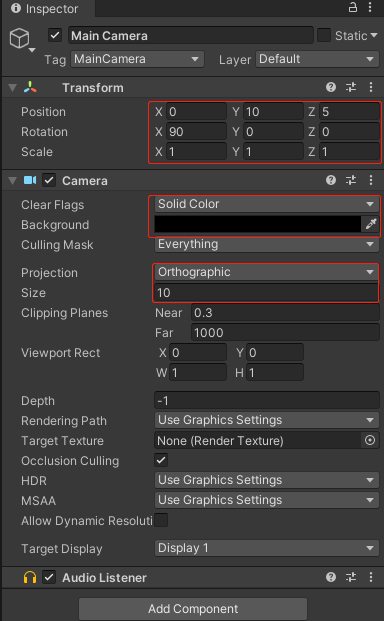
Set camera attribute values
- Reset camera Transform
- The x of Rotation is set to 90
- Position y is set to 10 and z is set to 5
- The Projections are set to orthographic because the camera looks down on the entire scene and does not need perspective
- Set Size to 10
- Set Clear Flags to Solid Color
- Background is set to black
Camera Inspector panel properties:
The Game view at this time is as follows. Is it dark? Because the lighting has not been processed, the next step is lighting
Light treatment
- Lighting is mainly to make the scene look more comfortable and less disobedient, so a reference value is also set here
- Change the Directional Light in the scene to MainLigjt
- Reset the properties of Main Light
- Set x of Rotation of Main Light to 20 and y to - 115
The final parameters of Main Light are as follows:

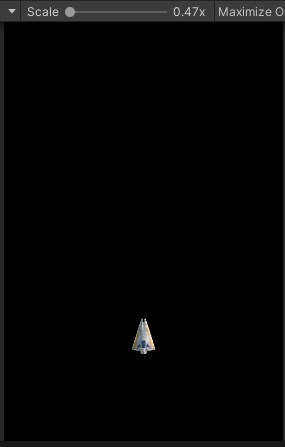
In this way, the camera and lighting can be easily handled. At this time, the Game view is as follows. Is it better than the above one~
Step 4: change the game background
At this time, the Game view is dark and thousands of miles away from the high force grid. Well, at least the Game background needs to be added
The steps are as follows:
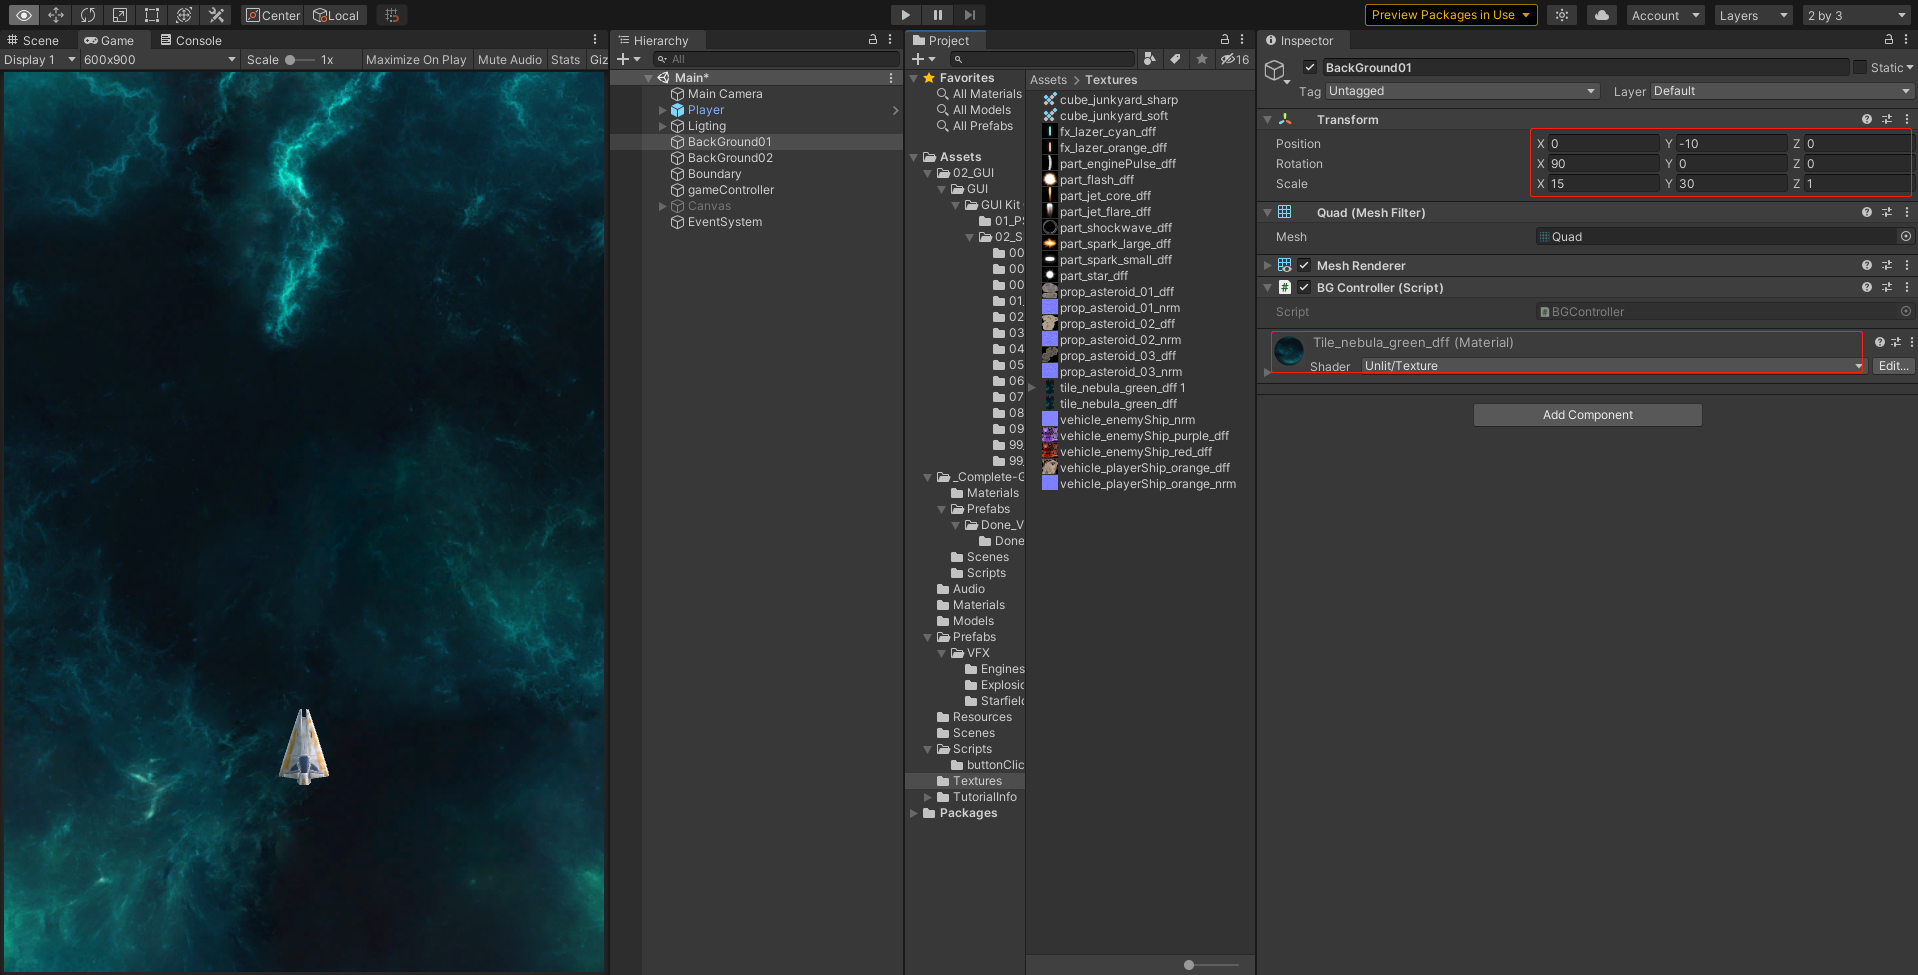
- Create a new Quad and rename it Background01. Method: right click in Hierarchy - > 3D object - > Quad
- Tile_ nebula_ green_ Drag DFF to the Background in the scene. Path: Assets\Textures\tile_nebula_green_dff
- tile_nebula_green_dff is a diagram in the resource package, which can be used as a background
Directly look at the Inspector panel attribute of Background. Just set it according to this attribute. The effect diagram is as follows:
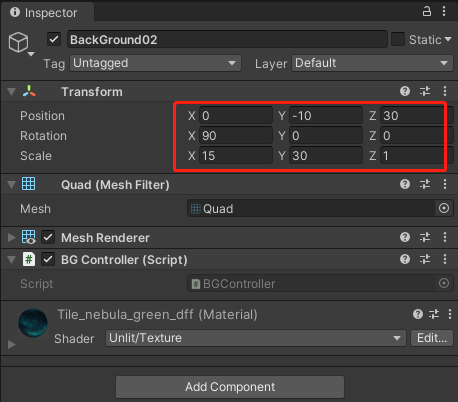
Copy a background, change its name to Backgroun02, and set the property panel like this
-
Then add a script to the background game object to make the background move
-
Generally, the game should make the background move, and then the protagonist appears to move without moving~
-
By judging the Z-axis parameters, the two background plates are replaced to form the effect of infinite cycle~
The background moves to see the effect (at this time, the plane should not move. In the next step, the recording screen has not been changed ~):
Upper Code:
using System.Collections;
using System.Collections.Generic;
using UnityEngine;

public class BGController : MonoBehaviour
{
    private float MoveSpeed = 1.0f;//Background moving speed
    private void FixedUpdate()
    {
        transform.Translate(Vector3.down * Time.deltaTime * MoveSpeed);//move
        if (transform.position.z <= -30)//If the z-axis is less than - 30
        {
            transform.position = new Vector3(0, 0, 30);//Cycle position
        }
    }
}
In this way, a simple game background will be handled. The next step is to start writing code to make our plane move!
Step 5: implementation of aircraft control script
- Now that the game scene is set up, it's time to write code to control the plane
- Let the aircraft move first. Create a new script named PlayerController. Press the up, down, left and right keys on the keyboard to control the aircraft to move up, down, left and right through the Rigidbody
- Add a speed parameter as the coefficient of velocity, which can adjust the flight speed of the aircraft on the panel!
The code is as follows:
using System.Collections;
using System.Collections.Generic;
using UnityEngine;

public class PlayerController : MonoBehaviour
{
    [Header("Moving speed")]
    public float speed;
    private Rigidbody rb;

    void Start()
    {
        rb = GetComponent<Rigidbody>();
    }

    void FixedUpdate()
    {
        float moveHorizontal = Input.GetAxis("Horizontal");
        float moveVertical = Input.GetAxis("Vertical");

        Vector3 movement = new Vector3(moveHorizontal, 0.0f, moveVertical);
        rb.velocity = movement * speed;
    }
}
At this point, save the code and run the game as follows:
But at this time, there is a problem that there is no boundary for aircraft control, and it is possible to even run out of the game scene. Let's use code to control it
The PlayerController script is modified as follows:
using System.Collections;
using System.Collections.Generic;
using UnityEngine;

[System.Serializable]
public class Boundary
{
    [Header("Boundary control")]
    public float xMin, xMax, zMin, zMax;
}

public class PlayerControllder : MonoBehaviour
{
    [Header("Moving speed")]
    public float Speed = 5f;
    public Boundary boundary;
    private Rigidbody rb;

    void Start()
    {
        rb = GetComponent<Rigidbody>();
    }
    void FixedUpdate()
    {
        float moveHorizontal = Input.GetAxis("Horizontal");
        float moveVertical = Input.GetAxis("Vertical");

        Vector3 movement = new Vector3(moveHorizontal, 0.0f, moveVertical);
        rb.velocity = movement * Speed;

        //Aircraft boundary setting
        rb.position = new Vector3(
            Mathf.Clamp(rb.position.x, boundary.xMin, boundary.xMax),
            0.0f,
            Mathf.Clamp(rb.position.z, boundary.zMin, boundary.zMax)
            );
    }
}
- A Boundary class is added to the code, in which four variables are used to control the four vertices of the Boundary
- A [System.Serializable] is also added to the Boundary class to enable the Boundary class to be displayed on the Inspector panel
You can set the attributes of the Inspector panel as shown in the following figure:
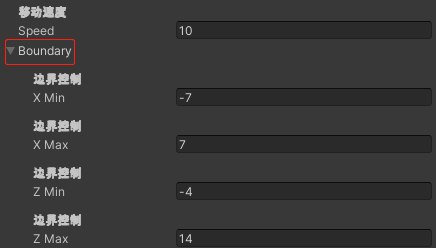
Now the plane can move freely within the boundary, and there is no need to worry about running out of the boundary
But when moving, it feels stiff and not smooth enough. It doesn't seem to have anything to do with our high force grid
Let's try to add a tilt effect when the plane moves. Just do it and operate it:
- There are many ways to tilt the aircraft. Let's control the Euler angle here and rotate the aircraft around the Z axis when moving left and right, so as to achieve the desired effect
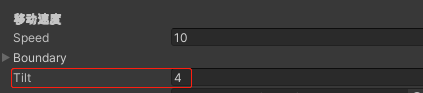
- Add a float parameter to the code to control the tilt force, and then add this line of code to the FixedUpdate to control the rotation of the aircraft
  public float tilt;

rb.rotation = Quaternion.Euler(0.0f, 0.0f, rb.velocity.x * -tilt);
Change the value of tilt to 4 in the Inspector
Take a look at the effect picture with tilt:

Does it look more silky when moving left and right, Nice!
Step 6: aircraft bullet control
- Now our planes can only move, but they can't launch shells. They can't launch shells. What's the name of hitting planes!
- Then let's add the shells and use the script to control the firing of shells! The preform of the shell is in the resource package. Path: Assets/Prefabs/Bolt
- First add a simple script to the shell, which is used to control the shell to attack forward after firing!
The speed parameter is the flight speed of the projectile, which can be customized and modified on the panel, so that the projectile will fly forward after being generated
using System.Collections;
using System.Collections.Generic;
using UnityEngine;

public class Mover : MonoBehaviour {
    [Header("Projectile moving speed")]
    public float speed;
    private Rigidbody rb;

	void Start () {
        rb = GetComponent<Rigidbody>();
        rb.velocity = transform.forward * speed;
	}
}
Now that there are shells, we create a sub object for the protagonist aircraft Player to control the birth position when the shells are fired
To put it simply, set the position when the shell is fired, which should be located in front of the player aircraft.
For example, in the real world, the aircraft's barrel, shells are fired from the barrel, and can't be fired from the aircraft cockpit ~ ha ha ha ha
As shown in the figure below, just place the shell firing point in the front part of the aircraft, so it won't be too abrupt~

- Then let's modify the PlayerController script and add a function of firing shells
- The instance () method is the method of generating the preset body in Unity. We take the shell as the preset body
- Then use the code to execute the method of generating shells when clicking the left mouse button, so as to achieve the method of firing shells we want
- Input.GetButton("Fire") is called when you click the left mouse button and use input Getmousebutton (0) has the same effect
- A private object nextFire is also added to calculate the continuous firing time interval of shells. How can it be fired in seconds! Add a time to make it more lasting~
Take a look at the code above:
using System.Collections;
using System.Collections.Generic;
using UnityEngine;

[System.Serializable]
public class Boundary
{
    [Header("Boundary control")]
    public float xMin, xMax, zMin, zMax;
}

public class PlayerControllder : MonoBehaviour
{
    [Header("Shell preset")]
    public GameObject bullet;
    [Header("Moving speed")]
    public float Speed = 5f;
    public Boundary boundary;
    public float tilt=4f;
    public Transform shotSpawn;//Shell firing point

    private GameObject bolt;
    private Rigidbody rb;

    private float fireRate=0.2f;//Launch interval
    private float nextFire;

    void Start()
    {
        rb = GetComponent<Rigidbody>();
    }
    private void Update()
    {
       Fire();
    }
    public void Fire()
    {
        if (Input.GetButton("Fire1") && Time.time>nextFire)
        {
            nextFire = Time.time + fireRate;
            bolt = Instantiate(bullet,transform.position,Quaternion.identity);
        }
    }

    void FixedUpdate()
    {
        float moveHorizontal = Input.GetAxis("Horizontal");
        float moveVertical = Input.GetAxis("Vertical");

        Vector3 movement = new Vector3(moveHorizontal, 0.0f, moveVertical);
        rb.velocity = movement * Speed;

        //Aircraft boundary setting
        rb.position = new Vector3(
            Mathf.Clamp(rb.position.x, boundary.xMin, boundary.xMax),
            0.0f,
            Mathf.Clamp(rb.position.z, boundary.zMin, boundary.zMax)
            );
        //Aircraft sideways
        rb.rotation = Quaternion.Euler(0.0f, 0.0f, rb.velocity.x * -tilt);
    }
}
Specify the public object of the script in the Inspector and drag the shell and firing point. There are many methods. Here is only one reference
At this time, when we run the game, we can see the effect shown in the figure below~

Step 7: create an enemy
At last, our protagonist aircraft can move freely, patrol and fire shells. Why hasn't there been a plane for me to shoot? My big gun is so hungry!
Then let's add the enemy we can attack now~
Because the content of the resource package is limited, we will add several extraterrestrial meteorites here to make up the number!
Operate~
Create meteorite
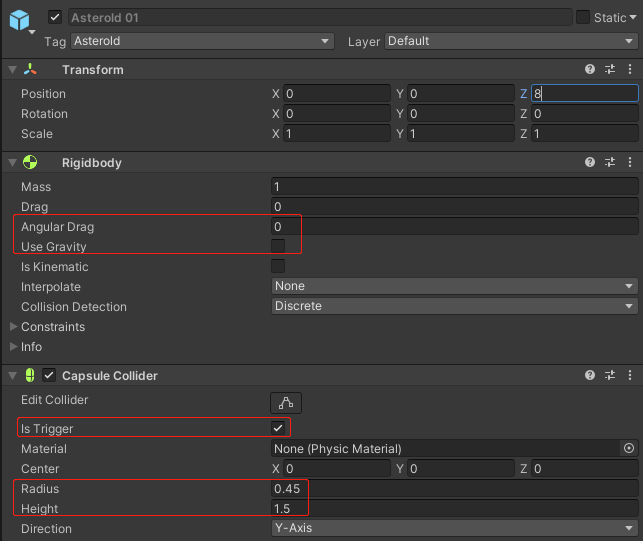
Resource path of meteorite: Assets/Prefabs/Asteroid 01
I added the prefabricated body here, which can be used directly. Let's talk about how to configure it
Rigid body and capsule collider are added to this enemy preform
- Asterioid - > Add component - > rigidbody, uncheck Use Gravity to prevent meteorites from falling to the ground. Angular Drag is set to 0 to ignore air resistance.
- Asterioid - > Add component - > capsule Collider, check Is Trigger, set Radius to 0.45 and Height to 1.5
Then add a script that can be flipped randomly and freely to the meteorite, so as to add some highlights to the game.
Random.insideUnitSphere is used to return a random Vector3 variable to make the meteorite flip randomly!
Upper Code:
using System.Collections;
using System.Collections.Generic;
using UnityEngine;

public class RandomRotator : MonoBehaviour {
	public float tumble;
	private Rigidbody rb;

	void Start () {
        rb = GetComponent<Rigidbody>();
		rb.angularVelocity = Random.insideUnitSphere * tumble;
	}
}
design sketch:
Create enemy aircraft
Now that we have meteorites, add another enemy plane.
Consider two points:
- 1. The enemy will fire shells at us
- 2. The enemy will randomly change the swimming direction
In this way, our game will be more realistic and more difficult
Operate~
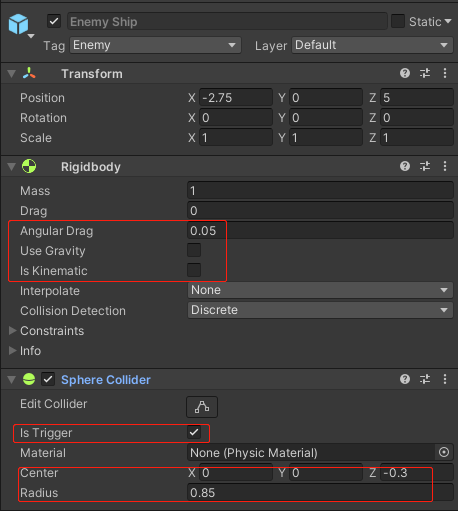
There are enemy material Assets/Prefabs/Enemy Ship in the resource package
This is the same as meteorite, with similar parameters. It is also a prefabricated body I made in advance
Rigid body and capsule collider are also added. I won't go into more details. Just look at the parameters directly
In this case, even if the enemy has one, we need to add the script of firing shells and random movement to him
Upper Code:
Script for firing shells:
using System.Collections;
using System.Collections.Generic;
using UnityEngine;

public class WeaponController : MonoBehaviour
{
	public GameObject shot;
	public Transform shotSpawn;
	public float fireRate;
	public float delay;

	void Start()
	{
		InvokeRepeating("Fire", delay, fireRate);
	}

	void Fire()
	{
		Instantiate(shot, shotSpawn.position, shotSpawn.rotation);

		GetComponent<AudioSource>().Play();
	}
}
Script to control the enemy to change direction randomly:
using System.Collections;
using System.Collections.Generic;
using UnityEngine;

public class EvasiveManeuver : MonoBehaviour
{
    public Boundary boundary;
    public float tilt;
    public float dodge;
    public float smoothing;
    public Vector2 startWait;
    public Vector2 maneuverTime;
    public Vector2 maneuverWait;

    private float currentSpeed;
    private float targetManeuver;

    private void Start()
    {
        currentSpeed = GetComponent<Rigidbody>().velocity.z;
        StartCoroutine(Evade());
    }

    IEnumerator Evade()
    {
        yield return new WaitForSeconds(Random.Range(startWait.x,startWait.y));
        while (true)
        {
            targetManeuver = Random.Range(1, dodge) * -Mathf.Sign(transform.position.x);
            yield return new WaitForSeconds(Random.Range(maneuverTime.x, maneuverTime.y));
            targetManeuver = 0;
            yield return new WaitForSeconds(Random.Range(maneuverTime.x,maneuverTime.y));
        }
    }

    void FixedUpdate()
    {
        float newManeuver = Mathf.MoveTowards(GetComponent<Rigidbody>().velocity.x, targetManeuver, smoothing * Time.deltaTime);
        GetComponent<Rigidbody>().velocity = new Vector3(newManeuver, 0.0f, currentSpeed);
        GetComponent<Rigidbody>().position = new Vector3
        (
            Mathf.Clamp(GetComponent<Rigidbody>().position.x, boundary.xMin, boundary.xMax),
            0.0f,
            Mathf.Clamp(GetComponent<Rigidbody>().position.z, boundary.zMin, boundary.zMax)
        );

        GetComponent<Rigidbody>().rotation = Quaternion.Euler(0, 0, GetComponent<Rigidbody>().velocity.x * -tilt);
    }
}
Well, now the enemy's operation is basically built. Now let's talk about the method of destroying the enemy and shells~
Step 8: Destroy
There is still a lack of a script to destroy the enemy. There are two possibilities for enemy destruction
- One is to be blasted by us and destroyed on the spot
- The other is that the enemy "passes by" with us and flies out of the field
We didn't kill them, but they will be destroyed automatically after they leave the game boundary, otherwise they will consume performance in vain.
Speaking of destruction, there is another problem.
When we fired shells for the main character's aircraft, the shells had not been added with destruction function. After they were sent out, they also consumed performance for nothing, so we dealt with them here.
Destroy shells
-
We need to destroy bullets when they leave the game area, so add a bounding box to the whole game range and let the bullets be destroyed automatically when they leave the bounding box.
-
Create a Cube and remove its Mesh Renderer to form a transparent bounding box~
-
Hierarchy - > create - > 3D object - > cube, rename to Boundary, reset Transform, uncheck Mesh Renderer, and check Is Trigger of Box Collider to detect the collision of flying bullets.
-
Set the size of Boundary: position = (0,0,5), Scale=(15,1,20). At the same time, add the Tag tag: boundary to the boundary, which will be used below
The renderings are as follows:
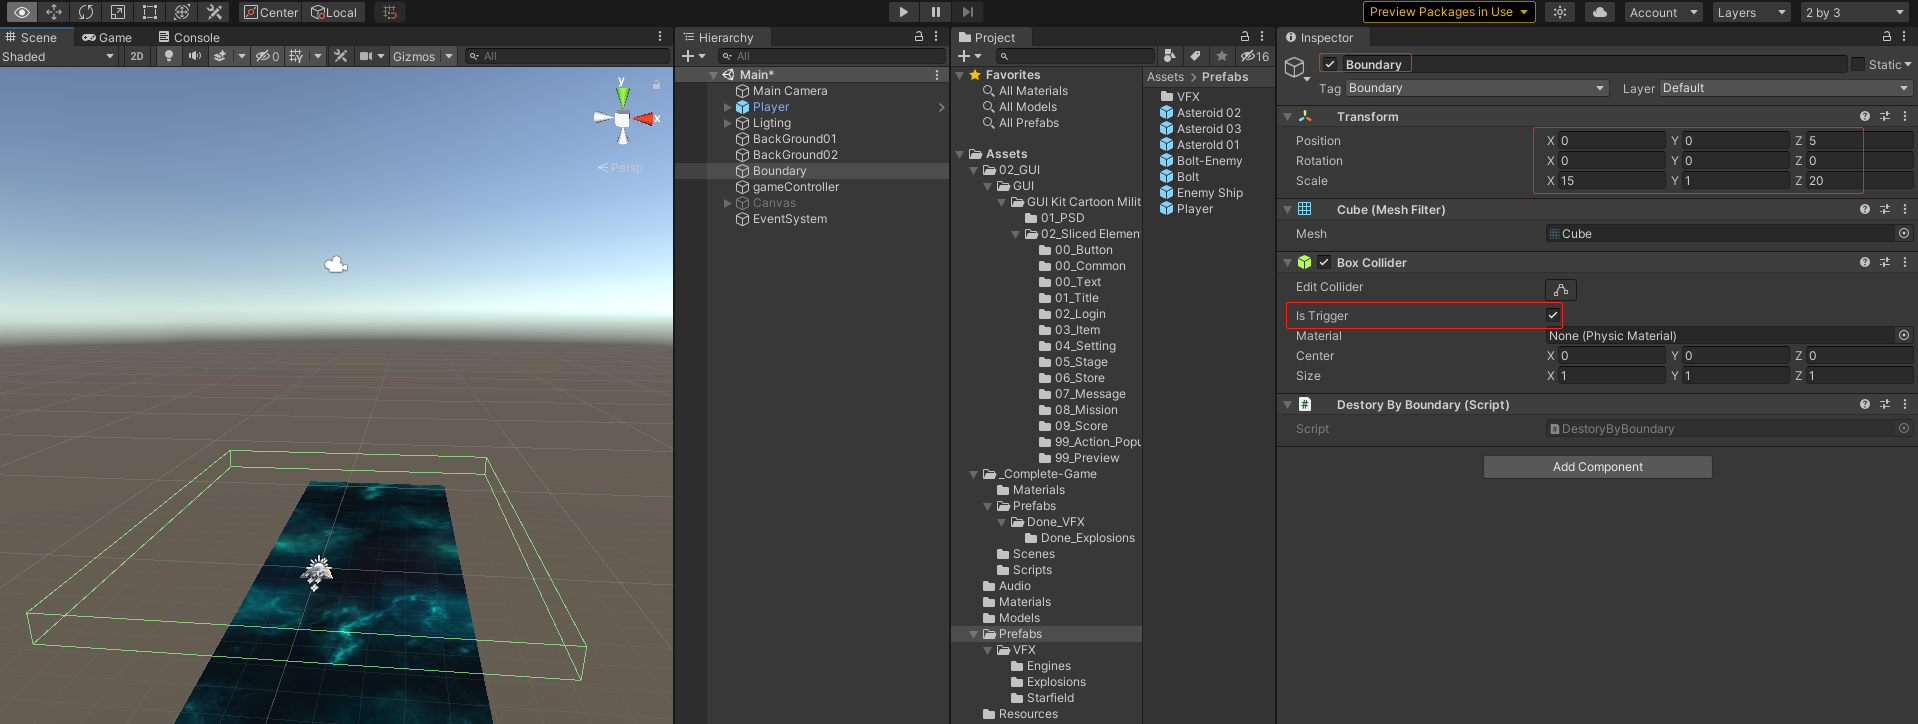
Then add a script to the Boundary to control the destruction of game objects
using System.Collections;
using System.Collections.Generic;
using UnityEngine;

public class DestroyByBoundary : MonoBehaviour
{
    void OnTriggerExit(Collider other)
    {
        Destroy(other.gameObject);
    }
}
Destroy the enemy
A bounding box is written on it to control the destruction of shells. Now our enemy should also be destroyed when encountering shells or players, so we also add a script to the enemy to control the destruction.
Here, a Tag bullet is also added to the protagonist's shell to determine whether the current game object should be destroyed during destruction.
When the enemy is destroyed, we add an explosion special effect, which makes it appear that the force is engaged. It is also very simple. As long as we generate an explosion special effect when triggering the destruction.
The special effects are in the resource package path: assets / prefabs / VFX / expansions
Just drag the explosion effect directly on the Inspector panel to the script

Upper Code:
using System.Collections;
using System.Collections.Generic;
using UnityEngine;
using UnityEngine.UI;

public class DestroyByContact : MonoBehaviour
{
    public GameObject explosion;
    public GameObject playerExplosion;
    private GameController _gameController;

    private void Awake()
    {
        _gameController = GameObject.Find("gameController").GetComponent<GameController>();
    }
    //When other colliders enter the trigger of the current GameObject, destroy the game object corresponding to the collider and destroy the GameObject at the same time
    void OnTriggerEnter(Collider other)
    {
        //If it's a player bullet
        if ( other.tag == "bullet")
        {
            Instantiate(playerExplosion,transform.position,transform.rotation);
            Destroy(other.gameObject);
            Destroy(gameObject);
        }
        //If it's a player
        if (other.tag == "Player")
        {
            Instantiate(playerExplosion, transform.position, transform.rotation);
            Destroy(gameObject);
        }
    }
}
Here, even if the creation and destruction of the enemy is simple, a small special effect is added when the enemy is destroyed~
Step 9: game controller
After the basic elements of the game have been operated, do you feel that a small game will be created by us soon~
The next step is to create a game controller to control the generation of the overall enemy~
Upper Code:
using System.Collections;
using System.Collections.Generic;
using UnityEngine;
using UnityEngine.UI;

public class GameController : MonoBehaviour
{
    [Header("Enemy preset")]
    public GameObject[] hazards;
    public Vector3 spawnValues;
    [Header("Number of enemies")]
    public int hazardCound = 10;
    [Header("In a batch, a single enemy generates an interval")]
    public float spawnWait = 0.5f;
    [Header("Start pause time")]
    public float startWait = 1f;
    [Header("The interval between two groups of enemies")]
    public float waveWait = 4;
    [Header("background music")]
    public AudioSource alarmBGM;

    private Text gameOverText;
    private Transform continues;
    private Text _againText;

    private GameObject player;
    private bool gameOver=false;

    void Start()
    {
        StartCoroutine(SpawnWaves());
        player = GameObject.FindWithTag("Player");
        gameOverText = GameObject.Find("Panel/gameOver").GetComponent<Text>();

        continues = GameObject.Find("Panel/again").transform ;
        _againText= GameObject.Find("again/againText").GetComponent<Text>();
        // alarmBGM.Stop();// Music stop
        alarmBGM.loop = true;//Turn on the music cycle
    }
    private void Update()
    {
        fraction.text = crtScore1.ToString();
        hp.value = crtHp;
        Death();
    }
    private void again()
    {
        _againText.text = "Do you want to start again!";
        continues.transform.GetChild(1).gameObject.SetActive(true);
        continues.transform.GetChild(2).gameObject.SetActive(true);
    }

    IEnumerator SpawnWaves()
    {
        int number = 0;
        yield return new WaitForSeconds(startWait);
        while (number<10)
        {
            for (int i=0;i<hazardCound; i++)
            {
                GameObject hazard = hazards[Random.Range(0, hazards.Length)];
                Vector3 spawnPosition = new Vector3(
                Random.Range(-spawnValues.x,spawnValues.x),spawnValues.y,spawnValues.z);
                Instantiate(hazard,spawnPosition,Quaternion.identity);
                yield return new WaitForSeconds(spawnWait);
            }
            number++;
            yield return new WaitForSeconds(waveWait);
            if (gameOver)
            {
                Invoke("again", 2);
                break;
            }
        }
    }
}
- Hazardcount, spawnwait, startwait and wavewait variables are added to the above code
- It is used to indicate the number of enemies, the interval between enemies, the pause time at the beginning of the game, and the interval between two batches of enemies.
- Using the synergy process, wave after wave of enemies are created according to time, and background music is added~
Take a look at the effect ~ does it have that smell!
Step 10: UI processing - free play
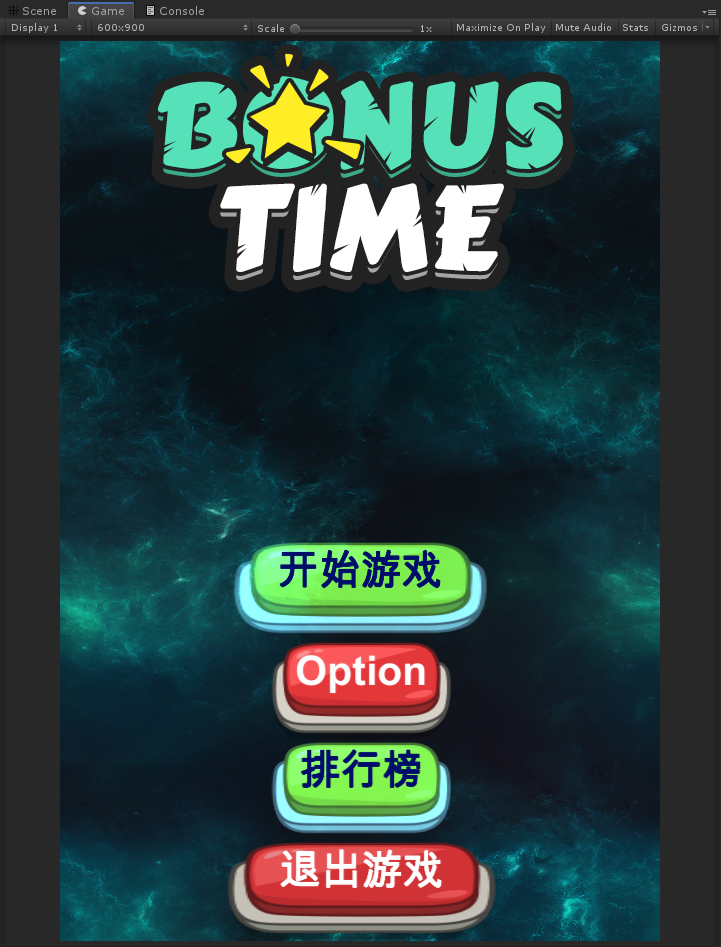
Main interface UI
-
Now that there is a game scene, how can a small game not have a UI interface~
-
Create a new game Scene for UI interface processing, and then click to switch when starting the game~
-
Now I have built a simple UI scenario reference ~ it's just a simple use of UGUI, so I won't repeat it
-
As long as you can click to start the game, you can switch the game scene~
Let's take a look at my UI effect:
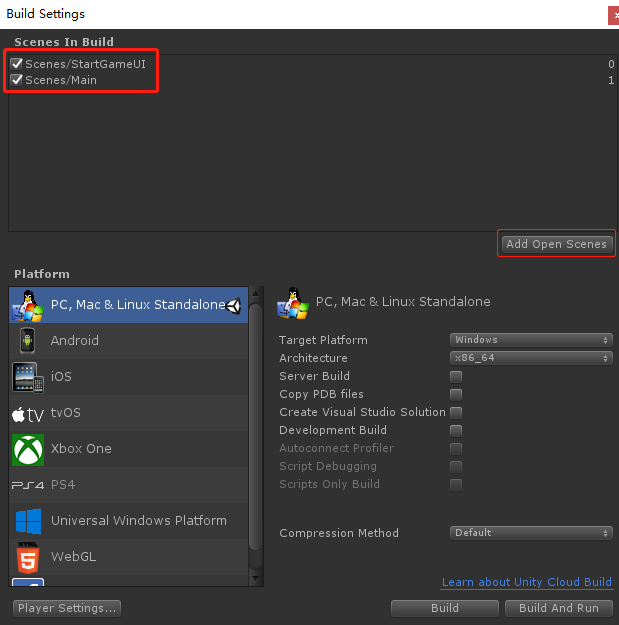
Then, when you click the start button, call the method of switching scenes. Note that you need to add scenes here
File/Build Setting /Add Open Scene
As shown below:
    private void OnClickStartGame()
    {
       //Switch scene
        SceneManager.LoadScene("Main");
    }
Game interface UI
-
Now that the UI of the main interface has been processed, the game interface also needs UI
-
Then we'd better add blood to our plane and score points for killing the enemy~
-
Is a normal game logic handled like this~
-
This is to change the script of the game controller, GameController, and declare a Text text to record the score, which can be called when killing the enemy.
-
Add the blood volume in the PlayerControllder script and call the blood deduction method when being attacked by the enemy or encountering the enemy
-
The sound effects of shells and destruction have also been added. I won't introduce more here. The sound control will be written separately later, otherwise I'm afraid we don't want to see too much~
-
I don't need to repeat this. It's all added according to my personal preference. Go directly to the code
Game controller code:
using System.Collections;
using System.Collections.Generic;
using UnityEngine;
using UnityEngine.UI;

public class GameController : MonoBehaviour
{
    [Header("Enemy preset")]
    public GameObject[] hazards;
    public Vector3 spawnValues;
    [Header("Number of enemies")]
    public int hazardCound = 10;
    [Header("In a batch, a single enemy generates an interval")]
    public float spawnWait = 0.5f;
    [Header("Start pause time")]
    public float startWait = 1f;
    [Header("The interval between two groups of enemies")]
    public float waveWait = 4;
    [Header("background music")]
    public AudioSource alarmBGM;

    private Text fraction;//Text to record scores
    private Slider hp;

    [HideInInspector]
    public int crtScore1 = 0;//Game score
    [HideInInspector]
    public int Score=0;//Highest score
    private int crtHp=100;//Current blood volume
    private Text gameOverText;
    private Transform continues;
    private Text _againText;

    private GameObject player;
    private bool gameOver=false;

    void Start()
    {
        StartCoroutine(SpawnWaves());
        fraction = GameObject.Find("Panel/fraction/score").GetComponent<Text>();
        hp = GameObject.Find("Panel/HP").GetComponent<Slider>();
        player = GameObject.FindWithTag("Player");
        gameOverText = GameObject.Find("Panel/gameOver").GetComponent<Text>();

        continues = GameObject.Find("Panel/again").transform ;
        _againText= GameObject.Find("again/againText").GetComponent<Text>();
        // alarmBGM.Stop();// Music stop
        alarmBGM.loop = true;//Turn on the music cycle
    }

    private void Update()
    {
        fraction.text = crtScore1.ToString();
        hp.value = crtHp;
        Death();
        //Play background music when HP > 0
        // if (Input.GetKeyDown(KeyCode.E))
        //  alarmBGM.Play();
    }

    /// <summary>
    ///Bonus method
    /// </summary>
    /// <param name="scores"></param>
    public void GetScore(int scores)
    {
        crtScore1 += scores;
    }
    /// <summary>
    ///Player's blood deduction method
    /// </summary>
    /// <param name="damage"></param>
    public void GetHp(int damage)
    {
        crtHp -= damage;
    }
    private void Death()
    {
        if (crtHp<0)
        {
            Destroy(player);
            //Stop playing background sound when blood volume is less than 0
            alarmBGM.Stop();

            gameOver = true;
            gameOverText.text = "Game Over!"+"Total score"+crtScore1;

            if (crtScore1>Score)
            {
                Score = crtScore1;
                //Store the highest score
                PlayerPrefs.SetInt("High",Score);
            }
        }
    }
    private void again()
    {
        _againText.text = "Do you want to start again!";
        continues.transform.GetChild(1).gameObject.SetActive(true);
        continues.transform.GetChild(2).gameObject.SetActive(true);
    }

    IEnumerator SpawnWaves()
    {
        int number = 0;
        yield return new WaitForSeconds(startWait);
        while (number<10)
        {
            for (int i=0;i<hazardCound; i++)
            {
                GameObject hazard = hazards[Random.Range(0, hazards.Length)];
                Vector3 spawnPosition = new Vector3(
                Random.Range(-spawnValues.x,spawnValues.x),spawnValues.y,spawnValues.z);
                Instantiate(hazard,spawnPosition,Quaternion.identity);
                yield return new WaitForSeconds(spawnWait);
            }
            number++;
            yield return new WaitForSeconds(waveWait);
            if (gameOver)
            {
                Invoke("again", 2);
                break;
            }
        }
    }
}
Role controller PlayerControllder Code:
using System.Collections;
using System.Collections.Generic;
using UnityEngine;


[System.Serializable]
public class Boundary
{
    [Header("Boundary control")]
    public float xMin, xMax, zMin, zMax;
}

public class PlayerControllder : MonoBehaviour
{
    [Header("Shell preset")]
    public GameObject bullet;
    [Header("Moving speed")]
    public float Speed = 5f;
    public Boundary boundary;
    public float tilt=4f;
    public Transform shotSpawn;//Shell firing point
    [Header("Player firing sound")]
    public AudioClip fireClip;

    private GameObject bolt;
    private Rigidbody rb;

    private float fireRate=0.2f;//Launch interval
    private float nextFire;

    void Start()
    {
        rb = GetComponent<Rigidbody>();
    }

    private void Update()
    {
       Fire();
    }
    public void Fire()
    {
        if (Input.GetButton("Fire") && Time.time>nextFire)
        {
            nextFire = Time.time + fireRate;
            bolt = Instantiate(bullet,transform.position,Quaternion.identity);
            AudioSource.PlayClipAtPoint(fireClip,transform.position);
        }
    }

    void FixedUpdate()
    {
        float moveHorizontal = Input.GetAxis("Horizontal");
        float moveVertical = Input.GetAxis("Vertical");

        Vector3 movement = new Vector3(moveHorizontal, 0.0f, moveVertical);
        rb.velocity = movement * Speed;

        //Aircraft boundary setting
        rb.position = new Vector3(
            Mathf.Clamp(rb.position.x, boundary.xMin, boundary.xMax),
            0.0f,
            Mathf.Clamp(rb.position.z, boundary.zMin, boundary.zMax)
            );
        //Aircraft sideways
        rb.rotation = Quaternion.Euler(0.0f, 0.0f, rb.velocity.x * -tilt);
    }
}
Last step: game display
-
When Dangdang, the game display was left to the last step. It's not in vain. I spent a day writing and a day working out such a game of flying~
-
I can see from the beginning that the eldest brothers here are good comrades and true love who study hard. I have written down the ideas and practices of the whole game. Maybe I haven't noticed some details. You can say it in the comment area. Please understand~
-
Since I can only upload photos within 5M, I compressed the recording screen, which may be stuck. Here is a simple demonstration ~ you can see the following video display!
This picture looks like Kaka's effect is not good. Let's take a look at the video demonstration in the battle scene
Aircraft battle demonstration video
The overall demonstration of the game is as follows:
Aircraft war game overall display video
👥 summary
- This article has made a game of flying. I don't know if it suits your appetite~
- If you can follow the blog and do it yourself, you should have no problem getting started with Unity ~ but it's still a world away from the boss!
- The first time I wrote so many articles, I was a little dizzy!
- Some details may not be noticed. Please forgive me~
If you want to learn the engineering source code, you can Click the link to download the source code Engineering Oh, there are packaged exe files that can be tried directly!
Come and experience it!
You can also Download the source code of this project from GitHub
- 😎 Me: what's up, Xuemei? Have you learned how to make the game of playing airplanes after reading this blog?
- 👩 The younger sister looked happy and said: Yes, brother, you are great! You look so handsome when you play with the plane. I'll play with you next time!
- 🥰 Me: emm... OK, remember to give me three likes and support. I'll take you to play more exciting next time!
- 👩 Xuemei: OK, brother, see you next time~