1. Environment and Version Description
~~~~~~~
● ubuntu 18.04
~~~~~~~
● CUDA 10.0
~~~~~~~
● cudnn 7.6.5
~~~~~~~
● gcc 7.3
~~~~~~~
● python 3.6
~~~~~~~
● tensorflow 1.14
~~~~~~~
● tensort 6.0.1
2. Environmental installation
2.1 CUDA installation
Drive drivers
ubuntu-drivers devices # View the drivers supported by the device
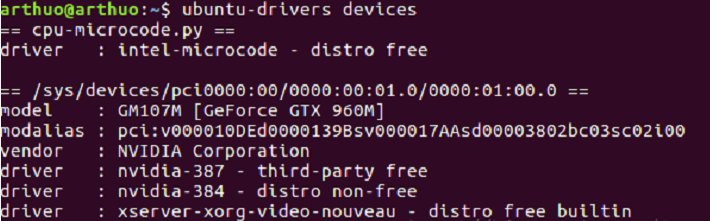
My computer supports 410, so install the driver first
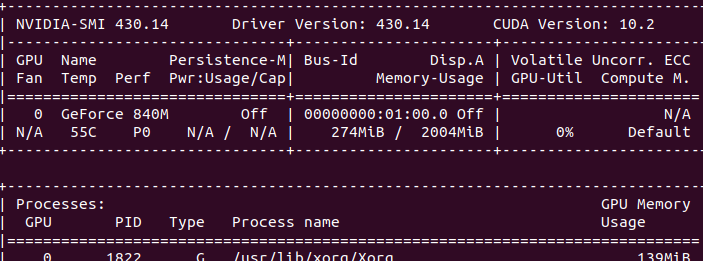
# 1. Update apt get source list
sudo apt-get update
sudo apt-get upgrade
# 2. Add driver source
sudo add-apt-repository ppa:graphics-drivers/ppa
sudo apt-get update
sudo apt-get install nvidia-410  # install
sudo nvidia-smi   # View the installation status of the driver
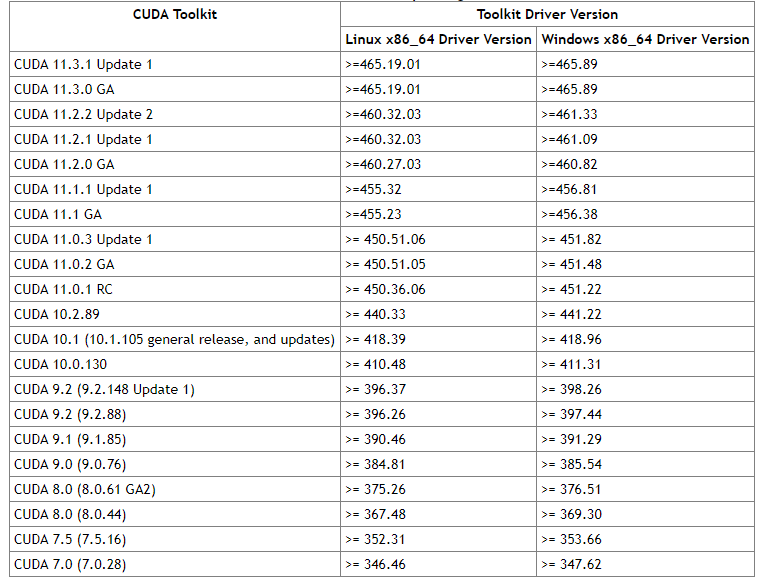
Select CUDA version according to the following figure, and select CUDA version 10.0, Click here to view the corresponding drivers on CUDA official website
, as shown in the figure below, some data:
Switch gcc
Select CUDA version 10.0, Click here to view the corresponding GCC version of CUDA official website
, as shown in the figure below, some data:
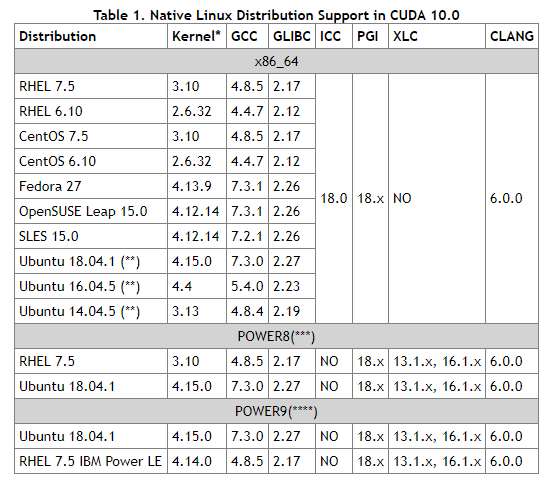
Bloggers use gcc, which is originally 7.3, so there is no need to install or replace. If you want to install or replace, use the following command to switch
# Install gcc5
sudo apt-get install gcc-5 gcc-5-multilib
sudo apt-get install g++-5 g++-5-multilib
# set priority
sudo update-alternatives --install /usr/bin/gcc gcc /usr/bin/gcc-5 50
sudo update-alternatives --install /usr/bin/g++ gc++/usr/bin/g++-5 50
# See the optional version of gcc and the current version
sudo update-alternatives --config gcc
# View gcc version
gcc -version
Installing cuda
Official website, click here
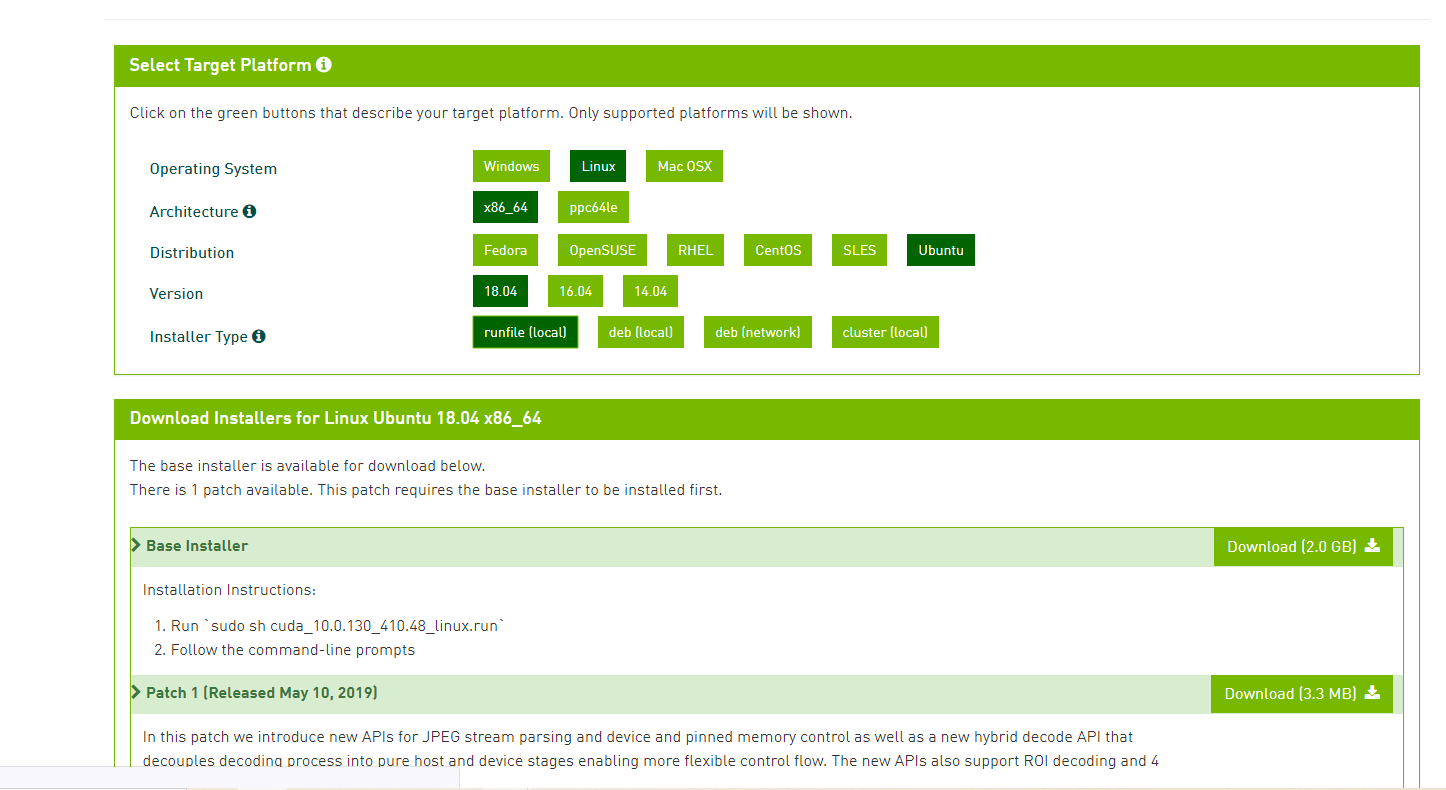
After downloading, run sudo sh * Run to install
Press Enter until you finish reading the statement
If the driver is installed independently, you must choose not to install the driver! Select the following: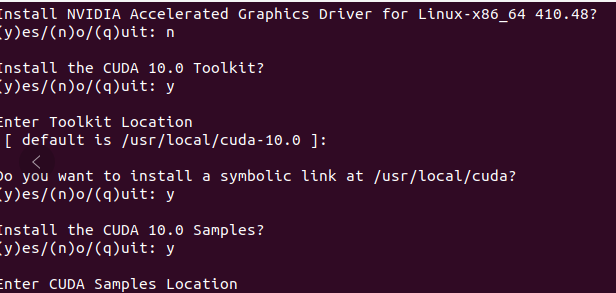
There will be some warnings during the installation, which can be ignored. The following configuration is required after installation
# Add environment variable
sudo gedit ~/.bashrc

# Add to last
export PATH=$PATH:/usr/local/cuda/bin
export LD_LIBRARY_PATH=$LD_LIBRARY_PATH:/usr/local/cuda/lib64
export LIBRARY_PATH=$LIBRARY_PATH:/usr/local/cuda/lib64

# Save exit
source ~/.bashrc

#Is the test successful
sudo rm -rf /usr/local/cuda
sudo ln -s /usr/local/cuda-10.0 /usr/local/cuda
nvcc --version

cd /usr/local/cuda/samples/1_Utilities/deviceQuery
sudo make
./deviceQuery

# restart
reboot

#input
nvidia-smi  # View the latest installation status
Install cudnn
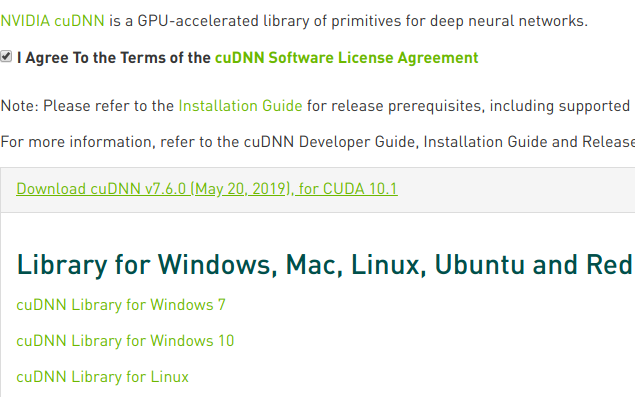
Official website, click here For version selection and download
Delete old version, skip if none
sudo rm -rf /usr/local/cuda/include/cudnn.h
sudo rm -rf /usr/local/cuda/lib64/libcudnn*
Install the new version and cd into the cuda folder that you just unzipped
sudo cp include/cudnn.h /usr/local/cuda/include/
sudo cp lib64/lib* /usr/local/cuda/lib64/
Establish soft link
cd /usr/local/cuda/lib64/
sudo chmod +r libcudnn.so.7.6.5
sudo ln -sf libcudnn.so.7.6.5 libcudnn.so.7
sudo ln -sf libcudnn.so.7 libcudnn.so
sudo ldconfig
Test verification
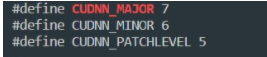
cat /usr/local/cuda/include/cudnn.h | grep CUDNN_MAJOR -A 2
If the version shown in the figure below appears, the installation is successful
2.2 installation of TensorRT
Download address, click the official website, here
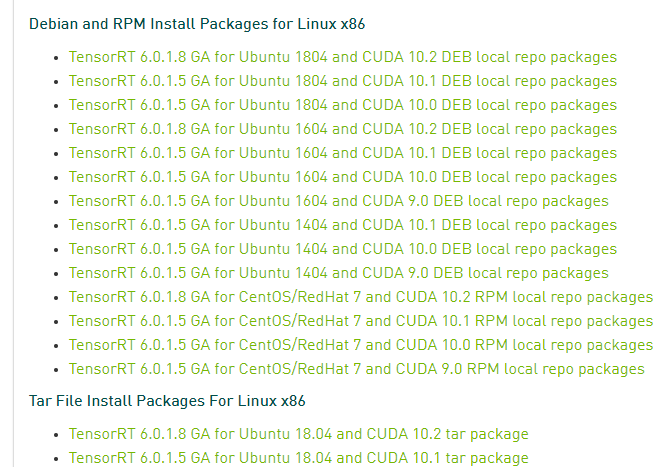
Select the tar version of 6.0 to download, and extract it to get the following work
# Create a new folder under home, name it tensorrt, and then copy and unzip the downloaded compressed file
tar xzvf TensorRT-6.0.1.5.Ubuntu-18.04.x86_64-gnu.cuda-10.0.cudnn7.6.tar.gz

# Unzip the TensorRT-6.0.1.5 folder and add the lib absolute path inside to the environment variable
gedit ~/.bashrc

# add to
export LD_LIBRARY_PATH=$LD_LIBRARY_PATH:/home/jason/tensorrt/TensorRT-6.0.1.5/lib

# take effect
source ~/.bashrc

#Install TensorRT
cd TensorRT-6.0.1.5/python/
pip install tensorrt-6.0.1.5-cp36-none-linux_x86_64.whl

#Install UFF, which is related to tensorflow. You can not install it
cd TensorRT-6.0.1.5/uff
pip install uff-0.6.5-py2.py3-none-any.whl

#Installing graphsurgeon
cd TensorRT-6.0.1.5/graphsurgeon
pip install graphsurgeon-0.4.1-py2.py3-none-any.whl

# Enter the python environment and test. If no error is reported, the installation is successful
import tensorrt
2.3 TF installation and other environments
sudo pip3 install tensorflow-gpu==1.14.0
sudo pip3 install numpy==1.19.5
sudo pip3 install h5py==3.1.0
sudo pip3 install onnx==1.4.1
sudo pip3 install Pillow==6.1.0
sudo pip3 install pycuda==2019.1.1
sudo pip3 install uff==0.6.5
sudo pip3 install wget==3.2
3. Model training (taking inception V3 as an example) – > omitted
Omitted, reference
4. Reasoning acceleration using tensorRT
4.1 model saving
In TensorFlow, I believe you will not be unfamiliar with the saving and calling of the model. Use the key statement Saver = TF train. Saver() and saver Save() can be completed.
However, I don't know whether you understand that tensorflow saves the structure and weight data of the model separately through the format file of checkpoint, which makes it inconvenient in some use scenarios.
Therefore, we need a way to combine the model structure and weight data in one file. tensorflow provides free_ Graph function and pb file format to solve this problem.
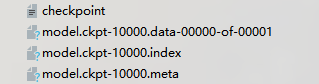
After saving, the model will be saved in the ckpt file. The checkpoint file saves a list of all model files in a directory. The events file is for the visualizer tensorboard.
Directly related to the saved model are the following three files:
The. data file holds the current parameter values
Saved the current parameter file name
The. meta file saves the current graph structure
When you use saver When restore () loads the model, you use this group of three checkpoint files. However, when we need to integrate the model and weight into one file, we need the following operations.
4.2. Generate PB file
ensorflow provides free_ Graph this function to generate pb files. The following code block can complete the operation of converting checkpoint file into pb file:
Load your model structure,
Provide checkpoint file address
Use TF train. Writegraph saves the graph, which will be provided to freeze_graph usage
Use free_ Generate pb file from graph
The specific implementation code is as follows
# -*-coding: utf-8 -*-
import tensorflow as tf
import numpy as np
import cv2
from tensorflow.python.framework import graph_util
resize_height = 224
resize_width = 224
depths = 3
def read_image(filename, resize_height, resize_width, normalization=False):
bgr_image = cv2.imread(filename)
if len(bgr_image.shape) == 2:
print("Warning:gray image", filename)
bgr_image = cv2.cvtColor(bgr_image, cv2.COLOR_GRAY2BGR)
rgb_image = cv2.cvtColor(bgr_image, cv2.COLOR_BGR2RGB)
if resize_height > 0 and resize_width > 0:
rgb_image = cv2.resize(rgb_image, (resize_width, resize_height))
rgb_image = np.asanyarray(rgb_image)
if normalization:
rgb_image = rgb_image / 255.0
return rgb_image
def freeze_graph_test(pb_path, image_path):
with tf.Graph().as_default():
output_graph_def = tf.GraphDef()
with open(pb_path, "rb") as f:
output_graph_def.ParseFromString(f.read())
tf.import_graph_def(output_graph_def, name="")
with tf.Session() as sess:
sess.run(tf.global_variables_initializer())
input_image_tensor = sess.graph.get_tensor_by_name("input:0")
input_keep_prob_tensor = sess.graph.get_tensor_by_name("keep_prob:0")
input_is_training_tensor = sess.graph.get_tensor_by_name("is_training:0")
output_tensor_name = sess.graph.get_tensor_by_name("InceptionV3/Logits/SpatialSqueeze:0")
im = read_image(image_path, resize_height, resize_width, normalization=True)
im = im[np.newaxis, :]
out = sess.run(output_tensor_name, feed_dict={input_image_tensor: im,
input_keep_prob_tensor: 1.0,
input_is_training_tensor: False})
print("out:{}".format(out))
score = tf.nn.softmax(out, name='pre')
class_id = tf.argmax(score, 1)
print("pre class_id:{}".format(sess.run(class_id)))
def freeze_graph(input_checkpoint, output_graph):
output_node_names = "InceptionV3/Logits/SpatialSqueeze"
saver = tf.train.import_meta_graph(input_checkpoint + '.meta', clear_devices=True)
with tf.Session() as sess:
saver.restore(sess, input_checkpoint)
output_graph_def = graph_util.convert_variables_to_constants(
sess=sess,
input_graph_def=sess.graph_def,
output_node_names=output_node_names.split(","))
with tf.gfile.GFile(output_graph, "wb") as f:
f.write(output_graph_def.SerializeToString())
print("%d ops in the final graph." % len(output_graph_def.node))
if __name__ == '__main__':
# transformation
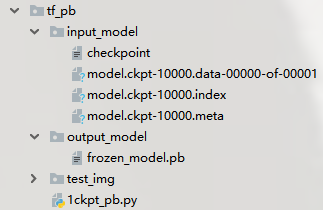
input_checkpoint = './input_model/model.ckpt-10000'
out_pb_path = "./output_model/frozen_model.pb"
freeze_graph(input_checkpoint, out_pb_path)
# test
image_path = './test_img/guitar.jpg'
freeze_graph_test(pb_path=out_pb_path, image_path=image_path)
4.3 conversion of pb to uff
preparation
import tensorflow as tf
import uff
import tensorrt as trt
import pycuda.driver as cuda
import pycuda.autoinit
from tensorrt.parsers import uffparser
● uff: It's just pb Translate into TensorRT Engine supported uff File, which can be serialized or directly circulated in the past.
● pycyda: For graphics cards cuda Programmed, if you want to use TensorRT of python API,This is a required library
● uffparser : For parsing uff Model
Parameter setting
# Data customization
MODEL_DIR = './output_model/frozen_model.pb'
CHANNEL = 3
HEIGHT = 224
WIDTH = 224
ENGINE_PATH = './model_seg/model_.pb.plan'
INPUT_NODE = 'input'
OUTPUT_NODE = ['InceptionV3/Logits/SpatialSqueeze']
INPUT_SIZE = [CHANNEL, HEIGHT ,WIDTH]
MAX_BATCH_SIZE = 1
MAX_WORKSPACE = 1<<30
● MODEL_DIR: Generated in step 1 pb Model address
● CHANNEL,HEIGHT,WIDTH: The channel, height and width of the picture are determined according to the input size of the model
● ENGINE_PATH: Save later TensorRT Address of the engine
● INPUT_NODE: Input node of the model
● OUTPUT_NODE: The output node of the model is a list. If there are many output nodes, the node names will be listed in this list
● INPUT_SIZE: Enter the size of the picture. Pay attention to whether the channel is in front or behind. Here, enter yes CHANNEL, HEIGHT ,WIDTH
● MAX_BATCH_SIZE: When reasoning, input several pictures at a time
● MAX_WORKSPACE: Size of video memory 1<<30 That is 1 GB The size of the. Sometimes, when the program runs, it will report a memory overflow error. At this time, it can be reduced MAX_WORKSPACE,For example, 2 << 10
Analytical model of pb to UF conversion
G_LOGGER = trt.infer.ConsoleLogger(trt.infer.LogSeverity.INFO)
uff_model = uff.from_tensorflow_frozen_model(FROZEN_GDEF_PATH, OUTPUT_NODE)
parser = uffparser.create_uff_parser()
parser.register_input(INPUT_NODE, INPUT_SIZE, 0)
parser.register_output(OUTPUT_NODE)
What we do here is to convert the pb file format into the UF file format. A concept you need to know is that UFF(Universal Framework Format) is a data format that describes DNN execution diagram. The binding execution diagram is input and output, so parser register_ Input and parser register_ What output does is record the input and output of tensorflow model in UFF file.
Note that for multiple outputs, because OUTPUT_NODE is a list, so you can put multiple output nodes into the list in turn.
If there are multiple inputs, you need to record the input node names in the UF one by one. register_input() requires three parameters:
name – Input name.
shape – Input shape.
order – Input order on which the framework input was originally.
Assuming that your model inputs three pictures at the same time in the input layer, you need to define three input nodes and specify the order as 0, 1 and 2 respectively. The order here refers to the order of model inputs in the UF structure. This order will be reflected in the following binding.
● parser.register_input(INPUT_NODE1, INPUT_SIZE, 0)
● parser.register_input(INPUT_NODE2, INPUT_SIZE, 1)
● parser.register_input(INPUT_NODE3, INPUT_SIZE, 2)
Save model
engine = trt.utils.uff_to_trt_engine(
		G_LOGGER,
		uff_model,
		parser,
		MAX_BATCH_SIZE,
		MAX_WORKSPACE,
		datatype=trt.infer.DataType.FLOAT)

# The above code creates the engine in TensorRT, that is, the engine, which will be responsible for the forward operation of the model. TensorRT is an acceleration tool for reasoning, so forward calculation is enough.
# After the engine is created successfully, it can be used. One suggestion, however, is to save the results. After all, so far, although there is little code, it is not easy to successfully convert pb files into UF files (who uses who knows!)
# Using the following statement, we have saved one PLAN file. The PLAN file is the serialized data used by the running engine to execute the network. Contains weights, steps performed in the network, and network information used to determine how to bind input and output caches.

trt.utils.cwrite_engine_to_file('./model_.pb.plan',engine.serialize())
4.4 reasoning steps
Now, let's call the previously saved plan file, enable the engine, and start reasoning with TensorRT.
engine = trt.utils.load_engine(G_LOGGER, './model_.pb.plan')
The engine is called engine, and the context in which the engine runs is called context. Both engine and context are necessary in the reasoning process. The relationship between them is as follows:
context = engine.create_execution_context()
engine = context.get_engine()
Before running the forward operation, we need to make a confirmation. get_nb_bindings() is to get the number of input and output tensors related to this engine. For the single input-output model in this example, the number of tensors is 2. For example, if there are three input and output values of the model, confirm that there are three output values of the model. We need to know this quantity in order to prepare for the allocation of video memory in the future.
print(engine.get_nb_bindings())
assert(engine.get_nb_bindings() == 2)
Now prepare an image img that can be input to the model Jpg, and converted to fp32
img = cv2.imread(img.jpg)
img = img.astype(np.float32)
At the same time, create an array to "catch" the output data. Why do you say "catch", because then you will see that when the engine performs forward reasoning calculation, it generates a data stream, which will be written into the output array
#create output array to receive data
OUTPUT_SIZE = 10
output = np.zeros(OUTPUT_SIZE , dtype = np.float32)
We need to allocate video memory for input and output and bind it.
# Use PyCUDA to apply for GPU video memory and register in the engine
# The requested size is the input of the entire batch size and the expected output pointer size.
d_input = cuda.mem_alloc(1 * img.size * img.dtype.itemsize)
d_output = cuda.mem_alloc(1 * output.size * output.dtype.itemsize)

# The engine needs to bind the pointer of GPU video memory. PyCUDA realizes memory application by allocating into ints.
bindings = [int(d_input), int(d_output)]
Now, we can start the reasoning calculation on TensorRT!
# Establish data flow
stream = cuda.Stream()
# Pass input to cuda
cuda.memcpy_htod_async(d_input, img, stream)
# Perform forward reasoning calculation
context.enqueue(1, bindings, stream.handle, None)
# Return forecast results
cuda.memcpy_dtoh_async(output, d_output, stream)
# synchronization
stream.synchronize()
At this time, if you print out the output, you will find that there is already a value in the output array, which is the result of TensorRT calculation.
If you use the tensorflow method to predict the same set of input data and see whether the calculation results are consistent, because there will be some differences in accuracy, but generally speaking, using tensorflow and TensorRT will get consistent results.
4.5 complete code
The appeal process is a false parameter, and the following part is the real and effective path
import uff
import tensorrt as trt
import pycuda.driver as cuda
import pycuda.autoinit
from tensorrt.parsers import uffparser
import cv2
MODEL_DIR = '/home/liyang/ly/inception2trt/tf_pb/output_model/frozen_model.pb'
CHANNEL = 3
HEIGHT = 224
WIDTH = 224
ENGINE_PATH = './model_.pb.plan'
INPUT_NODE = 'input'
output_node = 'InceptionV3/Logits/SpatialSqueeze'
INPUT_SIZE = [CHANNEL, HEIGHT, WIDTH]
MAX_BATCH_SIZE = 1
MAX_WORKSPACE = 1<<30

# PB-UFF
G_LOGGER = trt.infer.ConsoleLogger(trt.infer.LogSeverity.INFO)
uff_model = uff.from_tensorflow_frozen_model(FROZEN_GDEF_PATH, [OUTPUT_NODE])
parser = uffparser.create_uff_parser()
parser.register_input(INPUT_NODE, INPUT_SIZE, 0)
parser.register_output(OUTPUT_NODE)

# SERIVER
engine = trt.utils.uff_to_trt_engine(G_LOGGER,uff_model,
                     parser,MAX_BATCH_SIZE,
                     MAX_WORKSPACE,datatype=trt.infer.DataType.FLOAT)
# save
trt.utils.cwrite_engine_to_file('./checkpoint/model_.pb.plan',engine.serialize())


# start tensorR
engine = trt.utils.load_engine(G_LOGGER, './model_.pb.plan')
context = engine.create_execution_context()
input_img = cv2.imread('./1.jpg')
def infer32(batch_size):
    # commissioning
    engine = context.get_engine()
    assert(engine.get_nb_bindings() == 2)
    start = time.time()
    dims = engine.get_binding_dimensions(1).to_DimsCHW()
    elt_count = dims.C() * dims.H() * dims.W() * batch_size
    input_img = input_img.astype(np.float32)
    output = cuda.pagelocked_empty(elt_count, dtype=np.float32)
    d_input = cuda.mem_alloc(batch_size * input_img.size * input_img.dtype.itemsize)
    d_output = cuda.mem_alloc(batch_size * output.size * output.dtype.itemsize)
    bindings = [int(d_input), int(d_output)]
    stream = cuda.Stream()
    cuda.memcpy_htod_async(d_input, input_img, stream)
    context.enqueue(batch_size, bindings, stream.handle, None)
    cuda.memcpy_dtoh_async(output, d_output, stream)
    end = time.time()
    return output


infer32(1)
reference resources: https://blog.csdn.net/qq_34067821/article/details/90710192
~~~~~~~~~~
https://zhuanlan.zhihu.com/p/139767249
~~~~~~~~~~
https://zhuanlan.zhihu.com/p/64099452
~~~~~~~~~~
https://zhuanlan.zhihu.com/p/64114667