preface
For mysql8 0.28 installation tutorial I even spent a day in the official MySQL documentation. So far, I'm dedicated to trying to get started with MySQL 8 0 beginners. With the latest version of MySQL 8 0.28 is an example for detailed explanation of installation and preliminary use, and a detailed tutorial for beginners. Whether it is installed on Windows or Linux, we will. This is perhaps the most detailed mysql8 in the whole network so far 0.28 installation and use tutorial.
He who by reviewing the old can gain knowledge of the new and is fit to be a teacher. What we lack is the way to learn? The answer is not, but the lack of learning methods. Official documents are very detailed and authoritative. Other books and blogs are based on official documents and their own use experience. I hope you can summarize your learning methods and be good at using official documents to improve yourself.
It is recommended that beginners practice more in the command line window, practice makes perfect. Reach a certain degree of proficiency, and then improve our work efficiency with the help of client tools. What is the ultimate goal? Live and improve your ability to get money. Of course, I'm kidding. Get back to the point and look down.
From downloading to installing, to forgetting password solutions. Use the command line window step by step to learn the basic operation, and then use the client remote connection tool. Finally, with the popular Java language, demonstrate how to use JDBC to connect to the latest MySQL 8 0 database, and the results returned by executing the query.
text
We don't have much beeping. We can get dry goods directly. What we want is practicability and cost performance!
1, Mysql8 0.28 Download
You can download the msi file for one click installation or extract the zip file for command line initialization installation.
MySQL official website download address
https://dev.mysql.com/downloads/mysql/
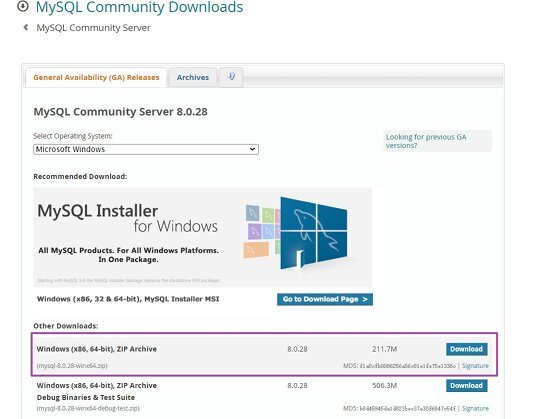
1. Windows version download
Under Windows, you can choose to download msi files or unzip zip files. For general use, select the one I selected with purple box line. As for the following Debug Test Suite, there are many test suites in it, which can be downloaded by personnel with test requirements.
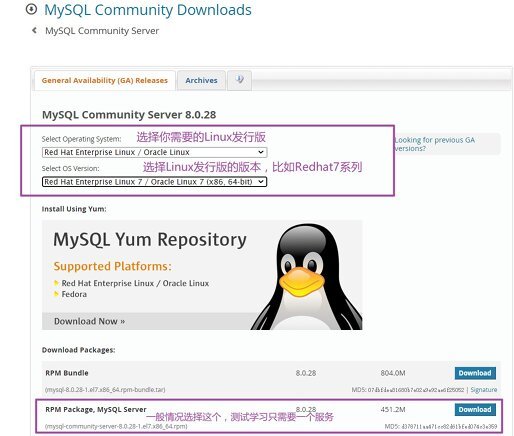
2. Linux version download
Select MySQL according to the Linux distribution version you need. For example, I personally choose the familiar Redhat7 series to download. There is also the bundle version, which contains some plug-ins and dependencies, which is easy to install using the rpm package. Installing a single server service requires installing other dependent packages, which is cumbersome. For beginners, it is recommended to download the RPM bundle version directly. If I don't, I'll toss. That's OK. Please go on and provide detailed installation steps.
3. Precautions
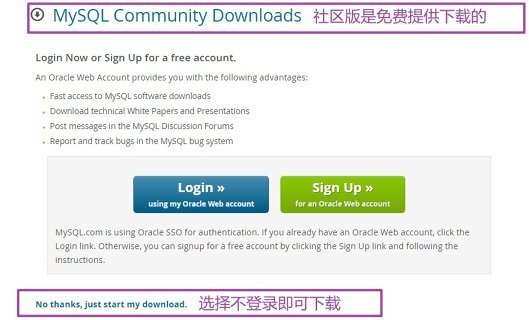
Ordinary people can not look carefully, the official will prompt to log in, and the font of the button button is very conspicuous, while the font below that I need to download immediately is very small. So please note that by selecting No thanks below, I need to download it immediately. Select the community version, which is available for free download.
2, Mysql8 0 installation
For beginners, it is recommended to install it under Windows.
Generally, a MySQL version service instance is installed by default. It does not rule out that the budget is limited. Install multiple instances on the same server for testing. The default port is 3306. It is recommended to modify the default port in the publishing (production) environment to prevent others from guessing. Next, install and test multiple MySQL service versions under the same operating system. Only install multiple services under Windows (without using virtual machine tools, test under real machine environment). There are convenient yum source and apt installation under Linux. One click installation depends on, but there are also cumbersome rpm package installation.
1. Install under Windows
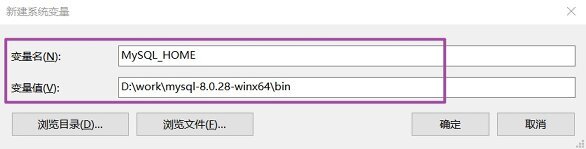
Configure environment variables, edit system environment variables, control panel > all control panel items > system > advanced system configuration > system environment variables:
#Variable name
MySQL_HOME
#Variable value
D:\work\mysql-8.0.28-winx64\bin
The installation path of msi is selected by one click. Pay attention to the installation path of msi.
This section mainly introduces the installation and instantiation of the unzipped version zip:
mysql-8.0.28-winx64.zip
1.1. Unzip the installation package mysql-8.0.28-winx64 zip
Add my. Under D:\work\mysql-8.0.28-winx64 after decompression INI file. The default decompression version is not available. Then add the following configuration:
[client]
# Set the default character set of mysql client
default-character-set=utf8

[mysqld]
# Set 3307 port to have multiple services. In order not to conflict, modify the default 3306 port to 3307
port=3307
# Set mysql installation directory
basedir=D:\\work\\mysql-8.0.28-winx64
# Set mysql database storage directory
datadir=D:\\work\\mysql-8.0.28-winx64\\data
# Maximum connections allowed
max_connections=20
# The character set used by the server defaults to the 8-bit encoded latin1 character set
character-set-server=utf8
# The default storage engine that will be used when creating new tables
default-storage-engine=INNODB
1.2 instantiation
Run the CMD command window as an administrator and switch to the directory after mysql decompression:
-- First step execution d:,Switch to D disc
d:
-- Step 2 execution cd Command, switch to personal installation mysql of bin Under the directory
cd D:\work\mysql-8.0.28-winx64\
Set it as an empty password to get rid of unnecessary trouble.
mysqld --initialize-insecure
1.3 installation services
Enter the bin directory of MySQL after decompression and execute the installation service command:
cd D:\work\mysql-8.0.28-winx64\bin
mysqld install
mysqld install --service -mysql8
If multiple services are not installed, use mysqld install. You don't need to specify a service name. The default service name is MySQL.
1.4. When using the service command, you need to run the CMD command as an administrator. Note that my path is executed in the bin directory
I haven't configured the system environment variables of MySQL 8, so I execute commands in the bin directory of MySQL.
Start service net start mysql
# Start service
net start mysql
D:\work\mysql-8.0.28-winx64\bin>net start mysql8
MySQL8 The service is starting .
MySQL8 The service has been started successfully.
Stop service net stop mysql
# Out of Service
net stop mysql
D:\work\mysql-8.0.28-winx64\bin>net stop mysql8
MySQL8 The service is stopping..
MySQL8 Service stopped successfully.
Delete service sc delete mysql
# Delete service
sc delete mysql
# Or mysqld remove to delete the service, you need to execute the mysqld command in the bin directory of mysql
mysqld remove mysql
1.5 precautions
# The installation service specifies the service name as MySQL8
 computer\HKEY_LOCAL_MACHINE\SYSTEM\ControlSet001\Services\MySQL8
# Or MySQL
 computer\HKEY_LOCAL_MACHINE\SYSTEM\ControlSet001\Services\MySQL
The installation service specifies the service name as MySQL8. As mentioned in the following multi instance service coexistence, you need to delete the original and residual registry, restart the computer, and then install.
A missing msvcr120 occurred DLL, missing components, install the following components to solve
vcredist_x64.exe
vcredist_x86.exe
Note: mysqld - initialize is used. The password is randomly generated and can be found in the error log of mysql
For example, my log (the file ending in. err in mysql data)
A temporary password is generated for root@localhost: 6hk20yueza=M
Command to change password
ALTER USER 'root'@'localhost' IDENTIFIED BY 'New password'
The reason why the introduction is so detailed under Windows is that our usual working environment is more carried out under Windows. Even if the Linux environment is used, the virtual machine is generally used together with the Linux distribution, and then the ECS. I'm familiar with some commands of MySQL. Can installation under Linux still embarrass you? Just turn over the official documents.
2. Installation under Linux
It is recommended that beginners do not install the rpm package like me. You can download the rpm bundle directly or use the official yum source of mysql. I have many years of Linux experience and some practical work experience; Know how to determine which packages are necessary and which need to be replaced.
Be sure to pay attention to the permission of Linux operating system. The permission can be met within the minimum range.
2.1. Prepare the installation package
You can download it directly on the official website or use the wget command. You can also use the yum source on the official website for installation. Or use the apt command to get the installation. As for why some Linux distributions remove MySQL from the default, there is a risk of source closure after MySQL is acquired by Oracle. Instead, her sister MariaDB, which is why I mentioned MariaDB during installation.
2.2. Install rpm package
The system will prompt which dependent packages are needed, so I prepare the required dependent packages in advance.
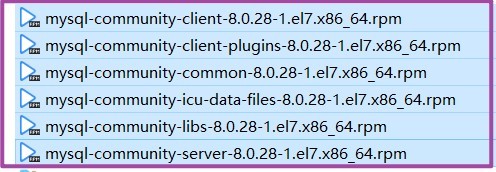
[mysql@localhost ~]$ rpm -ivh mysql-community-server-8.0.28-1.el7.x86_64.rpm
Warning: mysql-community-server-8.0.28-1.el7.x86_64.rpm: head V4 RSA/SHA256 Signature, secret key ID 3a79bd29: NOKEY
 Error: dependency detection failed:
    mysql-community-client(x86-64) >= 8.0.11 cover mysql-community-server-8.0.28-1.el7.x86_64 need
    mysql-community-common(x86-64) = 8.0.28-1.el7 cover mysql-community-server-8.0.28-1.el7.x86_64 need
    mysql-community-icu-data-files = 8.0.28-1.el7 cover mysql-community-server-8.0.28-1.el7.x86_64 need

[root@localhost mysql]# rpm -ivh mysql-community-icu-data-files-8.0.28-1.el7.x86_64.rpm
Warning: mysql-community-icu-data-files-8.0.28-1.el7.x86_64.rpm: head V4 RSA/SHA256 Signature, secret key ID 3a79bd29: NOKEY
 In preparation...                          ################################# [100%]
Upgrading/install...
   1:mysql-community-icu-data-files-8.################################# [100%]
[root@localhost mysql]# rpm -ivh mysql-community-common-8.0.28-1.el7.x86_64.rpm
Warning: mysql-community-common-8.0.28-1.el7.x86_64.rpm: head V4 RSA/SHA256 Signature, secret key ID 3a79bd29: NOKEY
 In preparation...                          ################################# [100%]
Upgrading/install...
   1:mysql-community-common-8.0.28-1.e################################# [100%]

[root@localhost mysql]# rpm -ivh mysql-community-client-8.0.28-1.el7.x86_64.rpm
Warning: mysql-community-client-8.0.28-1.el7.x86_64.rpm: head V4 RSA/SHA256 Signature, secret key ID 3a79bd29: NOKEY
 Error: dependency detection failed:
    mysql-community-client-plugins = 8.0.28-1.el7 cover mysql-community-client-8.0.28-1.el7.x86_64 need
    mysql-community-libs(x86-64) >= 8.0.11 cover mysql-community-client-8.0.28-1.el7.x86_64 need
2.2.1 install the dependency package, and then use rpm -qa | grep mysql to query which packages are installed. How to transfer it to the server, just a little scp command.

rpm -ivh mysql-community-common-8.0.28-1.el7.x86_64
rpm -ivh mysql-community-libs-8.0.28-1.el7.x86_64
rpm -ivh mysql-community-icu-data-files-8.0.28-1.el7.x86_64
rpm -ivh mysql-community-client-8.0.28-1.el7.x86_64
rpm -ivh mysql-community-client-plugins-8.0.28-1.el7.x86_64
[root@localhost mysql]# rpm -qa | grep mysql
2.2.2. Redhat7 series needs to uninstall the original MariaDB LIBS and replace it with MySQL community LIBS dependency
$ yum remove mariadb-libs
2.2.3 formal installation of server
$ rpm -ivh mysql-community-server-8.0.28-1.el7.x86_64.rpm
View the installed version of ver 8.0.28 for Linux on x86_ sixty-four
[mysql@localhost ~]$ mysqladmin --version
mysqladmin  Ver 8.0.28 for Linux on x86_64 (MySQL Community Server - GPL)
2.2.4. Assign the owner of mysql installation directory as mysql user, and the default installation path of rpm package is / var/lib/mysql. After granting mysql user owner and group permissions, you can use mysql user to log in or start and shut down services.
#Add mysql group
$ groupadd mysql
#Add mysql user to mysql group
$ useradd -g mysql mysql
#Modify mysql user password
$ mysql passwd
#Modify owner
$ chown -R mysql:mysql /var/lib/mysql
tips: you can also add mysql users to the / etc/sudoers configuration file to restrict the permissions of mysql users.
2.3 initialization
Set the password to blank, and the password can be modified in subsequent login
$ mysqld --initialize-insecure
2.4. Start service and view service status

The Redhat7 series uses commands to start MySQL services
$ systemctl start mysqld
Set startup and self startup
$ systemctl enable mysqld
Shut down service
$ systemctl stop mysqld
Restart service
$ systemctl restart mysqld
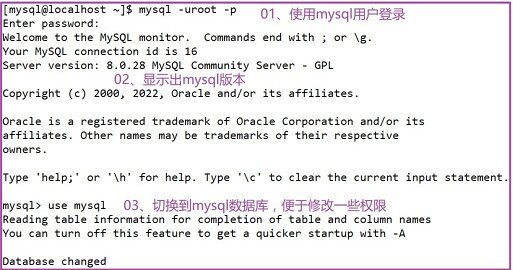
Login to mysql
$ mysql -uroot -p
2.5. Set up firewall
Join the mysql service and the required port 3306
$ firewall-cmd --zone=public --add-port=3306/tcp --permanent
$ firewall-cmd --zone=public --add-service=mysql --permanent
$ firewall-cmd --reload
Or temporarily turn off the firewall test
$ systemctl stop firewalld.service
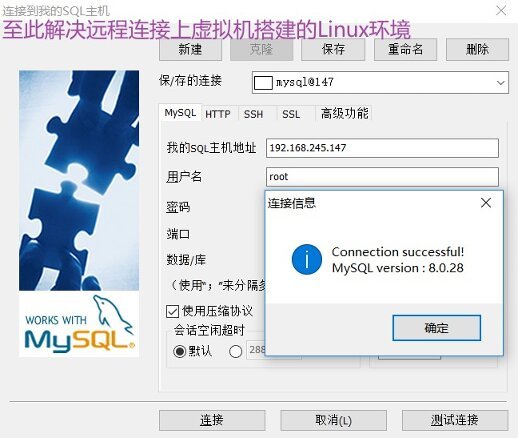
2.6 test remote login
Open the firewall, add 3306/tcp protocol rules and mysql service rules. The old password cache verification rule mysql is set_ native_ Password,, solving caching_ sha2_ The password authentication plug-in cannot be loaded.
mysql> CREATE USER 'root'@'%' IDENTIFIED BY 'Mysql@123456'; -- Step 1: create a user
mysql> GRANT ALL ON *.* TO root@'%'; -- Step 2 authorization
mysql> ALTER USER 'root'@'%' IDENTIFIED WITH mysql_native_password BY 'Mysql@123456'; -- Step 3: modify the password authentication method
mysql> flush privileges; -- Step 4 refresh permissions
3. About password forgetting solutions
Many small partners may have forgotten their passwords after setting them. The solution of this article is fully applicable to the latest version of MySQL 8 0.28, personally tested and verified.
reference resources MySQL8.0 official documents And [stackoverflow solution]( https://stackoverflow.com/que...
). As a result, I went back to skipping login password permission verification. The method before version 8.0 failed, and I didn't keep up with the pace of MySQL update.
1. Turn off MySQL service:
$ systemctl stop mysqld
2. Set MySQL environment option parameters and skip permission table verification
$ systemctl set-environment MYSQLD_OPTS="--skip-grant-tables"
Or in / etc / my CNF file to add, is the same effect. Finally, remember to remove the skip verification. In my.com under Windows Add skip grant tables to the INI file.
[mysqld]
skip-grant-tables
3. Started mysql with the settings just set
$ systemctl start mysqld
4. Log in to root
$ mysql -u root
5. Use the command to update the root user password
mysql> UPDATE mysql.user SET authentication_string = PASSWORD('MyNewPassword')
 -> WHERE User = 'root' AND Host = 'localhost';
mysql> FLUSH PRIVILEGES;
mysql> quit
a. This approach may not work
UPDATE user SET authentication_string = PASSWORD('123456') WHERE User = 'root' AND Host = 'localhost';b. Take to leave the password blank first
update user set authentication_string = '' where user = 'root';
6. Modify the password, solve the problem, and set stronger password rules
As mentioned my shokulei in the comments, for 5.7.6 and later, you should use
   mysql> ALTER USER 'root'@'localhost' IDENTIFIED BY '123456';
Or you'll get a warning
MySQL8.0 in this case, please set more secure password rules, such as setting the password as: Mysql@123456 , you can succeed.
ERROR 1819 (HY000): Your password does not satisfy the current policy requirements
mysql> ALTER USER 'root'@'localhost' IDENTIFIED BY 'Mysql@123456';
7. Close mysql service
$ systemctl stop mysqld
8. Reset the mysql environment variable parameters previously set
$ systemctl unset-environment MYSQLD_OPTS
9. Start mysql again
$ systemctl start mysqld
Finally, successfully log in to mysql
$ mysql -u root -p
3, Mysql8 0 use
Mainly based on Windows 10, some commands are also applicable to Linux.
1. Coexistence of multiple MySQL service instances in Windows
Pay attention to modifying the registry path to solve the unexpected stop of starting MySQL service. The prompt is 1067 or 1068.
net start mysql8
net start mysql
In order to test the latest version of the demo, I changed the service name to MySQL 8.
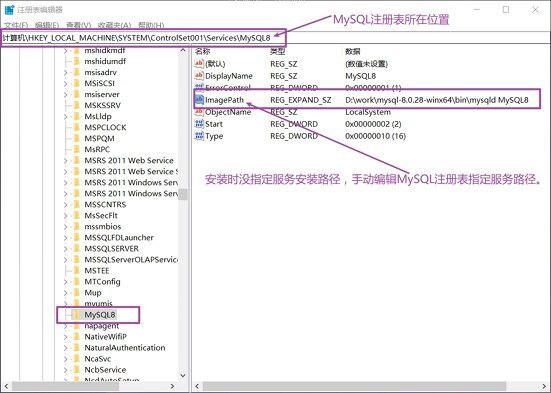
# The installation service specifies the service name as MySQL8
 computer\HKEY_LOCAL_MACHINE\SYSTEM\ControlSet001\Services\MySQL8
# Or MySQL
 computer\HKEY_LOCAL_MACHINE\SYSTEM\ControlSet001\Services\MySQL
I installed mariadb10 5.6. I want to continue using MariaDB and experience the latest version of MySQL 8 0.28, select this treatment.
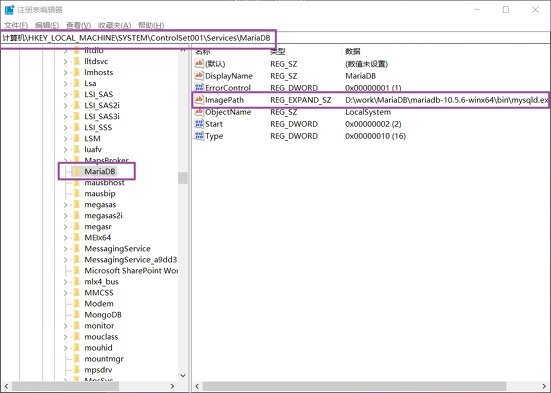
1.1 log in and specify port 3307. The default is 3306. My MariaDB has occupied port 3306. Personal test demonstrates the coexistence of multiple instances, and the port is changed to 3307.
Note: in Windows, use the cmd command window to log in as an administrator. It doesn't matter if the environment variable is not configured. Switch to the bin directory of MySQL installation and execute the command.
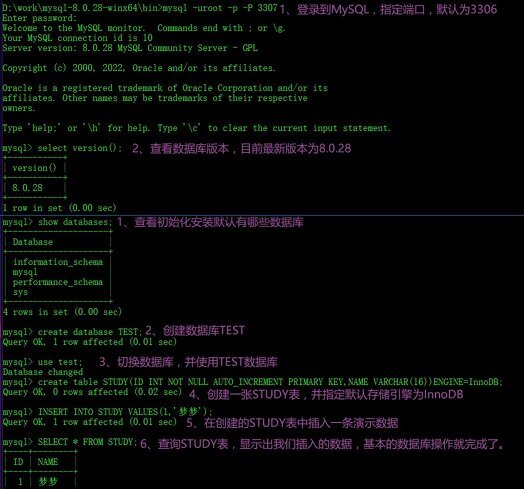
-- First step execution d:,Switch to D disc
d:
-- Step 2 execution cd Command, switch to personal installation mysql of bin Under the directory
cd D:\work\mysql-8.0.28-winx64\bin
-- Execute the login command and specify the port
mysql -uroot -p -P 3307
-- Query database version
```sql
mysql> select version();
+-----------+
| version() |
+-----------+
| 8.0.28    |
+-----------+
1 row in set (0.00 sec)
```
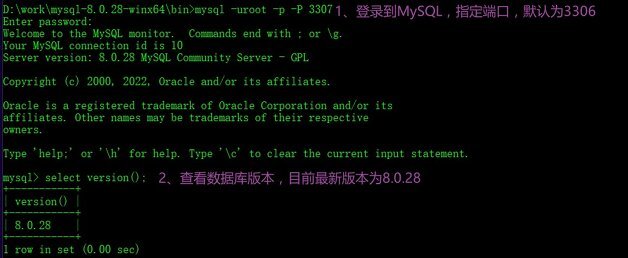
To sum up:
- Step 1: execute D:, switch to disk D;
- The second step is to execute the cd command and switch to the bin directory where mysql is installed;
- Step 3 execute the login command and specify the port to log in to mysql;
- Finally, simple interaction and query the database version.
1.2. Initially use the command line mode for interaction
2. Permission setting
2.1. Refer to official documents
Setting the remote login permission and password verification rules is related to installing the default authentication plug-in used by default in the database version
Refer to the official MySQL documentation: https://dev.mysql.com/doc/refman/8.0/en/upgrading-from-previous-series.html#upgrade-caching-sha2-password
01,Authentication plugin 'caching_sha2_password' is not supported
02,Authentication plugin 'caching_sha2_password' cannot be loaded:
dlopen(/usr/local/mysql/lib/plugin/caching_sha2_password.so, 2):
image not found
03,Warning: mysqli_connect(): The server requested authentication
method unknown to the client [caching_sha2_password]
Use the password cache authentication algorithm above. Description: the validation plug-in does not support caching_ sha2_ The password cannot be loaded. The service connection request raises a warning. The authentication method cannot recognize the client. Popular explanation: password verification rules are not allowed when using SQLyog, MySQL workbench and other client connections. The verification method needs to be changed or solved by other methods. The solution will be given below.
2.2. Modify the root user password
Use the alter user statement to change the user password:
ALTER USER 'root'@'localhost' IDENTIFIED BY 'New password';
2.3. Create ordinary users and authorize them (developers or DBA s use them frequently)
Beginners can ignore the step of authorization and use root to practice basic skills. Before getting started, the authorization mode of scalp numbness has not collapsed. Ha ha.
GRANT is the authorization command and REVOKE is the revocation command. Create users and authorize them to refer to official documents: https://dev.mysql.com/doc/refman/8.0/en/roles.html
CREATE ROLE: CREATE ROLE command
CREATE ROLE 'app_developer', 'app_read', 'app_write';
GRANT role permissions: GRANT command
GRANT ALL ON app_db.* TO 'app_developer';
GRANT SELECT ON app_db.* TO 'app_read';
GRANT INSERT, UPDATE, DELETE ON app_db.* TO 'app_write';
CREATE USER: CREATE USER command
CREATE USER 'dev1'@'localhost' IDENTIFIED BY 'dev1pass';
CREATE USER 'read_user1'@'localhost' IDENTIFIED BY 'read_user1pass';
CREATE USER 'read_user2'@'localhost' IDENTIFIED BY 'read_user2pass';
CREATE USER 'rw_user1'@'localhost' IDENTIFIED BY 'rw_user1pass';
Authorization to the user who created it: GRANT command
GRANT 'app_developer' TO 'dev1'@'localhost';
GRANT 'app_read' TO 'read_user1'@'localhost', 'read_user2'@'localhost';
GRANT 'app_read', 'app_write' TO 'rw_user1'@'localhost';
You can also be in my Ini or my Specify the settings in the CNF configuration file:
[mysqld]
mandatory_roles='role1,role2@localhost,r3@%.example.com'
You can also use the SET command to SET in the command mode:
SET PERSIST mandatory_roles = 'role1,role2@localhost,r3@%.example.com';
Check the permissions of role dev1. There are many permissions to check, so I won't list them one by one. For details, please refer to the official documents.
mysql> SHOW GRANTS FOR 'dev1'@'localhost';
+-------------------------------------------------+
| Grants for dev1@localhost                       |
+-------------------------------------------------+
| GRANT USAGE ON *.* TO `dev1`@`localhost`        |
| GRANT `app_developer`@`%` TO `dev1`@`localhost` |
+-------------------------------------------------+
Create a user and authorize all permissions:
CREATE USER 'old_app_dev'@'localhost' IDENTIFIED BY 'old_app_devpass';
GRANT ALL ON old_app.* TO 'old_app_dev'@'localhost';
LOCK user: LOCK: LOCK, blind guess unlocking is UNLOCK
ALTER USER 'old_app_dev'@'localhost' ACCOUNT LOCK;
Authorize the new development account permission, and authorize some permissions:
CREATE USER 'new_app_dev1'@'localhost' IDENTIFIED BY 'new_password';
GRANT 'old_app_dev'@'localhost' TO 'new_app_dev1'@'localhost';
The above official documents are provided for reference. Instead of looking around, it's better to read the official documents more directly and accurately. What we lack is not the way of learning, but the method of learning.
3. Test creation user
3.1. Create ordinary users and authorize remote login
Create a normal user test
mysql> CREATE USER 'test'@'localhost' IDENTIFIED BY '123456';
Query OK, 0 rows affected (0.00 sec)
Grant the user test local (localhost) permission, only query permission (SELECT), and authorize ALL (ALL)
mysql> GRANT SELECT ON *.* TO test@'localhost';
Query OK, 0 rows affected (0.01 sec)
3.2. Authorize root user
Create a root user, authorize all IP S to log in, and modify the password cache authentication method.
mysql> CREATE USER 'root'@'%' IDENTIFIED BY 'Mysql@123456';
mysql> GRANT ALL ON *.* TO root@'%';
mysql> ALTER USER 'root'@'%' IDENTIFIED WITH mysql_native_password BY 'Mysql@123456';
mysql> flush privileges;
Verify the login result in the third-party tool, and you can log in successfully under localhost:
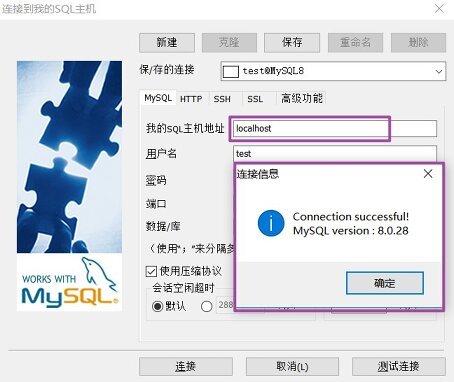
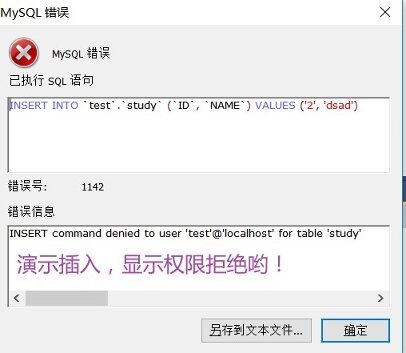
At present, only query permission is given, and insert permission is verified:
mysql> insert into study values(7,'Beautiful orange');
ERROR 1142 (42000): INSERT command denied to user 'test'@'localhost' for table 'study'
This is verified under the SQLyog tool. It is recommended that beginners practice more in the command line window, and practice makes perfect.
3.2. Authorize the root user to log in remotely, mysql8 0 authorization method
User authorization, on mysql8 It has become more stringent in version 0. Previously, MySQL 5.0 The way in which authorization can be executed has changed in version 6 or 5.7. After personal test, the operation is as follows.
MySQL8.0 authorization method. Remember to use flush privileges to refresh permissions
mysql> CREATE USER 'root'@'%' IDENTIFIED BY 'Mysql@123456'; -- Step 1: create a user
mysql> GRANT ALL ON *.* TO root@'%'; -- Step 2 authorization
mysql> ALTER USER 'root'@'%' IDENTIFIED WITH mysql_native_password BY 'Mysql@123456'; -- Step 3: modify the password authentication method
mysql> flush privileges; -- Step 4 refresh permissions
Modify the password authentication method (8.0 uses the cache authentication of sha2 algorithm by default). The first solution is as follows. This is only one of the solutions, and the personal test is effective.
ALTER USER 'root'@'localhost' IDENTIFIED WITH mysql_native_password BY '123456';
ALTER USER 'root'@'%' IDENTIFIED WITH mysql_native_password BY '123456';
The second solution: in my Ini or my Add the following configuration to the CNF configuration file, restart the service and load the configuration file. After testing, it doesn't take effect. It doesn't seem to read the configuration file, but it's strange that the 3307 port, default storage engine and encoding format I set are effective. (see the solution on the official website)
[mysqld]
default_authentication_plugin=mysql_native_password
MySQL8. The default authentication caching algorithm set in the 0 official document is caching_sha2_password
ALTER USER user(user) IDENTIFIED WITH caching_sha2_password BY 'password';
MySQL8. Authorization method before 0 (both 5.6 and 5.7 support this method)
GRANT ALL PRIVILEGES ON *.* TO 'Your username'@'Yours IP address' IDENTIFIED BY 'Set password' WITH GRANT OPTION;
Example: authorize the root user, and all IP S can be connected.
GRANT ALL PRIVILEGES ON *.* TO 'root'@'%' IDENTIFIED BY '123456' WITH GRANT OPTION;
Refresh permissions
flush privileges;
4. How to use the official documents efficiently
Log in to MySQL8, specify 3307 port, or log in using the default port.
mysql -uroot -p -P 3307
mysql -uroot -p
Use the help command to? Find the system help command in the form of create contents.
? create contents;
? create user;
? create database;
? create table;
? select;
? insert;
? update;
? delete;
URL: https://dev.mysql.com/doc/refman/8.0/en/select|insert|update|delete.html
When using local help documents, you will find that the system automatically prompts the address of the official documents https://dev.mysql.com/doc.
Example: query help command for creating tables? create table shows only part of the content.
mysql> ? create table
Name: 'CREATE TABLE'
Description:
Syntax:
CREATE [TEMPORARY] TABLE [IF NOT EXISTS] tbl_name
    (create_definition,...)
    [table_options]
    [partition_options]
data_type:
    (see https://dev.mysql.com/doc/refman/8.0/en/data-types.html)
index_type:
    USING {BTREE | HASH}
index_option: {
    KEY_BLOCK_SIZE [=] value
  | index_type
 ...
}
URL: https://dev.mysql.com/doc/refman/8.0/en/create-table.html- Name: the name of the help command to view
- Description: description
- Syntax: Example
- data_type: supported data types
- index_type: the index type that can be used
I only listed some parts for explanation, and I can test them myself in more detail.
Uppercase is adopted when creating users, databases, tables and fields, because it is not MySQL itself that is sensitive to uppercase under Linux and Unix.
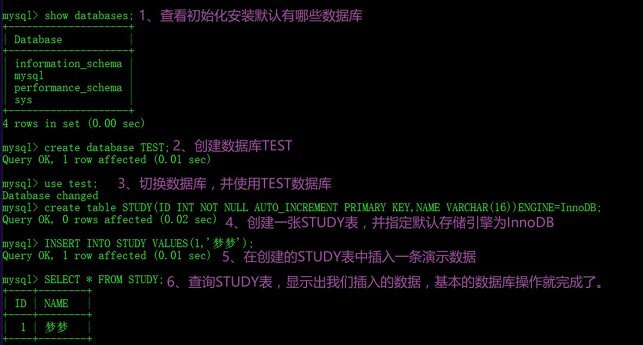
1. Create database
CREATE DATABASE TEST;
USE TEST;
2. To create a table, you can specify the storage ENGINE of the table through ENGINE, mysql5 6 and later versions are InnoDB storage ENGINE by default.
CREATE TABLE STUDY(
    ID INT NOT NULL PRIMARY KEY AUTO_INCREMENT,
    NAMES VARCHAR(64) NOT NULL
)ENGINE=MyISAM;
3. Insert data
INSERT INTO STUDY VALUES(1,'mysql Current latest version msyql8.0.28');
4. Query data
SELECT * FROM STUDY;
5. Modify data
UPDATE STUDY S SET S.NAMES='mysql The default storage engine is InnoDB' WHERE S.ID=1;
6. Delete all data
DELETE FROM STUDY;
So far, the basic user creation, database creation, addition, deletion, modification and query will be used.
4, MySQL connection tool
Made hyperlinks to facilitate access to the official website.
- phpMyAdmin
- MYSQL workbench
- SQLyog
Several commonly used tools are recommended: phpMyAdmin,SQLyog,MySQL Workbench Connect with Navicat visualization tool. The use of tools is the second, and the more important is the use of MySQL command statements.
The official installation of MySQL package and MySQL package are also provided!
Link: https://pan.baidu.com/s/11gIlZKxoTG5BCCcoXdVJRg Extraction code: ntu7
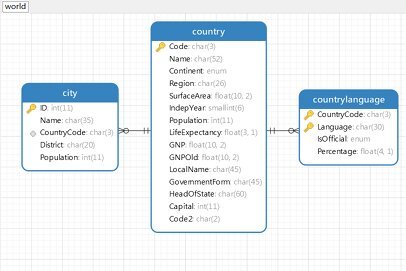
This paper presents a model of an example database world reverse generated using Navicat:
If you really want to use to build a physical model: it is recommended that you learn the use of Sybase PowerDesigner design tool, and you need to understand the three paradigms followed by relational database design. At present, the database design can meet 3NF at most. It is generally believed that the paradigm is too high. Although it has better constraints on data relations, it also leads to the increase of data relational tables and makes the database IO more busy. The relational constraints originally handled by the database are now more completed in the database user program.
5, JDBC of MySQL
1. Official connector-j
MySQL8. maven install JDBC for 0: https://dev.mysql.com/doc/connector-j/8.0/en/connector-j-installing-maven.html
JDBC connection driver management: https://dev.mysql.com/doc/connector-j/8.0/en/connector-j-usagenotes-connect-drivermanager.html
import java.sql.Connection;
import java.sql.DriverManager;
import java.sql.SQLException;

// Notice, do not import com.mysql.cj.jdbc.*
// or you will have problems!

public class LoadDriver {
    public static void main(String[] args) {
        try {
            // The newInstance() call is a work around for some
            // broken Java implementations
            Class.forName("com.mysql.cj.jdbc.Driver").newInstance();
        } catch (Exception ex) {
            // handle the error
        }
    }
}
Connection conn = null;
...
try {
    conn = DriverManager.getConnection("jdbc:mysql://localhost/test?" +
                                   "user=root&password=123456");
    // Do something with the Connection
   ...
} catch (SQLException ex) {
    // handle any errors
    System.out.println("SQLException: " + ex.getMessage());
    System.out.println("SQLState: " + ex.getSQLState());
    System.out.println("VendorError: " + ex.getErrorCode());
}
2. JDBC test connection MySQL 8 0 database
2.1 maven configuration
Set POM XML configuration file, using the latest version of MySQL 8.0.28 for connection test. maven's image warehouse can use Ali's image source address.
<dependency>
    <groupId>mysql</groupId>
    <artifactId>mysql-connector-java</artifactId>
    <version>8.0.28</version>
</dependency>

<dependency>
    <groupId>mysql</groupId>
    <artifactId>mysql-connector-java</artifactId>
    <version>8.0.28</version>
    <exclusions>
        <exclusion>
            <groupId>com.google.protobuf</groupId>
            <artifactId>protobuf-java</artifactId>
        </exclusion>
    </exclusions>
</dependency>
2.2. Writing Java code
Use the editor sts (spring tool suite 4 or IDEA)
Create a normal maven project or springboot project, and then configure POM xml.
Purpose: use pure JDBC test, or ORM framework mybatis, JPA, or hibernate, and finally achieve the most basic addition, deletion, modification and query of the database.
package com.example.demo.dao;
import java.sql.Connection;
import java.sql.DriverManager;
import java.sql.PreparedStatement;
import java.sql.ResultSet;
import java.sql.SQLException;
import org.slf4j.Logger;
import org.slf4j.LoggerFactory;
public class TestConnMySQL8 {
public static void main(String[] args) throws ClassNotFoundException, SQLException {
TestSQLConnMySQL();
}
private static final Logger log = LoggerFactory.getLogger(TestConnMySQL8.class);
//Initialization parameters
static Connection conn = null;
static PreparedStatement ps = null;
static ResultSet rs = null;
/**
* @throws SQLException
* @throws ClassNotFoundException
*/
private static void TestSQLConnMySQL() throws SQLException, ClassNotFoundException {
try {
Class.forName("com.mysql.cj.jdbc.Driver");
/**
* 1.Get the connection parameters URL, username and password. The default port is 3306
* MySQL: url ="jdbc:mysql://127.0.0.1:3306/test";
*/
/** MySQL Splice url**/
String url = "jdbc:mysql://192.168.245.147:3306/TEST?useUnicode=true&characterEncoding=utf-8";
String username = "root";
String password = "Mysql@123456";
//Get connection
conn = DriverManager.getConnection(url, username, password);
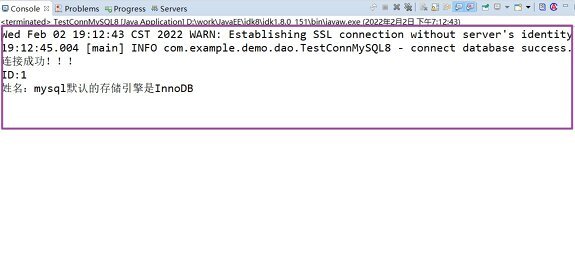
if(null != conn) {
log.info("connect database success...");
}else {
log.error("connect database failed...");
}
//query data base
String sql = "SELECT * FROM STUDY";
// 3. Execute SQL through preparedStatement
ps = conn.prepareStatement(sql);
// 4. Execute the query to obtain the result set
rs = ps.executeQuery();
// 5. Traverse the result set on the premise that your database has created tables and data
while (rs.next()) {
//getInt is used for the field type Int in the corresponding database table, and getString is used for varchar
System.out.println("ID:" + rs.getInt("ID"));
System.out.println("full name:" + rs.getString("NAMES"));
}
} finally {
// 6. Close the connection to release resources
rs.close();
ps.close();
conn.close();
}
}
}Connect and return test results in sts editing tool
summary
The above is the MySQL 8 0.28 installation and use of all the contents, I hope it can be helpful to your work and study. If you feel it's well written, take out your one button three times. It may be faster to update the official account, but it is still being improved. All the people who can see here are handsome boys and pretty girls. If I feel that the summary is not in place, I hope I can leave your valuable opinions, and I will adjust and optimize it in the article.
Original is not easy. Please indicate the source and author of reprint and respect the original. Upload to github or gitee from time to time. Identify Longteng Wanli sky. If you see that other platforms either send my article with this ID or reprint it. MySQL series articles: "MySQL development, is the choice of storage engine really important?" It has been uploaded to github and gitee warehouse SQL study. For the address of personal github warehouse, the PDF file will be updated first, and then the markdown file will be uploaded. If accessing github is too slow, you can use gitee for cloning.
tips: the static blog built with hexo will also be updated and maintained regularly.
<H5 align=center>Author: Longteng Wanli sky</H5>