Combination mode
Basic introduction
- Composite Pattern, also known as partial overall pattern, creates a tree structure of object groups and combines objects into a tree structure to represent the hierarchical relationship of "whole part".
- The combination mode combines objects according to the tree structure, which is used to represent the partial and overall levels.
- This type of design pattern belongs to structural pattern.
- The combination mode makes the user's access to single objects and combined objects consistent, that is, combination can make customers
Users deal with individual objects and combined objects in a consistent manner
Problems solved
- Composite mode solves such problems. When the object we want to deal with can generate a tree structure, and we want to operate on the nodes and leaves of the tree, it can provide a consistent way, regardless of whether it is a node or a leaf
- Corresponding schematic diagram

Example demonstration
Modern computers are generally divided into the following components: keyboard, display, chassis and mouse. The inside of the chassis includes motherboard, hard disk, power supply, etc. The motherboard is the heart of the host computer, which is generally inserted with CPU, memory, graphics card and other devices. Please describe a computer in combination mode, and try to realize a computer according to your knowledge of the game, which can play the "Jedi survival" game.
analysis
We should first find out which are leaf nodes and which are root nodes. The root node contains other components (that is, it can contain other components), and the smallest node is the leaf node, so it has only the most basic functions.
1) UML class diagram

2) Create parent class
Whether it is a leaf node or a root node, it is a component itself, but the functions it can use are different
/*
* Define a basic component. No matter what else it contains, it is a component of the computer first
* */
public abstract class OriginalComponent {
    private String name;
    private String brand;

    public OriginalComponent(String name, String brand) {
        this.name = name;
        this.brand = brand;
    }

    /*
     * Let's first look at the methods it can have from the perspective of the smallest component, such as CPU
     * It is also a class, but when they inherit this parent class, the use of these methods is specific
     * It also depends on their rewriting. In the parent class, our default implementation is to throw an exception, that is to say
     * If the inherited class does not override this method, it does not have permission to use this method.
     * */
    protected void add(OriginalComponent originalComponent){
        throw new UnsupportedOperationException();
    }

    protected void remove(OriginalComponent originalComponent){
        throw new UnsupportedOperationException();
    }

    /*
    * The output of component information is a basic function, which should be available to every component, so we will use this
    * Method is defined as abstract, and each subclass inheriting the parent class must implement this method.
    * */
    protected  abstract void print();
}
3) Root node
As mentioned earlier, the difference between root node and leaf node lies in the functions that can be used after inheriting the parent class.
Take the case as an example.
/*
* The chassis also contains other components
* */
public class ComputerCase extends OriginalComponent{
    List<OriginalComponent> componentList = new ArrayList<>();

    public ComputerCase(String name, String brand) {
        super(name, brand);
    }

    @Override
    protected void add(OriginalComponent originalComponent) {
        componentList.add(originalComponent);
    }

    @Override
    protected void remove(OriginalComponent originalComponent) {
        componentList.remove(originalComponent);
    }

    @Override
    protected void print() {
        for (OriginalComponent originalComponent : componentList) {
            System.out.println("---Chassis---");
            originalComponent.print();
        }
    }
}
4) Leaf node
Leaf nodes only have the most basic function, that is, output information.
Take one of the leaf node CPU s as an example
public class CPU extends OriginalComponent{

    public CPU(String name, String brand) {
        super(name, brand);
    }

    @Override
    protected void print() {
        System.out.println("Part name:"+this.getName()+"\t Component brand"+getBrand());
    }
}
5) Combination
Include each part in the class that manages it.
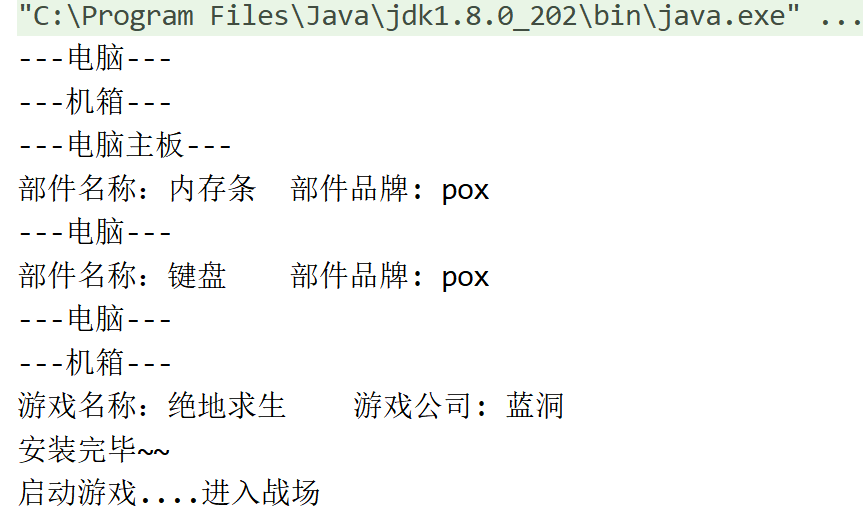
public class Client {
    public static void main(String[] args) {
        Computer computer = new Computer("computer", "pox");
        ComputerCase computerCase = new ComputerCase("Chassis", "pox");
        ComputerMotherboard computerMotherboard = new ComputerMotherboard("a main board", "pox");
        ComputerKeyboard computerKeyboard = new ComputerKeyboard("keyboard", "pox");
        Memory memory = new Memory("Memory module", "pox");

        Application application = new Application("application", "pox");
        Game game = new Game("Jedi survival", "Blue Hole");

        computer.add(computerCase);
        computer.add(computerKeyboard);
        computerCase.add(computerMotherboard);
        computerMotherboard.add(memory);
        computer.add(application);
        application.add(game);

        computer.print();
    }
}
6) Testing
The last question is to realize the game. Let's put it another way. The game is first an application, and then it is a component in the application. However, the application is also an integral part of the computer. You can add it to the game component directly.
public class Game extends OriginalComponent{

    public Game(String name, String brand) {
        super(name, brand);
    }

    @Override
    protected void print() {
        System.out.println("Game name:"+this.getName()+"\t Game company: "+getBrand());
        System.out.println("Installation completed~~");
        System.out.println("start games....Enter the battlefield");
    }
}
Summary
No matter how many components it contains, first of all, it is an integral part of the whole. For components that contain other components, you can implement more methods to include other components (that is, the root node). Components without other components are the most basic components, so it only needs to realize the most basic functions.
supplement
About HashMap, the source code is also a combination mode.
First, there is a basic interface Map (in the source code, it extracts some methods of the OriginalComponent in our example to create a higher interface). Some methods such as put and putAll have been defined in the Map. HashMap does not directly implement the interface of Map, but implements some basic methods in AbstractMap by inheriting an abstract class AbstractMap (the most primitive component definition similar to the OriginalComponent in our example), and some methods such as put throw exceptions by default. If subsequent inherited classes want to use these methods, Then you must rewrite these methods to use them.
For the leaf Node in this component tree, the leaf component is implemented through the internal class Node in HashMap. When calling put and other methods, the data will be wrapped in this Node first, and then stored in HashMap to realize the management of components.
The get() method is also used to find nodes.
=====HashMap Part of the source code, about put======
public V put(K key, V value) {
    return putVal(hash(key), key, value, false, true);
}

=====call putVal Method storage=====
// Partial source code
final V putVal(int hash, K key, V value, boolean onlyIfAbsent,
               boolean evict) {
    // Store in Node
    Node<K,V>[] tab; Node<K,V> p; int n, i;
}
proxy pattern
Basic introduction
- Proxy mode: provide an avatar for an object to control access to the object. That is, the target object is accessed through the proxy object The advantage of this is that additional function operations can be enhanced on the basis of the implementation of the target object, that is, the function of the target object can be extended.
- The proxied object can be a remote object, an object with high creation cost or an object requiring security control
- The agent mode has different forms, mainly including three kinds of static agent, dynamic agent (JDK agent, interface agent) and Cglib agent (it can dynamically create objects in memory without implementing interfaces. It belongs to the category of dynamic agent).
Static proxy
When using a static proxy, you need to define an interface or parent class. The proxy object (i.e. the target object) implements the same interface or inherits the same parent class with the proxy object.
Example demonstration
Please use the agent mode to realize a function: suppose you want to realize a qunar website, which can sell tickets for airlines, train stations and bus stations, and charge 5%, 3% and 1% of the ticket price as the agent fee.
1) UML class diagram
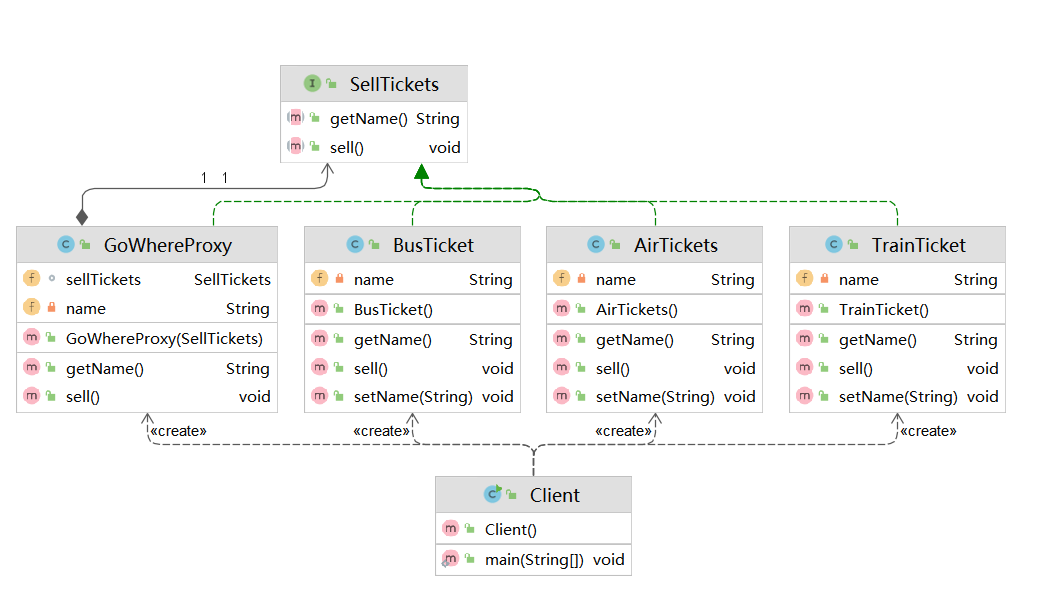
2) Create public interface
The proxy method needs to be the same, so the proxy object and the proxy object must implement the same interface. Here, define the interface first
public interface SellTickets {
    void sell();
    // Here, getname is used to distinguish the types of tickets
    String getName();
}
3) Create implementation class
Define the specific ticket name and implement the ticket purchase details
public class AirTickets implements SellTickets{
    private String name = "Air";

    @Override
    public void sell() {
        System.out.println("Sale of air tickets~~");
    }

    @Override
    public String getName() {
        return name;
    }

    public void setName(String name) {
        this.name = name;
    }
}
4) Writing dynamic proxy classes
Similarly, the agent has the same function. Therefore, you also need to implement the parent class interface
public class GoWhereProxy implements SellTickets{
SellTickets sellTickets;
private String name;
public GoWhereProxy(SellTickets sellTickets) {
name = "Where are you going?";
this.sellTickets = sellTickets;
}
/*
* Here you can make corresponding functions according to the type of incoming tickets
* */
@Override
public void sell() {
if (sellTickets.getName().equals("Air")){
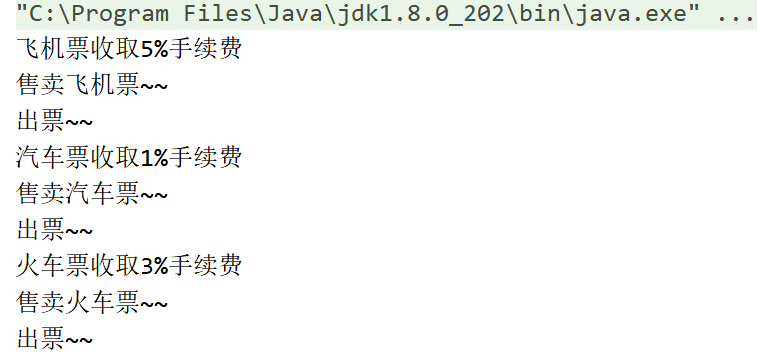
System.out.println("Air ticket charge 5%Service Charge");
sellTickets.sell();
System.out.println("Issue a ticket~~");
} else if (sellTickets.getName().equals("Bus")){
System.out.println("Bus ticket charge 1%Service Charge");
sellTickets.sell();
System.out.println("Issue a ticket~~");
} else if (sellTickets.getName().equals("Train")){
System.out.println("Train ticket charge 3%Service Charge");
sellTickets.sell();
System.out.println("Issue a ticket~~");
}
}
@Override
public String getName() {
return name;
}
}
5) Testing
In order to realize the type of selling multiple tickets, the static agent needs to add an additional attribute, getName, in the public interface (but for the agent object, it doesn't need this method in this example). Can we realize the agent sale of different tickets without adding additional methods?
Dynamic agent
public class Client {
    public static void main(String[] args) {
        AirTickets airTickets = new AirTickets();
        BusTicket busTicket = new BusTicket();
        TrainTicket trainTicket = new TrainTicket();

        /*
        * Three windows are opened, and each window sells tickets of a specified type
        * Acting aircraft, cars and trains respectively
        * */
        GoWhereProxy goWhereProxy1 = new GoWhereProxy(airTickets);
        goWhereProxy1.sell();

        GoWhereProxy goWhereProxy = new GoWhereProxy(busTicket);
        goWhereProxy.sell();

        GoWhereProxy goWhereProxy2 = new GoWhereProxy(trainTicket);
        goWhereProxy2.sell();
    }
}
6) Results
Summary
Advantages: the target function can be extended through the proxy object without modifying the function of the target object
Disadvantages: because the proxy object needs to implement the same interface as the target object, there will be many proxy classes
Once a method is added to the interface, both the target object and the proxy object must be maintained
Dynamic agent
Basic introduction
- The proxy object does not need to implement the interface, but the target object needs to implement the interface, otherwise the dynamic proxy cannot be used
- The generation of proxy object is to dynamically build proxy object in memory by using JDK API
- Dynamic agent is also called JDK agent and interface agent
You need to implement the proxy class at the bottom of Java, and implement different proxies according to the receiving type.
Example test
1) UML class diagram
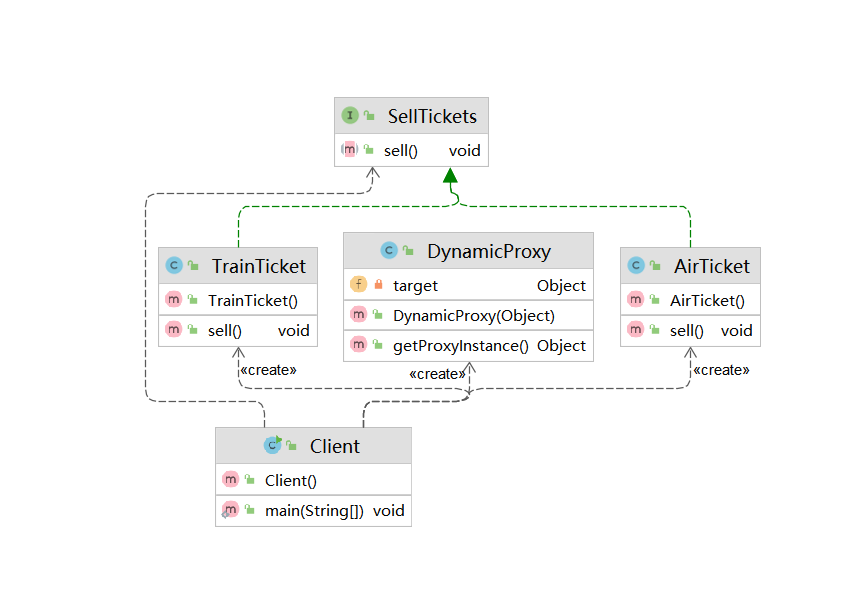
2) Create public interface
Like the above, you also need to define a basic interface. All ticket sales types are one kind of ticket sales. Extract the most basic ticket sales behavior into a public interface.
public interface SellTickets {
    void sell();
}
3) Implement common interface
Take BusTicket as an example
public class AirTicket implements SellTickets{
    @Override
    public void sell() {
        System.out.println("Sale of air tickets~~");
    }
}
4) Write dynamic proxy
The bottom layer is implemented through the proxy class package of Java. The specific implementation method is to obtain a series of information such as the type of class, the interface name in class and the interface inherited by class through class reflection. Through the information obtained, different incoming types and different agents can be realized.
public class DynamicProxy {
    private Object target;

    public DynamicProxy(Object target) {
        this.target = target;
    }

    /*
    * Here is to get the dynamic proxy class, which will proxy according to the type of the incoming class
    * You can use different ticket types and different agency methods here
    * The judgment condition here is to obtain the name of the class through the reflection of the class. You can judge by different class names
    * Are different ticket types.
    * */
    public Object getProxyInstance(){
        return Proxy.newProxyInstance(target.getClass().getClassLoader(),
                target.getClass().getInterfaces(),
                new InvocationHandler() {
                    @Override
                    public Object invoke(Object proxy, Method method, Object[] args) throws Throwable {
                        System.out.println("Agent mode start~~");

                        /*
                        * target.getClass().getName().equals("dynamicproxy.AirTicket")You can judge to make different agents
                        * Why: dynamic proxy Airticket, in fact, the name can be obtained by printing on the console. Here I use it
                        * System.out.println(target.getClass().getName());To get the name of the class in the console output
                        * */
                        /*
                        * 11.30 improvement
                        * - Change the information of the obtained class to instance judgment
                        * */
                        if (target instanceof AirTicket){
                            System.out.println("Charge 5%Handling charges");
                        } else if (target instanceof TrainTicket){
                            System.out.println("Charge 3%Service Charge");
                        } else if (target instanceof BusTicket){
                            System.out.println("Charge 1%Service Charge");
                        } else {
                            System.out.println();
                        }

                        Object invoke = method.invoke(target, args);
                        System.out.println("Issue a ticket~~");
                        return invoke;
                    }
                });
    }
}
Summary
It is to obtain different proxy types through reflection, and finally achieve different proxy methods. Proxy mode is used in many source codes. The addition and expansion of methods can be realized through proxy mode, which is usually used together with reflection.