vim is a lightweight editor with a powerful group of plug-ins. Its powerful user-defined shortcut key function allows you to realize various editing operations without touching the mouse.
Configuration directory of vim
. vimrc is the configuration file of vim. Users need to modify this file to personalize vim
vimrc configuration files are divided into system configuration and user configuration.
The system vimrc configuration file is stored in the installation directory of vim. My VIM is version 8.0, and the path of my system vimrc configuration file is / usr / share / VIM / vim80 / vimrc. Vim80 is slightly different according to the version number
The user vimrc file is stored in the user's home directory ~ / vimrc. This file is not available when you first use it. You need to create it yourself Vimrc file
The. VIM folder is the resource folder where VIM is stored, and its directory is / usr / share / VIM / vim80 / vim
You can also create it in the user folder ~ / vim folder, so The resources in the vim folder are only valid for the current user.
Here's the Directory structure under vim folder
| catalogue | purpose |
|---|---|
| autoload | autoload scripts |
| colors | This folder is required for color schemes and custom themes |
| compiler | Compile command: script file used by compiler |
| doc | file |
| ftplugin | Plug in for specific types of files (to be used with: filetype plugin command) |
| indent | Auto indent definition file |
| keymap | The naming format is {language} [- {layout}] [{encoding}] VIM's Keymap file |
| lang | Interface display language files (English, Chinese, etc.) |
| macros | Macro examples (hanoi, maze, urm, etc.), gadgets (justify, match, swapmus, etc.) |
| plugin | plug-in unit |
| syntax | Syntax highlight file |
| tools | Tools (unicode, vimpeel, etc.) |
| tutor | Introductory tutorial |
Basic configuration commands of vim
To configure your vim is to modify your vimrc configuration file
Switch to user directory cd~
Open Vimrc configuration file vim Vimrc, without this file, create MKDIR first vimrc
Add the effect you want to your vimrc file

Here are some common configurations
Font and color
"Automatically turn on syntax highlighting"
syntax enable

"Set font"
"set guifont=dejaVu\ Sans\ MONO\ 10
set guifont=Courier_New:h10:cANSI

"Set theme style"
"colorscheme desert

"Highlight the current row"
set cursorline
hi cursorline guibg=#00ff00
hi CursorColumn guibg=#00ff00
word processing
"Replace with spaces Tab"
set expandtab

"Set all Tab And indent to 4 spaces"
set tabstop=4

"set up<<and>>The width when the command moves is 4"
set shiftwidth=4

"This allows you to delete 4 spaces at a time when you press the backspace key"
set softtabstop=4
set smarttab

"Indent, auto indent (inherits the indent of the previous line)"
"set autoindent The command to turn on automatic indentation is an abbreviation for the following configuration
"Available autoindent Short for command, i.e“:set ai"And“:set noai"
"You can also use“:set ai sw=4"Turn indent on in one command and set the indent level
set ai
set cindent

"smart indent "
set si

"Auto wrap
set wrap

"Set soft width"
set sw=4

"Intra row substitution"
set gdefault
Vim interface
"Display ruler"
set ruler

"Sets the height of the command line"
set cmdheight=1

"Display rows"
set nu

"Do not use graphic buttons"
set go=

"Set magic"
set magic

"Turn off the sound prompt when an error is encountered"
"Turn off the error message ring"
set noerrorbells

"Turn off using visual ringing instead of calling"
set novisualbell

"Highlight matching parentheses([{and}])"
set showmatch

"The time (in tenths of a second) that matches the highlight of parentheses"
set mat=2

"Search highlighting character by character"
set hlsearch
set incsearch

"Search is case insensitive"
"Abbreviations can also be used(“:set ic"And“:set noic")"
set ignorecase

"Highlight the current row in a light color"
autocmd InsertLeave * se nocul
autocmd InsertEnter * se cul

"The input command is displayed and can be seen clearly"
set showcmd
Coding settings
"Set code"
set encoding=utf-8
set fencs=utf-8,ucs-bom,shift-jis,gb18030,gbk,gb2312,cp936

"Set file code"
set fileencodings=utf-8

"Set terminal code"
set termencoding=utf-8

"Set language code"
set langmenu=zh_CN.UTF-8
set helplang=cn
Other settings
"Pop up confirmation when processing unsaved or read-only files"
set confirm

"hide the toolbar"
set guioptions-=T

"Hide menu bar"
set guioptions-=m

"Display the status bar (the default value is 1, which means the status bar cannot be displayed)"
set laststatus=2

"What the status line displays"
set statusline=%F%m%r%h%w\ [FORMAT=%{&ff}]\ [TYPE=%Y]\ [POS=%l,%v][%p%%]\ %{strftime(\"%d/%m/%y\ -\ %H:%M\")}

"Background color settings"
set background=dark

"Shared clipboard"
set clipboard+=unnamed

"Never back up"
set nobackup
set noswapfile

"Auto save"
set autowrite

"close vi Compatibility mode"
set nocompatible

"Set history steps"
set history=1000

"Activate the use of the mouse"
set mouse=a
set selection=exclusive
set selectmode=mouse,key
vim set shortcut key
**Prefix keys: * * vim comes with many shortcut keys, plus the shortcut keys of various plug-ins. A large number of shortcut keys appear in a single-layer space, which will inevitably cause conflicts. In order to alleviate this problem, the prefix key is introduced. The default prefix key is \. You can put let mapleader = ";" Add to your profile and change your prefix key to;.
Mapping: through mapping, you can define your own shortcut keys to make your vim easier to use.
For example: add nmap < leader > wq to your configuration file: wq < CR > when you are in normal mode, press; wq will automatically save and exit the file. (provided you set it to;)
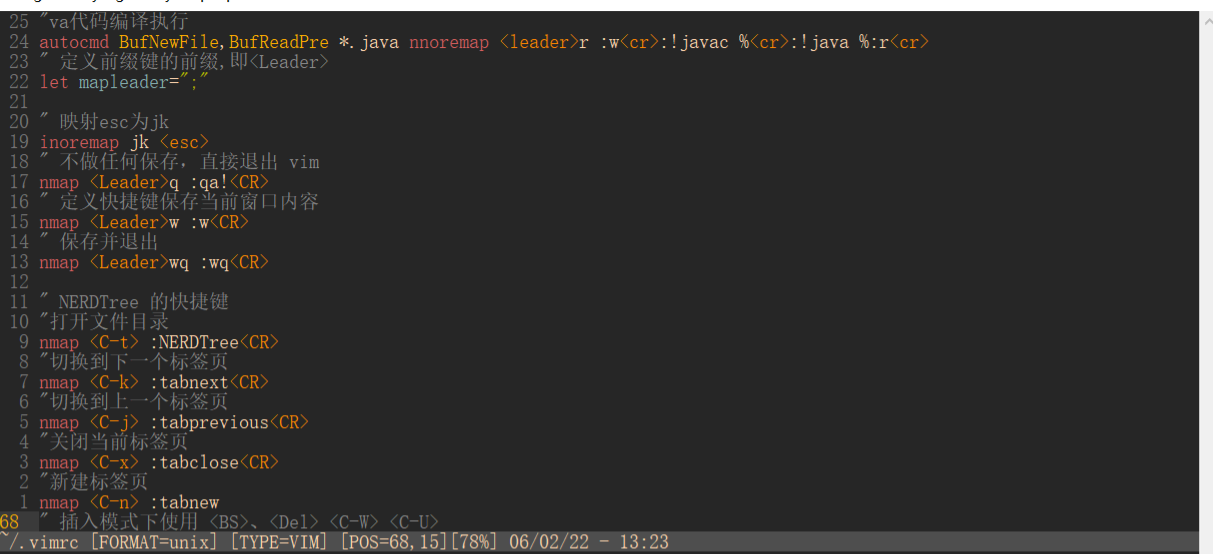
This is my shortcut key.
vim has developed a variety of mapping rules
- : imap: shortcut key that only works in Insert mode
- : cmap: only effective in command line mode
- : nmap: only effective in Normal mode
- : vmap: works only in Visual mode
- : map: effective in all modes above
- : noremap: includes: inoremap,: nnoremap, etc., non recursive mapping
Corresponding name of key
| name | Corresponding key |
|---|---|
| <C-s> | Ctrl+s |
| <S-s> | Shift+s |
| <BS> | Backspace key |
| <Tab> | Tab key |
| < CR > or < ENTER > or < return > | enter |
| <Esc> | Escape |
| <Space> | Space bar |
| <Up> | Up arrow key |
| <Down> | Down arrow key |
| <Left> | Left direction key |
| <Right> | Right arrow key |
| <F1> - <F12> | Function keys F1 to F12 |
| #1, #2..#9,#0 | F1 to F10 |
| <Insert> | Insert |
| <Del> | Delete |
| <Home> | Home |
| <End> | End |
| <PageUp> | Page up |
| <PageDown> | Page down |
vim custom theme
Theme of the system
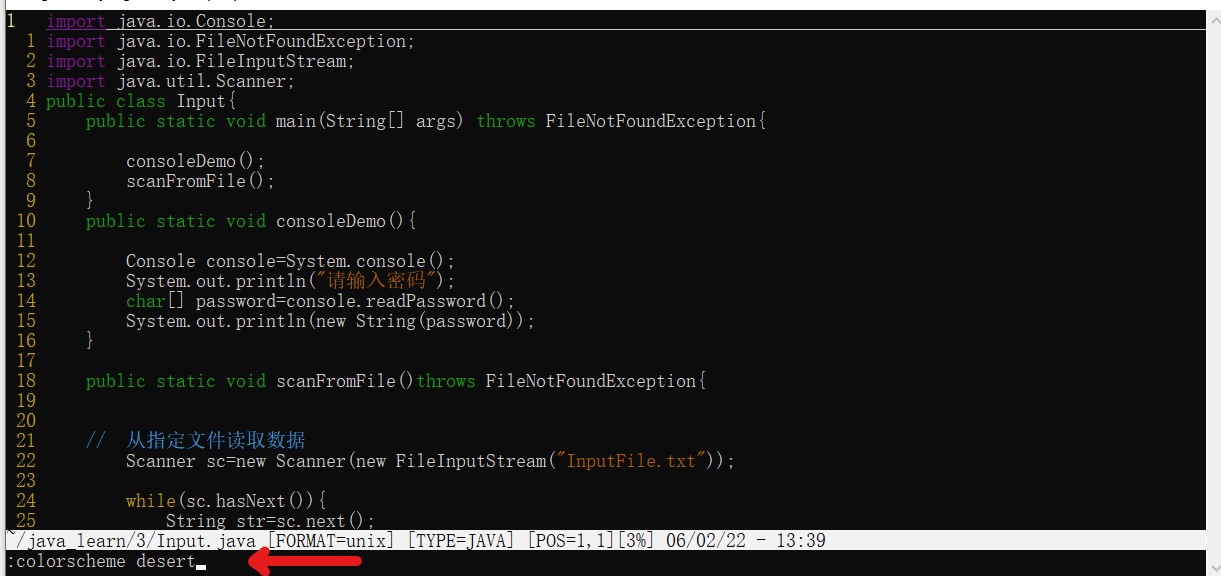
Enter vim and enter: colorscheme desert in normal mode to switch topics.
You can also stay here Add colorscheme desert to vimrc file, so you don't have to switch themes every time.
VIM has many built-in themes. In the / usr/share/vim/vim80/colors folder, vim80 is slightly different according to the version number

Under the colors folder vim ends with vim's built-in themes.
Import external theme
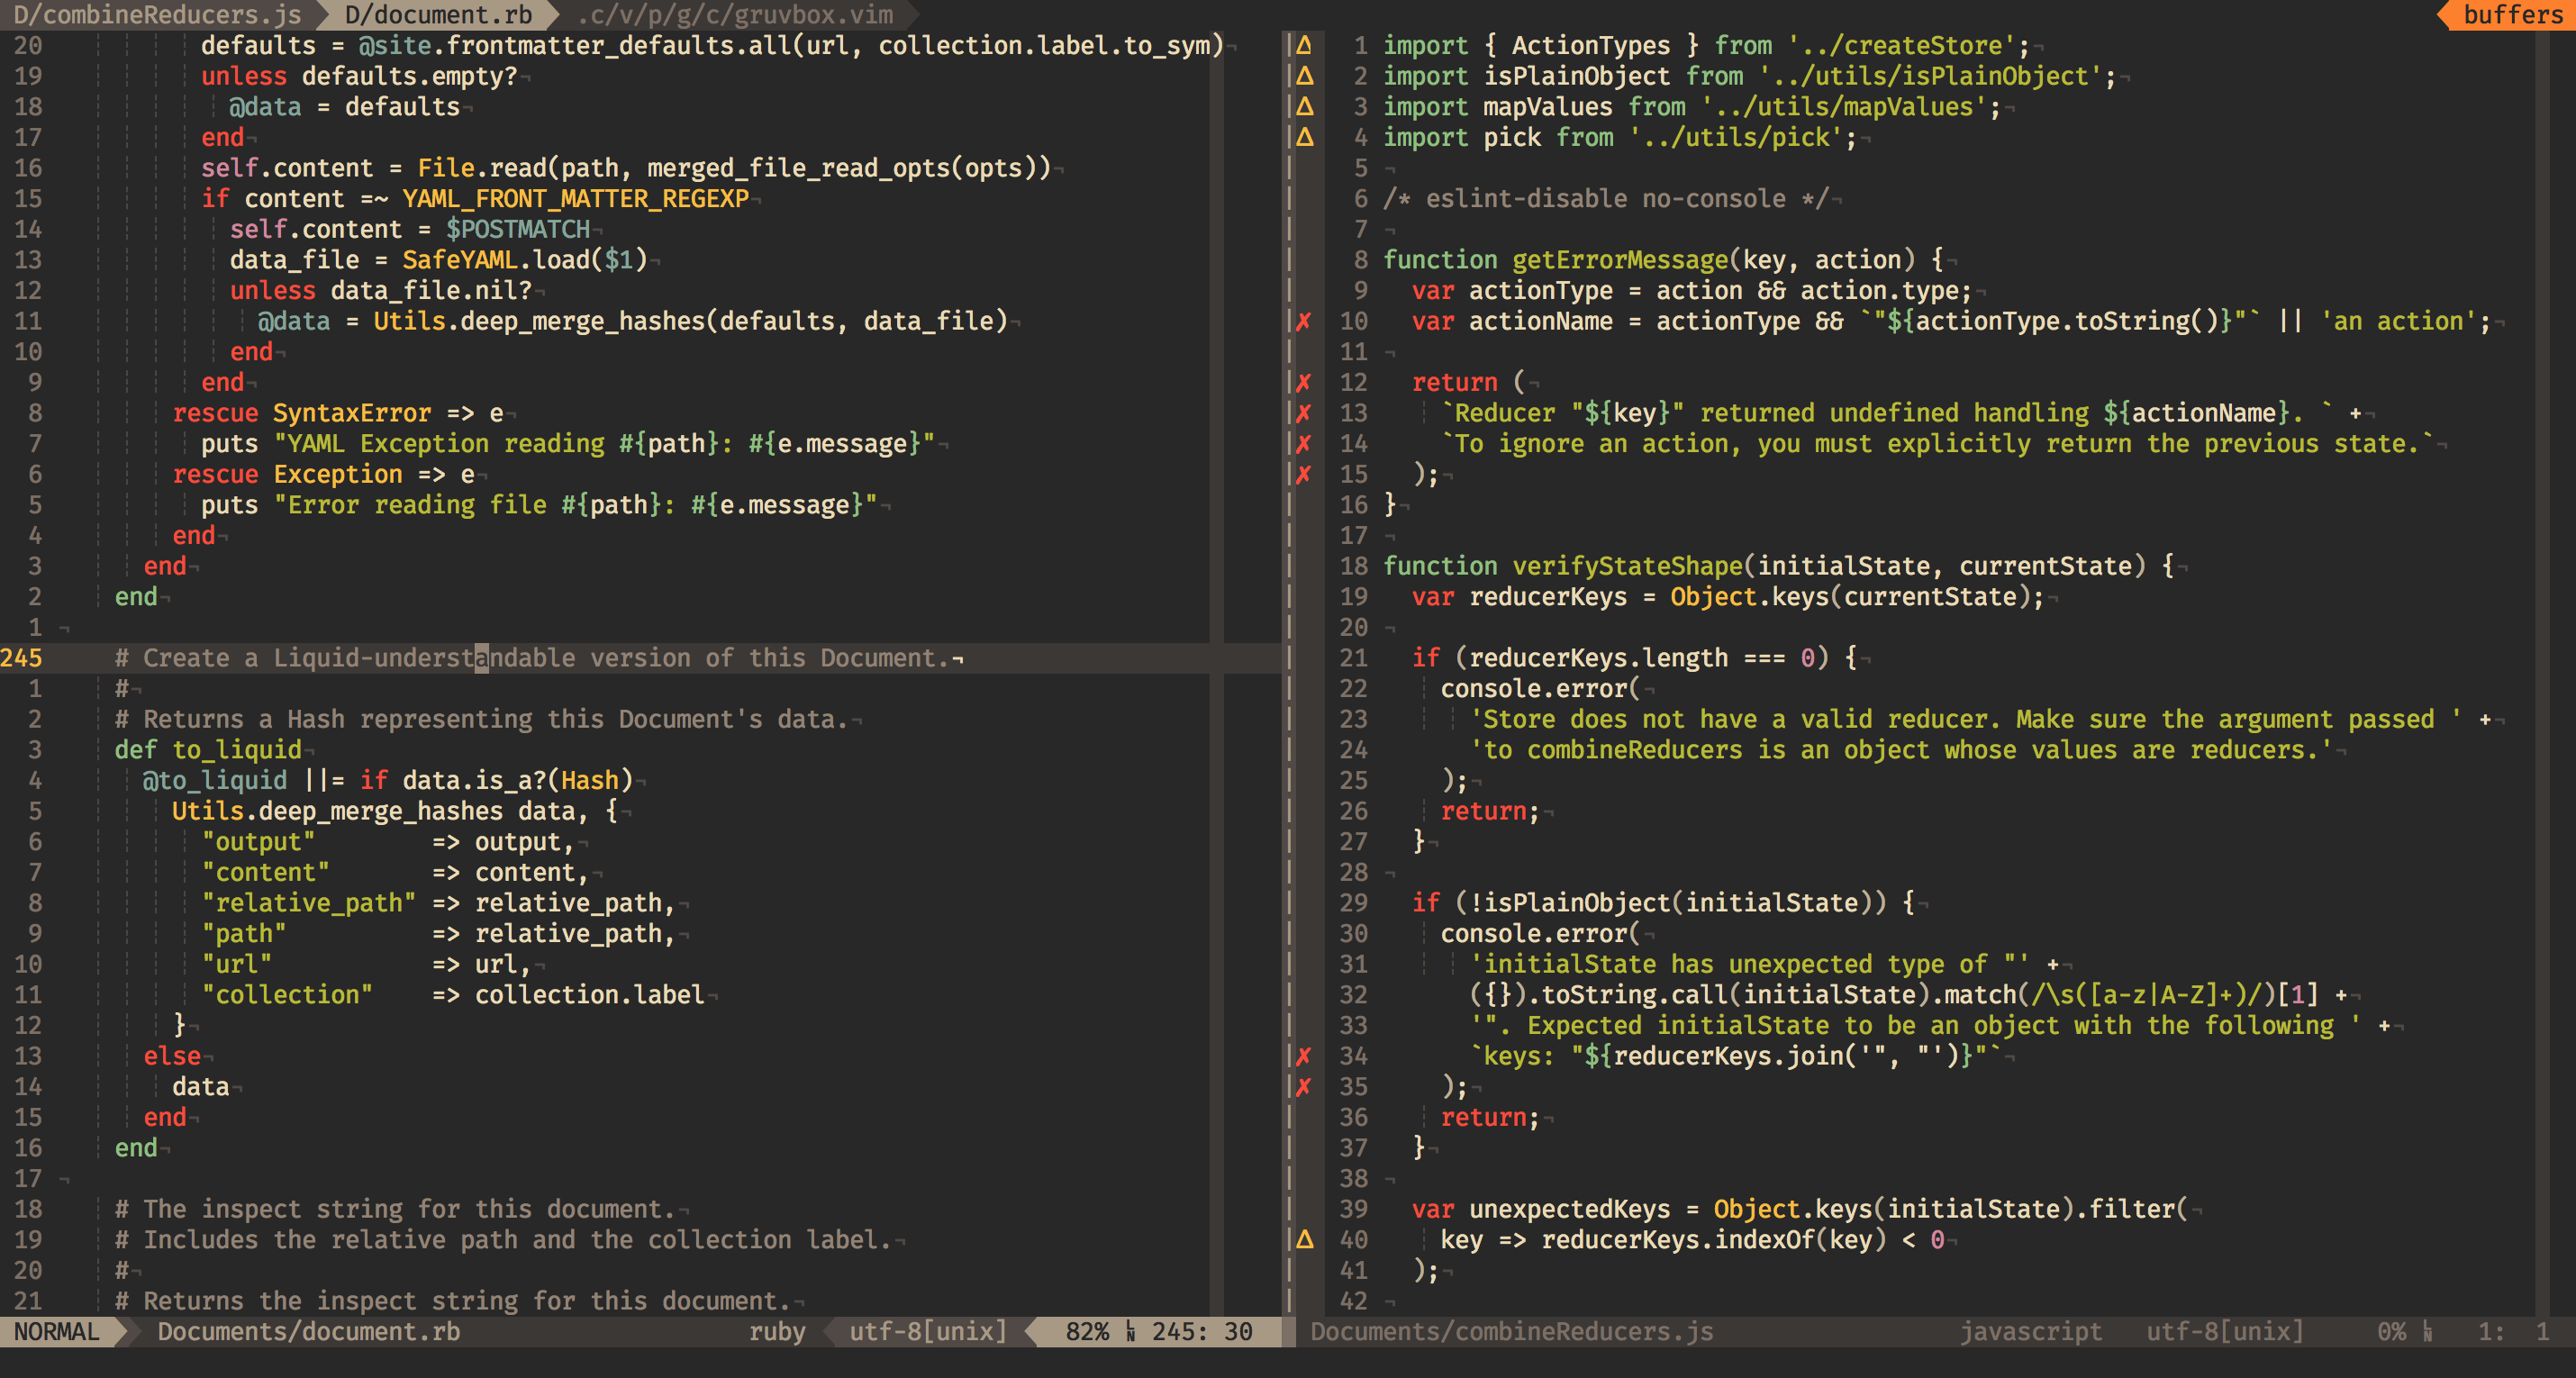
Take the gruvbox theme I'm using as an example to teach you how to operate it.
First switch the directory Cd ~ / If VIM / color does not have this directory, create MKDIR - P ~ / vim/color
Then execute the command git https://github.com/morhetz/gruvbox.git Download theme
Then execute CP gruvbox / colors / gruvbox vim ~/. vim/colors copy the downloaded theme file to ~ / vim/colors folder.
At ~ / Add colorscheme=gruvbox to the vimrc file, and you're done.
vim plug-in
VIM plug is a plug-in manager. We can easily manage our plug-ins through VIM plug.
Installing plug-ins using VIM plug
Install VIM plug so that it loads automatically at startup:
$ curl -fLo ~/.vim/autoload/plug.vim --create-dirs \
  https://raw.githubusercontent.com/junegunn/vim-plug/master/plug.vim
After executing the command, the plug Download the VIM file to ~ / vim/autoload / folder
Install the NERDTree plug-in through VIM plug-in
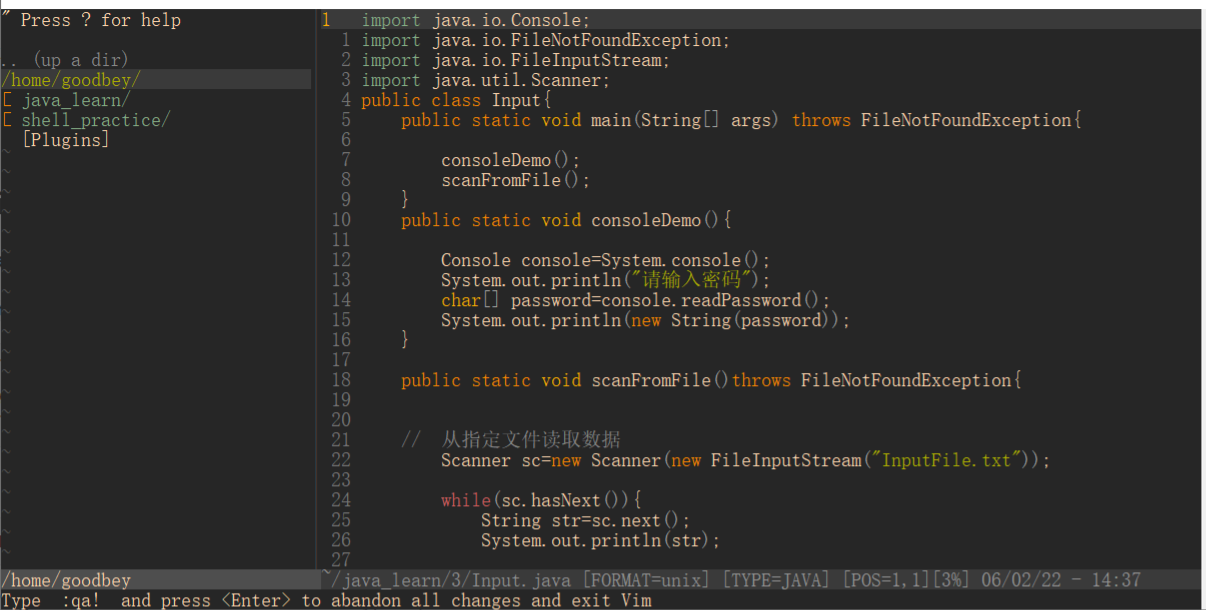
NERDTree is a file manager plug-in used to display tree directory in VIM interface. It can open files and browse directories in VIM operation interface.
At ~ / Add the following text to the vimrc file:
call plug#begin()
Plug 'preservim/NERDTree'
call plug#end()
Start Vim and type the following command:
:NERDTree
Cannot write, 'buftype' option is set
resolvent:
You can use the following name to view buftype settings. When buftype=nofile, you cannot save the file. You can save it only when buftype = empty
:verbose set buftype
How to modify buftype: switch vim to ex mode and enter: setlocal buftype=
Use of NERDTree
-
Enter: NERDTree to open the directory tree
-
Press "ctrl+w" several times, and the cursor will automatically switch between the left and right windows
-
As with editing a file, you can move the cursor to position it by h j k l
-
i and s can open files in horizontal or vertical split windows, preceded by g functions similar to go
-
t open in tab
-
T opens in the Background tab
-
p to the upper directory
-
P to root
-
K to the first node in the same directory
-
J to the last node in the same directory
-
m display the file system menu (add, delete, move operations)
-
? help
-
q off
You can easily open multiple files through NERDTree, and you can easily switch among multiple files by setting shortcut keys.
"Open file directory
 nmap <C-t> :NERDTree<CR>
 "Switch to the next tab
 nmap <C-k> :tabnext<CR>
 "Switch to previous tab
 nmap <C-j> :tabprevious<CR>
 "Close current tab
 nmap <C-x> :tabclose<CR>
 "New tab
 nmap <C-n> :tabnew