Logical volume related operations
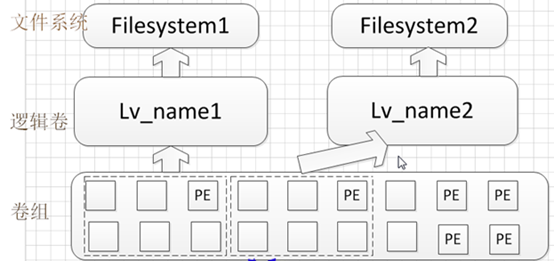
You can think of a logical volume as a component area, so of course, this logical volume also needs to be formatted and mounted. In addition, the logical volume can also be dynamically resized, and the data will not be lost, and there is no need to unmount the logical volume.
The commonly used commands are lvscan Lvcreate Lvdisplay lvextend lvreduce Lvremove Lvresize Lvchange
lvscan command
The lvscan command is used to scan all LVM logical volumes that exist in the current system. Using lvscan instruction, you can find all logical volumes in the system and their corresponding device files.
- grammar
lvscan [parameter]
- Parameters:
-b Displays the primary device of the logical volume and the device number
- Examples
use lvscan The command scans all logical volumes in the system
[root@zaishu ~]# lvscan
 Display device number:
[root@zaishu ~]# lvscan -b
lvcreate
Create a logical volume for LVM. Logical volumes are created on top of volume groups. The device file corresponding to the logical volume is saved in the volume group directory. For example, if a logical volume "lvol0" is created on the volume group "vg1000", the device file corresponding to this logical volume is "/ dev/vg1000/lvol0".
The logical volume is created on the volume group, and the device files corresponding to the logical volume are saved in the volume group directory;
For example, if a logical volume "lv_1" is created on the volume group "vg_1", the corresponding device file of this logical volume is "/ dev/vg_1/lv_1".
- grammar
lvcreate(option)(parameter)
- option
[root@zaishu ~]# lvcreate --help
lvcreate: Create a logical volume((create logical volume)
lvcreate
        [-A|--autobackup {y|n}]((automatic backup)
        [-a|--activate [a|e|l]{y|n}]
        [--addtag Tag]((add label)
        [--alloc AllocationPolicy](Allocation policy)
        [--cachemode CacheMode](Cache Mode)
        [-C|--contiguous {y|n}]
        [-d|--debug]
        [-h|-?|--help]
        [--ignoremonitoring](Ignore monitoring)
        [--monitor {y|n}]((monitoring)
        [-i|--stripes Stripes [-I|--stripesize StripeSize]]
        [-k|--setactivationskip {y|n}]
        [-K|--ignoreactivationskip]
        {-l|--extents LogicalExtentsNumber[%{VG|PVS|FREE}] |(Number of logical extensions)
         -L|--size LogicalVolumeSize[bBsSkKmMgGtTpPeE]}(Logical volume size)
        [-M|--persistent {y|n}] [--major major] [--minor minor]
        [-m|--mirrors Mirrors [--nosync] [{--mirrorlog {disk|core|mirrored}|--corelog}]](Mirror image)
        [-n|--name LogicalVolumeName](Logical volume name)
        [--noudevsync]
        [-p|--permission {r|rw}]
        [--[raid]minrecoveryrate Rate]
        [--[raid]maxrecoveryrate Rate]
        [-r|--readahead ReadAheadSectors|auto|none](Read header (sector)
        [-R|--regionsize MirrorLogRegionSize](Mirror logical area size)
        [-T|--thin  [-c|--chunksize  ChunkSize](Block size)
          [--discards {ignore|nopassdown|passdown}]
          [--poolmetadatasize MetadataSize[bBsSkKmMgG]]]
          [--poolmetadataspare {y|n}]
        [--thinpool ThinPoolLogicalVolume{Name|Path}] (Thin pool (logical volume)
        [-t|--test]
        [--type VolumeType](Volume type)
        [-v|--verbose]
        [-W|--wipesignatures {y|n}]
        [-Z|--zero {y|n}]
        [--version]
        VolumeGroupName [PhysicalVolumePath...]
- Examples
(1) Create an lv of the specified size and specify the name as lv_ two
lvcreate -L 2G -n lv_2 vg_1
(2) Create a lv that accounts for the size of all volume groups and specify the name lv_3 (note that the premise is that vg does not create lv)
lvcreate -l 100%VG -n lv_3 vg_1
(3) Create an lv with 80% free space and specify the name lv_ 4 (common)
lvcreate -l 80%Free -n lv_4 vg_1
(4) Use all remaining space
lvcreate -l 100%FREE -n yum_repo_lvm3 yum_repo_vg
Lvdisplay
Specifies the device file corresponding to the logical volume to display the properties
The lvdisplay instruction is used to display LVM logical volume space size, read-write status, snapshot information and other attributes.
Use the lvdisplay instruction to display the properties of the specified logical volume.
- Examples
[root@zaishu ~]# lvdisplay /dev/vg1000/lvol0 #Show logical volume properties
lvextend
The extend command is used to expand the space size of the logical volume online without interrupting the application's access to the logical volume. Use the lvextend command to dynamically expand disk space online. The whole space expansion process is completely transparent to applications.
- grammar
lvextend(option)(parameter)
- option
-L: Specifies the size of the logical volume in“ kKmMgGtT"Byte;
-l: Specifies the size of the logical volume( LE Number).
-
parameter
Logical volume: Specifies the logical volume to expand space. -
Examples
Use the lvextend command to add 100M space to the logical volume / dev/vg1000/lvol0.
[root@zaishu ~]# lvextend -L +100M /dev/vg1000/lvol0    #In order to solve the problem, add 100M space
Extending logical volume lvol0 to 300.00 MB
Logical volume lvol0 successfully resized
lvreduce
lvreduce instruction: shrink the space of logical volume. lvreduce instruction is used to reduce the space occupied by LVM logical volume.
- grammar
lvreduce [option] [parameter]
-
option
-L specifies the size of the logical volume in "kKmMgGtT" bytes
-l specifies the size of the logical volume (number of LE S)
Logical volume: Specifies the device file corresponding to the logical volume to be operated on -
Examples
Reduce the space size of the logical volume.
[root@zaishu ~]# lvreduce -L -50M /dev/vg1000/lvol0
#Reduce the space size of the logical volume by 50M
Lvremove
Lvremove instruction: deletes the logical volume. The lvremove instruction is used to delete the specified LVM logical volume.
- grammar
lvremove [option] [parameter]
-
option
-f: Force deletion -
be careful
If a logical volume has been loaded with the mount instruction, it cannot be deleted with the lvremove instruction. Before a logical volume can be deleted, it must be unmounted using the umount instruction. -
Examples
Deletes the specified logical volume.
[root@zaishu ~]# lvremove /dev/vg1000/lvol0 #Delete logical volume "lvol0"
Do you really want to remove active logical
volume "lvol0"? [y/n]: y    #confirm deletion
  Logical volume "lvol0" successfully removed
Lvresize
The lvresize command is used to adjust the space size of LVM logical volumes, which can increase and reduce space. Care should be taken when using the lvresize command to resize and shrink the logical volume space, as it may cause data loss.
- grammar
lvresize [parameter]
- parameter
-L specifies the size of the logical volume in "kKmMgGtT" bytes
-l specifies the size of the logical volume (number of LE S) - Examples
Increase logical volume space by 200M:
[root@zaishu ~]# lvresize -L +200M /dev/vg1000/lvol0
Lvchange
Use the lvchange command to change the properties of a logical volume.
- grammar
lvchange [option] [Logical volume path]
- option
-p<r|rw>	Change access to read-only( r)Or read/Write( rw)
-C<y|n>	An attempt was made to set or reset a continuous allocation policy for a logical volume
--monitor<y|n>	If dmeventd Installed, start or stop monitoring mirror or snapshot logical volumes
-M<y|n>	Set to y To make the secondary number permanent
-a<a|e|1|y|n>	Availability of logical volumes
--refresh	If the logical volume is activated, reload its metadata
--noudevsync	Disable udev synchronization
-r<ReadAheadSectors|auto|none>	Set the number of sectors of the read ahead logical volume, which can be set to ReadAheadSectors,auto,none
--minor<Secondary number>	Set secondary number
--resync	Force the mirror to be fully synchronized. This option is not required under normal circumstances because synchronization occurs automatically
--sysinit	Indicates that the script is initialized from an earlier system before a writable file system is available
- Examples
Set the logical volume status to unavailable.
lvchange –an /dev/VolGroup0/Vol01
Open logical volume
lvchange –ay /dev/VolGroup0/Vol01
Set the access rights of logical volume 1v1 to read-only
[root@zaishu ~]# lvchange -p r vg1/1v1
Set the access permission of logical volume 1v1 to read and write
[root@zaishu ~]# lvchange -p rw vg1/1v1