Abstract: as a NoSql database, redis provides an efficient caching scheme. This paper mainly explains its single example, master-slave mode, sentinel and cluster configuration mode, compares its advantages and disadvantages, and expounds the high availability of redis as a caching framework.
As an efficient caching framework, redis is widely used. In terms of data storage, it stores data in memory at runtime to achieve efficient data reading and writing. According to different customized persistence rules, it will persist data to hard disk irregularly.
In addition, compared with other NoSql databases, redis provides very rich data structures, such as dict, sds, linkedlist, ziplist, set, quicklist and geometry.
Based on these storage structures, redis provides users with a wealth of operation options, such as sorting certain types of data through zskiplist, which is a very time-consuming operation in the database.
Installation and use of Redis singleton
Compared with other caching frameworks, redis is very convenient to install. You only need to https://redis.io/download After downloading, unzip it, enter the redis directory and execute the following command to complete the installation:
make install
It should be noted here that make is a command in gcc. Please ensure that gcc is installed on the machine before installation. All commands in redis are under the src subdirectory of the redis installation directory, among which the more important ones are redis server, redis sentinel and redis cli.
After compilation, it is executed in the src directory/ Redis server starts redis (the window can be closed after startup), then opens a new window and executes it in the command line/ Redis cli can connect to the started redis service. Execute the following command to see that the compilation and installation succeeded:
127.0.0.1:6379> set hello world
127.0.0.1:6379> OK
127.0.0.1:6379> get hello
127.0.0.1:6379> "world"
It should be noted here that when redis is started in the above way, the ip used is 127.0.0.1 and the port is 6379. The other configurations are the default configuration. The relevant configurations can be found in redis.com under the redis installation directory Conf file. If you need to start according to the specified configuration file, you can add the name of the configuration file after redis server, such as:
./src/redis-server redis.conf
In addition, when using redis cli to connect the redis client, if there are no parameters, the default ip and port of the connection is 127.0.0.1:6379. If you need to connect the client with the specified ip and port, you can use the following methods:
./src/redis-cli -h 127.0.0.1 -p 6379
Here, the - h parameter represents the connected ip and - p represents the connected port.
After redis is configured, we can execute relevant commands in redis to operate data. For the common commands of redis, please check my blog "complete collection of common commands of redis", which has a more detailed explanation.
Redis master-slave mode configuration
Redis singleton provides a data caching method and rich data operation APIs, but there are two main problems in completely storing data in a single redis: data backup and performance degradation caused by large data volume.
Here, the master-slave mode of redis provides a better solution to these two problems. The master-slave mode refers to using one redis instance as the host and the other instances as the backup machine.
The data of the host and the slave are completely consistent. The host supports various operations such as data writing and reading, while the slave only supports data synchronization and reading with the host. In other words, the client can write data to the host, and the host automatically synchronizes the data writing operation to the slave.
The master-slave mode solves the problem of data backup, and because the master-slave service data is almost the same, the command to write data can be sent to the host for execution, and the command to read data can be sent to different slaves for execution, so as to achieve the purpose of separation of reading and writing.
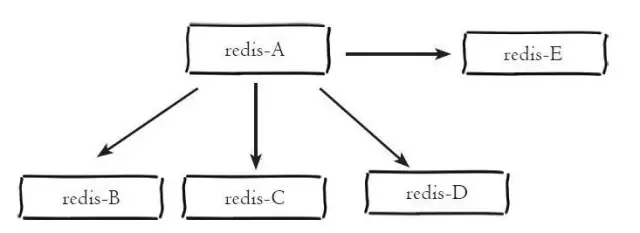
As shown below, the host redis-A has four Slaves: redis-B, redis-C, redis-D and redis-E
In point 1 above, we have introduced the configuration method of redis single instance, and we also introduced that the master-slave mode is actually composed of multiple redis instances. Therefore, the configuration of redis master-slave mode can be understood as that multiple different redis instances inform their master-slave relationship through certain configuration.
As mentioned earlier, each redis instance will occupy a local port number. There are two main configuration points for the configuration of master-slave mode: the port number of the current instance and whether the current instance is a host or a slave. If it is a slave, what is the ip and port of the host.
Redis. In the general redis directory Conf saves the default configuration. Try not to modify it. Here we copy three copies of redis Conf files, named 6379 conf,6380.conf and 6381 Conf, the following is the main configuration of the host with port 6379:
bind 127.0.0.1

port 6379

logfile "6379.log"

dbfilename "dump-6379.rdb"
The following is the configuration of the slave with ports 6380 and 6381:
bind 127.0.0.1

port 6380

logfile "6380.log"

dbfilename "dump-6380.rdb"

slaveof 127.0.0.1 6379
bind 127.0.0.1

port 6381

logfile "6381.log"

dbfilename "dump-6381.rdb"

slaveof 127.0.0.1 6379
It can be seen that instances with ports 6380 and 6381 are configured as slaves of instances with port 6379. After configuration, use redis server to execute the following commands to start three instances:
./src/redis-server 6379.conf

./src/redis-server 6380.conf

./src/redis-server 6381.conf
After startup, open three command-line tools to connect redis instances by executing the following commands:
./src/redis-cli -p 6379

./src/redis-cli -p 6380

./src/redis-cli -p 6381
Execute a get command in the three command-line tools to obtain the data with the key name msg, as shown below:
127.0.0.1:6379> get msg

(nil)
127.0.0.1:6380> get msg

(nil)
127.0.0.1:6381> get msg

(nil)
It can be seen that there is no data with msg key in the three redis instances. Now we set a data with msg key on the host 6379, as shown below:
127.0.0.1:6379> set msg "hello"

OK
You can see that the setting is successful. At this time, we execute the get msg command on the instances of 6380 and 6381, as shown below:
127.0.0.1:6380> get msg

"hello"
127.0.0.1:6381> get msg

"hello"
It can be seen that although we only set msg data on 6379 instances, there are also corresponding data on 6380 and 6381 instances, indicating that we have successfully configured the master-slave mode of redis.
In addition, if the relationship between master and slave nodes is not specified in the configuration file, you can also use the slaveof command to specify that the current node is called the slave node of a node after starting the relevant redis instance, such as:
127.0.0.1:6380> slaveof 127.0.0.1 6379
sentinel configuration in Redis
redis master-slave mode solves the possible performance problems of data backup and single instance, but it also introduces new problems.
Three redis instances are configured in the master-slave mode, and each instance uses a different ip (if on a different machine) and port number.
According to the above, in the master-slave mode, read and write operations can be allocated to different instances to improve the system throughput. However, this method also causes inconvenience in use, because each client specifies the ip and port number when connecting to the redis instance. If the connected redis instance goes offline due to failure, The master-slave mode also does not provide a certain means to inform the client of the address of other clients that can be connected, so it is necessary to manually change the client configuration and reconnect.
In addition, in the master-slave mode, if the master node goes offline due to failure, the slave node is interrupted synchronously because there is no master node, so manual failover is required.
In order to solve these two problems, redis officially provided sentinel architecture after version 2.8. For sentinel, several concepts need to be explained here:
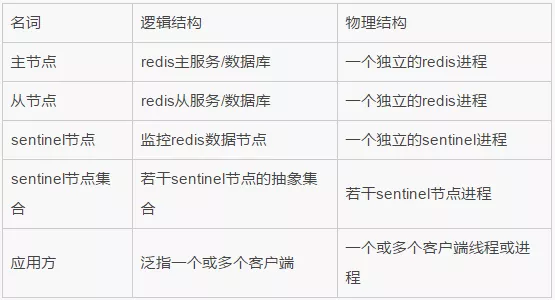
Each sentinel node is actually a redis instance. Different from the master-slave node, the sentinel node is used to monitor redis data nodes, while the sentinel node set refers to a set of sentinel monitoring nodes that monitor a group of master-slave redis instances, such as master node and slave nodes slave-1 and slave-2.
In order to monitor the three master-slave nodes, n sentinel nodes sentinel-1, sentinel-2, sentinel-N.
The following figure is an example of sentinel monitoring master-slave nodes:

It can be seen from the figure that for a group of master-slave nodes, sentinel is only an additional group of redis instances for monitoring.
After the master-slave node and sentinel node set are configured, sentinel nodes will send messages to each other to detect whether other sentinel nodes work normally, and sentinel nodes will also send messages to master-slave nodes to detect whether the monitored master-slave nodes work normally.
As mentioned earlier, the main function of sentinel architecture is to solve the failover of master nodes in master-slave mode.
Here, if the primary node goes offline due to a fault, when a sentinel node sends a detection message to the primary node;
1. If no reply is received within the specified time, the sentinel will subjectively judge that the master node has been offline, and it will send a message to the other sentinel nodes to ask whether it "thinks" that the master node has been offline. After receiving the message, the other sentinel will also send a detection message to the master node;
2. If it thinks that the master node has been offline, it will reply to the sentinel node asking it and inform it that it also thinks that the master node has been offline. When the sentinel node first receives more than the specified number (the number configured in the configuration file and half of the current sentinel node set, the larger of the two numbers here), it will reply that the current master node has been offline, Then it will fail over the primary node.
The basic idea of failover is to select a slave node from the slave nodes and send it slaveof no one (assuming that the selected slave node is 127.0.0.1:6380) to make it called an independent node (that is, the new master node), and then sentinel sends the slaveof 127.0.0.1 6380 command to the other slave nodes to make them become the slave nodes of the new master node again.
3. After reallocation, the sentinel node set will continue to monitor the offline master node (assuming 127.0.0.1:6379). If it goes online again, sentinel will send a slaveof command to make it a slave node of the new host point, and the failover is completed.
As we mentioned above, each sentinel node is essentially a redis instance, but different from the redis data node, its main function is to monitor the redis data node.
In the redis installation directory, there is a default sentinel configuration file sentinel Conf, which is similar to configuring the master-slave node. Here, copy three configuration files: sentinel-26379 conf,sentinel-26380.conf and sentinel-26381 conf. Edit these three profiles as follows:
port 26379

daemonize yes

logfile "26379.log"

dir /opt/soft/redis/data

sentinel monitor mymaster 127.0.0.1 6379 2

sentinel down-after-milliseconds mymaster 30000

sentinel parallel-syncs mymaster 1

sentinel failover-timeout mymaster 180000

sentinel myid mm55d2d712b1f3f312b637f9b546f00cdcedc787
For sentinel with ports 26380 and 26381, the configuration is similar to the above. You only need to modify the corresponding port number to the corresponding port number.
Here are two points to note:
① The myid parameter of each sentinel should also be modified, because sentinel nodes are uniquely distinguished from other sentinel nodes through this attribute;
② In the parameter sentinel monitor mymaster 127.0.0.1 6379 2, the port number 6379 here does not need to be changed, because sentinel knows the slave nodes of the current master node by detecting the state of the master node, so it can set the port number of the master node.
After the configuration is completed, we first start the three master-slave nodes, and then use the three configuration files to enable sentinel with the following command:
./src/redis-sentinel sentinel-26379.conf

./src/redis-sentinel sentinel-26380.conf

./src/redis-sentinel sentinel-26381.conf
Since the sentinel node is also a redis instance, we can use the following command to connect the sentinel node with redis cli:
./src/redis-cli -p 26379
After connecting the sentinel node, we can view the sentinel status through the following command:
127.0.0.1:26379> info sentinel
The results are as follows:
# Sentinel

sentinel_masters:1

sentinel_tilt:0

sentinel_running_scripts:0

sentinel_scripts_queue_length:0

sentinel_simulate_failure_flags:0

master0:name=mymaster,status=ok,address=127.0.0.1:6379,slaves=2,sentinels=3
As you can see, sentinel has detected that there are three master-slave nodes in total, including one master node and two slave nodes, and there are also three sentinel nodes in total.
After startup, we can actively offline the master node to simulate the sentinel failover process. First, connect the master node with port 6379 and use the following command to view the status of the master and slave nodes:
127.0.0.1:6379> info replication
The results are as follows:
# Replication

role:master

connected_slaves:2

slave0:ip=127.0.0.1,port=6380,state=online,offset=45616,lag=1

slave1:ip=127.0.0.1,port=6381,state=online,offset=45616,lag=1

master_repl_offset:45616

repl_backlog_active:1

repl_backlog_size:1048576

repl_backlog_first_byte_offset:2

repl_backlog_histlen:45615
It can be seen that the current master node has two slave nodes, with ports 6380 and 6381 respectively. Then we execute the following commands on the master node:
127.0.0.1:6379> shutdown save
Then we connect the slave node with port number 6380 and execute the following command:
127.0.0.1:6380> info replication
The results are as follows:
# Replication

role:master

connected_slaves:1

slave0:ip=127.0.0.1,port=6381,state=online,offset=12344,lag=0

master_repl_offset:12477

repl_backlog_active:1

repl_backlog_size:1048576

repl_backlog_first_byte_offset:2

repl_backlog_histlen:12476
It can be seen that after the instance with port 6379 goes offline, the instance with port 6380 is re elected as a new master node, and the instance with port 6381 is set as the slave node of the instance with port 6380.
If we re enable the node with port 6379 and then check the master-slave status, the results are as follows:
# Replication

role:master

connected_slaves:2

slave0:ip=127.0.0.1,port=6381,state=online,offset=59918,lag=0

slave1:ip=127.0.0.1,port=6379,state=online,offset=59918,lag=1

master_repl_offset:60051

repl_backlog_active:1

repl_backlog_size:1048576

repl_backlog_first_byte_offset:2

repl_backlog_histlen:60050
It can be seen that after the redis instance with port 6379 reconnects, the sentinel node detects its reconnection, so it sends a command to make it become the slave node of the new master node.
Redis cluster configuration
Redis Cluster is a function launched in redis version 3.0, which effectively solves the distributed requirements of redis. When encountering problems such as single machine memory, concurrency and traffic bottleneck, Cluster scheme can be adopted to achieve the purpose of load balancing.
On the other hand, sentinel in redis effectively solves the problem of failover, and also solves the problem that the offline client of the master node cannot identify the new available node. However, if the slave node is offline, sentinel will not failover it, and the client connecting the slave node cannot obtain the new available slave node, These problems have been effectively solved in Cluster.
The data in the redis cluster is linked to slots. A total of 16384 slots are defined. All data will be mapped to one of these 16384 slots according to the consistent hash algorithm.
On the other hand, these 16384 slots are allocated to different redis nodes according to settings. For example, three redis instances are started: cluster-A, cluster-B and cluster-C. here, slots 0-5460 are allocated to cluster-A and slots 5461-10922 are allocated to cluster-B, Allocate slots 10923-16383 to cluster-C (there are 16384 slots in total, but their labels are similar to array subscripts, from 0 to 16383).
In other words, the storage of data is only related to slots, and the number of slots is certain. Since the consistent hash algorithm is certain, the 16384 slots will be allocated to no matter how many redis instances, and the confirmed data will be allocated to the determined slots. Redis cluster achieves the purpose of high efficiency and high availability of redis in this way.
One thing that needs to be explained here is that the consistent hash algorithm calculates the mapping location according to the key value of the data, which has a great relationship with the number of nodes used.
The implementation idea of consistent hash partition is to assign a token to each node in the system, generally ranging from 0 to 2 ^ 32. These tokens form a hash ring. When reading and writing data and performing node search operation, first calculate the hash value according to the key, and then find the first token node greater than or equal to the hash value clockwise, and the data to be operated is saved on the node.
Through analysis, it can be found that the consistent hash partition has the following problems:
-
Adding and subtracting nodes will cause some data in the hash ring to be unable to hit, which needs to be processed manually or ignored;
-
When a small number of nodes are used, the node changes will affect the data mapping in the ring in a wide range, so this method is not suitable for the distributed scheme with a small number of nodes;
-
Common consistent hash partitions need to double or subtract half of the nodes when increasing or decreasing nodes to ensure the balance of data and load.
It is precisely because of these problems of consistent hash partition that redis uses virtual slots to deal with the problem of node change during partition, that is, all data is mapped to 16384 virtual slots. When redis nodes change, the slot of data mapping will not change, and this is also the basis for redis to expand nodes.
For the configuration of redis cluster, first install redis in the redis installation directory The conf file is copied in six copies, named cluster-6379 conf,cluster-6380.conf,cluster-6381.conf,cluster-6382.conf,cluster-6383.conf,cluster-6384.conf.
For a highly available cluster scheme, each node of the cluster will be assigned a slave node to prevent the data node from going offline due to failure. Here, six configuration files are used to define six redis instances, three of which are the master nodes and the remaining three are their slave nodes. For one of the six configuration files, the following parameters need to be modified:
port 6379

cluster-enabled yes

cluster-node-timeout 15000

cluster-config-file "nodes-6379.conf"

pidfile /var/run/redis_6379.pid

logfile "cluster-6379.log"

dbfilename dump-cluster-6379.rdb

appendfilename "appendonly-cluster-6379.aof"
For other configuration files, you only need to modify the port number and file name with port number of the corresponding item to the port number and file name of the port number to be specified.
After the configuration file is configured, use the following command to start each instance in the cluster:
./src/redis-server cluster-6379.conf

./src/redis-server cluster-6380.conf

./src/redis-server cluster-6381.conf

./src/redis-server cluster-6382.conf

./src/redis-server cluster-6383.conf

./src/redis-server cluster-6384.conf
After carefully reading the above configuration file, it can be found that the master-slave relationship of these six instances is not specified in the current configuration and startup process, and 16384 slots are not allocated.
Therefore, we need to make further configuration. There are two ways to allocate slots and set the master-slave relationship. One is to use redis cli to connect to the cluster node and then use the cluster meet command to connect to other nodes. For example, we first execute the following command to connect to the node on port 6379:
./src/redis-cli -p 6379
After connecting, use the cluster meet command to connect other nodes respectively:
127.0.0.1:6379>cluster meet 127.0.0.1 6380

127.0.0.1:6379>cluster meet 127.0.0.1 6381

127.0.0.1:6379>cluster meet 127.0.0.1 6382

127.0.0.1:6379>cluster meet 127.0.0.1 6383

127.0.0.1:6379>cluster meet 127.0.0.1 6384
After connecting, you can use the cluster nodes command to view the current cluster status:
127.0.0.1:6379> cluster nodes

4fa7eac4080f0b667ffeab9b87841da49b84a6e4 127.0.0.1:6384 master - 0 1468073975551 5 connected

cfb28ef1deee4e0fa78da86abe5d24566744411e 127.0.0.1:6379 myself,master - 0 0 0 connected

be9485a6a729fc98c5151374bc30277e89a461d8 127.0.0.1:6383 master - 0 1468073978579 4 connected

40622f9e7adc8ebd77fca0de9edfe691cb8a74fb 127.0.0.1:6382 master - 0 1468073980598 3 connected

8e41673d59c9568aa9d29fb174ce733345b3e8f1 127.0.0.1:6380 master - 0 1468073974541 1 connected

40b8d09d44294d2e23c7c768efc8fcd153446746 127.0.0.1:6381 master - 0 1468073979589 2 connected
It can be seen that the six configured nodes have joined the cluster, but they cannot be used now because 16384 slots have not been allocated to the cluster nodes. Redis cli can be used to allocate virtual slots to nodes on ports 63796380 and 6381 respectively, and then execute the following commands:
127.0.0.1:6379>cluster addslots {0...5461}

127.0.0.1:6380>cluster addslots {5462...10922}

127.0.0.1:6381>cluster addslots {10923...16383}
After adding slots, you can use the cluster info command to view the current cluster status:
127.0.0.1:6379> cluster info

cluster_state:ok

cluster_slots_assigned:16384

cluster_slots_ok:16384

cluster_slots_pfail:0

cluster_slots_fail:0

cluster_known_nodes:6

cluster_size:3

cluster_current_epoch:5

cluster_my_epoch:0

cluster_stats_messages_sent:4874

cluster_stats_messages_received:4726
Here, we allocate 16384 virtual slots to three nodes, and the remaining three nodes are configured as the slave nodes of these three nodes through the following commands to achieve the purpose of high availability:
127.0.0.1:6382>cluster replicate cfb28ef1deee4e0fa78da86abe5d24566744411e

OK

127.0.0.1:6383>cluster replicate 8e41673d59c9568aa9d29fb174ce733345b3e8f1

OK

127.0.0.1:6384>cluster replicate 40b8d09d44294d2e23c7c768efc8fcd153446746

OK
In this way, all cluster nodes are configured and available. Here, you can use the cluster nodes command to view the status of the current node:
127.0.0.1:6379> cluster nodes

4fa7eac4080f0b667ffeab9b87841da49b84a6e4 127.0.0.1:6384 slave 40b8d09d44294d2e23c7c768efc8fcd153446746 0 1468076865939 5 connected

cfb28ef1deee4e0fa78da86abe5d24566744411e 127.0.0.1:6379 myself,master - 0 0 0 connected 0-5461

be9485a6a729fc98c5151374bc30277e89a461d8 127.0.0.1:6383 slave 8e41673d59c9568aa9d29fb174ce733345b3e8f1 0 1468076868966 4 connected

40622f9e7adc8ebd77fca0de9edfe691cb8a74fb 127.0.0.1:6382 slave cfb28ef1deee4e0fa78da86abe5d24566744411e 0 1468076869976 3 connected

8e41673d59c9568aa9d29fb174ce733345b3e8f1 127.0.0.1:6380 master - 0 1468076870987 1 connected 5462-10922

40b8d09d44294d2e23c7c768efc8fcd153446746 127.0.0.1:6381 master - 0 1468076867957 2 connected 10923-16383
We use redis cli to connect to the cluster with the following command:
./src/redis-cli -c -p 6380
Note that when connecting redis instances in cluster mode, you need to add the parameter - c to indicate that the connected instances are in cluster mode. Execute the get command after connecting:
127.0.0.1:6380> get hello-> Redirected to slot [866] located at 127.0.0.1:6379(nil)
It can be seen that when executing the get command on the instance of port 6380, it first calculates the slot of the current key through the consistent hash algorithm, and determines that the slot is not in the current redis instance, so it redirects to the target instance to execute the command. Finally, it is found that there is no value corresponding to the key, so a (nil) is returned.