First, let's look at the main configuration class of SpringBoot:
@SpringBootApplication
public class StartEurekaApplication
{
    public static void main(String[] args)
    {
        SpringApplication.run(StartEurekaApplication.class, args);
    }
}
Click @ SpringBootApplication to see that @ SpringBootApplication is a composite annotation.
@Target(ElementType.TYPE)
@Retention(RetentionPolicy.RUNTIME)
@Documented
@Inherited
@SpringBootConfiguration
@EnableAutoConfiguration
@ComponentScan(excludeFilters = {
      @Filter(type = FilterType.CUSTOM, classes = TypeExcludeFilter.class),
      @Filter(type = FilterType.CUSTOM, classes = AutoConfigurationExcludeFilter.class) })
public @interface SpringBootApplication {

}
First, let's look at @ SpringBootConfiguration:
@Target({ElementType.TYPE})
@Retention(RetentionPolicy.RUNTIME)
@Documented
@Configuration
public @interface SpringBootConfiguration {
}
You can see that this annotation has only one @ Configuration except meta annotation, that is to say, this annotation is equivalent to @ Configuration, so the functions of these two annotations are the same. It allows us to register some additional beans and import some additional configurations.
Another function of @ Configuration is to turn this class into a Configuration class without additional XML for Configuration. So @ SpringBootConfiguration is equivalent to @ Configuration. Enter @ Configuration and find that the core of @ Configuration is @ Component, which indicates that the Configuration class of Spring is also a Component of Spring.
@Target({ElementType.TYPE})
@Retention(RetentionPolicy.RUNTIME)
@Documented
@Component
public @interface Configuration {
    @AliasFor(
        annotation = Component.class
    )
    String value() default "";
}
Continue to the next @ EnableAutoConfiguration. This annotation is to enable the function of automatic configuration.
@Target({ElementType.TYPE})
@Retention(RetentionPolicy.RUNTIME)
@Documented
@Inherited
@AutoConfigurationPackage
@Import({AutoConfigurationImportSelector.class})
public @interface EnableAutoConfiguration {
    String ENABLED_OVERRIDE_PROPERTY = "spring.boot.enableautoconfiguration";

    Class<?>[] exclude() default {};

    String[] excludeName() default {};
}
We can see that it is composed of @ AutoConfigurationPackage and @ Import(EnableAutoConfigurationImportSelector.class). Let's first say @ AutoConfigurationPackage, which means that the classes in the package and sub packages can be automatically scanned into the spring container.
@Target({ElementType.TYPE})
@Retention(RetentionPolicy.RUNTIME)
@Documented
@Inherited
@Import({Registrar.class})
public @interface AutoConfigurationPackage {
}
Use @ Import to Import a component into the Spring container. Here, the imported component is Registrar class. Take a look at this Registrar:
static class Registrar implements ImportBeanDefinitionRegistrar, DeterminableImports {
        Registrar() {
        }

        public void registerBeanDefinitions(AnnotationMetadata metadata, BeanDefinitionRegistry registry) {
            AutoConfigurationPackages.register(registry, (new AutoConfigurationPackages.PackageImport(metadata)).getPackageName());
        }

        public Set<Object> determineImports(AnnotationMetadata metadata) {
            return Collections.singleton(new AutoConfigurationPackages.PackageImport(metadata));
        }
    }
The above method is used to obtain the scanned package path. You can debug to view the specific value:
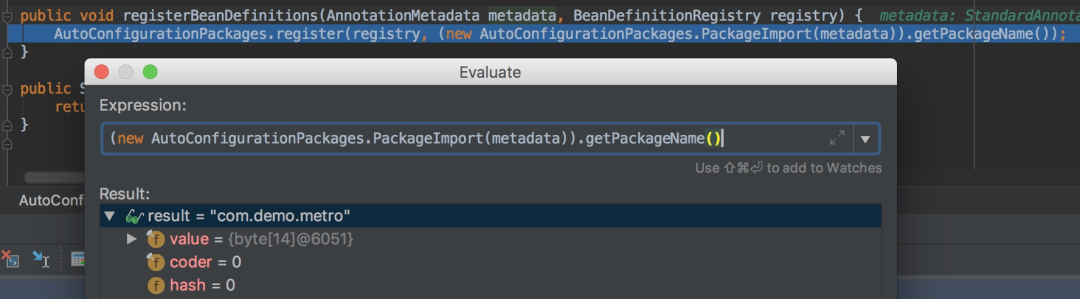
What is metadata? You can see that it is demospapplication marked on the @ SpringBootApplication annotation, that is, our main configuration class Application:
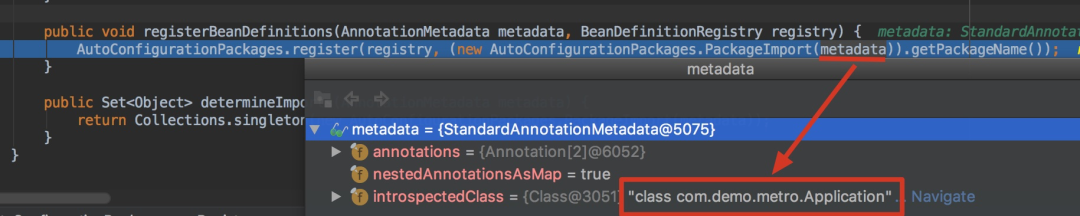
In fact, it is to scan and load all components in the package and sub package of the main configuration class (that is, the class marked by @ SpringBootApplication) into the Spring container. Therefore, we should put DemoApplication in the top level of the project (the outermost directory).
Look at the annotation @ Import(AutoConfigurationImportSelector.class). The @ Import annotation is to Import some components into the Spring container. Here, a component selector is passed in: AutoConfigurationImportSelector.
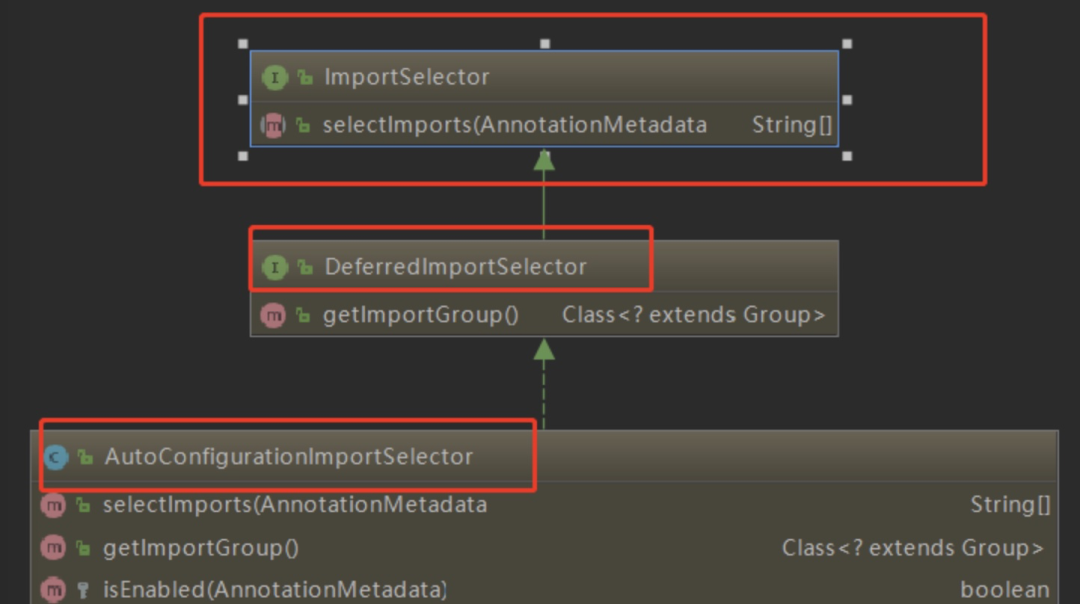
As can be seen from the figure, AutoConfigurationImportSelector inherits DeferredImportSelector and ImportSelector. ImportSelector has a method: selectImports. Return all components that need to be imported as full class names, and these components will be added to the container.
public String[] selectImports(AnnotationMetadata annotationMetadata) {
    if (!this.isEnabled(annotationMetadata)) {
        return NO_IMPORTS;
    } else {
        AutoConfigurationMetadata autoConfigurationMetadata = AutoConfigurationMetadataLoader.loadMetadata(this.beanClassLoader);
        AutoConfigurationImportSelector.AutoConfigurationEntry autoConfigurationEntry =
        this.getAutoConfigurationEntry(autoConfigurationMetadata, annotationMetadata);
        return StringUtils.toStringArray(autoConfigurationEntry.getConfigurations());
    }
}
Many automatic configuration classes (xxxAutoConfiguration) will be imported into the container; It is to import all the components needed for this scenario into the container and configure them.
With the automatic configuration class, it eliminates the work of manually writing configuration injection function components. How to get these configuration classes? Take a look at the following method:
protected AutoConfigurationImportSelector.AutoConfigurationEntry
  getAutoConfigurationEntry(AutoConfigurationMetadata autoConfigurationMetadata, AnnotationMetadata annotationMetadata) {
    if (!this.isEnabled(annotationMetadata)) {
        return EMPTY_ENTRY;
    } else {
        AnnotationAttributes attributes = this.getAttributes(annotationMetadata);
        List<String> configurations = this.getCandidateConfigurations(annotationMetadata, attributes);
        configurations = this.removeDuplicates(configurations);
        Set<String> exclusions = this.getExclusions(annotationMetadata, attributes);
        this.checkExcludedClasses(configurations, exclusions);
        configurations.removeAll(exclusions);
        configurations = this.filter(configurations, autoConfigurationMetadata);
        this.fireAutoConfigurationImportEvents(configurations, exclusions);
        return new AutoConfigurationImportSelector.AutoConfigurationEntry(configurations, exclusions);
    }
}
We can see the getCandidateConfigurations() method. Its function is to introduce some classes that have been loaded by the system. Which classes are they
protected List<String> getCandidateConfigurations(AnnotationMetadata metadata, AnnotationAttributes attributes) {
    List<String> configurations = SpringFactoriesLoader.loadFactoryNames(this.getSpringFactoriesLoaderFactoryClass(), this.getBeanClassLoader());
    Assert.notEmpty(configurations,
    "No auto configuration classes found in META-INF/spring.factories. If you are using a custom packaging, make sure that file is correct.");
    return configurations;
}
public static List<String> loadFactoryNames(Class<?> factoryClass, @Nullable ClassLoader classLoader) {
String factoryClassName = factoryClass.getName();
return (List)loadSpringFactories(classLoader).getOrDefault(factoryClassName, Collections.emptyList());
}
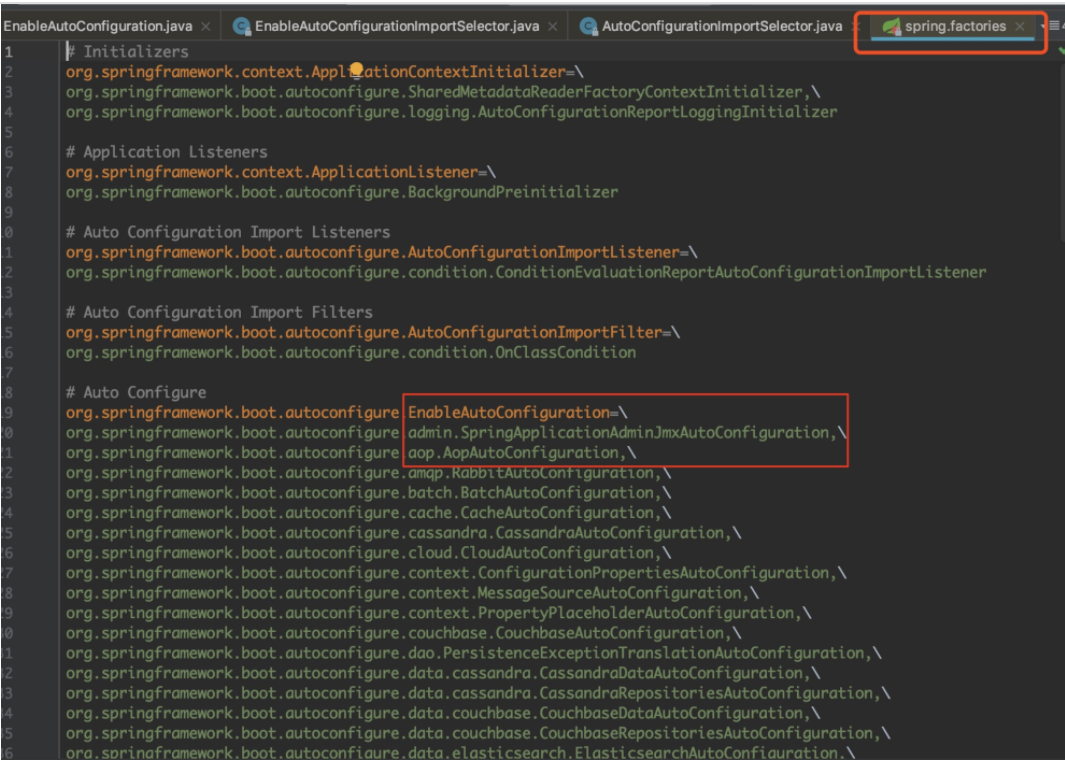
From meta-inf / spring Obtain resources from factories, and then load resources through Properties:
private static Map<String, List<String>> loadSpringFactories(@Nullable ClassLoader classLoader) {
    MultiValueMap<String, String> result = (MultiValueMap)cache.get(classLoader);
    if (result != null) {
        return result;
    } else {
        try {
            Enumeration<URL> urls = classLoader !=
          null ? classLoader.getResources("META-INF/spring.factories") : ClassLoader.getSystemResources("META-INF/spring.factories");
            LinkedMultiValueMap result = new LinkedMultiValueMap();

            while(urls.hasMoreElements()) {
                URL url = (URL)urls.nextElement();
                UrlResource resource = new UrlResource(url);
                Properties properties = PropertiesLoaderUtils.loadProperties(resource);
                Iterator var6 = properties.entrySet().iterator();

                while(var6.hasNext()) {
                    Map.Entry<?, ?> entry = (Map.Entry)var6.next();
                    String factoryClassName = ((String)entry.getKey()).trim();
                    String[] var9 = StringUtils.commaDelimitedListToStringArray((String)entry.getValue());
                    int var10 = var9.length;

                    for(int var11 = 0; var11 < var10; ++var11) {
                        String factoryName = var9[var11];
                        result.add(factoryClassName, factoryName.trim());
                    }
                }
            }

            cache.put(classLoader, result);
            return result;
        } catch (IOException var13) {
            throw new IllegalArgumentException("Unable to load factories from location [META-INF/spring.factories]", var13);
        }
    }
}
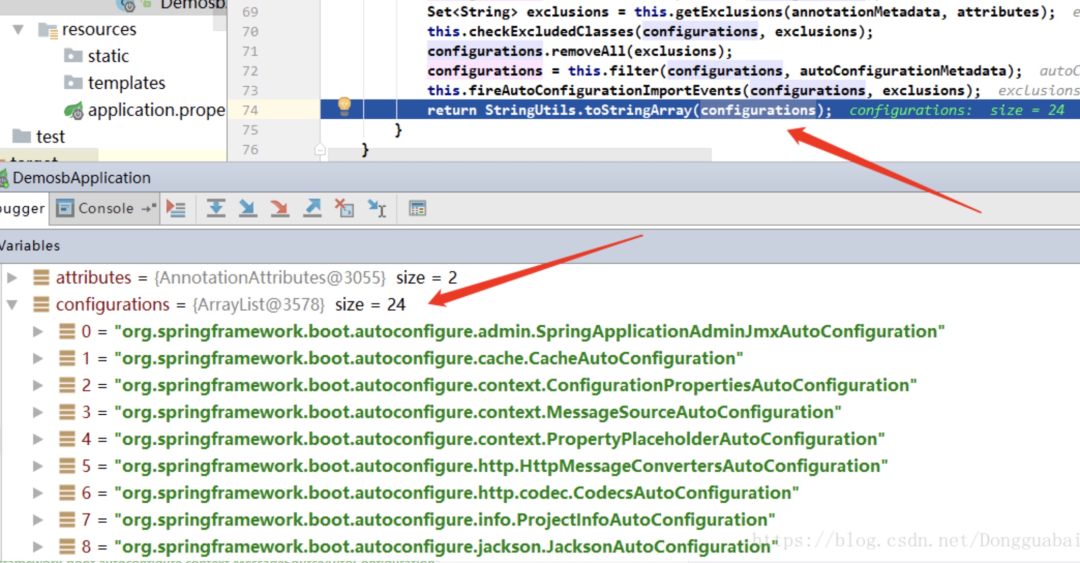
You can know that SpringBoot starts from meta-inf / Spring. In the classpath Obtain the values specified by EnableAutoConfiguration from factories, import these values into the container as automatic configuration classes, and the automatic configuration class will take effect to help us with automatic configuration. In the past, we need to configure things ourselves, and the automatic configuration class has helped us complete them. As shown in the figure below, you can find that some common classes in Spring have been imported automatically.
Next, look at the @ ComponentScan annotation, @ ComponentScan (excludefilters = {@ filter (type = filtertype. Custom, classes = typeexcludefilter. Class), @ filter (type = filtertype. Custom, classes = autoconfigurationexcludefilter. Class)}), which is to scan the package and put it into the spring container.
@ComponentScan(excludeFilters = {
  @Filter(type = FilterType.CUSTOM,classes = {TypeExcludeFilter.class}),
  @Filter(type = FilterType.CUSTOM,classes = {AutoConfigurationExcludeFilter.class})})
public @interface SpringBootApplication {}
To sum up, @ SpringbootApplication: that is to say, it has prepared a lot of things. Whether it is used or not depends on our program or configuration.
Next, continue to look at the run method:
public static void main(String[] args) {
        SpringApplication.run(Application.class, args);
    }
Let's see whether the automatic configuration is used in the execution of the run method. Let's click Run:
public ConfigurableApplicationContext run(String... args) {
    //timer
    StopWatch stopWatch = new StopWatch();
    stopWatch.start();
    ConfigurableApplicationContext context = null;
    Collection<SpringBootExceptionReporter> exceptionReporters = new ArrayList();
    this.configureHeadlessProperty();
    //monitor
    SpringApplicationRunListeners listeners = this.getRunListeners(args);
    listeners.starting();

    Collection exceptionReporters;
    try {
        ApplicationArguments applicationArguments = new DefaultApplicationArguments(args);
        ConfigurableEnvironment environment = this.prepareEnvironment(listeners, applicationArguments);
        this.configureIgnoreBeanInfo(environment);
        Banner printedBanner = this.printBanner(environment);
        //Prepare context
        context = this.createApplicationContext();
        exceptionReporters = this.getSpringFactoriesInstances(SpringBootExceptionReporter.class,                       new Class[]{ConfigurableApplicationContext.class}, context);
        //Pre refresh context
        this.prepareContext(context, environment, listeners, applicationArguments, printedBanner);
        //Refresh context
        this.refreshContext(context);
        //context after refresh
        this.afterRefresh(context, applicationArguments);
        stopWatch.stop();
        if (this.logStartupInfo) {
            (new StartupInfoLogger(this.mainApplicationClass)).logStarted(this.getApplicationLog(), stopWatch);
        }

        listeners.started(context);
        this.callRunners(context, applicationArguments);
    } catch (Throwable var10) {
        this.handleRunFailure(context, var10, exceptionReporters, listeners);
        throw new IllegalStateException(var10);
    }

    try {
        listeners.running(context);
        return context;
    } catch (Throwable var9) {
        this.handleRunFailure(context, var9, exceptionReporters, (SpringApplicationRunListeners)null);
        throw new IllegalStateException(var9);
    }
}
Then we focus on refreshContext(context); Refresh the context. Let's click in.
recommend: Java interview practice dictionary
private void refreshContext(ConfigurableApplicationContext context) {
   refresh(context);
   if (this.registerShutdownHook) {
      try {
         context.registerShutdownHook();
      }
      catch (AccessControlException ex) {
         // Not allowed in some environments.
      }
   }
}
We continue to click refresh(context);
protected void refresh(ApplicationContext applicationContext) {
   Assert.isInstanceOf(AbstractApplicationContext.class, applicationContext);
   ((AbstractApplicationContext) applicationContext).refresh();
}
He will call ((abstractapplicationcontext) ApplicationContext) refresh(); Methods, let's look at:
public void refresh() throws BeansException, IllegalStateException {
   synchronized (this.startupShutdownMonitor) {
      // Prepare this context for refreshing.
      prepareRefresh();
      // Tell the subclass to refresh the internal bean factory.
      ConfigurableListableBeanFactory beanFactory = obtainFreshBeanFactory();
      // Prepare the bean factory for use in this context.
      prepareBeanFactory(beanFactory);

      try {
         // Allows post-processing of the bean factory in context subclasses.
         postProcessBeanFactory(beanFactory);
         // Invoke factory processors registered as beans in the context.
         invokeBeanFactoryPostProcessors(beanFactory);
         // Register bean processors that intercept bean creation.
         registerBeanPostProcessors(beanFactory);
         // Initialize message source for this context.
         initMessageSource();
         // Initialize event multicaster for this context.
         initApplicationEventMulticaster();
         // Initialize other special beans in specific context subclasses.
         onRefresh();
         // Check for listener beans and register them.
         registerListeners();
         // Instantiate all remaining (non-lazy-init) singletons.
         finishBeanFactoryInitialization(beanFactory);
         // Last step: publish corresponding event.
         finishRefresh();
      }catch (BeansException ex) {
         if (logger.isWarnEnabled()) {
            logger.warn("Exception encountered during context initialization - " +
                  "cancelling refresh attempt: " + ex);
         }
         // Destroy already created singletons to avoid dangling resources.
         destroyBeans();
         // Reset 'active' flag.
         cancelRefresh(ex);
         // Propagate exception to caller.
         throw ex;
      }finally {
         // Reset common introspection caches in Spring's core, since we
         // might not ever need metadata for singleton beans anymore...
         resetCommonCaches();
      }
   }
}
Therefore, it is the loading process of a spring bean. Continue to look at a method called onRefresh():
protected void onRefresh() throws BeansException {
   // For subclasses: do nothing by default.
}
It is not directly implemented here, but we look for its specific implementation:

For example, Tomcat is related to the web. We can see a servletwebserver ApplicationContext:
@Override
protected void onRefresh() {
   super.onRefresh();
   try {
      createWebServer();
   }
   catch (Throwable ex) {
      throw new ApplicationContextException("Unable to start web server", ex);
   }
}
You can see that there is a createWebServer(); Method it creates a web container, and Tomcat is not a web container. How do you create it? Let's continue to see:
private void createWebServer() {
   WebServer webServer = this.webServer;
   ServletContext servletContext = getServletContext();
   if (webServer == null && servletContext == null) {
      ServletWebServerFactory factory = getWebServerFactory();
      this.webServer = factory.getWebServer(getSelfInitializer());
   }
   else if (servletContext != null) {
      try {
         getSelfInitializer().onStartup(servletContext);
      }
      catch (ServletException ex) {
         throw new ApplicationContextException("Cannot initialize servlet context",
               ex);
      }
   }
   initPropertySources();
}
factory.getWebServer(getSelfInitializer()); He was founded through a factory.
public interface ServletWebServerFactory {
   WebServer getWebServer(ServletContextInitializer... initializers);
}
You can see why it is an interface. Because we are more than a Tomcat web container.

We also see Jetty. Let's look at TomcatServletWebServerFactory:
@Override
public WebServer getWebServer(ServletContextInitializer... initializers) {
   Tomcat tomcat = new Tomcat();
   File baseDir = (this.baseDirectory != null) ? this.baseDirectory
         : createTempDir("tomcat");
   tomcat.setBaseDir(baseDir.getAbsolutePath());
   Connector connector = new Connector(this.protocol);
   tomcat.getService().addConnector(connector);
   customizeConnector(connector);
   tomcat.setConnector(connector);
   tomcat.getHost().setAutoDeploy(false);
   configureEngine(tomcat.getEngine());
   for (Connector additionalConnector : this.additionalTomcatConnectors) {
      tomcat.getService().addConnector(additionalConnector);
   }
   prepareContext(tomcat.getHost(), initializers);
   return getTomcatWebServer(tomcat);
}
This code is the built-in Tomcat we are looking for. In this process, we can see a process of creating Tomcat.
If you don't understand, let's understand it in another way. Everyone should know about stater. Give some examples.
<dependency>
    <groupId>org.springframework.boot</groupId>
    <artifactId>spring-boot-starter-data-redis</artifactId>
</dependency>
<dependency>
    <groupId>org.springframework.boot</groupId>
    <artifactId>spring-boot-starter-freemarker</artifactId>
</dependency>
First, customize a stat.
<parent>
    <groupId>org.springframework.boot</groupId>
    <artifactId>spring-boot-starter-parent</artifactId>
    <version>2.1.4.RELEASE</version>
    <relativePath/>
</parent>
<groupId>com.zgw</groupId>
<artifactId>gw-spring-boot-starter</artifactId>
<version>1.0-SNAPSHOT</version>

<dependencies>
    <dependency>
        <groupId>org.springframework.boot</groupId>
        <artifactId>spring-boot-autoconfigure</artifactId>
    </dependency>
</dependencies>
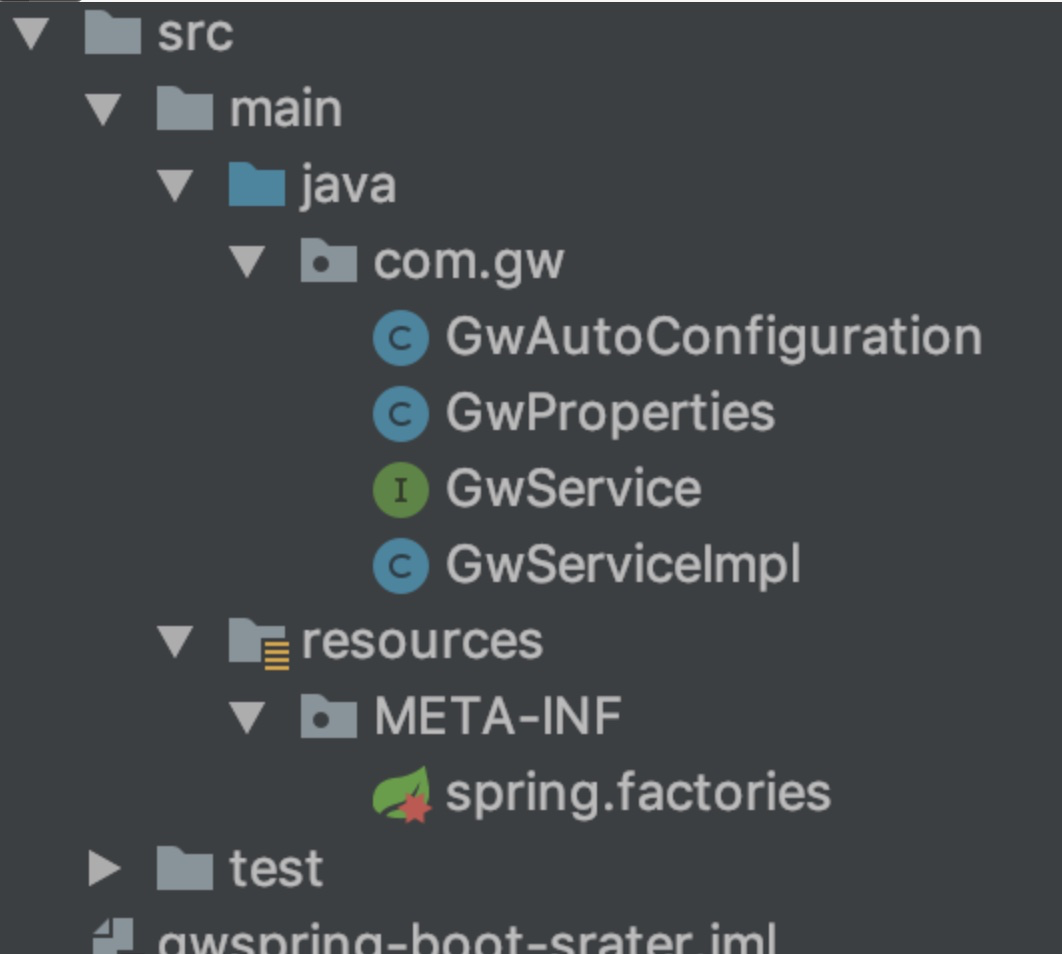
Let's first look at the maven configuration write version number. If you customize a stater, you must rely on the spring boot autoconfigure package. Let's first look at the project directory.
public class GwServiceImpl  implements GwService{
    @Autowired
    GwProperties properties;

    @Override
    public void Hello()
    {
        String name=properties.getName();
        System.out.println(name+"say:Hello");
    }
}
What we do is customize the name through the configuration file. This is the specific implementation. recommend: Java interview practice dictionary
@Component
@ConfigurationProperties(prefix = "spring.gwname")
public class GwProperties {

    String name="zgw";

    public String getName() {
        return name;
    }

    public void setName(String name) {
        this.name = name;
    }
}
This class can read the configuration file through @ ConfigurationProperties.
@Configuration
@ConditionalOnClass(GwService.class)  //Scan class
@EnableConfigurationProperties(GwProperties.class) //Make the configuration class effective
public class GwAutoConfiguration {

    /**
    * Function Description: managed to spring
    * @author zgw
    * @return
    */
    @Bean
    @ConditionalOnMissingBean
    public GwService gwService()
    {
        return new GwServiceImpl();
    }
}
This is a configuration class. Why is it written like this? Because the stators of spring boot are written like this. We can copy the stators with reference to them to achieve the purpose of automatic configuration. Then we use spring Factories can also be configured.
org.springframework.boot.autoconfigure.EnableAutoConfiguration=com.gw.GwAutoConfiguration
Then such a simple stat is completed, and maven can be packaged and used after being introduced in other projects.