HTTP request principle
We all know that HTTPS can encrypt information to prevent sensitive information from being obtained by third parties. Therefore, many bank websites or e-mail and other services with high security level will adopt HTTPS protocol.
HTTPS is actually composed of two parts: HTTP + SSL / TLS, that is, a module for processing encrypted information is added to HTTP. The information transmission of server and client will be encrypted through TLS, so the transmitted data is encrypted data. How to encrypt, decrypt and verify is shown in the figure below.
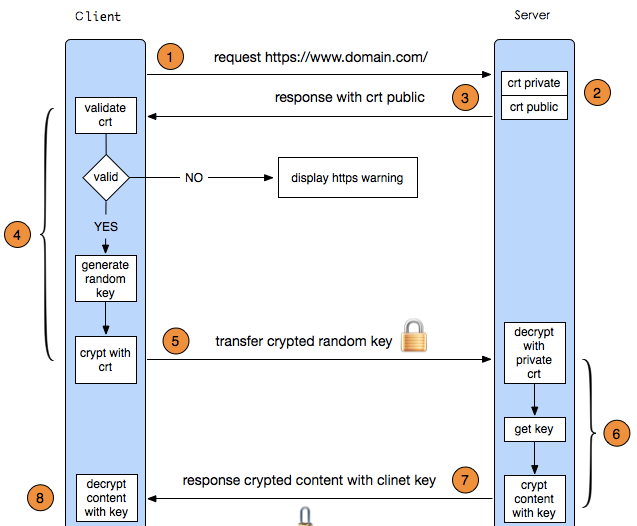
1. The client initiates an HTTPS request
There's nothing to say, that is, the user enters an https URL in the browser and connects to port 443 of the server.
2. Server configuration
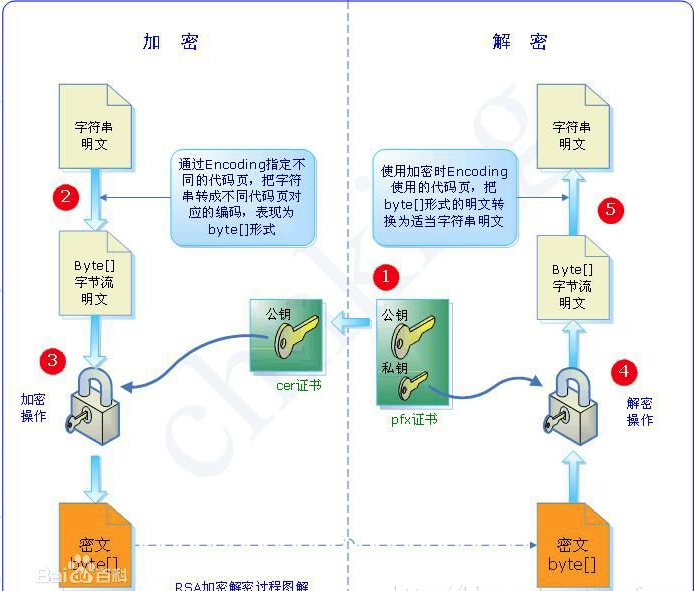
Servers using HTTPS protocol must have a set of digital certificates, which can be made by themselves or applied to the organization. The difference is that the certificate issued by yourself needs to be verified by the client before you can continue to access, while the certificate applied by a trusted company will not pop up a prompt page (startssl is a good choice, with 1 year of free service). This set of certificates is actually a pair of public and private keys. If you don't understand the public key and private key, you can imagine it as a key and a lock head. Only you are the only one in the world who has the key. You can give the lock head to others. Others can use the lock to lock important things and send them to you. Because only you have the key, only you can see what is locked by the lock.
3. Transmission certificate
This certificate is actually a public key. It just contains a lot of information, such as the issuing authority of the certificate, expiration time and so on.
4. Client resolution certificate
This part of the work is completed by the TLS of the client. First, it will verify whether the public key is valid, such as the issuing authority, expiration time, etc. If an exception is found, a warning box will pop up to prompt that there is a problem with the certificate. If there is no problem with the certificate, a random value is generated. The random value is then encrypted with a certificate. As mentioned above, lock the random value with a lock so that you can't see the locked content unless you have a key.
5. Transmit encrypted information
This part transmits the random value encrypted with the certificate. The purpose is to let the server get the random value. In the future, the communication between the client and the server can be encrypted and decrypted through this random value.
6. Service segment decryption information
After the server decrypts with the private key, it obtains the random value (private key) transmitted by the client, and then encrypts the content symmetrically through the value. The so-called symmetric encryption is to mix the information and private key through some algorithm, so that unless you know the private key, you can't get the content, and just the client and server know the private key, so as long as the encryption algorithm is strong enough and the private key is complex enough, the data is safe enough.
7. Transmit encrypted information
This part of information is the information encrypted by the private key of the service segment and can be restored at the client
8. Client decryption information
The client decrypts the information transmitted from the service segment with the previously generated private key, so it obtains the decrypted content. Even if the third party listens to the data in the whole process, it is helpless.
Openssl generation
Install openssl on window or generate directly under the ubuntu system of virtual machine. In order to ensure that there is no problem in execution, the ls view operation is directly performed after some steps are completed
1,openssl       //Check to see if openssl is installed
2,openssl genrsa -des3 -out danfeng.key 2048
//Key generation and private key creation. The past 1024 is no longer applicable
3,ls
4,openssl req -new -key danfeng.key -out danfeng.csr
//The generation method of csr needs to input the country, region, organization and email in turn. The most important thing is to have a common name, which can write your name or domain name. If you want to apply for https, this must match the domain name, otherwise a browser alert will be triggered.
5,ls
6,less danfeng.csr
//The above steps are the generation of server-side private key and server-side certificate, and the following steps are the generation of client-side private key
7,openssl rsa -in danfeng.key -out danfeng_nopass.key
// Client private key
8,openssl req -new -x509 -days 3650 -key danfeng_nopass.key -out danfeng.crt
//Self signed certificate
9,ls
10,less danfeng.crt
https configuration of Nginx
Install nginx, find the conf folder, and put the Danfeng generated by openssl CRT and Danfeng_ nopass. Put the key under it and find nginx Conf file, open it and make the following modifications.
  # HTTPS server
    #
    server {
        listen       443 ssl;
        server_name  localhost;

        ssl                  on;//Open ssl
        ssl_certificate      danfeng.crt;//certificate
        ssl_certificate_key  danfeng_nopass.key;

    #    ssl_session_cache    shared:SSL:1m;
    #    ssl_session_timeout  5m;

    #    ssl_ciphers  HIGH:!aNULL:!MD5;
    #    ssl_prefer_server_ciphers  on;

        location / {
            root   html;
            index  index.html index.htm;
        }
    }