-
Website service program
Web services generally refer to services that allow users to access various resources in the Internet through a browser,
Web network service is a passive access service program, that is, it will respond only after receiving the request from other hosts in the Internet. Finally, the web server used to provide the service program will transmit the requested content to the user through HTTP (Hypertext Transfer Protocol) or HTTPS (Secure Hypertext Transfer Protocol).
Classification of website service programs: Apache, Nginx, Tomcat, IIS(Internet Information Services, Internet of things information service; IIS is only applicable to windows system)
Mount system image
# mkdir -p /media/cdrom
# mount /dev/cdrom /media/cdrom
mount: /media/cdrom: WARNING: device write-protected, mounted read-only.
# vim /etc/fstab
/dev/cdrom /media/cdrom iso9660   defaults 0 0


Create a configuration file for the software warehouse
# vim /etc/yum.repos.d/rhel8.repo
[BaseOS]
name=BaseOS
baseurl=file:///media/cdrom/BaseOS
enabled=1
gpgcheck=0
[AppStream]
name=AppStream
baseurl=file:///media/cdrom/AppStream
enabled=1
gpgcheck=0


install Apache Service procedure
# dnf install httpd


Start the service and join the startup
# systemctl start httpd
# systemctl enable httpd
-
Configure service file parameters
Configuration file in Linux system
| effect | File name |
| Service directory | /etc/httpd |
| Master profile | /etc/httpd/conf/httpd.conf |
| Website data directory | /var/www/html |
| Access log | /var/log/httpd/access_log |
| Error log | /var/log/httpd/error_log |
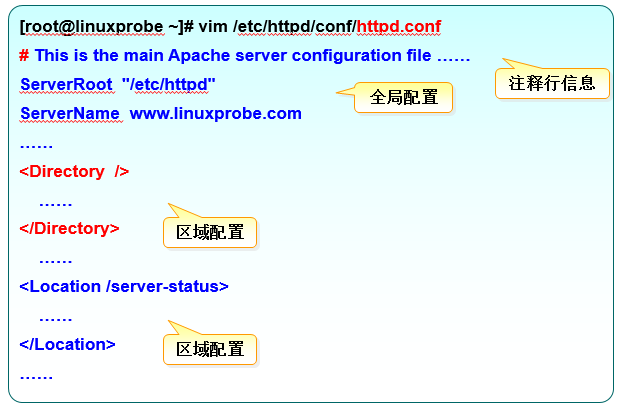
The most important service parameters are stored in the main configuration file. The general name is a folder named after the software name in / etc, which is called "service name. conf". In the configuration file, all lines starting with pound (#) are comment lines.
# dnf install -y httpd install httpd service
# Modify profile
#    The main configuration file is usually in / etc / service name / service name conf
#    General configuration file / etc / service name d
In the main configuration file of httpd service program, there are three types of information: comment line information, global configuration and regional configuration.

The most commonly used parameters and usage description when configuring httpd service program
| parameter | effect |
| ServerRoot | Service directory |
| ServerAdmin | Administrator mailbox |
| User | User running the service |
| Group | User group running the service |
| ServerName | Domain name of the web server |
| DocumentRoot | Website data directory (default directory / var/www/html) |
| Listen | Listening IP address and port number |
| DirectoryIndex | Default index page |
| ErrorLog | Error log file |
| CustomLog | Access log file |
| Timeout | Web page timeout, the default is 300 seconds |
Modify project default directory
Modify the parameter DocumentRoot used to define the website data saving path in line 122 to / home/wwwroot, and also modify the parameter Directory used to define the Directory permission in lines 127 and 134 to / home/wwwroot.
Modify project default directory
 Use about line 122 to define the parameters of the website data saving path DocumentRoot Change to/home/wwwroot,At the same time, about lines 127 and 134 need to be used to define the parameters of directory permission Directory The following path is also changed to/home/wwwroot.
# vim /etc/httpd/conf/httpd.conf
122 DocumentRoot "/home/wwwroot"
123
124 #
125 # Relax access to content within /var/www.
126 #
127 <Directory "/home/wwwroot">
128     AllowOverride None
129     # Allow open access:
130     Require all granted
131 </Directory>
132
133 # Further relax access to the default document root:
134 <Directory "/home/wwwroot">

Restart service
# systemctl restart httpd
# systemctl status httpd check the status and confirm whether it is enabled
# systemctl enable httpd add boot item
# firefox
-
SELinux security subsystem
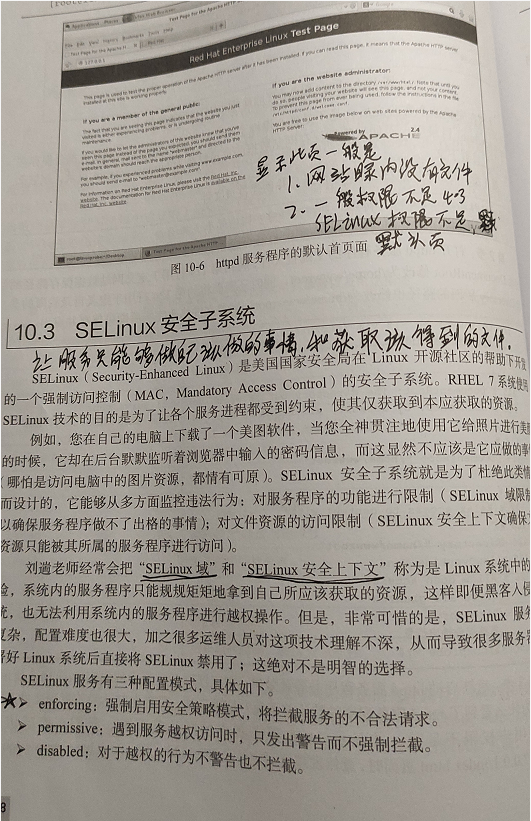
SELinux (security enhanced Linux) is a security subsystem of Mandatory Access Control (MAC) developed by the national security agency with the help of the Linux open source community. The purpose of using SELinux technology in Linux system is to restrict each service process to obtain only the resources that should be obtained.
If the general authority and firewall are doors and windows, SELinux is a protective fence installed outside to make the system more secure.
SELinux domain and SELinux security context are called double insurance in Linux system

SELinux service has three configuration modes
Enforceing: forcibly enabling the security policy mode, which will intercept illegal requests of the service.
permissive: when a service is accessed beyond its authority, only a warning will be issued instead of forced interception.
disabled: no warning or interception for ultra vires.
# vim /etc/selinux/config restart takes effect
SELINUX=enforcing
# Getenforceto view the current status
# Setenforce0 temporarily changes state 0 disabled 1 enabled
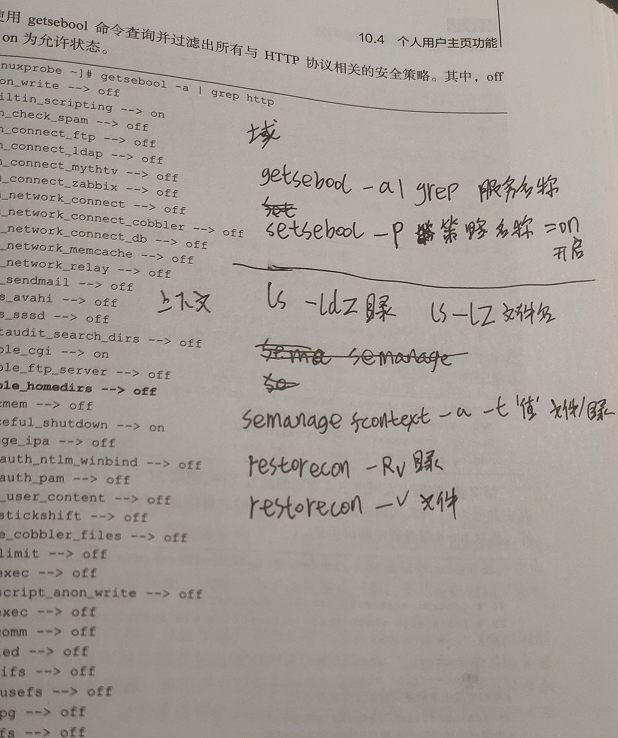
View - SELINUX - security context method: the "- Z" parameter in the ls command is used to view the security context value of the file, and the "- d" parameter represents that the object is a folder.
# ls -ldZ /var/www/html
drwxr-xr-x. root root system_u:object_r:httpd_sys_content_t:s0 /var/www/html
# ls -ldZ /home/wwwroot
drwxrwxrwx. root root unconfined_u:object_r:home_root_t:s0 /home/wwwroot
The SELinux security context set on the file is composed of multiple information items such as user segment, role segment and type segment.
User segment system_u represents the identity of the system process,
Role segment_ R represents the role of file directory,
Type segment httpd_sys_content_t represents the system file of the website service.

Semanage: the policy used to manage SELinux. The full English name is "SELinux manage". The syntax format is: "semanage [parameter] [file]".
| parameter | effect |
| -l | query |
| -a | add to |
| -m | modify |
| -d | delete |
The semanage command can not only set the policy of files and directories like the traditional chcon command, but also manage network ports and message interfaces (these new features will be covered later in this chapter).
Add a new entry to the new site data directory SELinux Security context, so that this directory and all files in it can be httpd Accessed by service program
# semanage fcontext -a -t httpd_sys_content_t /home/wwwroot
# semanage fcontext -a -t httpd_sys_content_t /home/wwwroot/*
use restorecon The command will be set SELinux The security context takes effect immediately. in use restorecon Command, you can add-Rv Parameter to recursively operate on the specified directory and display SELinux Modification process of security context
# restorecon -Rv /home/wwwroot/
-
Personal user homepage function
The function of personal user homepage provided by httpd service program is fully qualified for this job.
Turn on the function of personal home page
Step 1: edit / etc / httpd / conf.d/userdir Conf configuration file,
Modify the UserDir disabled parameter in line 17 and add a pound sign (#) in front of it, which means that the httpd service program will enable the function of individual user home page;
Modify UserDir public in line 24_ Remove the pound sign (#) in front of the HTML parameter (the UserDir parameter indicates the name of the directory where the website data is saved in the user's home directory, that is, the public_html directory).
Step 2: create a directory and homepage file for saving website data in the user's home directory. Change the permission of the home directory to 755 to ensure that other people also have permission to read the contents.
Step 3: restart the httpd service program and enter the web address in the address bar of the browser in the format of "web address / ~ user name" (the tilde is required, and there is no space between the web address, tilde and user name)
Step 4: use the setsebool command to modify the SELinux policy and enable the personal user home page function of httpd service. The - P parameter is permanently valid
# vim /etc/httpd/conf.d/userdir.conf
11 <IfModule mod_userdir.c>
12     #
13     # UserDir is disabled by default since it can confirm the presence
14     # of a username on the system (depending on home directory
15     # permissions).
16     #
17     # UserDir disabled
18
19     #
20     # To enable requests to /~user/ to serve the user's public_html
21     # directory, remove the "UserDir disabled" line above, and uncomment
22     # the following line instead:
23     #
24       UserDir public_html
25 </IfModule>
26
27 #
28 # Control access to UserDir directories.  The following is an example
29 # for a site where these directories are restricted to read-only.
30 #
31 <Directory "/home/*/public_html">
32     AllowOverride FileInfo AuthConfig Limit Indexes
33     Options MultiViews Indexes SymLinksIfOwnerMatch IncludesNoExec
34     Require method GET POST OPTIONS
35 </Directory>


# su - zhangsan
$ mkdir public_html
$ echo "Welcome" > public_html/index.html
$ chmod -R 755 /home/zhangsan


# getsebool -a | grep http view SELinux domain policy
# setsebool -P httpd_enable_homedirs=on
# firefox
Turn on personal user site login authentication
Step 1: first use the htpasswd command to generate the password database- c parameter indicates the first generation; Then add the storage file of the password database and the user name to be used for authentication (the user does not have to be an existing local account in the system).
Step 2: continue to edit the profile of individual user home page function. Modify the parameter information in lines 31 to 37 to the following contents,
# htpasswd -c /etc/httpd/passwd zhangsan
New password:Enter password for web page authentication here
Re-type new password:Enter it again to confirm
Adding password for user zhangsan


# vim /etc/httpd/conf.d/userdir.conf
31 <Directory "/home/*/public_html">
32     AllowOverride all   Pseudo static does not need to be allowed none
        #Save path of just generated password verification file
33     authuserfile "/etc/httpd/passwd"
        #Prompt information when users visit the website
34     authname "My privately website"
        #The authentication mode is password mode and basic authentication mode
35     authtype basic
        #The name of the user who needs to be authenticated when accessing the website
36     require user zhangsan
37 </Directory>
# systemctl restart httpd
The account and password used in authentication are the password generated by htpasswd command for website login, not the user password in the system
-
Virtual website host function
Before the birth of Virtual Private Server (VPS) and cloud computing technology, IDC service providers enabled the virtual host function in order to make full use of server resources and reduce the purchase threshold.
Using the virtual host function, a running physical server can be divided into multiple "virtual servers". However, this technology cannot realize the hardware resource isolation of the current virtual machine technology, so that these virtual servers can jointly use the hardware resources of the physical server, and the supplier can only limit the use space of the hard disk.
Apache's virtual host function is the technology that the server provides multiple websites and external access services based on different IP addresses, host domain names or port numbers requested by users. The resources requested by users are different, and the final web page contents are also different.
Network card binding multiple IP address
# vim /etc/sysconfig/network-scripts/ifcfg-ens160
IPADDR0=192.168.10.10
IPADDR1=192.168.10.20
IPADDR2=192.168.10.30
# nmcli reload ens160
# nmcli connection up ens160
IP address based
If a server has multiple IP addresses and each IP address corresponds to each website deployed on the server one by one, users will access the page resources of different websites when they request to access different IP addresses. Moreover, each website has an independent IP address, which is also of great benefit to search engine optimization.
Step 1: create three directories in / home/wwwroot to save the data of different websites, and write the homepage file of the website to them respectively.
Step 2: start at about 132 lines in the configuration file of httpd service, add and write three virtual host website parameters based on IP address respectively, then save and exit, and restart httpd service.
Step 3: set the SELinux security context of the new website data directory correctly, and use the restorecon command to make the newly set SELinux security context take effect immediately.
# mkdir -p /home/wwwroot/10
# mkdir -p /home/wwwroot/20
# mkdir -p /home/wwwroot/30
# echo "IP:192.168.10.10" > /home/wwwroot/10/index.html
# echo "IP:192.168.10.20" > /home/wwwroot/20/index.html
# echo "IP:192.168.10.30" > /home/wwwroot/30/index.html


# vim /etc/httpd/conf/httpd.conf
132 <VirtualHost 192.168.10.10>notes:IP address
133     DocumentRoot /home/wwwroot/10 notes:Home directory
134     ServerName www.linuxprobe.com notes:domain name rhel8 Not in
135     <Directory /home/wwwroot/10>notes:jurisdiction
136     AllowOverride None notes:Whether pseudo static is supported
137     Require all granted notes:Request authorization
138     </Directory>
139 </VirtualHost>

140 <VirtualHost 192.168.10.20>
141     DocumentRoot /home/wwwroot/20
142     ServerName www.linuxcool.com
143     <Directory /home/wwwroot/20>
144     AllowOverride None
145     Require all granted
146     </Directory>
147 </VirtualHost>

148 <VirtualHost 192.168.10.30>
149     DocumentRoot /home/wwwroot/30
150     ServerName www.linuxdown.com
151     <Directory /home/wwwroot/30>
152     AllowOverride None
153     Require all granted
154     </Directory>
155 </VirtualHost>
# systemctl restart httpd
# systemctl enable httpd


# semanage fcontext -a -t httpd_sys_content_t /home/wwwroot
# semanage fcontext -a -t httpd_sys_content_t /home/wwwroot/10
# semanage fcontext -a -t httpd_sys_content_t /home/wwwroot/10/*
# semanage fcontext -a -t httpd_sys_content_t /home/wwwroot/20
# semanage fcontext -a -t httpd_sys_content_t /home/wwwroot/20/*
# semanage fcontext -a -t httpd_sys_content_t /home/wwwroot/30
# semanage fcontext -a -t httpd_sys_content_t /home/wwwroot/30/*
# restorecon -Rv /home/wwwroot
Host based domain name
When the server cannot assign an independent IP address to each website, you can try to let Apache automatically identify the domain name requested by the user, so as to transmit different content according to different domain name requests/ etc/hosts is a configuration file used in Linux system to forcibly resolve a host domain name to a specified IP address.
Step 1: manually define the configuration file of the corresponding relationship between IP address and domain name. It will take effect immediately after saving and exiting.
Step 2: create three directories in / home/wwwroot to save data of different websites.
Step 3: start at about 132 lines in the configuration file of httpd service, add and write three virtual host website parameters based on host name respectively, then save and exit, and restart httpd service.
Step 4: correctly set the SELinux security context of the website data directory file to make it consistent with the website service function, and use the restorecon command to make the newly configured SELinux security context take effect immediately.
# vim /etc/hosts
192.168.10.10   www.linuxprobe.com www.linuxcool.com www.linuxdown.com


# mkdir -p /home/wwwroot/linuxprobe
# mkdir -p /home/wwwroot/linuxcool
# mkdir -p /home/wwwroot/linuxdown
# echo "www.linuxprobe.com" > /home/wwwroot/linuxprobe/index.html
# echo "www.linuxcool.com" > /home/wwwroot/linuxcool/index.html
# echo "www.linuxdown.com" > /home/wwwroot/linuxdown/index.html


# vim /etc/httpd/conf/httpd.conf
132 <VirtualHost 192.168.10.10>
133     Documentroot /home/wwwroot/linuxprobe
134     ServerName www.linuxprobe.com
135     <Directory /home/wwwroot/linuxprobe>
136     AllowOverride None
137     Require all granted
138     </Directory>
139 </VirtualHost>
140 <VirtualHost 192.168.10.10>
141     Documentroot /home/wwwroot/linuxcool
142     ServerName www.linuxcool.com
143     <Directory /home/wwwroot/linuxcool>
144     AllowOverride None
145     Require all granted
146     </Directory>
147 </VirtualHost>
148 <VirtualHost 192.168.10.10>
149     Documentroot /home/wwwroot/linuxdown
150     ServerName www.linuxdown.com
151     <Directory /home/wwwroot/linuxdown>
152     AllowOverride None
153     Require all granted
154     </Directory>
155 </VirtualHost>
# systemctl restart httpd
# systemctl enable httpd


# semanage fcontext -a -t httpd_sys_content_t /home/wwwroot
# semanage fcontext -a -t httpd_sys_content_t /home/wwwroot/linuxprobe
# semanage fcontext -a -t httpd_sys_content_t /home/wwwroot/linuxprobe/*
# semanage fcontext -a -t httpd_sys_content_t /home/wwwroot/linuxcool
# semanage fcontext -a -t httpd_sys_content_t /home/wwwroot/linuxcool/*
# semanage fcontext -a -t httpd_sys_content_t /home/wwwroot/linuxdown
# semanage fcontext -a -t httpd_sys_content_t /home/wwwroot/linuxdown/*
# restorecon -Rv /home/wwwroot