Today, let's start with the public module and build the spring cloud architecture. If you happen to be doing this, I hope it can help you

Common module encapsulation
In a complete microservice architecture, the processing of string and date is often the most. In some security application scenarios, encryption algorithms will also be used. In order to improve the scalability of the application, we should also version control the interface. Therefore, we need to encapsulate these scenarios to facilitate the use of developers. In this chapter, we give priority to building a complete micro service architecture from the public module.
Encapsulation of common class libraries in common engineering
Common project is a common module of the whole application. Therefore, it should contain common class libraries, such as date and time processing, string processing, encryption / decryption encapsulation, message queue encapsulation, etc.
Processing of date and time
In an application, the processing of date and time is one of the more widely used operations, such as blog publishing time and comment time. The time is stored in the database in the form of timestamp, which requires us to go through a series of processing to return to the client.
Therefore, we can create a date and time processing tool class Dateutils under the common project. Its code is as follows:
import java.text.ParseException;
import java.text.SimpleDateFormat;import java.util.calendar;
import java.util.Date;
public final class DateUtils {
public static boolean isLegalDate(String str, String pattern){
try {
SimpleDateFormat format = new SimpleDateFormat(pattern);format.parse(str);
return true;
} catch (Exception e){
return false;
}
}
public static Date parseString2Date(String str,String pattern){
try {
SimpleDateFormat format = new SimpleDateFormat(pattern);return format.parse( str);
}catch (ParseException e){
e.printstackTrace();return null;
}
}
public static calendar parseString2calendar(String str,String pattern){
return parseDate2Calendar(parsestring2Date(str, pattern));
}
public static String parseLong2DateString(long date,String pattern){
SimpleDateFormat sdf = new SimpleDateFormat(pattern);
String sd = sdf.format(new Date(date));
return sd;
}
public static Calendar parseDate2Calendar(Date date){
Calendar calendar = Calendar.getInstance();
calendar.setTime(date);
return calendar;
}
public static Date parseCalendar2Date(calendar calendar){
return calendar.getTime();
}
public static String parseCalendar2String(calendar calendar,String pattern){
return parseDate2String(parsecalendar2Date(calendar), pattern);
}
public static String parseDate2String(Date date,String pattern) {
SimpleDateFormat format = new SimpleDateFormat(pattern);
return format.format(date);
}
public static String formatTime( long time){
long nowTime = System.currentTimeMillis();long interval = nowTime - time;
long hours = 3600 * 1000;
long days = hours * 24;long fiveDays = days *5;if (interval < hours){
long minute = interval / 1008/ 60;
if (minute == 0) {
return"just";
}
return minute +"Minutes ago";}else if (interval < days){
return interval / 1000/ 360 day +"Hours ago";}else if (interval< fiveDays) {
return interval / 1000 / 3600/ 24+"Days ago";}else i
Date date = new Date(time);
return parseDate2String(date,"MM-dd");
}
}
}
When processing the Date format, we can call the method provided by the above code, such as isLegalDate, which determines whether the Date is legal. When we do Date conversion, we can call these methods starting with parse, and we can roughly know their meaning through the method name. For example, parseCalendar2String means to convert calendar type objects to string type, parseDate2String means to convert Date type objects to string type, and parseString2Date means to convert string type to Date type.
Of course, the above code cannot cover all the processing of dates. If you have new processing requirements in the development process, you can add new methods in DateUtils.
In addition, when we do project development, we should follow the principle of "no repeated wheel making", that is, we should introduce mature third-party class libraries as far as possible. At present, joda time is a mature framework for date processing in the market, and its introduction method is relatively simple. It only needs to be in POM XML can be added to its dependency, such as:
<dependency>
<groupId>joda-time</groupId>
<artifactId>joda-time</ artifactId><version>2.10.1</version>
</dependency>
Joda time is also relatively simple. You only need to build a DateTime object and operate the date and time through the DateTime object. If you get the date 90 days after the current date, you can write the following code:
DateTime dateTime = new DateTime();

System.out.println(dateTime.plusDays(90).toString("yyyy-MM-dd HH:mm:ss"));
Joda time is an efficient date processing tool, which is used by more and more people as an alternative to the JDK native date time class. When dealing with date and time, you can give priority to it.
String processing
In application development, string can be said to be the most common data type, and its processing is also the most common, such as the need to judge the non emptiness of string, the generation of random string and so on. Next, let's take a look at the string processing tool class stringUtils:
public final class StringUtils{
private static final char[] CHARS ={ '0','1','2','3', '4', '5','6', '7',' 8','9'};
private static int char_length =CHARS.length;
public static boolean isEmpty( string str){return null == str ll str.length()== 0;
}
public static boolean isNotEmpty(string str){
return !isEmpty(str);
}
public static boolean isBlank(String str){
int strLen;
if (null == str ll(strLen = str.length())== 0){
return true;
}
for (int i= e; i< strLen; i++){
if ( !Character.iswhitespace(str.charAt(i))){
return false;
}
}
return true;
}
public static boolean isNotBlank(String str){
return !isBlank(str);
}
public static String randomString(int length){
StringBuilder builder = new StringBuilder(length);Random random = new Random();
for (int i = 0; i< length; i++){
builder.append(random.nextInt(char_length));
}
return builder.toString();
}
public static string uuid()i
return UUID.randomUUID().toString().replace("-","");
}
private StringUtils(){

throw new AssertionError();
}
}
String is also called universal type. Any basic type (such as integer, floating point, Boolean, etc.) can be replaced by string. Therefore, it is necessary to encapsulate the basic operation of string.
The above code encapsulates the common operations of a string. For example, isEmpty and isBlank are used to judge whether it is empty. The difference is that isEmpty simply compares the length of the string. If the length is 0, it returns true, otherwise it returns false, such as "" (here represents a space), it returns false; isBlank judges whether there is content, such as "" (here represents a space) and returns true. Similarly, both isNotEmpty and isNotBlank judge whether it is not empty. The difference is the same as above. randomString refers to the randomly generated string of 6 numbers, which is commonly used for the generation of SMS verification code. uuid is used to generate unique identification, which is often used to generate database primary key and file name.
Encryption / decryption encapsulation
For some sensitive data, such as payment data, order data and password, we often need to encrypt them in the HTTP transmission process or data storage to ensure the relative security of the data. At this time, we need to use encryption and decryption algorithms.
At present, the commonly used encryption algorithms are divided into symmetric encryption algorithm, asymmetric encryption algorithm and information summary algorithm.
Symmetric encryption algorithm: encryption algorithm that uses the same key for encryption and decryption. Common encryption algorithms include AES, DES and XXTEA. Asymmetric encryption algorithm: generate a pair of public key and private key respectively. Use public key encryption and private key decryption. RSA is common. Information digest algorithm: an irreversible encryption algorithm. As the name suggests, it can only be encrypted but not decrypted. The common one is MD5 SHA-1 and SHA-256.
The actual projects of this book use AES, RSA, MD5 and SHA-1 algorithms, so they are encapsulated under the common project.
(1) In. POM Add dependency in XML:
<dependency>
<groupId>commons-codec</groupId>
<artifactId>commons-codec</artifactId></dependency>
<dependency>
<groupId>commons-io</groupid>
<artifactId>commons-io</ artifactId><version>2.6</version>
</dependency>
Among the above dependencies, commons codec is a package provided by the Apache foundation for information summarization and Base64 encoding and decoding. In the common symmetric and asymmetric encryption algorithms, the ciphertext will be Base64 encoded. Commons IO is a package provided by the Apache foundation for manipulating input and output streams. In the encryption / decryption algorithm of RSA, the operation of byte stream is required, so this dependent package needs to be added.
(2) Write AES algorithm:
import javax.crypto.spec. SecretKeySpec;
public class AesEncryptUtils {
private static final String ALGORITHMSTR = "AES/ECB/PKCSSPadding";
public static String base64Encode(byte[] bytes) i
return Base64.encodeBase64String( bytes);
}
public static byte[] base64Decode(String base64Code) throws Exception {
return Base64.decodeBase64(base64Code);
}
public static byte[] aesEncryptToBytes(String content,String encryptKey) throws
Exception {
KeyGenerator kgen = KeyGenerator.getInstance("AES");
kgen.init(128);
Cipher cipher = Cipher.getInstance(ALGORITHMSTR);
cipher.init(Cipher.ENCRYPT_MODE,new SecretKeySpec(encryptKey.getBytes(),"AES"));
return cipher.doFinal(content.getBytes("utf-8"));
}
public static String aesEncrypt(String content, String encryptKey) throwS Exception {
return base64Encode(aesEncryptToBytes(content,encryptKey));
}
public static string aesDecryptByBytes(byte[] encryptBytes, String decryptKey)throws
Exception {
KeyGenerator kgen = KeyGenerator.getInstance("AES");kgen.init(128);
Cipher cipher = Cipher.getInstance(ALGORITHMSTR);
cipher.init(Cipher.DECRYPT_MODE,new SecretKeySpec(decryptKey.getBytes(),"AES"));byte[] decryptBytes = cipher.doFinal(encryptBytes);
return new String(decryptBytes);
}
public static String aesDecrypt(String encryptStr, String decryptKey) throws
Exception i
return aesDecryptByBytes(base64Decode(encryptStr),decryptKey);
}
}
The above code is a general AES encryption algorithm. A unified key is required for encryption and decryption. The key is any custom string with a length of 16 bits, 24 bits or 32 bits. Here, the aesEncrypt method is called for encryption, in which the first parameter is plaintext and the second parameter is key; Call aesDecrypt to decrypt. The first parameter is ciphertext and the second parameter is key.
We notice that a string constant ALGORITHMSTR is defined in the code, and its content is AES/ECB/PKCS5Padding. It defines the specific encryption and decryption implementation of symmetric encryption algorithm. AES indicates that the algorithm is AES algorithm, ECB is encryption mode, PKCS5Padding is specific filling mode, and common filling modes include PKCS7Padding and NoPadding. Different methods are used to encrypt the same string, and the results are different. Therefore, we need to be unified with the client when setting the encryption algorithm, otherwise the client cannot decrypt the ciphertext returned by the server correctly.
(3) Write RSA algorithm:
public class RSAUtils {
public static final String CHARSET ="UTF-8";
public static final String RSA_ALGORITHM="RSA";
public static Map<String,String>createKeys(int keySize){
KeyPairGenerator kpg;
try{
kpg =KeyPairGenerator.getInstance(RSA_ALGORITHM);
Security.addProvider(new com.sun.crypto.provider. SunJCE());}catch(NoSuchAlgorithmException e){
throw new IllegalArgumentException("No such algorithm-->[" + RSA_ALGORITHM +"]");
}
kpg.initialize(keySize);
KeyPair keyPair = kpg.generateKeyPair();
Key publicKey = keyPair.getPublic();
string publicKeyStr = Base64.encodeBase64String(publicKey.getEncoded());
Key privateKey = keyPair.getPrivate();
String privateKeyStr = Base64.encodeBase64String(privateKey.getEncoded());
Map<String,String> keyPairMap = new HashMap<>(2);
keyPairMap.put("publicKey", publicKeyStr);
keyPairMap.put( "privateKey", privateKeyStr);
return keyPairMap;
}
public static RSAPublicKey getPublicKey(String publicKey) throws NoSuchAlgorithmException,InvalidKeySpecException {
KeyFactory keyFactory = KeyFactory.getInstance(RSA_ALGORITHM);
x509EncodedKeySpec x509KeySpec = new X509EncodedKeySpec(Base64.decodeBase64(publicKey)) ;
RSAPublicKey key = (RSAPublicKey) keyFactory.generatePublic( x509KeySpec);
return key;
}
public static RSAPrivateKey getPrivateKey(String privateKey) throws
NoSuchAlgorithmException,InvalidKeySpecException {
KeyFactory keyFactory = KeyFactory.getInstance(RSA_ALGORITHM);
PKCS8EncodedKeySpec pkcs8KeySpec = new PKCS8EncodedKeySpec(Base64.decodeBase64
(privateKey));
RSAPrivateKey key = (RSAPrivateKey) keyFactory.generatePrivate(pkcs8KeySpec);
return key;
}
public static String publicEncrypt(String data,RSAPublicKey publicKey){
try{
Cipher cipher = Cipher.getInstance("RSA/ECB/PKCS1Padding");
cipher.init(Cipher. ENCRYPT_MODE,publicKey);
return Base64.encodeBase64String(rsaSplitCodec(cipher,Cipher. ENCRYPT_MODE,
data.getBytes(CHARSET),publicKey.getModulus().bitLength()));
}catch(Exception e){
throw new RuntimeException("Encrypted string["+data +"]Exception encountered while",e);
}
}
public static String privateDecrypt(String data,RSAPrivateKey privateKey){
try{
Cipher cipher = Cipher.getInstance("RSA/ECB/PKCS1Padding");
cipher.init(Cipher. DECRYPT_MODE, privateKey);
return new String(rsaSplitCodec(cipher,Cipher. DECRYPT_MODE,
Base64.decodeBase64(data),privateKey.getModulus().bitLength()),CHARSET);
}catch(Exception e){
e.printStackTrace();
throw new RuntimeException("Decrypt string["+data+"]Exception encountered while",e);
}
}
private static byte[] rsaSplitCodec(Cipher cipher, int opmode, byte[] datas,int keySize){
int maxBlock = 0;
if(opmode == Cipher. DECRYPT_MODE){
maxBlock = keysize / 8;
}else{
maxBlock =keysize / 8 -11;
}
ByteArrayOutputStream out = new ByteArrayoutputStream();int offSet = 0;
byte[] buff;int i = 0;try{
while(datas. length > offSet)f
if(datas.length-offSet > maxBlock){
buff = cipher.doFinal(datas,offSet,maxBlock);}else{
buff = cipher.doFinal(datas,offSet, datas.length-offSet);
}
out.write(buff, 0,buff.length);
i++;
offSet = i * maxBlock;
}
}catch(Exception e){
e.printStackTrace();
throw new RuntimeException("Encryption and decryption threshold is["+maxBlock+"]An exception occurred while retrieving data for",e);
}
byte[] resultDatas = out.toByteArray();IOUtils.closeQuietly(out);
return resultDatas;
}
}
As mentioned earlier, RSA is an asymmetric encryption algorithm. The so-called asymmetry means that the keys used for encryption and decryption are different. The basic idea of RSA is to generate a pair of keys through certain rules, namely public key and private key. The public key is provided to the client, that is, anyone can get it, while the private key is stored on the server, and no one can get it through normal channels.
Usually, the asymmetric encryption algorithm uses the public key encryption at the client. After it is transmitted to the server, the server decrypts it with the private key. For example, the above code provides encryption and decryption methods, which are publicEncrypt and privateDecrypt methods respectively. However, these two methods cannot directly transfer the public-private key string, but return the RSAPublicKey and RSAPrivateKey objects through the getPublicKey and getPrivateKey methods, and then transfer them to the encryption and decryption method.
There are many ways to generate public and private keys, such as OpenSSL tools, third-party online tools and coding implementation. Because the asymmetric encryption algorithm maintains the public key and private key respectively, its algorithm efficiency is lower than that of the symmetric encryption algorithm, but the security level is higher than that of the symmetric encryption algorithm. Readers should consider comprehensively when choosing the encryption algorithm and adopt the encryption algorithm suitable for the project.
(4) Algorithm for writing information summary:
import java.security.MessageDigest;
public class MessageDigestutils {
public static string encrypt(String password,string algorithm){
try {
MessageDigest md =MessageDigest.getInstance(algorithm);byte[] b = md.digest(password.getBytes("UTF-8"));
return ByteUtils.byte2HexString(b);
}catch (Exception e){
e.printStackTrace();return null;
}
}
}
JDK has its own information summary algorithm, but it returns the type of byte array. In practice, it is necessary to convert the byte array into hexadecimal string. Therefore, the above code briefly encapsulates the information summary algorithm. By calling messagedigestutils The encrypt method can return the encrypted string ciphertext. The first parameter is plaintext and the second parameter is the specific information summary algorithm. The optional values are MD5, SHA1 and SHA256.
Information digest encryption is an irreversible algorithm, that is, it can only be encrypted and cannot be decrypted. In today's highly developed technology, although the information summary algorithm cannot be decrypted directly, it can be decrypted through the collision algorithm curve. Ms. Wang Xiaoyun, a famous mathematician and cryptography expert in China, has already cracked MD5 and SHA1 algorithms through collision algorithm. Therefore, in order to improve the security of encryption technology, we generally use "multiple encryption + salt" encryption, such as ND5 (MD5 (plaintext + salt)). Readers can understand salt as a key, but they can't decrypt it through salt.
Encapsulation of message queue
Message queue is generally used for asynchronous processing, high concurrency message processing and delay processing. It is also widely used in the current Internet environment. Therefore, it is also encapsulated for subsequent message queues.
In this example, RabbitMQ is used to demonstrate message queuing. First, install RabbitMQ under Windows system. Since RabbitMQ depends on Erlang, you should install Erlang first. The download address is http: / www.RabbitMQ com/which-erlang. HTML, double-click the downloaded file to complete the installation. Then install RabbitMQ. The download address is http: / www.RabbitMQ com/install-windows. HTML, double-click the downloaded exe file and follow the steps to complete the installation.
After installation, click Win+R and Enter the command services in the open running window MSc and press Enter to open the service list, as shown in the figure.
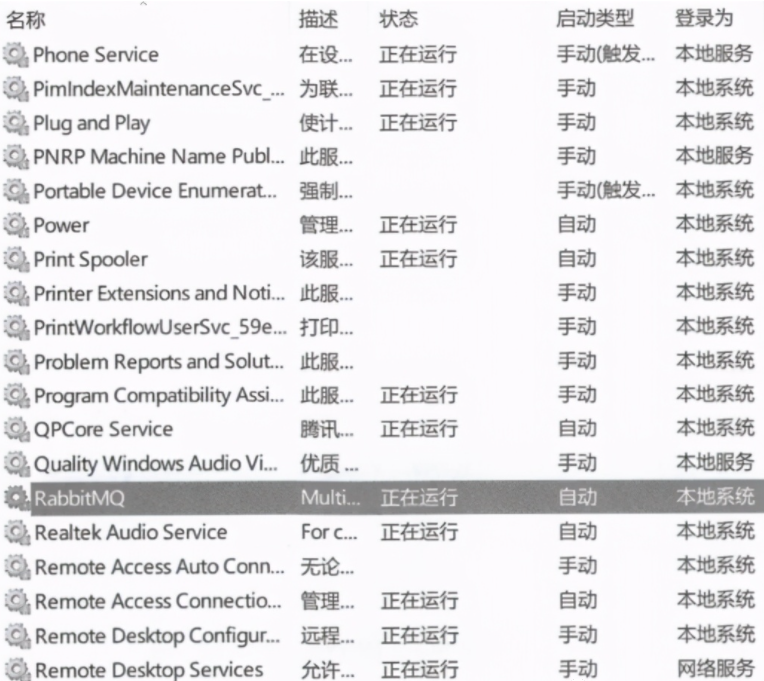
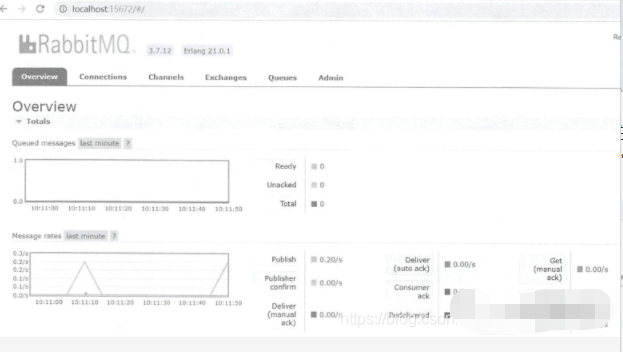
As you can see, RabbitMQ has started. By default, only port 5672 is opened after RabbitMQ is installed. We can only view and manage RabbitMQ by command. For convenience, we can enable the Web management function of RabbitMQ by installing a plug-in. Open the cmd command console, enter the sbin directory of the RabbitMQ installation directory, and enter
rabbitmq-plugins enablerabbitmq_management
OK, as shown in the figure below.

The default startup port of the Web management interface is 15672. Enter localhost:15672 in the browser. The default account and password are guest. After filling in, you can enter the main Web management interface, as shown in the figure below.
Next, we will encapsulate the message queue.
(1) Add RabbitMQ dependency:
<dependency>
<groupId>org.springframework.cloud</groupId>
<artifactId>spring-cloud-starter-bus-amqp</ artifactId>
</dependency>
Message queues are integrated through the Spring Cloud component Spring Cloud Bus. RabbitMQ can be easily used by adding dependencies on Spring Cloud starter bus AMQP.
(2) Create the RabbitMQ configuration class RabbitConfiguration, which is used to define the basic properties of RabbitMQ:
import org.springframework.amqp.core.Queue;
import org.springframework.boot.SpringBootConfiguration;
import org.springframework.context.annotation. Bean;
@SpringBootConfiguration
public class Rabbitconfiguration {
@Bean
public Queue queue(){
return new Queue( "someQueue");
}
}
As mentioned earlier, Spring Boot can use the @ SpringBootConfiguration annotation to configure applications. After we integrate RabbitMQ dependency, we also need to configure it basically. In the above code, we define a Bean whose function is to automatically create the message queue name. If you do not create a queue through code, you need to manually add a queue through the Web management interface of RabbitMQ every time, otherwise an error will be reported, as shown in the figure.

However, it is obviously not advisable to manually create a queue through the Web management interface every time. Therefore, we can define the queue in advance in the above configuration class.
(3) RabbitMQ is an asynchronous request, that is, the client sends a message, and the RabbitMQ server will send it back to the client after receiving the message. Those who send messages are called producers and those who receive messages are called consumers. Therefore, it is also necessary to encapsulate the sending and receiving of messages.
Create a class named MyBean to send and receive message queues:
@Component
public class MyBean {
private final AmqpAdmin amqpAdmin;
private final AmqpTemplate amqpTemplate;
@Autowired
public MyBean(AmqpAdmin amqpAdmin,AmqpTemplate amqpTemplate){
this.amqpAdmin = amqpAdmin;
this.amqpTemplate = amqpTemplate;
}
@RabbitHandler
@RabbitListener(queues = "someQueue")
public void processMessage(String content){
//Message queuing consumer
system.out.println( content);
}
public void send(string content){
//Message queue producer
amqpTemplate.convertAndSend("someQueue", content);
}
}
Among them, send is the message producer, responsible for sending messages whose queue name is someQueue, and processNessage is the message consumer. The @ RabbitHandler and @ RabbitListener annotations are defined on its method, indicating that the method is a message consumer and specifying which queue to consume.
Interface version management
Generally, after the first version of the product is released and launched, it will often be iterated and optimized continuously. We can't guarantee that the original interface will not be changed in the subsequent upgrade process, and some changes may affect the online business. Therefore, if you want to transform the interface without affecting the online business, you need to introduce the concept of version. As the name suggests, the version number is added when requesting the interface, and the back-end executes the business logic of different version periods according to the version number. Then, even if we upgrade the interface, it will not affect the original online interface, so as to ensure the normal operation of the system.
There are many ideas for version definition, such as:
Bring the person's version number through the request header, such as header("version", "1.0"); The URL address is followed by the version number, such as api?version=1.0;RESTful style version number definition, such as / api/v1.
This section will introduce the definition idea of the third version number. The simplest way is to write a fixed version number directly in RequestMapping, such as:
@RequestMapping("/v1/index")
The disadvantage of this method is poor scalability, and once other version numbers are passed in, the interface will report 404 error. For example, the request for the address of the client interface is / v2/index, but our project only defines v1, so we cannot request the index interface.
The effect we want is that if the incoming version number cannot be found in the project, we will automatically find the interface with the highest version. What can we do? Please refer to the following code for implementation.
(1) Define annotation class:
@Target(ElementType. TYPE)
@Retention(RetentionPolicy.RUNTIME)@Mapping
@Documented
public @interface ApiVersion {
int value();
}
In the above code, an annotation is first defined to specify the version number of the controller. For example, @ ApiVersion(1), you can access the methods defined by the controller through the address v1 / *.
(2) Custom RequestMappingHandler:
public class CustomRequestMappingHandlerMapping extends
RequestMappingHandlerMapping i
@override
protected RequestCondition<ApiVersionCondition> getCustomTypeCondition(Class<?>
handlerType) {
ApiVersion apiVersion = Annotationutils.findAnnotation(handlerType,
Apiversion.class);
return createCondition( apiversion);
}
@override
protected RequestCondition<ApiVersionConditionz getCustomMethodCondition(Nethod method){
ApiVersion apiversion = AnnotationUtils.findAnnotation(method,ApiVersion.class);
return createCondition(apiversion) ;
}
private RequestCondition<ApiVersionCondition> createCondition(ApiVersion apiVersion)f
return apiversion == null ? null : new ApiVersionCondition(apiVersion.value());
}
}
Spring MVC defines the request path through RequestMapping, so if we want to automatically request the specified controller through an address such as v1, we should inherit the RequestMappingHandlerMapping class to override its method.
After starting the application, Spring MVC will automatically map all controller classes and load the methods marked with @ RequestMapping annotation into memory. Since we inherit the RequestMappingHandlerMapping class, we will execute the rewritten getCustomTypeCondition and getCustomMethodCondition methods during mapping. We can know from the content of the method body that we have created a custom requestcondition and passed the version information to the requestcondition.
(3) The customrequestmappinghandlermapping class only inherits the RequestMappingHandlerMapping class, which Spring Boot does not know. Therefore, it needs to be defined in the configuration class to enable Spring Boot to execute the custom RequestMappingHandlerMapping class at startup.
Create a webConfig class in the public project, inherit the webNvcConfigurationSupport class, and then override the requestMappingHandlerMapping method, such as:
@Override
public RequestMappingHandlerMapping requestMappingHandlerMapping(){
RequestMappingHandlerMapping handlerMapping = new CustomRequestMappingHandlerMapping();handlerMapping.set0rder(0);
return handlerMapping;
}
In the above code, we override the requestMappingHandlerMapping method, instantiate the requestmapping handlermapping object, and return the CustomRequestMappingHandlerMapping class customized above.
(4) Add the annotation @ ApiVersion(1) to the controller class to realize version control, where the number 1 represents the version number v1. When requesting an interface, enter an address similar to / api/v1/index. The code is as follows:
@RequestMapping("{version}")
@RestController
@ApiVersion(1)
public class TestV1controller{
@GetMapping("index ")
public String index(){
return "";
}
}
Validity verification of input parameters
When defining the interface, we need to verify the input parameters to prevent the intrusion of illegal parameters. For example, when implementing the login interface, the mobile phone number and password cannot be empty, and the mobile phone number must be 11 digits. Although the client also performs verification, it is only for normal user requests. If the user bypasses the client and directly requests the interface, some abnormal characters may be passed in. Therefore, it is necessary for the backend to verify the validity of the input parameters at the same time.
The simplest way to verify legitimacy is to make if else judgment in each interface, but this method is not elegant enough. Spring provides a validation class validator, which we can write about.
Add the following methods to the public controller class:
protected void validate(BindingResult result){
if(result.hasFieldErrors()){
List<FieldError> errorList = result.getFieldErrors();
errorList.stream().forEach(item -> Assert.isTrue(false,item.getDefaultMessage()));
}
}
The validation result of the Validator will be stored in the BindingResult class, so the above method passes in the BindingResult class. In the above code, the program judges whether the verification fails through hasFieldErrors. If so, it takes out all error information through getFieldErrors method and loops the error list. Once an error is found, it throws an exception with Assert assertion method. Section 6.4 will introduce the handling of exceptions and return the prompt information of verification failure uniformly.
The advantage of using assertion is that it throws runtime exceptions, that is, we do not need to explicitly add throwsException after the method, which can ensure good scalability and simplify the amount of code.
Then @valid annotations are added to the parameters of the controller interface, followed by the BindingResult class, and the validate(result) method is called in the method body, such as:
@GetMapping( "index")
public String index(@valid TestRequest request, BindingResult result){
validate(result);
return "Hello " +request.getName();
}
To implement interface verification, you need to add each attribute to the verification rule annotation in the class with @ valid annotation defined, such as:
@Data
public class TestRequest {
@NotEmpty
private String name;
}
Common notes are listed below for readers' reference.
- @NotNull: cannot be empty.
- @NotEmpty: cannot be empty or empty string.
- @Max: maximum value.
- @Min: minimum value.
- @Pattern: regular matching.
- @Length: maximum and minimum length.
Unified handling of exceptions
Exceptions are common in product development, such as program running or database connection. Exceptions may be thrown in these processes. If no processing is carried out, the client will receive the content shown in the figure.

It can be seen that 500 is returned directly on the interface, which is not what we expected. Under normal circumstances, even if there is an error, a unified JSON format should be returned, such as:
{
"code" :0,
"message" :"Cannot be empty" ,"data" :null
}
In fact, it is very simple. It uses the AOP feature of Spring and adds the following methods to the public controller:
@ExceptionHandler
public SingleResult doError(Exception exception){
if(Stringutils.isBlank(exception.getMessage())){
return SingleResult.buildFailure();
}
return SingleResult.buildFailure(exception.getMessage());
}
Add the @ ExceptionHandler annotation to the doError method to indicate that when an Exception occurs, the annotated method will be executed, and the method will receive the Exception class. We know that Exception class is the parent class of all Exception classes, so when an Exception occurs, spring MVC will find the method marked with @ ExceptionHandler annotation, call it and pass it to the specific Exception object.
To return the above JSON format, we only need to return the SingleResult object. Note that SingleResult is a user-defined data result class, which inherits from the result class and represents the return of a single data object; The corresponding MultiResult class is used to return multiple result sets. All interfaces should return result. For this category, readers can refer to the supporting source code of this book, which can be found on com.com of common project lynn. blog. common. Result package.
Replace JSON converter
By default, Spring MVC adopts Jackson framework as the conversion engine of JSON format for data output. However, many JSON parsing frameworks have emerged on the market, such as fastjason and Gson. Jackson, as an old framework, is no longer comparable to these frameworks.
Spring's strength also lies in its extensibility. It provides a large number of interfaces to facilitate developers to change their default engine, and JSON conversion is no exception. Now let's take a look at how to replace Jackson with fastjason.
(1) Add fastjason dependency:
<dependency>
<groupId>com.alibaba</groupId><artifactId>fastjson</artifactId><version>1.2.47</version>
</ dependency>
Fastjason is a class library produced by Alibaba for generating and parsing JSON data, and its execution efficiency is also outstanding among similar frameworks. Therefore, this book adopts fastjason as the parsing engine of JSON.
(2) Override the configureMessageConverters method in the webConfig class:
@override
public void configureMessageConverters(List<HttpMessageConverter< ?>> converters){
super.configureMessageConverters(converters);
FastJsonHttpMessageConverter fastConverter=new Fast]sonHttpMessageConverter();FastJsonConfig fastJsonconfig=new FastsonConfig();
fastJsonconfig.setSerializerFeatures(
SerializerFeature.PrettyFormat
);
List<MediaType> mediaTypeList = new ArrayList<>();mediaTypeList.add(MediaType.APPLICATION_JSON_UTF8);fastConverter.setSupportedMediaTypes(mediaTypeList);fastConverter.setFastsonConfig(fastsonConfig);
converters.add(fastConverter);
}
When the program starts, the configureMessageConverters method will be executed. If the method is not rewritten, the method body is empty. We can see from the source code. The code is as follows:
/**

* Override this method to add custom {@link HttpMessageConverter}s to use* with the {@link RequestMappingHandlerAdapter} and the
* {@link ExceptionHandlerExceptionResolver}. Adding converters to the
* list turns off the default converters that would otherwise be registered* by default. Also see {@link #addDefaultHttpNessageConverters(List)} that* can be used to add default message converters.
* @param converters a list to add message converters to;* initially an empty list.
  */
  protected void configureMessageConverters(List<HttpNessageConverter<?>> converters) {}
At this time, Spring MVC takes Jackson as its default JSON parsing engine, so once we rewrite the configuremessage converters method, it will override Jackson and use our custom JSON parser as the JSON parsing engine.
Thanks to the extensibility design of Spring, we can replace the JSON parsing engine with fastjason, which provides abstracthttp messageconverter abstract class and GenericHttpMessageConverter interface. By implementing their methods, you can customize the JSON parsing method.
In the above code, FastJsonHttpMessageConverter is a converter implemented by fastjason to integrate Spring. Therefore, when rewriting the configureMessageConverters method, we must first instantiate the fastjsonhttpmessage converter object and perform the basic configuration of Fast]sonConfig. PrettyFormat indicates whether the returned result is formatted; MediaType sets the rule of encoding UTF-8. Finally, add the Fast3sonHttpMessageConverter object to the contents list.
In this way, when we request the data returned by the interface, Spring MVC will use fastjason to transform the data.
Redis encapsulation
As an in memory database, Redis is widely used. We can cache some data to improve the query performance of applications, such as saving login data (verification code, token, etc.), realizing distributed locks, etc.
Redis is also used in this practical project, and Spring Boot is very convenient to operate redis. SpringBoot integrates redis and implements a large number of methods. Some methods can be shared. We can encapsulate a set of our own redis operation code according to the project requirements.
(1) Add Redis dependency:
<dependency>
<groupId>org.springframework.boot</groupId>
<artifactId>spring-boot-starter-data-redis</artifactId>
</dependency>
Spring boot starter data contains data related packages, such as jpa, mongodb and elastic search. Therefore, Redis is also placed under spring boot starter data.
(2) Create a Redis class, which contains the general operations of Redis. Its code is as follows:
@Component
public class Redis i
@Autowired
private StringRedisTemplate template;
public void set(String key, String value,long expire){
template.opsForValue().set(key, value,expire,TimeUnit.SECONDS);
}
public void set(String key,string value){
template.opsForValue().set(key, value);
}
public Object get(String key) i
return template.opsForValue().get(key);
}
public void delete(String key) {
template.delete(key);
}
}
In the above code, we first inject the StringRedisTemplate class, which is the Redis operation template class provided by Spring Boot. Through its name, we can know that this class is specially used for string access operation. It inherits from the RedisTemplate class. The code only implements the basic operations of Redis, including key value saving, reading and deletion. The set method overloads two methods to receive the validity period of data saving, timeunit Seconds specifies the validity period in seconds. If readers find that these operations cannot meet the requirements in the process of project development, they can add methods to meet the requirements in this class.
Summary
This article mainly encapsulates the public modules of the blog website, that is, the methods and class libraries that may be used in each module to ensure the reusability of the code. Readers can also encapsulate some methods according to their own understanding and specific project requirements and provide them to each module.
Pay attention to me and update technical articles every day