Disadvantages of traditional Session authentication
In the last lesson, we used Shiro for user authentication. The internal identification is Subject through Session, and the server identifies cookies that depend on JSESSIONID. However, in the front-end and back-end separated projects, the front-end project will run separately, and the server that mounts another server is different from that of the back-end project. When the front end sends a request to the back end, it is cross domain and cannot carry the Cokie of JSESSIONID, which will cause each request to be a new Session. The root of the problem lies in the disadvantages of the traditional Session tracking technology (Session+Cookie):
1. Cross domain issues
2. Cluster issues
Then we must find a new technology to realize session tracking. We have come into contact with one thing, token. Token mechanism is a good solution. However, in the previous application, token has a database, which requires frequent access to the database, which greatly affects the performance of the server. Then Jwt (JSONS WEB TOKEN) is upgraded again on the traditional token.
To use a new technology to complete session tracking, the following requirements must be met:
1. Cookie s cannot be contacted and must be able to be transmitted across domains
2. Be able to identify users
3. Sufficient safety
JWT
JWT is a specification and a standard for token. It describes in detail what data a token should have. What is the specific function of each piece of data.
1. JWT specification
JWT is a string that consists of three parts, each of which is used between separate. For example: XXXXXXXX yyyyyyy. zzzzzz.
The three parts are:
Header:
Header information is a piece of JSON data that describes jwt's encryption method and type. The content of this section is basically unchanged.
{
"alg": "HS256", / / encryption method
"typ": "JWT" / / type
}
After such a JSON is encrypted with Base64URL, the first paragraph of JWT is obtained.
Payload
The load is also a piece of JSON data, which describes the JWT information ontology. The seven predefined properties of the load indicated in the specification are:
iss (issuer): issuer
Subject (subject): the principal, which stores the user ID
iat (Issued At): issuing time
exp (expiration time): expiration time
nbf (Not Before): effective time, which is invalid before
jti (JWT ID): No
aud (audience): audience
For example:
{
"iss": "http://localhost:8000/auth/login",
"sub": "1",
"iat": 1451888119,
"exp": 1454516119,
"nbf": 1451888119,
"jti": "37c107e4609ddbcc9c096ea5ee76c667",
"aud": "dev"
}
After such a piece of JSON data is encrypted with Base64URL, the second paragraph of JWT is obtained
Signature:
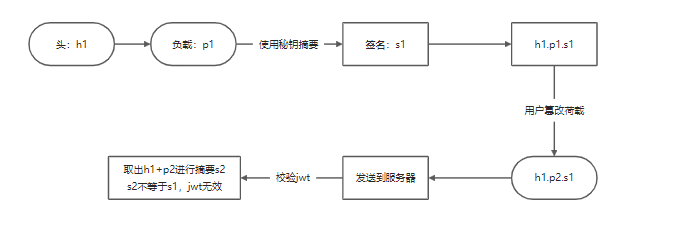
Signature is the biggest guarantee of JWT security. Because Base64 is reversible, if the client decrypts the load using Base64, modifies the sub, and then overwrites the original load in encryption, the JWT can be forged. In order to prevent the client from forging JWT, we encrypt the Header content + Payload content with higher security (HS256), and the encrypted content is the signature. HS256 is a digest encryption with secret key. The characteristic of digest encryption is irreversible.
We analyze the JWT at the back end to identify the user identity. The user identity is in the load, which can be obtained through Base64. However, we will verify the legitimacy of JWT before parsing JWT.
Signature to jwt security:
2. Use of JWT
Using a third-party JWT generator:
Import dependency:
<!-- jjwt -->
<dependency>
    <groupId>io.jsonwebtoken</groupId>
    <artifactId>jjwt</artifactId>
    <version>0.9.0</version>
</dependency>
JWT tool class:
//JWT tool class
public class JWTUtils {
    //Define encryption key
    private final static String KEY="wuyanzudemiyao";
    //Define the effective time of JWT
    private final static long TIME=3*24*60*60*1000;
    /*
    Method of generating JWT
     */
    public static String generatorJWT(String id){
        JwtBuilder builder = Jwts.builder()
                .setSubject(id)//Set user ID
                .setIssuedAt(new Date())//Set issuing time
                .setExpiration(new Date(new Date().getTime()+TIME))//Set expiration time
                .signWith(SignatureAlgorithm.HS256, KEY);//Set signature method and secret key
        String token = builder.compact();
        return token;
    }
    /*
    Verify JWT
     */
    public static void validateJWT(String token) throws Exception{
        Jwts.parser().setSigningKey(KEY).parseClaimsJws(token);
    }
    /*
    Parse the token and get the subject
     */
    public static String getId(String token) throws Exception{
        Claims claims = Jwts.parser().setSigningKey(KEY).parseClaimsJws(token).getBody();
        return claims.getSubject();
    }
}
3. Combination of JWT and actual business
Jwt business process for user identity authentication:
Issued by Jwt:

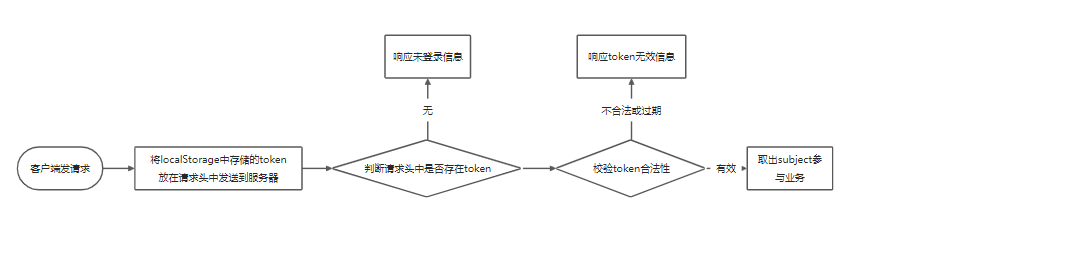
jwt verification:
4. Shiro+JWT realizes user authentication
The project and dependency are consistent with the Shiro project
• log in and issue a token
In the previous authentication, the login is put into the field. In the authentication project of Shiro+Jwt, the login is still put into the original controller. After successful login, a token is generated, and the token is put into JSONResult to respond to the client. In the original domain, we only used it for token verification.
@RestController
@RequestMapping("user")
@CrossOrigin
public class UserController {
    @GetMapping("login")
    public JSONResult login(String username, String password) throws Exception{
        if("admin".equals(username)&&"123456".equals(password)){
            //Using tools to generate token s
            String token = JWTUtils.generatorJWT("1");
            return new JSONResult("1001","success",token,null);
        }
        return new JSONResult("1001","fail",null,null);
    }
}
<script>
            $("#btn").click(function(){
                $.ajax({
                    url:"http://localhost/user/login",
                    type:"get",
                    data:$("#login-form").serialize(),
                    success:function(data){
                        alert(data.message);
                        //Store the token to localStorage
                        localStorage.setItem("token",data.object);
                    }
                });
            });
</script>
• when sending a request, the front end needs to carry a token in the request header
$.ajax({
  url:"http://localhost/user",
  type:"get",
  headers:{"token":localStorage.getItem("token")},
  success:function(data){
  alert(data.object);
  }
});
• the token can be taken from the request header in the controller
Take out the token from the request header, use JWTUtils to take out the subject data and participate in the business
@GetMapping
public JSONResult selectUser(@RequestHeader("token") String token) throws Exception{
    String id=JWTUtils.getId(token);
    return new JSONResult("1001","success","Xiang Shen YYDS",null);
}
• complete JWT certification using Shiro
For the custom filter, complete one in jwt
public class JWTFilter extends BasicHttpAuthenticationFilter {
    @Override
    protected boolean isAccessAllowed(ServletRequest request, ServletResponse response, Object mappedValue) {
        //The return value of true indicates that the request continues to execute downward
        //Judge whether the request header contains a token
        HttpServletRequest req= (HttpServletRequest) request;
        if(req.getHeader("token")!=null){
            //Call the authentication method, and the authentication result represents whether to release this time
            try {
                return executeLogin(request,response);
            } catch (Exception e) {
                e.printStackTrace();
            }
        }
        //If the return value is false, Shiro will throw 401 exception
        return false;
    }
    @Override
    protected boolean executeLogin(ServletRequest request, ServletResponse response) throws Exception {
        HttpServletRequest req= (HttpServletRequest) request;
        //Call the method in the domain class to perform authentication
        Subject subject = SecurityUtils.getSubject();
        JWTToken jwtToken = new JWTToken(req.getHeader("token"));
        //Let shiro pass the domain class to complete the certification
        subject.login(jwtToken);//Performing authentication is not logging in
        return true;
    }
    @Override
    protected boolean preHandle(ServletRequest request, ServletResponse response) throws Exception {
        HttpServletRequest httpServletRequest = WebUtils.toHttp(request);
        HttpServletResponse httpServletResponse = WebUtils.toHttp(response);
        //Handling cross domain
        httpServletResponse.setHeader("Access-control-Allow-Origin", httpServletRequest.getHeader("Origin"));
        httpServletResponse.setHeader("Access-Control-Allow-Methods", "GET,POST,OPTIONS,PUT,DELETE");
        httpServletResponse.setHeader("Access-Control-Allow-Headers", httpServletRequest.getHeader("Access-Control-Request-Headers"));
        //If the request method is options, it means that it is a pre inspection request. Therefore, it is released directly
        if (httpServletRequest.getMethod().equals(RequestMethod.OPTIONS.name())) {
            httpServletResponse.setStatus(HttpStatus.OK.value());
            return false;
        }
        return super.preHandle(request, response);
    }
}
To perform authentication, you need to pass in the token class object in Shiro. You need to customize a token. The user name and password are jwt tokens
public class JWTToken implements AuthenticationToken {
    public JWTToken(String token){
        this.token=token;
    }
    private String token;
    public String getToken() {
        return token;
    }
    public void setToken(String token) {
        this.token = token;
    }
    @Override
    public Object getPrincipal() {
        return token;
    }
    @Override
    public Object getCredentials() {
        return token;
    }
}
Handling authentication logic in domain classes
public class JWTRealm extends AuthorizingRealm {
    @Override
    public boolean supports(AuthenticationToken token) {
        return token instanceof JWTToken;//Determine the token type. If it is a JWTToken, authentication is allowed
    }
    @Override
    protected AuthorizationInfo doGetAuthorizationInfo(PrincipalCollection principalCollection) {
        return null;
    }
    //authentication
    @Override
    protected AuthenticationInfo doGetAuthenticationInfo(AuthenticationToken authenticationToken) throws AuthenticationException {
        String token= (String) authenticationToken.getPrincipal();
        //Perform token verification
        //The verification indicates that the token is valid and returns authentication information
        try {
            JWTUtils.validateJWT(token);
            SimpleAuthenticationInfo info = new SimpleAuthenticationInfo(token, token,getName());
            return info;
        } catch (Exception e) {
            //null is returned if the verification fails
            e.printStackTrace();
            return null;
        }
    }
}
• configure custom filters into Shiro
In previous projects, the anon, user and logout we used were Shiro's own filters. If we want to realize JWT verification through the filters, we need to add our own filters.
@Configuration
public class ShiroConfig {
    @Bean
    public JWTRealm initUserRealm(){
        return new JWTRealm();
    }
    @Bean
    public SecurityManager initSecurityManager(){
        DefaultWebSecurityManager securityManager = new DefaultWebSecurityManager();
        securityManager.setRealm(initUserRealm());
        return securityManager;
    }
    @Bean
    public ShiroFilterFactoryBean shiroFilter() throws UnsupportedEncodingException {
        //Instantiate Shiro filter factory
        ShiroFilterFactoryBean shiroFilterFactoryBean = new ShiroFilterFactoryBean();
        //Inject safety manager into the factory
        shiroFilterFactoryBean.setSecurityManager(initSecurityManager());
        //Add our own filter to Shiro
        Map<String, Filter> filters = shiroFilterFactoryBean.getFilters();
        filters.put("jwt",new JWTFilter());
        //Create an ordered key value pair to store the black-and-white list
        Map<String,String> filterChainDefinitionMap = new LinkedHashMap<String, String>();
        //anon indicates the resource address that can be accessed without login
        filterChainDefinitionMap.put("/user/login", "anon");
        //All other requested addresses need to pass jwt verification
        filterChainDefinitionMap.put("/**", "jwt");
        //Configure the black and white list to shiro filter
        shiroFilterFactoryBean.setFilterChainDefinitionMap(filterChainDefinitionMap);
        return shiroFilterFactoryBean;
    }
}
5. Authorization
The authorization process of Shiro+JWT is the same as that of Shiro alone. The only difference is that when querying user permissions, the required user ID cannot be obtained from the Session. Instead, the stored token is taken from the Subject and parsed to obtain the ID.
 @Override
protected AuthorizationInfo doGetAuthorizationInfo(PrincipalCollection principalCollection) {
    //Take out the token
    String token= (String) principalCollection.getPrimaryPrincipal();
    //Use JWTUtils to parse and get the subject
    String id = null;
    SimpleAuthorizationInfo info=null;
    System.out.println("to grant authorization");
    try {
        id = JWTUtils.getId(token);
        System.out.println(id);
        //Simulate query database permissions
        info= new SimpleAuthorizationInfo();
        info.addStringPermission("Role management");
        info.addStringPermission("New role");
        info.addStringPermission("user management ");
    } catch (Exception e) {
        e.printStackTrace();
    }
    return info;
}
No matter you have any problems in your study, Chongqing snail college welcomes you to come to consult and contact QQ: 296799112