Use of samba client
Share windos to linux
windows open sharing
On windows, the sharing method is: right click file attribute [can also be shared, such as disk C] - sharing - Advanced sharing - open
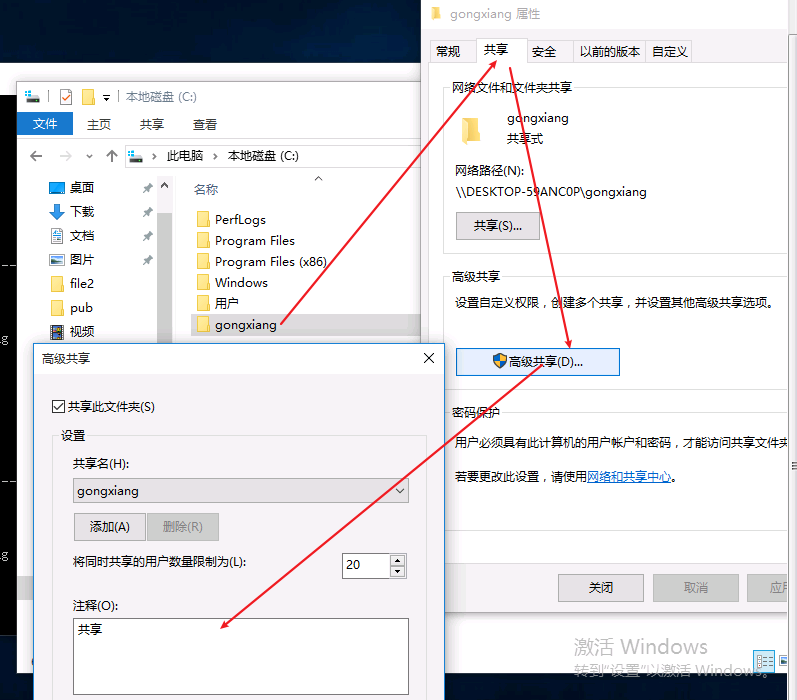
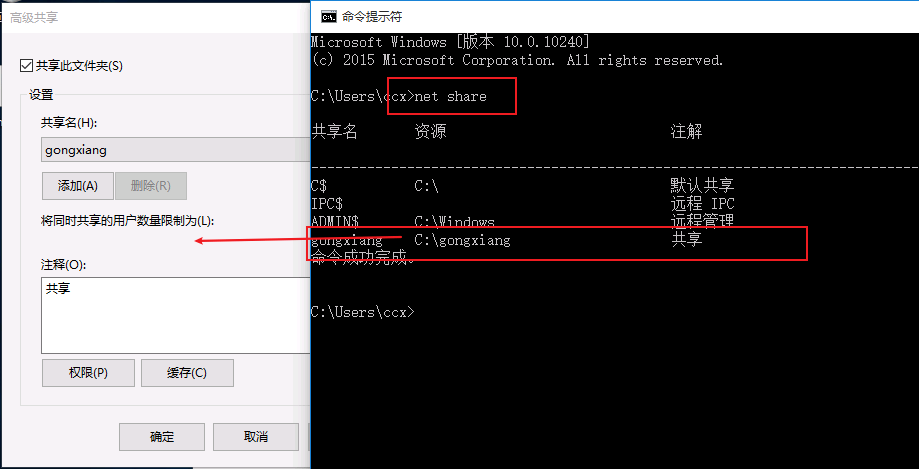
- net share: open the command panel on windows to view the share
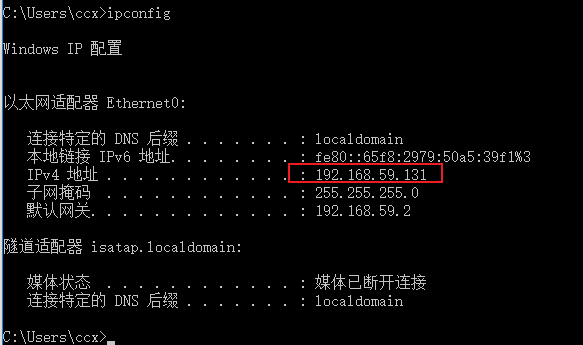
- ipconfig: open the command panel and check the local IP [this needs to be recorded, and these need to be logged in later]
Mount share on linux
Installation services [smbclient]
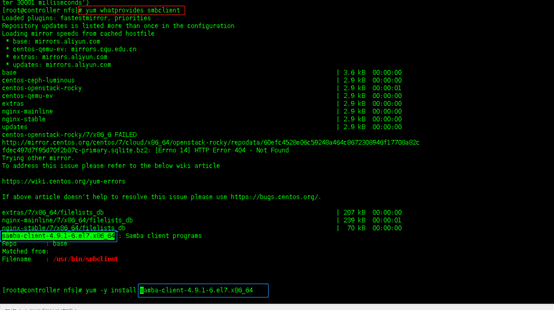
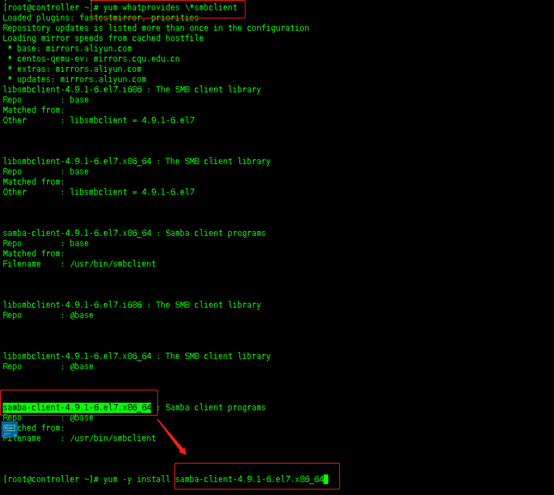
- Install smbclient on linux: first find the package name: yum whatprovides smbclient [find local source, use yum whatprovides /*smbclient for network source], and then yum -y install package name:
[root@centos76_3 ccx]# yum whatprovides smbclient
Loaded plugins: fastestmirror, langpacks
Loading mirror speeds from cached hostfile
7.6-bendi/filelists_db                                                                                                                             | 3.2 MB  00:00:00
samba-client-4.8.3-4.el7.x86_64 : Samba client programs
Repo        : 7.6-bendi
Matched from:
Filename    : /usr/bin/smbclien
[root@centos76_3 ccx]# yum -y install samba-client-4.8.3-4.el7.x86_64
Loaded plugins: fastestmirror, langpacks
Loading mirror speeds from cached hostfile
Resolving Dependencies
--> Running transaction check
---> Package samba-client.x86_64 0:4.8.3-4.el7 will be installed
--> Finished Dependency Resolution

Dependencies Resolved

==========================================================================================================================================================================
 Package                                    Arch                                 Version                                    Repository                               Size
==========================================================================================================================================================================
Installing:
 samba-client                               x86_64                               4.8.3-4.el7                                7.6-bendi                               618 k

Transaction Summary
==========================================================================================================================================================================
Install  1 Package

Total download size: 618 k
Installed size: 2.0 M
Downloading packages:
Running transaction check
Running transaction test
Transaction test succeeded
Running transaction
  Installing : samba-client-4.8.3-4.el7.x86_64                                                                                                                        1/1
  Verifying  : samba-client-4.8.3-4.el7.x86_64                                                                                                                        1/1

Installed:
  samba-client.x86_64 0:4.8.3-4.el7

Complete!
[root@centos76_3 ccx]#
View share
smbclient -L windowsIP: view the shared directory. If no user is specified, the default administrator user is admin.
smbclient -L windowsIP -U user name: specify the user name to view
smbclient -L windowsIP -U user name% password: you can view it directly without entering the password again
[root@centos76_3 ccx]# smbclient -L 192.168.59.131  # If the default admin name is modified, an error will be reported [specify the user name directly]
Enter SAMBA\root's password:
session setup failed: NT_STATUS_ACCESS_DENIED
[root@centos76_3 ccx]# smbclient -L 192.168.59.131 -U ccx1 #Specify user name
Enter SAMBA\ccx1's password:

        Sharename       Type      Comment
        ---------       ----      -------
        ADMIN$          Disk      Remote management
        C               Disk
        C$              Disk      Default share
        gongxiang       Disk      share
        IPC$            IPC       long-range IPC
Reconnecting with SMB1 for workgroup listing.
Connection to 192.168.59.131 failed (Error NT_STATUS_RESOURCE_NAME_NOT_FOUND)
Failed to connect with SMB1 -- no workgroup available
[root@centos76_3 ccx]#
[root@centos76_3 ccx]# smbclient -L 192.168.59.131 -U ccx%ccx #Specify the user name and password

        Sharename       Type      Comment
        ---------       ----      -------
        ADMIN$          Disk      Remote management
        C               Disk
        C$              Disk      Default share
        gongxiang       Disk      share
        IPC$            IPC       long-range IPC
Reconnecting with SMB1 for workgroup listing.
Connection to 192.168.59.131 failed (Error NT_STATUS_RESOURCE_NAME_NOT_FOUND)
Failed to connect with SMB1 -- no workgroup available
[root@centos76_3 ccx]#
- There are 2 ways to use, 1: direct login, 2: mount
Direct login share
- Command format: smbclient / / primary ip / path - U user name% password
For example, smbclient //192.168.26.1/D -U tom%111111 [Note: it is \ IP in windows and / / IP in linux]
[root@centos76_3 ccx]# smbclient //192.168.59.131/C -U ccx%ccx # login
Try "help" to get a list of possible commands.
smb: \> ls #View the remote directory [shared disk C I entered]
  $Recycle.Bin                      DHS        0  Fri May  7 16:57:04 2021
  bootmgr                          AHSR   395268  Fri Jul 10 19:00:31 2015
  BOOTNXT                           AHS        1  Fri Jul 10 19:00:31 2015
  Documents and Settings            DHS        0  Fri Jul 10 20:21:38 2015
  gongxiang                           D        0  Mon May 10 18:09:05 2021
  pagefile.sys                      AHS 10200547328  Fri Apr 30 17:10:08 2021
  PerfLogs                            D        0  Fri Jul 10 19:04:22 2015
  Program Files                      DR        0  Fri Apr 30 17:07:40 2021
  Program Files (x86)                DR        0  Fri Jul 10 19:04:26 2015
  ProgramData                        DH        0  Fri Apr 30 17:07:40 2021
  Recovery                          DHS        0  Fri Apr 30 16:57:02 2021
  swapfile.sys                      AHS 268435456  Fri Apr 30 17:10:08 2021
  System Volume Information         DHS        0  Mon May 10 10:27:16 2021
  Users                              DR        0  Fri Apr 30 17:10:23 2021
  Windows                             D        0  Fri Apr 30 16:59:13 2021

                78514687 blocks of size 4096. 73498041 blocks available
smb: \> pwd # View the remote directory. If you want to see the local path,! pwd
Current directory is \\192.168.59.131\C\
-
After logging in this way, you need to use commands to operate
Use the following parameters [in SMB: \ > environment (this is the interface after successful login)]:- ls # is the same as dir, listing remote directories
- ! ls # list local directories [linux]
- pwd # view current working directory
- get # downloads a single file
- mget # batch download
- put # single upload
- mput # batch upload
- # Online help for various interactive commands
- help
- lcd directory # switching local directory
- cd directory # switch shared directory
- mgetiptraf * # download files with names beginning with iptraf
- quit # exit shared directory
- ls downloaded file directory
be careful:
The download path of get and mget is the local directory before entering the shared directory
To change the download path, you can switch the local path lcd local path
These parameters and ftp parameters are common. If you want to know more, go directly to this file: Detailed instructions for ftp client [linux and windows]
-
Upload and download demo
Pay attention to the notes after the command
Note:
[root@centos76_3 ~]# smbclient //192.168.59.131/C -U ccx%ccx # login
Try "help" to get a list of possible commands.
smb: \> ls #View remote directory
  $Recycle.Bin                      DHS        0  Fri May  7 16:57:04 2021
  bootmgr                          AHSR   395268  Fri Jul 10 19:00:31 2015
  BOOTNXT                           AHS        1  Fri Jul 10 19:00:31 2015
  Documents and Settings            DHS        0  Fri Jul 10 20:21:38 2015
  gongxiang                           D        0  Tue May 11 09:36:24 2021
  pagefile.sys                      AHS 10200547328  Fri Apr 30 17:10:08 2021
  PerfLogs                            D        0  Fri Jul 10 19:04:22 2015
  Program Files                      DR        0  Fri Apr 30 17:07:40 2021
  Program Files (x86)                DR        0  Fri Jul 10 19:04:26 2015
  ProgramData                        DH        0  Fri Apr 30 17:07:40 2021
  Recovery                          DHS        0  Fri Apr 30 16:57:02 2021
  swapfile.sys                      AHS 268435456  Fri Apr 30 17:10:08 2021
  System Volume Information         DHS        0  Mon May 10 10:27:16 2021
  Users                              DR        0  Fri Apr 30 17:10:23 2021
  Windows                             D        0  Fri Apr 30 16:59:13 2021

                78514687 blocks of size 4096. 73497573 blocks available
smb: \> cd gongxiang\ #Enter the gongxiang directory of disk c
smb: \gongxiang\> ls
  .                                   D        0  Tue May 11 09:36:24 2021
  ..                                  D        0  Tue May 11 09:36:24 2021
  aaa.txt                             A        6  Tue May 11 09:36:32 2021

                78514687 blocks of size 4096. 73497573 blocks available
smb: \gongxiang\> lcd /root/ccx/         #Enter local directory
smb: \gongxiang\> !ls #Local file
file1  file2  file3  test4  test5  test6
smb: \gongxiang\> get aaa.txt  #Download aaa file
getting file \gongxiang\aaa.txt of size 6 as aaa.txt (2.0 KiloBytes/sec) (average 2.0 KiloBytes/sec)
smb: \gongxiang\> !ls #The file has been downloaded
aaa.txt  file1  file2  file3  test4  test5  test6
smb: \gongxiang\> put test4 #Permission was denied because this is the reason for the c disk, and it is not allowed to engage in remote [virtual machine has only one c disk, too lazy to add a hard disk to test, anyway, this is the operation]
NT_STATUS_ACCESS_DENIED opening remote file \gongxiang\test4
smb: \gongxiang\> ls
  .                                   D        0  Tue May 11 09:36:24 2021
  ..                                  D        0  Tue May 11 09:36:24 2021
  aaa.txt                             A        6  Tue May 11 09:36:32 2021

                78514687 blocks of size 4096. 73497573 blocks available
smb: \gongxiang\>
Mount shared directory
- Path / / mounting method: primary / mount
- For example, Mount disk D of the main ip into the / SMB file: Mount / / 192.168.26.1/d/smb
It was found that there was a mistake in the mounting report because there was no cifs format, so you need to install this format. Check the source first: Yum whatprovides mount cifs [find local source, use yum whatprovides /*mount.cifs for network source], and then yum -y install package name:
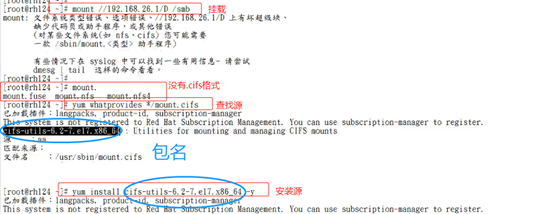

Mount again after installation: mount -o username = user name, password = user password / / primary IP / path mount path, such as mount -o username = Tom, password = 111111 / / 192.168.26.1/d/smb:

Auto mount after startup: write into / etc/fstab:

linux share to linux
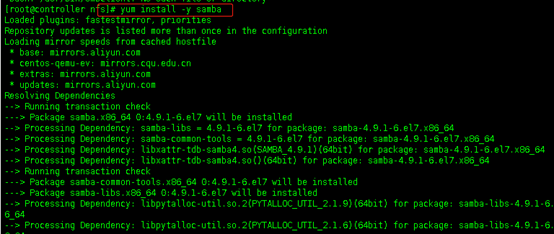
Install samba service: yum install -y samba
Start samba service and set automatic start: systemctl start smb, systemctl nable smb

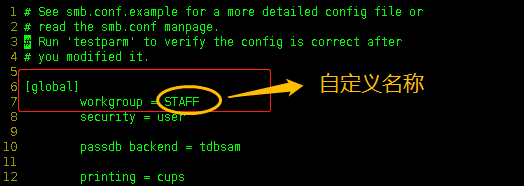
Modify the file: VI / etc / Samba / SMB Conf (tap and then tab to see if the file can be tabed out. If there is a problem with the service, modify workgroup=STAFF (custom name)
Create mount Directory: mkdir /common (custom name)
Modify context: chcon -R -t samba_share_t /common
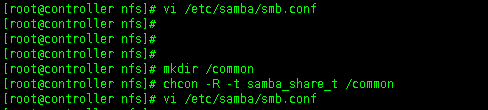
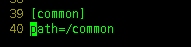
Share the file and add the shared path on the last line: VI / etc / Samba / SMB Conf, add content:
Turn off the firewall: systemctl stop firewalld
Select permanent (skip this step for the same network segment)
Configure rhce.config for firewall config CC customer access
rich rules—add—family(ipv4)—source(192.168.122.0/24)—elenment(service-samba)
–accetp
systemctl restart firewalld restart the firewall to take effect
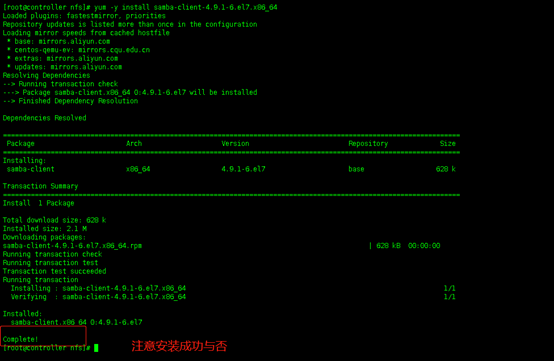
Install Samba client service: first find the package name: yum whatprovides smbclient, and then yum -y install package name:

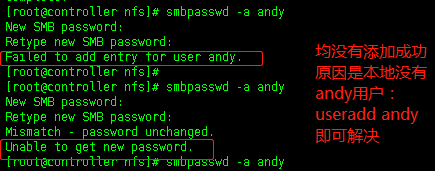
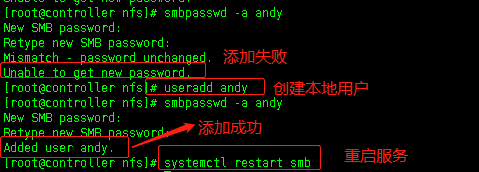
Add a user-defined user, such as adding a srmb user: smbpasswd -a andy. If the error message is shown in the figure below: adding a local user can be solved: useradd andy
After success, as shown in the figure, restart the service systemctl restart smb:
Master server configuration completed
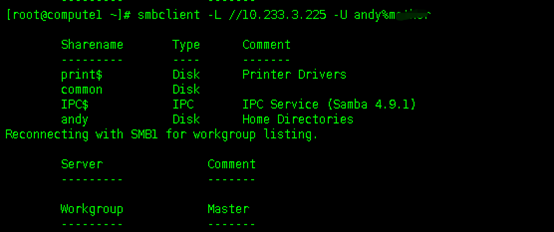
Configure client: install Samba client service: first find the package name: yum whatprovides smbclient, and then yum -y install package name:
smbclient -L / / primary ip -U username% password, as the user created above: smbclient -L //10.233.3.227 -U andy% *************************************************************
Create a new test file in the ip shared directory of the main server. Check whether it is normal after it is mounted and used:

mount -o username = user name, password = user password / / primary IP / path: mount -o username = Andy, password = mother / / 10.233.3.225/common/tt

success.
autofs (auto mount)
Introduction to automatic mount
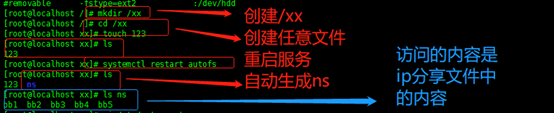
Suppose there is such a rule in the system: a specified external device / dev/xx is associated with a mount point / yy. At this time, we don't consider whether / dev/xx is mounted in / YY, but as long as the user accesses / YY, the system thinks you want to access / dev/xx, then the system will automatically mount / dev/xx in / yy.
Operation mode:
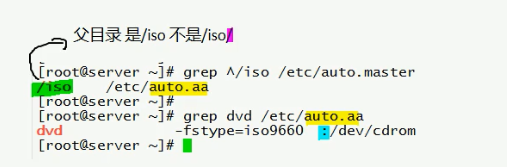
When we access the directory / iso/dvd, autofs will be triggered to automatically mount the local / dev/cdrom to / ios/dvd.
Because in auto In the master, we have specified the parent directory / iso, so the original things in / iso will be hidden.
Configure local mount autofs
Method for automatically mounting local files
To create such a rule, first install autofs: yum -y install autofs
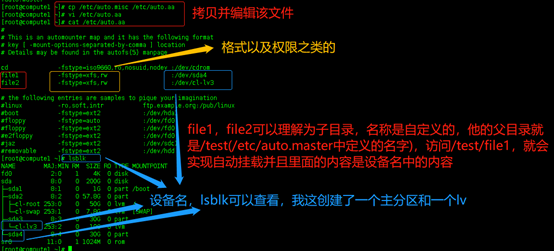
Edit file: VIM / etc / auto master
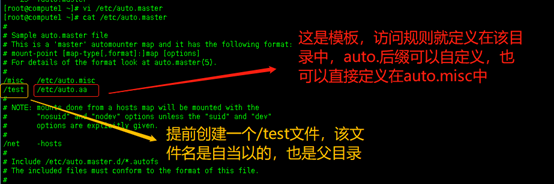
Note: in fact, the template in the above can not have a suffix, but there is a suffix, which is convenient to see the type of document at a glance.
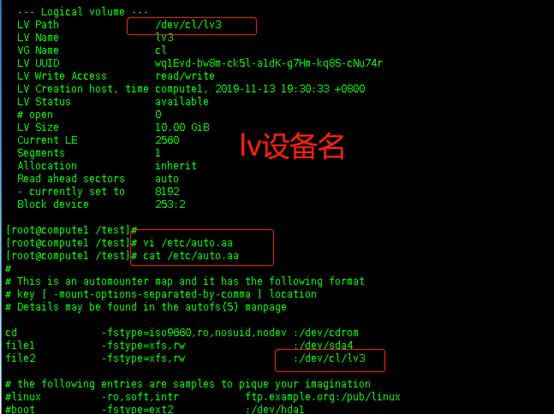
Then, because / etc / auto Aathis template does not exist, so you need to copy a template: CP / etc / auto misc /etc/auto.aa (if you are familiar with it, you can edit the file directly without copying the template), edit / etc / auto Aafile:
Note: the lv file name in the above figure is wrong: it should be / dev/cl/lv3 correctly. lvdisplay can view:
Test: create several files randomly in the parent directory when the CD is not mounted. Check whether the contents in the parent directory will be hidden when accessing. After creating the files, restart the service and set the startup: systemctl restart autofs, systemctl enable autofs:

Re-enter the parent directory and check whether there are files mounted: mount |grep -v grep |grep -v auto | grep device name
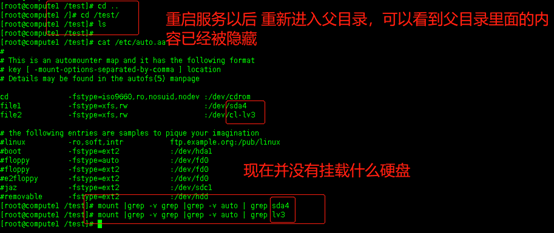
Now visit the / test/file directory:
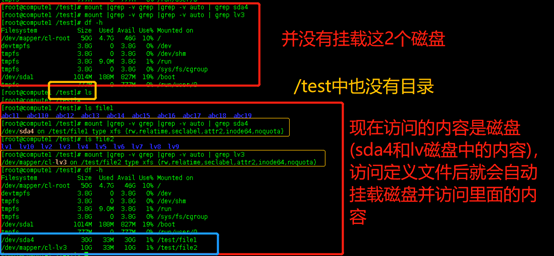
The above is the method of local mount.
Automatic mounting NFS share method
First configure the sharing file in the sharing directory server:
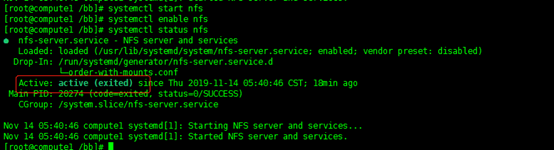
Install nfs service first: yum -y install nfs*
Turn on and set the startup self startup: systemctl start NFS, systemctl enable NFS. Check whether the status is active: systemctl status nfs:
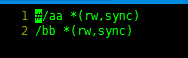
Then edit the shared file: vi /etc/exports, and define the shared file in it: Directory * (rw,sync) Note: * is accessible to all IPS, or you can specify ip, such as directory 0.0.0 (rw,sync)
Restart service: systemclt restart nfs
View the shared file: showmount -e current ip - if an error occurs: clnt_create:RPC:Unknown host, you need to add resolution: vi /etc/hosts, add ip address and host name:

Add an analysis screenshot after an error is reported:

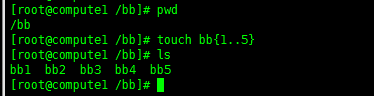
Create a new shared directory: mkdir /bb, and then mount the external disk to the current directory mount *** /bb. Here, for the convenience of demonstration, you can create several files in / bb at will:
To client server settings:
Install autofs first: yum -y install autofs
Then edit: VI / etc / auto Master - / - (meaning no parent directory defined) / etc / auto XX (or no suffix)

Suffix if not A template of misc: cp / etc / auto misc /etc/auto. XX (you can knock directly without cp template), and then open: VI / etc / auto xx:

To see the difference: first mkdir /xx and generate several files in it, and then restart the service: systemctl restart autofs, the definition file will be automatically generated, and the access is to share the content in the definition file in the ip
Note that if / etc / auto If the parent directory is defined in the master, then / etc / auto The parent directory of master, and cannot have /, if the parent directory is / - the detailed directory starting with / can be found in the template. The rule is like this, such as / etc / autu Master redefined a directory / father. Let's define a son in the template. In fact, the complete path is / father/son.
Take nfs mount as an example:
[root@compute1 ~]# systemctl restart autofs #Restart autofs service
[root@compute1 ~]#
[root@compute1 ~]# grep father /etc/auto.master #The / father parent directory is configured
/father /etc/nfs
[root@compute1 ~]# cat /etc/nfs #This subdirectory is created in the rule

son     -fstype=nfs,rw  10.233.3.225:/aa
[root@compute1 ~]# df -h # There is no mount point for / aa now
Filesystem           Size  Used Avail Use% Mounted on
/dev/mapper/cl-root   50G  4.9G   46G  10% /
devtmpfs             3.8G     0  3.8G   0% /dev
tmpfs                3.8G     0  3.8G   0% /dev/shm
tmpfs                3.8G   57M  3.8G   2% /run
tmpfs                3.8G     0  3.8G   0% /sys/fs/cgroup
/dev/sda1           1014M  188M  827M  19% /boot
tmpfs                777M     0  777M   0% /run/user/0
[root@compute1 ~]#
[root@compute1 ~]# cd /father/
[root@compute1 /father]#
[root@compute1 /father]# ls # There are no files in the parent directory
[root@compute1 /father]#
[root@compute1 /father]# cd son # Enter subdirectory
[root@compute1 /father/son]#
[root@compute1 /father/son]# ls #You can see the contents of the / aa file shared by nfs
1test  2test  3test  4test  5test
[root@compute1 /father/son]#
[root@compute1 /father/son]# df -h #You can also see the / aa mount point
Filesystem           Size  Used Avail Use% Mounted on
/dev/mapper/cl-root   50G  4.9G   46G  10% /
devtmpfs             3.8G     0  3.8G   0% /dev
tmpfs                3.8G     0  3.8G   0% /dev/shm
tmpfs                3.8G   57M  3.8G   2% /run
tmpfs                3.8G     0  3.8G   0% /sys/fs/cgroup
/dev/sda1           1014M  188M  827M  19% /boot
tmpfs                777M     0  777M   0% /run/user/0
10.233.3.225:/aa      50G  6.8G   44G  14% /father/son
[root@compute1 /father/son]#
Therefore, this mounting method is very suitable for configuring the home directory of network users (in order to save space, configure the home directory on the storage server, and then configure the home directory on the corresponding server)
For example, we have configured the home directory of hundreds of users in the / home/guests directory on a server. When we want to use it, we only need to configure an automatic mount on the corresponding user!
Configure the home directory of ldapuser0 user as follows
[root@server0 guests]# grep test /etc/auto.master
/home/guests /etc/test     # The previous parent directory is used to specify the storage path of the home directory
[root@server0 guests]# cat /etc/test
#Just specify the user name at the beginning (the directory here is the local mount point of the client)
ldapuser0 -fstype=nfs,rw classroom.example.com:/home/guests/ldapuser0
#classroom is the server side: / home is the mount point of the server
[root@server0 guests]#