spring framework
summary:
Spring is a lightweight open source framework for layered Java SE/EE application full stack with IoC (Inverse Of Control:
Inversion control) and AOP (Aspect Oriented Programming) provide a presentation layer Spring for the kernel
MVC, Spring JDBC in the persistence layer, transaction management in the business layer and many other enterprise application technologies can also integrate many of the open source world
Famous third-party framework and class library
Rod Johnson (father of spring)
Advantages of spring:
Convenient decoupling and simplified development
Through the IoC container provided by Spring, the dependencies between objects can be controlled by Spring to avoid hard coding
Excessive program coupling. Users do not have to write code for the very low-level requirements such as singleton pattern class and attribute file parsing
To focus more on the application of the upper layer.
AOP programming support
Through the AOP function of Spring, it is convenient for aspect oriented programming. Many functions that are not easy to be realized with traditional OOP can be realized
Intelligence podcast - focus on Java Net and Php, Web Graphic Design Engineer Training
First floor of jinyanlong office building, Jiancai Chengxi Road, Changping District, Beijing Tel: 400-618-9090
Easy to deal with through AOP.
Declarative transaction support
It can free us from the monotonous and boring transaction management code and flexibly manage transactions in a declarative way,
Improve development efficiency and quality.
Facilitate program testing
Almost all testing work can be carried out in a container independent programming way. Testing is no longer an expensive operation, but easy to use
What you do.
Convenient integration of various excellent frameworks
Spring can reduce the difficulty of using various frameworks and provide support for various excellent frameworks (Struts, Hibernate, Hessian, Quartz)
Etc.).
Reduce the difficulty of using Java EE API
For example, the Java EE API and java mail API are encapsulated in thin layers
The difficulty of use is greatly reduced.
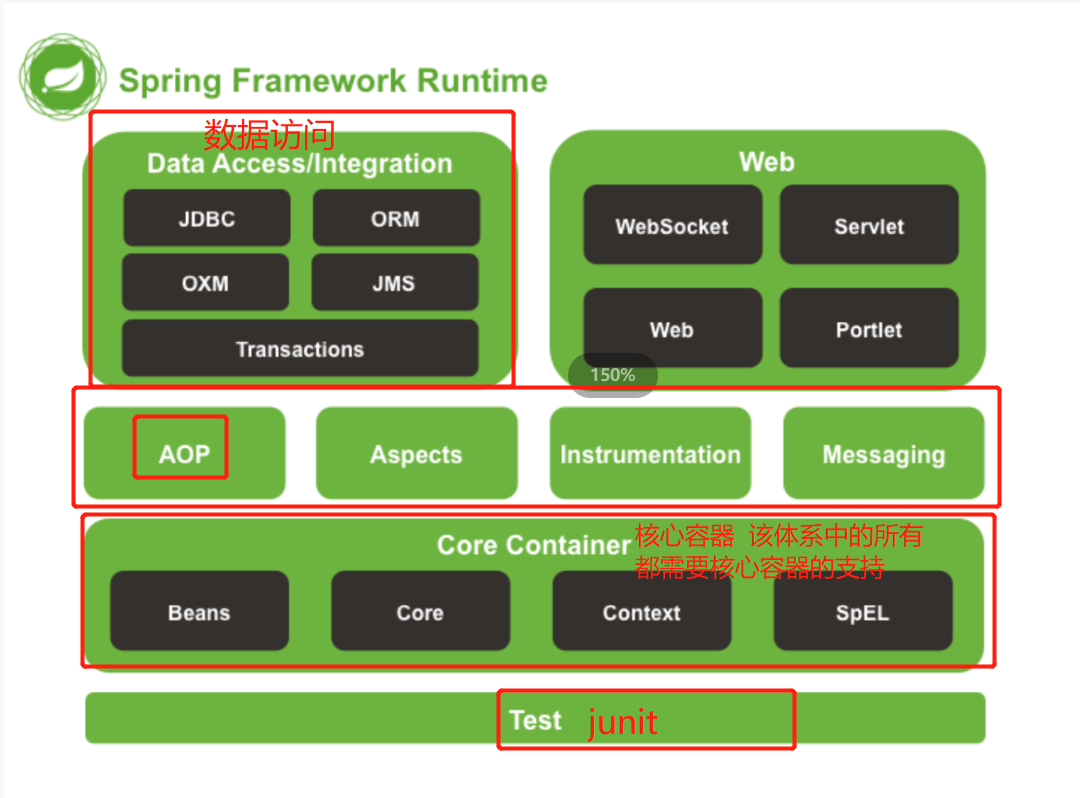
spring architecture:
Program coupling:
Coupling, also known as coupling degree, is a measure of the degree of correlation between modules. The strength of coupling depends on the complexity of the interface between modules, the way of calling modules and how much data is transmitted through the interface. The coupling degree between modules refers to the dependency relationship between modules, including control relationship, call relationship and data transfer relationship. The more connections between modules, the stronger the coupling, and the worse the independence (reducing the coupling can improve the independence). Coupling exists in various fields, not unique in software design, but we only discuss coupling in software engineering. In software engineering, coupling refers to the dependency between objects. The higher the coupling between objects, the higher the maintenance cost. Therefore, the design of objects should minimize the coupling between classes and components. In software design, coupling degree and cohesion degree are usually used as the criteria to measure the degree of module independence. A criterion for dividing modules is high cohesion and low coupling.
It is classified as follows:
(1) Content coupling. When a module directly modifies or operates the data of another module, or a module transfers to another module without normal entry, such coupling is called content coupling. Content coupling is the highest level of coupling and should be avoided.
(2) Common coupling. Two or more modules jointly reference a global data item. This coupling is called common coupling. In a structure with a large number of common coupling, it is very difficult to determine which module assigns a specific value to the global variable.
(3) External coupling. If a group of modules access the same global simple variable instead of the same global data structure, and the information of the global variable is not transmitted through the parameter table, it is called external coupling.
**(4) Control coupling** One module transmits a control signal to another module through the interface, and the module receiving the signal performs appropriate actions according to the signal value. This coupling is called control coupling.
(5) Mark coupling. If A module A passes A common parameter to two modules B and C through the interface, it is said that there is A tag coupling between modules B and C.
**(6) Data coupling** Data coupling refers to the transfer of data between modules through parameters. Data coupling is the lowest form of coupling
This type of coupling generally exists in the system, because in order to complete some meaningful functions, it is often necessary to take the output data of some modules as the input data of others.
**(7) Indirect coupling** There is no direct relationship between the two modules, and the relationship between them is completely realized through the control and call of the main module.
Summary:
Coupling is an important factor affecting software complexity and design quality. In design, we should adopt the following principles: if there must be coupling between modules, use data coupling as much as possible, use less control coupling, limit the scope of public coupling and avoid content coupling as much as possible.
Cohesion and coupling cohesion mark the tightness of each element in a module. It is a natural extension of the concept of information concealment and localization.
Cohesion is to measure the relationship within the module from the perspective of function. A good cohesion module should do exactly one thing. It describes the functional connections within the module. Coupling is a measure of the interconnection between modules in the software structure. The strength of coupling depends on the complexity of the interface between modules, the point of entering or accessing a module and the data passing through the interface.
The program pays attention to low coupling and high cohesion. That is, the elements in the same module should be highly close, but the interdependence between modules is not so close.
Cohesion and coupling are closely related. A module with high coupling with other modules means low cohesion, while a module with high cohesion means low coupling with other modules. In software design, we should strive to achieve high cohesion and low coupling
Coupling:
Dependencies between programs.
include:
Dependencies between classes,
Dependencies between methods
Decoupling: reducing dependencies between programs
Train of thought does not depend during compilation, but depends during operation
1. Use reflection to create objects and avoid using the new keyword
2. Get the fully qualified class name of the object to be created by reading the configuration file
Plant mode decoupling:
In the actual development, we can use the configuration file to configure the objects of the three layers. When the server application is started to load, let the methods in a class create these objects and coexist by reading the configuration file. In the next use, just take it directly. Then, the class that reads the configuration file, creates and obtains three-tier objects is the factory. To achieve IOC
Factory: get the class of the specified object from the container, which is called factory.
Container: a collection Map of objects created by reflection through the configuration in the configuration file
**IOC: * * control reversal
Leave the power of creating objects to the factory or framework, rather than the technical term of object-oriented programming (new), which includes dependency injection and dependency lookup.
The role of ioc: reduce the coupling in computer programs and remove the dependencies in the code.
Spring XML based IOC details
Class structure diagram of factory in spring
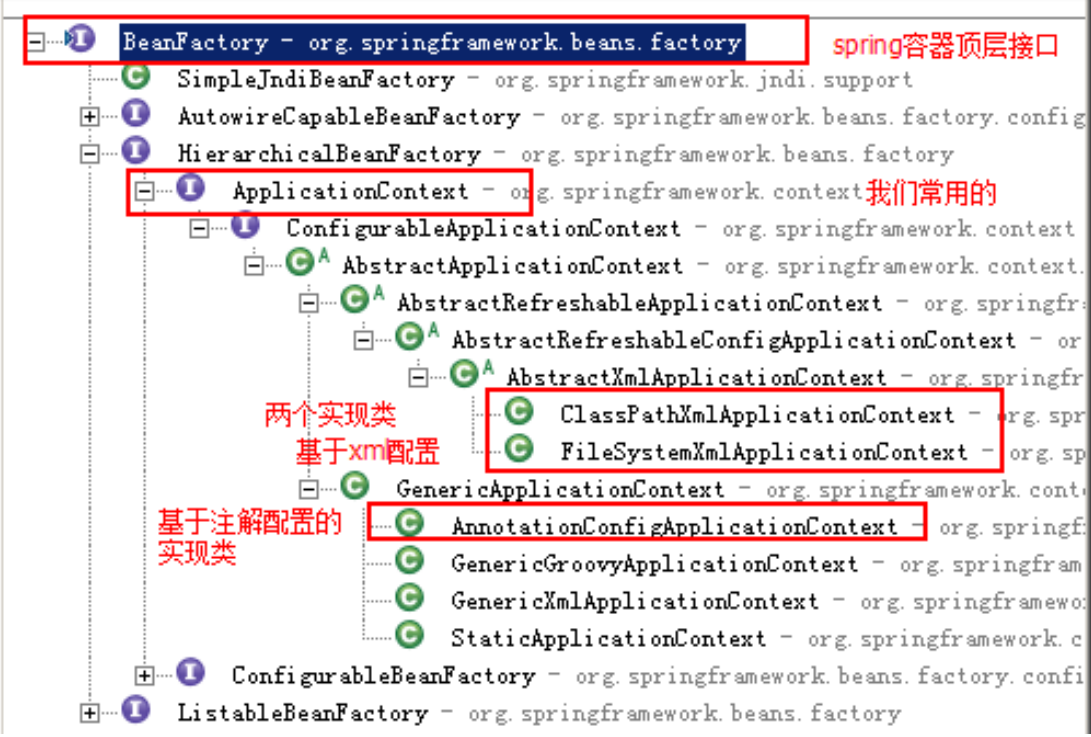
The difference between BeanFactory and ApplicationContext
BeanFactory is the top-level interface in the Spring container.
ApplicationContext is its sub interface.
Differences between BeanFactory and ApplicationContext:
Objects are created at different points in time.
ApplicationContext: as soon as the configuration file is read, the object is created by default.
BeanFactory: when to use and create objects
Implementation class of ApplicationContext interface
ClassPathXmlApplicationContext:
It loads the configuration file from the root path of the class. This is recommended
FileSystemXmlApplicationContext:
It loads the configuration file from the disk path. The configuration file can be anywhere on the disk.
AnnotationConfigApplicationContext:
When we use annotations to configure container objects, we need to use this class to create spring containers. It is used to read annotations
bean tags and management object details in IOC
bean tag:
effect:
Used to configure the object to be created by spring.
By default, it calls the parameterless constructor in the class. If there is no parameterless constructor, it cannot be created successfully.
Properties:
id: provide a unique identification for the object in the container. Used to get objects.
Class: Specifies the fully qualified class name of the class. Used to create reflective objects. The parameterless constructor is called by default.
Scope: Specifies the scope of the object.
- Singleton: default value, singleton
- prototype: multiple cases
- Request: in the web project, Spring creates a Bean object and stores the object into the request field
- Session: in the web project, Spring creates a Bean object and stores the object into the session domain
- Global session: used in Portlet environment in Web project If there is no Portlet environment, then
globalSession is equivalent to session
Init method: Specifies the name of the initialization method in the class.
Destroy method: Specifies the name of the destroy method in the class.
Scope and life cycle of bean s
Singleton object: scope="singleton"
An application has only one instance of an object. Its scope is the whole reference.
Life cycle:
Object birth: when the application loads and creates a container, the object is created.
Object alive: the object remains alive as long as the container is.
Object death: when the application unloads and destroys the container, the object is destroyed.
Multi instance object: scope="prototype"
Each time an object is accessed, the object instance is recreated.
Life cycle:
Object birth: creates a new object instance when using an object.
Object alive: as long as the object is in use, it will always be alive.
Object death: when an object is not used for a long time, it is recycled by the java garbage collector.
Three ways to instantiate beans
The first way: use the default parameterless constructor
It creates class objects based on the default parameterless constructor. If there is no default parameterless constructor in the bean, the creation will fail.
< bean id="accountService" class="com.itheima.service.impl.AccountServiceImpl"/ >
The second way: spring manages the static factory - use the method of static factory to create objects
Simulate a static factory and create a business layer implementation class
public class StaticFactory {
public static IAccountService createAccountService(){
return new AccountServiceImpl();
} }

use StaticFactory Static methods in classes createAccountService Create objects and store them in spring container
id Properties: specifying bean of id,Used to get from the container
class Property: Specifies the fully qualified class name of the static factory
factory-method Attribute: Specifies the static method of the production object

<bean id="accountService"
 class="com.itheima.factory.StaticFactory"
 factory-method="createAccountService"></bean>
The third way: spring manages the instance factory - use the instance factory method to create objects
/**
* Simulate an instance factory and create a business layer implementation class
* To create an object for this factory, you must an existing factory instance object and then call the method
*/
public class InstanceFactory {
     public IAccountService createAccountService(){
	return new AccountServiceImpl();
} }
<!-- This way is:
First hand over the establishment of the factory to spring To manage.
Then use the factory's bean To call the methods inside
	factory-bean Property: used to specify the instance factory bean of id.
	factory-method Method used to create an instance of an object.
-->
<bean id="instancFactory" class="com.itheima.factory.InstanceFactory"></bean>

 <bean id="accountService"
 	factory-bean="instancFactory"
 	factory-method="createAccountService">
 </bean>
Dependency injection of spring
Dependency Injection: Dependency Injection. It is the concrete implementation of the core ioc of spring framework.
When the program is written, the creation of objects is handed over to spring through control inversion, but there can be no dependency in the code.
ioc decoupling only reduces their dependencies, but it will not eliminate them.
For example, our business layer will still call the methods of the persistence layer. The dependency between the business layer and the persistence layer is maintained by spring after using spring. Simply put, it means waiting for the framework to transfer the persistence layer object to the business layer without getting it ourselves.
Constructor injection:
Using the constructor, give service Attribute value transfer in
 requirement:
		Class needs to provide a constructor corresponding to the parameter list.
Labels involved:
	constructor-arg
 Properties:
	index:Specifies the index position of the parameter in the constructor parameter list
	type:Specifies the data type of the parameter in the constructor
	name:Specifies the name of the parameter in the constructor. Who is assigned the value with this
=======The above three refer to who is assigned the value, and the following two refer to what value is assigned==============
	value:The values it can assign are basic data types and String type
	ref:It can assign other values bean Type, that is, it must be configured in the configuration file bean
	<bean id="accountService" class="com.itheima.service.impl.AccountServiceImpl">
				<constructor-arg name="name" value="Zhang San">
				</constructor-arg> <constructor-arg name="age" value="18">
				</constructor-arg> <constructor-arg name="birthday" ref="now">
	</constructor-arg>
</bean>
set method injection:
<!-- Through the configuration file bean Attribute value transfer in: use set Method mode
 Labels involved:
		property
 Properties:
	name: Found in class set The latter part of the method
	ref: Assigning a value to an attribute is something else bean Type
	value: Assigning a value to an attribute is the basic data type and string Type
		In actual development, this method is used more.
-->

<bean id="accountService" class="com.itheima.service.impl.AccountServiceImpl">
	 <property name="name" value="test"></property>
	 <property name="age" value="21"></property>
	 <property name="birthday" ref="now" ></property>
</bean>
Injection set properties:
<!-- Inject set data
	List Structural:
		array,list,set
	Map Structural
		map,entry,props,prop
-->
<bean id="accountService" class="com.itheima.service.impl.AccountServiceImpl">
<!-- When injecting set data, labels can be interchanged as long as the structure is the same -->
<!-- Inject data into the array -->
<property name="myStrs">
	 <set>
		 <value>AAA</value>
		 <value>BBB</value>
		 <value>CCC</value>
	</set>
</property>


<!-- injection list Aggregate data -->
 <property name="myList">
 <array>
	 <value>AAA</value>
	 <value>BBB</value>
	 <value>CCC</value>
</array>
</property>


<!-- injection set Aggregate data -->
<property name="mySet">
	<list>
		<value>AAA</value>
		<value>BBB</value>
		<value>CCC</value>
	</list>
</property>


<!-- injection Map data -->
<property name="myMap">
	 <props>
		 <prop key="testA">aaa</prop>
		  <prop key="testB">bbb</prop>
	</props>
</property>

<!-- injection properties data -->
<property name="myProps">
	<map>
		<entry key="testA" value="aaa"></entry>
		<entry key="testB">
			<value>bbb</value>
		</entry>
	</map>
</property>
</bean>
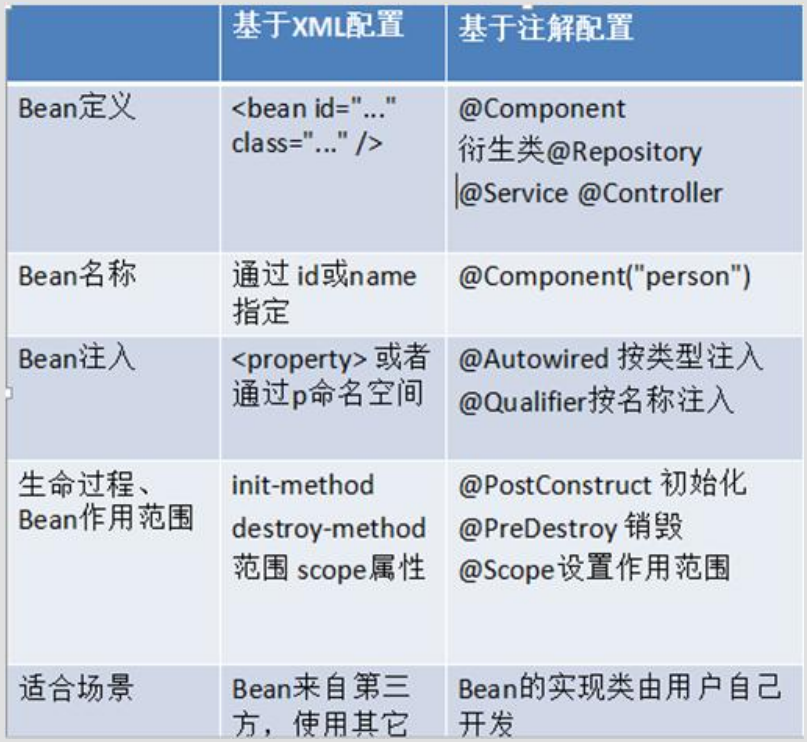
spring annotation:
1. To create an object:
@Component (specify the id of the bean): store the object of the current class into the spring container
effect:
Let spring manage the resources. This is equivalent to configuring a bean in xml.
Properties:
Value: Specifies the id of the bean. If the value attribute is not specified, the id of the default bean is the class name of the current class. Initial lowercase.
Using this annotation, you need to set the packages that spring needs to scan when creating containers in the configuration file
<?xml version="1.0" encoding="UTF-8"?>
<beans xmlns="http://www.springframework.org/schema/beans"
       xmlns:xsi="http://www.w3.org/2001/XMLSchema-instance"
       xmlns:context="http://www.springframework.org/schema/context"
       xsi:schemaLocation="http://www.springframework.org/schema/beans
        http://www.springframework.org/schema/beans/spring-beans.xsd
        http://www.springframework.org/schema/context
        http://www.springframework.org/schema/context/spring-context.xsd">

    <!-- inform spring Packages to be scanned when creating containers-->
    <context:component-scan base-package="com.asheng"></context:component-scan>
</beans>
**@Controller @Service @Repository: * * specify the three-tier annotation
These three annotations are the same as @ Component
@Controller: generally used in the presentation layer
@Service: generally used in the service layer
@Repository: generally used in the persistence layer
2. For injecting data:
@Autowired
effect:
Automatically inject by type. When using annotation to inject attributes, the set method can be omitted. It can only inject other bean types. When there are multiple types matching, use the name of the object variable to be injected as the id of the bean and look it up in the spring container. If it is found, the injection can also be successful. Report an error if you can't find it
@Qualifier
effect:
On the basis of automatic injection by type, it is injected according to the id of the Bean. It cannot be used independently when injecting fields, but must be used together with @ Autowire; However, it can be used independently when injecting method parameters.
Properties:
value: Specifies the id of the bean.
@Resource
effect:
Inject directly according to the id of the bean. It can only inject other bean types.
Properties:
name: Specifies the id of the bean
@Value
effect:
Inject data of basic data type and String type
Properties:
Value: used to specify the value
For changing the scope of action:
@Scope
effect:
Specifies the scope of the bean.
Properties:
Value: the value of the specified range.
Value: Singleton prototype request session global session
Life cycle related:
@PostConstruct
effect:
Specifies the initialization method.
@PreDestroy
effect:
Used to specify the destruction method.
Advantages of annotation:
Simple configuration and easy maintenance (if we find the class, we find the corresponding configuration).
Advantages of XML:
When modifying, there is no need to change the source code. Recompilation and deployment are not involved.
@Configuration
effect:
Used to specify that the current class is a spring Configuration class (instead of xml file), and annotations will be loaded from this class when creating a container. Annotationapplicationcontext (class with @ Configuration annotation) is required to obtain the container.
Properties:
value: used to specify the bytecode of the configuration class
Using @ Configuration annotation can make the current class as the Configuration class of spring, but you still need to configure the package to be scanned when creating the container.
@ComponentScan
effect:
Used to specify the packages that spring will scan when initializing the container. Functions and in the xml configuration file of spring:
< context: component scan base package = "com.itheima" / > is the same.
Properties:
Base packages: used to specify packages to scan. The same function as the value attribute in this annotation.
@Bean
effect:
This annotation can only be written on the method, indicating that an object is created using this method and put into the spring container.
Properties:
Name: assign a name to the object created by the current @ bean annotation method (that is, the id of the bean).
Code demonstration
@C@Configuration //Configure the current class as spring's configuration class instead of spring's xml configuration file
@ComponentScan("com.asheng")//This annotation allows you to specify the packages to be scanned when spring creates the container
public class SpringConfiguration {
    /**
     * Create QueryRunner object
     *  The following method is equal to = = = in the xml file
     *  <bean id="queryRunner" class="org.apache.commons.dbutils.QueryRunner" 					   scope="prototype">
     *         <constructor-arg name="ds" ref="dataSource"></constructor-arg>
     *   </bean>
     * @param dataSource
     * @return
     */

    @Bean("runner")//Store the return value of the current method as a Bean object into the spring container
    public QueryRunner createQueryRunner(DataSource dataSource){
        return new QueryRunner(dataSource);
    }

    /**
     *  When the method is configured only with annotations, the method parameter spring will go to the container to find out whether there are available bean objects
     *  The search method of @ Autowired is the same: search in the container by data type
     * @return
     */
    @Bean("dataSource")
    public DataSource ceeateDataSource(){
        ComboPooledDataSource dataSource = new ComboPooledDataSource();
        try {
            dataSource.setDriverClass("com.mchange.v2.c3p0.ComboPooledDataSource");
            dataSource.setJdbcUrl("jdbc:mysql://localhost:3306/spring?serverTimezone=UTC");
            dataSource.setUser("root");
            dataSource.setPassword("root");
            return dataSource;
        } catch (PropertyVetoException e) {
            throw new RuntimeException(e);
        }
    }
}
}
The @ Import annotation can also be used to Import the bytecode of other configuration classes
For example: @ Import(JdbcConfig.class)
@PropertySource
effect:
For loading The configuration in the properties file. For example, when we configure the data source, we can write the information connected to the database to
In the properties configuration file, you can use this annotation to specify the location of the properties configuration file.
Properties:
value []: used to specify the location of the properties file. If it is under the classpath, you need to write classpath:
  @Value("${driver}")
    private  String driver;

    @Value("${url}")
    private String url;

    @Value("${username}")
    private String username;

    @Value("${password}")
    private String password;

	@Bean("dataSource")
    public DataSource ceeateDataSource(){
        ComboPooledDataSource dataSource = new ComboPooledDataSource();
        try {
            dataSource.setDriverClass(driver);
            dataSource.setJdbcUrl(url);
            dataSource.setUser(username);
            dataSource.setPassword(password);
            return dataSource;
        } catch (PropertyVetoException e) {
            throw new RuntimeException(e);
        }
    }
Spring integrates Junit
1. Replace the original runner with @ RunWith annotation
@RunWith(SpringJUnit4ClassRunner.class)
public class AccountServiceTest {
}
2. Use @ ContextConfiguration to specify the location of the spring configuration file
@Properties of ContextConfiguration:
locations attribute: used to specify the location of the configuration file. If it is under the classpath, it needs to be indicated by classpath:
classes attribute: used to specify the class of the annotation. When xml configuration is not used, you need to use this attribute to specify the location of the annotation class.
@RunWith(SpringJUnit4ClassRunner.class)
@ContextConfiguration(locations= {"classpath:bean.xml"})//Annotation configuration is used
public class AccountServiceTest {
}
3. Use @ Autowired to inject data into variables in the test class
@RunWith(SpringJUnit4ClassRunner.class)
@ContextConfiguration(locations= {"classpath:bean.xml"})//xml file configuration is used
public class AccountServiceTest {
	@Autowired
	private IAccountService as ;
 }
Spring AOP (key)
AOP related terms
Joinpoint: (all methods in the interface are connection points)
The so-called connection points refer to those intercepted points. In spring, these points refer to methods, because spring only supports methods of type
Connection point.
Pointcut: (pointcuts are enhanced in methods)
The so-called entry point refers to the definition of which joinpoints we want to intercept.
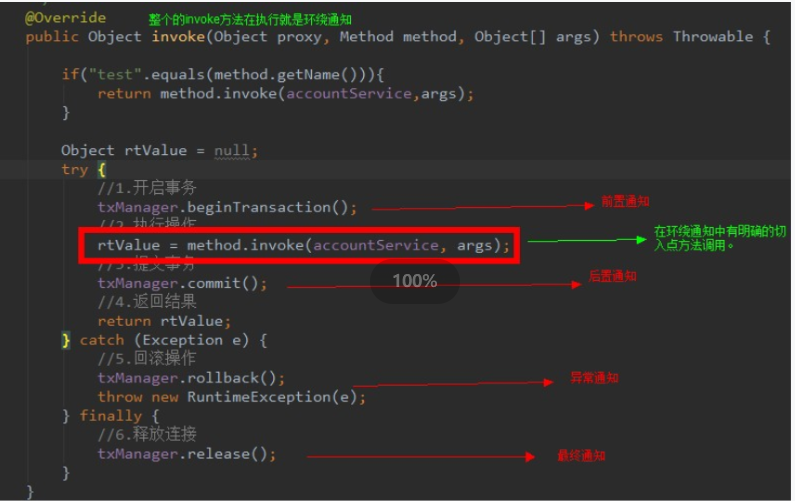
Advice:
The so-called notification refers to what needs to be done after intercepting the Joinpoint.
Types of notification: pre notification, post notification, exception notification, final notification and surround notification.
Introduction:
Introduction is a kind of special notice. Without modifying the class code, introduction can dynamically add some parties to the class at run time
Method or Field.
**Target (target object) 😗* Proxied object
The target object of the proxy.
Weaving:
Refers to the process of applying enhancements to the target object to create a new proxy object.
spring uses dynamic proxy weaving, while AspectJ uses compile time weaving and class loading time weaving.
Proxy:
After a class is woven and enhanced by AOP, a result proxy class is generated.
Aspect:
It is the combination of entry point and notification (Introduction)
ioc steps for configuring spring
1. Configure the notification class with bean tags
2. Step 2: declare aop configuration using aop:config
aop:config:
Function: used to declare the configuration of starting aop
			 < aop:config>
				The configuration code is written here
			</aop:config>
3. Step 3: configure the aspect using aop:aspect
aop:aspect:
Function: used to configure section.
Properties:
id: provide a unique identification for the section.
ref: refers to the id of the configured notification class bean.
<aop:aspect id="txAdvice" ref="txManager">
		The type of configuration notification should be written here
</aop:aspect>
4. Configure the pointcut expression using aop:pointcut:
Function: used to configure pointcut expressions. Is to specify which methods of which classes are enhanced.
Properties:
Expression: used to define the pointcut expression.
id: used to provide a unique identifier for the pointcut expression
< aop:pointcut expression="execution(
public void com.itheima.service.impl.AccountServiceImpl.transfer(
java.lang.String, java.lang.String, java.lang.Float) )" id="pt1"/>
5. Use aop:xxx to configure the corresponding notification type
aop:before
effect:
Used to configure pre notification. Specifies that the enhanced method is executed before the pointcut method
Properties:
Method: used to specify the enhanced method name in the notification class
Ponitcut Ref: reference to the expression used to specify the pointcut
Poinicut: expression used to specify the pointcut
Execution time point: executed before the pointcut method is executed
<aop:before method="beginTransaction" pointcut-ref="pt1"/>
aop:after-returni
Function: used to configure post notification
Properties:
Method: Specifies the name of the method in the notification.
pointct: define pointcut expressions
Pointcut Ref: Specifies the reference of the pointcut expression
Execution time point: after the pointcut method is executed normally. It and exception notification can only have one execution
<aop:after-returning method="commit" pointcut-ref="pt1"/>
aop:after-throwing
Function: used to configure exception notification
Properties:
Method: Specifies the name of the method in the notification.
pointct: define pointcut expressions
Pointcut Ref: specifies a reference to the pointcut expression
Execution time point: the pointcut method executes after an exception occurs. It and post notification can only execute one
<aop:after-throwing method="rollback" pointcut-ref="pt1"/>
Pointcut expression Description:
Execution: execution of matching method (common)
Execution (expression)
Expression syntax: execution([modifier] return value type package name. Class name. Method name (parameter))
Description:
Full matching method:
public void com.itheima.service.impl.AccountServiceImpl.saveAccount(com.itheima.domain.Account)
The access modifier can be omitted
void
com.itheima.service.impl.AccountServiceImpl.saveAccount(com.itheima.domain.Account)
The return value can use the * sign to indicate any return value
com.itheima.service.impl.AccountServiceImpl.saveAccount(com.itheima.domain.Account)
The package name can use a number to represent any package, but there are several levels of packages that need to be written
* *.*.*.*.AccountServiceImpl.saveAccount(com.itheima.domain.Account)
use..To represent the current package and its sub packages
* com..AccountServiceImpl.saveAccount(com.itheima.domain.Account)
Class name can be used*Sign, representing any class
* com..*.saveAccount(com.itheima.domain.Account)
Method names can be used*Sign, indicating any method
* com..*.*( com.itheima.domain.Account)
The parameter list can be used*,Indicates that the parameter can be any data type, but there must be a parameter
* com..*.*(*)
The parameter list can be used..It indicates whether there are parameters or not. Parameters can be of any type
* com..*.*(..)
Full universal distribution mode:
* *..*.*(..)
be careful:
Usually, we enhance the methods of the business layer, so the pointcut expressions are cut to the implementation classes of the business layer.
execution(* com.asheng.service.impl.*.*(..))
JdbcTemplate class of Spring
An object provided in the spring framework is the encapsulation of the original Jdbc, which makes it more convenient for us to use,
When using, you must provide a data source (information about java connecting to the database)
establish:
1. Create using a parameterless constructor
In use setDataSource(dataSource) passes in the data source.
2. Use the parameterized constructor to pass in the data source directly at creation time
JdbcTemplate jdbcTemplate = new JdbcTemplate(dataSource);
The data source can use DBCP, C3P0 and spring built-in data source (DriverManagerDataSource)
When writing exercise items: I will write a lot of dao layer implementation classes, and the code in the red box will repeat a lot, which needs to be extracted
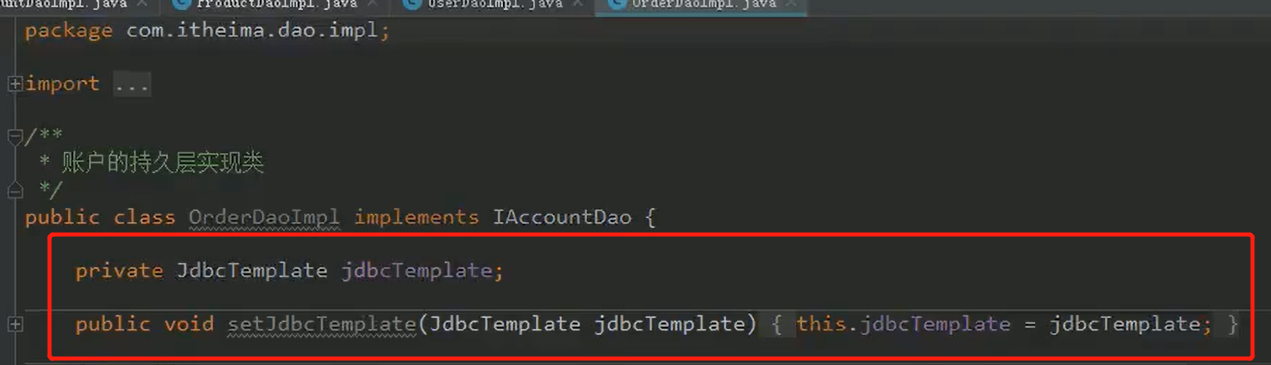
resolvent:
1. When writing the dao layer implementation class, we should inherit the duplicate code written for us in the JdbcDaoSupport class provided by spring. Just use it directly,
Disadvantages: configuration can only be used in XML based way, and annotations cannot be used
public class AccountDaoImpl extends JdbcDaoSupport implements AccountDao {
    @Override
    public List<Account> findAll() {
        List<Account> accounts = getJdbcTemplate().query("select * from account", new BeanPropertyRowMapper<Account>(Account.class));
        return accounts;
Transaction control in Spring:
1. PlatformTransactionManager interface
This interface is spring's transaction manager, which provides our common methods of operating transactions

There are two implementation classes of PlatformTransactionManager interface:
Learn one here:
DataSourceTransactionManager
2. Transaction definition: it is the definition information object of the transaction
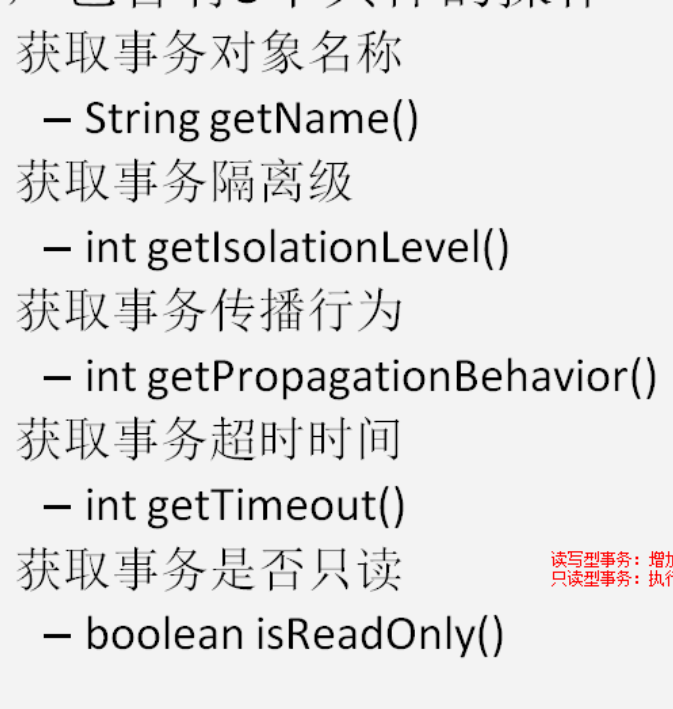
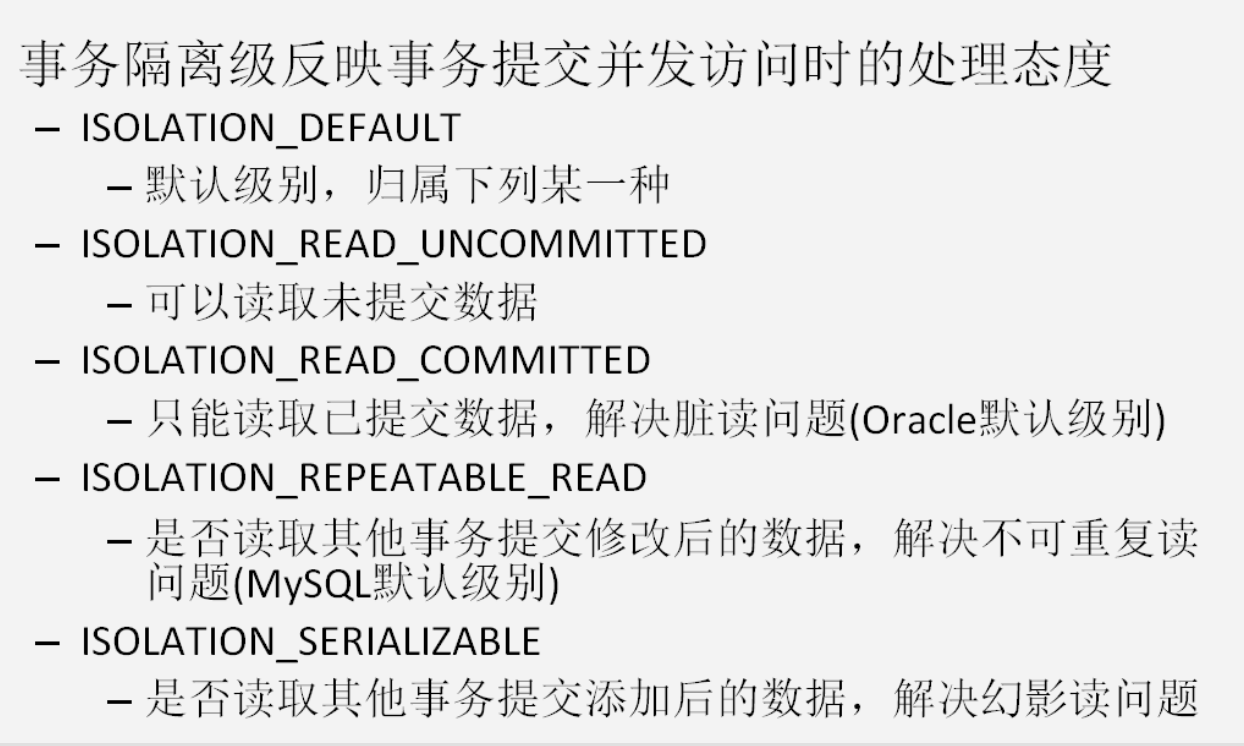
Isolation level of transaction
Propagation behavior of transactions
REQUIRED: if there is no transaction at present, create a new transaction. If there is already a transaction, join it. General selection (default)
SUPPORTS: SUPPORTS the current transaction. If there is no transaction, it will be executed in a non transactional manner (no transaction)
Timeout
The default value is - 1 and there is no timeout limit. If yes, set in seconds
**Read / write of transaction: * * it is recommended to set it as read-only when querying
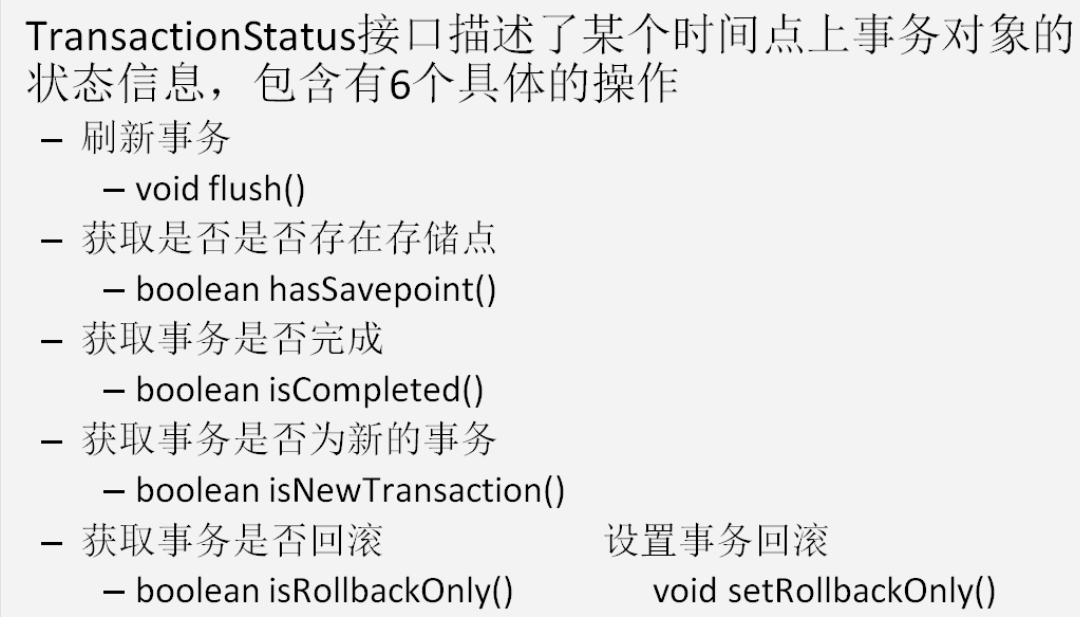
3. TransactionStatus interface
This interface provides the specific running state of the transaction
Exercise: xml based transaction control
<!-- spring Medium based xml Configuration of transactions
        1,Configure transaction manager
        2,Configure notifications for transactions
                use <tx:advice> Namespaces and constraints also need to be used aop Constraints of
        3,to configure aop The generic pointcut expression for aop: config Configuration in the space aop:pointcut
        4,Establish the corresponding relationship between transaction notification and pointcut expression  aop:advisor
        5,Configure the properties of the transaction
            stay<tx:advice>Internal configuration of label
                    tx:attributes>
                        <tx:method name=""/>
                    </tx:attributes>
    -->
    <!--Configure transaction manager-->
    <bean id="transactionManger" class="org.springframework.jdbc.datasource.DataSourceTransactionManager">
        <property name="dataSource" ref="DataSource"></property>
    </bean>

    <!-- Configure notifications for transactions-->
    <tx:advice id="txAdvice" transaction-manager="transactionManger">
        <!--Configure the properties of the transaction
            read-only: Whether it is a read-only transaction. default false,Not read-only. Query to set to true read-only
            isolation: Specifies the isolation level of the transaction. The default value is to use the default isolation level of the database. Default values are generally used
            propagation: Specifies the propagation behavior of the transaction. Default: REQUIRED It means that there must be transaction (addition, deletion and modification) query method selection SUPPORTS
            timeout: Specify the timeout. The default value is:-1. Never time out. Set to other values, in seconds
            rollback-for: Used to specify an exception. When the exception is generated during execution, the transaction is rolled back. If other exceptions are generated, the transaction will not be rolled back. There is no default value and any exceptions are rolled back.
            no-rollback-for: Used to specify an exception. When this exception occurs, the transaction will not be rolled back. When other exceptions occur, the transaction will be rolled back. There is no default value and any exceptions are rolled back.
        -->
        <tx:attributes>
            <!--* Wildcards represent all methods
                find*  Indicates that the method name is preceded by find Method of
                find* Priority over * high
             -->
            <tx:method name="*" propagation="REQUIRED" read-only="false"></tx:method>
            <tx:method name="find*" propagation="SUPPORTS" read-only="true"></tx:method>
        </tx:attributes>
    </tx:advice>

    <!--to configure aop Pointcut expression for -->
    <aop:config>
        <!-- Configure pointcut expressions-->
        <aop:pointcut id="pt1" expression="execution(* com.asheng.service.impl.*.*(..))"/>
        <!-- Configure the correspondence between transaction notification and expression-->
        <aop:advisor advice-ref="txAdvice" pointcut-ref="pt1"></aop:advisor>
    </aop:config>
Use annotations to control transactions:
1. Use @ Transactional annotation in the business layer
@Transactional(readOnly=true,propagation=Propagation.SUPPORTS)
The attribute of this annotation has the same meaning as the attribute in xml. This annotation can appear on interfaces, classes and methods.
It appears on the interface, indicating that all implementation classes of the interface have transaction support.
Appears on the class, indicating that all methods in the class have transaction support
Appears on the method, indicating that the method has transaction support.
Priority of the above three positions: method > class > interface
Enable spring's support for annotation transactions in the configuration file
<tx:annotation-driven transaction-manager="transactionManager"/>
Configuration without xml:
@Configuration
@EnableTransactionManagement
public class SpringTxConfiguration {
//Configure data source, JdbcTemplate and transaction manager. The previous steps have been written.
}