Requirements completed in this article:
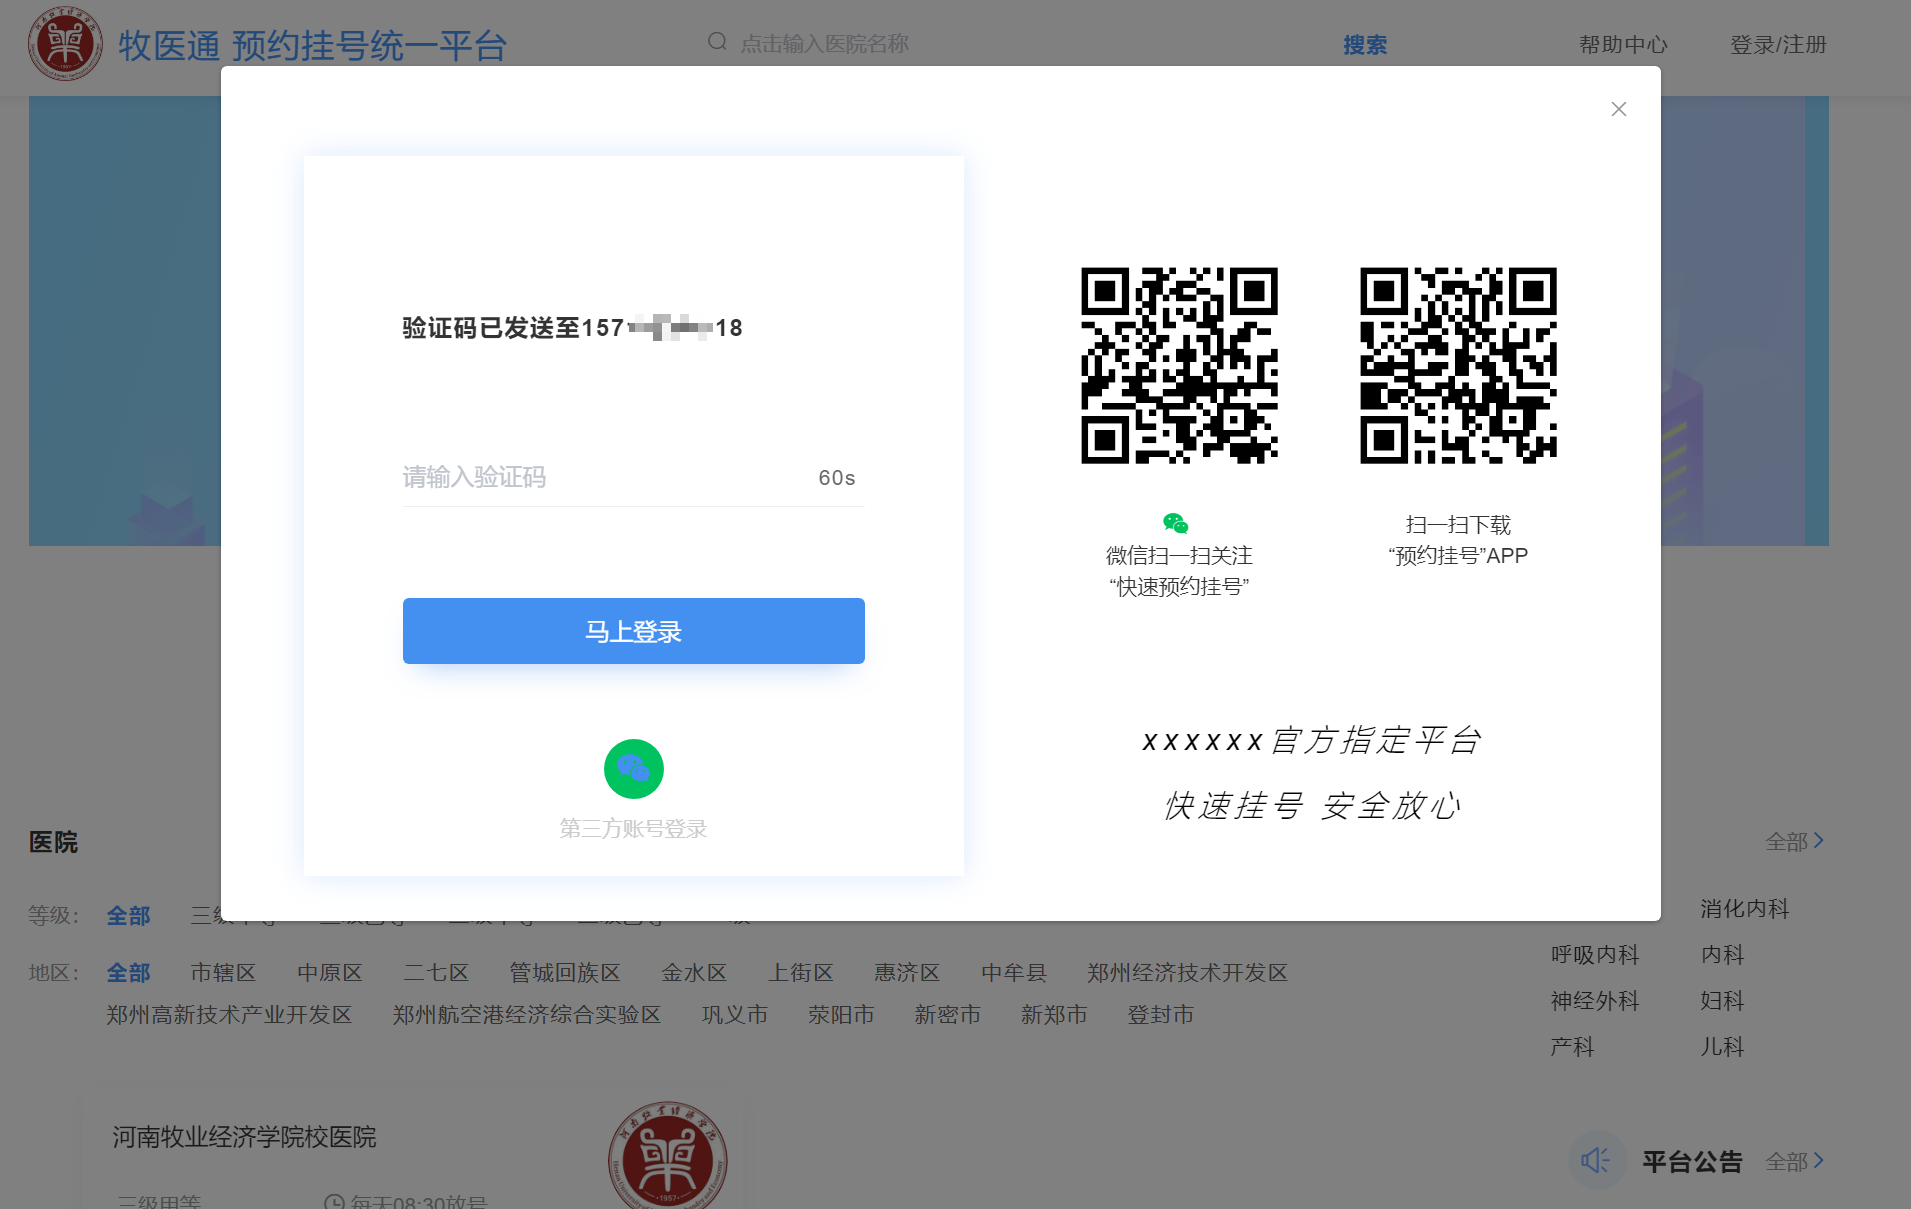
1. Login takes the form of pop-up layer.
2. Login method:
(1) Mobile phone number + mobile phone verification code
(2) Wechat scanning (completed later)
3. There is no registration interface. When logging in for the first time, judge whether the system exists according to the mobile phone number. If it does not exist, it will be registered automatically.
4. If wechat scanning and login is successful, you must bind the mobile phone number, that is, bind the mobile phone number after the first successful scanning, and then log in directly after the subsequent scanning.
5. The gateway judges the login status and how to login. The login layer pops up on the page.
Step 1: build the service user module
1. Start class & configure gateway
Set up the service user module for user login, where:
- Register the service with Nacos using the @ EnableDiscoveryClient annotation.
- Use the @ EnableFeignClients(basePackages = "com.gql") annotation to start the remote service call.
Start swagger scanning with @ ComponentScan(basePackages = "com.gql") annotation.
@SpringBootApplication
@ComponentScan(basePackages = "com.gql")
@EnableDiscoveryClient
@EnableFeignClients(basePackages = "com.gql")
public class ServiceUserApplication {
    public static void main(String[] args) {
        SpringApplication.run(ServiceUserApplication.class, args);
    }
}
Gateway configuration: since the project uses gateway as the gateway, the user module is added now. The gateway configuration needs to be added to the configuration file of gateway module:
# Set routing id
spring.cloud.gateway.routes[2].id=service-user
#Set the uri of the route
spring.cloud.gateway.routes[2].uri=lb://service-user
#Set the route assertion. The agent servicerId is the / auth / path of auth service
spring.cloud.gateway.routes[2].predicates= Path=/*/user/**
2. Three layer call
The login(@RequestBody LoginVo loginVo) method of the Controller layer calls the loginUser(LoginVo loginVo) method of the Service layer, and then calls redisTemplate and baseMapper to operate Redis and MySQL respectively.
Controller layer login(@RequestBody LoginVo loginVo) method:
    @Autowired
    private UserInfoService userInfoService;

    // User mobile number login interface
    @PostMapping("login")
    public Result login(@RequestBody LoginVo loginVo) {
        Map<String, Object> info = userInfoService.loginUser(loginVo);
        return Result.ok(info);
    }
Service layer loginUser(LoginVo loginVo) method:
@Autowired
    private RedisTemplate<String, String> redisTemplate;

    // User mobile number login interface
    @Override
    public Map<String, Object> loginUser(LoginVo loginVo) {
        // Get the entered mobile phone number and verification code from loginVo
        String phone = loginVo.getPhone();
        String code = loginVo.getCode();

        // Judge whether the mobile phone number and verification code are empty
        if (StringUtils.isEmpty(phone) || StringUtils.isEmpty(code)) {
            throw new YyghException(ResultCodeEnum.PARAM_ERROR);
        }

        // Verification code
        String redisCode = redisTemplate.opsForValue().get(phone);
        if (!code.equals(redisCode)) {
            throw new YyghException(ResultCodeEnum.CODE_ERROR);
        }


        // Judge whether it is the first login: query the database according to the mobile phone number
        QueryWrapper<UserInfo> wrapper = new QueryWrapper<>();
        wrapper.eq("phone", phone);
        UserInfo userInfo = baseMapper.selectOne(wrapper);

        // If it is the first time to log in with your mobile phone
        if (userInfo == null) {
            // Add information to database
            userInfo = new UserInfo();
            userInfo.setName("");
            userInfo.setPhone(phone);
            userInfo.setStatus(1);
            baseMapper.insert(userInfo);
        }

        // Check whether it is disabled
        if (userInfo.getStatus() == 0) {
            throw new YyghException(ResultCodeEnum.LOGIN_DISABLED_ERROR);
        }

        // Not the first time, log in directly
        // Return login information
        // Return login user name
        // Return tocken information
        HashMap<String, Object> map = new HashMap<>();
        String name = userInfo.getName();
        // If the user name is empty, get the nickname
        if (StringUtils.isEmpty(name)) {
            name = userInfo.getNickName();
        }
        // If the nickname is still empty, go to get the mobile phone number
        if (StringUtils.isEmpty(name)) {
            name = userInfo.getPhone();
        }
        map.put("name", name);

        // Using JWT to generate a token string
        String token = JwtHelper.createToken(userInfo.getId(), name);
        map.put("tocken", token);
        return map;
    }
Step 2: integrate JWT
JWT (Json Web Token) is an open standard based on JSON, which is implemented to transfer declarations between network application environments. The declaration of JWT is generally used to transfer the authenticated user identity information between identity providers and service providers, so as to obtain resources from the resource server. For example, it is used for user login. The most important function of JWT is the anti-counterfeiting of token information.
A JWT consists of three parts: public part, private part and signature part. The combination of the three is base64 encoded to obtain JWT. Because base64 encoding is not encryption, it just turns the plaintext information into an invisible string. But in fact, base64 can be encoded into plaintext with some tools, so don't put private information in JWT.
Integrate JWT into common util module: the version has been in yygh parent module POM XML add
<dependency>
    <groupId>io.jsonwebtoken</groupId>
    <artifactId>jjwt</artifactId>
</dependency>
Write the JwtHelper class in the common util module:
public class JwtHelper {
    // Expiration time
    private static long tokenExpiration = 24 * 60 * 60 * 1000;
    // Signature key
    private static String tokenSignKey = "123456";

    // Generate token according to parameters
    public static String createToken(Long userId, String userName) {
        String token = Jwts.builder()
                .setSubject("YYGH-USER")
                .setExpiration(new Date(System.currentTimeMillis() + tokenExpiration))
                .claim("userId", userId)
                .claim("userName", userName)
                .signWith(SignatureAlgorithm.HS512, tokenSignKey)
                .compressWith(CompressionCodecs.GZIP)
                .compact();
        return token;
    }

    // Get the user id according to the token string
    public static Long getUserId(String token) {
        if (StringUtils.isEmpty(token)) {
            return null;
        }
        Jws<Claims> claimsJws = Jwts.parser().setSigningKey(tokenSignKey).parseClaimsJws(token);
        Claims claims = claimsJws.getBody();
        Integer userId = (Integer) claims.get("userId");
        return userId.longValue();
    }

    // Get the user's name according to the token string
    public static String getUserName(String token) {
        if (StringUtils.isEmpty(token)) {
            return "";
        }
        Jws<Claims> claimsJws
                = Jwts.parser().setSigningKey(tokenSignKey).parseClaimsJws(token);
        Claims claims = claimsJws.getBody();
        return (String) claims.get("userName");
    }

    // test
    public static void main(String[] args) {
        String token = JwtHelper.createToken(1L, "Hudie");
        // token = header information + subject + signature hash
        System.out.println(token);
        System.out.println(JwtHelper.getUserId(token));
        System.out.println(JwtHelper.getUserName(token));
    }
}
Step 3: build a service MSM SMS module (integrate Alibaba cloud SMS)
1. Start class & configure gateway
Build a service MSM module for SMS login, including:
- Register the service with Nacos using the @ EnableDiscoveryClient annotation.
- Use @ SpringBootApplication(exclude = DataSourceAutoConfiguration.class) annotation to cancel the automatic configuration of data source, because sending SMS does not need to call MySQL database.
Start swagger scanning with @ ComponentScan(basePackages = "com.gql") annotation.
@SpringBootApplication(exclude = DataSourceAutoConfiguration.class)
@EnableDiscoveryClient
// swagger scan
@ComponentScan(basePackages = {"com.gql"})
public class ServiceMsmApplication {
    public static void main(String[] args) {
        SpringApplication.run(ServiceMsmApplication.class, args);
    }
}
Gateway configuration: since the project uses gateway as the gateway, the short message module is added now. The gateway configuration needs to be added to the configuration file of gateway module:
# Set routing id
spring.cloud.gateway.routes[3].id=service-msm
#Set the uri of the route
spring.cloud.gateway.routes[3].uri=lb://service-msm
#Set the route assertion. The agent servicerId is the / auth / path of auth service
spring.cloud.gateway.routes[3].predicates= Path=/*/msm/**
2. SMS configuration file & read configuration class
SMS profile: add the regionId, accessKeyId and secret of Alibaba cloud SMS in the properties of the SMS module:
# Alibaba cloud server of Hangzhou node is used here
aliyun.sms.regionId=cn-hangzhou
aliyun.sms.accessKeyId=[secrecy]
aliyun.sms.secret=[secrecy]
Read configuration file class: read the content of the configuration file in the configuration class:
@Component
public class ConstantPropertiesUtils implements InitializingBean {

    @Value("${aliyun.sms.regionId}")
    private String regionId;

    @Value("${aliyun.sms.accessKeyId}")
    private String accessKeyId;

    @Value("${aliyun.sms.secret}")
    private String secret;

    public static String REGION_Id;
    public static String ACCESS_KEY_ID;
    public static String SECRECT;

    @Override
    public void afterPropertiesSet() throws Exception {
        REGION_Id = regionId;
        ACCESS_KEY_ID = accessKeyId;
        SECRECT = secret;
    }
}
3. Generate verification code class
This class includes the method of generating 4-digit verification code and 6-digit verification code.
public class RandomUtil {

    private static final Random random = new Random();

    private static final DecimalFormat fourdf = new DecimalFormat("0000");

    private static final DecimalFormat sixdf = new DecimalFormat("000000");

    public static String getFourBitRandom() {
        return fourdf.format(random.nextInt(10000));
    }

    public static String getSixBitRandom() {
        return sixdf.format(random.nextInt(1000000));
    }

    /**
     * Given an array, extract n data
     * @param list
     * @param n
     * @return
     */
    public static ArrayList getRandom(List list, int n) {

        Random random = new Random();

        HashMap<Object, Object> hashMap = new HashMap<Object, Object>();

        // Generate random numbers and store them in HashMap
        for (int i = 0; i < list.size(); i++) {

            int number = random.nextInt(100) + 1;

            hashMap.put(number, i);
        }

        // Importing arrays from HashMap
        Object[] robjs = hashMap.values().toArray();

        ArrayList r = new ArrayList();

        // Traverse the array and print the data
        for (int i = 0; i < n; i++) {
            r.add(list.get((int) robjs[i]));
            System.out.print(list.get((int) robjs[i]) + "\t");
        }
        System.out.print("\n");
        return r;
    }
}
4. Layer 3 call
The sendCode(@PathVariable String phone) method of Controller layer calls redisTemplate to get the generated verification code directly, then calls send(phone, code) method of Service layer to send the mobile phone verification code through Ali cloud.
@RestController
@RequestMapping("/api/msm")
public class MsmApiController {

    @Autowired
    private MsmService msmService;

    @Autowired
    private RedisTemplate<String, String> redisTemplate;


    // Send mobile verification code
    @GetMapping("send/{phone}")
    public Result sendCode(@PathVariable String phone) {
        // Get the mobile phone verification code from redis. If you get it, return ok
        // (key: mobile phone number, value: verification code)
        String code = redisTemplate.opsForValue().get(phone);
        if (!StringUtils.isEmpty(code)) {
            return Result.ok();
        }
        // If it cannot be obtained, a 6-digit verification code is generated
        code = RandomUtil.getSixBitRandom();
        // Secretly print to console
        System.out.println(code);
        // Call service to return and send through Integrated SMS service
        boolean isSend = msmService.send(phone, code);

        // Put the generated verification code into redis and set the effective time
        if (isSend) {
            // The verification code is invalid for more than 1 minute
            redisTemplate.opsForValue().set(phone, code, 1, TimeUnit.MINUTES);
            return Result.ok();
        } else {
            return Result.fail().message("Sending SMS failed");
        }
    }
}
Mobile phone verification code sent by Service layer:
@Service
public class MsmServiceImpl implements MsmService {
    // Send mobile verification code
    @Override
    public boolean send(String phone, String code) {
        // Judge whether the mobile phone number is empty
        if (StringUtils.isEmpty(phone)) {
            return false;
        }

        // Integrate Alibaba cloud SMS services


        // Set relevant parameters
        DefaultProfile profile = DefaultProfile.
                getProfile(ConstantPropertiesUtils.REGION_Id,
                        ConstantPropertiesUtils.ACCESS_KEY_ID,
                        ConstantPropertiesUtils.SECRECT);
        IAcsClient client = new DefaultAcsClient(profile);

        CommonRequest request = new CommonRequest();
        // If it is HTTPS, you need to set ↓
        //request.setProtocol(ProtocolType.HTTPS);
        request.setMethod(MethodType.POST);
        request.setDomain("dysmsapi.aliyuncs.com");
        request.setVersion("2017-05-25");
        request.setAction("SendSms");

        //cell-phone number
        request.putQueryParameter("PhoneNumbers", phone);
        //Signature name
        request.putQueryParameter("SignName", "Kangaroo Jiari");
        //Template code
        request.putQueryParameter("TemplateCode", "SMS_215315088");
        //The verification code uses json format {"code":"123456"}
        Map<String, Object> param = new HashMap();
        param.put("code", code);
        request.putQueryParameter("TemplateParam", JSONObject.toJSONString(param));

        //Call method to send SMS
        try {
            CommonResponse response = client.getCommonResponse(request);
            System.out.println(response.getData());
            return response.getHttpResponse().isSuccess();
        } catch (ServerException e) {
            e.printStackTrace();
        } catch (ClientException e) {
            e.printStackTrace();
        }
        return false;
    }
}
Step 4: Login Page Front
1. Encapsulate api requests
Create API folder, create / API / userinfo js,/api/msm.js
import request from '@/utils/request'

const api_name = `/api/user`

export default {
    login(userInfo) {
        return request({
            url: `${api_name}/login`,
            method: `post`,
            data: userInfo
        })
    }
}
import request from '@/utils/request'

const api_name = `/api/msm`

export default {
    sendCode(mobile) {
        return request({
            url: `${api_name}/send/${mobile}`,
            method: `get`
        })
    }
}
2. Add login component
After successful login, we need to record the user information in the cookie, so execute NPM install JS cookie on the command line of vscode.
The login pop-up component is a common layer, so we put it in the header component and modify layouts / myheader Vue file:
For specific code, click here to view the warehouse.
3. Log in to global events
At present, the login pop-up layer is in the myheader component, and the login button is also in the same component. Click login and call showLogin() method.
On the reservation registration page, when selecting a department to register, we need to judge whether we are currently logged in. If so, we can enter the next page; If there is no login, the login layer needs to be displayed. We can register a global login event. When we need to log in to the layer, we send a login event, the header monitors the login event, and then we trigger the click event of the login button to open the login layer.
Register and listen to login events in the header, and modify myheader Vue components:
①. Introduce vue
import Vue from 'vue'
② Registration and listening events
  // After rendering the page
  mounted() {
    // Register global login event object
    window.loginEvent = new Vue();
    // Listen for login events
    loginEvent.$on("loginDialogEvent", function () {
      document.getElementById("loginDialog").click();
    });
    // Trigger the event and display the login layer: loginevent$ emit('loginDialogEvent')
  },
Adjust the registration page and modify / pages/hospital/_hoscode.vue components:
① Introducing cookie s
import cookie from 'js-cookie'
② Modification method
    schedule(depcode) {
      // Login judgment
      let token = cookie.get("token");
      if (!token) {
        loginEvent.$emit("loginDialogEvent");
        return;
      }
      window.location.href =
        "/hospital/schedule?hoscode=" + this.hoscode + "&depcode=" + depcode;
    },
Additional: user authentication and gateway integration
Idea:
- All requests will pass through the service gateway. The service gateway exposes the service to the outside world and carries out unified user authentication at the gateway;
- Since we want to authenticate users in the gateway, the gateway needs to know which URLs to authenticate, so we have to make rules for ur.
- For asynchronous requests from Api interfaces, we adopt url rule matching, such as: / api//auth /, and all that meet this rule must be authenticated by the user.
Therefore, we need to adjust the server gateway module.
Add a service in the gateway fill1
@Override
    public Mono<Void> filter(ServerWebExchange exchange, GatewayFilterChain chain) {
        ServerHttpRequest request = exchange.getRequest();
        String path = request.getURI().getPath();
        System.out.println("===" + path);

        //Internal service interface, external access is not allowed
        if (antPathMatcher.match("/**/inner/**", path)) {
            ServerHttpResponse response = exchange.getResponse();
            return out(response, ResultCodeEnum.PERMISSION);
        }

        //api Interface, asynchronous request, verification, user must log in
        if (antPathMatcher.match("/api/**/auth/**", path)) {
            Long userId = this.getUserId(request);
            if (StringUtils.isEmpty(userId)) {
                ServerHttpResponse response = exchange.getResponse();
                return out(response, ResultCodeEnum.LOGIN_AUTH);
            }
        }
        return chain.filter(exchange);
    }
See the warehouse for the website gateway filter code.
2. Adjust the front-end code
When requesting the server-side interface, we take the token by default. If the interface to be logged in does not have a token or the token expires, the server-side will return to 208 status, and then send a login event to open the login pop-up layer for login. Utils / request. Needs to be modified JS file:
import axios from 'axios'
import { MessageBox, Message } from 'element-ui'
import cookie from 'js-cookie'

// Create an axios instance
const service = axios.create({
    baseURL: 'http://localhost:9000',
    timeout: 15000 // Request timeout
})
// http request interceptor
service.interceptors.request.use(
    config => {
        // The token will not be processed first, but will be improved in subsequent use

        // Judge whether there is a token value in the cookie
        if (cookie.get('token')) {
            // Put the token value into the cookie
            config.headers['token'] = cookie.get('token')
        }
        return config
    },
    err => {
        return Promise.reject(err)
    })
// http response interceptor
service.interceptors.response.use(
    response => {
        if (response.data.code === 208) {
            // The login input box pops up
            loginEvent.$emit('loginDialogEvent')
            return
        } else {
            if (response.data.code !== 200) {
                Message({
                    message: response.data.message,
                    type: 'error',
                    duration: 5 * 1000
                })
                return Promise.reject(response.data)
            } else {
                return response.data
            }
        }
    },
    error => {
        return Promise.reject(error.response)
    })
export default service
So far, Alibaba cloud SMS has been integrated into the project.