1) Experimental platform: punctual atom STM32MP157 development board
2) Purchase link: https://item.taobao.com/item.htm?&id=629270721801
3) Full set of experimental source code + manual + video download address: http://www.openedv.com/thread-318813-1-1.html
4) Official station B of punctual atom: https://space.bilibili.com/394620890
5) Punctual atom STM32MP157 technical exchange group: 691905614

Chapter 26 Linux buzzer experiment
In the experiment in the last chapter, we wrote the LED lamp driver with the help of gpio subsystem. There is also a buzzer on the STM32MP1 development board. From the perspective of software, the buzzer driver and LED lamp driver are exactly the same, both controlling the high and low level of IO output. In this chapter, we will learn to write the Linux driver of buzzer, which is also the consolidation of gpio subsystem explained in the previous chapter.
26.1 buzzer driving principle
Buzzers are commonly used in computers, printers, alarms, electronic toys and other electronic products. There are two kinds of buzzers: active buzzers and passive buzzers. The "source" here is not a power supply, but a vibration source. The active buzzer has a vibration source inside, so the source buzzer will call as long as it is powered on. There is no shock source inside the passive buzzer, so it can not be driven directly by DC. It needs 2K-5K square wave to drive. The STM32MP1 development board of punctual atom uses an active buzzer, so it will work as long as it is powered. The active buzzer used by the development board is shown in the figure below:

Figure 26.1.1 active buzzer
As long as the active buzzer is powered on, it will call, so we can make a power supply circuit. The power supply circuit controls its on-off through an IO. Generally, the circuit is built by using a triode. Why can't we connect the GPIO directly to the negative pole of the buzzer like controlling the LED lamp, and control the on-off of the buzzer through the IO output. This is because the working current of the buzzer is larger than that of the LED lamp. Directly connecting the buzzer to the GPIO of the development board may burn the IO. Therefore, we need to indirectly control the on-off of the buzzer through a triode, which is equivalent to adding a layer of isolation. In this chapter, we will drive the active buzzer on the development board, and then write a simple test APP to control the buzzer to sound or turn off through the APP.
In this section, let's take a look at what needs to be done to write buzzer driver under Linux:
① Create a buzzer node in the device tree and add GPIO information to the buzzer node.
② Write driver and test APP, which is basically the same as the LED driver and test APP in Chapter 25.
Next, we will write the buzzer Linux driver according to the above two steps.
26.2 hardware schematic diagram analysis
The hardware schematic diagram of buzzer is shown in figure 26.2.1:
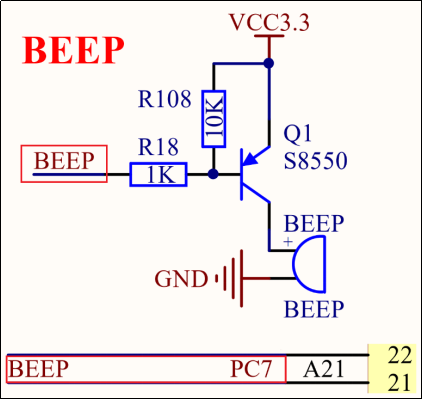
Figure 26.2.1 schematic diagram of buzzer
In figure 26.2.1, a PNP type triode 8550 is used to drive the buzzer, and the IO PC7 is used to control the conduction of triode Q1. When BEEP outputs low level, Q1 is turned on, which is equivalent to that the positive pole of the buzzer is connected to 3.3V power supply. The buzzer forms a path, so the buzzer will sound. Similarly, when BEEP outputs high level, Q1 does not turn on, so the buzzer does not form a path, so the buzzer will not sound.
26.3 preparation of experimental procedures
The routine path corresponding to this experiment is: development board CD 1, program source code 2, Linux driver routine 6_beep.
The experiment in this chapter is completed on the basis of the experiment in Chapter 25. The focus is to change the driver to device tree based
26.3.1 modify equipment tree file
Create a beep node under the root node "/", the node name is "beep", and the node content is as follows:
Example code 26.3.1.1 establish BEEP Buzzer node
1    beep {
2        compatible = "alientek,beep";
3        status = "okay";
4        beep-gpio = <&gpioc 7 GPIO_ACTIVE_HIGH>;
5    };
In line 4, the beep GPIO attribute specifies the GPIO used by the buzzer.
After the device tree is written, use the "make dtbs" command to recompile the device tree, and then use the newly compiled stm32mp157d ATK The DTB file starts the Linux system. After successful startup, enter the "/ proc / device tree" directory to check whether the "beep" node exists. If it exists, it indicates that the device tree has been basically modified successfully (specifically, drive verification). The results are shown in figure 26.3.1.1:
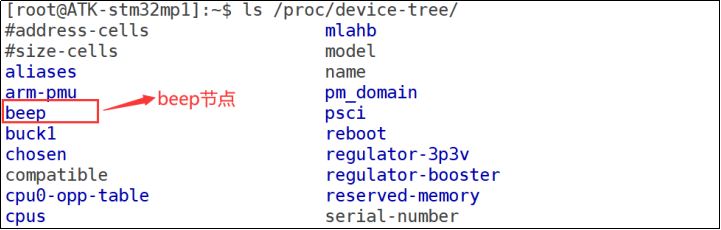
Figure 26.3.1.1 beep node
26.3.2 buzzer driver programming
After the device tree is ready, you can write the driver. The experiment in this chapter is in the experiment driver file gpioled in Chapter 45 C. Create a new folder named "6_beep" and then_ Create a vscode project in the beep folder, and the workspace is named "beep". After the project is created, create a new beep C file, in beep C enter the following contents:
Example code 26.3.2.1 beep.c File code snippet
1   #include <linux/types.h>
2   #include <linux/kernel.h>
3   #include <linux/delay.h>
4   #include <linux/ide.h>
5   #include <linux/init.h>
6   #include <linux/module.h>
7   #include <linux/errno.h>
8   #include <linux/gpio.h>
9   #include <linux/cdev.h>
10  #include <linux/device.h>
11  #include <linux/of.h>
12  #include <linux/of_address.h>
13  #include <linux/of_gpio.h>
14  #include <asm/mach/map.h>
15  #include <asm/uaccess.h>
16  #include <asm/io.h>
17  /***************************************************************
18  Copyright © ALIENTEK Co., Ltd. 1998-2029. All rights reserved.
19  File name 	:  beep.c
20  Author 	:  Punctual atomic Linux team
21  edition 	:  V1.0
22  Description 	:  Buzzer driver.
23  other 	:  nothing
24  Forum 	:  www.openedv.com
25  journal 	:  First edition v1.0 0 2020 / 12 / 31 punctual atomic Linux team creation
26  ***************************************************************/
27  #define BEEP_CNT        	 one 		/*  Number of equipment numbers 	*/
28  #define BEEP_NAME        	 "beep" 	/*  name 		*/
29  #define BEEPOFF           	 0 	/*  Turn off the buzzer 		*/
30  #define BEEPON            	 one 	/*  Turn on the buzzer 		*/
31
32  /* beep Equipment structure */
33  struct beep_dev{
34      dev_t devid;            		/* Equipment number     	*/
35      struct cdev cdev;       		/* cdev     	*/
36      struct class *class;    		/* class      		*/
37      struct device *device;  		/* equipment   	 	*/
38      int major;              		/* Main equipment No   	*/
39      int minor;              		/* Secondary equipment No   	*/
40      struct device_node  *nd; 	/* Device node 		*/
41      int beep_gpio;          		/* beep GPIO number used */
42  };
43
44  struct beep_dev beep;   /* beep equipment */
45
46  /*
47   * @description 	: open device
48   * @param – inode	: inode passed to driver
49   * @param – filp	: The device file has a file structure called private_ Member variable of data
50   *                    Generally, private is used when open ing_ Data points to the device structure.
51   * @return       	: 0 success; Other failures
52   */
53  static int led_open(struct inode *inode, struct file *filp)
54  {
55      filp->private_data = &beep; /* Set private data */
56      return 0;
57  }
58
59  /*
60   * @description 	: Read data from device
61   * @param - filp 	: Device file to open (file descriptor)
62   * @param - buf  	: Data buffer returned to user space
63   * @param - cnt  	: Length of data to read
64   * @param - offt 	: Offset relative to the first address of the file
65   * @return        	: The number of bytes read. If it is negative, it indicates that the read failed
66   */
67  static ssize_t led_read(struct file *filp, char __user *buf,
size_t cnt, loff_t *offt)
68  {
69      return 0;
70  }
71
72  /*
73   * @description  	: Write data to device
74   * @param - filp 	: A device file that represents an open file descriptor
75   * @param - buf  	: Data to be written to the device
76   * @param - cnt  	: Length of data to write
77   * @param - offt 	: Offset relative to the first address of the file
78   * @return        	: The number of bytes written. If it is negative, it indicates that the write failed
79   */
80  static ssize_t led_write(struct file *filp, const char __user *buf,
size_t cnt, loff_t *offt)
81  {
82      int retvalue;
83      unsigned char databuf[1];
84      unsigned char ledstat;
85      struct beep_dev *dev = filp->private_data;
86
87      retvalue = copy_from_user(databuf, buf, cnt);
88      if(retvalue < 0) {
89          printk("kernel write failed!\r\n");
90          return -EFAULT;
91      }
92
93      ledstat = databuf[0];       				/* Get status value */
94
95      if(ledstat == BEEPON) {
96          gpio_set_value(dev->beep_gpio, 0);  /* Turn on the buzzer */
97      } else if(ledstat == BEEPOFF) {
98          gpio_set_value(dev->beep_gpio, 1);  /* Turn off the buzzer */
99      }
100     return 0;
101 }
102
103 /*
104  * @description 	: Turn off / release the device
105  * @param - filp 	: Device file to close (file descriptor)
106  * @return        	: 0 success; Other failures
107  */
108 static int led_release(struct inode *inode, struct file *filp)
109 {
110     return 0;
111 }
112
113 /* Device operation function */
114 static struct file_operations beep_fops = {
115     .owner = THIS_MODULE,
116     .open = led_open,
117     .read = led_read,
118     .write = led_write,
119     .release =  led_release,
120 };
121
122 /*
123  * @description 	: Drive exit function
124  * @param       	: nothing
125  * @return      	: nothing
126  */
127 static int __init led_init(void)
128 {
129     int ret = 0;
130     const char *str;
131
132     /* LED settings used by GPIO 	*/
133     /* 1,Get device node: beep 	*/
134     beep.nd = of_find_node_by_path("/beep");
135     if(beep.nd == NULL) {
136         printk("beep node not find!\r\n");
137         return -EINVAL;
138     }
139
140     /* 2.Read status attribute */
141     ret = of_property_read_string(beep.nd, "status", &str);
142     if(ret < 0)
143         return -EINVAL;
144
145     if (strcmp(str, "okay"))
146         return -EINVAL;
147
148     /* 3,Get the value of the compatible property and match it */
149     ret = of_property_read_string(beep.nd, "compatible", &str);
150     if(ret < 0) {
151         printk("beep: Failed to get compatible property\n");
152         return -EINVAL;
153     }
154
155     if (strcmp(str, "alientek,beep")) {
156         printk("beep: Compatible match failed\n");
157         return -EINVAL;
158     }
159
160     /* 4, Get the gpio attribute in the device tree and get the LED number used by the LED */
161     beep.beep_gpio = of_get_named_gpio(beep.nd, "beep-gpio", 0);
162     if(beep.beep_gpio < 0) {
163         printk("can't get led-gpio");
164         return -EINVAL;
165     }
166     printk("beep-gpio num = %d\r\n", beep.beep_gpio);
167
168     /* 5.Apply to GPIO subsystem to use GPIO */
169     ret = gpio_request(beep.beep_gpio, "BEEP-GPIO");
170     if (ret) {
171         printk(KERN_ERR "beep: Failed to request beep-gpio\n");
172         return ret;
173     }
174
175     /* 6,Set PC7 as output and output high level. BEEP is turned off by default */
176     ret = gpio_direction_output(beep.beep_gpio, 1);
177     if(ret < 0) {
178         printk("can't set gpio!\r\n");
179     }
180
181     /* Register character device driver 	*/
182     /* 1,Create device number 	*/
183     if (beep.major) {       /*  Defines the equipment number */
184         beep.devid = MKDEV(beep.major, 0);
185         ret = register_chrdev_region(beep.devid, BEEP_CNT,
BEEP_NAME);
186         if(ret < 0) {
187             pr_err("cannot register %s char driver [ret=%d]\n",
BEEP_NAME, BEEP_CNT);
188             goto free_gpio;
189         }
190     } else {                        /* No device number defined */
191         ret = alloc_chrdev_region(&beep.devid, 0, BEEP_CNT,
BEEP_NAME); /* Application equipment No */
192         if(ret < 0) {
193             pr_err("%s Couldn't alloc_chrdev_region, ret=%d\r\n",
BEEP_NAME, ret);
194             goto free_gpio;
195         }
196         beep.major = MAJOR(beep.devid); /* Get the master device number of the assigned number */
197         beep.minor = MINOR(beep.devid); /* Get the secondary equipment number of the assigned number */
198     }
199     printk("beep major=%d,minor=%d\r\n",beep.major, beep.minor);
200
201     /* 2,Initialize cdev */
202     beep.cdev.owner = THIS_MODULE;
203     cdev_init(&beep.cdev, &beep_fops);
204
205     /* 3,Add a cdev */
206     cdev_add(&beep.cdev, beep.devid, BEEP_CNT);
207     if(ret < 0)
208         goto del_unregister;
209
210     /* 4,Create class */
211     beep.class = class_create(THIS_MODULE, BEEP_NAME);
212     if (IS_ERR(beep.class)) {
213         goto del_cdev;
214     }
215
216     /* 5,Create device */
217     beep.device = device_create(beep.class, NULL, beep.devid, NULL,
BEEP_NAME);
218     if (IS_ERR(beep.device)) {
219         goto destroy_class;
220     }
221     return 0;
222
223 destroy_class:
224     class_destroy(beep.class);
225 del_cdev:
226     cdev_del(&beep.cdev);
227 del_unregister:
228     unregister_chrdev_region(beep.devid, BEEP_CNT);
229 free_gpio:
230     gpio_free(beep.beep_gpio);
231     return -EIO;
232 }
233
234 /*
235  * @description 	: Drive exit function
236  * @param       	: nothing
237  * @return      	: nothing
238  */
239 static void __exit led_exit(void)
240 {
241     /* Unregister character device driver */
242     cdev_del(&beep.cdev);						/*  Delete cdev */
243     unregister_chrdev_region(beep.devid, BEEP_CNT); /* Logout equipment number */
244     device_destroy(beep.class, beep.devid);	/* Logout device */
245     class_destroy(beep.class);					/* Logout class */
246     gpio_free(beep.beep_gpio); 					/* Release GPIO */
247 }
248
249 module_init(led_init);
250 module_exit(led_exit);
251 MODULE_LICENSE("GPL");
252 MODULE_AUTHOR("ALIENTEK");
253 MODULE_INFO(intree, "Y");
beep.c The contents in the previous chapter are the same as those in the previous chapter gpioled.c The contents in are basically the same, except for initialization BEEP this PIN,I won't explain it in detail here.
26.3.3 write test APP
Test the ledapp tested in the previous chapter C file and create a new one named beepapp C, and then enter the following:
Example code 26.3.3.1 beepApp.c file
1   #include "stdio.h"
2   #include "unistd.h"
3   #include "sys/types.h"
4   #include "sys/stat.h"
5   #include "fcntl.h"
6   #include "stdlib.h"
7   #include "string.h"
8   /***************************************************************
9   Copyright © ALIENTEK Co., Ltd. 1998-2029. All rights reserved.
10  File name 		:  beepApp.c
11  Author 	:  Punctual atomic Linux team
12  edition 	:  V1.0
13  Description 	:  beep test APP.
14  other 	:  nothing
15  usage method 	: ./ Beepapp / dev / beep 0 turn off the buzzer
16               ./beepApp /dev/beep  1 Turn on the buzzer
17  Forum 	:  www.openedv.com
18  journal 	:  First edition v1.0 0 2020 / 12 / 31 punctual atomic Linux team creation
19  ***************************************************************/
20
21  #define BEEPOFF     0
22  #define BEEPON  1
23
24  /*
25   * @description  	: main main program
26   * @param - argc 	: argv Number of array elements
27   * @param - argv 	: Specific parameters
28   * @return        	: 0 success; Other failures
29   */
30  int main(int argc, char *argv[])
31  {
32      int fd, retvalue;
33      char *filename;
34      unsigned char databuf[1];
35
36      if(argc != 3){
37          printf("Error Usage!\r\n");
38          return -1;
39      }
40
41      filename = argv[1];
42
43      /* Turn on beep driver */
44      fd = open(filename, O_RDWR);
45      if(fd < 0){
46          printf("file %s open failed!\r\n", argv[1]);
47          return -1;
48      }
49
50      databuf[0] = atoi(argv[2]); /* What to do: turn on or off */
51
52      /* Write data to / dev/beep file */
53      retvalue = write(fd, databuf, sizeof(databuf));
54      if(retvalue < 0){
55          printf("BEEP Control Failed!\r\n");
56          close(fd);
57          return -1;
58      }
59
60      retvalue = close(fd); /* Close file */
61      if(retvalue < 0){
62          printf("file %s close failed!\r\n", argv[1]);
63          return -1;
64      }
65      return 0;
66  }
67
beepApp.c Document content and ledApp.c The contents of the file are basically the same. If you open, write and close the file.
26.4 operation test
26.4.1 compiling driver and testing APP
1. Compile driver
Write the Makefile file. The Makefile file of the experiment in this chapter is basically the same as the experiment in Chapter 20, except that the value of obj-m variable is changed to beep o. The contents of Makefile are as follows:
Example code 26.4.1.1 Makefile file
1  KERNELDIR := /home/zuozhongkai/linux/my_linux/linux-5.4.31
......
4  obj-m := beep.o
......
11 clean:
12  $(MAKE) -C $(KERNELDIR) M=$(CURRENT_PATH) clean
Line 4, setting obj-m The value of the variable is beep.o.
Input the following command to compile the driver module file:
make -j32
After successful compilation, a driver module file named "beep.ko" will be generated.
2. Compile test APP
Enter the following command to compile the test beepapp C this test procedure:
arm-none-linux-gnueabihf-gcc beepApp.c -o beepApp
After the compilation is successful, the beepApp application will be generated.
26.4.2 operation test
Compile beep. From the previous section Copy Ko and beepApp files to rootfs/lib/modules/5.4.31 directory, restart the development board, enter the directory lib/modules/5.4.31, and enter the following command to load beep Ko drive module:
depmod / / this command needs to be run when the driver is loaded for the first time
modprobe beep / / load the driver
After the driver is loaded successfully, some information will be output in the terminal, as shown in figure 26.4.2.1:

Figure 26.4.2.1 information output after successful driver loading
As can be seen from figure 26.4.2.1, the node beep is found, and the GPIO number of PC7 is 39. Use beepApp software to test whether the driver works normally. Enter the following command to turn on the buzzer:
. / beepApp /dev/beep 1 / / turn on the buzzer
Input the above command and observe whether the buzzer on the development board rings. If it rings, it indicates that the drive works normally. Turn off the buzzer after entering the following command:
. / beepApp /dev/beep 0 / / turn off the buzzer
After entering the above command, observe whether the buzzer on the development board stops ringing. If you want to unload the driver, you can enter the following command:
rmmod beep.ko