This article is shared from Huawei cloud community< [high concurrency] how to realize distributed current limiting under 100 million level traffic? You must master these theories!! >, author: Glacier.
In Internet applications, high concurrency systems will face a major challenge, that is, a large number of high concurrency visits, such as tmall's double 11, JD 618, second kill, rush purchase promotion, etc. These are typical high concurrency scenes with high traffic.
High concurrency system current limiting
With huge access traffic in a short time, how can we make the system handle high concurrency and ensure the stability of its own system? Some people will say that adding machines is enough. Because my system is distributed, we can solve the problem only by adding machines. But what if you can't solve this problem by adding machines? Moreover, in this case, we can not add machines without restrictions. The hardware resources of the server are always limited. Under the limited resources, we have to take some other measures to protect our back-end service system in order to deal with this kind of high traffic and high concurrency access, such as caching, asynchrony, degradation, flow restriction, static, etc.
Let's talk about how to realize flow restriction first.
What is current limiting?
In high concurrency systems, current limit usually refers to: speed limit high concurrency access or requests or speed limit requests within a time to protect our system. Once the speed limit rules of the system (such as the request speed limited by the system) are reached, the following methods can be used to process these requests.
- Denial of service (friendly prompt or jump to the error page).
- Queue or wait (e.g. second kill system).
- Service degradation (return the default bottom data).
In fact, it is to limit the speed of requests, such as 10r/s, that is, only 10 requests are allowed per second, which limits the speed of requests. In a sense, current limiting is actually the limitation of quantity at a certain frequency.
Current limit is generally used to control the rate of system service requests, such as current limit of tmall's double 11, current limit of JD 618, ticket grabbing of 12306, etc.
What are the usage scenarios of current limiting?
Here, let's take an example. Suppose you build a mall system. On a holiday, you suddenly find that the interface request to submit an order has suddenly increased by nearly 50 times compared with the usual request. Soon, the interface to submit an order timed out and threw an exception, which is almost unavailable. Moreover, because the order interface timeout is unavailable, it also leads to the failure of other services of the system.
How should we deal with this large traffic scenario? A typical treatment scheme is current limiting. Of course, in addition to current limiting, there are other solutions. Our article mainly focuses on current limiting.
- Second kill and rush purchase of scarce resources;
- Highly concurrent read and write operations to the database, such as submitting orders and instantly inserting a large amount of data into the database;
Flow restriction can be said to be a sharp tool to deal with high concurrency problems. With flow restriction, you can not worry about the collapse of system services or service avalanches caused by instantaneous peak traffic, and finally damage services rather than no services.
It should also be noted that the current limit should be evaluated and tested well, otherwise the normal access will be limited.
Counter
Counter method
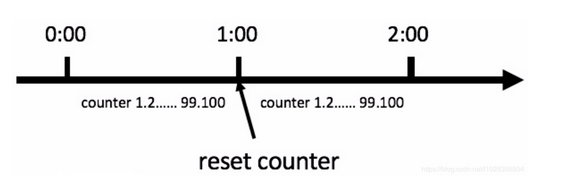
The simplest and crudest algorithm in the current limiting algorithm. For example, if an interface has no more than 60 requests in one minute, we can set a counter at the beginning. When each request is made, the value of this counter is increased by 1. If the value of this counter is greater than 60 and the time interval between the first request and the first request is within 1 minute, it indicates that there are too many requests; If the time interval between the request and the first request is greater than 1 minute and the value of the counter is still within the current limit, reset the counter.
Counters can also be used to limit the total number of concurrency in a certain period of time, such as the number of concurrency in database connection pool, thread pool and second kill; As long as the total number of requests in a certain period of time exceeds the set threshold, the counter limits the current. It is a simple and rough total quantity current limit, rather than the average rate current limit.
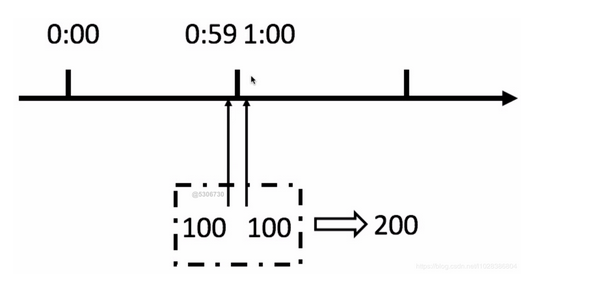
This method has a fatal problem: critical problem - when a malicious request is encountered, the user requests 100 times at 0:59 and 100 times at 1:00, then the user requests 200 times in 1 second. The user can reset the node burst request, and instantly exceed the rate limit set by us. The user may break our application through algorithm vulnerabilities.
We can use sliding window to solve this problem.
sliding window
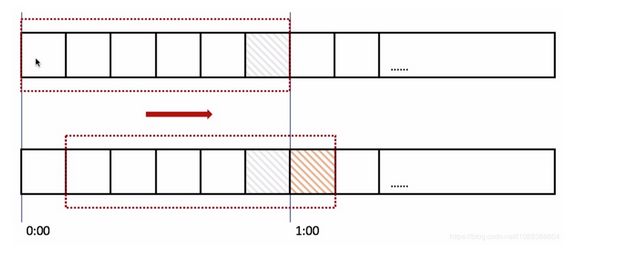
In the figure above, the whole red rectangle is a time window. In our example, a time window is 1 minute, and then we divide the time window. As shown in the figure above, we divide the sliding window into 6 grids, so each grid represents 10 seconds. Every time it exceeds 10 seconds, our time window will slide one grid to the right, and each grid has its own independent counter, For example, if a request arrives at 0:35, the counter from 0:30 to 0:39 will be + 1. How can sliding window solve the problem of critical point? As shown in the figure above, 100 requests arriving at 0:59 will be in the gray area grid, while the requests arriving at 1:00 will be in the red grid, and the window will slide one grid to the right. Then the total number of requests in this time window is 200, exceeding the limit of 100, so it can be detected that the current limit is triggered. Looking back at the counter algorithm, you will find that the counter algorithm is actually the window sliding algorithm, but the counter algorithm does not divide the time window, so it is a grid.
It can be seen that the more the grid division of the sliding window is, the more accurate the current limiting statistics will be.
Leaky bucket algorithm
The idea of the algorithm is that the water (request) enters the leaky bucket first, and the leaky bucket flows out at a constant speed. When the water flow speed is too large, it will overflow directly. It can be seen that the leaky bucket algorithm can forcibly limit the data transmission rate. As shown in the figure below.
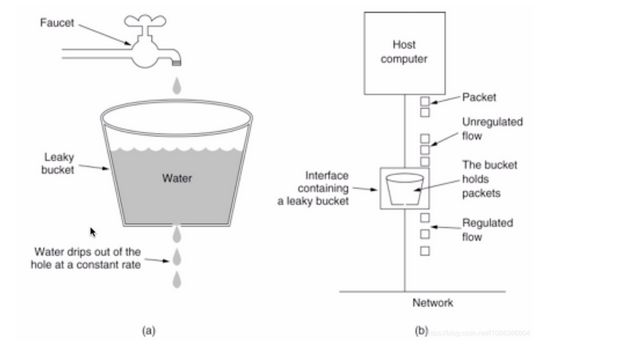
Leaky bucket algorithm does not support burst traffic.
Token Bucket
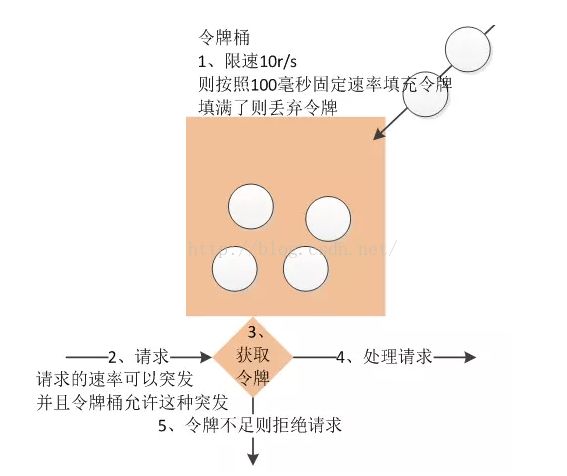
As can be seen from the above figure, the token algorithm is a little complex. The token is stored in the bucket. The bucket is empty at first, and the token is filled into the bucket at a fixed rate r until the capacity of the bucket is reached, and the excess token will be discarded. Every time a request comes, it will try to remove a token. If there is no token, the request cannot pass.
Token bucket algorithm supports burst traffic.
Implementation of token bucket algorithm
Guava framework provides the implementation of token bucket algorithm. You can directly use the RateLimiter class of this framework to create a token bucket current limiter. For example, if the number of token buckets placed per second is 5, then the RateLimiter object can ensure that no more than 5 tokens will be placed in one second, and place tokens at a fixed rate to achieve the effect of smooth output.
Smooth flow example
Here, I wrote an example of implementing token bucket algorithm using Guava framework, as shown below.
package io.binghe.limit.guava;

import com.google.common.util.concurrent.RateLimiter;

/**
 * @author binghe
 * @version 1.0.0
 * @description Token Bucket
 */
public class TokenBucketLimiter {
    public static void main(String[] args){
        //Generate 5 tokens per second
        RateLimiter limiter = RateLimiter.create(5);

        //The return value indicates the time taken to obtain a token from the token bucket, in seconds
        System.out.println(limiter.acquire(1));
        System.out.println(limiter.acquire(1));
        System.out.println(limiter.acquire(1));
        System.out.println(limiter.acquire(1));
        System.out.println(limiter.acquire(1));
        System.out.println(limiter.acquire(1));
        System.out.println(limiter.acquire(1));
        System.out.println(limiter.acquire(1));
        System.out.println(limiter.acquire(1));
        System.out.println(limiter.acquire(1));
    }
}
The implementation of the code is very simple. It uses the RateLimiter class of Guava framework to generate an object that puts 5 tokens into the bucket every second, and then continuously obtains tokens from the bucket. Let's run this code first, and the output result information is as follows.
0.0
0.197294
0.191278
0.19997
0.199305
0.200472
0.200184
0.199417
0.200111
0.199759
It can be seen from the output result that when the token is obtained from the bucket for the first time, the return time is 0.0, that is, it doesn't take time. After that, every time you get a token from the bucket, it will take some time. Why? It's reasonable to say that after five tokens are put into the bucket, it shouldn't take time to get the token from the bucket as the first time!
Because the implementation in Guava is like this: we use ratelimiter Create (5) when creating a token bucket object, it means that five tokens are added every second. One second is equal to 1000 milliseconds, that is, one token is put into the bucket every 200 milliseconds.
When we run the program, the program runs to ratelimit = ratelimit create(5); A token will be put into the bucket when the program runs to the first system out. println(limiter.acquire(1)); Since a token already exists in the bucket, it does not take time to obtain the token directly. However, when the program continues to execute downward, because the program will put a token into the bucket every 200 milliseconds, it takes almost 200 milliseconds to obtain the token.
Burst traffic example
Let's take another look at an example of burst traffic. The code example is shown below.
package io.binghe.limit.guava;

import com.google.common.util.concurrent.RateLimiter;

/**
 * @author binghe
 * @version 1.0.0
 * @description Token Bucket
 */
public class TokenBucketLimiter {
    public static void main(String[] args){
        //Generate 5 tokens per second
        RateLimiter limiter = RateLimiter.create(5);

        //The return value indicates the time taken to obtain a token from the token bucket, in seconds
        System.out.println(limiter.acquire(50));
        System.out.println(limiter.acquire(5));
        System.out.println(limiter.acquire(5));
        System.out.println(limiter.acquire(5));
        System.out.println(limiter.acquire(5));
    }
}
The meaning of the above code is: put 5 tokens into the bucket every second, get 50 tokens from the bucket for the first time, that is, we call burst traffic, and then get 5 tokens from the bucket every time. Next, let's run the above code to see the effect.
0.0
9.998409
0.99109
1.000148
0.999752
When running the code, you will find that when the command line prints out 0.0, you will wait a long time before printing the subsequent output results.
The program puts 5 tokens into the bucket every second. When the program runs to ratelimiter, limiter = ratelimiter create(5); When, the token is put into the bucket. When running to system out. println(limiter.acquire(50)); When it is found that the token will be obtained soon, which takes 0.0 seconds. Next, run to the first system out. println(limiter.acquire(5)); It took 9.998409 seconds. Guys, can you think about why it takes 10 seconds here?
This is because we use ratelimiter = ratelimiter create(5); When the code puts tokens into the bucket, five tokens are put in a second, while system out. println(limiter.acquire(50)); You need to get 50 tokens, that is, it takes 10 seconds to get 50 tokens, because it takes 10 seconds for the program to put 50 tokens into the bucket. When the program gets the token from the bucket for the first time, it gets it quickly. It took nearly 10 seconds to get the token the second time.
The Guava framework supports burst traffic, but it will be limited when it is requested again after the burst traffic, that is, after the burst traffic, it will make up for the time spent processing the burst request when it is requested again. Therefore, in our burst example program, it will take about 10 seconds to get 50 tokens from the bucket at a time and get the tokens from the bucket again.
Characteristics of Guava token bucket algorithm
- RateLimiter uses the token bucket algorithm to accumulate tokens. If the frequency of obtaining tokens is relatively low, it will not lead to waiting and obtain tokens directly.
- RateLimiter can cope with burst traffic because it accumulates tokens. That is, if five tokens are requested at the same time, because there are accumulated tokens in the token bucket at this time, the request can be responded to quickly.
- When there are not enough tokens to be issued, RateLimiter uses the lag method for processing, that is, the waiting time required for the previous request to obtain the token is borne and compensated by the next request, that is, waiting instead of the previous request. (here, you guys should understand)
HTTP interface current limiting practice
Here, we implement the flow restriction of Web interface. The specific method is: encapsulate the flow restriction algorithm based on token bucket with user-defined annotation to realize the flow restriction of interface.
Interface current limiting without annotations
Construction project
Here, we use the SpringBoot project to build the Http interface current limiting project. The SpringBoot project is essentially a Maven project. Therefore, the partners can directly create a Maven project. My project name here is mykit rateelimiter test. Next, in POM Add the following dependencies to the XML file to build the project into a SpringBoot project.
<parent>
        <groupId>org.springframework.boot</groupId>
        <artifactId>spring-boot-starter-parent</artifactId>
        <version>2.2.6.RELEASE</version>
    </parent>

    <modelVersion>4.0.0</modelVersion>
    <groupId>io.mykit.limiter</groupId>
    <artifactId>mykit-ratelimiter-test</artifactId>
    <version>1.0.0-SNAPSHOT</version>
    <packaging>jar</packaging>
    <name>mykit-ratelimiter-test</name>

    <properties>
        <guava.version>28.2-jre</guava.version>
    </properties>

    <dependencies>
        <dependency>
            <groupId>org.springframework.boot</groupId>
            <artifactId>spring-boot-starter-test</artifactId>
        </dependency>

        <dependency>
            <groupId>org.springframework.boot</groupId>
            <artifactId>spring-boot-starter-web</artifactId>
            <exclusions>
                <exclusion>
                    <groupId>org.springframework.boot</groupId>
                    <artifactId>spring-boot-starter-tomcat</artifactId>
                </exclusion>
                <exclusion>
                    <groupId>org.springframework.boot</groupId>
                    <artifactId>spring-boot-starter-logging</artifactId>
                </exclusion>
            </exclusions>
        </dependency>

        <dependency>
            <groupId>org.springframework.boot</groupId>
            <artifactId>spring-boot-starter-undertow</artifactId>
        </dependency>

        <dependency>
            <groupId>org.springframework.boot</groupId>
            <artifactId>spring-boot-configuration-processor</artifactId>
            <optional>true</optional>
        </dependency>

        <dependency>
            <groupId>org.springframework.boot</groupId>
            <artifactId>spring-boot-starter-data-redis</artifactId>
        </dependency>

        <dependency>
            <groupId>org.aspectj</groupId>
            <artifactId>aspectjweaver</artifactId>
        </dependency>

        <dependency>
            <groupId>org.springframework.boot</groupId>
            <artifactId>spring-boot-starter-aop</artifactId>
        </dependency>

        <dependency>
            <groupId>com.google.guava</groupId>
            <artifactId>guava</artifactId>
            <version>${guava.version}</version>
        </dependency>
    </dependencies>

    <build>
        <plugins>
            <plugin>
                <groupId>org.apache.maven.plugins</groupId>
                <artifactId>maven-compiler-plugin</artifactId>
                <version>3.1</version><!--$NO-MVN-MAN-VER$-->
                <configuration>
                    <source>${java.version}</source>
                    <target>${java.version}</target>
                </configuration>
            </plugin>
        </plugins>
    </build>
As you can see, in addition to the Jar package related to SpringBoot, I also referenced the guava framework, version 28.2-jre.
Create core class
Here, I mainly simulate the current limiting scenario of a payment interface. First, we define a PayService interface and a MessageService interface. The PayService interface is mainly used to simulate subsequent payment services, and the MessageService interface simulates sending messages. The definitions of interfaces are as follows.
- PayService
package io.mykit.limiter.service;
import java.math.BigDecimal;
/**
 * @author binghe
 * @version 1.0.0
 * @description Simulated payment
 */
public interface PayService {
    int pay(BigDecimal price);
}- MessageService
package io.mykit.limiter.service;
/**
 * @author binghe
 * @version 1.0.0
 * @description Simulate sending message service
 */
public interface MessageService {
    boolean sendMessage(String message);
}
Next, create their implementation classes as follows.
- MessageServiceImpl
package io.mykit.limiter.service.impl;
import io.mykit.limiter.service.MessageService;
import org.slf4j.Logger;
import org.slf4j.LoggerFactory;
import org.springframework.stereotype.Service;
/**
 * @author binghe
 * @version 1.0.0
 * @description Simulate sending messages
 */
@Service
public class MessageServiceImpl implements MessageService {
    private final Logger logger = LoggerFactory.getLogger(MessageServiceImpl.class);
    @Override
    public boolean sendMessage(String message) {
        logger.info("Message sent successfully===>>" + message);
        return true;
    }
}- PayServiceImpl
package io.mykit.limiter.service.impl;
import io.mykit.limiter.service.PayService;
import org.slf4j.Logger;
import org.slf4j.LoggerFactory;
import org.springframework.stereotype.Service;
import java.math.BigDecimal;
/**
 * @author binghe
 * @version 1.0.0
 * @description Simulated payment
 */
@Service
public class PayServiceImpl implements PayService {
    private final Logger logger = LoggerFactory.getLogger(PayServiceImpl.class);
    @Override
    public int pay(BigDecimal price) {
        logger.info("Payment successful===>>" + price);
        return 1;
    }
}
Due to the simulation of payment and sending messages, I printed out the relevant logs in the specific implementation method, and did not implement the specific business logic.
The next step is to create our Controller class PayController. The current limit is used in the pay() method of the PayController class interface. Two tokens are put into the bucket every second, and the client obtains the token from the bucket. If the token is not obtained within 500 milliseconds, we can directly go through the service degradation process.
The code of PayController is shown below.
package io.mykit.limiter.controller;
import com.google.common.util.concurrent.RateLimiter;
import io.mykit.limiter.service.MessageService;
import io.mykit.limiter.service.PayService;
import org.slf4j.Logger;
import org.slf4j.LoggerFactory;
import org.springframework.beans.factory.annotation.Autowired;
import org.springframework.web.bind.annotation.RequestMapping;
import org.springframework.web.bind.annotation.RestController;
import java.math.BigDecimal;
import java.util.concurrent.TimeUnit;

/**
 * @author binghe
 * @version 1.0.0
 * @description Test interface current limiting
 */
@RestController
public class PayController {
    private final Logger logger = LoggerFactory.getLogger(PayController.class);
    /**
     * RateLimiter A parameter is passed in the create() method of, which means that tokens are put into the bucket at a fixed rate of 2r/s, that is, at the rate of 2 tokens per second
     */
    private RateLimiter rateLimiter = RateLimiter.create(2);

    @Autowired
    private MessageService messageService;
    @Autowired
    private PayService payService;
    @RequestMapping("/boot/pay")
    public String pay(){
        //Record return interface
        String result = "";
        //In current limiting processing, the client requests to obtain the token from the bucket. If the token is not obtained within 500 milliseconds, the service degradation processing will be carried out directly
        boolean tryAcquire = rateLimiter.tryAcquire(500, TimeUnit.MILLISECONDS);
        if (!tryAcquire){
            result = "Too many requests, degraded processing";
            logger.info(result);
            return result;
        }
        int ret = payService.pay(BigDecimal.valueOf(100.0));
        if(ret > 0){
            result = "Payment successful";
            return result;
        }
        result = "Payment failed. Please try again...";
        return result;
    }
}
Finally, let's create the core startup class of mykit rateelimiter test project, as shown below.
package io.mykit.limiter;
import org.springframework.boot.SpringApplication;
import org.springframework.boot.autoconfigure.SpringBootApplication;

/**
 * @author binghe
 * @version 1.0.0
 * @description Project startup class
 */
@SpringBootApplication
public class MykitLimiterApplication {

    public static void main(String[] args){
        SpringApplication.run(MykitLimiterApplication.class, args);
    }
}
So far, we have basically completed the flow limiting Web application without annotation.
Run project
After the project is created, let's run the project. It's relatively simple to run the SpringBoot project. Just run the main() method of MykitLimiterApplication class directly.
After the project runs successfully, we enter the link in the browser address bar: http://localhost:8080/boot/pay . The page will output the words "payment succeeded", indicating that the project has been built successfully. As shown below.
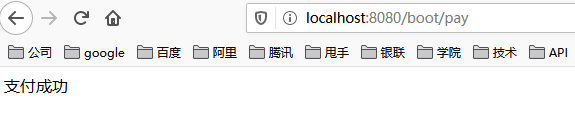
At this time, I only visited once and did not trigger current limiting. Next, we keep brushing the browser. At this time, the browser will output the words "payment failed, try again...", as shown below.

There is also a sendMessage() method in the PayController class, which simulates the interface for sending messages, and also uses the current limiting operation. The specific code is as follows.
@RequestMapping("/boot/send/message")
public String sendMessage(){
    //Record return interface
    String result = "";
    //In current limiting processing, the client requests to obtain the token from the bucket. If the token is not obtained within 500 milliseconds, the service degradation processing will be carried out directly
    boolean tryAcquire = rateLimiter.tryAcquire(500, TimeUnit.MILLISECONDS);
    if (!tryAcquire){
        result = "Too many requests, degraded processing";
        logger.info(result);
        return result;
    }
    boolean flag = messageService.sendMessage("Congratulations on your growth+1");
    if (flag){
        result = "Message sent successfully";
        return result;
    }
    result = "Message sending failed. Please try again...";
    return result;
}
The code logic and running effect of the sendMessage() method are the same as those of the pay() method, so I won't visit the browser anymore http://localhost:8080/boot/send/message The access effect of the address is, and the partners can verify it by themselves.
Current limiting without annotations
Through the writing of the project, we can find that when limiting the current of the interface in the project, developing without annotations will lead to a lot of redundancy in the code. Almost every method needs to write the same current limiting logic, and the code is very redundant.
How to solve the problem of code redundancy? We can use custom annotations for implementation.
Using annotations to implement interface current limiting
Using custom annotations, we can encapsulate some general business logic into the aspect of annotations, and add corresponding annotations to the methods that need to add annotation business logic. For our current limiting example, it can be implemented based on user-defined annotations.
Implement custom annotations
Implementation, let's create a custom annotation, as shown below.
package io.mykit.limiter.annotation;
import java.lang.annotation.*;
/**
 * @author binghe
 * @version 1.0.0
 * @description User defined annotation for current limiting
 */
@Target(value = ElementType.METHOD)
@Retention(RetentionPolicy.RUNTIME)
@Documented
public @interface MyRateLimiter {
    //The rate at which tokens are put into the bucket
    double rate();
    //Timeout for getting token from token bucket
    long timeout() default 0;
}
Implementation of custom annotation section
Next, we need to implement a facet class MyRateLimiterAspect, as shown below.
package io.mykit.limiter.aspect;

import com.google.common.util.concurrent.RateLimiter;
import io.mykit.limiter.annotation.MyRateLimiter;
import org.aspectj.lang.ProceedingJoinPoint;
import org.aspectj.lang.annotation.Around;
import org.aspectj.lang.annotation.Aspect;
import org.aspectj.lang.annotation.Pointcut;
import org.aspectj.lang.reflect.MethodSignature;
import org.springframework.beans.factory.annotation.Autowired;
import org.springframework.stereotype.Component;

import javax.servlet.http.HttpServletResponse;
import java.io.IOException;
import java.io.PrintWriter;
import java.util.concurrent.TimeUnit;

/**
 * @author binghe
 * @version 1.0.0
 * @description General current limiting section
 */
@Aspect
@Component
public class MyRateLimiterAspect {

    private RateLimiter rateLimiter = RateLimiter.create(2);

    @Pointcut("execution(public * io.mykit.limiter.controller.*.*(..))")
    public void pointcut(){

    }

    /**
     * Core section method
     */
    @Around("pointcut()")
    public Object process(ProceedingJoinPoint proceedingJoinPoint) throws Throwable{
        MethodSignature signature = (MethodSignature) proceedingJoinPoint.getSignature();

        //Use reflection to get whether there is @ MyRateLimiter annotation on the method
        MyRateLimiter myRateLimiter = signature.getMethod().getDeclaredAnnotation(MyRateLimiter.class);
        if(myRateLimiter == null){
            //The program is executed normally, and the target method is executed
            return proceedingJoinPoint.proceed();
        }
        //Get parameters on annotation
        //Get configuration rate
        double rate = myRateLimiter.rate();
        //Gets the time the client waits for a token
        long timeout = myRateLimiter.timeout();

        //Set current limiting rate
        rateLimiter.setRate(rate);

        //Judge whether the client timed out to obtain the token
        boolean tryAcquire = rateLimiter.tryAcquire(timeout, TimeUnit.MILLISECONDS);
        if(!tryAcquire){
            //service degradation
            fullback();
            return null;
        }
        //Get the token and execute it directly
        return proceedingJoinPoint.proceed();

    }

    /**
     * handle at a lower grade
     */
    private void fullback() {
        response.setHeader("Content-type", "text/html;charset=UTF-8");
        PrintWriter writer = null;
        try {
            writer =  response.getWriter();
            writer.println("Something went wrong. Try again?");
            writer.flush();;
        } catch (IOException e) {
            e.printStackTrace();
        }finally {
            if(writer != null){
                writer.close();
            }
        }
    }
}
The function of the custom section is relatively simple. I will not elaborate on what problems you may have to pay attention to the official account of WeChat.
Next, we transform the sendMessage() method in the PayController class. The modified method fragment code is as follows.
@MyRateLimiter(rate = 1.0, timeout = 500)
@RequestMapping("/boot/send/message")
public String sendMessage(){
    //Record return interface
    String result = "";
    boolean flag = messageService.sendMessage("Congratulations on your growth+1");
    if (flag){
        result = "Message sent successfully";
        return result;
    }
    result = "Message sending failed. Please try again...";
    return result;
}
Run deployment project
The deployment project is relatively simple. You only need to run the main() method under MykitLimiterApplication class. Here, for simplicity, we still enter the link address directly from the browser to access
The effect is as follows.

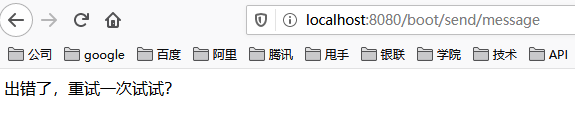
Next, we constantly refresh the browser. The words "message sending failed, try again..." will appear, indicating that the current limiting operation has been triggered.
- The project source code has been submitted to GitHub: https://github.com/sunshinelyz/mykit-ratelimiter
Click follow to learn about Huawei's new cloud technology for the first time~