catalogue
Why is Redis single thread so fast?
4. Redis has three special data types
6. Redis implements optimistic lock
8. Spring boot integrates Redis
9,Redis.conf detailed explanation
11. Redis publish and subscribe
12. Redis master-slave replication
Mode 1: command configuration (temporary)
Method 2: configuration file (permanent)
Manually configure the master node after downtime
13. Sentinel mode (automatic election mode)
Full configuration of sentinel mode
14. Redis's cache penetration and avalanche (interview frequency, work commonly used ~)
1. Know Redis
Redis (Remote Dictionary Server), that is, remote dictionary service, is an open source log type and key value database written in ANSI C language, supporting network, memory based and persistent, and provides API s in multiple languages.
What can Redis do?
1. Memory storage and persistence. The data in memory is lost immediately after power failure, so persistence is very important (RDB, AOF)
2. High efficiency and can be used for caching
3. Publish subscribe system
4. Map information analysis
5. Timer, counter (Views)
6,......
characteristic
1. Diverse data types
2. Persistence
3. Cluster
4. Business
......
2. Basic knowledge
1. The default database is 0, and the default database is 0
select 1  #Switch 1 database
DBSIZE  #View DB size
keys *  #View all key s
flushall #Empty all databases
flushdb #Empty the current database
exists key #Judge whether the current key exists
move key 1 #Remove current key
expire key second #Set expiration time
ttl key  #View the remaining expiration time of key
type key #View the type of key
Redis is single threaded
Officials say that Redis is based on memory operation, and CPU is not the performance bottleneck of Redis. The bottleneck of Redis is based on the memory and network bandwidth of the machine. Since single thread can be used, single thread can be used
Redis is written in C language. The official data is 100000 + QPS, which is no worse than MemeCache, which also uses key value
Why is Redis single thread so fast?
Myth 1: high performance servers must be multi-threaded
Myth 2: multithreading (CPU context switching) must be more efficient than single thread
Speed: CPU > memory > hard disk
Core: redis puts all data in memory, so the efficiency of using a single thread is the highest. For the memory system, if there is no context switching, the efficiency is the highest. Multiple reads and writes are on one CPU.
3. Redis five data types
1,String
set key value #Set key value
get key  #Get the value of key
exists key  #Does the key exist
append key value #Append the string. If the key is not saved, it is equivalent to set key value
strlen key #Get string length
incr key #Add 1 to the value of the current key
decr key #The value of the current key minus one
incrby key 10 #Current key plus 10
decrby key 10 #Current key minus 10
getrange key 0 3 #String range (getrange key 0 -1 gets all strings)
setrange key 1 xx #Replace the string starting at the specified position
setex key second value    #(set with expire) sets the expiration time
setnx key value   #(set if not with exists) reset does not exist (often used in distributed locks)
mset key1 v1 key2 v2  #Batch setting
mget key1 key2 key3  #Batch acquisition
msetnx key1 v1 key2 v2  #No re setting exists (batch atomic operations succeed and fail together)
getset key value #Get the original value before setting the new value
127.0.0.1:6379> FLUSHALL
OK
127.0.0.1:6379> set name lqh
OK
127.0.0.1:6379> keys *
1) "name"
127.0.0.1:6379> set age 1
OK
127.0.0.1:6379> keys *  #View all key s
1) "age"
2) "name"
127.0.0.1:6379> EXISTS key
(integer) 0
127.0.0.1:6379> EXISTS name #Judge whether the current key exists
(integer) 1
127.0.0.1:6379> move name 1 #Move the key to database 1
(integer) 1
127.0.0.1:6379> keys *
1) "age"
127.0.0.1:6379> set name 123
OK
127.0.0.1:6379> keys *
1) "name"
2) "age"
127.0.0.1:6379> EXPIRE name 10 #Set the expiration time of the key in seconds
(integer) 1
127.0.0.1:6379> ttl name #View the remaining time of the current key
(integer) 6
127.0.0.1:6379> set name lqh
OK
127.0.0.1:6379> keys *
1) "name"
2) "age"
127.0.0.1:6379> TYPE name #View the type of value corresponding to the current key
string
127.0.0.1:6379> TYPE age
string
127.0.0.1:6379> set key1 v1  #Set value
OK
127.0.0.1:6379> get key1  #Get value
"v1"
127.0.0.1:6379> keys *  #Get all key s
1) "key1"
2) "name"
3) "age"
127.0.0.1:6379> EXISTS key1  #Determine whether a key exists
(integer) 1
127.0.0.1:6379> APPEND key1 "hello"  #Append the string. If the key does not exist, it is equivalent to set key
(integer) 7
127.0.0.1:6379> get key1
"v1hello"
127.0.0.1:6379> APPEND key1 ",nihao"
(integer) 13
127.0.0.1:6379> STRLEN key1  #Get string length
(integer) 13
127.0.0.1:6379> get key1
"v1hello,nihao"
#step
127.0.0.1:6379> set views 0
OK
127.0.0.1:6379> get views
"0"
127.0.0.1:6379> incr views  #Self increasing one
(integer) 1
127.0.0.1:6379> incr views
(integer) 2
127.0.0.1:6379> get views
"2"
127.0.0.1:6379> decr views  #Self minus one
(integer) 1
127.0.0.1:6379> decr views
(integer) 0
127.0.0.1:6379> decr views
(integer) -1
127.0.0.1:6379> get views
"-1"
127.0.0.1:6379> INCRBY views 10  #Set the step size and specify the increment
(integer) 9
127.0.0.1:6379> DECRBY views 5   #Set the step size and specify the decrement
(integer) 4
127.0.0.1:6379> get views
"4"
#String range
127.0.0.1:6379> set key1 "hello,lqh"  #Set the value of key
OK
127.0.0.1:6379> get key1
"hello,lqh"
127.0.0.1:6379> GETRANGE key1 0 3  #Intercept string [0,3]
"hell"
127.0.0.1:6379> GETRANGE key1 0 -1  #Getting all strings is the same as getting key
"hello,lqh"
#replace
127.0.0.1:6379> set key2 abcdefg
OK
127.0.0.1:6379> get key2
"abcdefg"
127.0.0.1:6379> SETRANGE key2 1 xx  #Replace the string starting at the specified position
(integer) 7
127.0.0.1:6379> get key2
"axxdefg"
#setex key #(set with expire) sets the expiration time
#setnx key #(set if not with exists) if it does not exist, it will be frequently used in distributed locks
127.0.0.1:6379> setex key3 30 "hello"  #Set the value of key3 to hello and expire in 30 seconds
OK
127.0.0.1:6379> ttl key3
(integer) 19
127.0.0.1:6379> setnx mykey "redis"  #If mykey does not exist, create mykey
(integer) 1
127.0.0.1:6379> keys *
1) "mykey"
2) "key1"
3) "key2"
127.0.0.1:6379> ttl key3
(integer) -2
127.0.0.1:6379> setnx mykey "hello"  #If mykey exists, the creation fails
(integer) 0
127.0.0.1:6379> get mykey
"redis"
mset key1 v1 key2 v2  #Batch setting
mget key1 key2 key3  #Batch acquisition

127.0.0.1:6379> mset k1 v1 k2 v2 k3 v3  #Set multiple values at the same time
OK
127.0.0.1:6379> keys *
1) "k2"
2) "k3"
3) "k1"
127.0.0.1:6379> mget k1 k2 k3  #Get multiple values at the same time
1) "v1"
2) "v2"
3) "v3"
127.0.0.1:6379> msetnx k1 v1 k4 v4  #msetnx is an atomic operation that either succeeds or fails together
(integer) 0
127.0.0.1:6379> get k4
(nil)

#object
set user:1 {name:zhangsan,age:2} #Set a user:1 object with the value of json character to save an object

#The key here is a clever design: user: {ID}: {file}. This design is completely ok in redis
127.0.0.1:6379> mset user:1:name zhangsan user:1:age 2
OK
127.0.0.1:6379> mget user:1:name user:1:age
1) "zhangsan"
2) "2"
getset #get before set

127.0.0.1:6379> getset db redis  #nil if no value exists
(nil)
127.0.0.1:6379> get db
"redis"
127.0.0.1:6379> getset db Mongodb #If a value exists, get the original value and set a new value
"redis"
127.0.0.1:6379> get db
"Mongodb"
The data structure is the same
String similar usage scenario: in addition to being our string, value can also make our number (counter, count the number of multi units, number of fans, object cache storage)
2,List
In Redis, list can be used as the data structure of stack, queue and blocking queue
All list commands start with l
lpush key v1 v2 ...  #Insert one or more values into the head of the list (left)
rpush key v1 v2 ...  #Insert one or more values at the end of the list (right)
lrange key start end  #Obtain specific values from the used interval (all values are obtained from the 0 - 1 interval)
lpop key  #Remove the first value of the list header (left)
rpop key  #Remove the first value at the end of the list (right)
lindex key index #Get value by index
llen key   #Get list length
lrem key count value  #Remove the exact match of the specified number of value s in the list collection
ltrim key start stop   #Intercept the specified length through the subscript. The list has changed, leaving only the intercepted elements
rpoplpush key otherkey  #Removes the last element in the list and inserts it into another list header
lset key index value  #Replace the value of the specified subscript in the list with another value to update the operation (an error will be reported if the list or index does not exist)
linsert key before v1 v2  #Insert v2 before v1
linsert key after v1 v2  #Insert v2 after v1
127.0.0.1:6379> LPUSH list one  #Insert one or more values into the head of the list (left)
(integer) 1
127.0.0.1:6379> LPUSH list twe
(integer) 2
127.0.0.1:6379> LPUSH list three
(integer) 3
127.0.0.1:6379> LRANGE list 0 -1  #Get the value in the list
1) "three"
2) "twe"
3) "one"
127.0.0.1:6379> LRANGE list 0 1  #Obtain the specific value in the list through the interval
1) "three"
2) "twe"
127.0.0.1:6379> RPUSH list right  #Insert one or more values at the end of the list (right)
(integer) 4
127.0.0.1:6379> LRANGE list 0 -1
1) "three"
2) "twe"
3) "one"
4) "right"
#LPOP
#RPOP
127.0.0.1:6379> LRANGE list 0 -1
1) "three"
2) "twe"
3) "one"
4) "right"
127.0.0.1:6379> LPOP list #Remove the first element of the list
"three"
127.0.0.1:6379> RPOP list #Remove the last element of the list
"right"
127.0.0.1:6379> LRANGE list 0 -1
1) "twe"
2) "one"
#lindex
127.0.0.1:6379> LRANGE list 0 -1
1) "twe"
2) "one"
127.0.0.1:6379> LINDEX list 1  #Get a value in the list by subscript
"one"
127.0.0.1:6379> LINDEX list 0
"twe"
127.0.0.1:6379> Lpush list one
(integer) 1
127.0.0.1:6379> Lpush list twe
(integer) 2
127.0.0.1:6379> Lpush list three
(integer) 3
127.0.0.1:6379> Llen list  #Return list length
(integer) 3
#Removes the specified value
127.0.0.1:6379> Lpush list one
(integer) 1
127.0.0.1:6379> Lpush list twe
(integer) 2
127.0.0.1:6379> Lpush list three
(integer) 3
127.0.0.1:6379> Llen list
(integer) 3
127.0.0.1:6379> Lpush list three
(integer) 4
127.0.0.1:6379> lrem list 1 one #Remove the specified number of values in the list set and match them exactly
(integer) 1
127.0.0.1:6379> LRANGE list 0 -1
1) "three"
2) "three"
3) "twe"
127.0.0.1:6379> lrem list 1 three
(integer) 1
127.0.0.1:6379> LRANGE list 0 -1
1) "three"
2) "twe"
127.0.0.1:6379> Lpush list three
(integer) 3
127.0.0.1:6379> LRANGE list 0 -1
1) "three"
2) "three"
3) "twe"
127.0.0.1:6379> lrem list 2 three
(integer) 2
127.0.0.1:6379> LRANGE list 0 -1
1) "twe"
#ltrim trim

127.0.0.1:6379> Lpush mylist "hello"
(integer) 1
127.0.0.1:6379> Lpush mylist "hello1"
(integer) 2
127.0.0.1:6379> Lpush mylist "hello2"
(integer) 3
127.0.0.1:6379> Lpush mylist "hello3"
(integer) 4
127.0.0.1:6379> ltrim mylist 1 2  #Only those within the interval will be intercepted, and the rest will be deleted
OK
127.0.0.1:6379> LRANGE mylist 0 -1
1) "hello2"
2) "hello1"
rpoplpush  #Removes the last element in the list and moves it to the new list

127.0.0.1:6379> lpush list "hello"
(integer) 1
127.0.0.1:6379> lpush list "hello1"
(integer) 2
127.0.0.1:6379> lpush list "hello2"
(integer) 3
127.0.0.1:6379> rpoplpush list mylist  #Removes the last element in the list and moves it to the new list
"hello"
127.0.0.1:6379> lrange list 0 -1  #View the original list
1) "hello2"
2) "hello1"
127.0.0.1:6379> lrange mylist 0 -1  #The value exists in the view target list
1) "hello"
lset #Replaces the value of the specified subscript in the list with another value

127.0.0.1:6379> EXISTS list  #Determine whether this list exists
(integer) 0
127.0.0.1:6379> lset list 0 item  #If it doesn't exist, we will report an error if we update it
(error) ERR no such key
127.0.0.1:6379> lpush list value1
(integer) 1
127.0.0.1:6379> lrange list 0 0
1) "value1"
127.0.0.1:6379> lset list 0 item  #If present, update the value of the subscript
OK
127.0.0.1:6379> lrange list 0 0
1) "item"
127.0.0.1:6379> lset list 1 other  #If it does not exist, an error will be reported
(error) ERR index out of range
linsert #Insert a specific value before or after an element in the list

127.0.0.1:6379> rpush list hello
(integer) 1
127.0.0.1:6379> rpush list world
(integer) 2
127.0.0.1:6379> LINSERT list before "world" "other" #Insert other before world
(integer) 3
127.0.0.1:6379> LRANGE list 0 -1
1) "hello"
2) "other"
3) "world"
127.0.0.1:6379> lpush mylist hello
(integer) 1
127.0.0.1:6379> lpush mylist world
(integer) 2
127.0.0.1:6379> LINSERT mylist before "world" "other"
(integer) 3
127.0.0.1:6379> LRANGE list 0 -1
1) "hello"
2) "other"
3) "world"
127.0.0.1:6379> LRANGE mylist 0 -1
1) "other"
2) "world"
3) "hello"
127.0.0.1:6379> LINSERT list after "world" "123" #Insert 123 after world
(integer) 4
127.0.0.1:6379> LRANGE list 0 -1
1) "hello"
2) "other"
3) "world"
4) "123"
3,Set
The value in set cannot be repeated
sadd key value  #Add element
smembers key   #View the elements used in the specified set
sismember key value  #Determine whether a value exists in a set
scard key  #Gets the number of content elements in the set
srem key value   #Removes the specified element from the set
srandmember key count  #Select a specified number of members at random
spop key  #Randomly remove elements
smove oldkey  newkey member  #Moves a specified value from one set to another
sdiff key...   #Get multiple set difference sets
sinter key...  #Get the intersection of multiple set s (common friends and common concerns)
sunion key...  #Get union of multiple set s
127.0.0.1:6379> sadd myset hello  #Add element
(integer) 1
127.0.0.1:6379> sadd myset world
(integer) 1
127.0.0.1:6379> sadd myset 123
(integer) 1
127.0.0.1:6379> SMEMBERS myset  #View the elements used in the specified set
1) "123"
2) "world"
3) "hello"
127.0.0.1:6379> SISMEMBER myset hello #Judge whether a value exists in the specified set
(integer) 1
127.0.0.1:6379> SISMEMBER myset lqh
(integer) 0
127.0.0.1:6379> SCARD myset  #Gets the number of elements in the set set
(integer) 3
127.0.0.1:6379> srem myset 123  #Remove specified in set
(integer) 1
127.0.0.1:6379> SCARD myset
(integer) 2
127.0.0.1:6379> SMEMBERS myset
1) "world"
2) "hello"
127.0.0.1:6379> SRANDMEMBER myset  #Select a specified number of members at random
"world"
127.0.0.1:6379> SRANDMEMBER myset
"hello"
127.0.0.1:6379> SRANDMEMBER myset
"hello"
127.0.0.1:6379> SRANDMEMBER myset
"world"

127.0.0.1:6379> SMEMBERS myset
1) "def"
2) "abc"
3) "world"
4) "hello"
127.0.0.1:6379> spop myset  #Randomly remove elements
"def"
127.0.0.1:6379> spop myset
"hello"
#Moves a specified value from one set to another
127.0.0.1:6379> sadd myset hello
(integer) 1
127.0.0.1:6379> sadd myset world
(integer) 1
127.0.0.1:6379> sadd myset lqh
(integer) 1
127.0.0.1:6379> sadd myset2 set2
(integer) 1
127.0.0.1:6379> smove myset myset2 lqh #Moves a specified value from one set to another set
(integer) 1
127.0.0.1:6379> SMEMBERS myset
1) "world"
2) "hello"
127.0.0.1:6379> SMEMBERS myset2
1) "set2"
2) "lqh"
127.0.0.1:6379> sadd key1 1
(integer) 1
127.0.0.1:6379> sadd key1 2
(integer) 1
127.0.0.1:6379> sadd key1 3
(integer) 1
127.0.0.1:6379> sadd key2 3
(integer) 1
127.0.0.1:6379> sadd key2 4
(integer) 1
127.0.0.1:6379> sadd key2 5
(integer) 1
127.0.0.1:6379> sadd key2 6
(integer) 1
127.0.0.1:6379> SDIFF key1 key2  #Difference set
1) "1"
2) "2"
127.0.0.1:6379> SINTER key1 key2  #This is how you can meet common friends
1) "3"
127.0.0.1:6379> SUNION key1 key2  #Union
1) "1"
2) "2"
3) "3"
4) "4"
5) "5"
6) "6"
Application scenario: microblog, put all users' concerns into one set and fans into one set
->Common concern, second time friends, mutual concern
4,Hash
Map set key - (key value)
hset key field value  #Store a specific key value pair
hget key field   #Get a field value
hmset key field value field1 value1 ...  #Store multiple specific key value pairs
hmget key field field1 ...  #Get multiple field values
hgetall key    #Get all data
hdel key field  #Delete the key field specified in the hash, and the corresponding value will be lost
hlen key     #Get the number of fields in the hash
hexists key field   #Determine whether a field in the hash exists
hkeys key    #Get all key s in hash
hvals key    #Get all value s in hash
hincrby key field 1  #Add 1 to the value of the specified key in the hash
hincrby key field -1  #The value of the specified key in the hash minus 1
hsetnx key field value   #If the key specified in the hash does not exist, it will be created. If it exists, it will fail to create
127.0.0.1:6379> hset myhash field1 lqh #set a specific key value
(integer) 1
127.0.0.1:6379> hget myhash field1  #Get a field value
"lqh"
127.0.0.1:6379> hmset myhash field1 hello field2 world #set multiple key value s
OK
127.0.0.1:6379> hmget myhash field1 field2 #Get multiple field values
1) "hello"
2) "world"
127.0.0.1:6379> hgetall myhash  #Get all field values
1) "field1"
2) "hello"
3) "field2"
4) "world"
127.0.0.1:6379> HDEL myhash field1  #Delete the field specified by the hash, and the corresponding value value disappears
(integer) 1
127.0.0.1:6379> hgetall myhash
1) "field2"
2) "world"
#Get the number of fields in the hash
127.0.0.1:6379> hmset myhash field1 hello field2 world
OK
127.0.0.1:6379> hgetall myhash
1) "field2"
2) "world"
3) "field1"
4) "hello"
127.0.0.1:6379> hlen myhash  #Get the number of fields in the hash
(integer) 2
127.0.0.1:6379> HEXISTS myhash field1  #Determine whether a hash exists in a field
(integer) 1
127.0.0.1:6379> HEXISTS myhash field3
(integer) 0
#Get all key s in hash
#Get all value s in hash
127.0.0.1:6379> hkeys myhash  #Get all key s in hash
1) "field2"
2) "field1"
127.0.0.1:6379> hvals myhash  #Get all value s in hash
1) "world"
2) "hello"
#There is no HDECRBY in the hash, so subtraction is replaced by negative increment
127.0.0.1:6379> hset myhash field3 5
(integer) 1
127.0.0.1:6379> HINCRBY myhash field3 1  #Add 1 to the value of the specified key in the hash
(integer) 6
127.0.0.1:6379> HINCRBY myhash field3 -2  #Subtract two from the value of the specified key in the hash
(integer) 4
#If the key specified in the hash does not exist, it will be created. If it exists, it will fail to create
127.0.0.1:6379> hsetnx myhash field4 hello  #If the key specified in the hash does not exist, it will be created
(integer) 1
127.0.0.1:6379> hsetnx myhash field4 world  #Creation fails if it exists
(integer) 0
hash application scenario: changed data, such as user information and other frequently changing information; hash is more suitable for object storage, and String is more suitable for String storage.
5,Zset
An ordered set adds a sorted value to the set
zadd key score value  #Add element
zrange key 0 1   #Returns an ordered set through an index interval. All members (0 - 1) in the specified interval are returned
zrangebyscore key min max   #Sort and return from small to large, for example: zrangebyscore key1 -inf +inf (- inf: negative infinity + inf: positive infinity)
zrevrangebyscore myset +inf -inf  #Reverse order
zrevrange key 0 -1     #Sort and return from large to small
zrem key value   #Removes the specified element
zcard key        #Gets the quantity in the ordered collection
zcount key start stop   #Gets the number of members in the specified interval
127.0.0.1:6379> zadd myset 1 one  #Add a value
(integer) 1
127.0.0.1:6379> zadd myset 2 twe 3 three  #Add multiple values
(integer) 2
127.0.0.1:6379> zrange myset 0 -1
1) "one"
2) "twe"
3) "three"
#How to implement sorting
127.0.0.1:6379> zadd salary 2500 xiaoming #Add three users
(integer) 1
127.0.0.1:6379> zadd salary 1500 xiaohong
(integer) 1
127.0.0.1:6379> zadd salary 500 lihua
(integer) 1
127.0.0.1:6379> ZRANGEBYSCORE salary -inf +inf  #Show all users sorted from small to large
1) "lihua"
2) "xiaohong"
3) "xiaoming"
127.0.0.1:6379> ZRANGEBYSCORE salary -inf +inf withscores #Displays all users and scores, sorted from small to large
1) "lihua"
2) "500"
3) "xiaohong"
4) "1500"
5) "xiaoming"
6) "2500"
127.0.0.1:6379> zrevrangebyscore salary +inf -inf  #Show all users sorted from large to small
1) "xiaoming"
2) "xiaohong"
3) "lihua"
127.0.0.1:6379> zrevrangebyscore salary +inf -inf withscores #Displays all users and scores, sorted from large to small
1) "xiaoming"
2) "2500"
3) "xiaohong"
4) "1500"
5) "lihua"
6) "500"
127.0.0.1:6379> ZRANGEBYSCORE salary -inf 1500  #Displays a descending order of less than 1500
1) "lihua"
2) "xiaohong"
#Removing Elements
127.0.0.1:6379> zrange salary 0 -1
1) "lihua"
2) "xiaohong"
3) "xiaoming"
127.0.0.1:6379> zrem salary xiaohong  #Removing Elements
(integer) 1
127.0.0.1:6379> zrange salary 0 -1
1) "lihua"
2) "xiaoming"
127.0.0.1:6379> zcard salary  #Gets the number of in the ordered collection
(integer) 2
#Gets the number of members in the specified interval
127.0.0.1:6379> zadd myset 1 hello
(integer) 1
127.0.0.1:6379> zadd myset 2 world 3 lqh
(integer) 2
127.0.0.1:6379> zcount myset 1 3  #Gets the number of members in the specified interval
(integer) 3
127.0.0.1:6379> zcount myset 1 2
(integer) 2
4. Redis has three special data types
1,geospatial
Geographical location (location, nearby people, taxi distance...)
The bottom layer of geo is Zset. You can operate geo with Zset command
#geoadd add add geographic location
#Rule: the two poles cannot be added directly. Usually, the effective longitude is imported at one time through java: - 180 to 180, and the effective latitude is: - 85.05112878 to 85.05112878
127.0.0.1:6379> geoadd china:city 116.39 39.91 beijin
(integer) 1
127.0.0.1:6379> geoadd china:city 121.48 31.40 shanghai
(integer) 1
127.0.0.1:6379> geoadd china:city 114.02 30.58 wuhan
(integer) 1
127.0.0.1:6379> geoadd china:city 113.88 22.55 shenzhen
(integer) 1
127.0.0.1:6379> geoadd china:city 120.21 30.20 hangzhou
(integer) 1

#geopop gets the longitude and latitude of the specified member
#Obtain the current positioning, which must be a coordinate value
127.0.0.1:6379> GEOPOS china:city beijin
1) 1) "116.38999968767166138"
   2) "39.90999956664450821"
127.0.0.1:6379> GEOPOS china:city beijin hangzhou
1) 1) "116.38999968767166138"
   2) "39.90999956664450821"
2) 1) "120.21000176668167114"
   2) "30.19999988833350102"

#geodist view the linear distance between members
127.0.0.1:6379> GEODIST china:city beijin shanghai
"1051905.1484"
127.0.0.1:6379> GEODIST china:city beijin shanghai km
"1051.9051"

#georadius takes a given latitude and longitude as the center to find out the elements within a certain radius
#
127.0.0.1:6379> GEORADIUS china:city 110 30 1000 km #Take the longitude and latitude of 100,30 as the center, and find the city within 1000KM
1) "shenzhen"
2) "wuhan"
3) "hangzhou"
127.0.0.1:6379> GEORADIUS china:city 110 30 500 km
1) "wuhan"
127.0.0.1:6379> GEORADIUS china:city 110 30 500 km withdist #Displays the location of the distance to the center
1) 1) "wuhan"
   2) "391.4185"
127.0.0.1:6379> GEORADIUS china:city 110 30 500 km withcoord #Display others' longitude and latitude positioning information
1) 1) "wuhan"
   2) 1) "114.01999980211257935"
      2) "30.58000021509926825"
127.0.0.1:6379> GEORADIUS china:city 110 30 500 km withdist withcoord count 1 #Filter out the specified results
1) 1) "wuhan"
   2) "391.4185"
   3) 1) "114.01999980211257935"
      2) "30.58000021509926825"

#Geordiusbymember finds the elements within a certain radius with a given member as the center
127.0.0.1:6379> GEORADIUSBYMEMBER china:city beijin 1000 km
1) "beijin"
127.0.0.1:6379> GEORADIUSBYMEMBER china:city shanghai 400 km
1) "hangzhou"
2) "shanghai"

#Geohash returns the geohash representation of one or more location elements. It converts the two-dimensional longitude and latitude into one-dimensional 11 bit string. If the two strings are closer, the closer the distance is.
127.0.0.1:6379> geohash china:city beijin hangzhou
1) "wx4g092see0"
2) "wtm7z3wrb00"
The underlying implementation principle of GEO is actually Zset. We can use Zset to operate GEO
127.0.0.1:6379> zrange china:city 0 -1 #View all elements in the map
1) "shenzhen"
2) "wuhan"
3) "hangzhou"
4) "shanghai"
5) "beijin"
127.0.0.1:6379> zrem china:city beijin #Removes the specified element
(integer) 1
127.0.0.1:6379> zrange china:city 0 -1
1) "shenzhen"
2) "wuhan"
3) "hangzhou"
4) "shanghai"
2,hyperloglog
What is cardinality?
A={1,3,5,7,9,7}
B={1,3,5,7,9}
Cardinality (non repeating elements) = 5 acceptable error, with an error rate of about 0.81%
There are 6 elements in A, but 7 are repeated, so there are 5 that are not repeated, so the cardinality is 5, while the 5 numbers in B are not repeated, so the cardinality is also 5
Redis hyperloglog cardinality statistics algorithm:
Advantages: the technology of occupying fixed memory and storing 2 ^ 64 different elements only needs to occupy 12KB memory
UV of web page (if a person visits a website many times, it is still a person)
The traditional way is to save the user id in the set set and count the number of elements in the set as the standard judgment. Saving a large number of user IDs in this way will be more troublesome and consume more memory. Our purpose is not to save user IDs, but to count.
#Test use

127.0.0.1:6379> pfadd mykey a b c d e f g h i j #Create the first set of elements
(integer) 1
127.0.0.1:6379> pfcount mykey  #Count the number of element cardinality in key
(integer) 10
127.0.0.1:6379> pfadd mykey2 i j z a s g f i h a q #Create a second set of elements
(integer) 1
127.0.0.1:6379> pfcount mykey2
(integer) 9
127.0.0.1:6379> PFMERGE mykey3 mykey mykey2 #Merge two groups of MyKey, mykey2 - > mykey3 Union
OK
127.0.0.1:6379> pfcount mykey3 #View union number
(integer) 13
3,Bitmaps
Bit storage
Statistics of user information active inactive login not logged in punch in
bitmaps can be used for both States
bitmaps bitmap data structures are recorded by operating binary bits. Non-0 is 1
setbit key offset value  #Set bitmap
getbit key offset        #Gets the value of the specified bitmap
bitcount key     #Statistical quantity
#For example, clock in 0 a week is clock in 1
127.0.0.1:6379> setbit sign 0 1 #Set clock in days and clock in conditions
(integer) 0
127.0.0.1:6379> setbit sign 1 0
(integer) 0
127.0.0.1:6379> setbit sign 2 0
(integer) 0
127.0.0.1:6379> setbit sign 3 1
(integer) 0
127.0.0.1:6379> setbit sign 4 1
(integer) 0
127.0.0.1:6379> setbit sign 5 0
(integer) 0
127.0.0.1:6379> setbit sign 6 0
(integer) 0
127.0.0.1:6379> getbit sign 3   #Check whether you punch in one day
(integer) 1
127.0.0.1:6379> getbit sign 5
(integer) 0
127.0.0.1:6379> BITCOUNT sign   #Check the number of clocks in a week
(integer) 3
5. Redis transaction
Redis guarantees atomicity for a single command, but transactions do not guarantee atomicity
Essence of Redis transaction: a set of commands! All commands in a transaction will be serialized and executed in sequence during the execution of the transaction. One time, sequential and exclusive
Redis transactions do not have the concept of isolation level!
All commands are in transactions and are not executed directly! It will be executed only when the execution command is initiated!
Redis transactions:
- Open transaction (multi)
- Order queue (...)
- Execute transaction (exec) \ discard transaction (discard)
127.0.0.1:6379> multi  #Open transaction
OK
#Order to join the team
127.0.0.1:6379(TX)> set k1 v1
QUEUED
127.0.0.1:6379(TX)> set k2 v2
QUEUED
127.0.0.1:6379(TX)> get k2
QUEUED
127.0.0.1:6379(TX)> set k3 v3
QUEUED
127.0.0.1:6379(TX)> exec #Execute transaction
1) OK
2) OK
3) "v2"
4) OK
127.0.0.1:6379> multi  #Open transaction
OK
127.0.0.1:6379(TX)> set k1 v1
QUEUED
127.0.0.1:6379(TX)> set k2 v2
QUEUED
127.0.0.1:6379(TX)> set k4 v4
QUEUED
127.0.0.1:6379(TX)> DISCARD  #Cancel transaction
OK
127.0.0.1:6379> get k4  None of the commands in the transaction queue will be executed
(nil)
#Compiled exceptions (code problems, command errors), all commands in the transaction will not be executed
127.0.0.1:6379> multi
OK
127.0.0.1:6379(TX)> set k1 v1
QUEUED
127.0.0.1:6379(TX)> set k2 v2
QUEUED
127.0.0.1:6379(TX)> set k3 v3
QUEUED
127.0.0.1:6379(TX)> getset k3  #Wrong command
(error) ERR wrong number of arguments for 'getset' command
127.0.0.1:6379(TX)> set k4 v4
QUEUED
127.0.0.1:6379(TX)> set k5 v5
QUEUED
127.0.0.1:6379(TX)> exec  #Error in executing transaction
(error) EXECABORT Transaction discarded because of previous errors.
127.0.0.1:6379> get k5  #All commands will not be executed
(nil)
#Runtime exception (1 / 0). If there are syntax errors in the transaction, other commands can be executed normally when executing commands
#Error command throws exception

127.0.0.1:6379> multi
OK
127.0.0.1:6379(TX)> incr k1
QUEUED
127.0.0.1:6379(TX)> set k1 "v1"
QUEUED
127.0.0.1:6379(TX)> incr k1  #Will fail when executed
QUEUED
127.0.0.1:6379(TX)> set k2 v2
QUEUED
127.0.0.1:6379(TX)> set k3 v3
QUEUED
127.0.0.1:6379(TX)> get k3
QUEUED
127.0.0.1:6379(TX)> exec
1) (integer) 1
2) OK
3) (error) ERR value is not an integer or out of range #Although the command reported an error, it was still executed normally and successfully
4) OK
5) OK
6) "v3"
127.0.0.1:6379> get k2
"v2"
127.0.0.1:6379> get k3
"v3"
6. Redis implements optimistic lock
monitor! Watch / unwatch (unlock. If the transaction fails, unlock it first, and then manually monitor it again)
- Pessimistic lock:
- Very pessimistic, problems will occur whenever, no matter what you do, you will lock it!
- Optimistic lock
- I'm optimistic that there will be no problem at any time and I won't lock it! When updating data, judge whether someone has modified the data during this period.
- Get version
- Compare version when updating
#Successful normal execution
127.0.0.1:6379> set money 100
OK
127.0.0.1:6379> set out 0
OK
127.0.0.1:6379> watch money  #Monitor money objects
OK
127.0.0.1:6379> multi  #When the transaction ends normally and there is no change in the data period, the normal execution is successful
OK
127.0.0.1:6379(TX)> DECRBY money 20
QUEUED
127.0.0.1:6379(TX)> INCRBY out 20
QUEUED
127.0.0.1:6379(TX)> exec
1) (integer) 80
2) (integer) 20
#Test multithreading to modify the value. Using watch can be used as an optimistic lock operation of redis
127.0.0.1:6379> watch money  #Monitor money
OK
127.0.0.1:6379> multi
OK
127.0.0.1:6379(TX)> DECRBY money 10
QUEUED
127.0.0.1:6379(TX)> INCRBY out 10
QUEUED
127.0.0.1:6379(TX)> exec  #Before execution, another thread modifies our value, which will lead to transaction execution failure
(nil)

127.0.0.1:6379> unwatch  #If the transaction fails, unlock it first
OK
127.0.0.1:6379> watch money  #Get the latest value, monitor again, and select version
OK
127.0.0.1:6379> multi
OK
127.0.0.1:6379(TX)> decrby money 10
QUEUED
127.0.0.1:6379(TX)> incrby out 10
QUEUED
127.0.0.1:6379(TX)> exec  #Compare whether the supervisor's value has changed. If there is no change, the implementation will succeed, and if there is a change, it will fail
1) (integer) 990
2) (integer) 30
7,Jedis
What is Jedis: Redis officially recommended java connection development tool!
1. Import jar package
2. Connect database
3. Operation command
4. Disconnect
1. Import corresponding dependencies
        <!--Import jedis My bag-->
        <dependency>
            <groupId>redis.clients</groupId>
            <artifactId>jedis</artifactId>
            <version>3.7.0</version>
        </dependency>
        <!--fastjson-->
        <dependency>
            <groupId>com.alibaba</groupId>
            <artifactId>fastjson</artifactId>
            <version>1.2.79</version>
        </dependency>
2. Coding test:
- Connect database
- Operation command
- Disconnect
public class TestPing {
    public static void main(String[] args) {
        //1. new jedis object
        Jedis jedis = new Jedis("IP address",6379);
        jedis.auth("password");
        //The jedis command is all the instructions we learned before
        System.out.println(jedis.ping());

    }
}
3. jedis understands transactions
public class TestTX {
public static void main(String[] args) {
Jedis jedis = new Jedis("IP", 6379);
jedis.auth("password");
JSONObject jsonObject = new JSONObject();
jsonObject.put("hello","world");
jsonObject.put("name","lqh");
//Open transaction
Transaction multi = jedis.multi();
String s = jsonObject.toJSONString();
try {
multi.set("user1",s);
multi.set("user2",s);
multi.exec();//Close transaction
} catch (Exception e) {
multi.discard(); //Abandon transaction
e.printStackTrace();
}finally {
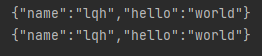
System.out.println(jedis.get("user1"));
System.out.println(jedis.get("user2"));
jedis.close();//Close connection
}
}
The transaction completed normally. When an exception is added and locked
jedis.flushDB();
JSONObject jsonObject = new JSONObject();
jsonObject.put("hello","world");
jsonObject.put("name","lqh");
jedis.watch("user1");//Lock monitoring
//Open transaction
Transaction multi = jedis.multi();
String s = jsonObject.toJSONString();
try {
multi.set("user1",s);
multi.set("user2",s);
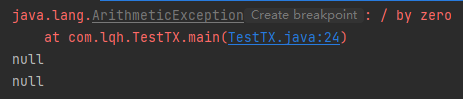
int i = 1/0; //The code throws an exception transaction and execution fails
multi.exec();//Close transaction
} catch (Exception e) {
multi.discard(); //Abandon transaction
e.printStackTrace();
}finally {
System.out.println(jedis.get("user1"));
System.out.println(jedis.get("user2"));
jedis.close();//Close connection
}
8. Spring boot integrates Redis
In springboot 2 After X, jedis is replaced by lettuce
Jedis adopts direct connection, and the operation of multiple threads is unsafe. If you want to avoid safety problems, use jedis pool connection pool! More like BIO mode
lettuce: with netty, instances can be shared among multiple threads. There is no thread insecurity problem and the number of threads can be reduced. More like NIO mode
Source code analysis
    @Bean
    @ConditionalOnMissingBean(
        name = {"redisTemplate"}
    ) //We can define a redisTemplate to replace the default one
    @ConditionalOnSingleCandidate(RedisConnectionFactory.class)
    public RedisTemplate<Object, Object> redisTemplate(RedisConnectionFactory redisConnectionFactory) {
        //The default RedisTemplate does not have too many settings, and all objects in redis need to be serialized
        //Both generic types are object types. We need to cast < string, Object > later
        RedisTemplate<Object, Object> template = new RedisTemplate();
        template.setConnectionFactory(redisConnectionFactory);
        return template;
    }

    @Bean
    @ConditionalOnMissingBean //Since Spring is the most commonly used type in redis, a bean is proposed separately
    @ConditionalOnSingleCandidate(RedisConnectionFactory.class)
    public StringRedisTemplate stringRedisTemplate(RedisConnectionFactory redisConnectionFactory) {
        return new StringRedisTemplate(redisConnectionFactory);
    }
Integration test
1. Import dependency
        <!--operation Redis-->
        <dependency>
            <groupId>org.springframework.boot</groupId>
            <artifactId>spring-boot-starter-data-redis</artifactId>
        </dependency>
2. Configure connection
#Configure redis
spring.redis.host=IP
spring.redis.port=6379
spring.redis.password=passowrd
3. Testing
    @Autowired
    private RedisTemplate redisTemplate;

    @Test
    void contextLoads() {
        //redisTemplate operates on different data types, and the api is the same as our instructions
        //opsForValue() operation String is similar to String
        //opsForList() operates like List
        //opsForSet()
        //opsForHash()
        //opsForZSet()
        //opsForGeo()
        //opsForHyperLogLog()

        //In addition to basic operations, our common methods can be operated directly through redisTemplate, such as transaction and basic CRUD

        //Get the connection object of redis
        //RedisConnection connection = redisTemplate.getConnectionFactory().getConnection();
        //connection.flushDb();
        //connection.flushAll();

        redisTemplate.opsForValue().set("mykey","hello");
        System.out.println(redisTemplate.opsForValue().get("mykey"));
    }
Customize RedisTemplate
@Configuration
public class redisConfig {
    //Can be used directly
    //Write our own redisTemplate
    @Bean
    @ConditionalOnSingleCandidate(RedisConnectionFactory.class)
    public RedisTemplate<String, Object> redisTemplate(RedisConnectionFactory redisConnectionFactory) {
        RedisTemplate<String, Object> redisTemplate = new RedisTemplate();
        redisTemplate.setConnectionFactory(redisConnectionFactory);

        // Serialization configuration
        // Replace the default serialization method with Jackson2JsonRedisSerialize
        Jackson2JsonRedisSerializer<?> jackson2JsonRedisSerializer = new Jackson2JsonRedisSerializer<>(Object.class);
        //Serialization of String
        StringRedisSerializer stringRedisSerializer = new StringRedisSerializer();
        ObjectMapper om = new ObjectMapper();
        om.setVisibility(PropertyAccessor.ALL, JsonAutoDetect.Visibility.ANY);
        //Enable default type
        om.activateDefaultTyping(LaissezFaireSubTypeValidator.instance,ObjectMapper.DefaultTyping.NON_FINAL);
        //Serialization class, object mapping settings
        jackson2JsonRedisSerializer.setObjectMapper(om);
        //key serialization using String
        redisTemplate.setKeySerializer(stringRedisSerializer);
        //value is serialized using jackson
        redisTemplate.setValueSerializer(jackson2JsonRedisSerializer);
        //hash key s are serialized using String
        redisTemplate.setHashKeySerializer(stringRedisSerializer);
        //The value of hash is serialized using jackson
        redisTemplate.setHashValueSerializer(jackson2JsonRedisSerializer);
        redisTemplate.afterPropertiesSet();
        return redisTemplate;
    }

}
RedisUtils
RedisUtils-RedisTemplate
9,Redis.conf detailed explanation
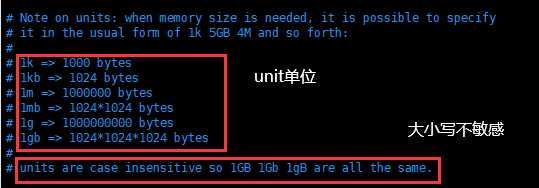
1. units
The configuration file unit is not case sensitive
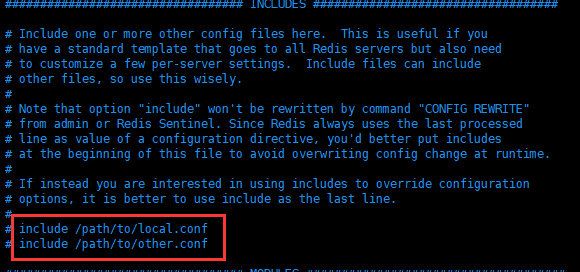
2. Include
3. network
bind 127.0.0.1 #Binding access ip
protected-mode yes #Protection mode yes on no off
port 6379   #port
4. General configuration
daemonize yes  #In the way of daemon, the default is no
pidfile /var/run/redis_6379.pid  #If it runs in the background (daemon), we need to specify a pid file!
5. Log
# Specify the server verbosity level.
# This can be one of:
# debug (a lot of information, useful for development/testing)
# verbose (many rarely useful info, but not a mess like the debug level)
# Notice (moderately verbose, what you want in production possibly)
# warning (only very important / critical messages are logged)
loglevel notice  #log level
logfile ""     #Log file name
databases 16   #The number of databases is 16 by default
always-show-logo yes   #Is the logo always displayed
6. Snapshot
Persistence: the number of operations performed within a specified time will be persisted to the file rdb .aof
redis is an in memory database. If there is no persistence, the data will be lost after power failure
save 3600 1   #If at least one key is modified within 3600 seconds, the persistence operation is performed
save 300 100   #If at least 100 key s have been modified within 300 seconds, the persistence operation is performed
save 60 10000  #If at least 10000 key s have been modified within 60 seconds, the persistence operation is performed
stop-writes-on-bgsave-error yes  #If persistence goes wrong, do you need to continue working
rdbcompression yes  #Whether to compress rdb file (it will consume some cpu resources)
rdbchecksum yes    #preservation. rdb files, error checking and verification
dir ./     #. rdb file save path
7. security
requirepass root #Set the password to root. There is no password by default
8. Client restrictions
maxclients 10000 #maximum connection
9. memory management
maxmemory <bytes> #Maximum memory capacity
maxmemory-policy noeviction #Memory processing policy the processing policy after the memory reaches the maximum limit
1,volatile-lru: Only for those with expiration time set key conduct LRU((default)
2,allkeys-lru : delete lru Algorithmic key
3,volatile-random: Random deletion is about to expire key
4,allkeys-random: Random deletion
5,volatile-ttl : Delete expiring
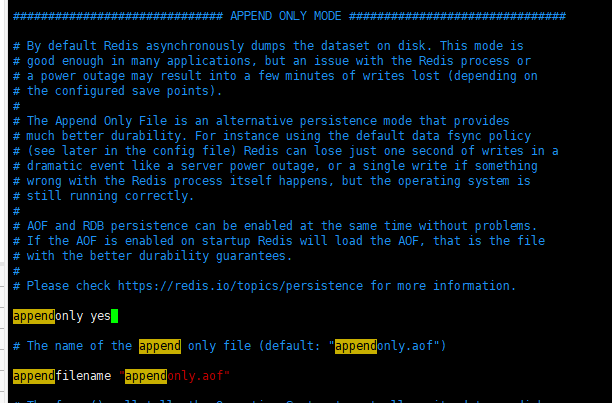
6,noeviction : Never expire, return error10. aof configuration (append only mode)
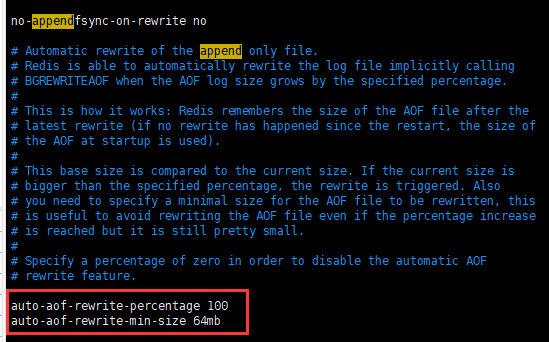
appendonly no   #aof mode is not enabled by default. rdb is used for persistence by default. In most cases, rdb is fully sufficient
appendfilename "appendonly.aof"  #. aof file name
# appendfsync always  #Each modification will perform synchronization and consume performance
appendfsync everysec  #Synchronization is performed once per second, but this 1s of data may be lost
# appendfsync no      #When synchronization is not performed, the operating system synchronizes the data itself, and the speed is the fastest
####Rewrite rule####
no-appendfsync-on-rewrite no
auto-aof-rewrite-percentage 100
auto-aof-rewrite-min-size 64mb  #If the aof file is larger than 64mb, it is too large. fork a new process to rewrite our file.
10. Persistence of Redis
1,RDB(Redis DataBase)
Write the collective snapshot of data in memory to disk at a specified time interval, that is, the jargon snapshot snapshot. When it is restored, it reads the snapshot file directly into memory.
Redis will separately create (fork) a sub process for persistence. It will first write the data to a temporary file. After the persistence process is completed, redis will use this temporary file to replace the last persistent file. In the whole process, the main process does not carry out any I/O operation. This ensures extremely high performance. If large-scale data recovery is needed and the integrity of data recovery is not very sensitive, RDB method is more efficient than AOF method.
advantage:
1. Suitable for large-scale data recovery.
2. The requirements for data integrity are not high.
Disadvantages:
1. The process operation needs a certain time interval. If redis goes down within the time interval, the data after the last persistence will be lost.
2. fork subprocesses occupy a certain amount of memory space.
The default persistence mode is RDB mode. Generally, this configuration does not need to be modified. The default saved RDB file is dump rdb
Trigger rule:
1. When the save rule is satisfied, the rdb rule is automatically triggered
2. After the flush command is executed, the rdb rules are triggered automatically
3. When you exit redis, the rdb rule will be triggered automatically
Recover rdb files:
1. Just put the rdb file in the startup directory of redis. When redis starts, it will automatically check dump rdb file, automatically recover the data in rdb file
127.0.0.1:6379> config get dir
1) "dir"
2) "/usr/local/bin"  #If there are rdb files in this directory, start redis to recover the data automatically
In master-slave replication, rdb is standby! From the plane!
2,AOF(Append Only File)
aof is not enabled by default and needs to be enabled manually (appendonly yes). aof saves appendonly by default aof file.
Restart and redis will take effect.
Record all the executed write commands, history, and execute all the recorded commands during recovery.
Each write operation is recorded in the form of log, and all instructions executed by redis are recorded (read operation is not recorded). Only files are allowed to be added, and files are not allowed to be overwritten. When redis starts, the file will be read to rebuild the data. In other words, if redis restarts, the write instructions will be executed from front to back according to the contents of the log file to complete the data recovery.
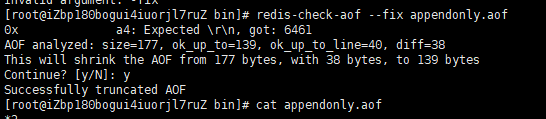
If the AOF file is damaged or has errors, redis cannot start. We need to fix the AOF file. Aof file corruption repair: redis check AOF - fix appendonly aof
If the file is normal, restart to start the recovery
Rewrite rule description
aof defaults to the unlimited addition of files, which will become larger and larger
If the aof file is larger than 64m, it is too large. fork a new process to rewrite our files
merits and demerits
appendonly no #aof mode is not enabled by default. rdb method is used for persistence by default. In most cases, rdb is enough
appendfilename "appendonly.aof"  #The name of the persistent file

# appendfsync always  #Each modification will perform synchronization and consume performance
appendfsync everysec  #Synchronization is performed once per second, but this 1s of data may be lost
# appendfsync no      #When synchronization is not performed, the operating system synchronizes the data itself, and the speed is the fastest
advantage:
1. Each modification will perform synchronization, which consumes performance and improves the integrity of file data.
2. Synchronization is performed once per second, but this 1s of data may be lost
3. When synchronization is not performed, the operating system synchronizes the data itself, and the speed is the fastest
Disadvantages:
1. Compared with data files, aof files are much larger than rdb files, and the repair speed is also slow.
2. aof also runs slower than rdb, so the default configuration of redis is rdb persistence.
Extension:
1. RDB persistence can snapshot and store your data within a specified time interval
2. Aof persistence records every write operation to the server. When the server restarts, these commands will be re executed to recover the original data. The AOF command additionally saves each write operation to the end of the file with redis protocol. Redis can also rewrite the AOF file in the background, so that the volume of the AOF file will not be too large.
3. Only cache. If you only want your data to exist when the server is running, you can also not use any persistence
4. Enable two persistence methods at the same time
- In this case, when redis restarts, AOF files will be loaded first to recover the original data, because in general, the data set saved in AOF files is more complete than that saved in RDB files.
- RDB data is not real-time. When using both, the server will only find AOF files when restarting. Do you want to use AOF only? The author suggests not, because RDB is more suitable for backing up the database (AOF is changing and hard to back up), fast restart, and there will be no potential bugs in AOF, which will be kept as a means in case.
5. Performance recommendations
- Because RDB files are only used for backup purposes, it is recommended to only persist RDB files on Slave, and only backup once every 15 minutes is enough. Only save 900 1 is retained.
- If you Enable AOF, the advantage is that in the worst case, only less than two seconds of data will be lost. The startup script is relatively simple. You can only load your own AOF file. The cost is that it brings continuous IO and AOF rewrite. Finally, the new data generated in the rewriting process will be written to the new file, resulting in almost inevitable blocking. As long as the hard disk is allowed, the frequency of AOF rewriting should be minimized. The default value of 64M for the basic size of AOF rewriting is too small, which can be set to more than 5G. By default, it exceeds 100% of the original size, and the size rewriting can be changed to an appropriate value.
- If AOF is not enabled, high availability can be achieved only by master slave replay, which can save a lot of IO and reduce the system fluctuation caused by rewriting. The price is that if the Master/Slave is dumped at the same time, more than ten minutes of data will be lost. The startup script also needs to compare the RDB files in the two Master/Slave and load the newer one. This is the architecture of microblog.
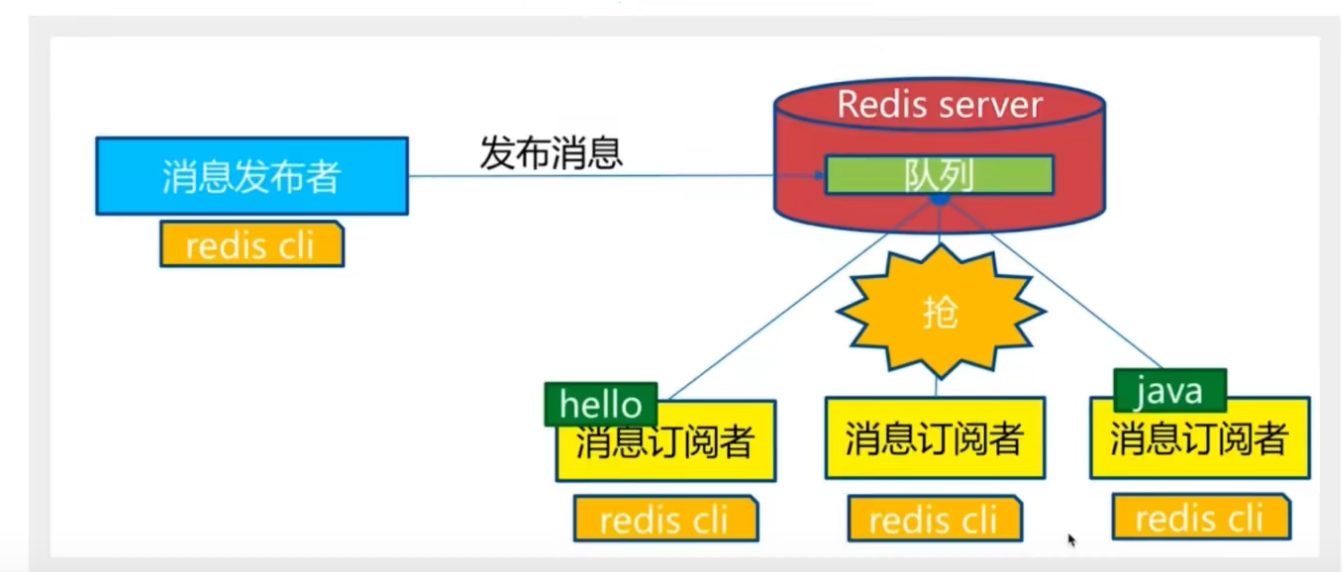
11. Redis publish and subscribe
Redis publish / subscribe (pub/sub) is a message communication mode: the sender (pub) sends information and the subscriber (sub) receives information.
Redis client can subscribe to any number of channels.
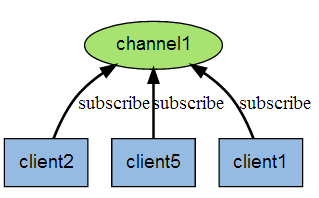
Subscribe / publish message diagram:
First: message sender, second: channel, third: Message subscriber
The following figure shows the relationship between channel 1 and the three clients subscribing to this channel - client2, client5 and client1:
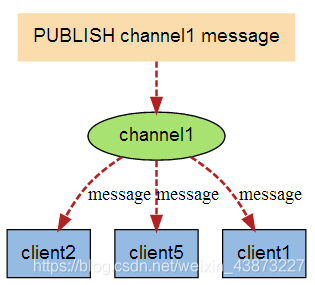
When a new message is sent to channel 1 through the PUBLISH command, the message will be sent to the three clients subscribing to it:
command
| command | describe |
| PSUBSCRIBE pattern [pattern..] | Subscribe to one or more channels that match a given pattern. |
| PUNSUBSCRIBE pattern [pattern..] | Unsubscribe from one or more channels that match the given pattern. |
| PUBSUB subcommand [argument[argument]] | View subscription and publishing system status. |
| PUBLISH channel message | Publish messages to specified channels |
| SUBSCRIBE channel [channel..] | Subscribe to a given channel or channels. |
| UNSUBSCRIBE channel [channel..] | Unsubscribe from one or more channels |
test
Subscriber
[root@iZbp180bogui4iuorjl7ruZ bin]# redis-cli -p 6379
127.0.0.1:6379> ping
PONG
127.0.0.1:6379> SUBSCRIBE javastudy  #Subscribed Channels
Reading messages... (press Ctrl-C to quit)
1) "subscribe"
2) "javastudy"
3) (integer) 1
#Waiting to read pushed information
1) "message"  #news
2) "javastudy" #Receiving channel
3) "hello"    #receive messages
1) "message"
2) "javastudy"
3) "world"
Sender
[root@iZbp180bogui4iuorjl7ruZ bin]# redis-cli -p 6379
127.0.0.1:6379> PUBLISH javastudy "hello"  #Send some messages to the specified channel
(integer) 1
principle
Redis is implemented in C by analyzing pubsub C file to understand the underlying implementation of publish and subscribe mechanism, so as to deepen the understanding of redis.
Redis implements PUBLISH and SUBSCRIBE functions through PUBLISH, SUBSCRIBE, PSUBSCRIBE and other commands.
Each Redis server process maintains a Redis that represents the status of the server H / redisserver structure, PubSub of structure_ The channels attribute is a dictionary, which is used to save the information of subscribed channels. The key of the dictionary is the channel being subscribed, and the value of the dictionary is a linked list, which stores all clients subscribing to this channel.
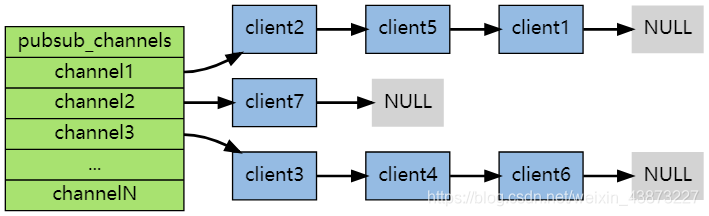
When the client subscribes, it is linked to the tail of the linked list of the corresponding channel. Unsubscribing is to remove the client node from the linked list.
shortcoming
If a client subscribes to a channel but does not read messages fast enough, the volume of redis output buffer will become larger and larger due to the continuous backlog of messages, which may slow down the speed of redis itself or even crash directly.
This is related to the reliability of data transmission. If the subscriber is disconnected, he will lose all messages published by the publisher during the short term.
application
Message subscription: official account subscription, micro-blog attention, and so on.
Multiplayer online chat room.
In a slightly complex scenario, we will use message middleware MQ for processing.
12. Redis master-slave replication
concept
Master Slave replication refers to copying data from one Redis server to other Redis servers. The former is called master/leader and the latter is called slave/follower; Data replication is unidirectional and can only be from master node to Slave node. Master mainly writes, Slave mainly reads.
Master-slave copy, read-write separation! 80% of the cases are read operations! Reduce server pressure!
By default, each Redis server is the master node; And a master node can have multiple slave nodes (or no slave nodes), but a slave node has and has only one master node.
The main functions of master-slave replication include
- Data redundancy: master-slave replication realizes the hot backup of data, which is a way of data redundancy other than persistence.
- Fault recovery: when the master node has problems, the slave node can provide services to achieve rapid fault recovery; In fact, it is a kind of redundancy of services.
- Load balancing: on the basis of master-slave replication, combined with read-write separation, the master node can provide write services, and the slave node can provide read services (that is, the application connects to the master node when writing Redis data, and the application connects to the slave node when reading Redis data), sharing the server load; Especially in the scenario of less writing and more reading, the concurrency of Redis server can be greatly improved by sharing the load among multiple nodes.
- Cornerstone of high availability (cluster): in addition to the above functions, master-slave replication is also the basis for sentinels and clusters to implement. Therefore, master-slave replication is the basis for high availability of Redis.
Generally speaking, to apply redis to engineering projects, it is absolutely impossible to use only one redis (downtime). The reasons are as follows:
1. Structurally, a single redis server will have a single point of failure, and one server needs to handle all the request loads, which is under great pressure.
2. In terms of capacity, the memory capacity of a single redis server is limited. Even if the memory capacity of a redis server is 256GB, all memory can not be used as redis storage memory. Generally speaking, the maximum memory used by a single redis should not exceed 20GB.
Environment configuration
You only need to configure the slave database, not the master database, because by default, each Redis server is the master node.
127.0.0.1:6379> info replication  #View information about the current library
# Replication
role:master   #Role master
connected_slaves:0   #Number of slave Libraries
master_failover_state:no-failover
master_replid:ada8f9fad2a4f4215bc6ddc844a4def15e96ee38
master_replid2:0000000000000000000000000000000000000000
master_repl_offset:0
second_repl_offset:-1
repl_backlog_active:0
repl_backlog_size:1048576
repl_backlog_first_byte_offset:0
repl_backlog_histlen:0
Copy three configuration files and modify the corresponding information:
1. Port
2,pid
3. log file name
4. rdb backup file name
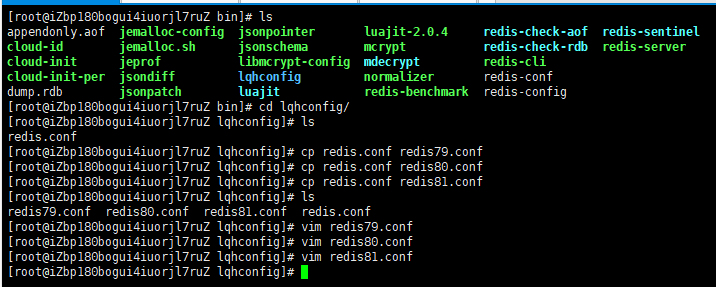
After modification, start three redis servers, which can be viewed through process information

One master and two slaves
By default, each redis server is the primary node; We just need to configure the slave node.
One master (79) and two slaves (80,81)
Mode 1: command configuration (temporary)
############ Slave node 1 ###########
127.0.0.1:6380> SLAVEOF 127.0.0.1 6379  #Set the slave node of the master node (Master)
OK
127.0.0.1:6380> info replication
# Replication
role:slave   #The current role is a slave node
master_host:127.0.0.1   #Master node information
master_port:6379
master_link_status:up
master_last_io_seconds_ago:5
master_sync_in_progress:0
slave_read_repl_offset:14
slave_repl_offset:14
slave_priority:100
slave_read_only:1
replica_announced:1
connected_slaves:0
master_failover_state:no-failover
master_replid:88094280f7464b766cb067bcac5db93fffb5d16d
master_replid2:0000000000000000000000000000000000000000
master_repl_offset:14
second_repl_offset:-1
repl_backlog_active:1
repl_backlog_size:1048576
repl_backlog_first_byte_offset:1
repl_backlog_histlen:14

############ Slave node 2 ###########
127.0.0.1:6381> SLAVEOF 127.0.0.1 6379   #Set the slave node of the master node (Master)
OK
127.0.0.1:6381> info replication
# Replication
role:slave   #The current role is a slave node
master_host:127.0.0.1   #The current role is a slave node
master_port:6379
master_link_status:up
master_last_io_seconds_ago:3
master_sync_in_progress:0
slave_read_repl_offset:630
slave_repl_offset:630
slave_priority:100
slave_read_only:1
replica_announced:1
connected_slaves:0
master_failover_state:no-failover
master_replid:88094280f7464b766cb067bcac5db93fffb5d16d
master_replid2:0000000000000000000000000000000000000000
master_repl_offset:630
second_repl_offset:-1
repl_backlog_active:1
repl_backlog_size:1048576
repl_backlog_first_byte_offset:631
repl_backlog_histlen:0

############ Master node ###########
127.0.0.1:6379> info replication
# Replication
role:master   #The current character is the primary node
connected_slaves:2   #Number of slave nodes
slave0:ip=127.0.0.1,port=6380,state=online,offset=770,lag=1   #Slave node information
slave1:ip=127.0.0.1,port=6381,state=online,offset=770,lag=0   #Slave node information
master_failover_state:no-failover
master_replid:88094280f7464b766cb067bcac5db93fffb5d16d
master_replid2:0000000000000000000000000000000000000000
master_repl_offset:770
second_repl_offset:-1
repl_backlog_active:1
repl_backlog_size:1048576
repl_backlog_first_byte_offset:1
repl_backlog_histlen:770
The real master-slave configuration should be configured in the configuration file. In this case, it is permanent. We use commands here, which are temporary
Method 2: configuration file (permanent)
Modify the configuration file and set the master node information
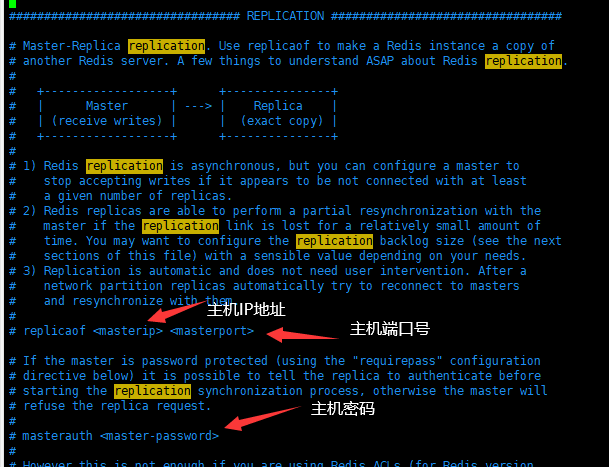
details
The master node can write, but the slave node cannot write and can only read! All information and data in the master node will be automatically saved by the slave node!
############### Master node (writable) ###############
127.0.0.1:6379> keys *
(empty array)
127.0.0.1:6379> set k1 v1
OK
127.0.0.1:6379> set k1 v1
OK
127.0.0.1:6379> keys *
1) "k1"
127.0.0.1:6379> get k1
"v1"

############### Slave node (non writable, read only) ###############
127.0.0.1:6380> keys *
(empty array)
127.0.0.1:6380> keys *
1) "k1"
127.0.0.1:6380> get k1
"v1"
127.0.0.1:6380> set k2 v2
(error) READONLY You can't write against a read only replica.

127.0.0.1:6381> keys *
(empty array)
127.0.0.1:6381> keys *
1) "k1"
127.0.0.1:6381> get k1
"v1"
127.0.0.1:6381> set k2 v2
(error) READONLY You can't write against a read only replica.
be careful:
1. When the master node goes down, the slave node is still connected to the master node as a slave node and has no write permission; When the master node reconnects, the slave node can still directly obtain the information written by the master node!
2. If the slave node is configured with the command line, restart the slave node and the master-slave configuration will fail! But when it is reconfigured as a slave node, the value will be obtained from the master node immediately!
3. If the slave node is configured in the configuration file, the slave node goes down and the master node writes. When the slave node reconnects, the value will be obtained from the master node. The information of the previous master node write operation still exists in the slave node!
Replication principle
Slave starts successfully. After connecting to the Master, it will send a sync synchronization command!
After receiving the synchronization command, the Master starts the background save process and collects all the received commands for modifying the dataset. After the background process is executed, the Master will transfer the whole data file to Slave and complete a synchronization!
Full copy: after receiving the database file data, the Slave service saves it and loads it into memory.
Incremental copy: the Master continues to send all new collected modification commands to Slave in turn to complete synchronization.
However, as long as the Master is reconnected, a full synchronization (full replication) will be performed automatically. The data must be seen in Slave.
Manually configure the master node after downtime
Link model: M-S(M)-S. when the first master node survives, the S(M) node is a slave node and cannot write!
When the first primary node goes down, you can manually set the node as the primary node:
slaveof no one #Make yourself the master node
If the first primary node is restored, it needs to be reconfigured.
13. Sentinel mode (automatic election mode)
summary
The method of master-slave switching technology is: when the master node goes down, one slave node needs to be manually switched to the master node, which requires manual intervention, time-consuming and laborious, and the service will not be available for a period of time. This is not a recommended way. More often, we give priority to Sentinel mode. Since 2.8, Redis has officially provided Sentinel architecture to solve this problem.
It can monitor whether the master node fails in the background. If it fails, it will automatically convert the slave node to the master node according to the number of votes.
Sentinel mode is a special mode. Firstly, Redis provides sentinel commands. Sentinel is an independent process. As a process, it can run independently. The principle is that the sentinel sends a command and waits for the response of the Redis server, so as to monitor multiple running Redis instances
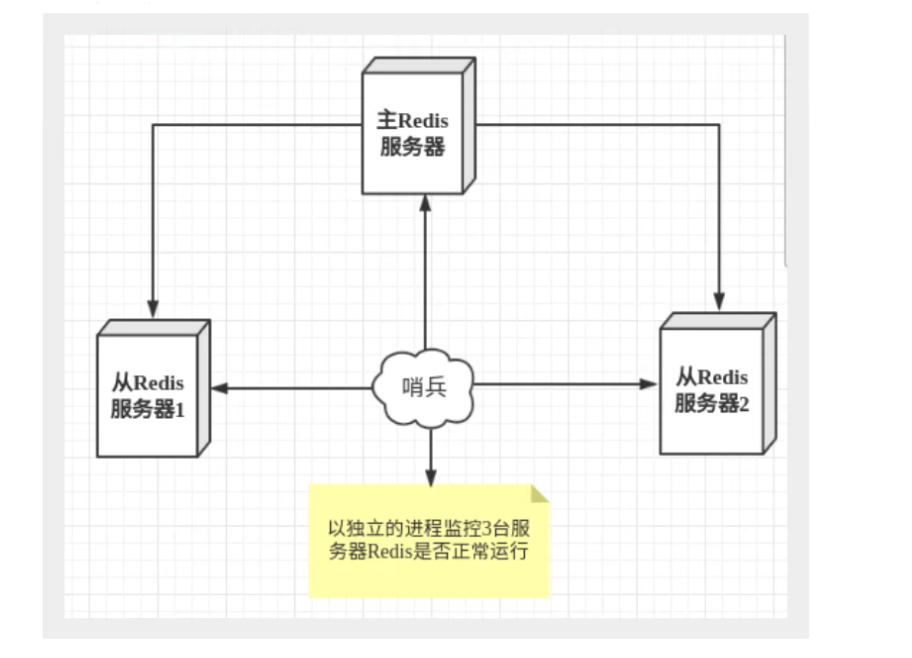
Here, the sentry has two functions:
- Send commands to let Redis server return to monitor its running status, including master server and slave server.
- When the sentinel detects that the master is down, it will automatically switch the slave to the master, and then notify other slave servers through publish subscribe mode to modify the configuration file and let them switch to the master node.
However, there may be problems when a sentinel process monitors the Redis server. Therefore, we can use multiple sentinels for monitoring. Each sentinel will also monitor each other, thus forming a multi sentinel mode.
Assuming that the main server is down, sentry 1 detects this result first, and the system will not immediately carry out the failover process. Sentry 1 only subjectively believes that the main server is unavailable. This phenomenon is called subjective offline. When the following sentinels also detect that the primary server is unavailable and the number reaches a certain value, a vote will be held between sentinels. The voting result is initiated by a sentinel for failover. After the switch is successful, each sentinel will switch the host from the server monitored by themselves through the publish and subscribe mode. This process is called objective offline.
test
1. Configure sentinel profile sentinel conf
# sentinel monitor the monitored name host port 1
sentinel monitor headredis 127.0.0.1 6379 1
The following number 1 means that the host hangs up. slave votes to see who takes over as the host. The one with the most votes will become the host.
The value of "1" parameter is < quorum >, that is, how many primary nodes fail over when they detect a problem with the primary node. In fact, how many sentinel s think that the main node's subjective offline is the real offline, and then fail over to make it offline objectively
2. Activate the sentry
[root@iZbp180bogui4iuorjl7ruZ bin]# redis-sentinel lqhconfig/sentinel.conf
24222:X 17 Feb 2022 20:08:18.995 # oO0OoO0OoO0Oo Redis is starting oO0OoO0OoO0Oo
24222:X 17 Feb 2022 20:08:18.995 # Redis version=6.2.6, bits=64, commit=00000000, modified=0, pid=24222, just started
24222:X 17 Feb 2022 20:08:18.995 # Configuration loaded
24222:X 17 Feb 2022 20:08:18.996 * monotonic clock: POSIX clock_gettime
                _._
           _.-``__ ''-._
      _.-``    `.  `_.  ''-._           Redis 6.2.6 (00000000/0) 64 bit
  .-`` .-```.  ```\/    _.,_ ''-._
 (    '      ,       .-`  | `,    )     Running in sentinel mode
 |`-._`-...-` __...-.``-._|'` _.-'|     Port: 26379
 |    `-._   `._    /     _.-'    |     PID: 24222
  `-._    `-._  `-./  _.-'    _.-'
 |`-._`-._    `-.__.-'    _.-'_.-'|
 |    `-._`-._        _.-'_.-'    |           https://redis.io
  `-._    `-._`-.__.-'_.-'    _.-'
 |`-._`-._    `-.__.-'    _.-'_.-'|
 |    `-._`-._        _.-'_.-'    |
  `-._    `-._`-.__.-'_.-'    _.-'
      `-._    `-.__.-'    _.-'
          `-._        _.-'
              `-.__.-'

24222:X 17 Feb 2022 20:08:19.003 # Sentinel ID is c01306dba4facd34ffb19a0758ffc524f60cb4dd
24222:X 17 Feb 2022 20:08:19.003 # +monitor master myredis 127.0.0.1 6379 quorum 1 #Master node information
24222:X 17 Feb 2022 20:08:19.004 * +slave slave 127.0.0.1:6380 127.0.0.1 6380 @ myredis 127.0.0.1 6379  #Slave node 1 information
24222:X 17 Feb 2022 20:08:19.011 * +slave slave 127.0.0.1:6381 127.0.0.1 6381 @ myredis 127.0.0.1 6379  #Slave node 2 information
If the master node is disconnected, a server will be randomly selected from the slave as the host at this time! (voting algorithm)
127.0.0.1:6379> set k1 v1
OK
127.0.0.1:6379> SHUTDOWN
not connected> exit
Primary node after Election:
Slave node after Election:
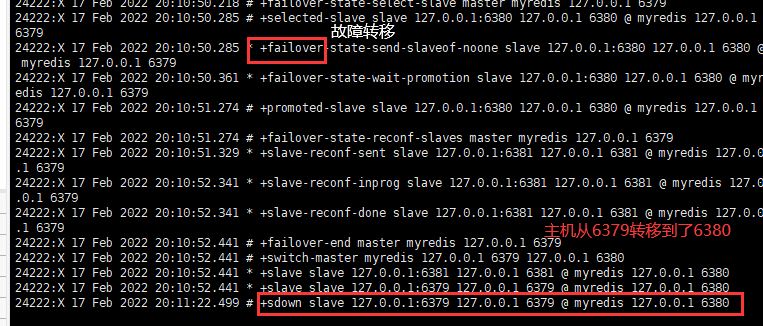 When the previously down master node is reconnected, the previously down master node will be automatically converted by the sentinel into the slave node of the newly elected master node. This is the rule of sentinel mode
Sentinel mode
advantage:
1. Sentinel cluster, based on master-slave replication mode, has the advantages of all master-slave configurations.
2. The master-slave can be switched, the fault can be transferred, and the availability of the system is better.
3. Sentinel mode is the upgrade of master-slave mode. It is more robust from manual to automatic!
Disadvantages:
1. Redis is not easy to expand online. Once the cluster capacity reaches the upper limit, online expansion will be very troublesome!
2. The configuration of sentinel mode is actually very troublesome. There are many choices!
Full configuration of sentinel mode
Complete sentinel mode configuration file sentinel conf
# Example sentinel.conf
# The port on which the sentinel sentinel instance runs is 26379 by default
# If there are multiple sentinels, you also need to configure the port of each sentinel
port 26379
# sentinel's working directory
dir /tmp
# The ip port of the redis master node monitored by sentry sentinel
# The master name can be named by itself. The name of the master node can only be composed of letters A-z, numbers 0-9 and the three characters ". -" form.
# Quorumwhen the sentinel of these quorum s thinks that the master master node is lost, it objectively thinks that the master node is lost
# sentinel monitor <master-name> <ip> <redis-port> <quorum>
sentinel monitor mymaster 127.0.0.1 6379 1
# When the requirepass foobared authorization password is enabled in the Redis instance, all clients connecting to the Redis instance must provide the password
# Set the password of sentinel sentinel connecting master and slave. Note that the same authentication password must be set for master and slave
# sentinel auth-pass <master-name> <password>
sentinel auth-pass mymaster MySUPER--secret-0123passw0rd
# After the specified number of milliseconds, the master node does not respond to the sentinel sentinel. At this time, the sentinel subjectively thinks that the master node goes offline for 30 seconds by default
# sentinel down-after-milliseconds <master-name> <milliseconds>
sentinel down-after-milliseconds mymaster 30000
# This configuration item specifies the maximum number of slave s that can synchronize the new master at the same time when a failover active / standby switch occurs,
The smaller the number, the better failover The longer it takes,
But if this number is bigger, it means more slave because replication Not available.
You can ensure that there is only one at a time by setting this value to 1 slave Is in a state where the command request cannot be processed.
# sentinel parallel-syncs <master-name> <numslaves>
sentinel parallel-syncs mymaster 1
# Failover timeout can be used in the following aspects:
#1. The interval between two failover s of the same sentinel to the same master.
#2. When a slave synchronizes data from a wrong master, the time is calculated. Until the slave is corrected to synchronize data to the correct master.
#3. The time required to cancel an ongoing failover.
#4. During failover, configure the maximum time required for all slaves to point to the new master. However, even after this timeout, the slave will still be correctly configured to point to the master, but it will not follow the rules configured by parallel syncs
# The default is three minutes
# sentinel failover-timeout <master-name> <milliseconds>
sentinel failover-timeout mymaster 180000
# SCRIPTS EXECUTION
#Configure the script to be executed when an event occurs. You can notify the administrator through the script. For example, send an email to notify relevant personnel when the system is not running normally.
#There are the following rules for the running results of scripts:
#If the script returns 1 after execution, the script will be executed again later. The number of repetitions is currently 10 by default
#If the script returns 2 after execution, or a return value higher than 2, the script will not be executed repeatedly.
#If the script is terminated due to receiving the system interrupt signal during execution, the behavior is the same as when the return value is 1.
#The maximum execution time of a script is 60s. If it exceeds this time, the script will be terminated by a SIGKILL signal and then re executed.
#Notification script: this script will be called when any warning level event occurs in sentinel (such as subjective failure and objective failure of redis instance),
#At this time, the script should notify the system administrator about the abnormal operation of the system through e-mail, SMS, etc. When calling the script, two parameters will be passed to the script,
#One is the type of event,
#One is the description of the event.
#If sentinel If the script path is configured in the conf configuration file, you must ensure that the script exists in this path and is executable, otherwise sentinel cannot be started successfully.
#Notification script
# sentinel notification-script <master-name> <script-path>
  sentinel notification-script mymaster /var/redis/notify.sh
# Client reconfiguration master node parameter script
# When a master changes due to failover, this script will be called to notify the relevant clients of the change of the master address.
# The following parameters will be passed to the script when calling the script:
# <master-name> <role> <state> <from-ip> <from-port> <to-ip> <to-port>
# At present, < state > is always "failover",
# < role > is one of "leader" or "observer".
# The parameters from IP, from port, to IP and to port are used to communicate with the old master and the new master (i.e. the old slave)
# This script should be generic and can be called multiple times, not targeted.
# sentinel client-reconfig-script <master-name> <script-path>
sentinel client-reconfig-script mymaster /var/redis/reconfig.sh
14. Redis's cache penetration and avalanche (interview frequency, work commonly used ~)
High availability of services
The use of Redis cache has greatly improved the performance and efficiency of applications, especially in data query. But at the same time, it also brings some problems. Among them, the most crucial problem is data consistency. Strictly speaking, there is no solution to this problem. If the consistency of data is very high, cache cannot be used.
Other typical problems are cache penetration, cache avalanche and cache breakdown. At present, the industry also has more popular solutions.
Cache penetration
concept
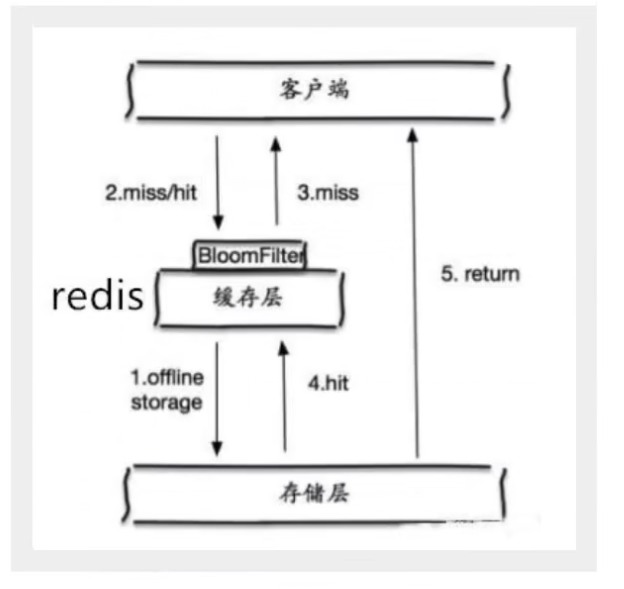
The concept of cache penetration is very simple. When users want to query a data, they find that the redis memory database does not hit, that is, the cache does not hit, so they query the persistence layer database. No, so this query failed. When there are many users, the cache fails to hit, so they all request the persistence layer database. This will put a lot of pressure on the persistence layer database, and cache penetration occurs at this time.
Solution
1. Bloom filter
Bloom filter is a data structure, which stores all possible query parameters in the form of hash. It is verified at the control layer and discarded if it does not meet the requirements, so as to avoid the query pressure on the underlying storage system;
2. Cache empty objects
When the storage layer fails to hit, even the returned empty object will be cached, and an expiration time will be set. Then accessing the data will be obtained from the cache, protecting the back-end data source;
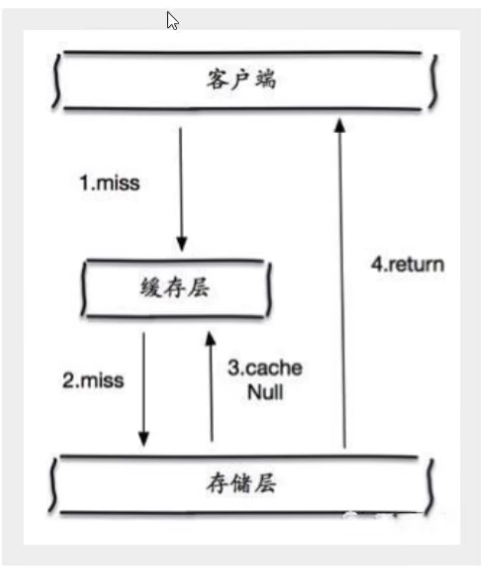
However, there are two problems with this method:
- If null values can be cached, this means that the cache needs more space to store more keys, because there may be many null keys;
- Even if the expiration time is set for the null value, there will still be inconsistency between the data of the cache layer and the storage layer for a period of time, which will have an impact on the business that needs to maintain data consistency.
Buffer breakdown
concept
Here we need to pay attention to the difference between and cache penetration. Cache breakdown refers to that a key is very hot and is constantly carrying large concurrency. Large concurrency focuses on accessing this point. When the key fails, the continuous large concurrency breaks through the cache and directly requests the database, which is like cutting a hole in the barrier.
When a key expires, a large number of requests are accessed concurrently. This kind of data is generally hot data. Because the cache expires, the database will be accessed to query the latest data at the same time, and the cache will be written back, which will cause the pressure on the database to increase instantaneously.
Solution
1. Set hotspot data not to expire
From the cache level, no expiration time is set, so there will be no problems after the hot key expires.
2. Add mutex
Distributed lock: using distributed lock ensures that there is only one thread for each key to query the back-end service at the same time, and other threads do not have the permission to obtain the distributed lock, so they only need to wait. This method shifts the pressure of high concurrency to distributed locks, so it is a great test for distributed locks.
Cache avalanche
concept
Cache avalanche refers to the expiration of the cache set in a certain period of time. Redis is down!
One of the reasons for the avalanche, such as the rush purchase of zero point, and the centralized storage of goods in the cache for one hour. At 1 o'clock, a large number of caches collectively expire, and the access queries for these commodities fall into the database. For the database, there will be periodic pressure peaks, so all requests will reach the storage layer, and the calls of the storage layer will surge, resulting in the failure of the storage layer.
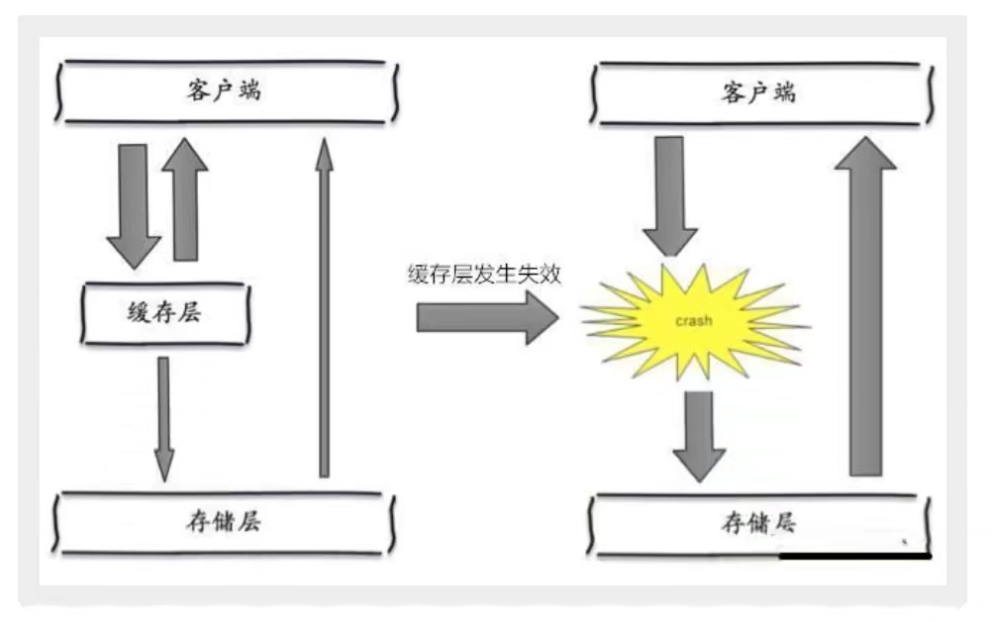
In fact, centralized expiration is not very fatal. The more fatal cache avalanche is the downtime or disconnection of a node of the cache server. Therefore, the naturally formed cache avalanche must be to create a cache in a certain period of time. At this time, the database can withstand the pressure. It is nothing more than periodic pressure on the database. The downtime of the cache service node will cause unpredictable pressure on the database server, which is likely to crush the database in an instant.
Solution
1. Redis high availability
The meaning of this idea is that since redis may also hang up, add several more redis servers. If one hangs up, others can continue to work. In fact, it is to build a cluster.
2. Current limiting degradation
The idea of this solution is to control the number of threads reading and writing to the database cache by locking or queuing after the cache fails. For example, for a key, only one thread is allowed to query data and write cache, while other threads wait.
3. Data preheating
The meaning of data heating is to access the possible data before formal deployment, so that part of the data that may be accessed in large quantities will be loaded into the cache. Before a large concurrent access is about to occur, manually trigger the loading of different cache key s and set different expiration times to make the cache invalidation time as uniform as possible.