*This article contains many code fragments. It is recommended to browse on the PC side:
https://cloud.tencent.com/document/product/876/68589
Article catalogue
Overview and development preparation
Step 1: write login function and home page code
Step 2: home page logic processing
Step 3: realize the function of extracting notes
Step 4: my note page design
Step 5: logical processing of my note page
Step 6: Supplement details
summary
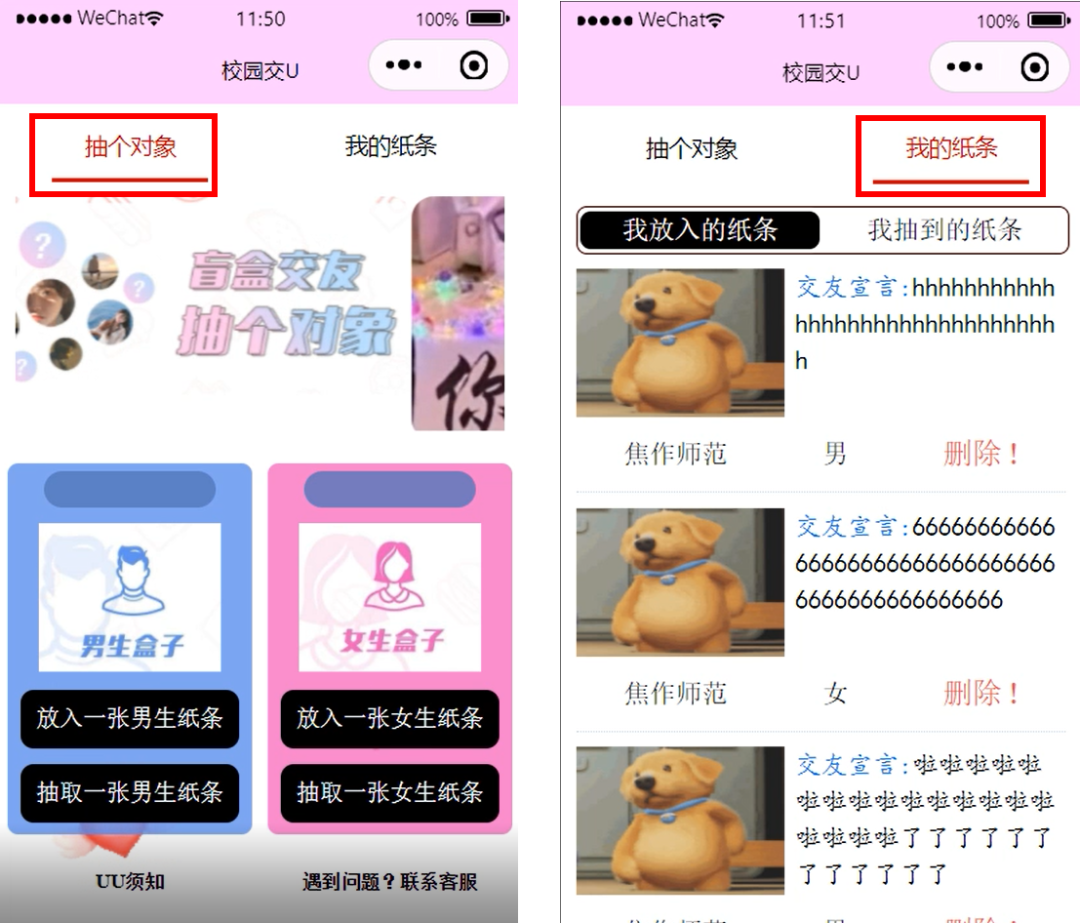
This paper introduces how to use cloud development related capabilities to quickly complete the development of a campus dating applet. And around the two pages of an object and my note to show and explain the functions.
explain: The relevant source materials involved in this example tutorial have been authorized accordingly.
preparation
Go to wechat developer tool to open cloud development.
https://developers.weixin.qq.com/miniprogram/dev/wxcloud/quick-start/miniprogram.html
Operation process
The specific operation process can be divided into the following 6 steps.
- 1. Write the login function and home page code
- 2 home page logic processing
- 3. Realize the function of extracting notes
- 4 my note page design
- 5 logical processing of my note page
- 6 details supplement
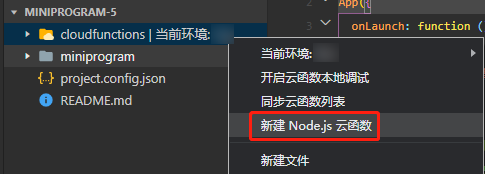
Design of database table
To separate the user's login from the note data corresponding to the user, you need to create a # users_ The school , table is used to store wechat applet users, and a , body is created for the notes put in by all users_ girl_ In order to make it easier for users to manage the extracted note, another "body" is created_ girl_ yun_ The put table is used to store the notes pulled out by all users.
Open wechat developer tool, click cloud development to enter cloud development console > database page. Click the new button to create} users_school,body_girl_yun , and , body_girl_yun_put # three sets, as shown in the figure below:
Step 1: write login function and home page code
Operation steps
Applet configuration and page creation
1,app.json, configure the path of two pages:
"pages": [ "pages/index/index", "pages/history/history" ]
After the configuration is completed, refresh the developer tool, and the index, history folder and corresponding files will be generated in the page pages folder js,. wxml, . wxss# and json file.
2. On app Set the position of tabbar in JSON, and set the contents at the top of the page and inside:
"tabBar": { "color": "black", "selectedColor": "#D00000 "," position ":" top "," list ": [{" pagepath ":" pages / index / index "," text ":" draw an object "}, {" pagepath ":" pages / history / history "," text ":" my note "}]},3. On app JS to store the openId of the current user:
this.globalData = { openId: '' }Realize the user login function and openId record
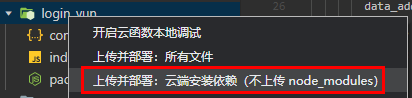
1. Right click the current environment folder and click new node JS cloud function and name the file login_yun.
2. Enter login_ Index. In the Yun directory JS file, in cloud Configure the environment in the init() function.
cloud.init( { // Env Parameter Description: / / the env parameter determines which cloud environment resources will be requested by default for the next cloud development call (wx.cloud.xxx) initiated by the applet. / / please fill in the environment ID here. You can open the cloud console to view the environment ID. / / if not, the default environment (the first created environment) will be used. / / env: 'my env ID', env: 'cloud1234567890XXXXXXX' })3. Operate openId in the cloud function entry function
exports.main = async (event, context) => {  const wxContext = cloud.getWXContext()
  const openId = md5(wxContext.OPENID)
  // Query whether there is data let user under this openid_ data = await db. collection("users_school"). where({    openId: openId  }). get()
  // If there is no such user, add openId to the database if (user_data. Data. Length = = = 0) {try {let data_add = await dB. Collection ("users_school"). Add ({data: {openId: openId}}) return {data_add, openId, status: 202 / / newly added data}} catch (E) {console. Error (E)} //If you have} else {return {user_data, status: 200 / / you already have a user}}
4. Then right-click login_yun folder, click upload and deploy: cloud installation dependency, that is, the preparation of cloud functions is completed.
5. The cloud function of the login function is called by loading index on the index page JS, and in the life cycle of onload.
const that = this if (wx.getUserProfile) { that.setData({ canIUseGetUserProfile: false, }) } wx.cloud.callFunction({ name: 'login_yun' // Call cloud function}) Then (result = > {console. Log (result) if (result. Result. Status = = = 200) {/ / saved in global globalData for subsequent use app. globalData. Openid = result. Result. User_data. Data [0]. Openid} else {app. globalData. Openid = result. Openid}})Write index front-end page
1. The rotation chart at the top can be directly realized by adding the label of "swiper" and "swiper item" provided by the applet.
<view class="swiper_view"> <swiper autoplay="true" interval="3000" duration="500" circular="true" class="swiper"> <swiper-item> <image mode="widthFix" src="../../images/_2.jpg"></image> </swiper-item> <swiper-item> <image mode="widthFix" src="../../images/_1.png"></image> </swiper-item> </swiper> <!-- scaleToFill --></view>
2. The middle box part is written with basic labels, pictures and CSS styles. Click put and extract, and a box for collecting information will pop up. Bind the click event with bindmap and display it in index JS to handle the corresponding events.
<view class="body_bottom"> <view class="body_bottom_put" bindtap="putBody">Put in a boy's note</view> <view class="body_bottom_out" bindtap="outBody">Draw a boy's note</view></view>
3. The black mask layer is completed with a view tag and CSS style. Click the corresponding cancelHide of the mask layer to hide the mask layer.
<view class="hide" wx:if="{{putBodyMask || outBodyMask || putGirlMask || outGirlMask || xuzhiMask || xieyiMask}}" bindtap="cancelHide"></view>CSS covers the whole screen, plus color and transparency.
/* mask */.hide { width: 100vw; height: 100vh; background-color: black; opacity: 0.5; position: fixed; top: 0vw; left: 0vh;}4. Male and female students put in and extract pop-up boxes, and picker is used to select different schools for classification.
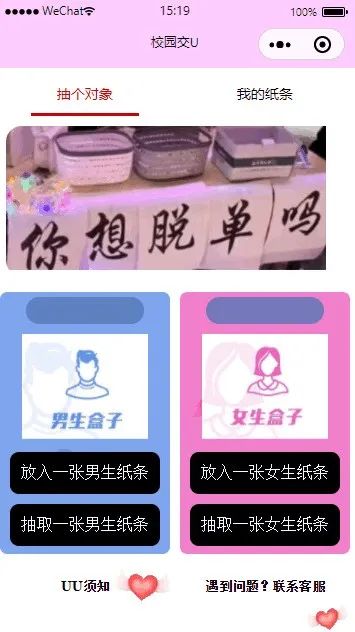
<picker bindchange="bindSchoolChangePut" value="{{indexBody4}}" range="{{arrayBody4}}" class="out_body_content_2_picker"> <view> - {{arrayBody4[indexBody4]}} - </view></picker>5. After refining the front page and style of index, the final effect is shown in the following figure:
Step 2: home page logic processing
Operation steps
1. Enter index JS page, in the life cycle of onload, call login_ The Yun cloud function implements the login operation
wx.cloud.callFunction({ name: 'login_yun' }).then(res => { console.log(res) if(res.result.status === 200){ app.globalData.openId = res.result.user_data.data[0].openId }else{ app.globalData.openId = res.result.openId } })2. In index JS page, add data to store the required data.
data: { // Mask layer flags putbodymask: false, putgirlmask: false, xuzhimask: true, / / extracted mask layers outbodymask: false, outgirlmask: false, / / dating declaration textareabody: '', textareagirl: '', / / QQ micro signal numberbody: '', numbergirl: '', / / SRC srclistbody: [] for uploading picture preview,
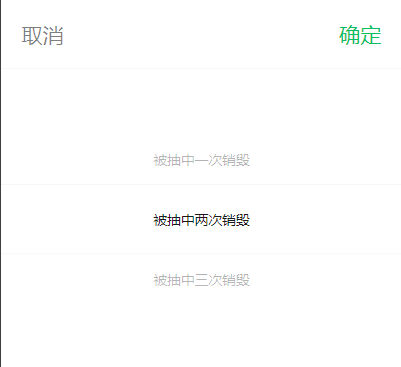
// School arrayBody4: ["Henan University of technology", "Jiaozuo University", "Jiaozuo normal school"], indexBody4: 0, / / the life of the note arrayBody2: ["destroyed once", "destroyed twice", "destroyed three times"], indexbody2: 0, arraybody3: ["Henan University of technology", "Jiaozuo University", "Jiaozuo normal school"], indexBody3: 0,
// School arrayGirl4: ["Henan University of technology", "Jiaozuo University", "Jiaozuo normal school"], indexGirl4: 0 / / the life of the note arrayGirl2: ["destroyed once", "destroyed twice", "destroyed three times"], indexgirl2: 0, arraygirl3: ["Henan University of technology", "Jiaozuo University", "Jiaozuo normal school"], indexGirl3: 0, //Add the plus sign of the picture addMask: true},3. The logic of school choice.
- bindchange="bindSchoolChangePut" in picker can trigger the event of school change through bindSchoolChangePut and select the corresponding school.
- e.detail.value to get the list index of schools bound in data.
// When putting in, the school selects bindschoolchangeput: function (E) {this. SetData ({indexbody4: parseInt (e.detail. Value)})}4. Click OK to put in, trigger the corresponding surePutBodyBtns event, and then judge, so as to limit the length of the declaration of making friends.
if(that.data.textareaBody.length < 20){ return wx.showToast({ title: 'The declaration of making friends is too short', icon: 'error', duration: 2000 }) }5. Regular matching of uploaded micro signals.
if(!(/^(((13[0-9]{1})|(15[0-9]{1})|(18[0-9]{1})|(17[0-9]{1}))+\d{8})$/).test(that.data.numberBody) && !(/^[a-zA-Z]([-_a-zA-Z0-9]{6,20})$/).test(that.data.numberBody)){ return wx.showToast({ title: 'Micro signal format error', icon: 'error', duration: 2000 }) }Wechat official wechat rules:
- 6-20 letters, numbers, underscores and minus signs can be used.
- Must start with a letter (letters are not case sensitive).
- Setting Chinese is not supported.
6. Realize the selection of local pictures, limit one upload at a time, and limit the size of pictures. cloudPath randomly configures the path stored in cloud storage.
// Select the local picture chooseimggirl: function() {const that = this Wx. Chooseimage ({count: 5, sizetype: ['original ','compressed'], sourcetype: ['album ','camera'], success (RES) {/ / tempfilepath can be used as the src attribute of img tag to display the picture if (res.tempfiles [0]. Size > 1200000) {return wx.showtoast( {Title: 'picture too large', Icon: 'error', duration: 2000})}
        const filePath = res.tempFilePaths[0]        let timeStamp = Date.parse(new Date());        const cloudPath = "image/" + timeStamp + filePath.match(/\.[^.]+?$/)[0]        that.pageData.filePath = filePath        that.pageData.cloudPath = cloudPath        that.setData({          srcListGirl: res.tempFilePaths        })      }    })
7. Click the life of the note, and the selection of the corresponding value corresponds to the database life field.
8. After clicking to confirm the insertion, the corresponding logic is to upload the picture first, and then upload the location, weChatId and other information to the body_ girl_ If you upload the Yun table successfully, you need to jump to the history page.
// api for uploading pictures. First upload pictures to cloud storage Wx cloud. UploadFile ({cloudpath, filepath, success: function (RES) {Wx. Hideloading () Wx. Showloading ({Title: 'information uploading', mask: true}) / / upload data dB after uploading the picture collection("body_girl_yun"). add({          data: {            location: that.data.indexGirl4,            weChatId: that.data.numberGirl,            picture: res.fileID,            life: parseInt(that.data.indexGirl2) + 1,            des: that.data.textareaGirl,            sex: 2,            openId: app.globalData.openId,            time: new Date().getTime()          }         }). then(result => {          wx.hideLoading()
          that.pageData = {            filePath: '',            cloudPath: ''          }          that.setData({            putGirlMask: false,            srcListGirl: [],            textareaGirl: '',            numberGirl: ''          })            // After uploading to wx.history page Switchtab ({URL: '/ pages / history / history', success: res = > {Wx. Showtoast ({Title: 'successfully put note', Icon: 'success'})},             fail: err => {              wx.showToast({                title: err,                icon: 'error'              })            }          })      }    })
9. Two click events at the bottom of the page: contact customer service and uu instructions. Contact customer service mainly at index Wxml is implemented through the open type = "concat" of the applet.
index.html
<!-- Notification at the bottom --><view class="bottom_view"> <button bindtap="xuzhi">UU Notice</button> <!-- <text class="heng">|</text> --> <button bindcontact="contact" open-type="contact">Problems? Contact customer service</button></view>
index.js
// Click Xuzhi: function() {this. SetData ({xuzhimask: true})}, / / contact customer service: function() {console. Log()}Step 3: realize the function of extracting notes
Operation steps
1. Random extraction can be found by using the "developer resources" provided by wechat open documents for random query extraction. The extraction condition is that "gender, school and life value must be greater than 0".
// Random sampling dB collection('body_girl_yun'). aggregate(). Match ({sex: 1, location: parseInt (that. Data. Indexbody3), life:. GT (0) / / health value should be greater than 0}) sample({ size: 1}). end()2. If you draw, you will be dealt with. If you cannot draw, you will be prompted to reduce your HP by 1.
// If there is no note of boys from this school in the database, it will be if (res.list. Length = = 0) {return Wx. Showtoast ({Title: 'no note of this school', Icon: 'error', mask: true})} / / if the note is extracted, the operation will be carried out. / / the health value is reduced by one, and the health value of 0 will not be extracted collection('body_girl_yun'). where({ _id: res.list[0]._id }). update({ data: { life: parseInt(res.list[0].life) - 1 } }). Then (resultupdate = > {Wx. Showtoast ({Title: 'extraction succeeded', Icon: 'success', mask: true})}) catch(err=>{ wx.showToast({ title: err, icon: 'error' }) })3. Write data to body_ girl_ yun_ In the put table.
// And add the data to the body_ girl_ yun_ put      db. collection('body_girl_yun_put'). add({        data: {          picture: res.list[0].picture,          des: res.list[0].des,          location: res.list[0].location,          sex: res.list[0].sex,          weChatId: res.list[0].weChatId,          openId: app.globalData.openId,          time: new Date().getTime()        }      }). then( resultAdd => {
      }).catch(err=>{        wx.showToast({          title: err,          icon: 'error'        })      })    })
4. If the data is saved successfully, you will jump to the page history.
wx.switchTab({          url: '/pages/history/history',          success: res=>{            wx.showToast({              title: 'Pull out the note successfully',              icon: 'success'            })          },          fail: err => {
          }        })        that.setData({          outBodyMask: false        })
5. Plus prompt box and loading effect, Wx showLoading, wx.hideLoading() and added some basic error handling.
// Confirm to extract a male note sureOutBodyBtn: function() {const} that = this Wx. Showloading ({Title: 'random extraction', mask: true}) / / random extraction dB collection('body_girl_yun'). aggregate(). Match ({sex: 1, location: parseInt (that. Data. Indexbody3), life:. GT (0) / / health value should be greater than 0}) sample({ size: 1}). end()    . Then (RES = > {Wx. Hideloading() / / if (res.list. Length = = 0) {return Wx. Showtoast ({Title: 'no note in this school', Icon: 'error', mask: true})}
      console.log(res)      // Life value is reduced by one, and those whose life value is 0 will not be drawn out dB collection('body_girl_yun'). where({        _id: res.list[0]._id      }). update({        data: {          life: parseInt(res.list[0].life) - 1        }      }). Then (resultupdate = > {Wx. Showtoast ({Title: 'extraction succeeded', Icon: 'success', mask: true})}) catch(err=>{        wx.showToast({          title: err,          icon: 'error'        })      })

      // And add the data to the body_ girl_ yun_ put      db. collection('body_girl_yun_put'). add({        data: {          picture: res.list[0].picture,          des: res.list[0].des,          location: res.list[0].location,          sex: res.list[0].sex,          weChatId: res.list[0].weChatId,          openId: app.globalData.openId,          time: new Date().getTime()        }      }). then( resultAdd => {
        wx.switchTab({          url: '/pages/history/history',          success: res=>{            wx.showToast({              title: 'Pull out the note successfully',              icon: 'success'            })          },          fail: err => {            wx.showToast({              title: err,              icon: 'error'            })          }        })
        // console.log("data add" resultadd) that setData({          outBodyMask: false        })      }). catch(err=>{        wx.showToast({          title: err,          icon: 'error'        })      })    })  }
Step 4: my note page design
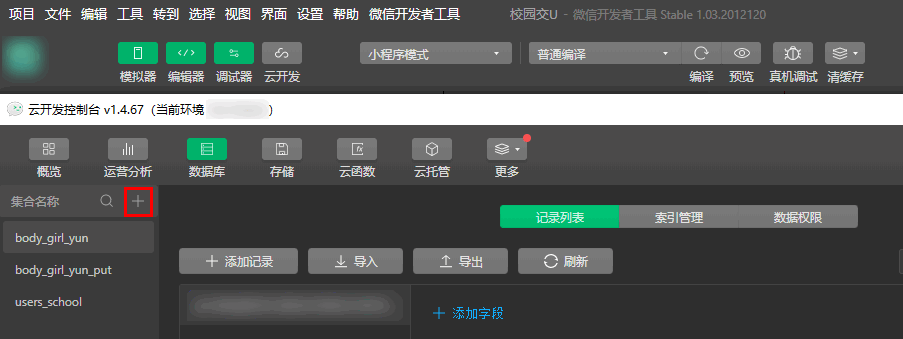
Page design of the note I put in
1. The "note I put in" and "note I pulled out" at the top switch class by changing the value of active.
<view class="top_title"> <text class="{{active === true ? 'on': ''}}" bindtap="inBtn">The note I put in</text> <text class="{{active === true ? '': 'on'}}" bindtap="outBtn">The note I drew</text></view>2. The front-end for loops out each data for display. dataList is the data found in the database, indicating wx:key.
<view class="put" wx:for="{{dataListPut}}" wx:key="_id" > <view class="putTop"> <view class="putTopImg"> <image src="{{item.picture}}"></image> </view> <view class="putTopDes"> <text>Declaration of making friends:</text>{{item.des}} </view> </view> </view>Data required for deletion_ ID, so you need to cooperate with JS to transfer parameters: Data id = "{item. _id}}".
<view class="putBottom"> <text>{{schoolList[item.location]}}</text> <text>{{item.sex == 1? 'male': 'female'}}</text> <text class="putBottomDelete" bindtap="deletePut" data-id="{{item._id}}">delete !</text></view>Through e.target dataset. ID: get the passed parameter.
deletePut: function(e){ const that = this const _id = e.target.dataset.id3. Realize the 3 lines of the declaration of making friends, and display them with ellipsis if they exceed.
.outTopDes_1{ height: 15vh; overflow: hidden; text-overflow: ellipsis; display: -webkit-box; -webkit-line-clamp: 3; -webkit-box-orient: vertical; word-break: break-all;}4. The front-end judges whether there is data. If there is no data, it displays "empty".
<view class="kong" wx:if="{{active === true? true: false}}" hidden="{{dataListPut.length == 0 ? false: true}}">absolutely empty</view><view class="kong" wx:else hidden="{{dataListOut.length == 0 ? false: true}}">absolutely empty</view>The page design of the note I drew
1. Basically the same as the "note I put in" page. The display position of micro signal is increased, and the number of lines of friendship declaration is reduced by one line. Centered display of micro signal:
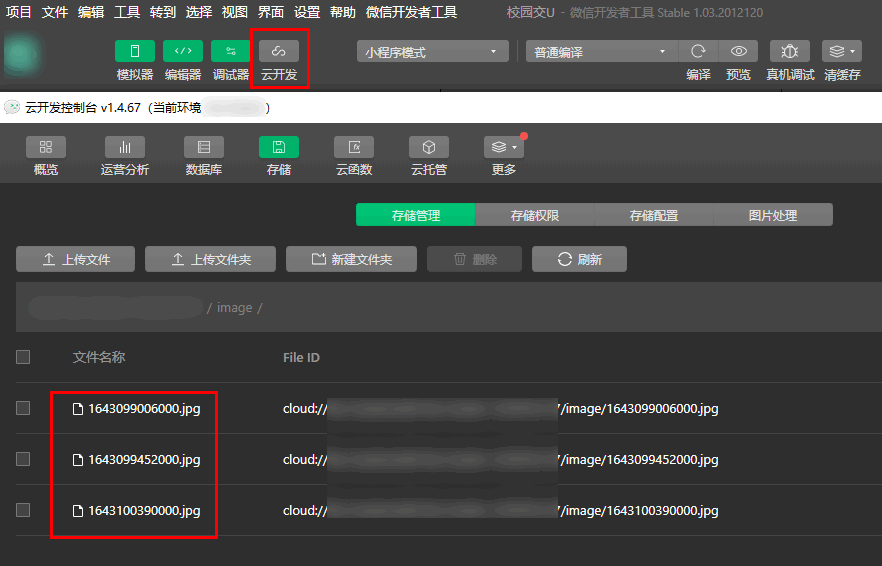
.outTopDes_2{ color: rgb(62, 88, 238); text-align: center; font-size: 35rpx;}2. The pictures uploaded by users can be obtained in the cloud development console > storage > storage management page.
Step 5: logical processing of my note page
Operation steps
1. data design.
active: true, // Used to change the currently selected style, dataListPut: [], / / used to save the data of the put page, datalistout: [], schoollist: ["Henan Normal University", "Jiaozuo Normal University"]
2. onload life cycle design.
- Because this page does not have the function of obtaining the openId of the user, you need to judge whether the openId of the user has been obtained. If not, skip to the index page to get openId and prompt the corresponding error.
if(app.globalData.openId == ''){ wx.switchTab({ url: '/pages/index/index', success: res => { }, fail: err => { wx.showToast({ title: err, icon: 'error' }) } }) }- Call the data function that requests "the note I put in".
that.getPutData()
3. Open the document through the applet to provide the query method, use the user's openId to obtain the data, and use that SetData is sent to dataListPut for page rendering.
Query method | effect |
|---|---|
limit | To limit the number of pieces of data obtained |
orderBy | Data sorting |
// Get data put getputdata: function (E) {const that = this dB. Collection ('body_girl_yun '). Where ({openid: app. GlobalData. Openid}) limit(10). orderBy('time', 'desc'). get(). then(res => { console.log(res) if(res.data.length == 0){ that.setData({ dataListPut: res.data }) return wx. Showtoast ({Title: 'no data', Icon: 'none'})} that setData({ dataListPut: res.data }) }). Catch (ERR = > {Wx. Showtoast ({Title: 'failed to load data', icon: 'error'})})},4. Logical implementation of deleting note.
- Implement deletion prompt.
wx.showModal({         title: 'Tips',         // content: 'are you sure to delete the note', content: 'after deletion, the friendship hall will not be visible, are you sure', success (res) {
})- If the user confirms the deletion, use remove to send it through the front end_ id, corresponding to the only data, is deleted, including basic error handling. Otherwise, you will be prompted to cancel the deletion.
if (res.confirm) { db.collection("body_girl_yun").where({ _id: _id }).remove().then(res => { wx.hideLoading() if(res.errMsg == 'collection.remove:ok'){ that.getPutData() }else{ wx.showToast({ title: 'Delete failed', icon: 'error', mask: true }) } }).catch( console.error )} else if (res.cancel) { wx.showToast({ title: 'Delete cancel', icon: 'error', mask: true })}}5. Carry out paging query and load data by clicking the bottom.
- Trigger the event through onReachBottom.
/** * Handler for bottom pull event on page */ onReachBottom: function () { if(this.data.active==true){ this.getPutDataBottom() }else{ this.getOutDataBottom() } },- Through {skip (pagePut * 10) Use the pagePut parameter in limit (10) to record the number of pages.
- Splice the old and new data through concat and update it to the page.
// Event getputdatabottom: function() {const that = this let pageput = that.data.pageput + 1
    db.collection('body_girl_yun').where({        openId: app.globalData.openId    }).skip(pagePut * 10).limit(10).orderBy('time', 'desc').get().then(res => {        console.log(res)        wx.hideLoading()        // If there is still data if (res.data. Length > 0) {/ / splice the data through concat let all_data = that.data.datalistput.concat (res.data) that.setdata ({datalistput: all_data, pageput: pageput})} else {Wx. Hideloading () wx.showtoast( {Title: 'no more data', icon: 'none'})}
    })},
6. Pull down to refresh data.
- You need to start with the app The drop-down refresh function enablePullDownRefresh is configured in the JSON file.
"window": { "backgroundColor": "#FFCCFF", "backgroundTextStyle": "light", "navigationBarBackgroundColor": "#Ffccff "," navigationbartitletext ":" campus handover U "," navigationbartextstyle ":" black "," enablepulldownrefresh ": true},- The user onPullDownRefresh drops down the function that triggers the request data to retrieve the data.
/** * Page related event handling function -- listening to user drop-down actions */ onPullDownRefresh: function () { if(this.data.active == true){ this.getPutData("pull") }else{ this.getOutData("pull") } },Step 6: Supplement details
Operation steps
1. Add the showLoading effect of deleting the note.
wx.showLoading({ title: 'Deleting', mask: true})There are also showLoading for obtaining put data.
2. Add the showModal prompt.
wx.showModal({      title: 'Tips',      content: 'Confirm delete note?',      success (res) {
      })
So far, all functions of the applet have been realized. See the} sample code for more details.
Example code:
https://gitee.com/hhh3167253066/school_friends
- End -