brief introduction
In our daily use, some smart devices support access to HomeKit, that is, users can access and control the device through the "home" of Apple mobile phone. However, this operation has obvious limitations. Android phones cannot be used and cannot be linked with devices that do not support access to HomeKit. For example, use iPhone to remotely switch the lights in your home;
Take Home Assistant for example. It is an open source smart home system based on Python, which can support access to many brands of smart devices. However, to a certain extent, it also has advantages and disadvantages: on the one hand, it has centralized management; On the other hand, the disadvantage is that it can only be accessed in the local area network and cannot be remotely controlled through the external network;
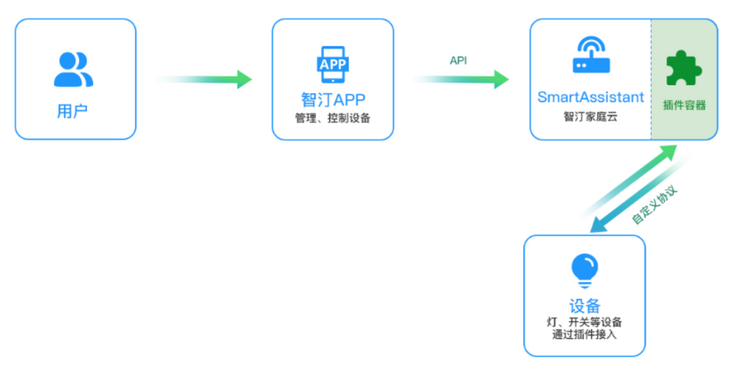
Here, many people do not know that the first comprehensive open source protocol in China that adopts the software characteristics of smart home manufacturers. It is a rising rookie by virtue of its ability to run offline in the LAN and obtain more powerful functions by binding to zhiting cloud. When running in the LAN environment, users can discover and manage zhiting home cloud through zhiting APP and install plug-ins to manage and control the devices.
Secondly, through the zhiting cloud account, associate the zhiting family cloud device to the cloud, and then support the control of the device on the external network through the cloud transfer.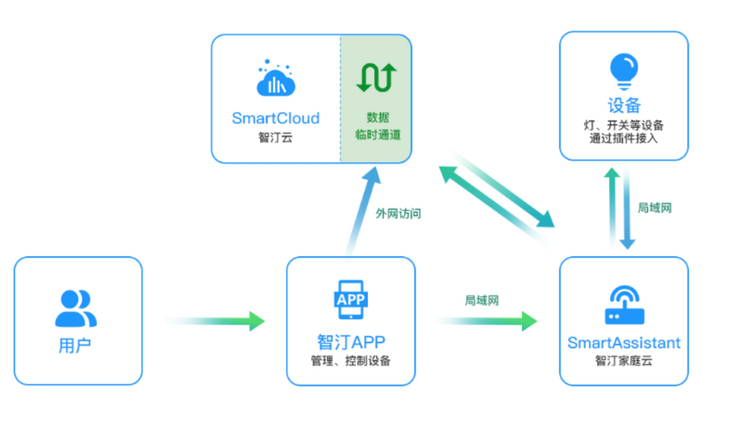
At the same time, it provides the function of direct access to cloud virtual home, which is convenient for users of wuzhiting family cloud devices; Zhiting cloud also provides an interface for virtual home data migration to physical home.

For families connected to the cloud, zhiting cloud provides cloud to cloud access. Users can authorize smart speakers such as Xiaodu, tmall elf and Google Nest to directly control the device.

2, Install third-party plug-ins
Zhiting home cloud runs on a Linux host and uses Docker to deploy and isolate its services. Some of the core service containers need to be pre configured and run automatically with the system startup; The plug-in service is managed by SA calling docker API.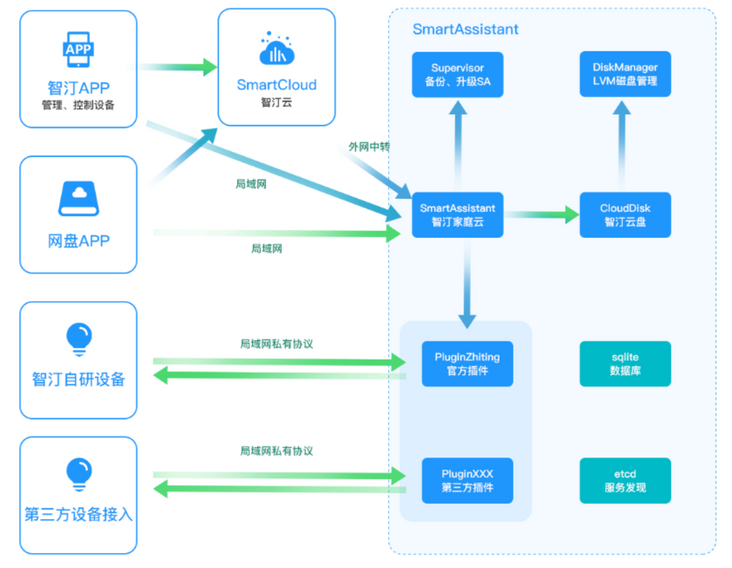
After the plug-in is started, it will run a gRPC service and an optional HTTP service. SA monitors the running status of the plug-in through the docker API and obtains the plug-in information through the gRPC interface. The sample plug-ins implemented in the plug-in implementation tutorial; Reference: golang zhiting technology development document
Development example
1. Image compilation and deployment
For the time being, only plug-ins can be installed in the image mode. After debugging is normal, they are compiled into an image and provided to SA
- Dockerfile example reference
FROM golang:1.16-alpine as builder
RUN apk add build-base
COPY . /app
WORKDIR /app
RUN go env -w GOPROXY="goproxy.cn,direct"
RUN go build -ldflags="-w -s" -o demo-plugin

FROM alpine
WORKDIR /app
COPY --from=builder /app/demo-plugin /app/demo-plugin

# static file
COPY ./html ./html
ENTRYPOINT ["/app/demo-plugin"]
- Compile image
docker build -f your_plugin_Dockerfile -t your_plugin_name
- Run plug-in
docker run -net=host your_plugin_name
//Note: the - net=host parameter is only useful in linux environments.
Compared with HomeBridge: it is a dynamic plug-in. Its main function is to enable homekit to recognize that the device accessed by Home Assistant is equivalent to a bridge.
The installation of homebridge requires npm. It's a little troublesome to install npm under raspberry pie. I won't describe it in detail here. After npm is installed, just enter the following statements in order to install homebridge and its related dependent packages.
sudo npm install -g --unsafe-perm homebridge hap-nodejs node-gyp
cd /usr/local/lib/node_modules/homebridge/
sudo npm install --unsafe-perm bignum
cd /usr/local/lib/node_modules/hap-nodejs/node_modules/mdns
sudo node-gyp BUILDTYPE=Release rebuild
Next, you can install homebridge mqtt.
npm install -g homebridge-mqtt
In raspberry pie, the configuration of homebridge is mainly to edit the "config.json" file under "/ home/pi/.homebridge". The following is an example of the homebridge mqtt configuration.
{
"bridge": {
"name": "Homebridge",
"username": "12:34:56:78:90:AB",
"port": 38960,
"pin": "123-45-678"
},
    "platforms": [{
 "platform": "mqtt",
    "name": "mqtt",
    "url": "mqtt://127.0.0.1",
    "port": 61613,
    "topic_type": "multiple",
    "topic_prefix": "homebridge",
    "username": "admin",
    "password": "password",
    "cert": "/path/to/certificate.pem",
    "key": "path/to/key.pem",
    "ca": "/path/to/ca_certificate.pem"
}]