Introduction to project background and competition questions
Satellites are widely used and many industries rely on them every day. We usually classify the orbit of artificial earth satellites into low orbit (200 km ~ 2000 km), medium orbit (2000 km ~ 20000 km) and high orbit (more than 20000 km) according to the altitude.
The geostationary orbit belongs to a high orbit, which forms an angle of 0 degrees with the equatorial plane. The geostationary orbit satellite runs in the same direction as the earth's rotation, and its operation cycle is synchronous with the earth. It remains relatively stationary with us on the earth. On it, there are large communication satellites of many countries. The limited geostationary orbit resources are precious. Therefore, in order to prevent the running satellites from possible collision, timely detection, tracking, early warning and cataloging of unknown space targets such as space debris and natural celestial bodies in the running space is an important work for the "space guard" to ensure the normal and healthy satellite activities.

The project is based on the SpotGEO Challenge competition for target detection in geostationary orbit and nearby held by ESA and the University of Adelaide in 2020 to realize the "space guard" - space target detection system, so as to detect weak space targets in images collected by low-cost telescopes, including space debris, non cooperative aircraft, etc.
Project link: https://aistudio.baidu.com/aistudio/projectdetail/2285947?shared=1
Data set introduction
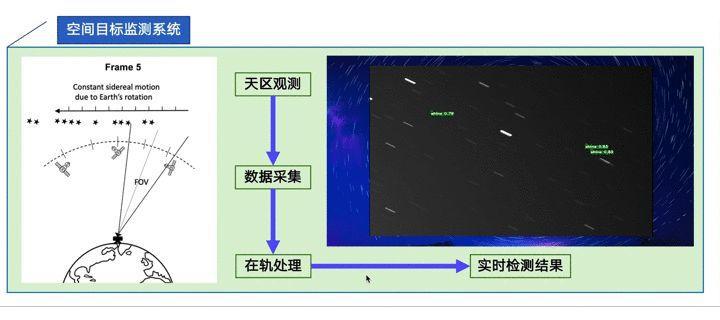
At present, the international system for space target detection and recognition generally includes two parts: ground-based system and space-based system. The observation equipment includes Sky Survey Telescope, CCD camera and so on. The data set provided in this competition was taken at night by a low-cost CMOS camera mounted on a ground-based telescope. The exposure time of the camera is 40s, and five consecutive frames are taken as a sequence.

Schematic diagram of data acquisition of ground-based telescope
During the exposure time of the camera, the background stars other than the targets or celestial bodies near the geostationary orbit have relative velocities with the earth, so the background stars in the picture are striped. While GEO targets remain relatively stationary, most of them appear in the form of spots or short stripes in the image. In the process of frame sequence shooting, the telescope where the camera is located rotates at a uniform speed, so the motion trajectory of the space target is a straight line.
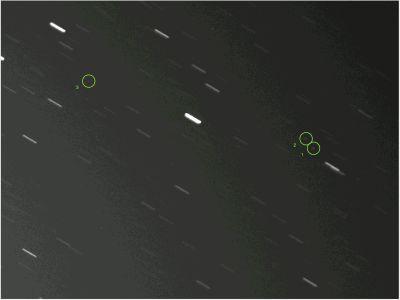
Dataset example
This is the structure of the data set provided by the competition. The same level directory of the decompressed data set includes two folders of train and test and two corresponding annotation files. The training set and test set respectively contain several sequences and two-level directories composed of frame images of the sequence. The picture format is PNG format and the size is 640x480. The total number of pictures in the whole data set is 32000, of which the training set contains 1280 sequences 6400 and the test set contains 5120 sequences 25600.
Annotation file format: the annotation of each image includes four groups of values: frame sequence number, frame image sequence number, target quantity and corresponding position coordinates (x,y).
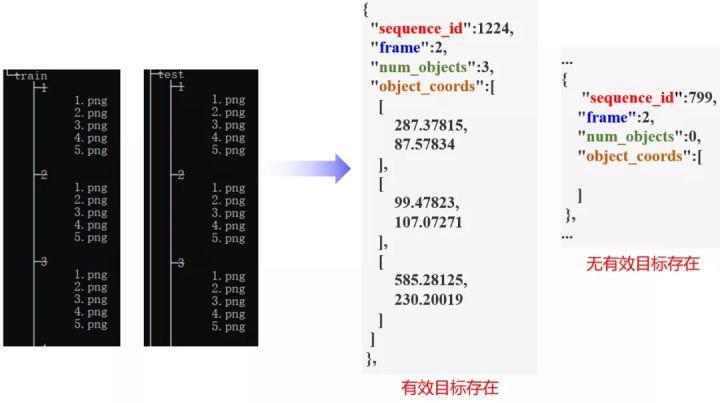
Sample data set composition
Target characteristics
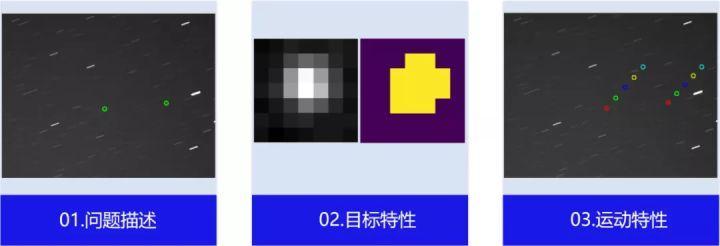
We further concretize the problem to be solved, which can be summarized as small target detection in sequential images under the background of starry sky.
Target characteristics: in the image, most of the targets we focus on appear in the form of spots or short stripes in the image, rather than completely in the form of point targets. The overall brightness of the target is also dark, which is due to the pixel dispersion phenomenon caused by long exposure time, atmospheric distortion, sensor defects and other reasons. In addition, the difficulty of the problem is also increased due to various conditions such as cloud cover, atmospheric / weather influence, light pollution, star occlusion (the background star happens to cross the position of the orbital object). There will be some problems in the data set, such as abnormally highlighted pseudo targets, or the target objects only appear in a few frames of the five frame images in the sequence.
Target motion characteristics: we use the annotation information to match the target position of 5 frames of images in a sequence in one image, showing an obvious uniform linear motion trajectory.
Problem analysis
Problem transformation
Combined with the characteristics of the target, we regard the location of the annotation point in the data set as the center of the bbox marking box, and take the width of the center point as 3 pixels to get the target annotation box. The coordinates of the upper left corner and the lower right corner are calculated according to the length width offset, which transforms the problem into the target detection problem with the number of categories of 2.
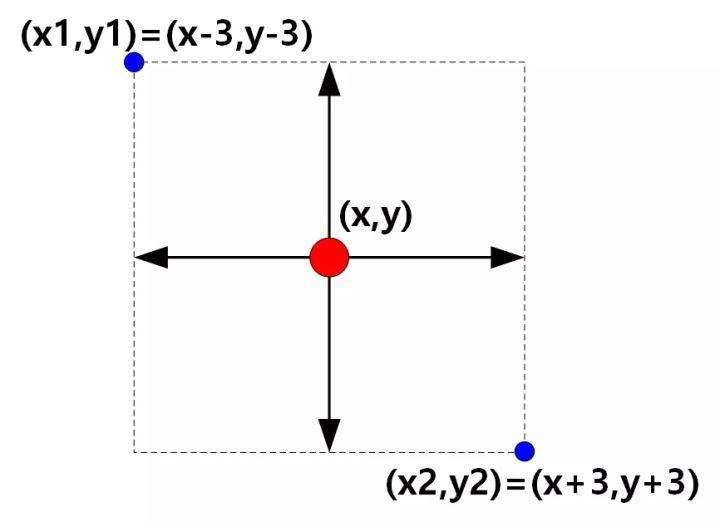
Annotation diagram
Overall development process
The whole process development tool PaddleX is used in this project. The whole project mainly includes three parts: data preprocessing, model training and export and model deployment:
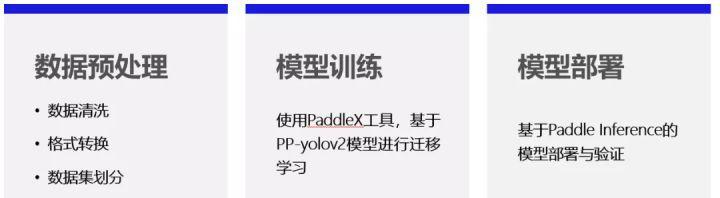
Development process
The work of data preprocessing mainly includes:
1. Data cleaning
Firstly, the frame sequence without any target is deleted;
#Data cleaning
import json

def read_annotation_file(path):
    annotation_list = json.load(open(path))
    # Transform list of annotations into dictionary
    annotation_dict = {}
    for annotation in annotation_list:
        sequence_id = annotation['sequence_id']
        if sequence_id not in annotation_dict:
            annotation_dict[sequence_id] = {}
        annotation_dict[sequence_id][annotation['frame']] = annotation['object_coords']   #just pull out the object_coords
    return annotation_dict

anopath = 'work/train_anno.json'
train_annotation= read_annotation_file(anopath)
ori_seq = len(train_annotation)
print('\n Number of original sequences:', ori_seq)

#According to num_ Delete invalid training sequence in the objects field
for i in range(1, ori_seq):
    if len(train_annotation[i][1]) == 0:
        del train_annotation[i]

# train_annotation is data numpy
real_seq = len(train_annotation)
print('\n Number of valid sequences:', real_seq)
2. Data set annotation format conversion
In order to facilitate the use of PaddleX data interface, the original annotation file is re converted to VOC format
from pycocotools.coco import COCO
import os, cv2, shutil
from lxml import etree, objectify
from tqdm import tqdm
from PIL import Image

CKimg_dir = './SpotGEOvoc/VOCImages'
CKanno_dir = './SpotGEOvoc/VOCAnnotations'

def catid2name(coco):  # Build a dictionary of names and id numbers
    classes = dict()
    for cat in coco.dataset['categories']:
        classes[cat['id']] = cat['name']
        # print(str(cat['id'])+":"+cat['name'])
    return classes

def get_CK5(origin_anno_dir, origin_image_dir, verbose=False):
    dataTypes = ['train']
    for dataType in dataTypes:
        annFile = '{}_anno.json'.format(dataType)
        annpath = os.path.join(origin_anno_dir, annFile)
        print(annpath)
        coco = COCO(annpath)
        classes = catid2name(coco)
        imgIds = coco.getImgIds()
        # imgIds=imgIds[0:1000]#For testing, take 10 pictures and see the storage effect
        for imgId in tqdm(imgIds):
            img = coco.loadImgs(imgId)[0]
            showbycv(coco, dataType, img, classes, origin_image_dir, verbose=False)

def main():
    base_dir = './SpotGEOvoc'  # step1 here is a new folder to store the converted pictures and labels
    image_dir = os.path.join(base_dir, 'VOCImages')  # Generate two subfolders images and annotations in the above folder
    anno_dir = os.path.join(base_dir, 'VOCAnnotations')
    mkr(image_dir)
    mkr(anno_dir )
    origin_image_dir = './SpotGEOv2'  # step 2 original coco image storage location
    origin_anno_dir = './SpotGEOv2'  # step 3 marked storage location of original coco
    verbose = True  # Check whether the switch mark is correct. If it is true, the mark will be displayed on the picture
    get_CK5(origin_anno_dir, origin_image_dir, verbose)
3. Divide the original training data into training set and verification set
!paddlex --split_dataset --format VOC --dataset_dir MyDataset --val_value 0.2 --test_value 0
For model selection and development: because the project is ultimately end-to-end deployment, a lightweight and efficient detection model is the first choice. Here I use the flying propeller characteristic model PP-YOLOv2, which is optimized, upgraded and upgraded by the Baidu PaddlePaddle team based on the PP-YOLO model. The network structure is shown in the following figure. The Baseline Model is pp-yolo, and the backbone network is resnet50 VD. The combined added optimization components include 10 Tricks, such as Deformable Conv, SSLD, CoordConv, DropBlock, SPP, large batch size, EMA, IoU Loss, IoU Aware, Grid Sensitive, etc.

The model training subject only needs these codes, configure the data set format and path, and then modify num_ The classes parameter. The number of categories is the number of categories excluding background classes, that is, the total number of categories is - 1. Adjust and set a series of training parameters, and then start model training.
num_classes = 1
model = pdx.det.PPYOLOv2(num_classes=num_classes, backbone='ResNet50_vd_dcn')

model.train(
    num_epochs=3600,
    train_dataset=train_dataset,
    train_batch_size=4,
    eval_dataset=eval_dataset,
    learning_rate=0.001 / 8,
    warmup_steps=1000,
    warmup_start_lr=0.0,
    save_interval_epochs=36,
    lr_decay_epochs=[216, 243],
    save_dir='output/PPyolov2_r50vd_dcn')
Then wait for the model training and evaluation results before exporting and deploying the model.
!paddlex --export_inference --model_dir=/home/aistudio/output/PPyolov2_r50vd_dcn/best_model --save_dir=/home/aistudio/inference
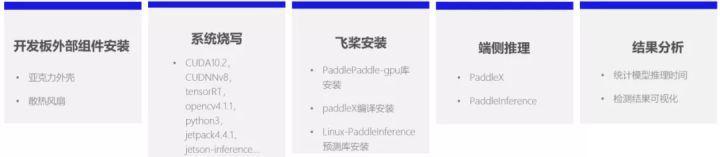
Finally, this project implements a set of practical demonstration system based on Nvidia Jetson Nano platform.

The whole process from preliminary preparation to reasoning program verification mainly includes the following parts.

In the software part, the end-to-end reasoning program is mainly composed of the following three parts. I have to praise the API again for its fragrance!

The specific reasoning code is as follows:
## python deployment process
import glob
import numpy as np
import threading
import time
import random
import os
import base64
import cv2
import json
import paddlex as pdx

os.environ['CUDA_VISIBLE_DEVICES']='0'
predictor = pdx.deploy.Predictor(model_dir='./infer', use_gpu=True, gpu_id=0, use_trt=True)

def get_images(image_path, support_ext=".jpg|.jpeg|.png"):
    if not os.path.exists(image_path):
        raise Exception(f"Image path {image_path} invalid")

    if os.path.isfile(image_path):
        return [image_path]

    imgs = []
    for item in os.listdir(image_path):
        ext = os.path.splitext(item)[1][1:].strip().lower()
        if (len(ext) > 0 and ext in support_ext):
            item_path = os.path.join(image_path, item)
            imgs.append(item_path)
    return imgs

def crest_dir_not_exist(path):
    if not  os.path.exists(path):
        os.mkdir(path)

def run(img_path,img_name,save_path):
    result = predictor.predict(img_file=img_name, warmup_iters=100, repeats=100)
    time2= time.time()
    pdx.det.visualize(img_name, result, threshold=0.5, save_dir=save_path)
    time3 = time.time()
    print("Visual Time: {}s".format(time3-time2))

if __name__ == "__main__":
    test_path = 'visual/'
    save_path = 'output/visual/'

    crest_dir_not_exist(save_path)

    L = get_images(test_path)
    N = len(L)
    print(N)
    for i in range(N):
        print(L[i])
        run(test_path, L[i],save_path)
The actual result demonstration dynamic diagram is shown below.
The above is my share. Interested partners can click the project link below to exchange and learn together.