preface
As we all know, Java development is jokingly called spring development by the old oil subroutine apes, which shows the position of spring in Java development. If there is no spring framework, the code written by most people will be a shit.
Spring MVC is a very important module among the seven modules of spring.
MVC framework is a full-featured MVC implementation of building Web applications. Through the policy interface, MVC framework becomes highly configurable
Friends who are interested in the other six modules of the Spring framework can directly click to get the information I sorted out Complete Spring learning notes , there are a lot of source code analysis and project practice, which can be exchanged together.
MVC Design Overview
In the early development of Java Web, the operations of display layer, control layer and data layer were all handed over to JSP or JavaBean for processing. We call it model 1:

- Disadvantages:
- JSP and Java Bean are seriously coupled, and Java code and HTML code are also coupled together
- Developers are required not only to master Java, but also to have a superb front-end level
- The front end and the back end depend on each other. The front end needs to wait for the back end to complete, and the back end also depends on the front end to complete, so as to carry out effective testing
- Code is difficult to reuse
Because of the above disadvantages, this method was soon replaced by Servlet + JSP + Java Bean. The early MVC Model * * (Model2) * * is like the following figure:
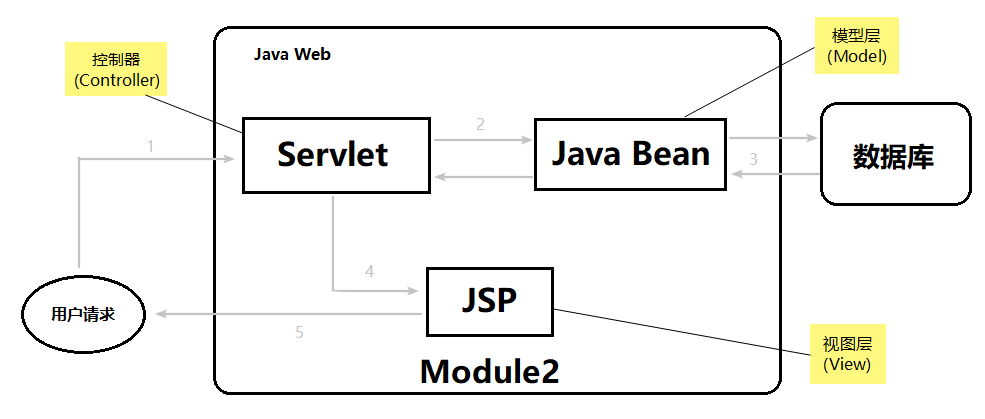
First, the user's request will arrive at the Servlet, then call the corresponding Java Bean according to the request, and hand over all the display results to the JSP to complete. This mode is called MVC mode.
- M stands for Model
What is the model? Models are data, Dao and bean - V stands for View
What is the view? Is a web page, JSP, used to display the data in the model - C stands for controller
What is the controller? The function of controller is to display different data (models) on different views. Servlet plays such a role.
Spring MVC architecture
In order to solve the programming of database transactions that have not been handled well in the persistence layer, and to meet the strong rise of NoSQL, Spring MVC gives a scheme:

**The traditional model layer is divided into business layer (Service) and data access layer (DAO,Data Access Object)** Under Service, we can operate the data access layer through Spring's declarative transaction, and on the business layer, we are also allowed to access NoSQL, which can meet the use of NoSQL, which can greatly improve the performance of the Internet system.
- characteristic:
The structure is loose, and almost all kinds of views can be used in Spring MVC
Loose coupling, separate modules
Seamless integration with Spring
Hello Spring MVC
Let's write our first Spring MVC program:
Step 1: create a new Spring MVC project in IDEA

It is called hellosppring MVC, and click Finish:

IDEA will automatically help us download the necessary jar packages and create some default directories and files for us. After creation, the project structure is as follows:

Step 2: modify the web xml
We open the web XML, complete the modification according to the following figure:

Change the value of < URL pattern > element to /, which means that all requests should be intercepted and handed over to the background controller of Spring MVC for processing. After changing:
<servlet-mapping>
    <servlet-name>dispatcher</servlet-name>
    <url-pattern>/</url-pattern>
</servlet-mapping>
Step 3: edit dispatcher servlet xml
The beginning of the file name dispatcher is the same as the above web The < servlet name > element in XML corresponds to the dispatcher configured. This is the mapping configuration file of Spring MVC (XXX servlet. XML). We edit it as follows:
<?xml version="1.0" encoding="UTF-8"?>
<beans xmlns="http://www.springframework.org/schema/beans"
      xmlns:xsi="http://www.w3.org/2001/XMLSchema-instance"
      xsi:schemaLocation="http://www.springframework.org/schema/beans http://www.springframework.org/schema/beans/spring-beans.xsd">

   <bean id="simpleUrlHandlerMapping"
         class="org.springframework.web.servlet.handler.SimpleUrlHandlerMapping">
       <property name="mappings">
           <props>
               <!-- /hello Path request to id by helloController Controller processing-->
               <prop key="/hello">helloController</prop>
           </props>
       </property>
   </bean>
   <bean id="helloController" class="controller.HelloController"></bean>
</beans>
Step 4: write HelloController
Create the HelloController class under Package controller and implement org springframework. web. servlet. mvc. Controller interface:
package controller;

import org.springframework.web.servlet.ModelAndView;
import org.springframework.web.servlet.mvc.Controller;

public class HelloController implements Controller{
   @Override
   public ModelAndView handleRequest(javax.servlet.http.HttpServletRequest httpServletRequest, javax.servlet.http.HttpServletResponse httpServletResponse) throws Exception {
   	return null;
   }
}
- There is a problem: javax Servlet package not found
- Solution: put the servlet API in the [lib] folder under the directory of the local Tomcat server Copy the jar package to the [lib] folder of the project and add dependencies
Spring MVC combines models and views through ModelAndView objects
ModelAndView mav = new ModelAndView("index.jsp");
mav.addObject("message", "Hello Spring MVC");
The view here is index jsp
The message of the model data is "Hello Spring MVC"
package controller;

import org.springframework.web.servlet.ModelAndView;
import org.springframework.web.servlet.mvc.Controller;

public class HelloController implements Controller {

   public ModelAndView handleRequest(javax.servlet.http.HttpServletRequest httpServletRequest, javax.servlet.http.HttpServletResponse httpServletResponse) throws Exception {
   	ModelAndView mav = new ModelAndView("index.jsp");
   	mav.addObject("message", "Hello Spring MVC");
   	return mav;
   }
}
Step 5: prepare the index jsp
Index The content of the JSP is modified to:
<%@ page language="java" contentType="text/html; charset=UTF-8"
   pageEncoding="UTF-8" isELIgnored="false"%>

<h1>${message}</h1>
The content is very simple. El expression is used to display the content of message.
Step 6: deploy Tomcat and related environments
Find [Edit Configurations] under [Run]

To configure the Tomcat environment:

Select the local Tomcat server and change its name:

Under the Deployment tab, complete the following operations:

Just click OK. Let's click the triangle in the upper right corner to run the Tomcat server.
- Problem: Tomcat server cannot start normally
- Reason: Tomcat server cannot find the relevant jar package
- Solution: cut and paste the whole [lib] folder under [WEB-INF] and re-establish the dependency:

Step 7: restart the server
Restart the server and enter the address: localhost/hello

Click to receive Complete Spring learning notes
Track Spring MVC requests
Every time a user clicks a link or submits a form in the Web browser, the request starts to work. Like a postman, it will go through many sites from leaving the browser to getting the response back. Each site will leave some information and bring other information. The following figure shows the request process of Spring MVC:
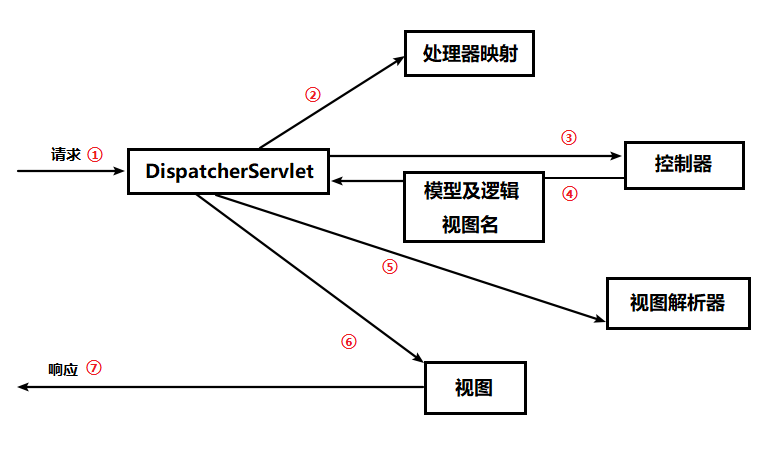
First stop: dispatcher Servlet
After the request leaves the browser, the first stop is the dispatcher Servlet. According to the name, this is a Servlet. Through J2EE learning, we know that the Servlet can intercept and process HTTP requests. The dispatcher Servlet will intercept all requests and send these requests to the Spring MVC controller.
<servlet>
   <servlet-name>dispatcher</servlet-name>
   <servlet-class>org.springframework.web.servlet.DispatcherServlet</servlet-class>
   <load-on-startup>1</load-on-startup>
</servlet>
<servlet-mapping>
   <servlet-name>dispatcher</servlet-name>
   <!-- Block all requests -->
   <url-pattern>/</url-pattern>
</servlet-mapping>
- The task of the dispatcher servlet is to intercept requests sent to the Spring MVC controller.
Second station: handler mapping
- **Question: * * there may be multiple controllers in a typical application. Which controller should these requests be sent to?
Therefore, DispatcherServlet will query one or more processor mappings to determine where the next station of the request is. The processor mapping will make decisions according to the URL information carried by the request. For example, in the above example, we configure simpleurhandlermapping to give the / hello address to helloController for processing:
<bean id="simpleUrlHandlerMapping"
     class="org.springframework.web.servlet.handler.SimpleUrlHandlerMapping">
   <property name="mappings">
       <props>
           <!-- /hello Path request to id by helloController Controller processing-->
           <prop key="/hello">helloController</prop>
       </props>
   </property>
</bean>
<bean id="helloController" class="controller.HelloController"></bean>
Third station: controller
Once the appropriate controller is selected, the dispatcher servlet will send the request to the selected controller. When the controller arrives, the request will unload its load (the request submitted by the user) and wait for the controller to process these information:
public ModelAndView handleRequest(javax.servlet.http.HttpServletRequest httpServletRequest, javax.servlet.http.HttpServletResponse httpServletResponse) throws Exception {
   // processing logic
   ....
}
Station 4: return to DispatcherServlet
When the controller completes the logic processing, it usually generates some information, which is the information that needs to be returned to the user and displayed on the browser. They are called models. It's not enough to just return the original information - this information needs to be formatted in a user-friendly way, usually HTML, so the information needs to be sent to a view, usually JSP.
The last thing the controller does is package the model data and represent the view name * * (logical view name) for rendering output. It is then sent back with the model name and the view name**
public ModelAndView handleRequest(javax.servlet.http.HttpServletRequest httpServletRequest, javax.servlet.http.HttpServletResponse httpServletResponse) throws Exception {
   // processing logic
   ....
   // Return to DispatcherServlet
   return mav;
}
Fifth stop: View parser
In this way, the controller will not be coupled with a specific view, and the view name passed to the dispatcher servlet does not directly represent a specific JSP. (in fact, it can't even determine that the view is JSP) instead, it passes only a logical name that will be used to find the real view that produces the result.
The dispatcher servlet will use the view resolver to match the logical view name to a specific view implementation, which may or may not be a JSP
The above example is directly bound to index JSP view
Sixth stop: View
Now that the dispatcher servlet knows which view renders the result, the requested task is basically completed.
Its last stop is the implementation of the view, where it delivers the model data and the requested task is completed. The view uses the model data to render the result, which will be passed to the client through the response object.
<%@ page language="java" contentType="text/html; charset=UTF-8"
        pageEncoding="UTF-8" isELIgnored="false"%>

<h1>${message}</h1>
Configuring Spring MVC with annotations
Above, we have a certain understanding of Spring MVC and created the first Spring MVC program through XML configuration. Let's see how to complete the configuration of the above program based on annotation:
Step 1: add annotation for HelloController
package controller;

import org.springframework.web.bind.annotation.RequestMapping;
import org.springframework.web.servlet.ModelAndView;

@Controller
public class HelloController{

   @RequestMapping("/hello")
   public ModelAndView handleRequest(javax.servlet.http.HttpServletRequest httpServletRequest, javax.servlet.http.HttpServletResponse httpServletResponse) throws Exception {
   	ModelAndView mav = new ModelAndView("index.jsp");
   	mav.addObject("message", "Hello Spring MVC");
   	return mav;
   }
}
Remove the implemented interface.
- Briefly explain:
- @Controller comments:
Obviously, this annotation is used to declare the controller, but in fact, this annotation has little impact on Spring MVC itself. (Spring actually said that it is only used to assist in component scanning, which can be replaced by @ Component annotation, but I tried it myself, but it didn't work, because the above example didn't configure JSP view parser, and I configured one myself, which still didn't succeed...) - @RequestMapping annotation:
Obviously, this means that the path / hello will be mapped to this method
Step 2: cancel the previous XML comment
In dispatcher servlet In the XML file, comment out the previous configuration, and then add a component scan:
<?xml version="1.0" encoding="UTF-8"?>
<beans xmlns="http://www.springframework.org/schema/beans"
xmlns:xsi="http://www.w3.org/2001/XMLSchema-instance"
xmlns:context="http://www.springframework.org/schema/context"
xsi:schemaLocation="http://www.springframework.org/schema/beans http://www.springframework.org/schema/beans/spring-beans.xsd http://www.springframework.org/schema/context http://www.springframework.org/schema/context/spring-context.xsd">
<!--<bean id="simpleUrlHandlerMapping"-->
<!--class="org.springframework.web.servlet.handler.SimpleUrlHandlerMapping">-->
<!--<property name="mappings">-->
<!--<props>-->
<!--<!– /hello Path request to id by helloController Controller processing–>-->
<!--<prop key="/hello">helloController</prop>-->
<!--</props>-->
<!--</property>-->
<!--</bean>-->
<!--<bean id="helloController" class="controller.HelloController"></bean>-->
<!-- scanning controller Components under -->
<context:component-scan base-package="controller"/>
</beans>
Step 3: restart the server
When the configuration is completed, restart the server and enter the localhost/hello address. You can still see the effect:
@RequestMapping annotation details
If @ RequestMapping acts on a class, it is equivalent to adding an address before all configured mapping addresses of the class, for example:
@Controller
@RequestMapping("/wmyskxz")
public class HelloController {
	@RequestMapping("/hello")
	public ModelAndView handleRequest(....) throws Exception {
		....
	}
}
- Access address: localhost/wmyskxz/hello
Configure view parser
Remember the request process of Spring MVC? The view parser is responsible for locating the view. It accepts a logical view name passed by the dispatcher servlet to match a specific view.
- Requirements: we don't want users to directly access some pages, such as pages with important data, such as pages supported by model data.
- Problems caused by:
We can put a [test.jsp] under the [web] root directory to simulate a page of important data. We don't need to do anything. Restart the server and enter localhost / test JSP can be accessed directly, which will cause data leakage
In addition, we can directly enter localhost / index JSP try. According to the above program, this will be a blank page, because you can access it directly without getting the ${message} parameter, which will affect the user experience
Solution
We configure our JSP file under the [page] folder in the [WEB-INF] folder. The [WEB-INF] is the default security directory in the Java Web and is not allowed to be accessed directly by users * (that is, you can never access it through localhost/WEB-INF /)*
But we need to tell this to the view parser, which we use in dispatcher servlet The XML file is configured as follows:
<bean id="viewResolver"
     class="org.springframework.web.servlet.view.InternalResourceViewResolver">
   <property name="prefix" value="/WEB-INF/page/" />
   <property name="suffix" value=".jsp" />
</bean>
A view parser built in Spring MVC is configured here. The parser follows a convention that * * will add prefix and suffix to the view name to determine the physical path of view resources in a Web application** Let's actually see the effect:
Step 1: modify HelloController
Let's modify the code:

Step 2: configure the view parser:
According to the above configuration, complete:
<?xml version="1.0" encoding="UTF-8"?>
<beans xmlns="http://www.springframework.org/schema/beans"
xmlns:xsi="http://www.w3.org/2001/XMLSchema-instance"
xmlns:context="http://www.springframework.org/schema/context"
xsi:schemaLocation="http://www.springframework.org/schema/beans http://www.springframework.org/schema/beans/spring-beans.xsd http://www.springframework.org/schema/context http://www.springframework.org/schema/context/spring-context.xsd">
<!--<bean id="simpleUrlHandlerMapping"-->
<!--class="org.springframework.web.servlet.handler.SimpleUrlHandlerMapping">-->
<!--<property name="mappings">-->
<!--<props>-->
<!--<!– /hello Path request to id by helloController Controller processing–>-->
<!--<prop key="/hello">helloController</prop>-->
<!--</props>-->
<!--</property>-->
<!--</bean>-->
<!--<bean id="helloController" class="controller.HelloController"></bean>-->
<!-- scanning controller Components under -->
<context:component-scan base-package="controller"/>
<bean id="viewResolver"
class="org.springframework.web.servlet.view.InternalResourceViewResolver">
<property name="prefix" value="/WEB-INF/page/" />
<property name="suffix" value=".jsp" />
</bean>
</beans>
Step 3: clip index JSP file
Create a new [page] folder under the [WEB-INF] folder, and cut and paste the [index.jsp] file into it:

Step 4: update resources and restart the server
Visit the localhost/hello path and see the correct effect:
- Principle:

The name of the logical view we passed in is index, plus the prefix "/ Web inf / page /" and the suffix ". jsp", we can determine the path of the physical view, so that we can put all the views under the [page] folder in the future!
- Note: the configuration at this time is only dispatcher servlet XML
The controller receives the request data
Using the controller to receive parameters is often the first step in the development of business logic by Spring MVC. In order to explore the parameter transmission method of Spring MVC, let's first create a simple form to submit data:
<!DOCTYPE html>
<%@ page language="java" contentType="text/html; charset=UTF-8"
         pageEncoding="UTF-8" import="java.util.*" isELIgnored="false"%>
<html>
<head>
    <meta charset="utf-8">
    <title>Spring MVC Parameter transmission mode</title>
</head>
<body>
<form action="/param" role="form">
    user name:<input type="text" name="userName"><br/>
    password:<input type="text" name="password"><br/>
    <input type="submit" value="Submit">
</form>
</body>
</html>
Just be ugly. Let's test it:

Implemented using Servlet native API:
It's easy to know that the form will be submitted to the / param directory. Let's use the Servlet native API to see if we can get the data:
@RequestMapping("/param")
public ModelAndView getParam(HttpServletRequest request,
   					 HttpServletResponse response) {
   String userName = request.getParameter("userName");
   String password = request.getParameter("password");

   System.out.println(userName);
   System.out.println(password);
   return null;
}
Test successful:

Use matching rules with the same name
We can set the formal parameter name of the method definition to the same method as the parameter name passed in from the foreground to obtain data (matching rule of the same name):
@RequestMapping("/param")
public ModelAndView getParam(String userName,
   						 String password) {
   System.out.println(userName);
   System.out.println(password);
   return null;
}
Test successful:

-
Problem: this will produce strong coupling with the front desk, which we don't want
-
Solution: use @ RequestParam("foreground parameter name") to inject:
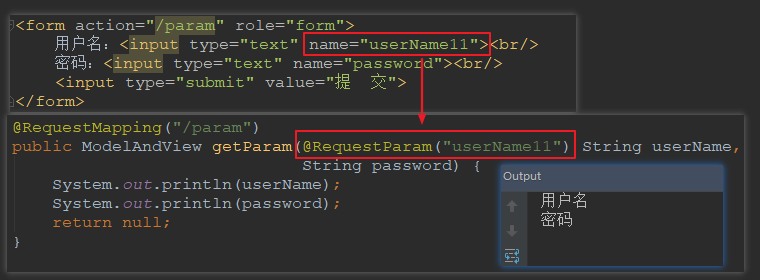
-
@RequestParam annotation details:
The annotation has three variables: value, required, and defaultvalue -
Value: Specifies the name of the name attribute. The value attribute can be left blank by default
-
Required: whether this parameter is required. It can be set to [true] or [false]
-
Default value: set the default value

Use model to transfer parameters
- Requirement: the foreground parameter name must be the same as the field name in the model
Let's first create a User model for our form:
package pojo;

public class User {

   String userName;
   String password;

   /* getter and setter */
}
Then the test is still successful:

Chinese garbled code problem
- Note: as in Servlet, this method is only valid for POST method (because it is a request processed directly)
We can do this by configuring the Spring MVC character encoding filter on the web Add to XML:
<filter>
    <filter-name>CharacterEncodingFilter</filter-name>
    <filter-class>org.springframework.web.filter.CharacterEncodingFilter</filter-class>
    <init-param>
        <param-name>encoding</param-name>
        <!-- Set encoding format -->
        <param-value>utf-8</param-value>
    </init-param>
</filter>
<filter-mapping>
    <filter-name>CharacterEncodingFilter</filter-name>
    <url-pattern>/*</url-pattern>
</filter-mapping>
Controller echo data
Through the above, we know how to accept the requested data and solve the problem of POST garbled code. So how do we echo the data? Therefore, we create a [test2.jsp] under [page]:
<!DOCTYPE html>
<%@ page language="java" contentType="text/html; charset=UTF-8"
        pageEncoding="UTF-8" import="java.util.*" isELIgnored="false" %>
<html>
<head>
   <title>Spring MVC Data echo</title>
</head>
<body>
<h1>Echo data: ${message}</h1>
</body>
</html>
Using Servlet native API to implement
Let's test whether the Servlet native API can complete this task:
@RequestMapping("/value")
public ModelAndView handleRequest(HttpServletRequest request,
   							  HttpServletResponse response) {
   request.setAttribute("message","success!");
   return new ModelAndView("test1");
}
Enter: localhost/value test in the browser address bar

Use the ModelAndView object provided by Spring MVC

Using Model objects
In Spring MVC, we usually use this method to bind data,

- Annotate with @ ModelAttribute:
@ModelAttribute
public void model(Model model) {
   model.addAttribute("message", "Annotation succeeded");
}

@RequestMapping("/value")
public String handleRequest() {
   return "test1";
}
In this way, when accessing the controller method handleRequest(), it will first call the model() method to add the message to the page parameters. It can be called directly in the view, but in this way, all methods of the controller will call the model() method first, but it is also very convenient because all kinds of data can be added.
Client jump
No matter the address / hello in front, jump to index JSP or / test jump to test JSP, these are all server-side jumps, that is, request Getrequestdispatcher ("address") forward(request, response);
How do we jump to the client? We continue to write in HelloController:
@RequestMapping("/hello")
public ModelAndView handleRequest(javax.servlet.http.HttpServletRequest httpServletRequest, javax.servlet.http.HttpServletResponse httpServletResponse) throws Exception {
	ModelAndView mav = new ModelAndView("index");
	mav.addObject("message", "Hello Spring MVC");
	return mav;
}

@RequestMapping("/jump")
public ModelAndView jump() {
	ModelAndView mav = new ModelAndView("redirect:/hello");
	return mav;
}
When we use redirect:/hello, it means we want to jump to the path of / hello. We restart the server and enter: localhost/jump in the address bar, which will automatically jump to the path of / hello:
It can also be used as follows:
@RequestMapping("/jump")
public String jump() {
	return "redirect: ./hello";
}
File upload
Let's first review the traditional file upload and download: here
Let's take a look at how to upload and download files in Spring MVC
- Note: you need to import commons-io-1.3.2 Jar and commons-fileupload-1.2.1 Jar two packages
Step 1: configure the upload parser
In dispatcher servlet Add a new sentence to XML:
<bean id="multipartResolver" class="org.springframework.web.multipart.commons.CommonsMultipartResolver"/>
Enable support for upload function
Step 2: write JSP
The file name is upload JSP, still created under [page]:
<%@ page contentType="text/html;charset=UTF-8" language="java" %>
<html>
<head>
   <title>Test file upload</title>
</head>
<body>
<form action="/upload" method="post" enctype="multipart/form-data">
   <input type="file" name="picture">
   <input type="submit" value="Upload">
</form>
</body>
</html>
Step 3: write controller
Create a new [UploadController] class under Package [controller]:
package controller;

import org.springframework.stereotype.Controller;
import org.springframework.web.bind.annotation.RequestMapping;
import org.springframework.web.bind.annotation.RequestParam;
import org.springframework.web.multipart.MultipartFile;
import org.springframework.web.servlet.ModelAndView;

@Controller
public class UploadController {

   @RequestMapping("/upload")
   public void upload(@RequestParam("picture") MultipartFile picture) throws Exception {
   	System.out.println(picture.getOriginalFilename());
   }

   @RequestMapping("/test2")
   public ModelAndView upload() {
   	return new ModelAndView("upload");
   }

}
Step 4: Test
Enter localhost/test2 in the browser address bar, select the file and click upload. The test is successful:

It's almost enough to write here. This article is mainly for those who don't know Spring MVC, so there must be a lot of things that haven't been written, including other modules of Spring framework. I'll update them when I have time, so interested friends can pay attention and praise by the way!
Of course, if you can't wait, you can click to get it Complete Spring learning notes
end