[5 minutes to teach you] three kinds of verification code functions - Digital SMS verification code - Graphic verification code - sliding verification code
Absrtact: we are doing some login verification of the background system. It is inevitable to use the verification code function to assist in verification and improve security. In our daily life, verification methods are everywhere. The most common way is the SMS verification code. Click to send the verification code, and then the mobile phone receives the SMS and fills in the verification code to log in successfully. However, some other verification code functions are also used, so, I just want to focus on recording, hoping to help you
I Digital SMS verification code
Idea:
a. Two text boxes + one button to obtain the verification code. The text box is used to input the mobile phone number and the obtained verification code. The button is responsible for clicking and recording the countdown;
b. js write timer setTimeout to record the expiration time of 60 second verification code;
c. The background provides an interface for SMS acquisition and verification. We upload the mobile phone number as a parameter, and send the verification code to the mobile phone number after obtaining it in the background;
- HTML
<input type="text" name="phone" id="phone" value="" placeholder="Please enter your mobile number" maxlength="11" />
<input type="" name="verCode" id="verCode" value="" placeholder="Please enter the verification code" maxlength="6"/>
<input type="button" name="" id="verCodeBtn" value="Get verification code"  onclick="settime(this);"/>
- Countdown JS
//Verification Code
var counts = 60;

function settime(val) {
    if(counts == 0) {
        val.removeAttribute("disabled");
        val.value = "Get verification code";
        counts = 60;
        return false;
    } else {
        val.setAttribute("disabled", true);
        val.value = "Resend(" + counts + ")";
        counts--;
    }
    setTimeout(function() {
        settime(val);
    }, 1000);
}
- Ajax interface JS
$(function(){
   //Get verification code
    $("#verCodeBtn").click(function() {
        var userinfo = {
            "UserPhoneNum": '86//' + $("input[name='phone']").val()
        }

        $.ajax({
            url: "https://www.xxxxx.cn/user/sendcode/",
            data: userinfo,
            type: "get",
            success: function(data) {
                if(JSON.parse(data).state === 404 || JSON.parse(data).state === 202 || userinfo.UserPhoneNum === '86//') {
                    alert("Verification code sending failed")
                } else {
                    alert("The verification code was sent successfully. Please wait patiently")
                }
            },
            error: function() {
                alert("fail in send");
            }
        });
    });
})
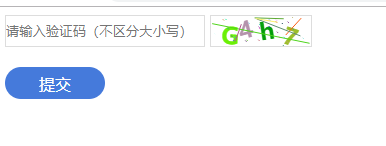
II Graphic verification code
Summary: the general graphic verification code is like the SMS verification code above. It is the verification code image generated in the background returned to the front end. In that case, it is relatively simple, because the complex problems are solved in the background. Here I mainly talk about the other way, that is, the graphic verification code is solved through the canvas canvas without calling the back interface.
Idea:
a. A text box is used to input the verification code composed of numbers and letters + a canvas label to display the graphic verification code + a submit button;
b. Submit button to verify the form, and prompt for correct or wrong input;
c. Generate and render verification code graphics with canvas, and get random color values;
- HTML
<div class="code">
        <input type="text" value="" placeholder="Please enter the verification code (case insensitive)" class="input-val">
        <canvas id="canvas" width="100" height="30"></canvas>
        <button class="btn">Submit</button>
    </div>
- CSS
<style>
      .input-val {
        width: 200px;
        height: 32px;
        border: 1px solid #ddd;
        box-sizing: border-box;
      }
      #canvas {
        vertical-align: middle;
        box-sizing: border-box;
        border: 1px solid #ddd;
        cursor: pointer;
      }
      .btn {
        display: block;
        margin-top: 20px;
        height: 32px;
        width: 100px;
        font-size: 16px;
        color: #fff;
        background-color: #457adb;
        border: none;
        border-radius: 50px;
      }
    </style>
- JS
<script type="text/javascript" src="js/jquery-3.3.1.min.js" ></script>
<script>
    $(function(){
        var show_num = [];
        draw(show_num);

        $("#canvas").on('click',function(){
            draw(show_num);
        })
        $(".btn").on('click',function(){
            var val = $(".input-val").val().toLowerCase();
            var num = show_num.join("");
            if(val==''){
                alert('Please enter the verification code!');
            }else if(val == num){
                alert('Submitted successfully!');
                $(".input-val").val('');
                // draw(show_num);

            }else{
                alert('Verification code error! Please re-enter!');
                $(".input-val").val('');
                // draw(show_num);
            }
        })
    })

    //Generate and render verification code graphics
    function draw(show_num) {
        var canvas_width=$('#canvas').width();
        var canvas_height=$('#canvas').height();
        var canvas = document.getElementById("canvas");//Get the object of canvas, actor
        var context = canvas.getContext("2d");//Get the canvas drawing environment and the stage where the actors perform
        canvas.width = canvas_width;
        canvas.height = canvas_height;
        var sCode = "a,b,c,d,e,f,g,h,i,j,k,m,n,p,q,r,s,t,u,v,w,x,y,z,A,B,C,E,F,G,H,J,K,L,M,N,P,Q,R,S,T,W,X,Y,Z,1,2,3,4,5,6,7,8,9,0";
        var aCode = sCode.split(",");
        var aLength = aCode.length;//Gets the length of the array

        for (var i = 0; i < 4; i++) {  //The for loop here can control the number of verification code digits (if you want to display 6 digits, change 4 to 6)
            var j = Math.floor(Math.random() * aLength);//Get random index value
            // var deg = Math.random() * 30 * Math.PI / 180;// Generate random radians between 0 and 30
            var deg = Math.random() - 0.5; //Generate a random radian
            var txt = aCode[j];//Get a random content
            show_num[i] = txt.toLowerCase();
            var x = 10 + i * 20;//x coordinate of text on canvas
            var y = 20 + Math.random() * 8;//y coordinate of text on canvas
            context.font = "bold 23px Microsoft YaHei ";

            context.translate(x, y);
            context.rotate(deg);

            context.fillStyle = randomColor();
            context.fillText(txt, 0, 0);

            context.rotate(-deg);
            context.translate(-x, -y);
        }
        for (var i = 0; i <= 5; i++) { //Display line on verification code
            context.strokeStyle = randomColor();
            context.beginPath();
            context.moveTo(Math.random() * canvas_width, Math.random() * canvas_height);
            context.lineTo(Math.random() * canvas_width, Math.random() * canvas_height);
            context.stroke();
        }
        for (var i = 0; i <= 30; i++) { //Small dots are displayed on the verification code
            context.strokeStyle = randomColor();
            context.beginPath();
            var x = Math.random() * canvas_width;
            var y = Math.random() * canvas_height;
            context.moveTo(x, y);
            context.lineTo(x + 1, y + 1);
            context.stroke();
        }
    }

    //Get random color values
    function randomColor() {
        var r = Math.floor(Math.random() * 256);
        var g = Math.floor(Math.random() * 256);
        var b = Math.floor(Math.random() * 256);
        return "rgb(" + r + "," + g + "," + b + ")";
    }

</script>
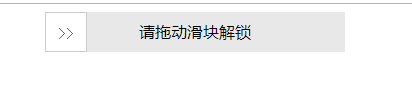
III Sliding verification code
Absrtact: this slider is used when logging in the blog park. It is in the form of a puzzle. The following principle is the same. The logic is to judge whether it is human operation according to the mouse sliding track, coordinate position, calculation of drag speed, etc. if the little partner wants to do the same effect as the blog Park, it can be used as a reference.
Idea:
a. It is composed of three div s, which constitute the effect of slider and bottom progress bar;
b. Write js, register mouse press, suspend and release events;
c. Record the moving distance and state of the slider to judge whether it is successful;
- Initial state of sliding verification code
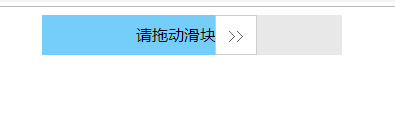
- Sliding state
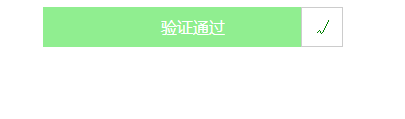
- Success status
- HTML
<div class="drag">
<div class="bg"></div>
<div class="text" onselectstart="return false;">Please drag the slider to unlock</div>
<div class="btn">>></div>
</div>
- CSS
<style>
        .drag{
            width: 300px;
            height: 40px;
            line-height: 40px;
            background-color: #e8e8e8;
            position: relative;
            margin:0 auto;
        }
        .bg{
            width:40px;
            height: 100%;
            position: absolute;
            background-color: #75CDF9;
        }
        .text{
            position: absolute;
            width: 100%;
            height: 100%;
            text-align: center;
            user-select: none;
        }
        .btn{
            width:40px;
            height: 38px;
            position: absolute;
            border:1px solid #ccc;
            cursor: move;
            font-family: "Song style";
            text-align: center;
            background-color: #fff;
            user-select: none;
            color:#666;
        }
</style>
- JS
<script>
//1, Define a method to get DOM elements
var $ = function(selector){
return document.querySelector(selector);
},
box = $(".drag"),//container
bg = $(".bg"),//background
text = $(".text"),//written words
btn = $(".btn"),//slider
success = false,//Whether it passes the verification
distance = box.offsetWidth - btn.offsetWidth;//Width (distance) of successful sliding
//2, Register mouse press events for sliders
btn.onmousedown = function(e){
//1. The transition attribute set later must be cleared before pressing the mouse
btn.style.transition = "";
bg.style.transition ="";
//Note: the clientX event property will return the horizontal coordinates of the mouse pointer to the browser page (or client area) when the event is triggered.
//2. When the slider is in the initial position, get the horizontal position when the mouse is pressed
var e = e || window.event;
var downX = e.clientX;
//3, Register mouse movement events for documents
document.onmousemove = function(e){
var e = e || window.event;
//1. Obtain the horizontal position after the mouse is moved
var moveX = e.clientX;
//2. Get the offset of the horizontal position of the mouse (position when the mouse moves - position when the mouse is pressed)
var offsetX = moveX - downX;
//3. Judge here: the relationship between the horizontal moving distance of the mouse and the successful sliding distance
if( offsetX > distance){
offsetX = distance;//If you slip past the end, stop it at the end
}else if( offsetX < 0){
offsetX = 0;//If you slide to the left of the starting point, reset it to the starting point position
}
//4. Dynamically set the offset of the slider and the width of the background color according to the distance the mouse moves
btn.style.left = offsetX + "px";
bg.style.width = offsetX + "px";
//If the horizontal movement distance of the mouse = the width of successful sliding
if( offsetX == distance){
//1. Set the style after successful sliding
text.innerHTML = "Verification passed";
text.style.color = "#fff";
btn.innerHTML = "√";
btn.style.color = "green";
bg.style.backgroundColor = "lightgreen";
//2. Set the status after successful sliding
success = true;
//After success, clear the mouse press event and move event (because the move does not involve the mouse release event)
btn.onmousedown = null;
document.onmousemove = null;
//3. Callback function after successful unlocking
setTimeout(function(){
alert('Unlock succeeded!');
},100);
}
}
//4, Register the mouse release event for the document
document.onmouseup = function(e){
//If the mouse is released and slides to the end point, the verification passes
if(success){
return;
}else{
//Otherwise, reset the slider (set the attribute transition effect of 1s)
btn.style.left = 0;
bg.style.width = 0;
btn.style.transition = "left 1s ease";
bg.style.transition = "width 1s ease";
}
//As long as the mouse is released, it means that there is no need to drag the slider at this time, then the mouse movement and release events will be cleared.
document.onmousemove = null;
document.onmouseup = null;
}
}
</script>