I've always wanted to write an article that deeply analyzes the relationship between window, View and Activity from the perspective of source code to help those junior and intermediate Android developers deepen their understanding of the three, but I haven't been able to calm down and write some good articles in recent years. At present, the plagiarism of many blogs is very serious, which gives many developers a headache. If you search a few articles, you will find that they are the same. I don't know whether the content I write will be the same as that of other bloggers, but I think it should be different.
Needless to say, window is a basic and important concept in Android display. When many students go to the interview, they will be asked, "please talk about the relationship between window, view and activity". Many people are confused and don't know where to start to answer this question. I'll tell them that you can start from the entry of setting the Layout of activity.
1, setContentView of Activity
Click the setContentView source code in the onCreate method to have a look. The following code block is found:

Here's an explanation. Some students open the following code block:
 @Override
    public void setContentView(@LayoutRes int layoutResID) {
        getDelegate().setContentView(layoutResID);
    }
Because you use AppCompatActivity, but it also inherits the Activity in the end. This time, we will not interpret the source code of AppCompatActivity. In fact, we can find that most of the life cycle of the Activity is entrusted to AppCompatDelegate. OK, stop here.
If you only look at the source code of the Activity, then you can see that getWindow returns the global variable mWindow in the Activity, which is the Window type. So when was it assigned?
At this time, we need to recall what we need to do first to open an Activity? It must be startActivity() first. Finally, the code will call the performLaunchActivity method in the ActivityThread, create the Activity object through reflection, and execute its attach method. Window is created in this method. The code is as follows:
  final void attach(Context context, ActivityThread aThread,
            Instrumentation instr, IBinder token, int ident,
            Application application, Intent intent, ActivityInfo info,
            CharSequence title, Activity parent, String id,
            NonConfigurationInstances lastNonConfigurationInstances,
            Configuration config, String referrer, IVoiceInteractor voiceInteractor,
            Window window, ActivityConfigCallback activityConfigCallback, IBinder assistToken) {
        attachBaseContext(context);
        mFragments.attachHost(null /*parent*/);
        mWindow = new PhoneWindow(this, window, activityConfigCallback);
        mWindow.setWindowControllerCallback(this);
        mWindow.setCallback(this);
        mWindow.setOnWindowDismissedCallback(this);
        mWindow.getLayoutInflater().setPrivateFactory(this);
        if (info.softInputMode != WindowManager.LayoutParams.SOFT_INPUT_STATE_UNSPECIFIED) {
            mWindow.setSoftInputMode(info.softInputMode);
        }
        mUiThread = Thread.currentThread();
        //ellipsis
         . . .
        mWindow.setWindowManager(
                (WindowManager)context.getSystemService(Context.WINDOW_SERVICE),
                mToken, mComponent.flattenToString(),
                (info.flags & ActivityInfo.FLAG_HARDWARE_ACCELERATED) != 0);
        if (mParent != null) {
            mWindow.setContainer(mParent.getWindow());
        }
        mWindowManager = mWindow.getWindowManager();
        //ellipsis
        . . . .
    }
Assign mWindow to a PhoneWindow object in the attach method of Activity. In fact, there is only one implementation class of Window in the whole Android system, that is, PhoneWindow.
Then look at mwindow Use the setwindowmanager method to transfer the system WindowManager to PhoneWindow, as shown below:
public void setWindowManager(WindowManager wm, IBinder appToken, String appName,
            boolean hardwareAccelerated) {
        mAppToken = appToken;
        mAppName = appName;
        mHardwareAccelerated = hardwareAccelerated;
        if (wm == null) {
            wm = (WindowManager)mContext.getSystemService(Context.WINDOW_SERVICE);
        }
        mWindowManager = ((WindowManagerImpl)wm).createLocalWindowManager(this);
    }

public WindowManagerImpl createLocalWindowManager(Window parentWindow) {
        return new WindowManagerImpl(mContext, parentWindow);
    }
According to the above code, we can see that a WindowManagerImpl object is instantiated in PhoneWindow. Some students wonder what WindowManagerImpl is. Let's not discuss it first and wait a minute.
2, Phonewindow setContentView()
After reading the process of attach ing method, creating window and so on, let's go back to the beginning
getWindow. The setcontentview (layoutresid) code block is based on the above analysis, that is, phonewindow setContentView(layoutResID);

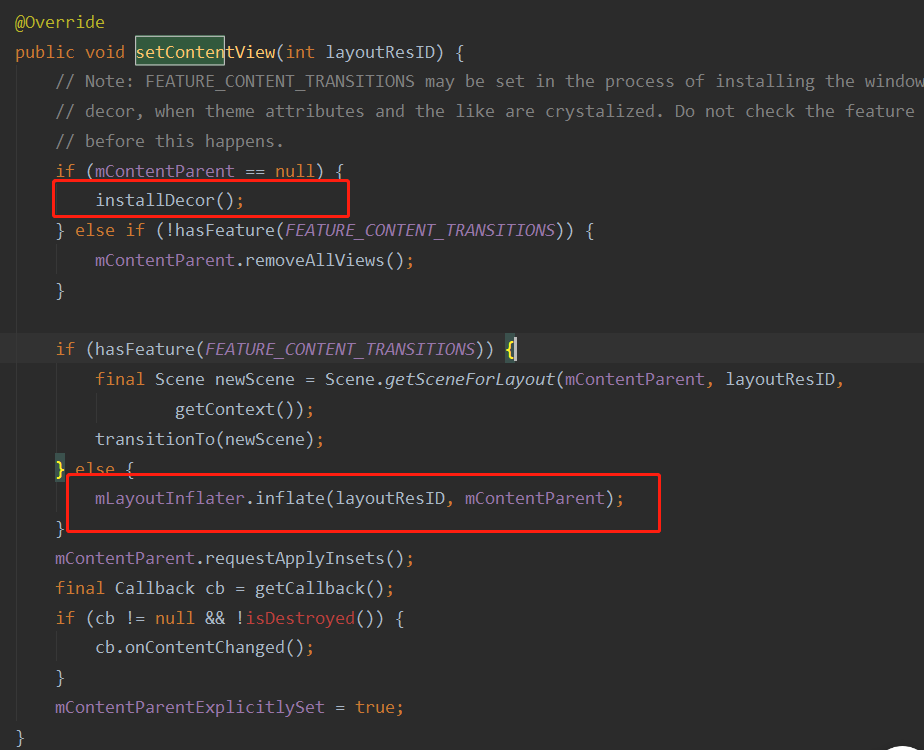
In Figure 1, installDecor is called to initialize DecorView and mContentParent.
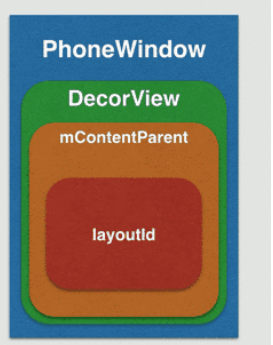
In Figure 2, the layout passed in by calling setContentView is added to mContentParent. It can be seen that there is a DecorView in PhoneWindow by default, and an mContentParent in DecorView by default. The layout implemented by ourselves is added to mContentParent. Therefore, after setContentView, the View relationship within PhoneWindow is as follows:

Through the above steps, so far, only a DecorView has been created in PhoneWindow, and the layoutId layout we passed in the Activity has been filled in the DecorView, but the DecorView has not established any contact with the Activity, nor has it been drawn on the interface for display. In other words, it has not been officially added to Window by WindowManager.
When was DecorView drawn on the screen? (note that the following explanation is generally the important place to answer this question in the interview)
In the handleResumeActivity method of the ActivityThread, the onResume method of Acitivy will be called first, and then the makeVisible() method of Acitivy will be called. It is in the makeVisible method that DecorView really completes the display process, and the view of the Activity can be seen by the user.
The Activity is not visible when it is executed to onCreate. The content in the Activity is visible on the screen only after onResume is executed. The reason for this phenomenon is that the onCreate stage only initializes the content that the Activity needs to display, and the DecorView in PhoneWindow will be really drawn to the screen in the onResume stage.
In the handleResumeActivity of ActivityThread, the addView method of WindowManager will be called to add DecorView to WMS(WindowManagerService), as shown below:
  @Override
    public void handleResumeActivity(IBinder token, boolean finalStateRequest, boolean isForward, String reason) {
         //ellipsis
        . . . .
        . . . .
        if (r.window == null && !a.mFinished && willBeVisible) {
            r.window = r.activity.getWindow();
            View decor = r.window.getDecorView();
            decor.setVisibility(View.INVISIBLE);
            ViewManager wm = a.getWindowManager();
            WindowManager.LayoutParams l = r.window.getAttributes();
            a.mDecor = decor;
            l.type = WindowManager.LayoutParams.TYPE_BASE_APPLICATION;
            l.softInputMode |= forwardBit;
            if (r.mPreserveWindow) {
                a.mWindowAdded = true;
                ViewRootImpl impl = decor.getViewRootImpl();
                if (impl != null) {
                    impl.notifyChildRebuilt();
                }
            }
            if (a.mVisibleFromClient) {
                if (!a.mWindowAdded) {
                    a.mWindowAdded = true;
                    wm.addView(decor, l);
                } else {
                    a.onWindowAttributesChanged(l);
                }
            }
        //ellipsis
        . . . .
        . . . .
    }
Look at the key code above, WM addView(decor, l),
3, addView() of WindowManager
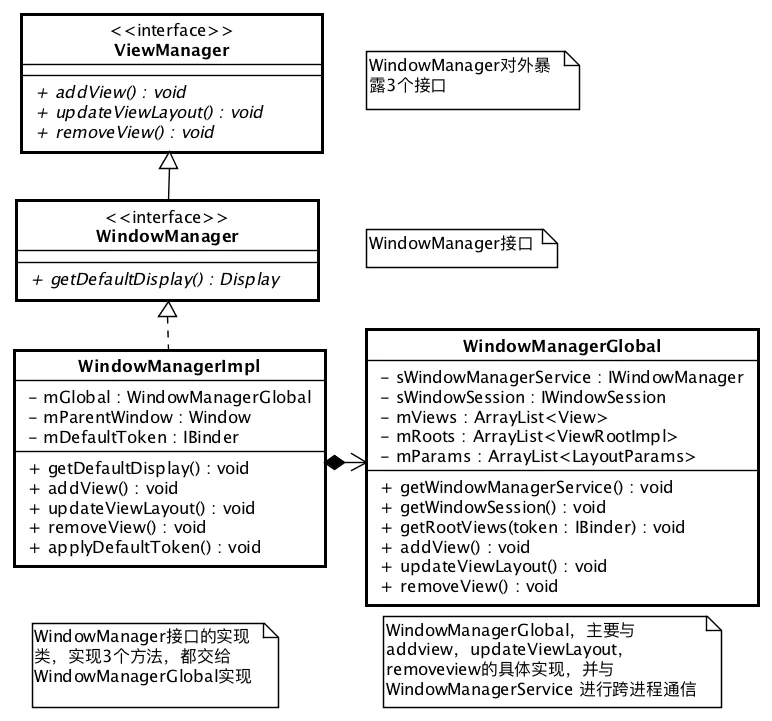
Through the above code, we know that it is handed over to WindowManger for processing, but it is an interface type. Its real implementer is WindowManagerImpl class. Take a look at its addView method as follows:

It is found that it calls the addView method of WindowManagerGlobal again. What is WindowManagerGlobal?
To be honest, I don't know, because it does too many things to define it. Simply, WindowMangerGlobal is a singleton, and there is only one instance object in each process. Take a look at its addView method, as shown below:
 public void addView(View view, ViewGroup.LayoutParams params,
            Display display, Window parentWindow) {
        ViewRootImpl root;
        View panelParentView = null;
        //ellipsis
        . . . .
        . . . .
        root = new ViewRootImpl(view.getContext(), display);
        view.setLayoutParams(wparams);
        mViews.add(view);
        mRoots.add(root);
        mParams.add(wparams);
        // do this last because it fires off messages to start doing things
            try {
                root.setView(view, wparams, panelParentView);
            } catch (RuntimeException e) {
                // BadTokenException or InvalidDisplayException, clean up.
                if (index >= 0) {
                    removeViewLocked(index, true);
                }
                throw e;
            }
        }
    }
In its addView method, a key ViewRootImpl object is created, and then the view is added to WMS through the setView method of ViewRootImpl.
4, setView() of ViewRootImpl
public void setView(View view, WindowManager.LayoutParams attrs, View panelParentView) {
        synchronized (this) {
            if (mView == null) {
                mView = view;

                int res; /* = WindowManagerImpl.ADD_OKAY; */
                requestLayout();
                if ((mWindowAttributes.inputFeatures
                        & WindowManager.LayoutParams.INPUT_FEATURE_NO_INPUT_CHANNEL) == 0)
                    mInputChannel = new InputChannel();
                }
                mForceDecorViewVisibility = (mWindowAttributes.privateFlags
                        & PRIVATE_FLAG_FORCE_DECOR_VIEW_VISIBILITY) != 0;
                try {
                    mOrigWindowType = mWindowAttributes.type;
                    mAttachInfo.mRecomputeGlobalAttributes = true;
                    collectViewAttributes();
                    res = mWindowSession.addToDisplay(mWindow, mSeq, mWindowAttributes,
                            getHostVisibility(), mDisplay.getDisplayId(), mTmpFrame,
                            mAttachInfo.mContentInsets, mAttachInfo.mStableInsets,
                            mAttachInfo.mOutsets, mAttachInfo.mDisplayCutout, mInputChannel,
                            mTempInsets);
                    setFrame(mTmpFrame);
                }
The more important requestLayout() method in the above code is to refresh the layout. After calling this method, the View associated with ViewRootImpl also performs measure - layout - draw operation to ensure that the measurement and drawing operations have been completed before the View is added to the Window and displayed on the screen.
Then the second important thing is to call the addToDisplay method of mWindowSession to add the View to WMS.
WindowSession is a singleton object in WindowManagerGlobal. The initialization code is as follows:
 public static IWindowSession getWindowSession() {
        synchronized (WindowManagerGlobal.class) {
            if (sWindowSession == null) {
                try {
                    InputMethodManager.ensureDefaultInstanceForDefaultDisplayIfNecessary();
                    IWindowManager windowManager = getWindowManagerService();
                    sWindowSession = windowManager.openSession(
                            new IWindowSessionCallback.Stub() {
                                @Override
                                public void onAnimatorScaleChanged(float scale) {
                                    ValueAnimator.setDurationScale(scale);
                                }
                            });
                } catch (RemoteException e) {
                    throw e.rethrowFromSystemServer();
                }
            }
            return sWindowSession;
        }
    }
sWindowSession is actually IWindowSession type, which is a Binder type. The real implementation class is the Session in the System process. In the figure above, AIDL is used to obtain the Session object in the System process.
-
Check the validity of the parameters. If it is a child Window, make appropriate adjustments
-
Create ViewRootImpl and add View to the collection
-
Use ViewRootImpl to update the interface and complete the process of adding Window
-
When learning the working principle of View, we know that the drawing process of View is completed by ViewRootImpl. Of course, there is no exception here. It is realized through the setView method of ViewRootImpl. Within setView, the asynchronous refresh request will be completed through requestLayout, in which The type of mWindowSession is IWindowSession, which is a Binder object. The real implementation class is Session, which is the location of IPC call mentioned earlier. In the Session, WindowManagerService will be used to add windows
So far, Window has been successfully passed to WMS. The rest of the work will be transferred to the WMS in the system process to complete the final addition operation.
I'll put a diagram for the above process, and the students will see the implementation process clearly, as shown in the following figure:

Summary:
Through the process of setContentView, the relationship among activity, Window and View is analyzed. On the surface, the participation of activity in the whole process is relatively low, and most of the adding operations of View are encapsulated in Window. Activity is equivalent to a management class provided by Android to developers, which can more easily realize the operation logic of Window and View.
I hope the above explanation can give you a little help in understanding the relationship between the three, and I hope you can give me more support.