Vue3 quick start (I)
Personal blog: Vue3 quick start (I)
After the internship and entering the company, after simply installing vscode, node, git and other necessary tools, the tutor directly asked if he had studied vue3. After saying that he had only studied vue2, he shared two articles with me and asked me to check the documents to quickly accelerate from vue2 to vue3. This article will refer to many articles and documents. Some borrowed may not be noted. Please contact us for infringement. (however, even for reference, I have many examples that are easier to understand according to my own understanding, although they are not much worse)
Attached are previous notes: Vue2
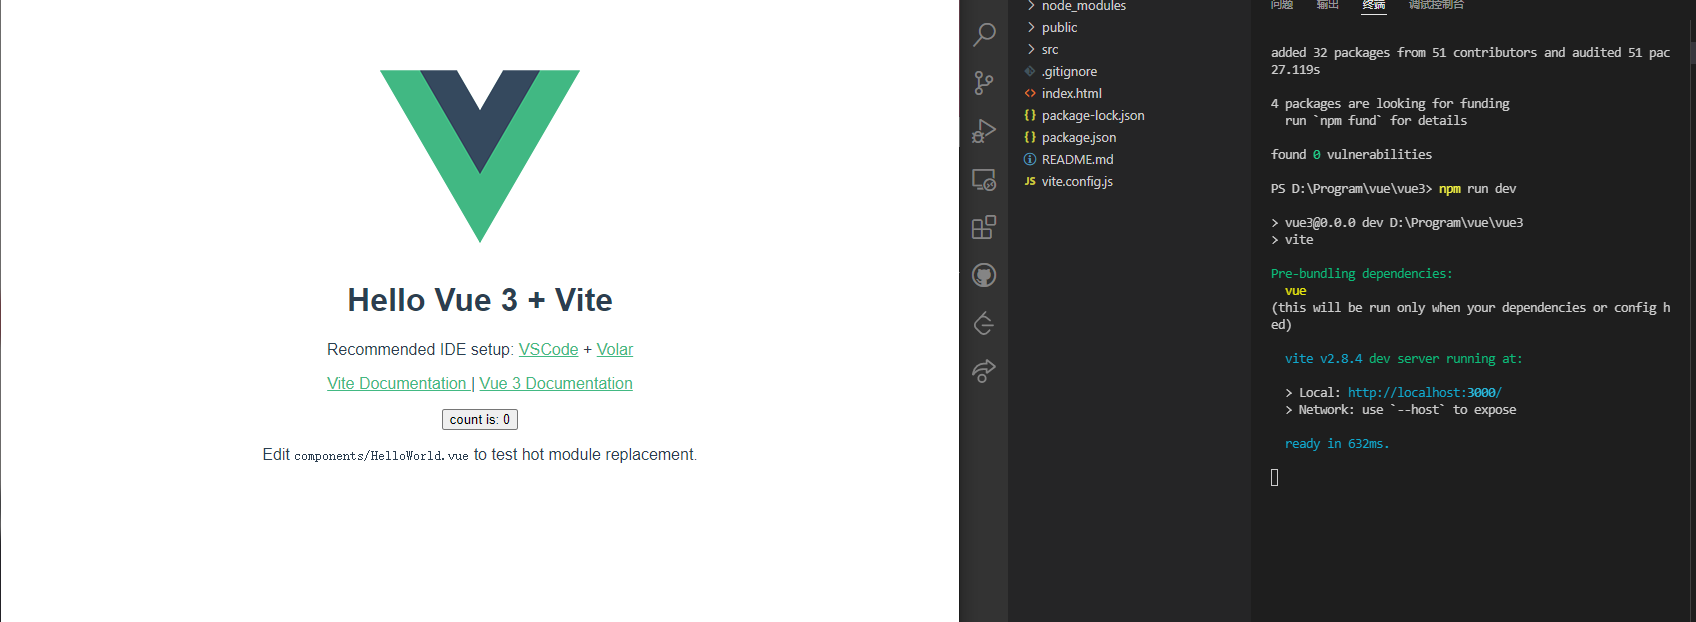
1. Build the project
The first step, of course, is to build the project. There is a major difference here, vue3 using web development build tools vite , not webpack
vite benefits:
- Fast cold server startup without packaging
- HMR (hot renewal)
- Compile on demand
In addition, the server port opened by vite is 3000 by default instead of 8080
npm init vite@latest

# Use yarn
yarn create vite
On demand selection

The method of project startup is no longer npm run serve, but npm run dev
2. Change of entry documents
Vue2
import Vue from 'vue'
import App from './App.vue'

import router from './router'

Vue.config.productionTip = false

new Vue({
  router,
  render: h => h(App),
}).$mount('#app')
Vue3
import { createApp } from 'vue'
import App from './App.vue'
import router from './router'

createApp(App)
  .use(router)
  .mount('#app')
Vue3 no longer introduces the Vue constructor, but the createApp factory function.
3. Combined API
3.1 set up
The setup function is the entry to the composition API
The variables and methods defined in the setup function need to return before they can be used in the template
In fact, it is similar to vue2, except that in vue2, the data is in the data function, and the method is in the methods node, while vue3 is "more human", which is more similar to the native js. The data and method are ordinary variables and methods, which can be used in the template only by return ing.
Vue3
<template>
  <button @click="alertName">alert name</button>
  <p>
    {{ nickname }}
  </p>
</template>


<script>
export default {
  name: "App",

  setup() {
    let nickname = "Red blue purple"

    function alertName() {
      alert(`I am ${nickname}`)
    }

    return {
      nickname,
      alertName
    }
  }
}
</script>
There is no longer a need for a unique root label in the template. This improvement feels very comfortable. After checking the data, it is found that although there seems to be no root node, only vue3's root node is a virtual node and will not be mapped to a specific node. Because a tree must have a root node, using a virtual node as the root node is very useful.
Vue2
<template>
  <div id="app">
    <button @click="alertName">alert nickname</button>
    <p>
      {{ nickname }}
    </p>
  </div>
</template>

<script>
export default {
  name: "App",
  data() {
    return {
      nickname: "Red blue purple"
    }
  },
  methods: {
    alertName() {
      alert(`I am ${this.nickname}`)
    }
  }
}
</script>
3.2 ref
Let's take a look at this example first
<template>
  <button @click="changeName">change name</button>
  <p>
    {{ nickname }}
  </p>
</template>


<script>
export default {
  name: "App",
  setup() {
    let nickname = "Red blue purple"

    function changeName() {
      nickname = "clz"
      console.log(nickname)
    }

    return {
      nickname,
      changeName
    }
  }
}
</script>
After clicking, it is found that the data has changed, but the name in the p tag has not changed. Is it because the data-driven view of vue has failed.
Of course, it's not. It's just that there is a difference between responsive data and ordinary data in vue3. Only responsive data can drive the change of view. The above nickname is just a string, not responsive data, and will not change naturally when trying.
It is also very simple to turn a string into responsive data. You only need to introduce and use ref
<template>
  <button @click="changeName">change name</button>
  <p>
    {{ nickname }}
  </p>
</template>


<script>
import { ref } from "vue"

export default {
  name: "App",
  setup() {
    let nickname = ref("Red blue purple")

    function changeName() {
      nickname = "clz"
      console.log(nickname)
    }

    return {
      nickname,
      changeName
    }
  }
}
</script>
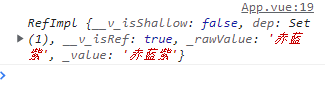
However, it still can't. why? The reason is that ref changes the nickname into an instance object of RefImpl, which needs to be modified value to modify, the bottom layer still uses get and set to operate.
Comment out the nickname = "clz" in the changeName method above, and then click the button to know the instance object of RefImpl
Final version:
<template>
  <button @click="changeName">change name</button>
  <p>
    {{ nickname }}
  </p>
</template>


<script>
import { ref } from "vue"

export default {
  name: "App",
  setup() {
    let nickname = ref("Red blue purple")

    function changeName() {
      nickname.value = "clz"
      // console.log(nickname)
    }

    return {
      nickname,
      changeName
    }
  }
}
</script>
To modify, use value. Why not use {{nickname.value}} to display it? This is because vue3 directly gives you nickname after detecting that it is a ref object value (quite humanized)
3.3 reactive
<template>
  <button @click="changeName">change name</button>
  <p>
    name: {{ people.name }}
  </p>
  <p>
    age: {{ people.age }}
  </p>
</template>


<script>
import { ref } from "vue"

export default {
  name: "App",
  setup() {
    let people = ref({
      name: "Red blue purple",
      age: 21
    })

    function changeName() {
      people.value.name = "clz"
    }

    return {
      people,
      changeName
    }
  }
}
</script>
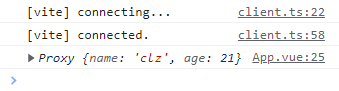
At first glance, it looks the same as in ref above, but in fact, if the object type is converted into responsive data, the function reactive should be used, but if the ref is an object, reactive will be called automatically. Print people Value is no longer a RefImpl object, but a Proxy object.
- Basic data type: Based on object get and set in defineproperty hijack data to realize responsive
- Object type: use Proxy to implement responsive
<template>
  <button @click="changeName">change name</button>
  <p>
    name: {{ people.name }}
  </p>
  <p>
    age: {{ people.age }}
  </p>
  <p>hobby: {{hobbys[0]}}, {{hobbys[1]}}</p>
</template>


<script>
import { reactive } from "vue"

export default {
  name: "App",
  setup() {
    let people = reactive({
      name: "Red blue purple",
      age: 21
    })
    let hobbys = reactive(["music", "comic"])
    // let hobbys = ["music", "animation"]

    function changeName() {
      people.name = "clz"
      hobbys[0] = "study"
    }

    return {
      people,
      changeName,
      hobbys
    }
  }
}
</script>
There is a problem above: array data that is not converted into response data through reactive() is also response data. I don't know why
It can also be written in the form of data in vue2
<template>
  <button @click="changeName">change name</button>
  <p>
    name: {{ data.people.name }}
  </p>
  <p>
    age: {{ data.people.age }}
  </p>
  <p>hobby: {{data.hobbys[0]}}, {{data.hobbys[1]}}</p>
</template>


<script>
import { reactive } from "vue"

export default {
  name: "App",
  setup() {
    let data = reactive({
      people: {
        name: "Red blue purple",
        age: 21
      },
      hobbys: ["music", "comic"]
    })

    function changeName() {
      data.people.name = "clz"
      data.hobbys[0] = "study"
    }

    return {
      data,
      changeName
    }
  }
}
</script>
Difference between ref and reactive:
| ref | reactive |
|---|---|
| Define basic type data | Define object or array type data |
| Through object get and set of defineproperty () to implement responsive (data hijacking) | The response type (data hijacking) is realized through Proxy, and the internal data of the source code is operated through Reflect |
| Operational data is required value, not required for reading | Neither operation nor data reading is required value |
3.3 computed
Calculate attributes, similar to vue2
<template>
  r: <input type="text" v-model.number="color.r"><br>
  g: <input type="text" v-model.number="color.g"><br>
  b: <input type="text" v-model.number="color.b"><br>
  rgb: <input type="text" v-model="color.rgb" :style="{color: color.rgb}">
</template>


<script>
import { reactive, computed } from "vue"

export default {
  name: "App",
  setup() {
    let color = reactive({
      r: 255,
      g: 0,
      b: 0
    })

    color.rgb = computed(() => {
      return `rgb(${color.r}, ${color.g}, ${color.b})`
    })

    return {
      color
    }
  }
}
</script>
If you modify the calculated property, you will be warned because the calculated property is read-only

Implementation modifiable:
<template>
  r: <input type="text" v-model="color.r"><br>
  g: <input type="text" v-model="color.g"><br>
  b: <input type="text" v-model="color.b"><br>
  rgb: <input type="text" v-model="color.rgb" :style="{color: color.rgb}">
</template>


<script>
import { reactive, computed } from "vue"

export default {
  name: "App",
  setup() {
    let color = reactive({
      r: 255,
      g: 0,
      b: 0
    })

    color.rgb = computed({
      get() {
        console.log(color.r)
        return `rgb(${color.r},${color.g},${color.b})`
      },
      set(value) {
        let rgbList = value.split(",")
        color.r = rgbList[0].slice(4)
        color.g = rgbList[1]
        color.b = rgbList[2].slice(0, -1)
      }
    })

    return {
      color
    }
  }
}
</script>
The key to realize the modifiability of calculation attribute: the calculated () parameter is an object, in which a get method is used to obtain the value and a set method is used to modify the value
3.4 watch
monitor
<template>
  <div class="home">
    <h1>The current number is:{{num}}</h1>
    <button @click="num++">+1</button>
  </div>
</template>

<script>
import { ref, watch } from "vue"

export default {
  name: "Home",
  setup() {
    let num = ref(0)
    watch(
      num, // If you want to listen to multiple data, the first parameter is the data array to listen to, in which newValue and oldValue are also arrays, and the first element is the first parameter to listen to
      (newValue, oldValue) => {
        console.log(`The number has increased, the current value ${newValue}, Original value ${oldValue}`)
      }
      // {
      //   immediate: true,
      //   deep: true
      // }/ / the third parameter is the option setting. You can set immediate listening and deep listening
    )

    return {
      num
    }
  }
}
</script>
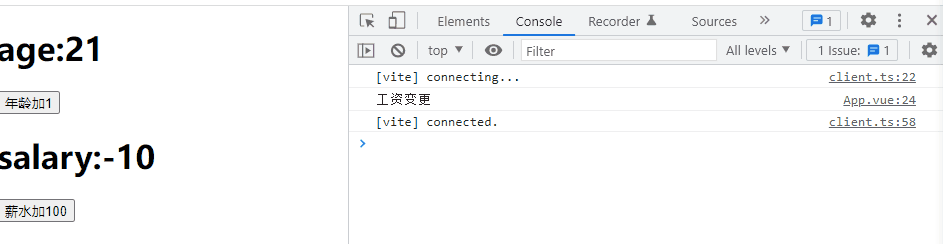
<template>
  <div class="home">
    <h1>age:{{people.age}}</h1>
    <button @click="people.age++">Age plus 1</button>
    <h1>salary:{{people.job.salary}}</h1>
    <button @click="people.job.salary+=100">Salary plus 100</button>
  </div>
</template>

<script>
import { reactive, watch } from "vue"
export default {
  name: "Home",
  setup() {
    let people = reactive({
      name: "Red blue purple",
      age: 21,
      job: {
        salary: -10
      }
    })
    watch(
      people,
      (newValue, oldValue) => {
        console.log(`The information has changed`, newValue, oldValue) // When directly listening to a responsive data defined by reactive, the oldValue will appear, which is also the updated value. By default, deep listening is enabled and cannot be turned off
      },
      {
        deep: false
      }
    )

    // Listen for an attribute in a responsive data defined by reactive
    // If it is an object, you need to turn on depth monitoring to monitor changes.
    // Or change to listening to people job. Salary (direct manual pointing out the final goal)
    // watch(
    //   () => people.job,
    //   (newValue, oldValue) => {
    //     console.log(` work information changed `, newValue, oldValue)
    //   },
    //   {
    //     deep: true
    //   }
    // )

    return {
      people
    }
  }
}
</script>
[the external chain image transfer fails. The source station may have an anti-theft chain mechanism. It is recommended to save the image and upload it directly (img-zjlyemen-1645448763434)( https://s2.loli.net/2022/02/19/nGhpPxlU948jtSb.png )]
If the listener is used to listen to the responsive data defined by reactive, the old data cannot be obtained, and deep listening is enabled by default, and deep listening cannot be turned off
watchEffect:
- Immediate update is enabled by default (immediate: true)
- Monitor whoever you use
<template>
  <div class="home">
    <h1>age:{{people.age}}</h1>
    <button @click="people.age++">Age plus 1</button>
    <h1>salary:{{people.job.salary}}</h1>
    <button @click="people.job.salary+=100">Salary plus 100</button>
  </div>
</template>

<script>
import { reactive, watchEffect } from "vue"
export default {
  name: "Home",
  setup() {
    let people = reactive({
      name: "Red blue purple",
      age: 21,
      job: {
        salary: -10
      }
    })
    watchEffect(() => {
      const salary = people.job.salary
      console.log("Salary change")
    })

    return {
      people
    }
  }
}
</script>
3.5 life cycle hook
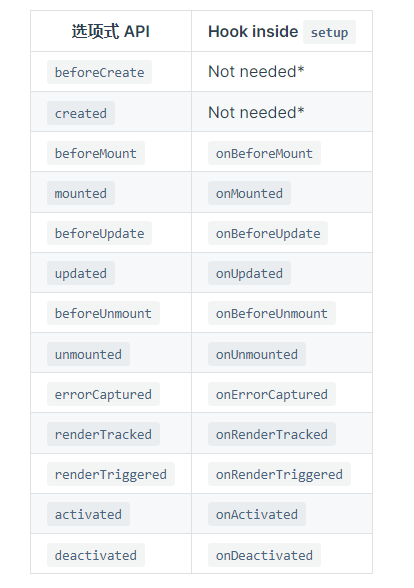
In vue3, beforeDestroy is changed to beforeUnmount, and destroyed is changed to unmount
Beforecreated and created have no API, because setup is actually equivalent to these two lifecycle functions
Use example:
<template>
  <h2>{{num}}</h2>
  <button @click="num++">+1</button>
</template>

<script>
import { onMounted, onUpdated } from "vue"
import { ref } from "vue"

export default {
  name: "Home",
  setup() {
    onMounted(() => {
      console.log("onMounted")
    }),
      onUpdated(() => {
        console.log("Data update")
      })

    let num = ref(0)

    return {
      num
    }
  }
}
</script>
3.6 toRef and toRefs
toRef is to change data into ref type data, and toRefs is to convert multiple numbers into responsive data
Let's first cite the previous example:
<template>
  <div class="home">
    <h1>age:{{people.age}}</h1>
    <button @click="people.age++">Age plus 1</button>
    <h1>salary:{{people.job.salary}}</h1>
    <button @click="people.job.salary+=100">Salary plus 100</button>
  </div>
</template>

<script>
import { reactive, watchEffect } from "vue"
export default {
  name: "Home",
  setup() {
    let people = reactive({
      name: "Red blue purple",
      age: 21,
      job: {
        salary: -10
      }
    })
    watchEffect(() => {
      const salary = people.job.salary
      console.log("Salary change")
    })

    return {
      people
    }
  }
}
</script>
Careful observation shows that people are used many times in the template, So I want to be lazy and play a little smart when return ing
return {
  age: people.age,
  salary: people.job.salary
}
Oh, you can no longer change the data by clicking the button. The reason is that the data return ed is not a response, but a number. Naturally, it cannot be changed. Verification is also very simple. Just print people in watchEffect() That's all.
You can automatically modify the data in people through toRef. Don't forget to introduce toRef
return {
  age: toRef(people, 'age'),
  salary: toRef(people.job, 'salary')
}
At this time, you may think of using ref, that is, the following form
return {
  age: ref(people.age),		// ref() does not change the data in people, but toRef can be modified
  salary: ref(people.job.salary)
}
In this way, at first glance, the effect is indeed the same, but the actual data has not found any change, which can be found through the listener
Why? In fact, if you use ref, there is an object similar to new. Naturally, the object from new has no substantive connection with the original data
Using toRefs, you can steal a little lazy
return {
  ...toRefs(people), // Deconstruction can only deconstruct one layer, so the deep layer still needs to be written
  ...toRefs(people.job)
}
4. Other changes
-
Remove keyCode as the modifier of v-on
<input v-on:keyup.13="submit" />
<input v-on:keyup.enter="submit" />

<!-- vue2 Both of the above forms are supported, vue3 Only the following is supported, that is, only through button aliases -->
-
Remove native as the modifier of v-on
-
Remove filter filter
Vue 3 migration strategy notes
4.1 routing
app.vue
<template>
  <router-view></router-view>
</template>
<script>
import { useRoute, useRouter } from "vue-router"

export default {
  setup() {
    const route = useRoute()
    const router = useRouter()

    console.log(route.path)
    router.push("/home")
  }
}
</script>
main.js
import { createApp } from 'vue'
import App from './App.vue'
import router from './router'

createApp(App)
  .use(router)
  .mount('#app')
router \ index.js
import { createRouter, createWebHashHistory } from "vue-router"


const routes = [
  {
    path: "/home",
    name: "home",
    component: () => import("../components/home.vue")
  },
  {
    path: "/login",
    name: "login",
    component: () => import("../components/login.vue")
  }
]


export default createRouter({
  history: createWebHashHistory(),
  routes
})
be careful:
- The useroute introduced from Vue router is equivalent to this of vue2$ route,this.$router
- When introducing components, it must be added vue suffix
Programming navigation parameters
<template>
  <router-view></router-view>
</template>
<script>
import { useRoute, useRouter } from "vue-router"

export default {
  setup() {
    const route = useRoute()
    const router = useRouter()

    // query programmatic navigation parameter transfer
    // router.push({
    //   path: "/home",
    //   query: {
    //     id: 666
    //   }
    // })

    // params programmed navigation parameter transmission
    router.push({
      name: "login",
      params: {
        // The routing rule should also be configured with path: "/login/:id",
        id: 666
      }
    })
  }
}
</script>
4.2 navigation guard
4.2.1 local navigation guard
home.vue
<template>
  home
</template>

<script>
import { onBeforeRouteLeave } from "vue-router"

export default {
  setup() {
    onBeforeRouteLeave((to, from) => {		// You can go there by default. You can use return false to prohibit going there
      console.log("go", to)
      console.log("come from", from)
    })
  }
}
</script>
4.2.2 global navigation guard
main.js
import { createApp } from 'vue'
import App from './App.vue'
import router from './router'

router.beforeEach((to, from) => { // next is an optional parameter, which can be written or not. return false is to cancel navigation, otherwise it means that it has passed the verification
  console.log('go', to)
  console.log('come from', from)
  // return false
})

createApp(App)
  .use(router)
  .mount('#app')
4.3 $refs
<template>
  <button @click="getValue" ref="btn">click</button>
</template>

<script>
import { getCurrentInstance, nextTick, reactive, ref } from "vue"

export default {
  setup() {
    const ci = getCurrentInstance()
    const { proxy } = getCurrentInstance()
    // console.log(getCurrentInstance()) / / you can only connect blocks in setup(). If it is in a function, you will get null

    function getValue() {
      console.log(ci.refs.btn)
      console.log(proxy.$refs.btn) // You can also use proxy$ Refs to get
    }

    return {
      getValue
    }
  }
}
</script>
4.4 nextTick
nextTick(): performs a deferred callback after the end of the next DOM update cycle. Use this method immediately after modifying the data to get the updated dom.
<template>
  <button @click="change" ref="btn">{{msg}}</button>
</template>

<script>
import { getCurrentInstance, nextTick, ref } from "vue"

export default {
  setup() {
    let { proxy } = getCurrentInstance()

    let msg = ref("Hi")
    function change() {
      const btn = proxy.$refs.btn
      msg.value = "Hello"

      console.log("Direct printing:", btn.innerText)

      nextTick(() => {
        console.log("nextTick: ", btn.innerText)
      })
    }

    return {
      msg,
      change
    }
  }
}
</script>
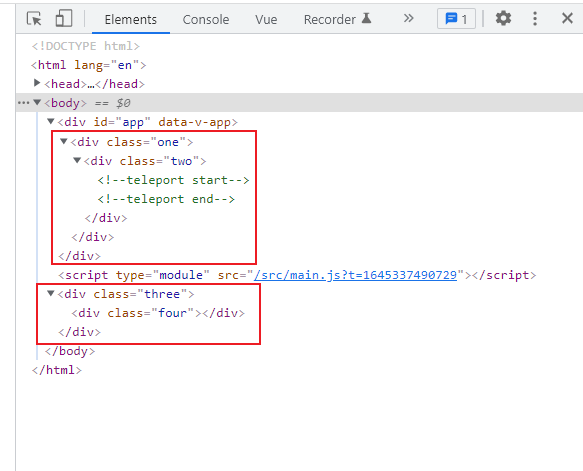
4.5 teleport
Using < report >, you can transfer the html under the report to the specified location (such as the body) through to.
<template>
  <div class="one">
    <div class="two">
      <teleport to="body">
        <div class="three">
          <div class="four"></div>
        </div>
      </teleport>
    </div>
  </div>
</template>

<script>
export default {
  name: "App"
}
</script>
5. Magic weapon (setup syntax sugar)
Vue3.0 through the setup() function, you need to return the data and methods to use, but vue3 In 2, you only need to add the setup attribute on the srcipt tag, so that the template can be used directly without return
<template>
  <button @click="alertName">alert name</button>
  <p>{{ nickname }}</p>
</template>


<script setup>
  let nickname = "Red blue purple"

  function alertName() {
    alert(`I am ${nickname}`)
  }
</script>
reference resources: