vscode voice annotation to enrich information (Part 2)
preface
The last article in this series is mainly about recording audio & audio file storage. At that time, I was in no mood for voice annotation for a week because of a bug in the recording.
1, MP3 file storage location
Voice notes usage scenario
- Use voice notes for individual items.
- Multiple projects use voice notes.
- mp3 files generated by "voice notes" are placed in their own projects.
- mp3 files generated by "voice notes" are uniformly stored somewhere in the world.
- Part of the mp3 generated by voice notes exists in the project, and part uses the global path.
vscode workspace
The user's configuration must be read where the specific audio is stored, but if the user only configures a path globally, this path cannot meet the scenes where each item stores audio files in different locations. At this time, the concept of vscode workspace is introduced.
If the eslint rules of each project are different, we can't meet this scenario only by configuring the eslint rules globally. At this time, we need to create a new one in the project vscode folder, where you can create settings JSON file. The configuration written in this file is the personalized configuration for the current project.
Configure workspace (absolute path or relative path)
Although we understand the concept of workspace, we can't solve the practical problems. For example, we configure the absolute path of audio files in the workspace vscode > settings. JSON files are uploaded to the code warehouse, so the configuration will be pulled by everyone. Each developer's computer system may be different, and the location of the folder where the project is stored may be different. Therefore, defining an absolute path in the workspace cannot solve the problem of team cooperation.
If the user configures a relative path, and this path is relative to the current settings JSON file itself, then the problem becomes how to know settings Where is the JSON file? Although the vscode plug-in can read the configuration information of the workspace, it cannot read the settings The location of the JSON file.
settings.json file tracing
I first thought about letting users manually select a location to store audio files after each recording, but obviously this method is not simple enough in operation. During a run, I suddenly thought that when users want to record audio, they must click somewhere to trigger the recording function, vscode provides a method to obtain the location of the file where the user triggers the command.
Then I will start with the file location where the user triggered the command and search level by level Vscode file, for example, get the user in / xxx1 / XXX2 / xxx3 JS file, then I will judge / xxx1 / XXX2 / Whether vscode is a folder, if not, judge / xxx1 / Whether vscode is a folder, and so on until it is found The location of the vscode folder. If it is not found, an error will be reported.
Verification of audio folder path
Use settings The location of JSON file plus the relative path configured by the user can get the real audio storage location. At this time, we can't relax. We need to check whether the obtained folder path really has a folder. Here, we won't actively create a folder for the user.
There may be a problem at this time. If there is a project a with a project b, but you want to record audio in project b, but it is not set in project b Vscode workspace folder, but it is in project a vscode > settings. JSON, then the recording file of project b will be stored in project a.
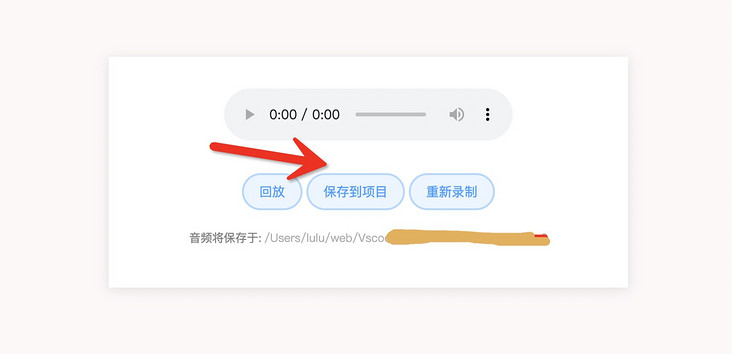
The above problems can not accurately test the user's real target path, so my idea is to pre display the path to be saved in the recorded audio page, and let the user be the final gatekeeper:

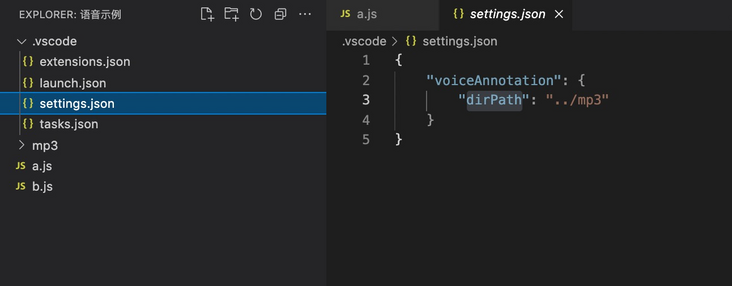
Current plug-in simple user configuration:
{
    "voiceAnnotation": {
        "dirPath": "../mp3"
    }
}
2, Definition of configuration
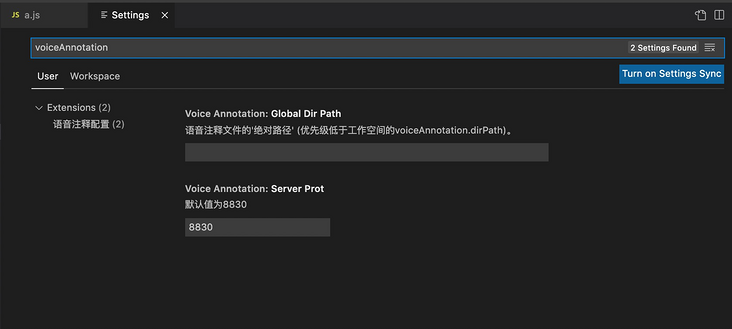
If the user doesn't want to store the audio files in the project and is afraid that his project will become larger, we support a separate audio storage project. At this time, we need to configure an absolute path globally, because the global configuration will not be synchronized to other developers. When we can't get the audio path defined by the user in the vscode workspace, Let's take the value of the global path. Let's configure the global attributes together:
package.json new global configuration settings:
    "contributes":
        "configuration": {
            "type": "object",
            "title": "Voice annotation configuration",
            "properties": {
                "voiceAnnotation.globalDirPath": {
                    "type": "string",
                    "default": "",
                    "description": "Voice annotation file'Absolute path' (Lower priority than workspace voiceAnnotation.dirPath). "
                },
                "voiceAnnotation.serverProt": {
                    "type": "number",
                    "default": 8830,
                    "description": "The default value is 8830"
                }
            }
        }
    },
For the specific meaning of each attribute, please refer to the effect drawing after configuration:
3, Method for obtaining audio folder location
util/index. TS (there are specific methods to analyze below):
export function getVoiceAnnotationDirPath() {
    const activeFilePath: string = vscode.window.activeTextEditor?.document?.fileName ?? "";
    const voiceAnnotationDirPath: string = vscode.workspace.getConfiguration().get("voiceAnnotation.dirPath") || "";
    const workspaceFilePathArr = activeFilePath.split(path.sep)
    let targetPath = "";
    for (let i = workspaceFilePathArr.length - 1; i > 0; i--) {
        try {
            const itemPath = `${path.sep}${workspaceFilePathArr.slice(1, i).join(path.sep)}${path.sep}.vscode`;
            fs.statSync(itemPath).isDirectory();
            targetPath = itemPath;
            break
        } catch (_) { }
    }
    if (voiceAnnotationDirPath && targetPath) {
        return path.resolve(targetPath, voiceAnnotationDirPath)
    } else {
        const globalDirPath = vscode.workspace
            .getConfiguration()
            .get("voiceAnnotation.globalDirPath");

        if (globalDirPath) {
            return globalDirPath as string
        } else {
            getVoiceAnnotationDirPathErr()
        }
    }
}

function getVoiceAnnotationDirPathErr() {
    vscode.window.showErrorMessage(`Please .vscode/setting.json Internal setting
    "voiceAnnotation": {
        "dirPath": "Relative path of audio folder"
    }`)
}
Sentence by sentence analysis
1: Get active location
vscode.window.activeTextEditor?.document?.fileName
The above method can obtain the file location where your current trigger command is located. For example, you can right-click inside a.js and click an option in the menu. At this time, using the above method will obtain the absolute path of a.js file. Of course, it is not just the operation menu. All commands, including a paragraph of hover, can call this method to obtain the file location.
2: Get configuration item
 vscode.workspace.getConfiguration().get("voiceAnnotation.dirPath") || "";
 vscode.workspace.getConfiguration().get("voiceAnnotation.globalDirPath");
The above method can not only obtain the information in the project vscode > settings. JSON file configuration, and it is also a method to obtain the global configuration, so we need to distinguish which one to use, so I name it dirPath and globalDirPath here.
3: File path separator
/ xxx/xx/x.js where "/" is path SEP, because there are differences in mac or window systems, path is used here SEP is designed to be compatible with users of other systems.
4: Error reporting
If the relative path and absolute path cannot be obtained, an error is thrown:
vscode.window.showErrorMessage(error message)
5: Use
The first is when the server saves the audio. The second is when the web page is opened, it will be passed to the front-end user to display the save path.
4, Initial knowledge of recording
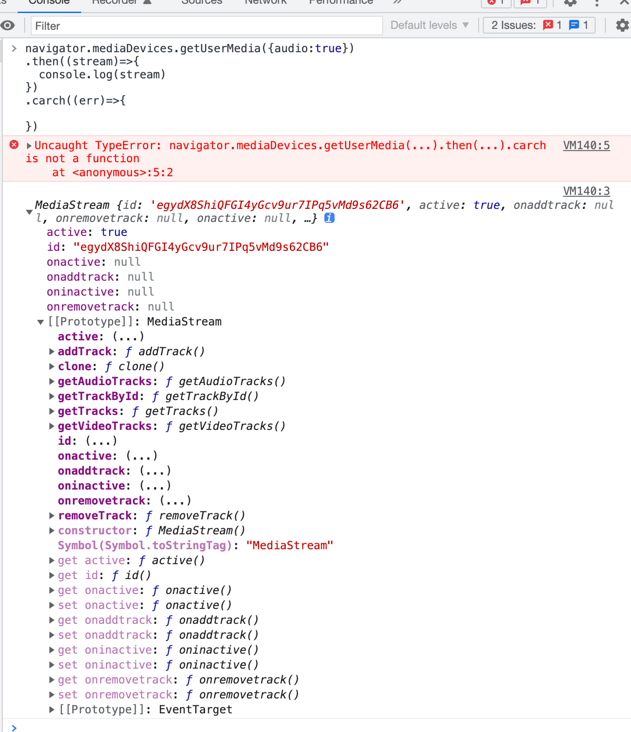
Students who have not used the recording function may not have seen navigator MediaDevices this method returns a MediaDevices object that provides connection access to media input devices such as cameras and microphones, as well as screen sharing.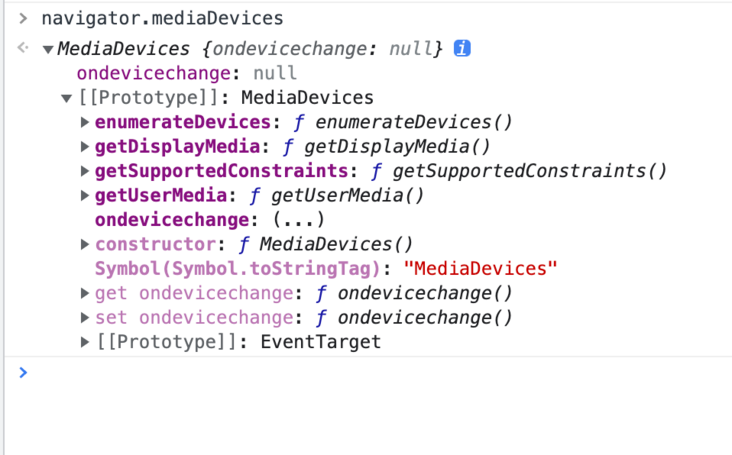
To record audio, you need to obtain the user's permission first, navigator mediaDevices. Getusermedia is a successful callback when the user license is successfully obtained and the device is available.

navigator.mediaDevices.getUserMedia({audio:true})
.then((stream)=>{
  // Because we input {audio:true}, the stream is the content stream of audio
})
.carch((err)=>{

})
5, Initialize recording device and configuration
The following shows the 'initialization' of defining the playback tag and environment. As usual, the code is added first, and you can explain it sentence by sentence later:
  <header>
    <audio id="audio" controls></audio>
    <audio id="replayAudio" controls></audio>
  </header>
let audioCtx = {}
let processor;
let userMediStream;
navigator.mediaDevices.getUserMedia({ audio: true })
.then(function (stream) {
userMediStream = stream;
audio.srcObject = stream;
audio.onloadedmetadata = function (e) {
    audio.muted = true;
};
})
.catch(function (err) {
console.log(err);
});1: Find something interesting and get the element directly with id
2: Save audio content stream
Here, the media source is saved on the global variable to facilitate subsequent replay of sound:
userMediStream = stream;
The srcObject attribute specifies the 'media source' associated with the < audio > tag:
audio.srcObject = stream;
3: Monitor data changes
Set audio when loading is complete muted = true;, Mute the device and record audio. Why mute it? In fact, it's because we don't need to play our voice at the same time when recording, which will lead to heavy "echo", so we need to mute here.
audio.onloadedmetadata = function (e) {
audio.muted = true;
};6, Start recording
First add a click event for the 'start recording' button:
  const oAudio = document.getElementById("audio");
  let buffer = [];

  oStartBt.addEventListener("click", function () {
    oAudio.srcObject = userMediStream;
    oAudio.play();
    buffer = [];
    const options = {
      mimeType: "audio/webm"
    };
    mediaRecorder = new MediaRecorder(userMediStream, options);
    mediaRecorder.ondataavailable = handleDataAvailable;
    mediaRecorder.start(10);
  });
Process the acquired audio data
  function handleDataAvailable(e) {
    if (e && e.data && e.data.size > 0) {
      buffer.push(e.data);
    }
}- oAudio.srcObject defines the 'media source' for playing labels.
- oAudio.play(); Start playing. Here we set muted = true to mute, so this is the beginning of recording.
- buffer is used to store audio data. You need to clear the last residue every time you record.
- new MediaRecorder creates a MediaRecorder object to record the specified MediaStream, that is, this method exists for the recording function. Its second parameter can enter the specified mimeType type. I checked the specific type on MDN.

- mediaRecorder.ondataavailable defines the specific processing logic for each piece of audio data.
- mediaRecorder.start(10); All pieces of audio are processed for 10ms. The audio information is stored in the Blob. I understand that the configuration here is to generate a Blob object every 10ms.
At this point, we will continue to enrich the audio recording function of the buffer, and then we can continue to collect the audio information.
7, End, replay, replay
1: End recording
Of course, the recording will come to an end. Some students asked whether it is necessary to limit the length or size of the audio? But I feel that the specific restriction rules should be customized by each team. This version only provides core functions.
  const oEndBt = document.getElementById("endBt");

  oEndBt.addEventListener("click", function () {
    oAudio.pause();
    oAudio.srcObject = null;
});- Click the end of recording button, oaudio Pause() stops the label playback.
- oAudio.srcObject = null; Cut off the media source so that this tag can no longer get audio data.
2: Replay recording
Every time you use dental floss, you may be tempted to smell it (unbearable to look back). Of course, you need to listen to the recorded audio again for the effect:
  const oReplayBt = document.getElementById("replayBt");
  const oReplayAudio = document.getElementById("replayAudio");

  oReplayBt.addEventListener("click", function () {
    let blob = new Blob(buffer, { type: "audio/webm" });
    oReplayAudio.src = window.URL.createObjectURL(blob);
    oReplayAudio.play();
});- Blob is a form of data storage. We use blob to realize pure front-end generation of excel. It can be simply understood that the first parameter is the data of the file, and the second parameter can define the type of the file.
- window. url. The createobjecturl parameter is' resource data '. This method generates a string of URLs. The incoming' resource data 'can be accessed through the url. Note that the generated url will become invalid and inaccessible if it is short.
- oReplayAudio.src specifies the playback address for the player. Since there is no recording, there is no need to specify srcObject.
- oReplayAudio.play(); Start playing.
3: Re record audio
The recording is not good. Of course, I have to re record it. At first, I want to be compatible with pause and continuation, but I feel that these capabilities are somewhat away from the core. It is expected that there should be few long voice notes. Here I will directly brush the page violently.
  const oResetBt = document.getElementById("resetBt");

  oResetBt.addEventListener("click", function () {
    location.reload();
  });
8, Conversion format
The obtained audio files may fail to play directly using node. Although this simple audio data stream file can be recognized by the browser, in order to eliminate the differences between different browsers and different operating systems, we need to convert it to the standard mp3 audio format for insurance.
Mp3 is a lossy music format, while wav is a lossless music format. In fact, the difference between the two is very obvious. The former sacrifices the quality of music for smaller file volume, while the latter tries to ensure the quality of music to the greatest extent. This also leads to different purposes. MP3 is generally used for ordinary users to listen to songs, while WAV files are usually used for studio recording and professional audio projects.
Here I choose lamejs, which is a plug-in github address here.
lamejs is an mp3 encoder rewritten with JS. The simple understanding is that it can produce standard mp3 coding format.
Add some initial logic in the initialization logic:
      let audioCtx = {};
      let processor;
      let source;
      let userMediStream;
      navigator.mediaDevices
        .getUserMedia({ audio: true })
        .then(function (stream) {
          userMediStream = stream;
          audio.srcObject = stream;
          audio.onloadedmetadata = function (e) {
            audio.muted = true;
          };
          audioCtx = new AudioContext(); // newly added
          source = audioCtx.createMediaStreamSource(stream); // newly added
          processor = audioCtx.createScriptProcessor(0, 1, 1); // newly added
          processor.onaudioprocess = function (e) { // newly added
            const array = e.inputBuffer.getChannelData(0);
            encode(array);
          };
        })
        .catch(function (err) {
          console.log(err);
});- new AudioContext() is the context of audio processing. Basically, all operations on audio will be carried out in this type.
- audioCtx.createMediaStreamSource(stream) creating an audio interface is a bit abstract.
- audioCtx.createScriptProcessor(0, 1, 1) creates an object for JavaScript to directly process audio, that is, it can operate audio data with js. The three parameters are 'buffer size', 'number of input channels' and' number of output channels'.
- processor.onaudioprocess is the processing method to listen for new data.
- encode processes audio and returns a float32Array array.
The following code refers to the code of others on the Internet. The specific effect is to complete the conversion of lamejs:
   let mp3Encoder,
        maxSamples = 1152,
        samplesMono,
        lame,
        config,
        dataBuffer;

      const clearBuffer = function () {
        dataBuffer = [];
      };

      const appendToBuffer = function (mp3Buf) {
        dataBuffer.push(new Int8Array(mp3Buf));
      };

      const init = function (prefConfig) {
        config = prefConfig || {};
        lame = new lamejs();
        mp3Encoder = new lame.Mp3Encoder(
          1,
          config.sampleRate || 44100,
          config.bitRate || 128
        );
        clearBuffer();
      };
      init();

      const floatTo16BitPCM = function (input, output) {
        for (let i = 0; i < input.length; i++) {
          let s = Math.max(-1, Math.min(1, input[i]));
          output[i] = s < 0 ? s * 0x8000 : s * 0x7fff;
        }
      };

      const convertBuffer = function (arrayBuffer) {
        let data = new Float32Array(arrayBuffer);
        let out = new Int16Array(arrayBuffer.length);
        floatTo16BitPCM(data, out);
        return out;
      };

      const encode = function (arrayBuffer) {
        samplesMono = convertBuffer(arrayBuffer);
        let remaining = samplesMono.length;
        for (let i = 0; remaining >= 0; i += maxSamples) {
          let left = samplesMono.subarray(i, i + maxSamples);
          let mp3buf = mp3Encoder.encodeBuffer(left);
          appendToBuffer(mp3buf);
          remaining -= maxSamples;
        }
      };
The corresponding start recording needs to add some logic
      oStartBt.addEventListener("click", function () {
        clearBuffer();
        oAudio.srcObject = userMediStream;
        oAudio.play();
        buffer = [];
        const options = {
          mimeType: "audio/webm",
        };
        mediaRecorder = new MediaRecorder(userMediStream, options);
        mediaRecorder.ondataavailable = handleDataAvailable;
        mediaRecorder.start(10);
        source.connect(processor); // newly added
        processor.connect(audioCtx.destination); // newly added
});- source.connect(processor) don't panic. Source is returned by createMediaStreamSource mentioned above, and processor is returned by createScriptProcessor. Here is to connect the two, so it is equivalent to starting to use js to process audio data.
- audioCtx.destination the final output address of an audio graphic in a particular case, usually a speaker.
- processor.connect forms a link, that is, start to listen to the processor.
The corresponding end recording adds some logic
      oEndBt.addEventListener("click", function () {
        oAudio.pause();
        oAudio.srcObject = null;
        mediaRecorder.stop(); // newly added
        processor.disconnect(); // newly added
});- mediaRecorder.stop stop audio (for playback of recording)
- processor.disconnect() stops processing audio data (converted to mp3).
9, Send the recorded audio file to the server
The finished data should be passed to the back end in the form of FormData.
      const oSubmitBt = document.getElementById("submitBt");

      oSubmitBt.addEventListener("click", function () {
        var blob = new Blob(dataBuffer, { type: "audio/mp3" });
        const formData = new FormData();
        formData.append("file", blob);
        fetch("/create_voice", {
          method: "POST",
          body: formData,
        })
          .then((res) => res.json())
          .catch((err) => console.log(err))
          .then((res) => {
            copy(res.voiceId);
            alert(`Saved to shear plate: ${res.voiceId}`);
            window.opener = null;
            window.open("", "_self");
            window.close();
          });
});- Here, we will close the current page after successfully transmitting the audio file, because there are really not many voice notes to be recorded.
10, Future outlook
No similar plug-ins have been found in the vscode plug-in store, and no similar plug-ins have been found on github, indicating that this problem is not very painful, but it does not mean that these problems are left unchecked. It is right to take action and really do something to improve.
For developers, this "voice annotation" plug-in can be imagined that it will only be used when the text cannot be described clearly, so the use of recording function should be very low frequency. Because of this, of course, there will not be "too many" audio files, so the extra volume of the project may not cause great trouble.
In the future, if you use it, my plan is to add a "one click delete unused comments". With the development of the project, some comments will be eliminated, and manual cleaning will not make sense.
When playing, it shows whose recording is and the specific time of recording.
In addition to voice notes, users can also add text + pictures, that is, make a plug-in with notes as the core.
end
That's it this time. I hope to make progress with you.