0. All my software download directories are in the software directory
mkdir -p /usr/local/fastdfs
cd /usr/local/fastdfs/
1. Install gcc on Linux machine
yum -y install cmake make gcc-c++
1, Install core library
1.1 installation version
#Official website
https://github.com/happyfish100

fastdfs-6.06.tar.gz
libfastcommon-1.0.43.tar.gz
fastdfs-nginx-module-1.22.tar.gz
nginx-1.16.1.tar.gz
1.2 the official website address is as follows:
https://github.com/happyfish100
https://github.com/happyfish100
1.3 first install the core library. The first step is to decompress the compressed package of the core library
#Unzip the current compressed package
tar -zxvf libfastcommon-1.0.43.tar.gz
1.4 enter the decompressed directory and execute the command of decompressing and installing
cd libfastcommon-1.0.43/
#View the following commands under the current directory

#============================================================
[root@VM-0-12-centos libfastcommon-1.0.7]# ll
 Total consumption 24
-rw-rw-r-- 1 root root 2170 9 June 16, 2014 HISTORY
-rw-rw-r-- 1 root root  582 9 June 16, 2014 INSTALL
-rw-rw-r-- 1 root root 1341 9 June 16, 2014 libfastcommon.spec
-rwxrwxr-x 1 root root 2151 9 June 16, 2014 make.sh
-rw-rw-r-- 1 root root  617 9 June 16, 2014 README
drwxrwxr-x 2 root root 4096 9 June 16, 2014 src
#============================================================
#Use make SH compile it
./make.sh
#Adopt/ make. Install with the SH command
./make.sh install
✔ The related operations of the core library are completed
1.5 soft connection creation
Because the directory set by FastDFS main program is / usr/local/lib, we need to create a soft link and change it to the location we want (equivalent to a shortcut)
ln -s /usr/lib64/libfastcommon.so /usr/local/lib/libfastcommon.so
ln -s /usr/local/lib64/libfdfsclient.so /usr/local/lib/libfdfsclient.so
ln -s /usr/local/lib64/libfdfsclient.so /usr/lib/libfdfsclient.so
2, Install FastDFS
2.1 unzip the tar package
tar -zxvf fastdfs-6.06.tar.gz
2.2 entering the directory
🎇** Note: * * do not compile directly after decompression. First modify the configuration file of the compilation command
cd fastdfs-6.06
Modify the compilation command after entering the directory
vim ./make.sh
Modify the following configuration, save and exit after modification
TARGET_PREFIX=$DESTDIR/usr/local
Execute compile and install commands
#Compile source code
./make.sh
#install
./make.sh install
After installation, the location of FastDFS main program is
- /The location of the usr/local/bin executable. The default installation location is / usr/bin.
- /The location of the etc/fdfs configuration file is the default location
- /The location of the main program code of usr/local/lib64 is in / usr/bin by default.
- /The location of some plug-in groups contained in usr/local/include/fastdfs is in / usr/include/fastdfs by default
3, Configure tracker
3.1 configuring tracker
#Enter the configuration file directory
cd /etc/fdfs
#Before configuring, copy a copy of the source file and change its name to form a good habit
cp tracker.conf.sample tracker.conf
#Modify profile
vim tracker.conf
#Modify the following contents


#Base directory (the management data of storage will be stored in this directory when Tracker runs)
base_path=/fastdfs/tracker
#Save and exit

#Create directory
mkdir -p /fastdfs/tracker
3.2 start tracker
#Enter the directory of the startup command
cd /etc/init.d
#Because the startup directory has been modified before startup, we still need to modify the startup command again
vim fdfs_trackerd
#Modify the contents of the following positions
PRG=/usr/local/bin/fdfs_trackerd

#start-up
./fdfs_trackerd start

#==========================================================
#After successful startup, you can check whether the startup status is successful

[root@VM-0-12-centos init.d]# ./fdfs_trackerd status
fdfs_trackerd (pid 21341) Running...

#==========================================================
#Stop start command
./fdfs_trackerd stop
#Restart command
./fdfs_trackerd restart

#Set startup and self startup (this is an optional operation, according to your preference)
vim /etc/rc.d/rc.local
#Add the following command to the configuration file of startup and self startup
/etc/init.d/fdfs_trackerd start
4, Configure storage
4.1 basic configuration
#Enter directory
cd /etc/fdfs
#Before configuring, copy a copy of the source file and change its name to form a good habit
cp storage.conf.sample storage.conf
#Modify profile
vim storage.conf


#Modify the following contents
###################################################
#Directory address where data and logs are stored
base_path=/fastdfs/storage/base
#The directory where files are actually stored. After storage is started, 256 * 256 directories will be successfully used to store files
store_path0=/fastdfs/storage/store
#Configure the tracker address. If there are multiple addresses, we can only keep one in the stand-alone environment
tracker_server=172.16.96.128:22122
#Save and exit

#After exiting, build the previously configured directory
mkdir -p /fastdfs/storage/base
mkdir -p /fastdfs/storage/store
4.2 start storage
#Enter the directory of the startup command
cd /etc/init.d
#Because the startup directory has been modified before startup, we still need to modify the startup command again
vim fdfs_storaged
#Modify the contents of the following positions
PRG=/usr/local/bin/fdfs_storaged
#start-up
./fdfs_storaged start

#====================================================
#View status
[root@VM-0-12-centos init.d]# ./fdfs_storaged status
fdfs_storaged (pid 28822) Running...
4.3 visit the data storage directory
cd /fastdfs/storage/store/data
ls
You can see that there are 256 directories named in hexadecimal, and each directory also contains 256 subdirectories
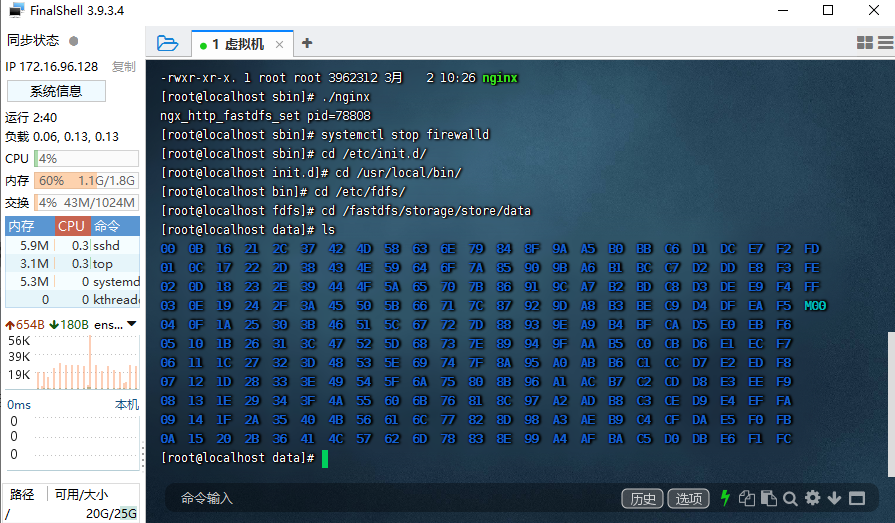
#View services
netstat -ntlp
5, Configure client (optional)
5.1 basic configuration
If you are using pure java code, this step can be ignored
#Enter the configuration directory
cd /etc/fdfs

#==============================================================
[root@VM-0-12-centos data]# cd /etc/fdfs
[root@VM-0-12-centos fdfs]# ll
 Total consumption 36
-rw-r--r-- 1 root root 1461 2 November 26:44 client.conf.sample
-rw-r--r-- 1 root root 7898 2 December 26:26 storage.conf
-rw-r--r-- 1 root root 7829 2 November 26:44 storage.conf.sample
-rw-r--r-- 1 root root 7177 2 December 26:00 tracker.conf
-rw-r--r-- 1 root root 7102 2 November 26:44 tracker.conf.sample

#==============================================================

#As always, copy the files first and then modify them to form a good habit
cp client.conf.sample client.conf
#Modify profile
vim client.conf
#Modify the following configuration
base_path=/fastdfs/client

#Replace the address of the following tracker server with your own server address
tracker_server=172.81.205.117:22122
#Save and exit to create the desired directory
mkdir -p /fastdfs/client
5.2 uploading files
#Enter directory
cd /usr/local/bin/

#====================================================================
#Here are all the commands that tracer can use for file operation
[root@VM-0-12-centos fdfs]# cd /usr/local/bin/
[root@VM-0-12-centos bin]# ll
 Total consumption 24164
-rwxr-xr-x 1 root root  321720 2 November 26:44 fdfs_appender_test
-rwxr-xr-x 1 root root  321496 2 November 26:44 fdfs_appender_test1
-rwxr-xr-x 1 root root  308376 2 November 26:44 fdfs_append_file
-rwxr-xr-x 1 root root  307808 2 November 26:44 fdfs_crc32
-rwxr-xr-x 1 root root  308400 2 November 26:44 fdfs_delete_file
-rwxr-xr-x 1 root root  309168 2 November 26:44 fdfs_download_file
-rwxr-xr-x 1 root root  308744 2 November 26:44 fdfs_file_info
-rwxr-xr-x 1 root root  322544 2 November 26:44 fdfs_monitor
-rwxr-xr-x 1 root root 1125160 2 November 26:44 fdfs_storaged
-rwxr-xr-x 1 root root  331624 2 November 26:44 fdfs_test
-rwxr-xr-x 1 root root  326736 2 November 26:44 fdfs_test1
-rwxr-xr-x 1 root root  465168 2 November 26:44 fdfs_trackerd
-rwxr-xr-x 1 root root  309360 2 November 26:44 fdfs_upload_appender
-rwxr-xr-x 1 root root  310384 2 November 26:44 fdfs_upload_file
-rwxr-xr-x 1 root root    1768 2 November 26:44 restart.sh
-rwxr-xr-x 1 root root    1680 2 November 26:44 stop.sh
We use the file upload command fdfs_upload_file
#Pick any file in your host and I'll upload the command transaction file
 ./fdfs_upload_file /etc/fdfs/client.conf ./fdfs_upload_file
#After the upload is successful, the volume name plus file name will be returned
group1/M00/00/00/rBEADGIZs4OAZzTPAAS8cObeCbQ1309199
#You can find the upload location according to the file path
❤ Command interpretation
The naming of uploaded files is divided into three parts: 🤞
- ./fdfs_upload_file file upload command, the directory where the command is located is / usr/local/bin/
- /etc/fdfs/client.conf enable the client command. The directory of the command is / etc / FDFS/
- ./fdfs_upload_file the file that needs to be uploaded. Find the file you need to upload and upload it. Here I upload this command as a file
Deep parsing return path group1/M00/00/00/rBEADGIZs4OAZzTPAAS8cObeCbQ1309199
- Group1 is the volume name of the storage configuration. Use the command cat / etc / FDFS / storage Conf view the volume name group we have previously configured_ name=group1
- M00 virtual directory, not in charge for the time being
- /00 / 00 / file saving path
- rBEADGIZs4OAZzTPAAS8cObeCbQ1309199 file name after renaming
- Enter the storage directory to view the file just uploaded
[root@VM-0-12-centos 00]# cd /fastdfs/storage/store/
[root@VM-0-12-centos store]# ls
data
[root@VM-0-12-centos store]# cd data/00/00
[root@VM-0-12-centos 00]# ls
rBEADGIZs4OAZzTPAAS8cObeCbQ1309199
#This is the file we just uploaded
5.3 deleting files
Deleting a file requires the full volume name plus the file name
cd /usr/local/bin/

./fdfs_delete_file /etc/fdfs/client.conf group1/M00/00/00/rBEADGIZs4OAZzTPAAS8cObeCbQ1309199
#Check the file storage location again and find that the file disappears, which indicates that the file has been deleted
[root@VM-0-12-centos bin]# cd /fastdfs/storage/store/data/00/00
[root@VM-0-12-centos 00]# ll
 Total consumption 0
[root@VM-0-12-centos 00]#
6, Install Nginx component module
cd /usr/local/fastdfs/
#Unzip the Nginx package
tar -zxvf fastdfs-nginx-module-1.22.tar.gz
 #Enter the src directory to modify the relevant configuration
cd fastdfs-nginx-module-1.22/src

#=====================================================================
[root@VM-0-12-centos src]# ll
 Total consumption 84
-rw-rw-r-- 1 root root 43501 7 May 2018 common.c
-rw-rw-r-- 1 root root  3995 7 May 2018 common.h
-rw-rw-r-- 1 root root   848 7 May 2018 config
-rw-rw-r-- 1 root root  3725 7 May 2018 mod_fastdfs.conf
-rw-rw-r-- 1 root root 28668 7 May 2018 ngx_http_fastdfs_module.c
#=====================================================================

#Modify config file
vim config
#Modify the following
CORE_INCS="$CORE_INCS /usr/local/include/fastdfs /usr/include/fastcommon/"
#Save and exit
6.1 installation nginx
Installation dependency
yum install -y gcc gcc-c++ make automake autoconf libtool pcre pcre-develzlib zlib-devel openssl openssl-devel
Enter the directory where the compressed package is located
cd /usr/local/fastdfs/
Unzip the package
tar -zxvf nginx-1.16.1.tar.gz
Create directory backup
mkdir -p /var/temp/nginx
Configure nginx installation information
cd /usr/local/fastdfs/nginx-1.16.1/


./configure \
--prefix=/usr/local/nginx \
--pid-path=/var/run/nginx/nginx.pid \
--lock-path=/var/lock/nginx.lock \
--error-log-path=/var/log/nginx/error.log \
--http-log-path=/var/log/nginx/access.log \
--with-http_gzip_static_module \
--http-client-body-temp-path=/var/temp/nginx/client \
--http-proxy-temp-path=/var/temp/nginx/proxy \
--http-fastcgi-temp-path=/var/temp/nginx/fastcgi \
--http-uwsgi-temp-path=/var/temp/nginx/uwsgi \
--http-scgi-temp-path=/var/temp/nginx/scgi \
--add-module=/usr/local/fastdfs/fastdfs-nginx-module-1.22/src
-Add module must be defined. This configuration information is used to specify the module to be loaded when installing nginx. If it is not specified, fastdfs nginx module will not be loaded during nginx installation, and subsequent functions cannot be realized. The latter path is the absolute path generated by decompressing fastdfs nginx module
install
cd /usr/local/fastdfs/nginx-1.16.1/
make
make install
#Modify profile
cd /usr/local/fastdfs/fastdfs-nginx-module-1.22/src
#Copy all configuration files to the / etc/fdfs / directory
cp mod_fastdfs.conf /etc/fdfs/

#Enter the configuration file directory
cd /etc/fdfs/
#Modify profile
vim mod_fastdfs.conf
#Change the address of the tracker server to your own
tracker_server=172.16.96.128:22122
#Turn on the setting that contains the group name in the URL
url_have_group_name = true
store_path0=/fastdfs/storage/store

#Copy the configuration file to the specified directory
cp /usr/local/fastdfs/fastdfs-6.06/conf/http.conf /etc/fdfs/
cp /usr/local/fastdfs/fastdfs-6.06/conf/mime.types /etc/fdfs/

#Create nginx launch soft link
ln -s /usr/local/lib64/libfdfsclient.so /usr/lib64/libfdfsclient.so

#Network storage service soft link
ln -s /fastdfs/storage/store/data/ /fastdfs/storage/store/data/M00

#Modify nginx configuration -- enter the directory where the nginx configuration file is located
cd /usr/local/fastdfs/nginx-1.16.1/conf
#Modify file
vim nginx.conf
#==================================================================
user  root;
listen       8888;
Reason for port 8888 storage.conf Port 8888 is configured inside
The nginx configuration file needs to be modified in three places
✔ First, modify the user access permission to root
✔ The second is to modify the listening port to 8888
✔ The third place is the mapping address of nginx module tool
location ~/group[0-9]/M00{
            ngx_fastdfs_module;
        }
The contents of the complete configuration file are as follows. The places marked in Chinese are the places that have been modified
#Configure user access
user  root;

worker_processes  1;

events {
    worker_connections  1024;
}


http {
    include       mime.types;
    default_type  application/octet-stream;

    keepalive_timeout  65;

    #gzip  on;

	#Configure the listening port 8888 and the address of storage
    server {
        listen       8888;
        server_name  localhost;
        location ~/group[0-9]/M00{
            ngx_fastdfs_module;
        }

        location / {
            root   html;
            index  index.html index.htm;
        }

        error_page   500 502 503 504  /50x.html;
        location = /50x.html {
            root   html;
        }
    }

}
After modifying the nginx configuration file, you need to restart the storage service
#Enter the directory of the startup command
cd /etc/init.d
#Start sotrage service
./fdfs_storaged restart
👀** Note: * * before starting the storage service, you must ensure that the tracker of the tracking server is started. If it is shut down unexpectedly, you need to start the tracker service in the same directory
After the restart, start the nginx service
cd /usr/local/nginx/sbin

 ./nginx
After the nginx service is started, you can enter the URL address in the browser to access the file resources.
7, Upload file test
Again, I used the client to upload files. I put a picture of pleasant goat in the / usr/local/fastdfs / directory
Use the client command to upload pictures and enter the client cd /usr/local/bin of the upload file command/

Get the return value of the uploaded file
group1/M00/00/00/rBBggGIe2xOAGhOdAADljrKeogE984.jpg
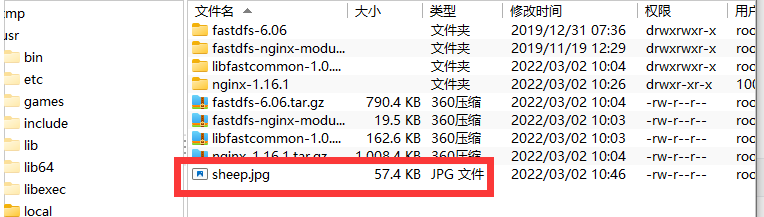
Enter the storage directory to see if the picture is safe
/fastdfs/storage/store/data/00/00
Check the file. What is stored in the current directory is the pleasant goat picture I just uploaded
ls

rBBggGIe2xOAGhOdAADljrKeogE984.jpg
Access with browser
http://172.16.96.128:8888/group1/M00/00/00/rBBggGIe2xOAGhOdAADljrKeogE984.jpg

If you can't access successfully by using the browser, remember to turn off the firewall of linux and check whether the configuration file of nginx is configured correctly
8, Java API
I put the code of Java API operating FastDFS in my github warehouse and get it myself if necessary