preface
I just got it in the pit. I just got it again.
Step 1 of CV: start from environment construction!
1. Environmental preparation
(1) Install Visual Studio
You need to use C + + to install the compilation library, so you need to install Microsoft Visual Studio. The most common version is 2019. The latest 2022 version should also be OK. The installation is very simple.
Download address: Microsoft Visual Studio official download address
Remember the installation location during installation, and then add the path in the system variable path. VS2019 is the path of cl.exe file:
**:\Program Files (x86)\Microsoft Visual Studio\2019\Community\VC\Tools\MSVC\14.****\bin\Hostx86\x64
(the position of the asterisk will be replaced according to your installation), then move up to the top, exit after confirming all the way, and shut down and restart.
(2) Project document preparation
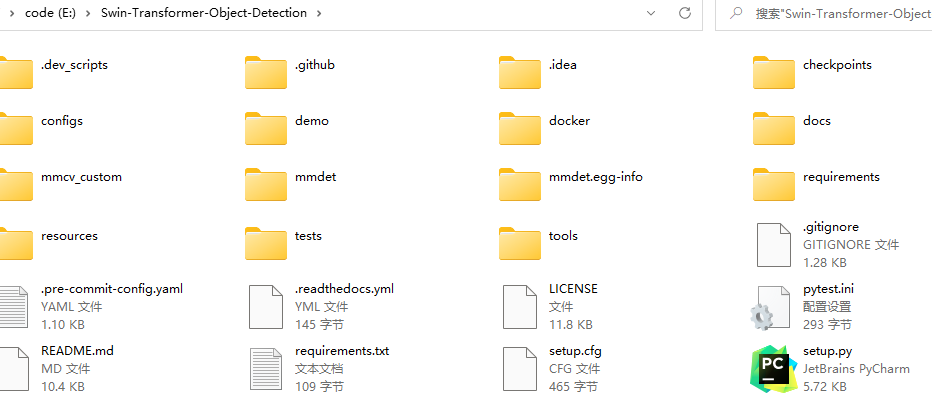
stay swin transformer official github warehouse Download or clone the code engineering file and name it swing transformer object detection. Then create a new folder named checkpoints under this folder and put the officially disclosed pre training models into it. The whole is like this.

2. Virtual environment creation
The old rule is to make a new project and build a new virtual environment.
In Anaconda Powershell Prompt, type:
conda create -n swinmm python=3.7 -y
conda activate swinmm
swinmm is the environment name, which can be changed by yourself!!!
3. Install pytorch
Refer to the previous article Image classification source code of swin transformer based on win10 reproduction Experience in installing and running code, continue to type:
conda install pytorch==1.8.1 torchvision==0.9.1 cudatoolkit=10.1 -c pytorch
4. Install mmcv
There are three ways to choose. Try which one can be installed successfully by yourself. Here is a big pit!
(1) Automatic installation (unstable, not recommended)
pip install openmim
mim install mmdet
(2) Manual installation (highly recommended!!!)
pip install mmcv-full==1.3.8 -f https://download.openmmlab.com/mmcv/dist/cu101/torch1.8.0/index.html
PS:
one: cu101 and torch 1 in the command 8.0 is the place that needs attention. If it is not changed according to the above steps, it is 1.8.0 instead of 1.8.1. The reason is officially explained;
two: the specific cuda and pytorch version correspondence and installation commands can be found in https://mmcv.readthedocs.io/en/latest/get_started/installation.html View in;
three: the reason for specifying version 1.3.8 here is that at first, my second method failed, and then I used the third method to install from the source code. As a result, the installed mmcv is the latest version 1.4.6, and then an error will be reported when the code runs. Prompt:
AssertionError: MMCV==1.4.6 is used but incompatible. Please install mmcv>=1.2.4, <=1.4.0.
Therefore, the version of mmcv should be selected between 1.2.4 and 1.4.0!
(3) Install from source
use
git clone https://github.com/open-mmlab/mmcv.git
Or package, download and unzip the code in the github warehouse, then use the cd command in Anaconda Powershell Prompt to switch to the root directory, and then:
#build
python setup.py build_ext
# install
python setup.py develop
5. Install mmdet
Continue to use the cd command to switch the path to the swin transformer object detection project file path prepared in the first step. For example, mine is:
cd E:/
cd Swin-Transformer-Object-Detection
Continue typing:
pip install -r requirements/build.txt
python setup.py develop
6. Install apex
If you train swin, you also need to use something called apex. Please refer to the previous article for the installation steps Image classification source code of swin transformer based on win10 reproduction Install in step 5 of.
The text steps are as follows. See the original blog for details:
Download the source code in GitHub https://github.com/NVIDIA/apex To the local folder (there are also relevant file resources in the network disk in the first step of the installation step);
Switch to the folder where apex is located on the command line;
Enter the command: Python setup Py install wait for the installation to complete.
7. Test
Open the swing transformer object detection project file in pychar, install some packages that are prompted to be missing, and then create a new demo Py file, copy the following code into it:
from mmdet.apis import init_detector, inference_detector, show_result_pyplot
import cv2

# The path of configs can be found according to this
config_file = 'E:/Swin-Transformer-Object-Detection/configs/swin/cascade_mask_rcnn_swin_tiny_patch4_window7_mstrain_480-800_giou_4conv1f_adamw_3x_coco.py'

# This is the weight file, which is the newly created checkpoints folder in the first step of environment preparation
checkpoint_file = 'E:/Swin-Transformer-Object-Detection/checkpoints/cascade_mask_rcnn_swin_tiny_patch4_window7.pth'
device = 'cuda:0'
# init a detector
model = init_detector(config_file, checkpoint_file, device=device)
# inference the demo image

# The test picture is in the demo folder of the official project file
image = 'E:/Swin-Transformer-Object-Detection/demo/demo.jpg'

result = inference_detector(model, image)

show_result_pyplot(model, image, result, score_thr=0.3)
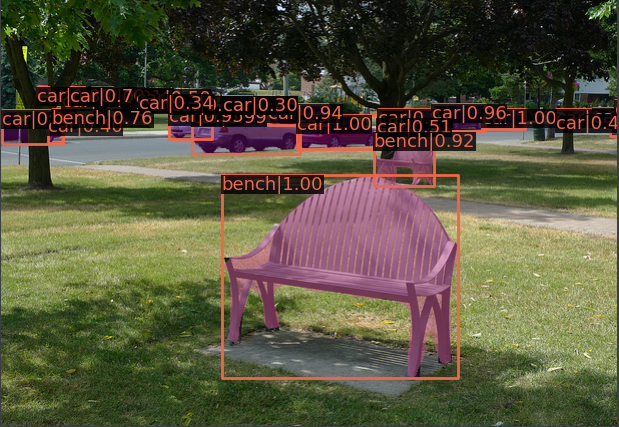
If there is no problem, the operation results are as follows:

I haven't seen how to train. There are too many and complex engineering documents. They are not as clear as the classification. If there are problems, update them later!