Today, we welcome the Fourth Lecture of JS. Today, I'll give my family a brief talk on how to obtain the parent and child elements of HTML tags in JS. If you don't understand anything, you can send me a private letter or comment below, and you will reply when you see it. Oh, I also hope the family who have been learning JS with me will continue to stick to it!!!
catalogue
II Principle of dynamically changing document content
III Node types and node relationships in DOM trees
IV Element common properties (how to use)
Vi Using JS to manipulate tables
I What is DOM?
- DOM is actually a Document Object Model, which consists of these three words.
- Documents can be changed dynamically through DOM
II Principle of dynamically changing document content
- Parse documents (such as HTML) and generate DOM trees
- Change the document content through DOM standard interface + programming language
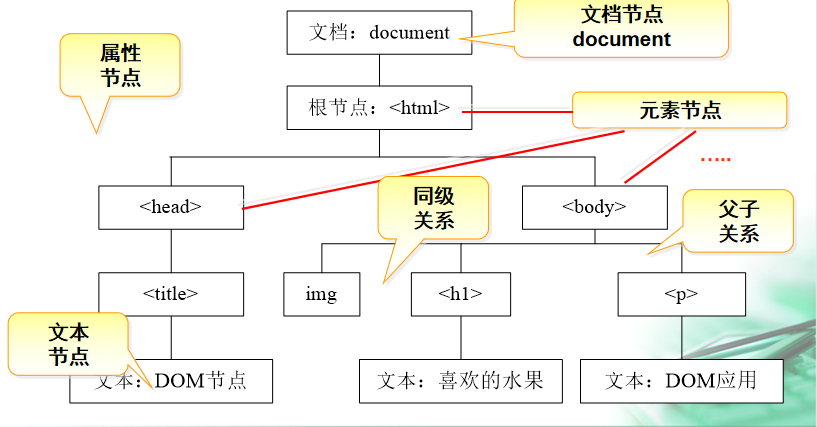
III Node types and node relationships in DOM trees
document: the largest parent element in the web page is the top level of the DOM tree. Element: element is actually the HTML tag in the web page. Node: the node understands it as a and element It's the same, HTML tags
IV Element common properties (how to use)
| 1 | Element.parent | Gets the parent of the element |
| 2 | Element.children | Gets the labels of all child elements in the element |
| 3 | Element.childElementCount | Gets the number of child elements in the element |
| 4 | Element.firstElementChild | Gets the first element of the element |
| 5 | Element.lastElementChild | Gets the last element of the element |
| 6 | Element.previousElementSibling | Get the previous adjacent element of the element |
| 7 | Element.nextElementSibling | Get the next adjacent element of the element |
Note: Element: an Element is an HTML tag. We usually give the tag an id name and use the id name to call the attribute
For example:
<div id="div">
<img src="img/1.gif">
</div>
Get the child elements of div and write them in our < script > tag
<script>
This div is the id name we set for the < div > tag
div.Element.children
</script>
1.Element.parent gets the parent of the element
<!DOCTYPE html>
<html>
	<head>
		<meta charset="utf-8">
		<title></title>
	</head>
	<body>

		<div id="div">
			<img src="img/1.gif">
			<img src="img/2.gif" id="img">
			<img src="img/3.gif">
		</div>

		<!-- The largest parent element in a web page is document -->
<script>
		// Sets the background color for the parent element of the img tag
		//  Element.parentElement gets the parent of the element
		// Element: element (also known as label) element means label
		// Note: img here is an id name set for the tag
		  img.parentElement.style.background="yellow";

</script>

	</body>
</html>
2. Element.children , get the labels of all child elements in the element
<!DOCTYPE html>
<html>
	<head>
		<meta charset="utf-8">
		<title></title>
	</head>
	<body>

		<div id="div">
			<img src="img/1.gif">
			<img src="img/2.gif" id="img">
			<img src="img/3.gif">
		</div>

<script>


		// Element.children: get all child element labels in the element
		console.log(div.children)


</script>

	</body>
</html>
3.Element.childElementCount gets the number of child elements in the element
<!DOCTYPE html>
<html>
	<head>
		<meta charset="utf-8">
		<title></title>
	</head>
	<body>

		<div id="div">
			<img src="img/1.gif">
			<img src="img/2.gif" id="img">
			<img src="img/3.gif">
		</div>


<script>

		// Query how many child elements the div tag has
		// Set an id for our div tag, also called Div
		// Element.childElementCount: gets the number of child elements in the element
		console.log(div.childElementCount);

</script>

	</body>
</html>
4.Element.firstElementChild gets the first element of the element
<!DOCTYPE html>
<html>
	<head>
		<meta charset="utf-8">
		<title></title>
	</head>
	<body>

		<div id="div">
			<img src="img/1.gif">
			<img src="img/2.gif" id="img">
			<img src="img/3.gif">
		</div>

<script>

		// Element.firstElementChild: gets the first element of the element
		console.log(div.firstElementChild);

</script>

	</body>
</html>
5.Element.lastElementChild gets the last element of the element
<!DOCTYPE html>
<html>
	<head>
		<meta charset="utf-8">
		<title></title>
	</head>
	<body>

		<div id="div">
			<img src="img/1.gif">
			<img src="img/2.gif" id="img">
			<img src="img/3.gif">
		</div>

<script>

		// Element.lastElementChild: gets the last element of the element
		console.log(div.lastElementChild);

</script>

	</body>
</html>
6.Element.previousElementSibling: get the previous adjacent element of the element
<!DOCTYPE html>
<html>
	<head>
		<meta charset="utf-8">
		<title></title>
	</head>
	<body>

		<div id="div">
			<img src="img/1.gif">
			<img src="img/2.gif" id="img">
			<img src="img/3.gif">
		</div>

<script>
		//Element.previousElementSibling gets the previous adjacent element of the element
		console.log(img.previousElementSibling);
</script>

	</body>
</html>
7.Element. Nextlementsibling , get the previous adjacent element of the element
<!DOCTYPE html>
<html>
	<head>
		<meta charset="utf-8">
		<title></title>
	</head>
	<body>

		<div id="div">
			<img src="img/1.gif">
			<img src="img/2.gif" id="img">
			<img src="img/3.gif">
		</div>

<script>

		//Element. Nextlementsibling gets the next adjacent element of the element
		console.log(img.nextElementSibling);

</script>

	</body>
</html>
V Common methods of Element
| 1 | document.createElement(TagName) | Create Element element based on tag name |
| 2 | Element.setAttribute(name,value) | Set properties in labels |
| 3 | Element.getAttribute(name) | Gets the attribute in the tag |
| 4 | Element.appendChild(Node) | Append child nodes at the end of the content |
| 5 | Element.cloneNode(blooean) | Copy node (copy child nodes or not) |
| 6 | Element.removeChild(Node) | Remove child node |
| 7 | Element.insertBefore(Node1,Node2) | Insert Node1 before Node2 |
| 8 | Element.insertBefore(Node,null) | End insert |
| 9 | Element.before(Node) | Add node after node |
| 10 | Element.after(Node) | Add node before node |
| 11 | Element.replaceChild(Node1,Node2) | Replace Node2 with Npde1 |
1.document.createElement(TagName) creates an Element based on the tag name
2.Element.setAttribute(name,value) sets the attribute in the tag
3.Element.appendChild(Node) appends a child node at the end of the content
The three methods are applied below
<!DOCTYPE html>
<html>
	<head>
		<meta charset="utf-8">
		<title></title>
	</head>
	<body>

		<div id="div">
			<img src="img/1.gif">
			<img src="img/2.gif" id="img">
			<img src="img/3.gif">
		</div>

		<button onclick="add()">Add picture</button>

<script>

		// document.createElement creates an Element based on the tag name
		function add(){
			var i=document.createElement("img");
			// Element.setAttribute(name,value) sets the attribute in the tag
			// Name: attribute name value: what to insert
			i.setAttribute("src","img/4.gif")
			// Element.appendChild: append child node at the end of content
			div.appendChild(i);

		}


</script>

	</body>
</html>
4.Element. CloneNode (blobean) copy node (whether to copy child nodes)
<!DOCTYPE html>
<html>
	<head>
		<meta charset="utf-8">
		<title></title>
	</head>
	<body>

		<div id="div">
			<img src="img/1.gif">
			<img src="img/2.gif" id="img">
			<img src="img/3.gif">
		</div>


		<button onclick="fz()">Copy picture</button>
		<!-- The largest parent element in a web page is document -->
<script>

		// Copy element
		function fz(){
			// Element. CloneNode (blobean): copy elements
			var i=div.cloneNode(true);
			// Set the id to '' because the IDS cannot be the same
			i.setAttribute("id","");
			// Append to body
			document.body.appendChild(i);
		}


</script>

	</body>
</html>
5.Element.removeChild(Node) moves out the child node
<!DOCTYPE html>
<html>
	<head>
		<meta charset="utf-8">
		<title></title>
	</head>
	<body>

		<div id="div">
			<img src="img/1.gif">
			<img src="img/2.gif" id="img">
			<img src="img/3.gif">
		</div>

		<button onclick="del()">Delete picture</button>

		<!-- The largest parent element in a web page is document -->
<script>


		// Delete child node
		function del(){
			// Delete the last photo with each click
			// Get the last one
			var i=div.lastElementChild
			// Delete this last picture
			// Element.removeChild(Node): remove child elements
			// Node means the same as Element
			div.removeChild(i);
		}


</script>

	</body>
</html>
6. Element. Insert before (Node1, Node2) inserts Node1 before Node2
<!DOCTYPE html>
<html>
	<head>
		<meta charset="utf-8">
		<title></title>
	</head>
	<body>

		<div id="div">
			<img src="img/1.gif">
			<img src="img/2.gif" id="img">
			<img src="img/3.gif">
		</div>

<script>


		// Insert a picture before picture 2
		function addBefore(){
			// Create elements from labels
			var i=document.createElement("img");
			i.setAttribute("src","img/5.gif");
			// Element.insertBefore(Node1,Node2)
			// Insert Node1 before Node2
		    div.insertBefore(i,img);
		}


</script>
<button onclick="addBefore()">insert</button>

	</body>
</html>
7. Element. Insert before (node, null)
<!DOCTYPE html>
<html>
	<head>
		<meta charset="utf-8">
		<title></title>
	</head>
	<body>

		<div id="div">
			<img src="img/1.gif">
			<img src="img/2.gif" id="img">
			<img src="img/3.gif">
		</div>


<script>


		// Insert picture at end
		function aAfter(){
			// Create elements from labels
			var i=document.createElement("img");
			i.setAttribute("src","img/5.gif");
			// Element.insertBefore(Node,null)
			// End insert
		    div.insertBefore(i,null);
		}


</script>

<button onclick="aAfter()">End insert</button>

	</body>
8.Element.before(Node) adds a node after the node
<!DOCTYPE html>
<html>
	<head>
		<meta charset="utf-8">
		<title></title>
	</head>
	<body>

		<div id="div">
			<img src="img/1.gif">
			<img src="img/2.gif" id="img">
			<img src="img/3.gif">
		</div>


		<!-- The largest parent element in a web page is document -->
<script>


		// Add node after node
		function bBefore(){
			// Create elements from labels
			var i=document.createElement("img");
			i.setAttribute("src","img/5.gif");
			// Element.before(Node)
			// End insert
		    img.before(i);
		}


</script>


<button onclick="bBefore()">Insert a node after the second picture</button>

	</body>
</html>
9. Element.after(Node)) adds a node before the node
<!DOCTYPE html>
<html>
	<head>
		<meta charset="utf-8">
		<title></title>
	</head>
	<body>

		<div id="div">
			<img src="img/1.gif">
			<img src="img/2.gif" id="img">
			<img src="img/3.gif">
		</div>

<script>

		// Add node before node
		function bAfter(){
			// Create elements from labels
			var i=document.createElement("img");
			i.setAttribute("src","img/5.gif");
			// Element.after(Node)
			//  Add node before node
		    img.after(i);
		}


</script>

<button onclick="bAfter()">Insert a node in the second picture</button>


	</body>
</html>
10.Element.replaceChild(Node1,Node2) replaces Node2 with Npde1
You can only replace it once. If you click the button to replace it, an error will be reported
<!DOCTYPE html>
<html>
	<head>
		<meta charset="utf-8">
		<title></title>
	</head>
	<body>

		<div id="div">
			<img src="img/1.gif">
			<img src="img/2.gif" id="img">
			<img src="img/3.gif">
		</div>


<script>

		// Replace picture 2 with a new picture
		function replace1(){
			// Create elements from labels
			var i=document.createElement("img");
			i.setAttribute("src","img/5.gif");
			// Element.replaceChild(Node1,Node2)
			// Replace Node2 with Npde1
		    div.replaceChild(i,img);
		}


</script>

<button onclick="replace1()">Replace picture</button>
	</body>
</html>
Vi Using JS to manipulate tables
In the DOM structure, the child node in the table tag is Tbody
| table.rows | Row set in table |
| row.cells | A collection of columns in a row |
| table.insertRow(i) | Insert a row where i is in the table |
| row.insertCell(i) | Insert a column where i is in the row |
| table.deleteRow(i) | Delete line i |
Put the code at the bottom, let's have a look, knock it out and understand how to use it
<!DOCTYPE html>
<html>
	<head>
		<meta charset="utf-8">
		<title>Operation table data</title>
	</head>
	<body>

		<!-- Topic 1:When clicking the first multi selection box of the form, the first multi selection box is equivalent to the select all button when shopping,
		 When you click him, other multiple check boxes are also checked-->
		 <!-- 1.Create a table first -->
		 <!-- table:form tr:that 's ok  td:column   border:frame-->
		 <!-- 2.Get your status -->

		 <!-- Topic 2:Delete the last row of data -->
		 <!-- Topic 3: delete all data -->
		 <!-- Topic 4:Click the delete button to delete the data of this row -->
		 <!-- Topic 5:Add data -->
     <table border id="table">
		 <tr>
			 <td><input type="checkbox" onclick="fn1(this.checked)"></td>
			 <td>Commodity name</td>
			 <td>commodity price</td>
			 <td>Commodity Operation</td>
		 </tr>

		 <tr>
			 <!-- this It means your own state,Put yourself
			 Whether the selected state is passed into our function-->
			 <td><input type="checkbox"></td>
			 <td>Banana</td>
			 <td>3.5/One kilogram</td>
			 <td><button>delete</button></td>
		 </tr>

		 <tr>
		 			 <td><input type="checkbox"></td>
		 			 <td>Banana</td>
		 			 <td>3.5/One kilogram</td>
		 			 <td><button>delete</button></td>
		 </tr>

		 <tr>
		 			 <td><input type="checkbox"></td>
		 			 <td>Banana</td>
		 			 <td>3.5/One kilogram</td>
		 			 <td><button>delete</button></td>
		 </tr>

		 <tr>
		 			 <td><input type="checkbox"></td>
		 			 <td>Banana</td>
		 			 <td>3.5/One kilogram</td>
		 			 <td><button>delete</button></td>
		 </tr>
	 </table>

	 <script>

	 // Topic 1:
		function fn1(cbx){
			// Get each multiple selection box
			var is=document.getElementsByTagName("input")
			// Traversing fore is, we use a loop
			// Remember to use foreach loop instead of var and use our let
			// Because var will have bug s
			for(let i of is){
				i.checked=cbx;
			}
		}

		// Topic 2:
		//1. Get the last row of data first
		function delLast(){
			//table.deleteRows delete the line
			// When the table has more data than one row, the last row will be deleted
			// table.
			if(table.rows.length>1){
			table.deleteRow(-1);
			}
		}

		//Topic 3:
		function delAll(){
			while(table.rows.length>1){
				table.deleteRow(-1);
			}
		}

		function load(){
			// Get the button tag under the td tag
			for(let i of document.querySelectorAll("td button"))
			// Call the delete method for the button click event
			i.onclick=del;
		}

		// Topic 4:
		function del(){
			//Click the button to delete this line. We need to get this line to delete
			// This means "this". Whoever calls this function, this is who
			// We need to get TR, delete the line, and tr makes the parent of our button
			// Element.parentElement gets the parent element of the element
			// Element means element, which we can understand as our html tag
			// Two are used here, which means that we take its parent element
			var tr=this.parentElement.parentElement
			//Remove the contents of the label
			// tr.innerHTML="";

			// Delete label + contents of label
			tr.outerHTML="";
		}


		// Topic 5:
		function add(){
			// Table: is the id name we gave the table
			// table.insertRow(i): inserts a row where i is in the table
			var tr=table.insertRow();
			// row.insertCell: insert columns in rows
			var d1=tr.insertCell();
			var d2=tr.insertCell();
			var d3=tr.insertCell();
			var d4=tr.insertCell();
			// Insert content for each column
			// innerHTM can insert html tags or text
			d1.innerHTML='<input type="checkbox">'
			// textContent can insert text, not html tags
            d2.textContent="watermelon";
			d3.textContent="2.22/Jin";
			d4.innerHTML="<button>delete</button>"
			// Call the delete method: let's add the data delete button to delete the data
			load();
		}
		// Call method
		  load();
	 </script>
	 <br><button onclick="delLast()">Delete last line</button>
	 <button onclick="delAll()">Delete all data in the table</button>
	 <button onclick="add()">Add data</button>
	</body>
</html>
This is the end of today's course. Everyone knocks with the code and makes detailed comments on the code. If you don't understand, send a private letter or comment below. I also hope you will persevere in learning and update from time to time, because you can't reply to your questions at work. You will reply when you see it.