catalog:
3. VideoCache Development Guide
4. Collection of articles in the "HarmonyOS tripartite component development guide"
introduction
In the previous article, I introduced the component use and development guide of the bottom navigation bar. This article will bring you another implementation of Hongmeng tripartite component: Flexbox. What is Flexbox? If you are familiar with Java Swing, you will not be unfamiliar. That is, the control is automatically added to the right according to the width of ViewGroup. If the remaining space in the current line is insufficient, Automatically added to the next line. It feels like all controls float to the left. The first line is full and float to the second line ~ so it is also called flow layout. Hongmeng does not provide streaming layout, but in some cases, streaming layout is very suitable for use, such as keyword tags, search hot word list, etc., such as the following figure:
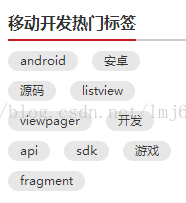

These are especially suitable for using Flexbox. This article will lead you to implement Flexbox by yourself, and then use the Flexbox we define to achieve the above label effect. Learn to use a control and learn to write a control. I believe everyone knows that it is better to teach people to fish than to teach people to fish.
Next, let's take a look at the implementation effect of Hongmeng simulator. The effect diagram is as follows:
Figure (1) default label status
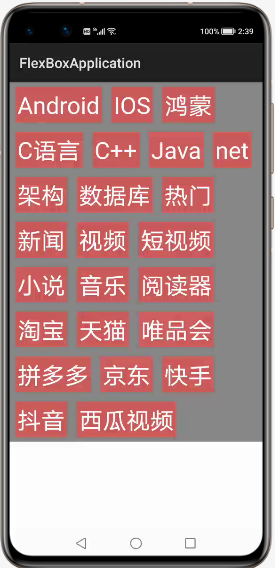
Figure (2) tag selected

VideoCache User Guide
Ø create a new project and add component Har package dependency
To add HAR to the application module, you only need to add flexboxlibrary debug Copy HAR to the entry\libs directory
Ø modify the configuration file
1. Add the following code to the layout:
<com.istone.flexboxlibrary.HWFlowViewGroup
    ohos:id="$+id:viewgroup"
    ohos:height="match_content"
    ohos:width="match_parent"
    ohos:background_element="gray"
    ohos:orientation="vertical"
    />
2. Use in the code in the following ways:
   //mNames is the data source of item. It can be any data type that needs to be displayed. It can be defined according to the actual situation
parentLayout = (HWFlowViewGroup) findComponentById(ResourceTable.Id_viewgroup);
parentLayout.HWFlowViewGroup(getContext(), mNames, parentLayout);
parentLayout.setOnItemClickListener((Component view) -> {
//Callback after item Click
    Text text = (Text)view;
    if(text.isSelected()){
        text.setTextColor(Color.BLACK);

    }else{
        text.setTextColor(Color.WHITE);
    }
});
VideoCache Development Guide
In the above, we have explained how to use Flexbox in the development process. Next, we will briefly analyze the implementation idea of Flexbox
1. For Flexbox, you need to specify LayoutConfig. At present, we only need to be able to recognize margin and padding
2. Calculate the width of all childviews in measureChild, and then calculate the width of each current row according to the width of childView
3. Finally, layout all childviews in the according to the calculated width.
Taking text as an example, the code for calculating each childView is as follows:
private float measureChild(Text text) {
    Paint paint = new Paint();
    paint.setTextSize(text.getTextSize());
    float childWidth = paint.measureText(text.getText());
    childWidth = childWidth + text.getPaddingLeft() + text.getPaddingRight() + text.getMarginLeft() + text.getMarginRight();
    return childWidth;
}
Initialize the layout of each line with the following code:
private DirectionalLayout initDirtLayout() {
    DirectionalLayout childLayout = new DirectionalLayout(mContext);
    childLayout.setOrientation(Component.HORIZONTAL);
    DirectionalLayout.LayoutConfig layoutConfig = new DirectionalLayout.LayoutConfig(ComponentContainer.LayoutConfig.MATCH_PARENT, ComponentContainer.LayoutConfig.MATCH_CONTENT);
    layoutConfig.setMargins(10, 10, 10, 10);
    childLayout.setLayoutConfig(layoutConfig);
    return childLayout;
}
Get the width of the screen. The code is as follows:
private void getParentWidthAndHeight() {
    Optional<Display> display = DisplayManager.getInstance().getDefaultDisplay(mContext);
    Point pt = new Point();
    display.get().getSize(pt);
    mParentWidth = (int) pt.getPointX();
}
Dynamic layout:
private void initChildViews() {
    for (int i = 0; i < mNames.length; i++) {
        Text text = new Text(mContext);
        text.setId(i);
        text.setText(mNames[i]);
        text.setTextSize(100);
        text.setSelected(false);
        text.setTextColor(Color.WHITE);
        text.setPadding(10, 10, 10, 10);
        ShapeElement background = new ShapeElement();
        background.setRgbColor(new RgbColor(205, 92, 92));
        text.setBackground(background);
        DirectionalLayout.LayoutConfig layoutConfig = new DirectionalLayout.LayoutConfig(ComponentContainer.LayoutConfig.MATCH_CONTENT, ComponentContainer.LayoutConfig.MATCH_CONTENT);
        layoutConfig.setMargins(20, 10, 20, 10);
        text.setLayoutConfig(layoutConfig);

        if (i == 0) {
            childLayout = initDirtLayout();
            mLineWidth = measureChild(text);
            childLayout.addComponent(text);
        } else {
            mLineWidth = mLineWidth + measureChild(text);
            if (mLineWidth > (mParentWidth - childLayout.getMarginLeft() - childLayout.getMarginRight())) {
                mParentLayout.addComponent(childLayout);
                childLayout = initDirtLayout();
                mLineWidth = measureChild(text);
            }
            childLayout.addComponent(text);
            if (i == mNames.length - 1) {
                mParentLayout.addComponent(childLayout);
            }
        }

        ComponentBean bean = new ComponentBean(text, false);
        list.add(bean);

        text.setClickedListener(component -> {
            text.setSelected(!text.isSelected());
            mOnItemClickListener.onItemClick(text);
        });
    }
}
Define the interface to realize the click event of item
public interface OnItemClickListener {
    void onItemClick(Component view);
}

public void setOnItemClickListener(OnItemClickListener onItemClickListener) {
    mOnItemClickListener = onItemClickListener;
}
According to the train of thought, is it very simple? We just need to grasp how to calculate the width of childview and when to add a new line.
For more original, please pay attention to: https://harmonyos.51cto.com/column/30
Author: soft Tongtian Kehui
For more information, please visit the Hongmeng community jointly built by 51CTO and Huawei: https://harmonyos.51cto.com