Write in front
python has been studied several times in succession, and began to learn it in college. They all learned some leather and didn't stick to it. They have been in contact with basic grammar, regularity, Socket and reptiles. I do a lot of java and I don't use it at ordinary times, so I haven't had a systematic note for myself to review. Here is a more basic one for myself to review. The original resource is the learning notes shared by small partners. I'll sort it out and summarize it here. Life refueling
© 2018-2020 liruilong@aliyun.com,All rights reserved.
This article is the original article of the blogger and follows the CC 4.0 BY-SA copyright agreement. For reprint, please attach the source link of the original text and this statement.
Introduction to multitasking
Python multiprocess
Import process package
#Import process package
import multiprocessing
Description of Process class
Process([group [, target [, name [, args [, kwargs]]]]])
- Group: Specifies the process group. Currently, only None can be used
- Target: the name of the target task to be executed
- Name: process name
- args: pass parameters to the execution task in tuple mode
- kwargs: pass parameters to the execution task in dictionary mode
Common methods for instance objects created by Process:
- start(): start the child process instance (create child process)
- join(): wait for the execution of the child process to end
- terminate(): terminate the child process immediately regardless of whether the task is completed or not
Common properties of instance objects created by Process:
- name: alias of the current process. The default is Process-N, and N is an integer incremented from 1
Multi process multitasking code
import multiprocessing
import time
# Dance task
def dance():
    for i in range(5):
        print("Dancing...")
        time.sleep(0.2)
# Singing task
def sing():
    for i in range(5):
        print("Singing...")
        time.sleep(0.2)

if __name__ == '__main__':
    # Create a child process for dancing
    # Group: indicates the process group. At present, only None can be used
    # Target: indicates the name of the target task to be executed (function name, method name)
    # Name: process name. The default is Process-1
    dance_process = multiprocessing.Process(target=dance, name="myprocess1")
    sing_process = multiprocessing.Process(target=sing)
    # Start the sub process to execute the corresponding task
    dance_process.start()
    sing_process.start()
Execution result:
Singing
Dancing
Singing
Dancing
Singing
Dancing
Singing
Dancing
Singing
Dancing
Get process number
Purpose of obtaining process number
The purpose of obtaining the process number is to verify the relationship between the main process and the sub process. You can know that the sub process is created by the main process. Two operations for obtaining process number
- Get the current process number
- Get the current parent process number
- Is an OS module
Get the current process number
os.getpid() means to get the current process number
import multiprocessing
import time
import os
# Dance task
def dance():
    # Gets the number of the current process
    print("dance:", os.getpid())
    # Get current process
    print("dance:", multiprocessing.current_process())
    for i in range(5):
        print("Dancing...")
        time.sleep(0.2)
        # Extension: kill the specified process according to the process number
        os.kill(os.getpid(), 9)
# Singing task
def sing():
    # Gets the number of the current process
    print("sing:", os.getpid())
    # Get current process
    print("sing:", multiprocessing.current_process())
    for i in range(5):
        print("Singing...")
        time.sleep(0.2)


if __name__ == '__main__':
    # Gets the number of the current process
    print("main:", os.getpid())
    # Get current process
    print("main:", multiprocessing.current_process())
    # Create a child process for dancing
    # Group: indicates the process group. At present, only None can be used
    # Target: indicates the name of the target task to be executed (function name, method name)
    # Name: process name. The default is Process-1
    dance_process = multiprocessing.Process(target=dance, name="myprocess1")
    sing_process = multiprocessing.Process(target=sing)
    # Start the sub process to execute the corresponding task
    dance_process.start()
    sing_process.start()
Execution result:
main: 70763
main: <_MainProcess(MainProcess, started)>
dance: 70768
dance: <Process(myprocess1, started)>
Dancing
sing: 70769
sing: <Process(Process-2, started)>
Singing
Singing
Singing
Singing
Singing
Get the current parent process number
os.getppid() means to get the current parent process number
import multiprocessing
import time
import os
# Dance task
def dance():
    # Gets the number of the current process
    print("dance:", os.getpid())
    # Get current process
    print("dance:", multiprocessing.current_process())
    # Gets the number of the parent process
    print("dance Parent process number of:", os.getppid())
    for i in range(5):
        print("Dancing...")
        time.sleep(0.2)
        # Extension: kill the specified process according to the process number
        os.kill(os.getpid(), 9)
# Singing task
def sing():
    # Gets the number of the current process
    print("sing:", os.getpid())
    # Get current process
    print("sing:", multiprocessing.current_process())
    # Gets the number of the parent process
    print("sing Parent process number of:", os.getppid())
    for i in range(5):
        print("Singing...")
        time.sleep(0.2)


if __name__ == '__main__':
    # Gets the number of the current process
    print("main:", os.getpid())
    # Get current process
    print("main:", multiprocessing.current_process())
    # Create a child process for dancing
    # Group: indicates the process group. At present, only None can be used
    # Target: indicates the name of the target task to be executed (function name, method name)
    # Name: process name. The default is Process-1
    dance_process = multiprocessing.Process(target=dance, name="myprocess1")
    sing_process = multiprocessing.Process(target=sing)
    # Start the sub process to execute the corresponding task
    dance_process.start()
    sing_process.start()
main: 70860
main: <_MainProcess(MainProcess, started)>
dance: 70861
dance: <Process(myprocess1, started)>
Parent process number of dance: 70860
Dancing
sing: 70862
sing: <Process(Process-2, started)>
Parent process number: 860
Singing
Singing
Singing
Singing
Singing
The process executes a task with parameters
Introduction to the process executing tasks with parameters
The task we use the process to execute has no parameters. If the task we use the process to execute has parameters, how to pass parameters to the function?
There are two ways for the Process class to execute a task and pass parameters to the task:
- args means to pass parameters to the execution task in the form of tuples
- kwargs means to pass parameters to the execution task in the form of dictionary
Use of args parameter
import multiprocessing
import time
# Tasks with parameters
def task(count):
    for i in range(count):
        print("Task execution..")
        time.sleep(0.2)
    else:
        print("Task execution completed")

if __name__ == '__main__':
    # Create child process
    # args: pass in parameters to the task as tuples
    sub_process = multiprocessing.Process(target=task, args=(5,))
    sub_process.start()
Task execution
Task execution
Task execution
Task execution
Task execution
Task execution completed
Use of kwargs parameter
import multiprocessing
import time
# Tasks with parameters
def task(count):
    for i in range(count):
        print("Task execution..")
        time.sleep(0.2)
    else:
        print("Task execution completed")


if __name__ == '__main__':
    # Create child process
    # kwargs: indicates that parameters are passed in as a dictionary
    sub_process = multiprocessing.Process(target=task, kwargs={"count": 3})
    sub_process.start()
Task execution
Task execution
Task execution
Task execution completed
Process considerations
Notes on the process:
- Global variables are not shared between processes
- The main process will wait for the execution of all child processes to end
Global variables are not shared between processes:
import multiprocessing
import time
# Define global variables
g_list = list()
# Task of adding data
def add_data():
   for i in range(5):
       g_list.append(i)
       print("add:", i)
       time.sleep(0.2)
   # The code is executed here, indicating that the data addition is completed
   print("add_data:", g_list)


def read_data():
   print("read_data", g_list)


if __name__ == '__main__':
   # Create a child process to add data
   add_data_process = multiprocessing.Process(target=add_data)
   # Create a child process that reads data
   read_data_process = multiprocessing.Process(target=read_data)
   # Start the sub process to execute the corresponding task
   add_data_process.start()
   # The main process waits for the execution of the sub process adding data to be completed, and then the program continues to execute and read the data
   add_data_process.join()
   read_data_process.start()
   print("main:", g_list)
   # Summary: global variables are not shared among multiple processes
add: 0
add: 1
add: 2
add: 3
add: 4
add_data: [0, 1, 2, 3, 4]
main: []
read_data []
Creating a child process will copy the resources of the main process, that is, the child process is a copy of the main process, like a pair of twins. The reason why global variables are not shared between processes is that the global variables in the same process are not operated, but the names of global variables in different processes are the same.
The main process will wait for the execution of all child processes to end
If we create a subprocess now, it will take about 2 seconds for the subprocess to execute. Now let the main process execute for 0.5 seconds and exit the program. Check the execution results
import multiprocessing
import time
# Define the tasks that the process needs to perform
def task():
    for i in range(10):
        print("Task execution...")
        time.sleep(0.2)

if __name__ == '__main__':
    # Create child process
    sub_process = multiprocessing.Process(target=task)
    sub_process.start()
    # The main process is delayed by 0.5 seconds
    time.sleep(0.5)
    print("over")
    exit()
    # Summary: the main process will wait for all sub processes to finish executing before exiting
Task execution
Task execution
Task execution
over
Task execution
Task execution
Task execution
Task execution
Task execution
Task execution
Task execution
The main process will wait for the execution of all sub processes to end. What if we let the main process execute for 0.5 seconds and the sub processes are destroyed and no longer executed?
We can set up a daemon for the main process or let the child process destroy before the main process exits
- Guarding the main process: guarding the main process means that the main process exits, and the child process is destroyed and no longer executed
- Subprocess destruction: subprocess execution ends
import multiprocessing
import time
# Define the tasks that the process needs to perform
def task():
    for i in range(10):
        print("Task execution...")
        time.sleep(0.2)

if __name__ == '__main__':
    # Create child process
    sub_process = multiprocessing.Process(target=task)
    # Set the main process to be guarded. The main process exits and the sub process is destroyed directly. The life cycle of the sub process depends on the main process
    # sub_process.daemon = True
    sub_process.start()
    time.sleep(0.5)
    print("over")
    # Let the child process destroy
    sub_process.terminate()
    exit()
    # Summary: the main process will wait for all sub processes to finish executing before exiting
    # If you want the main process to exit and the child process to be destroyed, you can set the main process to be guarded or let the child process be destroyed before the main process exits
Use of multithreading
Import thread module
#Import thread module
import threading
Thread class thread parameter description
Thread([group [, target [, name [, args [, kwargs]]]]])
- Group: thread group. Currently, only None can be used
- Target: name of the target task to be executed
- args: pass parameters to the execution task as tuples
- kwargs: pass parameters to the execution task in dictionary mode
- Name: thread name, which is generally not set
Start thread
- The start thread uses the start method
Multithreading completes multitasking
import threading
import time
# Singing task
def sing():
    # Extension: get current thread
    # print("sing the thread currently executing is:", threading.current_thread())
    for i in range(3):
        print("Singing...%d" % i)
        time.sleep(1)
# Dance task
def dance():
    # Extension: get current thread
    # Print ("the thread currently executed by dance is:", threading.current_thread())
    for i in range(3):
        print("Dancing...%d" % i)
        time.sleep(1)


if __name__ == '__main__':
    # Extension: get current thread
    # print("the thread currently executing is:", threading.current_thread())
    # Create a singing thread
    # target: the name of the function executed by the thread
    sing_thread = threading.Thread(target=sing)
    # Create a dance thread
    dance_thread = threading.Thread(target=dance)
    # Open thread
    sing_thread.start()
    dance_thread.start()
Singing... 0
Dancing... 0
Singing... 1
Dancing... 1
Singing... 2
Dancing... 2
A thread executes a task with parameters
Introduction to thread executing tasks with parameters
Previously, the tasks we use threads to execute have no parameters. If the tasks we use threads to execute have parameters, how to pass parameters to the function? Thread class executes a task and passes parameters to the task in two ways:
- args means to pass parameters to the execution task in the form of tuples
- kwargs means to pass parameters to the execution task in the form of dictionary
Use of args parameter
import threading
import time
# Tasks with parameters
def task(count):
    for i in range(count):
        print("Task execution..")
        time.sleep(0.2)
    else:
        print("Task execution completed")


if __name__ == '__main__':
    # Create child thread
    # args: pass in parameters to the task as tuples
    sub_thread = threading.Thread(target=task, args=(5,))
    sub_thread.start()
Task execution
Task execution
Task execution
Task execution
Task execution
Task execution completed
Use of kwargs parameter
import threading
import time
# Tasks with parameters
def task(count):
    for i in range(count):
        print("Task execution..")
        time.sleep(0.2)
    else:
        print("Task execution completed")


if __name__ == '__main__':
    # Create child thread
    # kwargs: indicates that parameters are passed in as a dictionary
    sub_thread = threading.Thread(target=task, kwargs={"count": 3})
    sub_thread.start()
Task execution
Task execution
Task execution
Task execution completed
Thread considerations
- Execution between threads is out of order
- The main thread will wait for the execution of all child threads to end
- Sharing global variables between threads
- Error in sharing global variable data between threads
Execution between threads is out of order
- The execution between threads is disordered, which is determined by cpu scheduling. Which thread is scheduled by cpu will execute first. Threads without scheduling cannot execute.
- The execution between processes is also disordered. It is determined by the operating system scheduling. Which process the operating system schedules will be executed first. Processes without scheduling cannot be executed.
import threading
import time


def task():
    time.sleep(1)
    print("Current thread:", threading.current_thread().name)


if __name__ == '__main__':
   for _ in range(5):
       sub_thread = threading.Thread(target=task)
       sub_thread.start()
Current thread: Thread-1
Current thread: Thread-2
Current thread: Thread-4
Current thread: Thread-5
Current thread: Thread-3
The main thread will wait for the execution of all child threads to end
If we create a sub thread now, it will take about 2.5 seconds for the sub thread to execute. Now let the main thread execute for 1 second and exit the program to check the execution results
import threading
import time
# Test whether the main thread will wait for the execution of the child thread before exiting the program
def show_info():
    for i in range(5):
        print("test:", i)
        time.sleep(0.5)


if __name__ == '__main__':
    sub_thread = threading.Thread(target=show_info)
    sub_thread.start()
    # Main thread delay 1 second
    time.sleep(1)
    print("over")
test: 0
test: 1
over
test: 2
test: 3
test: 4
The main thread will wait for the execution of all sub threads to end. What if we let the main thread execute for 1 second and the sub threads are destroyed and no longer executed?
We can set the guard main thread
Guarding the main thread: guarding the main thread means that the main thread exits, and the child thread is destroyed and no longer executed
There are two ways to set the guard main thread:
- threading.Thread(target=show_info, daemon=True)
- Thread object setDaemon(True)
import threading
import time
# Test whether the main thread will wait for the execution of the child thread before exiting the program
def show_info():
    for i in range(5):
        print("test:", i)
        time.sleep(0.5)


if __name__ == '__main__':
    # Create a child thread to guard the main thread
    # daemon=True guard the main thread
    # Guard main thread mode 1
    sub_thread = threading.Thread(target=show_info, daemon=True)
    # It is set as the guardian main thread. After the main thread exits, the sub thread directly destroys the code that no longer executes the sub thread
    # Guard main thread mode 2
    # sub_thread.setDaemon(True)
    sub_thread.start()
    # Main thread delay 1 second
    time.sleep(1)
    print("over")
test: 0
test: 1
over
Sharing global variables between threads
Requirements:
Define a global variable of list type
Create two sub threads to execute the task of adding data to the global variable and the task of reading data from the global variable respectively
Check whether global variable data is shared between threads
import threading
import time
# Define global variables
my_list = list()
# Write data task
def write_data():
    for i in range(5):
        my_list.append(i)
        time.sleep(0.1)
    print("write_data:", my_list)
# Read data task
def read_data():
    print("read_data:", my_list)


if __name__ == '__main__':
    # Create a thread to write data
    write_thread = threading.Thread(target=write_data)
    # Create a thread to read data
    read_thread = threading.Thread(target=read_data)
    write_thread.start()
    # delayed
    # time.sleep(1)
    # After the main thread waits for the write thread to finish executing, the code continues to execute
    write_thread.join()
    print("Start reading data")
    read_thread.start()
write_data: [0, 1, 2, 3, 4]
Start reading data
read_data: [0, 1, 2, 3, 4]
Error in sharing global variable data between threads
Requirements:
- Define two functions to realize 1 million cycles, and add 1 to the global variable every cycle
- Create two sub threads to execute the corresponding two functions and view the calculated results
import threading
# Define global variables
g_num = 0
# Loop once to add 1 to the global variable
def sum_num1():
    for i in range(1000000):
        global g_num
        g_num += 1
    print("sum1:", g_num)
# Loop once to add 1 to the global variable
def sum_num2():
    for i in range(1000000):
        global g_num
        g_num += 1
    print("sum2:", g_num)


if __name__ == '__main__':
    # Create two threads
    first_thread = threading.Thread(target=sum_num1)
    second_thread = threading.Thread(target=sum_num2)
    # Start thread
    first_thread.start()
    # Start thread
    second_thread.start()
sum1: 1210949
sum2: 1496035
Multithreading has an error in operating data on global variables at the same time. Error analysis:
Two threads first_thread and second_thread must be set to the global variable g_num(0 by default) adds 1. However, due to the simultaneous operation of multiple threads, the following situations may occur:
- In G_ When num = 0, first_thread get g_num=0. At this point, the system sets the first_thread is scheduled to the "sleeping" state, and second_thread changes to the "running" state, and t2 also gets g_num=0
- Then second_thread adds 1 to the obtained value and assigns it to g_num so that g_num=1
- Then the system puts second_thread is scheduled as "sleeping", and the first_ Turn thread to "running". Thread t1 assigns its previous 0 plus 1 to g_num.
- This leads to the first_thread and first_ Threads are all right for g_num plus 1, but the result is still g_num=1
Solution to global variable data error:
Thread synchronization: ensure that only one thread can operate global variable synchronization at the same time: cooperate with the pace and run in a predetermined order. If you finish, I'll say it again. It's like a walkie talkie in real life
Thread synchronization mode:
- Thread wait (join)
- mutex
import threading
# Define global variables
g_num = 0
# Loop 1000000 times, adding 1 to the global variable each time
def sum_num1():
    for i in range(1000000):
        global g_num
        g_num += 1
    print("sum1:", g_num)
# Loop 1000000 times, adding 1 to the global variable each time
def sum_num2():
    for i in range(1000000):
        global g_num
        g_num += 1
    print("sum2:", g_num)


if __name__ == '__main__':
    # Create two threads
    first_thread = threading.Thread(target=sum_num1)
    second_thread = threading.Thread(target=sum_num2)
    # Start thread
    first_thread.start()
    # After the first thread finishes executing the code, the second thread will continue to execute the code
    # Thread synchronization: after one task is completed, another task can be executed. At the same time, only one task is executing
    first_thread.join()
    # Start thread
    second_thread.start()
sum1: 1000000
sum2: 2000000
mutex
Mutex lock: lock the shared data to ensure that only one thread can operate at the same time.
Note: a mutex lock is robbed by multiple threads. The thread that grabs the lock executes first. The thread that does not grab the lock needs to wait. After the mutex lock is used and released, other waiting threads will grab the lock.
Use of mutex
Steps for using mutex:
# Create lock
mutex = threading.Lock()
# Lock
mutex.acquire()
...The code written here can ensure that only one thread can operate at the same time, Lock shared data...
# Release lock
mutex.release()
Note:
The code between the acquire and release methods can only be operated by one thread at a time
If other threads have used the mutex when calling the acquire method, the acquire method will be blocked at this time and can not be locked again until the mutex is released.
Use the mutex lock to complete the operation that two threads add one million times to the same global variable
import threading
# Define global variables
g_num = 0
# Create global mutex
lock = threading.Lock()
# Loop once to add 1 to the global variable
def sum_num1():
    # Lock
    lock.acquire()
    for i in range(1000000):
        global g_num
        g_num += 1
    print("sum1:", g_num)
    # Release lock
    lock.release()
# Loop once to add 1 to the global variable
def sum_num2():
    # Lock
    lock.acquire()
    for i in range(1000000):
        global g_num
        g_num += 1
    print("sum2:", g_num)
    # Release lock
    lock.release()


if __name__ == '__main__':
    # Create two threads
    first_thread = threading.Thread(target=sum_num1)
    second_thread = threading.Thread(target=sum_num2)
    # Start thread
    first_thread.start()
    second_thread.start()
    # Tip: add the mutex lock. We can't decide which thread grabs the lock. The thread grabs the lock and executes first. The thread that doesn't grab the lock needs to wait
    # Coupled with the mutex lock, multitasking instantly becomes a single task, and the performance will decline, that is, only one thread can execute at the same time
sum1: 1000000
sum2: 2000000
Note: through the execution result, the address mutex can ensure that multiple threads access shared data without data error
Deadlock:
Deadlock: the situation of waiting for the other party to release the lock is a deadlock
Deadlock example
Requirement: take values in the list according to the subscript to ensure that only one thread can take values at the same time
import threading
import time
# Create mutex
lock = threading.Lock()
# Take values according to subscripts to ensure that only one thread can take values at the same time
def get_value(index):
    # Lock
    lock.acquire()
    print(threading.current_thread())
    my_list = [3,6,8,1]
    # Judge whether the subscript release is out of bounds
    if index >= len(my_list):
        print("Subscript out of bounds:", index)
        return
    value = my_list[index]
    print(value)
    time.sleep(0.2)
    # Release lock
    lock.release()


if __name__ == '__main__':
    # Simulate a large number of threads to perform value taking operations
    for i in range(30):
        sub_thread = threading.Thread(target=get_value, args=(i,))
        sub_thread.start()
Avoid deadlock
==Release the lock in place-
import threading
import time
# Create mutex
lock = threading.Lock()
# Take values according to subscripts to ensure that only one thread can take values at the same time
def get_value(index):
    # Lock
    lock.acquire()
    print(threading.current_thread())
    my_list = [3,6,8,1]
    if index >= len(my_list):
        print("Subscript out of bounds:", index)
        # When the subscript is out of bounds, it is necessary to release the lock so that subsequent threads can take values
        lock.release()
        return
    value = my_list[index]
    print(value)
    time.sleep(0.2)
    # Release lock
    lock.release()


if __name__ == '__main__':
    # Simulate a large number of threads to perform value taking operations
    for i in range(30):
        sub_thread = threading.Thread(target=get_value, args=(i,))
        sub_thread.start()
Three directions of process and thread comparison
- Relationship comparison
- Threads are attached to processes. Without processes, there will be no threads.
- A process provides one thread by default, and a process can create multiple threads.
- Difference comparison
- Global variables are not shared between processes,
- Threads share global variables, but pay attention to the problem of resource competition. The solution: mutual exclusion or thread synchronization
- The resource cost of creating a process is greater than that of creating a thread
- Process is the basic unit of operating system resource allocation, and thread is the basic unit of CPU scheduling
- Threads cannot execute independently and must exist in the process
- Multi process development is more stable than single process multithreading development
- Comparison of advantages and disadvantages
- Process advantages and disadvantages:
- Advantages: multiple cores can be used
- Disadvantages: high resource overhead
- Advantages and disadvantages of threads:
- Advantages: low resource overhead
- Disadvantages: multi core cannot be used
- Process advantages and disadvantages:
Network programming
The concept of socket
Socket (socket for short) is a tool for communication between processes, just like the socket in real life. If all household appliances want to work based on the socket, network communication between processes needs to be based on this socket.
- Function of socket: responsible for network data transmission between processes, such as data porter.
- socket usage scenario: it is no exaggeration to say that as long as network related applications or software use sockets.
TCP network application development process
Introduction of TCP network application development process
TCP network application development is divided into:
- TCP client program development
- TCP server program development
Note: the client program refers to the program running on the user's equipment, and the server program refers to the program running on the server equipment, which provides data services for the client.
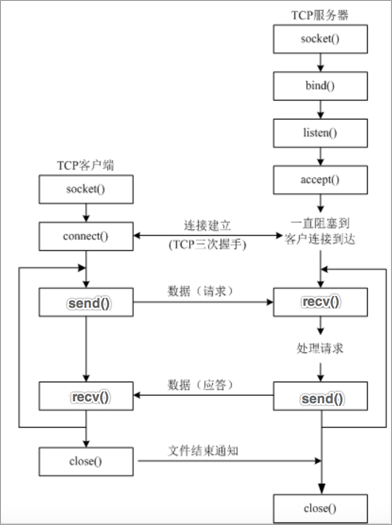
Introduction of TCP client program development process
Step description:
- Create client socket object
- Establish connection with server socket
- send data
- receive data
- Close Client Socket
TCP client program development
import socket module
Create a client socket object socket(AddressFamily, Type)
Parameter Description:
- AddressFamily refers to the IP address type, which is divided into TPv4 and IPv6
- Type indicates the transmission protocol type
Method description: - connect((host, port)) means to establish a connection with the server socket. Host is the server ip address and port is the port number of the application
- send(data) means sending data, and data is binary data
- Recv (buffer size) indicates the received data, and buffer size is the length of each received data
import socket

if __name__ == '__main__':
    # Create tcp client socket
    # 1. AF_INET: indicates ipv4
    # 2. SOCK_STREAM: tcp transport protocol
    tcp_client_socket = socket.socket(socket.AF_INET, socket.SOCK_STREAM)
    # Establish connection with server application
    tcp_client_socket.connect(("192.168.131.62", 8080))
    # When the code is executed to this point, the connection is established successfully
    # Ready to send data
    send_data = "Hello, server, I'm Xiaohei on the client!".encode("gbk")
    # send data
    tcp_client_socket.send(send_data)
    # Receive data. The maximum number of bytes of data received this time is 1024
    recv_data = tcp_client_socket.recv(1024)
    # The returned data is directly the binary data sent by the server program
    print(recv_data)
    # Decode data
    recv_content = recv_data.decode("gbk")
    print("The data of the receiving server is:", recv_content)
    # Close socket
    tcp_client_socket.close()
b'hello'
The data of the receiving server is: hello
Introduction of TCP server program development process
Step description:
- Create server socket object
- Binding port number
- Set listening
- Waiting to accept the connection request from the client
- receive data
- send data
- Close socket
TCP server program development
import socket module
Create the server socket object socket socket(AddressFamily, Type)
Parameter Description:
- AddressFamily refers to the IP address type, which is divided into TPv4 and IPv6
- Type indicates the transmission protocol type
Method description: - bind((host, port)) indicates the binding port number. Host is the ip address and port is the port number. Generally, the ip address is not specified, indicating that any ip address of the machine can be used.
- listen (backlog) indicates setting listening. The backlog parameter indicates the maximum number of connections waiting to be established.
- accept() means waiting to accept the connection request from the client
- send(data) means sending data, and data is binary data
- Crecv (buffer size) indicates the received data, and buffer size is the length of each received data
import socket

if __name__ == '__main__':
    # Create tcp server socket
    tcp_server_socket = socket.socket(socket.AF_INET, socket.SOCK_STREAM)
    # Set the port number reuse, let the program exit, and release the port number immediately
    tcp_server_socket.setsockopt(socket.SOL_SOCKET, socket.SO_REUSEADDR, True)
    # Bind port number to program
    tcp_server_socket.bind(("", 8989))
    # Set listening
    # 128: the maximum number of connections waiting to be established. Prompt: at present, it is a single task server, which can only serve one client at a time. The subsequent use of multitasking can enable the server to serve multiple clients at the same time,
    # There is no need for the client to wait to establish a connection
    # The socket after listen is only responsible for receiving the client connection request and cannot send and receive messages. The new socket returned is used to send and receive messages
    tcp_server_socket.listen(128)
    # Wait for the client to establish a connection. The code will unblock and continue to execute only after the client and server establish a connection successfully
    # 1. Socket dedicated to communication with client: service_client_socket
    # 2. ip address and port number of client: ip_port
    service_client_socket, ip_port = tcp_server_socket.accept()
    # This code indicates that the connection is established successfully
    print("Client ip Address and port number:", ip_port)
    # Receive the data sent by the client. The maximum number of bytes of data received this time is 1024
    recv_data = service_client_socket.recv(1024)
    # Gets the length of the data
    recv_data_length = len(recv_data)
    print("The length of the received data is:", recv_data_length)
    # Decoding binary data
    recv_content = recv_data.decode("gbk")
    print("The data received from the client is:", recv_content)
    # Ready to send data
    send_data = "ok, The problem is being handled...".encode("gbk")
    # Send data to client
    service_client_socket.send(send_data)
    # Close the socket between the service and the client, and terminate the service communicating with the client
    service_client_socket.close()
    # Close the socket of the server and terminate the service of establishing connection request with the client
    tcp_server_socket.close()
ip address and port number of client: ('172.16.47.209 ', 52472)
Length of received data: 5
The data received from the client is: hello
Note: after the connection between the client and the server is established, the port number will not be released immediately after the server program exits. It needs to wait about 1-2 minutes.
There are two solutions:
- Replace the server port number
- Set the port number reuse (recommended for everyone), that is, release the port number immediately after the server program exits.
The code for setting port number multiplexing is as follows:
# Parameter 1: indicates the current socket
# Parameter 2: set port number multiplexing option
# Parameter 3: set the value corresponding to the port number multiplexing option
tcp_server_socket.setsockopt(socket.SOL_SOCKET, socket.SO_REUSEADDR, True)
Considerations for TCP network applications
- When the TCP client program wants to communicate with the TCP server program, it must first establish a connection
- TCP client programs generally do not need to bind the port number, because the client initiates the connection actively.
- The TCP server program must be bound with the port number, otherwise the client cannot find the TCP server program.
- The socket after listen is a passive socket, which is only responsible for receiving connection requests from new clients and cannot send and receive messages.
- When the TCP client program and the TCP server program are successfully connected, the TCP server program will generate a new socket, which will be used for sending and receiving client messages.
- Closing the socket returned by accept means that communication with the client has been completed.
- Closing the socket after listen ing means that the socket of the server is closed, which will cause the new client to be unable to connect to the server, but the previously successfully connected client can still communicate normally.
- When the socket of the client calls close, the recv of the server will unblock and the length of the returned data is 0. The server can judge whether the client has + gone offline by the length of the returned data. On the contrary, when the server closes the socket, the recv of the client will unblock and the length of the returned data is 0.
Case - multitasking TCP server program development
Specific implementation steps
- Write a TCP server program and wait circularly to accept the connection request of the client
- When the connection between the client and the server is established successfully, a sub thread is created, and the sub thread is used to process the request of the client to prevent the main thread from blocking
- Set the created sub thread to guard the main thread to prevent the main thread from being unable to exit.
import socket
import threading


# Handle the requested operation of the client
def handle_client_request(service_client_socket, ip_port):
    # Receive data sent by client circularly
    while True:
        # Receive data sent by client
        recv_data = service_client_socket.recv(1024)
        # if statement can be directly used to judge whether there is data in the container type. if there is data in the container type, the condition is true, otherwise the condition fails
        # Container type: list, dictionary, tuple, string, set, range, binary data
        if recv_data:
            print(recv_data.decode("gbk"), ip_port)
            # reply
            service_client_socket.send("ok,The problem is being handled...".encode("gbk"))

        else:
            print("The client is offline:", ip_port)
            break
    # Terminate communication with client
    service_client_socket.close()


if __name__ == '__main__':
    # Create tcp server socket
    tcp_server_socket = socket.socket(socket.AF_INET, socket.SOCK_STREAM)
    # Set the port number reuse, let the program exit, and release the port number immediately
    tcp_server_socket.setsockopt(socket.SOL_SOCKET, socket.SO_REUSEADDR, True)
    # Binding port number
    tcp_server_socket.bind(("", 9090))
    # Set listening. The socket after listening is a passive socket, which is only responsible for receiving the connection request of the client
    tcp_server_socket.listen(128)
    # Cycle waiting to receive the connection request from the client
    while True:
        # Waiting for the client to receive the connection request
        service_client_socket, ip_port = tcp_server_socket.accept()
        print("Client connection succeeded:", ip_port)
        # When the connection between the client and the server is successful, a sub thread needs to be created, and different sub threads are responsible for receiving messages from different clients
        sub_thread = threading.Thread(target=handle_client_request, args=(service_client_socket, ip_port))
        # Set the main thread of daemon
        sub_thread.setDaemon(True)
        # Start child thread
        sub_thread.start()


    # The tcp server socket does not need to be closed because the server program needs to be running all the time
    # tcp_server_socket.close()
Client connection succeeded: ('172.16.47.209', 51528)
Client connection succeeded: ('172.16.47.209', 51714)
hello1 ('172.16.47.209', 51528)
hello2 ('172.16.47.209', 51714)
Analysis of send and recv principles of socket
1. Know the sending and receiving buffer of TCP socket
When creating a TCP socket object, there will be a send buffer and a receive buffer. The send and receive buffer refers to a piece of space in memory.
2. Analysis of send principle
Does send send send data directly to the server?
No, if you want to send data, you must send data through the network card. The application cannot send data directly through the network card. It needs to call the operating system interface, that is, the application writes the sent data to the sending buffer (a space in memory), and then the operating system controls the network card to send the data in the sending buffer to the server network card.
3. Analysis of recv principle
Does recv receive data directly from the client?
No, the application software cannot receive data directly through the network card. It needs to call the operating system interface. The operating system receives data through the network card, writes the received data into the receiving buffer (a space in memory), and then the application obtains the data sent by the client from the receiving buffer.
Schematic diagram of send and recv
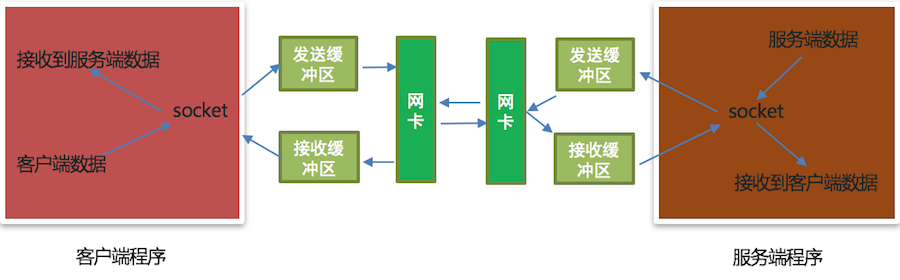
explain:
- Send data is sent to the send buffer
- The received data is obtained from the receive buffer
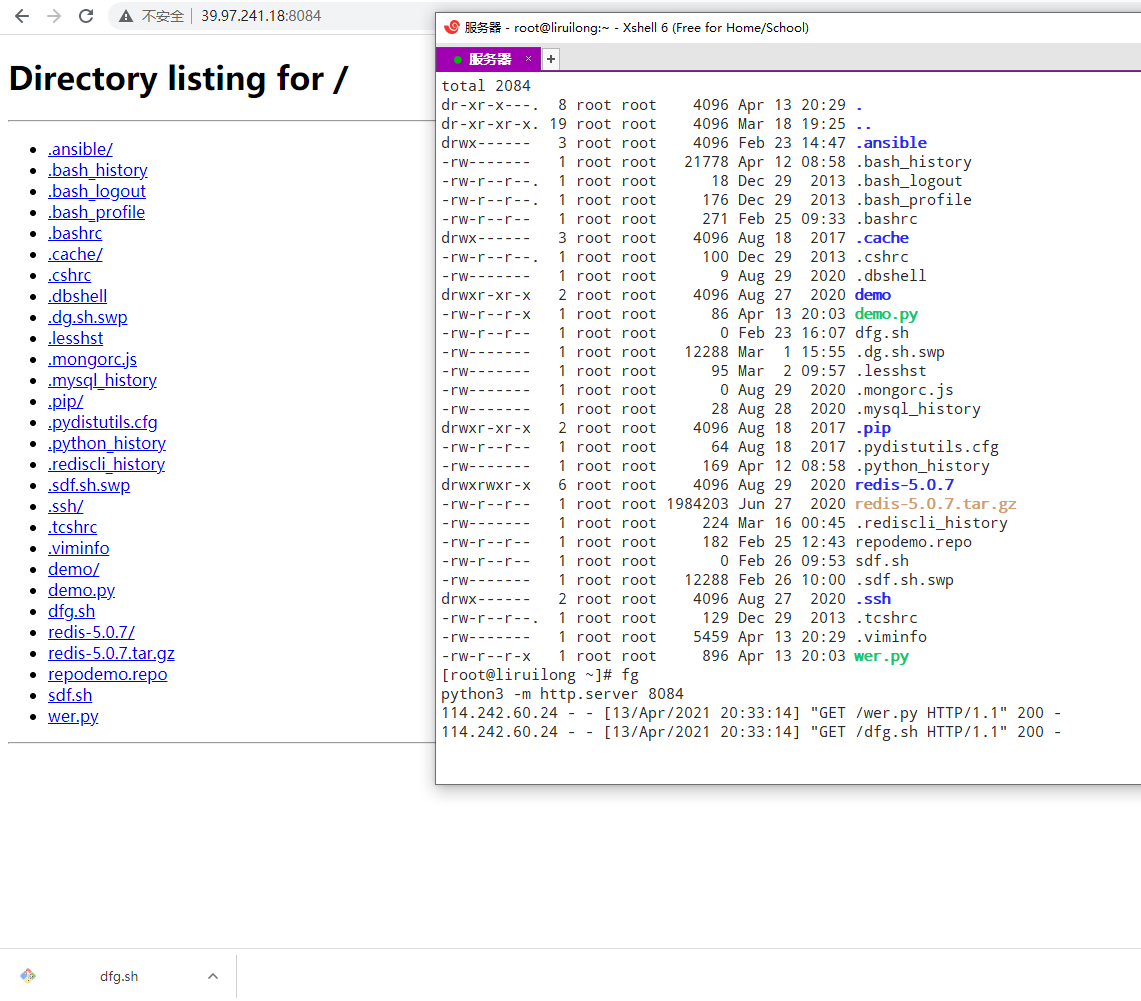
Python static Web server
Build Python's own static Web server
How to build Python's own static Web server
Build Python's own static Web server and use python3 -m http Server port number. If the port number is not specified, it is 8000 by default
Access static Web server IP port:
Return fixed page data
Develop your own static Web server
Implementation steps:
- Write a TCP server program
tcp_server_socket = socket.socket(socket.AF_INET, socket.SOCK_STREAM)
# Cyclic acceptance of connection requests from clients
while True:
    conn_socket, ip_port = tcp_server_socket.accept()
- Obtain the http request message data sent by the browser
client_request_data = conn_socket.recv(4096)
- Read the fixed page data, assemble the page data into HTTP response message data and send it to the browser.
response_data = (response_line + response_header + "\r\n").encode("utf-8") + response_body
conn_socket.send(response_data)
After sending the HTTP response message data, close the socket serving the client.
conn_socket.close()
import socket


if __name__ == '__main__':
    # Create tcp server socket
    tcp_server_socket = socket.socket(socket.AF_INET, socket.SOCK_STREAM)
    # Set the port number reuse, and the program exit port will be released immediately
    tcp_server_socket.setsockopt(socket.SOL_SOCKET, socket.SO_REUSEADDR, True)
    # Binding port number
    tcp_server_socket.bind(("", 9000))
    # Set listening
    tcp_server_socket.listen(128)
    while True:
        # Waiting to accept the connection request from the client
        new_socket, ip_port = tcp_server_socket.accept()
        # When the code is executed to this point, the connection is established successfully
        recv_client_data = new_socket.recv(4096)
        # Decoding binary data
        recv_client_content = recv_client_data.decode("utf-8")
        print(recv_client_content)

        with open("static/index.html", "rb") as file:
            # Read file data
            file_data = file.read()


        # Response line
        response_line = "HTTP/1.1 200 OK\r\n"
        # Response header
        response_header = "Server: PWS1.0\r\n"

        # Responder
        response_body = file_data

        # Splicing response message
        response_data = (response_line + response_header + "\r\n").encode("utf-8") + response_body
        # send data
        new_socket.send(response_data)

        # Close the socket between the service and the client
        new_socket.close()
Return fixed page data according to different mappings
No matter what page the user accesses, the data returned by the server is fixed
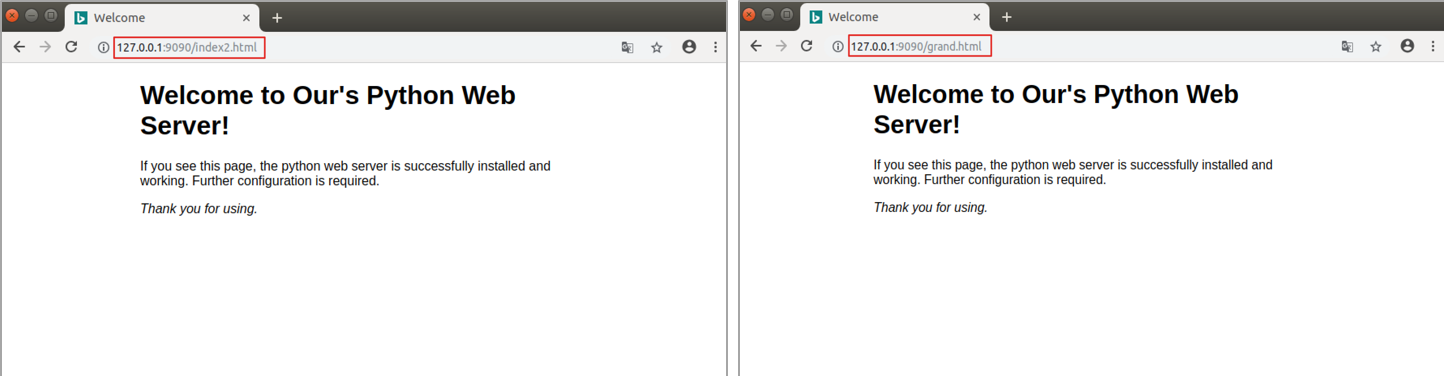
Implementation steps of returning specified page data:
- Gets the path of the resource requested by the user
request_list = client_request_conent.split(" ",  maxsplit=2)
 request_path = request_list[1]
- Read the data of the specified file according to the path of the requested resource
 with open("static" + request_path, "rb") as file:
 file_data = file.read()
- Assemble the response message of the specified file data and send it to the browser
 response_data = (response_line + response_header + "\r\n").encode("utf-8") + response_body
 conn_socket.send(response_data)
- Judge that the requested file does not exist at the server, assemble the response message in 404 status and send it to the browser
 try:
     # Open the specified file and omit the code
 except Exception as e:
     conn_socket.send(404 Response message data)
import socket


def main():
    # Create tcp server socket
    tcp_server_socket = socket.socket(socket.AF_INET, socket.SOCK_STREAM)
    # Set the port number reuse, and the program exit port will be released immediately
    tcp_server_socket.setsockopt(socket.SOL_SOCKET, socket.SO_REUSEADDR, True)
    # Binding port number
    tcp_server_socket.bind(("", 9000))
    # Set listening
    tcp_server_socket.listen(128)
    while True:
        # Waiting to accept the connection request from the client
        new_socket, ip_port = tcp_server_socket.accept()
        # When the code is executed to this point, the connection is established successfully
        recv_client_data = new_socket.recv(4096)
        if len(recv_client_data) == 0:
            print("The browser is closed")
            new_socket.close()
            return

        # Decoding binary data
        recv_client_content = recv_client_data.decode("utf-8")
        print(recv_client_content)
        # Divide according to the specified string, and the maximum number of divisions is 2
        request_list = recv_client_content.split(" ", maxsplit=2)

        # Get request resource path
        request_path = request_list[1]
        print(request_path)

        # Judge whether the requested is the root directory. If the condition is true, specify the home page data to return
        if request_path == "/":
            request_path = "/index.html"

        try:
            # Dynamically open the specified file
            with open("static" + request_path, "rb") as file:
                # Read file data
                file_data = file.read()
        except Exception as e:
            # The requested resource does not exist, and 404 data is returned
            # Response line
            response_line = "HTTP/1.1 404 Not Found\r\n"
            # Response header
            response_header = "Server: PWS1.0\r\n"
            with open("static/error.html", "rb") as file:
                file_data = file.read()
            # Responder
            response_body = file_data

            # Splicing response message
            response_data = (response_line + response_header + "\r\n").encode("utf-8") + response_body
            # send data
            new_socket.send(response_data)
        else:
            # Response line
            response_line = "HTTP/1.1 200 OK\r\n"
            # Response header
            response_header = "Server: PWS1.0\r\n"

            # Responder
            response_body = file_data

            # Splicing response message
            response_data = (response_line + response_header + "\r\n").encode("utf-8") + response_body
            # send data
            new_socket.send(response_data)
        finally:
            # Close the socket between the service and the client
            new_socket.close()

if __name__ == '__main__':
    main()
Static Web server - multitasking
The current web server can not support multi-user access at the same time, and can only process the requests of clients one by one. So how to develop a multi task web server to process the requests of multiple clients at the same time?
Multithreading can be used to save memory resources more than processes.
Implementation steps of multitasking web server program:
- When the connection between the client and the server is established successfully, a sub thread is created, and the sub thread is used to process the request of the client to prevent the main thread from blocking.
while True:
     conn_socket, ip_port = tcp_server_socket.accept()
     # Open up sub threads and execute corresponding tasks
     sub_thread = threading.Thread(target=handle_client_request, args=(conn_socket,))
- Set the created sub thread to guard the main thread to prevent the main thread from being unable to exit.
# Open up sub threads and execute corresponding tasks
 sub_thread = threading.Thread(target=handle_client_request, args=(conn_socket,))
 sub_thread.setDaemon(True) # Set the main thread of daemon
 sub_thread.start()
import socket
import threading

# Processing client requests
def handle_client_request(new_socket):
    # When the code is executed to this point, the connection is established successfully
    recv_client_data = new_socket.recv(4096)
    if len(recv_client_data) == 0:
        print("The browser is closed")
        new_socket.close()
        return

    # Decoding binary data
    recv_client_content = recv_client_data.decode("utf-8")
    print(recv_client_content)
    # Divide according to the specified string, and the maximum number of divisions is 2
    request_list = recv_client_content.split(" ", maxsplit=2)

    # Get request resource path
    request_path = request_list[1]
    print(request_path)

    # Judge whether the requested is the root directory. If the condition is true, specify the home page data to return
    if request_path == "/":
        request_path = "/index.html"

    try:
        # Dynamically open the specified file
        with open("static" + request_path, "rb") as file:
            # Read file data
            file_data = file.read()
    except Exception as e:
        # The requested resource does not exist, and 404 data is returned
        # Response line
        response_line = "HTTP/1.1 404 Not Found\r\n"
        # Response header
        response_header = "Server: PWS1.0\r\n"
        with open("static/error.html", "rb") as file:
            file_data = file.read()
        # Responder
        response_body = file_data

        # Splicing response message
        response_data = (response_line + response_header + "\r\n").encode("utf-8") + response_body
        # send data
        new_socket.send(response_data)
    else:
        # Response line
        response_line = "HTTP/1.1 200 OK\r\n"
        # Response header
        response_header = "Server: PWS1.0\r\n"

        # Responder
        response_body = file_data

        # Splicing response message
        response_data = (response_line + response_header + "\r\n").encode("utf-8") + response_body
        # send data
        new_socket.send(response_data)
    finally:
        # Close the socket between the service and the client
        new_socket.close()


# Program entry function
def main():
    # Create tcp server socket
    tcp_server_socket = socket.socket(socket.AF_INET, socket.SOCK_STREAM)
    # Set the port number reuse, and the program exit port will be released immediately
    tcp_server_socket.setsockopt(socket.SOL_SOCKET, socket.SO_REUSEADDR, True)
    # Binding port number
    tcp_server_socket.bind(("", 9000))
    # Set listening
    tcp_server_socket.listen(128)

    while True:
        # Waiting to accept the connection request from the client
        new_socket, ip_port = tcp_server_socket.accept()
        print(ip_port)
        # When the client and server establish a connection procedure, a sub thread is created
        sub_thread = threading.Thread(target=handle_client_request, args=(new_socket,))
        # Set the main thread of daemon
        sub_thread.setDaemon(True)
        # Start the child thread to execute the corresponding task
        sub_thread.start()

if __name__ == '__main__':
    main()
Static Web server - multitasking
Problems with static Web servers
The current web server can not support multi-user access at the same time, and can only process the requests of clients one by one. So how to develop a multi task web server to process the requests of multiple clients at the same time?
- Multithreading can be used to save memory resources more than processes. Implementation steps of multitasking web server program:
- When the connection between the client and the server is established successfully, a sub thread is created, and the sub thread is used to process the request of the client to prevent the main thread from blocking.
 while True:
     conn_socket, ip_port = tcp_server_socket.accept()
     # Open up sub threads and execute corresponding tasks
     sub_thread = threading.Thread(target=handle_client_request, args=(conn_socket,))
- Set the created sub thread to guard the main thread to prevent the main thread from being unable to exit.
import socket
import threading


# Processing client requests
def handle_client_request(new_socket):
    # When the code is executed to this point, the connection is established successfully
    recv_client_data = new_socket.recv(4096)
    if len(recv_client_data) == 0:
        print("The browser is closed")
        new_socket.close()
        return

    # Decoding binary data
    recv_client_content = recv_client_data.decode("utf-8")
    print(recv_client_content)
    # Divide according to the specified string, and the maximum number of divisions is 2
    request_list = recv_client_content.split(" ", maxsplit=2)

    # Get request resource path
    request_path = request_list[1]
    print(request_path)

    # Judge whether the requested is the root directory. If the condition is true, specify the home page data to return
    if request_path == "/":
        request_path = "/index.html"

    try:
        # Dynamically open the specified file
        with open("static" + request_path, "rb") as file:
            # Read file data
            file_data = file.read()
    except Exception as e:
        # The requested resource does not exist, and 404 data is returned
        # Response line
        response_line = "HTTP/1.1 404 Not Found\r\n"
        # Response header
        response_header = "Server: PWS1.0\r\n"
        with open("static/error.html", "rb") as file:
            file_data = file.read()
        # Responder
        response_body = file_data

        # Splicing response message
        response_data = (response_line + response_header + "\r\n").encode("utf-8") + response_body
        # send data
        new_socket.send(response_data)
    else:
        # Response line
        response_line = "HTTP/1.1 200 OK\r\n"
        # Response header
        response_header = "Server: PWS1.0\r\n"

        # Responder
        response_body = file_data

        # Splicing response message
        response_data = (response_line + response_header + "\r\n").encode("utf-8") + response_body
        # send data
        new_socket.send(response_data)
    finally:
        # Close the socket between the service and the client
        new_socket.close()


# Program entry function
def main():
    # Create tcp server socket
    tcp_server_socket = socket.socket(socket.AF_INET, socket.SOCK_STREAM)
    # Set the port number reuse, and the program exit port will be released immediately
    tcp_server_socket.setsockopt(socket.SOL_SOCKET, socket.SO_REUSEADDR, True)
    # Binding port number
    tcp_server_socket.bind(("", 9000))
    # Set listening
    tcp_server_socket.listen(128)

    while True:
        # Waiting to accept the connection request from the client
        new_socket, ip_port = tcp_server_socket.accept()
        print(ip_port)
        # When the client and server establish a connection procedure, a sub thread is created
        sub_thread = threading.Thread(target=handle_client_request, args=(new_socket,))
        # Set the main thread of daemon
        sub_thread.setDaemon(True)
        # Start the child thread to execute the corresponding task
        sub_thread.start()


if __name__ == '__main__':
    main()
Static Web server - object oriented development
Implementation steps:
- Abstract the Web server providing services into a class (HTTP webserver)
class HttpWebServer(object):
- Provide the initialization method of Web server, and create socket object in the initialization method
def __init__(self):
 # Initialize the server socket, set listening, and omit the code
- Provide a method to start the Web server and let the Web server process the client request operation.
 def start(self):
 while True:
     service_client_socket, ip_port = self.tcp_server_socket.accept()
     # The connection is established successfully, and the sub thread is opened to process the request of the client
     sub_thread = threading.Thread(target=self.handle_client_request, args=(service_client_socket,))
     sub_thread.start()
Developing static Web server in object-oriented way
import socket
import threading


# Define web server classes
class HttpWebServer(object):
    def __init__(self):
        # Create tcp server socket
        tcp_server_socket = socket.socket(socket.AF_INET, socket.SOCK_STREAM)
        # Set the port number reuse, and the program exit port will be released immediately
        tcp_server_socket.setsockopt(socket.SOL_SOCKET, socket.SO_REUSEADDR, True)
        # Binding port number
        tcp_server_socket.bind(("", 9000))
        # Set listening
        tcp_server_socket.listen(128)
        # Save successfully created server socket
        self.tcp_server_socket = tcp_server_socket

    # Processing client requests is defined as a static method
    @staticmethod
    def handle_client_request(new_socket):
        # When the code is executed to this point, the connection is established successfully
        recv_client_data = new_socket.recv(4096)
        if len(recv_client_data) == 0:
            print("The browser is closed")
            new_socket.close()
            return

        # Decoding binary data
        recv_client_content = recv_client_data.decode("utf-8")
        print(recv_client_content)
        # Divide according to the specified string, and the maximum number of divisions is 2
        request_list = recv_client_content.split(" ", maxsplit=2)

        # Get request resource path
        request_path = request_list[1]
        print(request_path)

        # Judge whether the requested is the root directory. If the condition is true, specify the home page data to return
        if request_path == "/":
            request_path = "/index.html"

        try:
            # Dynamically open the specified file
            with open("static" + request_path, "rb") as file:
                # Read file data
                file_data = file.read()
        except Exception as e:
            # The requested resource does not exist, and 404 data is returned
            # Response line
            response_line = "HTTP/1.1 404 Not Found\r\n"
            # Response header
            response_header = "Server: PWS1.0\r\n"
            with open("static/error.html", "rb") as file:
                file_data = file.read()
            # Responder
            response_body = file_data

            # Splicing response message
            response_data = (response_line + response_header + "\r\n").encode("utf-8") + response_body
            # send data
            new_socket.send(response_data)
        else:
            # Response line
            response_line = "HTTP/1.1 200 OK\r\n"
            # Response header
            response_header = "Server: PWS1.0\r\n"

            # Responder
            response_body = file_data

            # Splicing response message
            response_data = (response_line + response_header + "\r\n").encode("utf-8") + response_body
            # send data
            new_socket.send(response_data)
        finally:
            # Close the socket between the service and the client
            new_socket.close()

    # Start the web server to work
    def start(self):
        while True:
            # Waiting to accept the connection request from the client
            new_socket, ip_port = self.tcp_server_socket.accept()
            # When the client and server establish a connection procedure, a sub thread is created
            sub_thread = threading.Thread(target=self.handle_client_request, args=(new_socket,))
            # Set the main thread of daemon
            sub_thread.setDaemon(True)
            # Start the child thread to execute the corresponding task
            sub_thread.start()


# Program entry function
def main():
    # Create web server object
    web_server = HttpWebServer()
    # Start the web server to work
    web_server.start()


if __name__ == '__main__':
    main()
Command line start dynamic binding port number
- Develop a command line to start a static web server with a dynamically bound port number
Implementation steps:
- Get the command line parameters of the terminal executing the python program
sys.argv
- Judge the type of parameter and set the port number to be integer
 if not sys.argv[1].isdigit():
     print("The startup command is as follows: python3 xxx.py 9090")
     return
 port = int(sys.argv[1])
- Add a port number parameter to the initialization method of the Web server class to bind the port number
 def __init__(self, port):
     self.tcp_server_socket.bind(("", port))
import socket
import threading
import sys

# Define web server classes
class HttpWebServer(object):
    def __init__(self, port):
        # Create tcp server socket
        tcp_server_socket = socket.socket(socket.AF_INET, socket.SOCK_STREAM)
        # Set the port number reuse, and the program exit port will be released immediately
        tcp_server_socket.setsockopt(socket.SOL_SOCKET, socket.SO_REUSEADDR, True)
        # Binding port number
        tcp_server_socket.bind(("", port))
        # Set listening
        tcp_server_socket.listen(128)
        # Save successfully created server socket
        self.tcp_server_socket = tcp_server_socket

    # Processing client requests
    @staticmethod
    def handle_client_request(new_socket):
        # When the code is executed to this point, the connection is established successfully
        recv_client_data = new_socket.recv(4096)
        if len(recv_client_data) == 0:
            print("The browser is closed")
            new_socket.close()
            return

        # Decoding binary data
        recv_client_content = recv_client_data.decode("utf-8")
        print(recv_client_content)
        # Divide according to the specified string, and the maximum number of divisions is 2
        request_list = recv_client_content.split(" ", maxsplit=2)

        # Get request resource path
        request_path = request_list[1]
        print(request_path)

        # Judge whether the requested is the root directory. If the condition is true, specify the home page data to return
        if request_path == "/":
            request_path = "/index.html"

        try:
            # Dynamically open the specified file
            with open("static" + request_path, "rb") as file:
                # Read file data
                file_data = file.read()
        except Exception as e:
            # The requested resource does not exist, and 404 data is returned
            # Response line
            response_line = "HTTP/1.1 404 Not Found\r\n"
            # Response header
            response_header = "Server: PWS1.0\r\n"
            with open("static/error.html", "rb") as file:
                file_data = file.read()
            # Responder
            response_body = file_data

            # Splicing response message
            response_data = (response_line + response_header + "\r\n").encode("utf-8") + response_body
            # send data
            new_socket.send(response_data)
        else:
            # Response line
            response_line = "HTTP/1.1 200 OK\r\n"
            # Response header
            response_header = "Server: PWS1.0\r\n"

            # Responder
            response_body = file_data

            # Splicing response message
            response_data = (response_line + response_header + "\r\n").encode("utf-8") + response_body
            # send data
            new_socket.send(response_data)
        finally:
            # Close the socket between the service and the client
            new_socket.close()

    # Start the web server to work
    def start(self):
        while True:
            # Waiting to accept the connection request from the client
            new_socket, ip_port = self.tcp_server_socket.accept()
            # When the client and server establish a connection procedure, a sub thread is created
            sub_thread = threading.Thread(target=self.handle_client_request, args=(new_socket,))
            # Set the main thread of daemon
            sub_thread.setDaemon(True)
            # Start the child thread to execute the corresponding task
            sub_thread.start()

# Program entry function
def main():

    print(sys.argv)
    # Judge whether the command line parameter is equal to 2,
    if len(sys.argv) != 2:
        print("Execute the following command: python3 xxx.py 8000")
        return

    # Determine whether all strings are composed of numbers
    if not sys.argv[1].isdigit():
        print("Execute the following command: python3 xxx.py 8000")
        return

    # Get terminal command line parameters
    port = int(sys.argv[1])
    # Create web server object
    web_server = HttpWebServer(port)
    # Start the web server to work
    web_server.start()

if __name__ == '__main__':
    main()
Python program operates MySQL database
To install pymysql third-party package:
[root@liruilong ~]# yum  -y install pymysql
[root@liruilong ~]# ls
Usage of pymysql:
- Import pymysql package: import pymysql
- Create connection object: call the connect() function in the pymysql module to create a connection object
Conn = connect (parameter list)
- Parameter host: the connected mysql host. If the local host is' localhost '
- Parameter port: the port of the connected mysql host. The default is 3306
- Parameter user: user name of the connection
- Parameter password: the password of the connection
- Parameter database: name of the database
- Parameter charset: the coding method used for communication. utf8 is recommended
Operating instructions for connecting objects:
- Close connection conn.close()
- Submit data conn.commit()
- Undo data conn.rollback()
Get cursor object:
The goal of obtaining cursor objects is to execute sql statements and complete the operations of adding, deleting, modifying and querying the database.
# Call the cursor() method of the connection object to get the cursor object
 cur =conn.cursor()
Cursor operation instructions:
- Execute SQL statements using cursors: execute(operation [parameters]) executes SQL statements and returns the number of affected rows. It is mainly used to execute insert, update, delete, select and other statements
- Get a piece of data in the query result set: cur Fetchone() returns a tuple, such as (1, 'three')
- Get all data in the query result set: cur Fetchall() returns a tuple, such as ((1, 'Zhang San'), (2, 'Li Si'))
- Close cursor: cur Close() indicates that the and database operations are completed
pymysql completes the data query operation
import pymysql

# Create connection object
conn = pymysql.connect(host='localhost', port=3306, user='root', password='mysql',database='python', charset='utf8')

# Get cursor object
cursor = conn.cursor()

# Query SQL statement
sql = "select * from students;"
# The return value of the executed SQL statement is the number of rows affected by the SQL statement during execution
row_count = cursor.execute(sql)
print("SQL Number of rows affected by statement execution%d" % row_count)

# Take out a row of data in the result set, for example: (1, 'Zhang San')
# print(cursor.fetchone())

# Get all the data in the result set, for example: ((1, 'Zhang San'), (2, 'Li Si'), (3, 'Wang Wu'))
for line in cursor.fetchall():
    print(line)

# Close cursor
cursor.close()

# Close connection
conn.close()
pymysql completes the addition, deletion and modification of data
import pymysql

# Create connection object
conn = pymysql.connect(host='localhost', port=3306, user='root', password='mysql',database='python', charset='utf8')

# Get cursor object
cursor = conn.cursor()

try:
    # Add SQL statement
    # sql = "insert into students(name) values('liu Lu '), ('wang Meili');"
    # Delete SQL statement
    # sql = "delete from students where id = 5;"
    # Modify SQL statement
    sql = "update students set name = 'Iron bastard' where id = 6;"
    # Execute SQL statement
    row_count = cursor.execute(sql)
    print("SQL Number of rows affected by statement execution%d" % row_count)
    # Submit data to database
    conn.commit()
except Exception as e:
    # Roll back the data, that is, undo the SQL statement operation just now
    conn.rollback()

# Close cursor
cursor.close()

# Close connection
conn.close()
- conn.commit() means to submit the modification operation to the database
- conn.rollback() means to roll back data
Prevent SQL injection
What is SQL injection? The malicious data submitted by the user is spliced with the SQL statement in the form of string, which affects the semantics of the SQL statement and eventually leads to the phenomenon of data leakage.
·How to prevent SQL injection? SQL statement parameterization
Parameters in SQL language use% s to occupy positions. This is not a string formatting operation in python. Store the parameters required for% s occupation in SQL statement in a list, and pass the parameter list to the second parameter in execute method
Sample code to prevent SQL injection:
from pymysql import connect

def main():

    find_name = input("Please enter item name:")

    # Create Connection
    conn = connect(host='localhost',port=3306,user='root',password='mysql',database='jing_dong',charset='utf8')
    # Get Cursor object
    cs1 = conn.cursor()

    # Unsafe way
    # Enter 'or 1 = 1 or' (single quotation marks should also be entered)
    # sql = "select * from goods where name='%s'" % find_name
    # print("""sql===>%s<====""" % sql)
    # # Execute the select statement and return the number of affected rows: query all data
    # count = cs1.execute(sql)

    # Safe way
    # Construction parameter list
    params = [find_name]
    # Execute the select statement and return the number of affected rows: query all data
    count = cs1.execute("select * from goods where name=%s", params)
    # be careful:
    # If there are multiple parameters, parameterization is required
    # Then params = [value 1, value 2...], At this time, you can have multiple% s in the sql statement
    # %s does not need quotes

    # Print affected rows
    print(count)
    # Get the results of the query
    # result = cs1.fetchone()
    result = cs1.fetchall()
    # Print query results
    print(result)
    # Close Cursor object
    cs1.close()
    # Close Connection object
    conn.close()

if __name__ == '__main__':
    main()
Introduction to transaction
Transaction is a series of user-defined operations to execute SQL statements. These operations are either completely executed or not executed at all. It is an inseparable work execution unit.
Transaction usage scenario: in daily life, sometimes we need to carry out bank transfer. Behind this bank transfer operation is the need to execute multiple SQL statements. If there is a sudden power failure halfway through the execution of these SQL statements, this function will only be completed halfway. This situation is not allowed. To solve this problem, we need to complete it through transactions.
Four characteristics of transaction
- Atomicity: a transaction must be regarded as an indivisible minimum unit of work. All operations in the whole transaction must be committed successfully or rolled back. For a transaction, it is impossible to perform only part of the operations. This is the atomicity of the transaction
- Consistency: the database always transitions from one consistent state to another. (in the previous example, consistency ensures that even if the system crashes during the transfer process, there will be no loss of $200 in the checking account. Because the transaction is not submitted in the end, the changes made in the transaction will not be saved to the database.)
- Isolation: Generally speaking, the modification operation made by a transaction is invisible to other transactions before committing the transaction. (in the previous example, when the third statement is executed and the fourth statement is not started, another account summary program starts running, and it sees that the balance of the checking account has not been reduced by $200.)
- Persistence Durability: once a transaction is committed, its changes will be permanently saved to the database.
Use of transactions:
- Before using transactions, first ensure that the storage engine of the table is of InnoDB type. Only this type can use transactions. The storage engine of the table in MySQL database is of InnoDB type by default.
- Description of table storage engine: table storage engine is a mechanism to store data. Different table storage engines provide different storage mechanisms.
- After the transaction is started, execute the modify command, and the changed data will be saved to the cache file of MySQL server instead of being maintained in the physical table
- MySQL database adopts autocommit mode by default. If a transaction is not displayed and started, each sql statement will be submitted as a transaction. When autocommit=0 is set, the autocommit mode is cancelled until the displayed execution commit and rollback indicate the end of the transaction.
- set autocommit = 0 means that the auto commit transaction mode is canceled. You need to manually execute commit to complete the transaction submission
Indexes
Introduction to index
Index is also called "key" in MySQL. It is a special file. It saves the location information of all records in the data table. More generally, database index is like the directory in front of a book, which can speed up the query speed of the database.
Application scenario:
When there is a large amount of data in the database, the search for data will become very slow, so we can improve the query efficiency of the database through indexing.
Use of index
- View existing indexes in the table: show index from table name;
- The primary key column is automatically indexed
- The index name is not specified, and the field name is used by default
To verify index performance:
-- Start running time monitoring:
set profiling=1;
-- Find the 10000th data ha-99999
select * from test_index where title='ha-99999';
-- View execution time:
show profiles;
-- to title Create index for field:
alter table test_index add index (title);
-- Execute the query statement again
select * from test_index where title='ha-99999';
-- Check the execution time again
show profiles;
Joint index
Joint index is also called composite index, that is, one index covers two or more fields in the table. It is generally used when multiple fields are queried together.
-- establish teacher surface
create table teacher
(
    id int not null primary key auto_increment,
    name varchar(10),
    age int
);

-- Create federated index
alter table teacher add index (name,age);
Benefits of Federated index: reduce the cost of disk space, because every index created is actually an index file created, which will increase the cost of disk space.
Leftmost principle of joint index when using joint index, we should abide by a leftmost principle, that is, index(name,age) supports the combined query of name, name and age, but does not support the query of individual age, because the created joint index is not used.
Example of leftmost principle:
-- The following query uses a federated index
select * from stu where name='Zhang San' -- Here we use the union index name part
select * from stu where name='Li Si' and age=10 -- Here the complete use of joint index, including name and age part
-- The following query does not use a federated index
select * from stu where age=10 -- Because there is no such combination in the joint index, only name | name age These two combinations
When using the query data of the joint index, you must ensure that the leftmost field of the joint index appears in the query criteria, otherwise the joint index will become invalid
Advantages, disadvantages and usage principles of index in MySQL
- Advantages: Speed up data query
- Disadvantages: Creating an index will take time and disk space, and the time will increase as the amount of data increases
Use principle:
- Through the comparison of advantages and disadvantages, it is not that the more indexes the better, but that they need to be used reasonably.
- Avoid creating too many indexes for frequently updated tables, and create indexes for frequently used query fields,
- It is better not to use indexes for tables with small amount of data, because due to less data, it may take less time to query all data than to traverse the index, and the index may not produce optimization results.
- There are many same values in one field. Do not establish an index. For example, there are only two different values for men and women in the "gender" field of the student table. On the contrary, there are many different values in a field, but the index can be established.
Closure & decorator
Introduction to closure:
We have learned about the function before. We know that when the function is called, the variables defined in the function are destroyed, but sometimes we need to save the variable in the function and complete some column operations on the basis of the variable every time. For example, how to sum with other numbers on the basis of the variable every time? We can solve this need through the closure we learn today.
Definition of closure: on the premise of function nesting, the internal function uses the variables of the external function, and the external function returns the internal function. We call this internal function using the variables of the external function as a closure.
Composition conditions of closure
Through the definition of closure, we can know the formation conditions of closure:
- On the premise of function nesting (function is defined inside the function)
- The internal function uses the variables of the external function (including the parameters of the external function)
- An external function returned an internal function
# Define an external function
def func_out(num1):
    # Define an internal function
    def func_inner(num2):
        # The internal function uses the variable (num1) of the external function
        result = num1 + num2
        print("The result is:", result)
    # The external function returns the internal function, and the internal function returned here is the closure
    return func_inner

# Create closure instance
f = func_out(1)
# Execute closure
f(2)
f(3)
The result is: 3
The result is: 4
Description of closure execution results: from the above output results, it can be seen that the closure saves the variable num1 in the external function. Each closure execution is calculated on the basis of num1 = 1.
Function of closure
Closures can save variables in external functions and will not be destroyed when external functions are called.
Note: because the closure refers to the variables of the external function, the variables of the external function are not released in time and consume memory.
Use of closures
case
Requirements: use closures to realize the dialogue information of different people according to the configuration information, such as dialogue:
Zhang San: have you arrived in Beijing? Li Si: it's already here. Don't worry.
- Define external functions to receive different configuration information parameters. The parameters are person names
- Define the parameters for the internal function to receive dialog information
- The configuration information and dialog information are spliced and output in the internal function
Implementation of function code
# External function
def config_name(name):
    # Internal function
    def say_info(info):
        print(name + ": " + info)

    return say_info

tom = config_name("Tom")

tom("Hello!")
tom("Hello, are you there?")

jerry = config_name("jerry")

jerry("be not in, Don't play!")
Operation results:
Tom: Hello!
Tom: Hello, are you there?
jerry: No, don't play!
Closure case description: closure can also improve the reusability of code without manually defining additional function functions.
Modify external variables used within closures
Error example of modifying external variables used in closures:
# Define an external function
def func_out(num1):

    # Define an internal function
    def func_inner(num2):
        # The intention here is to modify the value of external num1. In fact, a local variable num1 is defined in the internal function
        num1 = 10
        # The internal function uses the variable (num1) of the external function
        result = num1 + num2
        print("The result is:", result)

    print(num1)
    func_inner(1)
    print(num1)

    # The external function returns the internal function, and the internal function returned here is the closure
    return func_inner

# Create closure instance
f = func_out(1)
# Execute closure
f(2)
Decorator
- The definition of decorator: it is a function that adds additional functions to existing functions, which is essentially a closure function. Reverse application similar to AOP surround notification
Functional features of decorator: - Do not modify the source code of existing functions
- Do not modify the calling method of existing functions
- Add additional functions to existing functions
# Add a login verification function
def check(fn):
    def inner():
        print("Please login first....")
        fn()
    return inner


def comment():
    print("Comment")

# Use decorators to decorate functions
comment = check(comment)
comment()

# Basic rudiment of decorator
# def decorator(fn): # fn: objective function
#     def inner():
#         '' before executing function '' '
#         fn() # Execute decorated functions
#         '' after function execution '' '
#     return inner
Execution result:
Please login first
Comment
- A closure function has only one parameter and must be a function type. The function defined in this way is a decorator.
- Writing code should follow the open and closed principle, which stipulates that the implemented function code is not allowed to be modified, but can be extended.
Grammar of ornament
If multiple functions need to add login verification function, you need to write func = check(func) code every time to decorate the existing functions, which is still troublesome.
Python provides a simpler way to write decorative functions, that is, syntax sugar. The writing format of syntax sugar is: @ decorator name. You can also decorate existing functions through syntax sugar
# Add a login verification function
def check(fn):
    print("Decorator function executed")
    def inner():
        print("Please login first....")
        fn()
    return inner

# Use syntax sugar to decorate functions
@check
def comment():
    print("Comment")

comment()
Use of decorators
Usage scenario of decorator
- Statistics of function execution time
- Output log information
The decorator implements the statistics of the execution time of existing functions
import time

# Decorator function
def get_time(func):
    def inner():
        begin = time.time()
        func()
        end = time.time()
        print("Function execution cost%f" % (end-begin))
    return inner


@get_time
def func1():
    for i in range(100000):
        print(i)

func1()
...
99995
99996
99997
99998
99999
Function execution cost 0.329066
Use of universal decorator
Decorating functions with parameters
# Add the function of outputting log
def logging(fn):
    def inner(num1, num2):
        print("--Trying to calculate--")
        fn(num1, num2)

    return inner


# Decorating functions with decorators
@logging
def sum_num(a, b):
    result = a + b
    print(result)
sum_num(1, 2)
– trying to calculate –
3
Decorate functions with return values
# Add the function of outputting log
def logging(fn):
    def inner(num1, num2):
        print("--Trying to calculate--")
        result = fn(num1, num2)
        return result
    return inner


# Decorating functions with decorators
@logging
def sum_num(a, b):
    result = a + b
    return result


result = sum_num(1, 2)
print(result)
– trying to calculate –
3
Decorating functions with indefinite length parameters
# Add the function of outputting log
def logging(fn):
    def inner(*args, **kwargs):
        print("--Trying to calculate--")
        fn(*args, **kwargs)

    return inner


# Use syntax to decorate functions
@logging
def sum_num(*args, **kwargs):
    result = 0
    for value in args:
        result += value

    for value in kwargs.values():
        result += value

    print(result)

sum_num(1, 2, a=10)
– trying to calculate –
13
Universal decorator
# Add the function of outputting log
def logging(fn):
    def inner(*args, **kwargs):
        print("--Trying to calculate--")
        result = fn(*args, **kwargs)
        return result

    return inner


# Use syntax to decorate functions
@logging
def sum_num(*args, **kwargs):
    result = 0
    for value in args:
        result += value

    for value in kwargs.values():
        result += value

    return result

@logging
def subtraction(a, b):
    result = a - b
    print(result)

result = sum_num(1, 2, a=10)
print(result)

subtraction(4, 2)
– trying to calculate –
13
– trying to calculate –
2
Use of multiple decorators
The decoration process of multiple decorators is: the decorator closest to the function is decorated first, and then the external decorator is decorated again. The decoration process is from inside to outside
def make_div(func):
    """The return value of the decorated function div label"""
    def inner(*args, **kwargs):
        return "<div>" + func() + "</div>"
    return inner


def make_p(func):
    """The return value of the decorated function p label"""
    def inner(*args, **kwargs):
        return "<p>" + func() + "</p>"
    return inner


# Decoration process:
# 1 content = make_p(content)
# 2 content = make_div(content)
# content = make_div(make_p(content))
@make_div
@make_p
def content():
    return "Life is short"

result = content()

print(result)
Decorator with parameters
When the decorator is passed in, it can be used as the parameter of the decorator
Wrong writing: decorator can only receive one parameter, and it is still a function type.
def decorator(fn, flag):
    def inner(num1, num2):
        if flag == "+":
            print("--Trying to add--")
        elif flag == "-":
            print("--Trying to subtract--")
        result = fn(num1, num2)
        return result
    return inner


@decorator('+')
def add(a, b):
    result = a + b
    return result

result = add(1, 3)
print(result)
Traceback (most recent call last):
File "/home/python/Desktop/test/hho.py", line 12, in
@decorator('+')
TypeError: decorator() missing 1 required positional argument: 'flag'
Correct writing: wrap a function outside the decorator, let the outermost function receive parameters, and return the decorator, because the @ symbol must be followed by the decorator instance.
Wrap a function outside the decorator, let the outermost function receive parameters, and return the decorator, because the @ symbol must be followed by the decorator instance.
# Add the function of outputting log
def logging(flag):

    def decorator(fn):
        def inner(num1, num2):
            if flag == "+":
                print("--Trying to add--")
            elif flag == "-":
                print("--Trying to subtract--")
            result = fn(num1, num2)
            return result
        return inner

    # Return to decorator
    return decorator


# Decorating functions with decorators
@logging("+")
def add(a, b):
    result = a + b
    return result


@logging("-")
def sub(a, b):
    result = a - b
    return result

result = add(1, 2)
print(result)

result = sub(1, 2)
print(result)
Use of class decorator
Another special use of decorators is class decorators, which decorate functions by defining a class.
class Check(object):
    def __init__(self, fn):
        # The initialization operation is completed here
        self.__fn = fn

    # Realize__ call__ Method, indicating that the object is a callable object and can be called like a function.
    def __call__(self, *args, **kwargs):
        # Add decoration function
        print("Please log in first...")
        self.__fn()

@Check
def comment():
    print("Comment")
comment()
- @Check is equivalent to comment = Check(comment), so you need to provide an init method and add an fn parameter.
- If you want the instance object of a class to be called like a function, you need to use the call method in the class to turn the instance of the class into a callable object, that is, you can call it like a function.
Decorate the fn function in the call method to add additional functions.
Execution result:
Please log in first
Comment
Mini Web Framework
Overview of web Framework
Introduction to the relationship between web framework and web server:
We have studied the web server before. We know that the web server mainly receives the user's http request and returns different resource data according to the user's request. But before, we developed a static web server, which returns static resource data. If we want the web server to return dynamic resources, how should we deal with it?
The use of web framework is specifically responsible for handling users' dynamic resource requests. This web framework is actually an application that provides services for web servers, which is called web framework for short.
Relationship description:
-
The web server receives the request initiated by the browser. If it is a dynamic resource request, find the web framework to process it
-
The web framework is responsible for processing the dynamic resource request of the browser and sending the processing result to the web server
-
The web server then sends the response result to the browser
-
Static resources: resources that do not need to change frequently. This kind of resources can be prepared by the web server in advance, such as png/jpg/css/js and other files.
-
Dynamic resources: on the contrary to static resources, such resources often change. For example, when we browse goods in jd.com, we often filter according to the conditions. If we choose different conditions, the goods we browse will be different. This resource cannot be prepared in advance by the web server. We need a web framework to help the web server prepare. Here, the web server can html resource requests are considered as dynamic resource requests, which are handled by the web framework.
-
WSGI protocol: Python Web Server Gateway Interface (abbreviated as WSGI) is a simple and general interface between Web server and Web application or framework defined for Python language. Since WSGI was developed, similar interfaces have appeared in many other languages. WSGI protocol stipulates that the Web server transmits the request information of dynamic resources to the Web framework for processing, and the Web framework returns the processed results to the Web server.
Framework program development
Introduction to framework responsibilities
- Receive the dynamic resource request from the web server and provide the web server with the service to process the dynamic resource request.
Dynamic resource judgment
Judge according to the suffix of the requested resource path
- If the suffix of the requested resource path is html is a dynamic resource request, which is processed by the web framework program.
- Otherwise, it is a static resource request, which is processed by the web server program.
Web server program (web.py) code:
import socket
import threading
import sys
import framework


# Define web server classes
class HttpWebServer(object):
    def __init__(self, port):
        # Create tcp server socket
        tcp_server_socket = socket.socket(socket.AF_INET, socket.SOCK_STREAM)
        # Set the port number reuse, and the program exit port will be released immediately
        tcp_server_socket.setsockopt(socket.SOL_SOCKET, socket.SO_REUSEADDR, True)
        # Binding port number
        tcp_server_socket.bind(("", port))
        # Set listening
        tcp_server_socket.listen(128)
        self.tcp_server_socket = tcp_server_socket

    # Handle customer requests and declare static methods
    @staticmethod
    def handle_client_quest(new_socket):
        # When the code is executed to this point, the connection is established successfully
        recv_client_data = new_socket.recv(4096)
        if len(recv_client_data) == 0:
            print("The browser is closed")
            # Close the socket between the service and the client
            new_socket.close()
            return

        # Decoding binary data
        recv_client_content = recv_client_data.decode("utf-8")
        print(recv_client_content)
        # Divide according to the specified string, and the maximum number of divisions is 2
        request_list = recv_client_content.split(" ", maxsplit=2)

        # Get request resource path
        request_path = request_list[1]
        print(request_path)

        # Judge whether the requested is the root directory. If the condition is true, specify the home page data to return
        if request_path == "/":
            request_path = "/index.html"

        # Determine whether it is a dynamic resource request
        if request_path.endswith(".html"):
            """Here is the dynamic resource request. The request information is handed over to the framework for processing"""
            # The dictionary stores the user's request information
            env = {
                "request_path": request_path
            }

            # Get processing results
            status, headers, response_body = framework.handle_request(env)

            # Data splicing response message processed by framework
            # Response line
            response_line = "HTTP/1.1 %s\r\n" % status
            # Response header
            response_header = ""
            # Traversal header information
            for header in headers:
                # Splice multiple response heads
                response_header += "%s: %s\r\n" % header
            response_data = (response_line +
                             response_header +
                             "\r\n" +
                             response_body).encode("utf-8")
            # send data
            new_socket.send(response_data)
            # Close socket
            new_socket.close()

        else:
            """Here is the static resource request"""
            try:
                # Dynamically open the specified file
                with open("static" + request_path, "rb") as file:
                    # Read file data
                    file_data = file.read()
            except Exception as e:
                # The requested resource does not exist, and 404 data is returned
                # Response line
                response_line = "HTTP/1.1 404 Not Found\r\n"
                # Response header
                response_header = "Server: PWS1.0\r\n"
                with open("static/error.html", "rb") as file:
                    file_data = file.read()
                # Responder
                response_body = file_data

                # Splicing response message
                response_data = (response_line + response_header + "\r\n").encode("utf-8") + response_body
                # send data
                new_socket.send(response_data)
            else:
                # Response line
                response_line = "HTTP/1.1 200 OK\r\n"
                # Response header
                response_header = "Server: PWS1.0\r\n"

                # Responder
                response_body = file_data

                # Splicing response message
                response_data = (response_line + response_header + "\r\n").encode("utf-8") + response_body
                # send data
                new_socket.send(response_data)
            finally:
                # Close the socket between the service and the client
                new_socket.close()

    def start(self):
        while True:
            # Waiting to accept the connection request from the client
            new_socket, ip_port = self.tcp_server_socket.accept()
            sub_thread = threading.Thread(target=self.handle_client_quest, args=(new_socket,))
            # Set daemon thread
            sub_thread.setDaemon(True)
            sub_thread.start()


# Program entry function
def main():

    # Get command line parameter judgment length
    if len(sys.argv) != 2:
        print("Execute the following command: python3 xxx.py 9000")
        return

    # Determine whether the port number is a number
    if not sys.argv[1].isdigit():
        print("Execute the following command: python3 xxx.py 9000")
        return

    # Need to convert to int type
    port = int(sys.argv[1])

    # Create web server
    web_server = HttpWebServer(port)
    # Start the web server
    web_server.start()


if __name__ == '__main__':
    main()
Handle dynamic resource requests from clients
- Create web Framework Program
- Receive dynamic resource request from web server
- Process the dynamic resource request of the web server and return the processing result to the web server
- The web server assembles the processing results into a response message and sends it to the browser
web Framework Program (framework.py) code:
"""miniweb Framework, which is responsible for processing dynamic resource requests"""
import time


# Get home page data
def index():
    # Response status
    status = "200 OK";
    # Response header
    response_header = [("Server", "PWS2.0")]
    # Processed data
    data = time.ctime()

    return status, response_header, data


# Dynamic resource not found
def not_found():
    # Response status
    status = "404 Not Found";
    # Response header
    response_header = [("Server", "PWS2.0")]
    # Processed data
    data = "not found"

    return status, response_header, data


# Processing dynamic resource requests
def handle_request(env):
    # Get dynamic request resource path
    request_path = env["request_path"]
    print("Dynamically received resource requests:", request_path)

    if request_path == "/index.html":
        # Get home page data
        result = index()
        return result
    else:
        # Dynamic resource not found
        result = not_found()
        return result
Development of template replacement function, replacing template variables with simulation data
framework.py example code:
# Get home page data
def index():
    # Response status
    status = "200 OK";
    # Response header
    response_header = [("Server", "PWS2.0")]

    # 1. Open the template file and read the data
    with open("template/index.html", "r") as file:
        file_data = file.read()

    # The processed data is queried from the database
    data = time.ctime()
    # 2. Replace the template traversal in the template file
    result = file_data.replace("{%content%}", data)

    return status, response_header, result
Routing list function development
- What is routing? Routing is the mapping from the requested URL to the processing function, that is, associate the requested URL with the processing function in advance.
- Routing list: how to manage so many routes? You can use a routing list to manage and save each route through the routing list.
- Add a route in the route list, traverse the route list according to the user's request, and process the user's request
# Define routing list
route_list = [
    ("/index.html", index),
    ("/center.html", center)
]

# Processing dynamic resource requests
def handle_request(env):
    # Get dynamic request resource path
    request_path = env["request_path"]
    print("Dynamic resource request received:", request_path)
    # Traverse the routing list and select the function to be executed
    for path, func in route_list:
        if request_path == path:
            result = func()
            return result
    else:
        # Dynamic resource not found
        result = not_found()
        return result
Add route in decorator mode
Previously, we have implemented the route list, but each time we add a route, we need to add it manually. Next, we want to complete the automatic addition of the route, which can be realized through the decorator. When using the decorator to decorate the processing function, we need to know that the decorated function is associated with the request path, In other words, the decorator needs to receive a url parameter, so the decorator we define is a decorator with parameters.
"""miniweb Framework, which is responsible for processing dynamic resource requests"""
import time

# Define routing list
route_list = []


# Define decorator with parameters
def route(path):
    # Decorator
    def decorator(func):
        # When the decorator is executed to decorate the specified function, the path and function are added to the routing list
        route_list.append((path, func))

        def inner():
            # Executes the specified function
            return func()

        return inner
    # Return to decorator
    return decorator


# Get home page data
@route("/index.html")
def index():
    # Response status
    status = "200 OK";
    # Response header
    response_header = [("Server", "PWS2.0")]

    # Open the template file and read the data
    with open("template/index.html", "r") as file:
        file_data = file.read()

    # The processed data is queried from the database
    data = time.ctime()
    # Replace template traversal in template file
    result = file_data.replace("{%content%}", data)

    return status, response_header, result


# Get personal center data
@route("/center.html")
def center():
    # Response status
    status = "200 OK";
    # Response header
    response_header = [("Server", "PWS2.0")]

    # Open the template file and read the data
    with open("template/center.html", "r") as file:
        file_data = file.read()

    # The processed data is queried from the database
    data = time.ctime()
    # Replace template traversal in template file
    result = file_data.replace("{%content%}", data)

    return status, response_header, result


# Dynamic resource not found
def not_found():
    # Response status
    status = "404 Not Found";
    # Response header
    response_header = [("Server", "PWS2.0")]
    # Processed data
    data = "not found"

    return status, response_header, data


# Processing dynamic resource requests
def handle_request(env):
    # Get dynamic request resource path
    request_path = env["request_path"]
    print("Dynamic resource request received:", request_path)
    # Traverse the routing list and select the function to be executed
    for path, func in route_list:
        if request_path == path:
            result = func()
            return result
    else:
        # Dynamic resource not found
        result = not_found()
        return result
Development of displaying stock information page
Data preparation
-- Create database
create database stock_db charset=utf8;
-- Switch database
use stock_db;
-- implement sql file
source stock_db.sql;
- Query stock information according to sql statement
# Get home page data
@route("/index.html")
def index():
    # Response status
    status = "200 OK";
    # Response header
    response_header = [("Server", "PWS2.0")]

    # Open template, read data
    with open("template/index.html", "r") as file:
        file_data = file.read()

    # The processed data is queried from the database
    conn = pymysql.connect(host="localhost",
                           port=3306,
                           user="root",
                           password="mysql",
                           database="stock_db",
                           charset="utf8")

    # Get cursor
    cursor = conn.cursor()
    # Query sql statement
    sql = "select * from info;"
    # Execute sql
    cursor.execute(sql)
    # Get result set
    result = cursor.fetchall()
    print(result)
- Replace template variables with query data
# Get home page data
@route("/index.html")
def index():
    # Response status
    status = "200 OK";
    # Response header
    response_header = [("Server", "PWS2.0")]

    # Open the template file and read the data
    with open("template/index.html", "r") as file:
        file_data = file.read()

    # The processed data is queried from the database
    conn = pymysql.connect(host="localhost",
                           port=3306,
                           user="root",
                           password="mysql",
                           database="stock_db",
                           charset="utf8")

    # Get cursor
    cursor = conn.cursor()
    # Query sql statement
    sql = "select * from info;"
    # Execute sql
    cursor.execute(sql)
    # Get result set
    result = cursor.fetchall()
    print(result)

    data = ""
    for row in result:
        data += '''<tr>
                    <td>%s</td>
                    <td>%s</td>
                    <td>%s</td>
                    <td>%s</td>
                    <td>%s</td>
                    <td>%s</td>
                    <td>%s</td>
                    <td>%s</td>
                    <td><input type="button" value="add to" id="toAdd" name="toAdd" systemidvaule="000007"></td>
                   </tr>''' % row

    # Replace template traversal in template file
    result = file_data.replace("{%content%}", data)

    return status, response_header, result
Development of personal center data interface
Query personal center data according to sql statement Convert personal center data into json string and return
# Development of personal center data interface
@route("/center_data.html")
def center_data():
    # Response status
    status = "200 OK";
    # Response header
    response_header = [("Server", "PWS2.0"), ("Content-Type", "text/html;charset=utf-8")]
    conn = pymysql.connect(host="localhost",
                           port=3306,
                           user="root",
                           password="mysql",
                           database="stock_db",
                           charset="utf8")

    # Get cursor
    cursor = conn.cursor()
    # Query sql statement
    sql = '''select i.code, i.short, i.chg,
             i.turnover, i.price, i.highs, f.note_info
             from info as i inner join focus as f on i.id = f.info_id;'''
    # Execute sql
    cursor.execute(sql)
    # Get result set
    result = cursor.fetchall()
    # Close cursor
    cursor.close()
    # Close database connection
    conn.close()
    print(result)
     # Personal center data list
    center_data_list = list()
    # Traverse each row of data and turn it into a dictionary
    for row in result:
        # Create an empty dictionary
        center_dict = dict()
        center_dict["code"] = row[0]
        center_dict["short"] = row[1]
        center_dict["chg"] = row[2]
        center_dict["turnover"] = row[3]
        center_dict["price"] = str(row[4])
        center_dict["highs"] = str(row[5])
        center_dict["note_info"] = row[6]
        # Add each dictionary information
        center_data_list.append(center_dict)

    # Convert the list dictionary into json string and display it on the console
    json_str = json.dumps(center_data_list,ensure_ascii=False)
    print(json_str)
    return status, response_header, json_str
Code Description:
- json.dumps function converts the dictionary into JSON string: the first parameter of the function means to convert the specified object into JSON string, and the second parameter of the parameter is ensure_ascii=False indicates that ascii code is not used and Chinese can be displayed on the console.
- Adding content type to the response header indicates the encoding format of the specified data
ajax request data rendering personal center page
# Get personal center data
@route("/center.html")
def center():
    # Response status
    status = "200 OK"
    # Response header
    response_header = [("Server", "PWS2.0")]

    # Open the template file and read the data
    with open("template/center.html", "r") as file:
        file_data = file.read()

    # Replace template traversal in template file
    result = file_data.replace("{%content%}", "")

    return status, response_header, result
Return the empty template file data of the personal center according to the user's request, and add ajax request to the template file of the personal center to obtain the personal center data
// Send ajax request to get personal center page data
$.get("center_data.html", function (data) {

    var data_array = data;

    // Get table label object
    var $table = $(".table")
    for(var i = 0; i < data_array.length; i++){
        // Get each object
        var center_obj = data_array[i];
        var row_html = '<tr>' +
            '<td>'+ center_obj.code +'</td>' +
            '<td>'+ center_obj.short +'</td>' +
            '<td>'+ center_obj.chg +'</td>' +
            '<td>'+ center_obj.turnover +'</td>' +
            '<td>'+ center_obj.price +'</td>' +
            '<td>'+ center_obj.highs +'</td>' +
            '<td>'+ center_obj.note_info +'</td>' +
            '<td><a type="button" class="btn btn-default btn-xs" href="/update/000007.html"> <span class="glyphicon glyphicon-star" aria-hidden="true"></span> modify </a></td><td><input type="button" value="delete" id="toDel" name="toDel" systemidvaule="000007"></td></tr>';
        // Add html data assembled for each row to the table tag
        $table.append(row_html);
    }

}, "json");
logging log
Introduction to logging
In real life, log recording is very important. For example, there will be transfer records during bank transfer; During the flight of the aircraft, there will be a black box (flight data recorder) to record the flight process of the aircraft. What should we do in our python program to record the log information generated during the operation of the program?
This can be done using the logging package
The purpose of recording program log information is to:
- It is very convenient to understand the operation of the program
- It can analyze the user's operation behavior, preferences and other information
- It is convenient for developers to check bug s
logging log level introduction
There are five log levels, from low to high: debug, info, warning, error and critical
Log level description:
- DEBUG: used when debugging a bug
- INFO: used when the program is running normally
- WARNING: the program is not used as expected, but it is not an error. For example, the user login password is wrong
- ERROR: used when the program has an ERROR, such as IO operation failure
- CRITICAL: a particularly serious problem that makes the program unable to continue running. For example, the disk space is empty and is rarely used
The default is WARNING level. Log information is recorded only when the level is above or above WARNING.
The order of log level from low to high is: debug < info < warning < error < critical
logging log usage
There are two ways to record logs in the logging package:
- Output to console
- Save to log file
Example code for outputting log information to console:
import logging

logging.debug('This is a debug Level log information')
logging.info('This is a info Level log information')
logging.warning('This is a warning Level log information')
logging.error('This is a error Level log information')
logging.critical('This is a critical Level log information')
Log information only shows logs with WARNING level or higher, which indicates that the default log level is set to WARNING · logging log level and output format:
import logging

# Set log level and output log format
logging.basicConfig(level=logging.DEBUG,
                    format='%(asctime)s - %(filename)s[line:%(lineno)d] - %(levelname)s: %(message)s')

logging.debug('This is a debug Level log information')
logging.info('This is a info Level log information')
logging.warning('This is a warning Level log information')
logging.error('This is a error Level log information')
logging.critical('This is a critical Level log information')
- Level indicates the set log level
- Format indicates the output format of the log. Parameter Description:
- %(levelname)s: print log level name
- %(filename)s: print the name of the current executing program
- %(lineno)d: the current line number of the print log
- %(actime) s: time to print the log
- %(message)s: print log information
Example code of saving log information to log file:
import logging

logging.basicConfig(level=logging.DEBUG,
                    format='%(asctime)s - %(filename)s[line:%(lineno)d] - %(levelname)s: %(message)s',
                    filename="log.txt",
                    filemode="w")

logging.debug('This is a debug Level log information')
logging.info('This is a info Level log information')
logging.warning('This is a warning Level log information')
logging.error('This is a error Level log information')
logging.critical('This is a critical Level log information')
Application of logging in mini web project
web. Example of logging used by py program:
1. The program entry module sets the setting of logging
import socket
 import threading
 import sys
 import framework
 import logging

 # logging log configuration
 logging.basicConfig(level=logging.DEBUG,
                     format='%(asctime)s - %(filename)s[line:%(lineno)d] - %(levelname)s: %(message)s',
                     filename="log.txt",
                     filemode="w")
2.INFO level log output, example code:
# Determine whether it is a dynamic resource request
 if request_path.endswith(".html"):
     """Here is the dynamic resource request. The request information is handed over to the framework for processing"""
     logging.info("Dynamic resource request:" + request_path)
     ...
 else:
     """Here is the static resource request"""
     logging.info("Static resource request:" + request_path)
     ...
3.WARNING level log output, example code:
# Get command line parameter judgment length
 if len(sys.argv) != 2:
     print("Execute the following command: python3 xxx.py 9000")
     logging.warning("The user started the program on the command line. The number of parameters is incorrect!")
     return

 # Determine whether the port number is a number
 if not sys.argv[1].isdigit():
     print("Execute the following command: python3 xxx.py 9000")
     logging.warning("The user starts the program on the command line. The parameter is not a numeric string!")
     return
framework. Example of logging used by py program:
4.ERROR level log output, example code:
 # Processing dynamic resource requests
 def handle_request(env):
     # Get dynamic request resource path
     request_path = env["request_path"]
     print("Dynamic resource request received:", request_path)
     # Traverse the routing list and select the function to be executed
     for path, func in route_list:
         if request_path == path:
             result = func()
             return result
     else:
         logging.error("The corresponding route is not set:" + request_path)
         # Dynamic resource not found
         result = not_found()
         return result
The logging configuration information is set once in the program entry module, and the whole program can take effect. logging. Config basic indicates the configuration log