Reprinted from: https://blog.csdn.net/stilll123456/article/details/88370355
The original blogger has been reorganized into the following personal blog:
SpringBoot integration shiro+jwt+redis - stateless token login (I) overview
SpringBoot integration shiro+jwt+redis - stateless token login (II) authorization
SpringBoot integration shiro+jwt+redis - stateless token login (III) authentication
~~~~~~~~~~~~~~~~~~~~~~~~~~~~~~~~~~~~~~~~~~~~~~~~~~~~~~~~~~~~~~~~~~~~~~~~~~~~~~~~~~~~~~~~~~~~~~~~~~~~~~~~~~
catalogue
(1) Overview
1, Foreword
2, Relevant description
2-1. Shiro + JWT implements stateless authentication mechanism
2-2. Concept description of AccessToken and RefreshToken
2-3. About saving RefreshToken information in Redis (make JWT controllable)
2-4. About automatically refreshing AccessToken according to RefreshToken
3, Project structure
(2) Authorization
1, Maven configuration
2, Application configuration
3, Issue Token
4, Clear Token
5, Presentation description
(3) Authentication chapter
1, Maven configuration
2, Application configuration
3, Rewrite filter
4, Custom Realm
5, Shiro configuration
6, Overwrite Shiro cache
6-1. Rewrite Shiro Cache to Redis
6-2. Override Shiro cache manager
7, Custom exception
8, Get current login user
9, Effect demonstration
10, At Last
(1) Overview
1, Foreword
In microservices, we generally use stateless login, while the traditional session mode, under the front and back-end separated microservice architecture, if we continue to use it, we will have to solve the problem of cross domain sessionId, cluster session sharing and so on. This is obviously laborious and thankless, but the integration of shiro is not coincidentally contrary to our expectations:
(1) shiro's default interception jump is to jump to the url page. After the front and back ends are separated, the back end has no right to interfere with the page Jump.
(2) the login interception verification mechanism used by shiro by default is exactly the session used.
Of course, this is not what we want, so if we need to use shiro, we need to transform it. So how to transform it? We can customize login verification based on shiro integration, continue to integrate JWT, or oauth2 0 and so on, making it support stateless login of the server, that is, token login.
This time, we will take you through three blog posts to realize shiro integration and JWT stateless login. This one mainly makes an overall introduction. First, we have an overall idea, and then we can make you less detours. In the following chapters, I will take you step by step to build the service. At the same time, I will provide the source code to you at the end of the series. (ps: This article refers to a lot of materials in the implementation process. At that time, the implementation was in a hurry and was not recorded, which was infringed and deleted.)
Here we go.
2, Relevant description
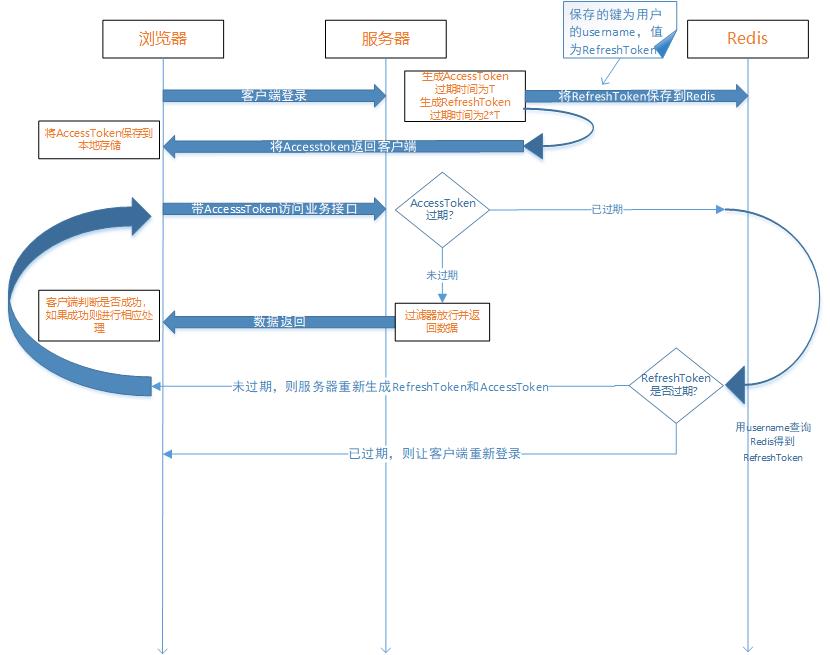
2-1. Shiro + JWT implements stateless authentication mechanism
1. First, post the user name and password to login. If it succeeds, an encrypted Authorization is returned in the request Header. If it fails, 10001 status codes such as not logged in are directly returned. Later access can be carried with this Authorization.
2. The authentication process is mainly to rewrite shiro's entry filter, BasicHttpAuthenticationFilter, and perform interception, token verification, authorization and other operations on this basis
2-2. Concept description of AccessToken and RefreshToken
1. AccessToken: used to identify the user authorization in the interface transmission process. The client needs to carry it every request. For security reasons, it is usually valid for a short time.
2. RefreshToken: it is symbiotic with AccessToken. It is generally used to refresh AccessToken. It is saved on the server, invisible to the client, and has a long effective time.
2-3. About saving RefreshToken information in Redis (make JWT controllable)
1. After the login authentication is passed, return the AccessToken information (save the current timestamp and account number in the AccessToken), and set a RefreshToken in Redis with the account number as the Key and the Value as the current timestamp (login time). At present, the AccessToken must not be invalid and the corresponding RefreshToken exists in Redis, Moreover, the authentication is passed only when the RefreshToken timestamp is consistent with the timestamp in the AccessToken information, so as to achieve the controllability of JWT. If you log in again and obtain a new AccessToken, the old AccessToken cannot be authenticated, because the RefreshToken timestamp information stored in Redis will only be consistent with the timestamp carried in the latest AccessToken information, In this way, each user can only use the latest AccessToken authentication.
2. Redis's RefreshToken can also be used to judge whether a user is online. If a RefreshToken of redis is deleted, the access token corresponding to the RefreshToken will not pass the authentication, which is equivalent to controlling the user's login and eliminating the user
2-4. About automatically refreshing AccessToken according to RefreshToken
1. The expiration time of the AccessToken itself is 5 minutes (configurable in the configuration file), and the expiration time of the RefreshToken is 30 minutes (configurable in the configuration file). After 5 minutes after logging in, the current AccessToken will expire. If you bring the AccessToken to access JWT again, a TokenExpiredException exception will be thrown, indicating that the Token has expired. Start to judge whether to refresh the AccessToken, First, redis queries whether the RefreshToken exists and whether the timestamp is consistent with the timestamp carried by the expired AccessToken. If it exists and is consistent, the AccessToken will be refreshed.
2. After the refresh, the expiration time of the new AccessToken is still 5 minutes (configurable in the configuration file), and the timestamp is the current latest timestamp. At the same time, set the timestamp in the RefreshToken to the current latest timestamp, and the refresh expiration time to 30 minutes (configurable in the configuration file). Finally, store the refreshed AccessToken in the Authorization field in the Header of the Response and return it.
3. At the same time, the front-end obtains and replaces it. You can access it with a new AccessToken next time.
3, Project structure
First of all, make it clear that the split structure of the following items is only for demonstration purposes and is not necessarily suitable for you. It can be split according to the actual situation of each project. The renderings are as follows:
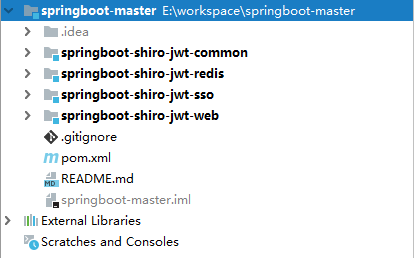
- Springboot Shiro JWT common: place common constants, configurations, etc.
- Springboot Shiro JWT redis: redis encapsulation.
- Springboot Shiro JWT Web: web interface provider, token authentication.
- Springboot Shiro JWT SSO: login, logout, token authorization and elimination.
(2) Authorization
Above Overview I believe you have a general idea and impression of what to do next. In short, there are only two things we need to do, one is authorization, the other is authentication.
Let's start with authorization. What is authorization? Here, simply speaking, it is to issue a token. When will it be issued? There is no doubt that it is after successful login / registration.
As for the automatic refresh of AccessToken according to RefreshToken mentioned above, I will classify it as token refresh, and the code will be implemented in the description of subsequent chapters.
Here we go.
1, Maven configuration
| | <!-- jwt -->
<dependency>
<groupId>com.auth0</groupId>
<artifactId>java-jwt</artifactId>
<version>${java-jwt.version}</version>
</dependency>
|
2, Application configuration
| | server:
port: 8001
spring:
application:
name: springboot-shiro-jwt-sso
# profiles: springboot-shiro-jwt-sso
## Redis configuration - start
redis:
# Redis database index (0 by default)
database: 1
# Redis server address
host: 127.0.0.1
# Redis server connection port
port: 6379
# Redis server connection password (blank by default)
# password: "doufuplus"
# Connection timeout (MS)
timeout: 5000
jedis:
pool:
# Maximum number of connections in connection pool (negative value indicates no limit)
max-active: 8
# Maximum blocking waiting time of connection pool (negative value indicates no limit)
max-wait: -1
# Maximum free connections in connection pool
max-idle: 8
# Minimum free connections in connection pool
min-idle: 0
## Redis configuration - end
## Time format configuration - start
jackson:
serialization:
write-dates-as-timestamps: true
## Time format configuration - end
## product configuration - start
info:
app.name: springboot-shiro-jwt-sso
company.name: doufuplus
build.artifactId: $project.artifactId$
build.modelVersion: $project.modelVersion$
## product configuration - end
## Log configuration - start
logging:
level:
com.nfgj.medical.service: DEBUG
## Log configuration - end
## Other configurations - start
config:
# JWT authentication encryption private key (Base64 encryption)
encrypt-jwtKey: U0JBUElOENhspJrzkyNjQ1NA
# AccessToken expiration time (seconds)
accessToken-expireTime: 600
# RefreshToken expiration time (seconds)
refreshToken-expireTime: 604800
## Other configurations - end
|
3, Issue Token
There is no difficulty in issuing the token. The main thing is to generate the AccessToken and place it in the Header to the front end. Then generate a RefreshToken and save it on the server. redis is used here to save.
| | /**
* Sign in
* Please indicate the source of reprint. For more technical articles, please visit my personal blog site: https://www.doufuplus.com
*
* @author , doufu
* @date 2019/08/03
*/
@PostMapping("/login")
public Result login(String account, String password, HttpServletResponse response) {
try {
if (!("doufuplus".equals(account) && "123456".equals(password))) {
return new Result(ResultCode.PASSWORD_ERROR, "account or password error.");
}
// Clear possible shiro permission information cache
if (redis.hasKey(RedisConstant.PREFIX_SHIRO_CACHE + account)) {
redis.del(RedisConstant.PREFIX_SHIRO_CACHE + account);
}
// Set the RefreshToken. The timestamp is the current timestamp. You can set it directly (you don't need to delete it first and then set it. The existing RefreshToken will be overwritten)
String currentTimeMillis = String.valueOf(System.currentTimeMillis());
redis.set(RedisConstant.PREFIX_SHIRO_REFRESH_TOKEN + account, currentTimeMillis,
Integer.parseInt(refreshTokenExpireTime));
// The AccessToken is returned from the Authorization in the Header, and the timestamp is the current timestamp
String token = JwtUtil.sign(account, currentTimeMillis);
response.setHeader("Authorization", token);
response.setHeader("Access-Control-Expose-Headers", "Authorization");
return new Result().OK();
} catch (Exception e) {
e.printStackTrace();
return new Result(ResultCode.ERROR, e.getMessage());
}
}
|
4, Clear Token
If there is no business, there will be no harm. If there is login, there will be exit. The clearing of token s mainly involves two things:
- Clear possible shiro permission information
- Clear RefreshToken
| | /**
* sign out
* Please indicate the source of reprint. For more technical articles, please visit my personal blog site: https://www.doufuplus.com
*
* @author , doufu
* @date 2019/08/03
*/
@RequestMapping("/logout")
public Result logout() {
try {
String token = "";
// Get header information
Enumeration<String> headerNames = request.getHeaderNames();
while (headerNames.hasMoreElements()) {
String key = (String) headerNames.nextElement();
String value = request.getHeader(key);
if ("Authorization".equalsIgnoreCase(key)) {
token = value;
}
}
// Verification token
if (StringUtils.isBlank(token)) {
return new Result(ResultCode.PARAM_ERROR);
}
String account = JwtUtil.getClaim(token, JwtConstant.ACCOUNT);
if (StringUtils.isBlank(account)) {
return new Result(ResultCode.NOT_LOGIN, "token Invalid or incorrect.");
}
// Clear shiro permission information cache
if (redis.hasKey(RedisConstant.PREFIX_SHIRO_CACHE + account)) {
redis.del(RedisConstant.PREFIX_SHIRO_CACHE + account);
}
// Clear RefreshToken
redis.del(RedisConstant.PREFIX_SHIRO_REFRESH_TOKEN + account);
return new Result().OK();
} catch (Exception e) {
e.printStackTrace();
return new Result(ResultCode.ERROR, e.getMessage());
}
}
|
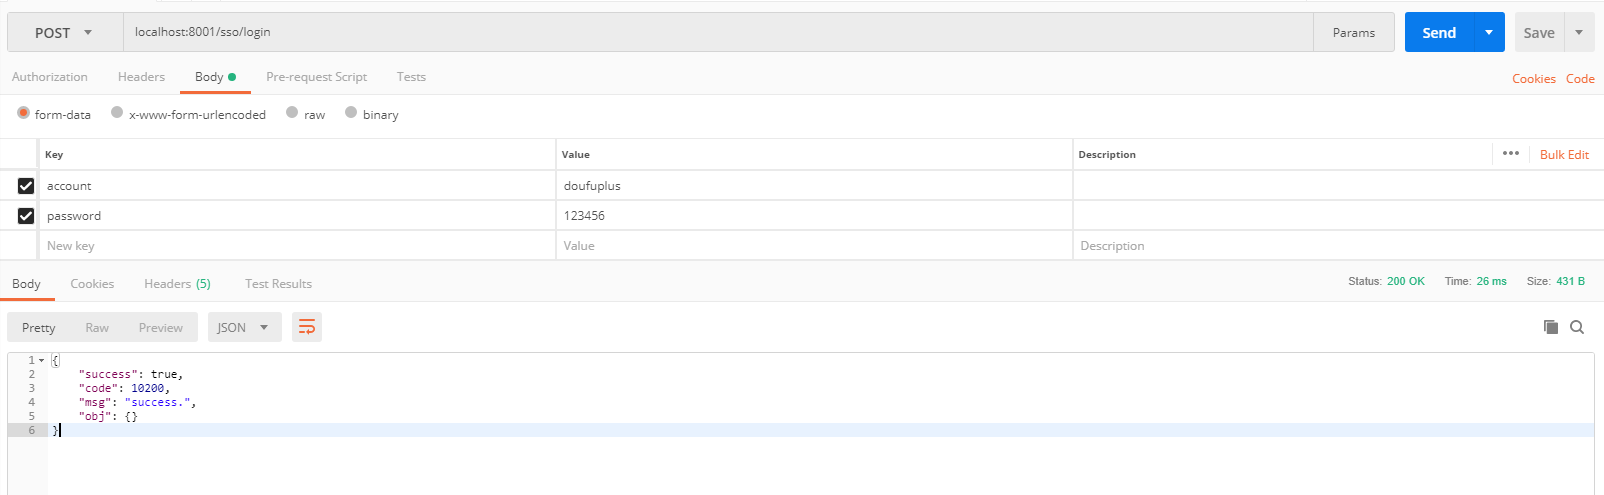
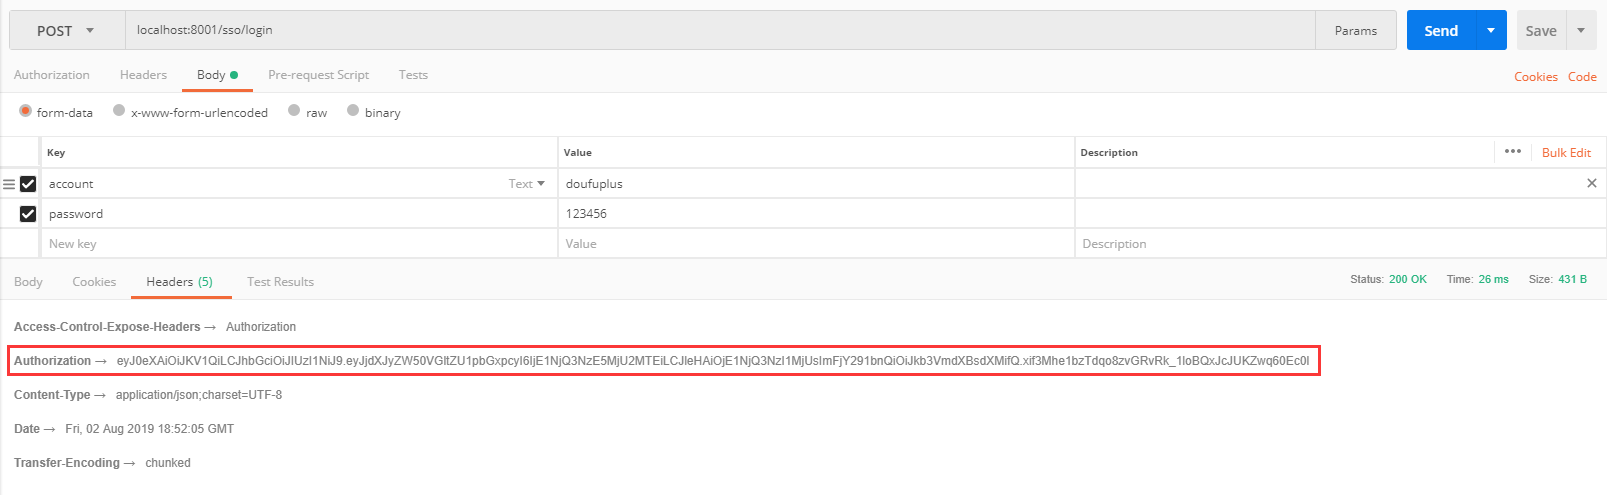
5, Presentation description
- Login succeeded, return 10200
- View the Header, and the Authorization returns the AccessToken information
(3) Authentication chapter
Above Authorization In, we have finished issuing and clearing tokens. In fact, the above operations do not need to be really integrated with shiro. In this chapter, I will explain how to carry out token authentication after integrating shiro. At the same time, it will also be the last play to realize stateless login authentication.
1, Maven configuration
The main configurations are as follows. Please refer to the source code for specific references:
| | <!-- jwt -->
<dependency>
<groupId>com.auth0</groupId>
<artifactId>java-jwt</artifactId>
<version>${java-jwt.version}</version>
</dependency>
<!-- shiro -->
<dependency>
<groupId>org.apache.shiro</groupId>
<artifactId>shiro-spring</artifactId>
<version>${shiro-spring.version}</version>
</dependency>
<!-- mysql Connector -->
<dependency>
<groupId>mysql</groupId>
<artifactId>mysql-connector-java</artifactId>
</dependency>
<!-- druid Connection pool -->
<dependency>
<groupId>com.alibaba</groupId>
<artifactId>druid-spring-boot-starter</artifactId>
<version>${druid.version}</version>
</dependency>
<!-- myBatis plus starter -->
<dependency>
<groupId>com.baomidou</groupId>
<artifactId>mybatis-plus-boot-starter</artifactId>
<version>${mybatis-plus-boot.version}</version>
</dependency>
<!-- myBatis plus -->
<dependency>
<groupId>com.baomidou</groupId>
<artifactId>mybatis-plus</artifactId>
<version>${mybatis-plus.version}</version>
</dependency>
|
2, Application configuration
| | server:
port: 8002
spring:
application:
name: springboot-shiro-jwt-web
# profiles: springboot-shiro-jwt-web
## Database configuration - start
datasource:
url: jdbc:mysql://localhost:3306/springboot-master?useSSL=false&allowMultiQueries=true&useUnicode=true&characterEncoding=UTF-8&serverTimezone=Asia/Shanghai&tinyInt1isBit=false
username: root
password: root
type: com.alibaba.druid.pool.DruidDataSource
# driver-class-name: com.mysql.cj.jdbc.Driver
# Connection pool configuration
druid:
# Initialization size, min, Max
initial-size: 5
min-idle: 5
max-active: 20
# Configure the timeout time for getting connections
max-wait: 60000
# How often is the configuration interval detected? Idle connections that need to be closed are detected in milliseconds
time-between-eviction-runs-millis: 60000
# Configure the minimum lifetime of a connection in the pool, in milliseconds
min-evictable-idle-time-millis: 300000
validation-query: SELECT 1 FROM DUAL
test-while-idle: true
test-on-borrow: false
test-on-return: false
# Open PSCache and specify the size of PSCache on each connection
pool-prepared-statements: true
max-pool-prepared-statement-per-connection-size: 20
# Configure the filters for monitoring statistics interception. After removing the filters, the sql in the monitoring interface cannot be counted, and 'wall' is used for firewall
filters: stat,wall,log4j2
use-global-data-source-stat: true
# Open the mergeSql function through the connectProperties property; Slow SQL record
connect-properties: druid.stat.mergeSql=true;druid.stat.slowSqlMillis=5000
# Configure monitoring server
stat-view-servlet:
url-pattern: /druid/*
login-username: admin
login-password: 123456
reset-enable: false
# Add IP whitelist
#allow:
# Add IP blacklist. When the whitelist and blacklist duplicate, the blacklist has higher priority
#deny:
web-stat-filter:
# Add filter rule
url-pattern: /*
# Ignore filter format
exclusions: "*.js,*.gif,*.jpg,*.jpeg,*.png,*.css,*.ico,/druid/*"
## Database configuration - end
## Redis configuration - start
redis:
# Redis database index (0 by default)
database: 1
# Redis server address
host: 127.0.0.1
# Redis server connection port
port: 6379
# Redis server connection password (blank by default)
# password: "doufuplus"
# Connection timeout (MS)
timeout: 5000
jedis:
pool:
# Maximum number of connections in connection pool (negative value indicates no limit)
max-active: 8
# Maximum blocking waiting time of connection pool (negative value indicates no limit)
max-wait: -1
# Maximum free connections in connection pool
max-idle: 8
# Minimum free connections in connection pool
min-idle: 0
## Redis configuration - end
## mybatis configuration - start
mybatis-plus:
# mapper.xml scan
mapper-locations: classpath*:/mapper/*.xml
# For entity scanning, multiple package s are separated by commas or semicolons
type-aliases-package: com.doufuplus.boot.shiro.entity
global-config:
db-config:
# Primary key type
id-type: UUID
# Field policy
# field-strategy: DEFAULT
# Database uppercase underline conversion
capital-mode: true
# Serial interface implementation class configuration
# key-generator: com.baomidou.mybatisplus.core.incrementer
# Logical deletion configuration
logic-delete-value: 1
logic-not-delete-value: 0
configuration:
# Enable automatic hump naming rules
map-underscore-to-camel-case: true
cache-enabled: false
call-setters-on-nulls: true
# Print SQL statement
log-impl: org.apache.ibatis.logging.stdout.StdOutImpl
## mybatis configuration - end
## product configuration - start
info:
app.name: springboot-shiro-jwt-web
company.name: doufuplus
build.artifactId: $project.artifactId$
build.modelVersion: $project.modelVersion$
## product configuration - end
## Log configuration - start
logging:
level:
com.nfgj.medical.service: DEBUG
## Log configuration - end
## Other configurations - start
config:
# JWT authentication encryption private key (Base64 encryption)
encrypt-jwtKey: U0JBUElOENhspJrzkyNjQ1NA
# AccessToken expiration time (seconds)
accessToken-expireTime: 600
# RefreshToken expiration time (seconds)
refreshToken-expireTime: 604800
# Shiro cache expiration time (seconds) (the general setting is consistent with the expiration time of AccessToken). Here, the CustomCache failed to read and needs to be solved
shiro-cache-expireTime: 600
## Other configurations - end
|
3, Rewrite filter
stay Overview As I mentioned in, the authentication process is mainly to rewrite shiro's entry filter BasicHttpAuthenticationFilter. Rewriting mainly does three things:
- Judge whether the request needs login authentication Authorization (the interception white list can be written here). If necessary, the request must add the Authorization field in the Header to store the AccessToken, that is, tourists can access directly without Authorization (if there is permission control, tourists' access will be blocked).
- Call getsubject (request, response) Login (token), submit the AccessToken to the UserRealm in shiro for authentication.
- AccessToken refresh: judge whether the RefreshToken has expired. If it has not expired, return a new AccessToken and RefreshToken and let the request continue to access normally.
| | /**
* JWT filter
* Please indicate the source of reprint. For more technical articles, please visit my personal blog site: https://www.doufuplus.com
*
* @author , doufu
* @date 2019/08/03
*/
public class JwtFilter extends BasicHttpAuthenticationFilter {
@Value("${config.refreshToken-expireTime}")
private String refreshTokenExpireTime;
@Autowired
private RedisClient redis;
/**
* Here, let's explain in detail why the final return is true, that is, access is allowed. For example, we provide an address GET /article. The logged in users and tourists see different contents
* If false is returned here, the request will be directly intercepted, and the user can't see anything, so we return true here, which can be passed in the Controller
* subject.isAuthenticated() To determine whether the user logs in
* If some resources can only be accessed by logged in users, we only need to add the @ requireauthentication annotation on the method
* However, one disadvantage of this is that it is not able to filter and authenticate GET,POST and other requests separately (because we have rewritten the official method), but it has little impact on the application
*/
@Override
protected boolean isAccessAllowed(ServletRequest request, ServletResponse response, Object mappedValue) {
// Determine whether the user wants to log in
if (this.isLoginAttempt(request, response)) {
try {
// Login to Shiro UserRealm
this.executeLogin(request, response);
} catch (Exception e) {
// There is an exception in authentication, and the error message msg is passed
String msg = e.getMessage();
// Get the application exception (the Cause is the throwable exception that causes this throwable exception to be thrown)
Throwable throwable = e.getCause();
if (throwable != null && throwable instanceof SignatureVerificationException) {
// The exception is that the AccessToken authentication of JWT fails (the Token or key is incorrect)
msg = "token Or the key is incorrect(" + throwable.getMessage() + ")";
} else if (throwable != null && throwable instanceof TokenExpiredException) {
// The exception is that the AccessToken of JWT has expired. If it is judged that the RefreshToken has not expired, refresh the AccessToken
if (this.refreshToken(request, response)) {
return true;
} else {
msg = "token Expired (" + throwable.getMessage() + ")";
}
} else {
// Application exception is not empty
if (throwable != null) {
// Get application exception msg
msg = throwable.getMessage();
}
}
/**
* 1. Two processing methods for errors Forward the illegal request to the Controller of / 401 for processing, throw a user-defined unauthorized access exception, be caught globally, and then return the Response information 2
* There is no need to forward and directly return the Response information. Generally, the second method is used (more convenient)
*/
// Directly return the Response information
this.response401(request, response, msg);
return false;
}
}
return true;
}
/**
* Here we explain in detail why rewriting can compare the parent method, but the executeLogin method call is removed
* If not, the doGetAuthenticationInfo method will be called cyclically
*/
@Override
protected boolean onAccessDenied(ServletRequest request, ServletResponse response) throws Exception {
this.sendChallenge(request, response);
return false;
}
/**
* Check whether the Header contains the Authorization field. If yes, conduct Token login authentication and Authorization
*/
@Override
protected boolean isLoginAttempt(ServletRequest request, ServletResponse response) {
// Get the accesstoken of Authorization in the current Header (getAuthzHeader method in Shiro has been implemented)
// String requestURI = ((HttpServletRequest) request).getRequestURI();
// String token = this.getAuthzHeader(request);
// return token != null;
// By default, all need to be verified
return true;
}
/**
* Access token login authentication and authorization
*/
@Override
protected boolean executeLogin(ServletRequest request, ServletResponse response) throws Exception {
// Get the accesstoken of Authorization in the current Header (getAuthzHeader method in Shiro has been implemented)
JwtToken token = new JwtToken(this.getAuthzHeader(request));
// Submit to UserRealm for authentication. If there is an error, he will throw an exception and be caught
this.getSubject(request, response).login(token);
// If no exception is thrown, it indicates successful login and returns true
return true;
}
/**
* Refresh the AccessToken to determine whether the RefreshToken has expired. If it has not expired, return a new AccessToken and continue normal access
*/
private boolean refreshToken(ServletRequest request, ServletResponse response) {
// Get the accesstoken of Authorization in the current Header (getAuthzHeader method in Shiro has been implemented)
String token = this.getAuthzHeader(request);
// Get the account information of the current Token
String account = JwtUtil.getClaim(token, JwtConstant.ACCOUNT);
// Judge whether RefreshToken exists in Redis
if (redis.hasKey(RedisConstant.PREFIX_SHIRO_REFRESH_TOKEN + account)) {
// RefreshToken still exists in Redis. Get the timestamp of RefreshToken
String currentTimeMillisRedis = redis.get(RedisConstant.PREFIX_SHIRO_REFRESH_TOKEN + account).toString();
// Obtain the timestamp in the current AccessToken and compare it with the timestamp in RefreshToken. If the current timestamp is consistent, refresh the AccessToken
if (JwtUtil.getClaim(token, JwtConstant.CURRENT_TIME_MILLIS).equals(currentTimeMillisRedis)) {
// Get the current latest timestamp
String currentTimeMillis = String.valueOf(System.currentTimeMillis());
// Read the configuration file and get the refreshTokenExpireTime property
// PropertiesUtil.readProperties("config.properties");
// String refreshTokenExpireTime =
// PropertiesUtil.getProperty("refreshTokenExpireTime");
// Set the timestamp in RefreshToken to the latest timestamp, and the refresh expiration time will expire in 30 minutes (the refreshTokenExpireTime property can be configured in the configuration file)
redis.set(RedisConstant.PREFIX_SHIRO_REFRESH_TOKEN + account, currentTimeMillis,
Integer.parseInt(refreshTokenExpireTime));
// Refresh the AccessToken and set the timestamp to the latest timestamp
token = JwtUtil.sign(account, currentTimeMillis);
// Log in Shiro again with the newly refreshed AccessToken
JwtToken jwtToken = new JwtToken(token);
// Submit to UserRealm for authentication. If there is an error, he will throw an exception and be caught. If no exception is thrown, it means that the login is successful and returns true
this.getSubject(request, response).login(jwtToken);
// Finally, the refreshed AccessToken is stored in the Authorization field in the Header of the Response and returned
HttpServletResponse httpServletResponse = (HttpServletResponse) response;
httpServletResponse.setHeader("Authorization", token);
httpServletResponse.setHeader("Access-Control-Expose-Headers", "Authorization");
return true;
}
}
return false;
}
/**
* The Response information is returned directly without forwarding
*/
private void response401(ServletRequest req, ServletResponse resp, String msg) {
HttpServletResponse httpServletResponse = (HttpServletResponse) resp;
httpServletResponse.setStatus(HttpStatus.UNAUTHORIZED.value());
httpServletResponse.setCharacterEncoding("UTF-8");
httpServletResponse.setContentType("application/json; charset=utf-8");
PrintWriter out = null;
try {
out = httpServletResponse.getWriter();
String data = JsonConvertUtil.objectToJson(new Result(ResultCode.NOT_LOGIN, msg));
out.append(data);
} catch (IOException e) {
throw new CustomException("Direct return Response Message appears IOException abnormal:" + e.getMessage());
} finally {
if (out != null) {
out.close();
}
}
}
/**
* Cross domain support
*/
@Override
protected boolean preHandle(ServletRequest request, ServletResponse response) throws Exception {
HttpServletRequest httpServletRequest = (HttpServletRequest) request;
HttpServletResponse httpServletResponse = (HttpServletResponse) response;
httpServletResponse.setHeader("Access-control-Allow-Origin", httpServletRequest.getHeader("Origin"));
httpServletResponse.setHeader("Access-Control-Allow-Methods", "GET,POST,OPTIONS,PUT,DELETE");
httpServletResponse.setHeader("Access-Control-Allow-Headers",
httpServletRequest.getHeader("Access-Control-Request-Headers"));
// When cross domain, we will first send an OPTIONS request. Here, we will directly return to the normal state for the OPTIONS request
if (httpServletRequest.getMethod().equals(RequestMethod.OPTIONS.name())) {
httpServletResponse.setStatus(HttpStatus.OK.value());
return false;
}
return super.preHandle(request, response);
}
}
|
4, Custom Realm
Consistent with the conventional shiro, we do authentication and authorization related to identity and authority in real
| | /**
* Custom Realm
* Please indicate the source of reprint. For more technical articles, please visit my personal blog site: https://www.doufuplus.com
*
* @author , doufu
* @date 2019/08/03
*/
@Service
public class UserRealm extends AuthorizingRealm {
@Autowired
private RedisClient redis;
@Autowired
private UserMapper userMapper;
/**
* Dakeng, this method must be rewritten, or Shiro will report an error
*/
@Override
public boolean supports(AuthenticationToken token) {
return token instanceof JwtToken;
}
/**
* This method is called only when the user permission needs to be detected, such as checkrole and checkpermission
*/
@Override
protected AuthorizationInfo doGetAuthorizationInfo(PrincipalCollection principals) {
SimpleAuthorizationInfo simpleAuthorizationInfo = new SimpleAuthorizationInfo();
/*
// Return the role, permission and other information owned by the current user, and code it according to its own item
String account = JwtUtil.getClaim(principals.toString(), JwtConstant.ACCOUNT);
// Query user roles
List<Role> roles = roleMapper.findByAccount(account);
for (int i = 0, roleLen = roles.size(); i < roleLen; i++) {
Role role = roles.get(i);
// Add role
simpleAuthorizationInfo.addRole(role.getName());
// Query permissions according to user roles
List<Permission> permissions = permissionMapper.findByRoleId(role.getId());
for (int j = 0, perLen = permissions.size(); j < perLen; j++) {
Permission permission = permissions.get(j);
// add permission
simpleAuthorizationInfo.addStringPermission(permission.getSn());
}
}
*/
return simpleAuthorizationInfo;
}
/**
* By default, this method is used to verify whether the user name is correct or not, and an exception can be thrown.
*/
@Override
protected AuthenticationInfo doGetAuthenticationInfo(AuthenticationToken auth) throws AuthenticationException {
String token = (String) auth.getCredentials();
if (StringUtils.isBlank(token)) {
throw new AuthenticationException("token cannot be empty.");
}
// Decrypt and obtain the account, which is used to compare with the database
String account = JwtUtil.getClaim(token, JwtConstant.ACCOUNT);
// Account number is empty
if (StringUtils.isBlank(account)) {
throw new AuthenticationException("token Account number in is empty(The account in Token is empty.)");
}
// Query whether the user exists
User user = userMapper.findByAccount(account);
if (user == null) {
throw new AuthenticationException("The account does not exist(The account does not exist.)");
}
// The two accesstokens must have the same authentication time stamp, and the two accesstokens must pass the authentication
if (JwtUtil.verify(token) && redis.hasKey(RedisConstant.PREFIX_SHIRO_REFRESH_TOKEN + account)) {
// Get the timestamp of RefreshToken
String currentTimeMillisRedis = redis.get(RedisConstant.PREFIX_SHIRO_REFRESH_TOKEN + account).toString();
// Obtain the timestamp of AccessToken and compare it with that of RefreshToken
if (JwtUtil.getClaim(token, JwtConstant.CURRENT_TIME_MILLIS).equals(currentTimeMillisRedis)) {
return new SimpleAuthenticationInfo(token, token, "userRealm");
}
}
throw new AuthenticationException("token expired or incorrect.");
}
}
|
5, Shiro configuration
Note the configuration of JwtFilter. Due to the loading order of filter in spring boot, the Bean injection of JwtFilter should be placed after shiroFilter, otherwise the following exception will be reported:
| | No SecurityManager accessible to the calling code, either bound to the org.apache.shiro.util.
ThreadContext or as a vm static singleton. This is an invalid application configuration.
|
The code is as follows:
| | /**
* Shiro to configure
* Please indicate the source of reprint. For more technical articles, please visit my personal blog site: https://www.doufuplus.com
*
* @author , doufu
* @date 2019/08/03
*/
@Configuration
public class ShiroConfig {
/**
* Configure and use custom Realm and close Shiro's own session. See the document for details
* http://shiro.apache.org/session-management.html#SessionManagement-StatelessApplications%28Sessionless%29
*/
@Bean("securityManager")
public DefaultWebSecurityManager getManager(UserRealm userRealm, RedisTemplate<String, Object> template) {
DefaultWebSecurityManager manager = new DefaultWebSecurityManager();
// Use custom Realm
manager.setRealm(userRealm);
// Close Shiro's own session
DefaultSubjectDAO subjectDAO = new DefaultSubjectDAO();
DefaultSessionStorageEvaluator defaultSessionStorageEvaluator = new DefaultSessionStorageEvaluator();
defaultSessionStorageEvaluator.setSessionStorageEnabled(false);
subjectDAO.setSessionStorageEvaluator(defaultSessionStorageEvaluator);
manager.setSubjectDAO(subjectDAO);
// Set custom Cache
manager.setCacheManager(new CustomCacheManager(template));
return manager;
}
/**
* Generate a shirorerediscachemanager
**/
private CustomCacheManager cacheManager(RedisTemplate template) {
return new CustomCacheManager(template);
}
/**
* Add your own filter and customize url rules. See the document for details http://shiro.apache.org/web.html#urls -
*/
@Bean("shiroFilter")
public ShiroFilterFactoryBean factory(DefaultWebSecurityManager securityManager) {
ShiroFilterFactoryBean factoryBean = new ShiroFilterFactoryBean();
// Add your own filter named jwt
Map<String, Filter> filterMap = new HashMap<>(16);
filterMap.put("jwtFilter", jwtFilterBean());
factoryBean.setFilters(filterMap);
factoryBean.setSecurityManager(securityManager);
// Custom url rules
Map<String, String> filterRuleMap = new HashMap<>(16);
// All requests go through our own JWTFilter
filterRuleMap.put("/**", "jwtFilter");
factoryBean.setFilterChainDefinitionMap(filterRuleMap);
return factoryBean;
}
/**
* <pre>
* To inject bean s, note here:
*
* (1)The code sequence should be placed after shiroFilter, otherwise an error will be reported:
* No SecurityManager accessible to the calling code, either bound to the org.apache.shiro.util.
* ThreadContext or as a vm static singleton. This is an invalid application configuration.
*
* (2)If you do not register here, you will not be able to inject bean s normally in the filter
* </pre>
*/
@Bean("jwtFilter")
public JwtFilter jwtFilterBean() {
return new JwtFilter();
}
/**
* The following code is to add annotation support
*/
@Bean
@DependsOn("lifecycleBeanPostProcessor")
public DefaultAdvisorAutoProxyCreator defaultAdvisorAutoProxyCreator() {
DefaultAdvisorAutoProxyCreator defaultAdvisorAutoProxyCreator = new DefaultAdvisorAutoProxyCreator();
// Force the use of cglib to prevent duplicate agents and problems that may cause agent errors, https://zhuanlan.zhihu.com/p/29161098
defaultAdvisorAutoProxyCreator.setProxyTargetClass(true);
return defaultAdvisorAutoProxyCreator;
}
@Bean
public LifecycleBeanPostProcessor lifecycleBeanPostProcessor() {
return new LifecycleBeanPostProcessor();
}
@Bean
public AuthorizationAttributeSourceAdvisor authorizationAttributeSourceAdvisor(
DefaultWebSecurityManager securityManager) {
AuthorizationAttributeSourceAdvisor advisor = new AuthorizationAttributeSourceAdvisor();
advisor.setSecurityManager(securityManager);
return advisor;
}
}
|
6, Overwrite Shiro cache
6-1. Rewrite Shiro Cache to Redis
| | /**
* Overwrite Shiro's Cache to save reads
* Please indicate the source of reprint. For more technical articles, please visit my personal blog site: https://www.doufuplus.com
*
* @author , doufu
* @date 2019/08/03
*/
public class CustomCache<K, V> implements Cache<K, V> {
// TODO redis @Autowired injection failed, so the following parameter transfer form is adopted
// @Autowired
// private RedisClient redis = new RedisClient();
// TODO @Value injection failed @ value ("${config. Shiro cache expireTime}")
private String shiroCacheExpireTime = "600";
private RedisTemplate<String, Object> redisTemplate;
public CustomCache(RedisTemplate redisTemplate) {
// Use StringRedisSerializer for serialization
// redisTemplate.setValueSerializer(new StringRedisSerializer());
this.redisTemplate = redisTemplate;
}
/**
* The key name of the cache is shiro:cache:account
*
* @param key
* @return java.lang.String
* @author Wang926454
* @date 2018/9/4 18:33
*/
private String getKey(Object key) {
return RedisConstant.PREFIX_SHIRO_CACHE + JwtUtil.getClaim(key.toString(), JwtConstant.ACCOUNT);
}
/**
* Get cache
*/
@Override
public Object get(Object key) throws CacheException {
return redisTemplate.opsForValue().get(this.getKey(key));
}
/**
* Save cache
*/
@Override
public Object put(Object key, Object value) throws CacheException {
// Read the configuration file and get the expiration time of Shiro cache of Redis
// PropertiesUtil.readProperties("config.properties");
// String shiroCacheExpireTime =
// PropertiesUtil.getProperty("shiroCacheExpireTime");
// Set Shiro cache of Redis
try {
redisTemplate.opsForValue().set(this.getKey(key), value, Integer.parseInt(shiroCacheExpireTime), TimeUnit.SECONDS);
return true;
} catch (Exception e) {
e.printStackTrace();
return false;
}
}
/**
* Remove cache
*/
@Override
public Object remove(Object key) throws CacheException {
redisTemplate.delete(this.getKey(key));
return null;
}
/**
* Empty all caches
*/
@Override
public void clear() throws CacheException {
// TODO Auto-generated method stub
}
/**
* Number of caches
*/
@Override
public Set<K> keys() {
// TODO Auto-generated method stub
return null;
}
/**
* Get all key s
*/
@Override
public int size() {
// TODO Auto-generated method stub
return 0;
}
/**
* Get all value s
*/
@Override
public Collection<V> values() {
// TODO Auto-generated method stub
return null;
}
/*
* @Override public void clear() throws CacheException {
* redis.getJedis().flushDB(); }
*/
/*
* @Override public int size() { Long size = JedisUtil.getJedis().dbSize();
* return size.intValue(); }
*/
/*
* @Override public Set keys() { Set<byte[]> keys =
* JedisUtil.getJedis().keys(new String("*").getBytes()); Set<Object> set = new
* HashSet<Object>(); for (byte[] bs : keys) {
* set.add(SerializableUtil.unserializable(bs)); } return set; }
*/
/*
* @Override public Collection values() { Set keys = this.keys(); List<Object>
* values = new ArrayList<Object>(); for (Object key : keys) {
* values.add(JedisUtil.getObject(this.getKey(key))); } return values; }
*/
}
|
6-2. Override Shiro cache manager
| | /**
* Override Shiro cache manager
* Please indicate the source of reprint. For more technical articles, please visit my personal blog site: https://www.doufuplus.com
*
* @author , doufu
* @date 2019/08/03
*/
public class CustomCacheManager implements CacheManager {
private RedisTemplate<String, Object> redisTemplate;
public CustomCacheManager(RedisTemplate redisTemplate) {
this.redisTemplate = redisTemplate;
}
@Override
public <K, V> Cache<K, V> getCache(String s) throws CacheException {
return new CustomCache<K, V>(redisTemplate);
}
}
|
7, Custom exception
In order to return the unified Json prompt, we need to rewrite shiro's exception information. The code is as follows:
| | /**
* Exception control processor
* Please indicate the source of reprint. For more technical articles, please visit my personal blog site: https://www.doufuplus.com
*
* @author , doufu
* @date 2019/08/03
*/
@RestControllerAdvice
public class ExceptionAdvice {
/**
* Catch all Shiro exceptions
*/
@ResponseStatus(HttpStatus.UNAUTHORIZED)
@ExceptionHandler(ShiroException.class)
public Result handle401(ShiroException e) {
return new Result(ResultCode.UNLAWFUL, "No access(Unauthorized):" + e.getMessage());
}
/**
* Catch Shiro (unauthorized exception) exception separately. This exception is an exception thrown when the user does not have the required permission to access the request with permission control
*/
@ResponseStatus(HttpStatus.UNAUTHORIZED)
@ExceptionHandler(UnauthorizedException.class)
public Result handle401(UnauthorizedException e) {
Result result = new Result();
return new Result(ResultCode.UNLAWFUL, "No access(Unauthorized):current Subject You do not have the required permissions for this request(" + e.getMessage() + ")");
}
/**
* Catch Shiro(UnauthenticatedException) exception separately
* This exception is an exception thrown when an anonymous subject cannot be authorized when a request with permission control is accessed as a tourist, and the authorization fails
*/
@ResponseStatus(HttpStatus.UNAUTHORIZED)
@ExceptionHandler(UnauthenticatedException.class)
public Result handle401(UnauthenticatedException e) {
return new Result(ResultCode.UNLAWFUL, "No access(Unauthorized):current Subject It's anonymous Subject,Please login first(This subject is anonymous.)");
}
/**
* Catch check exception (BindException)
*/
@ResponseStatus(HttpStatus.BAD_REQUEST)
@ExceptionHandler(BindException.class)
public Result validException(BindException e) {
List<FieldError> fieldErrors = e.getBindingResult().getFieldErrors();
Map<String, Object> error = this.getValidError(fieldErrors);
return new Result(ResultCode.ERROR, error.get("errorMsg").toString(), error.get("errorList"));
}
/**
* Catch check exception (MethodArgumentNotValidException)
*/
@ResponseStatus(HttpStatus.BAD_REQUEST)
@ExceptionHandler(MethodArgumentNotValidException.class)
public Result validException(MethodArgumentNotValidException e) {
List<FieldError> fieldErrors = e.getBindingResult().getFieldErrors();
Map<String, Object> error = this.getValidError(fieldErrors);
return new Result(ResultCode.ERROR, error.get("errorMsg").toString(), error.get("errorList"));
}
/**
* Catch 404 exception
*/
@ResponseStatus(HttpStatus.NOT_FOUND)
@ExceptionHandler(NoHandlerFoundException.class)
public Result handle(NoHandlerFoundException e) {
return new Result(ResultCode.NOT_FOUND, e.getMessage());
}
/**
* Catch all other exceptions
*/
@ResponseStatus(HttpStatus.INTERNAL_SERVER_ERROR)
@ExceptionHandler(Exception.class)
public Result globalException(HttpServletRequest request, Throwable ex) {
return new Result(ResultCode.ERROR, ex.toString() + ": " + ex.getMessage());
}
/**
* Catch all other custom exceptions
*/
@ResponseStatus(HttpStatus.BAD_REQUEST)
@ExceptionHandler(CustomException.class)
public Result handle(CustomException e) {
return new Result(ResultCode.ERROR, e.getMessage());
}
/**
* Get status code
*/
private HttpStatus getStatus(HttpServletRequest request) {
Integer statusCode = (Integer) request.getAttribute("javax.servlet.error.status_code");
if (statusCode == null) {
return HttpStatus.INTERNAL_SERVER_ERROR;
}
return HttpStatus.valueOf(statusCode);
}
/**
* Get verification error information
*/
private Map<String, Object> getValidError(List<FieldError> fieldErrors) {
Map<String, Object> map = new HashMap<String, Object>(16);
List<String> errorList = new ArrayList<String>();
StringBuffer errorMsg = new StringBuffer("Check exception(ValidException):");
for (FieldError error : fieldErrors) {
errorList.add(error.getField() + "-" + error.getDefaultMessage());
errorMsg.append(error.getField() + "-" + error.getDefaultMessage() + ".");
}
map.put("errorList", errorList);
map.put("errorMsg", errorMsg);
return map;
}
}
|
8, Get current login user
Since we have submitted the token to shiro in the above JwtFilter, we can get it directly from the Subject:
| | /**
* Get current login user
* Please indicate the source of reprint. For more technical articles, please visit my personal blog site: https://www.doufuplus.com
*
* @author , doufu
* @date 2019/8/10
*/
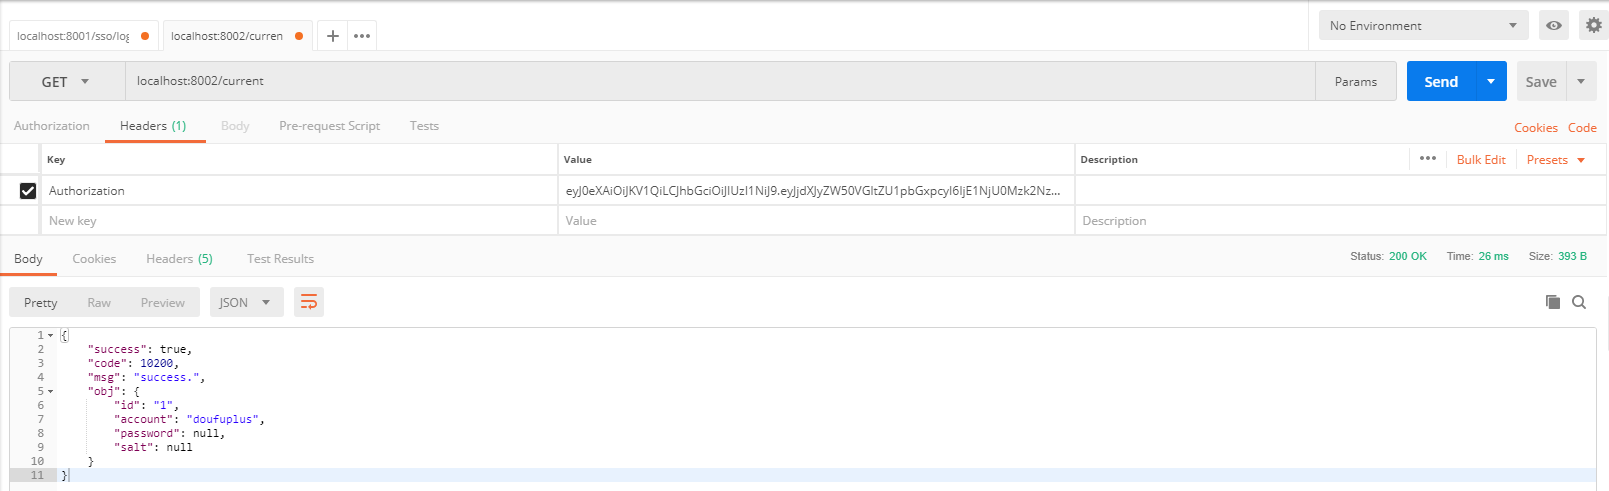
@RequestMapping("/current")
public Result current() {
try {
User user = new User();
Subject subject = SecurityUtils.getSubject();
if (subject != null) {
String token = (String) subject.getPrincipal();
if (StringUtils.isNotBlank(token)) {
String account = JwtUtil.getClaim(token, JwtConstant.ACCOUNT);
if (StringUtils.isNotBlank(account)) {
user = testService.findUserByAccount(account);
}
}
}
return new Result(ResultCode.SUCCESS, "success.", user);
} catch (Exception e) {
e.printStackTrace();
return new Result(ResultCode.ERROR, e.getMessage());
}
}
|
Call as follows:
9, Effect demonstration
The main code has basically ended here. Next, let's see the final integration effect.
-
First, we write an interface normally, and the code is as follows:
1
2
3
4
5
6
7
8
9
10
11
| /**
* test
* Please indicate the source of reprint. For more technical articles, please visit my personal blog site: https://www.doufuplus.com
*
* @author , doufu
* @date 2019/8/10
*/
@RequestMapping("/test")
public Result test() {
return new Result(ResultCode.SUCCESS, "Hello SHIRO JWT!");
}
|
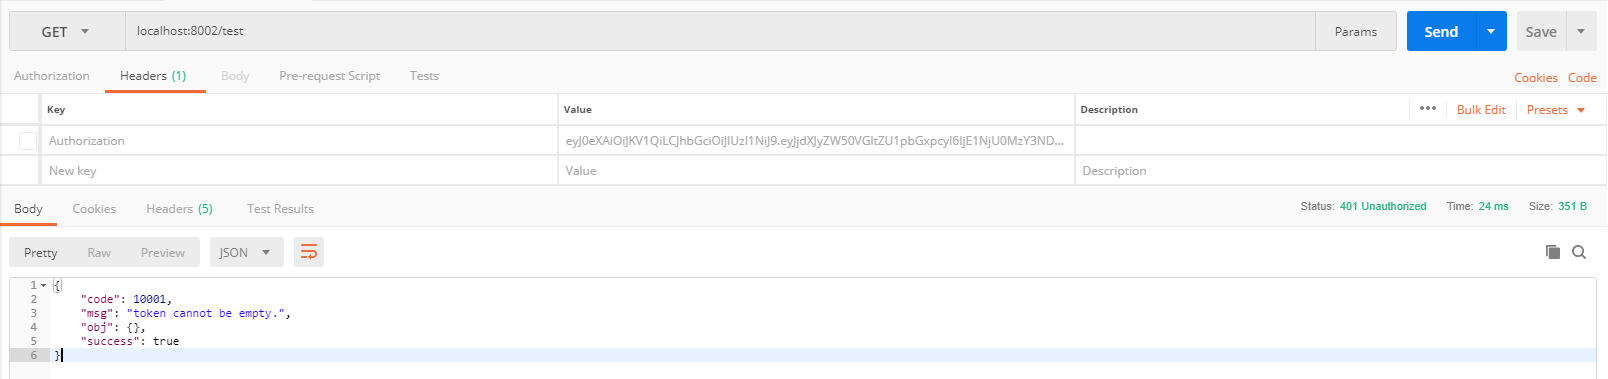
-
Use the postman direct interface to access and prompt token cannot be empty
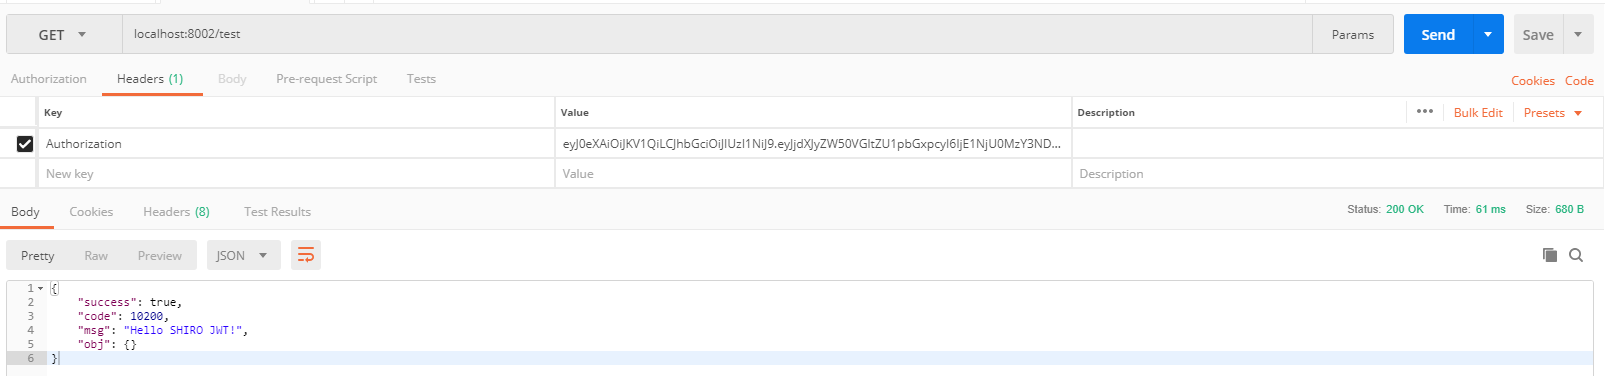
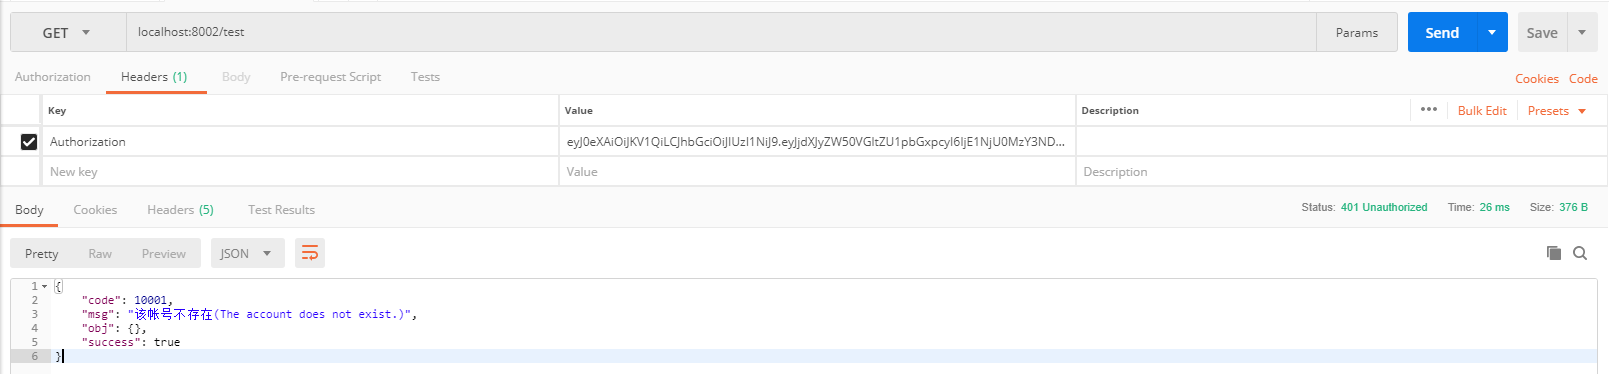
- Carry the token generated in the login interface above to access:
- Since we use the account of doufuplus to log in and generate the token, the account is modified as follows:
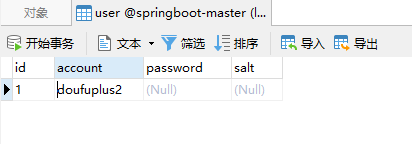
The effect of continuing visit is as follows:
As for other abnormal conditions, you can test them by yourself. I won't explain too much here.
10, At Last
Project source code: GitHub (Note: select branch: Shiro JWT)