
preface:
Hello, everyone. Today I'll teach you to do a comprehensive Python practice: extracting pictures in PDF and Word with Python

To realize today's theme, we have to first involve a very common framework content GUI in Python. We have also talked about some development cases involving python GUI framework in our articles before; This article is written in Python / PDF, and then in Excel / word. So what we need to do today is to flexibly combine the two contents, make analysis, and make a multi file image extraction software combined with the GUI framework PysimpleGUI.
As shown in the figure:
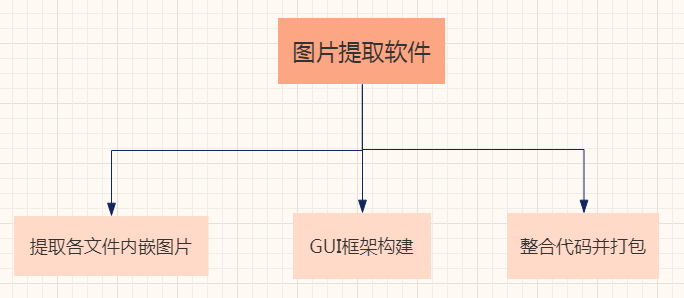
This article will be divided into the following parts:
- PDF and Word file image extraction
- Construct picture extractor GUI framework
- Integrate code and package
The main Python modules involved are:
- PIL
- PySimpleGUI
- re
- win32
- os
- zipfile
- fitz
Module installation
First, use pip to install the dependent modules
pip install pillow   #This is the installation of the PTL module
pip install pypiwin32    #This is the installation of win32
pip install os
pip install zipfile
pip install PyMuPDF  #This is a package that refers to fitz's operation on PDF
pip install PySimpleGui
1, Extract embedded pictures of each file
There are two ways to read excel. One is to change the suffix to ZIP format for extraction. One is to copy and save excel pictures through the pilot module. Word image extraction method and through Similar to the zip extraction method, the PDF extraction method requires special modules. This article only explains the extraction methods of PDF and word. The reading methods of Excel are similar. See the code.
1.1 extracting Word pictures
Let's look at the code first
path = values["lujing"]
count = 1
for file in os.listdir(path):
    new_file = file.replace(".docx",".zip")
    os.rename(os.path.join(path,file),os.path.join(path,new_file))
    count+=1
    number = 0
    craterDir = values["lujing"] + '/'  # The path to the folder where the zip file is stored
    saveDir = values["lujing"] + '/' # Path to store pictures
    list_dir = os.listdir(craterDir) # Get all zip file names
    for i in range(len(list_dir)):
        if 'zip' not in list_dir[i]:
            list_dir[i] = ''
            while '' in list_dir:
                list_dir.remove('')
                for zip_name in list_dir:
                    # Default mode r, read
                    azip = zipfile.ZipFile(craterDir + zip_name)
                    # Returns all folders and files
                    namelist = (azip.namelist())
                    for idx in range(0,len(namelist)):
                        if namelist[idx][:11] == 'word/media/':#The picture is in this path
                            img_name = saveDir + str(number)+'.jpg'
                            f = azip.open(namelist[idx])
                            img = Image.open(f)
                            img = img.convert("RGB")
                            img.save(img_name,"JPEG")
                            number += 1
                            azip.close()  #Close the file, there must be, free up memory
Here's the code and pass The code idea of extracting Excel pictures by zip is the same.
"
path = values["lujing"] here is the value of the key * * "lujing" * * in the GUI, that is, the file storage location, which is used for os module reading and operation.
new_file = file.replace(".docx",".zip") is the replacement suffix. If it is Excel, put Change docx to xlsx or xls.
Criterdir = values ["lujing"] + '/' this is the folder path where the zip file is stored. Note that the value with the key "lujing" read here should be added /.
saveDir = values["lujing"] + '/' this is the path where the image is stored. Similarly, add a / sign as above.
"
Finally, compared with Excel extraction, the biggest difference is the following code
if namelist[idx][:11] == 'word/media/':
The values in brackets are different. It is well understood that we can print namelist[idx], and we can find that the index 0 to 10 is the location of 'word/media /'. In Excel, it is the top 9.
1.2 extracting PDF images
Let's take a look at the relevant codes first:
def pdf2pic(path, pic_path):
    doc = fitz.open(path)
    nums = doc._getXrefLength()
    imgcount = 0
    for i in range(1, nums):
        text = doc._getXrefString(i)
        if ('Width 2550' in text) and ('Height 3300' in text) or ('thumbnail' in text):
            continue
            checkXO = r"/Type(?= */XObject)"
            checkIM = r"/Subtype(?= */Image)"
            isXObject = re.search(checkXO, text)
            isImage = re.search(checkIM, text)
            if not isXObject or not isImage:
                continue
                imgcount += 1
                pix = fitz.Pixmap(doc, i)
                img_name = "img{}.png".format(imgcount)
                if pix.n < 5:
                    try:
                        pix.writePNG(os.path.join(pic_path, img_name))
                        pix = None
                        except:
                            pix0 = fitz.Pixmap(fitz.csRGB, pix)
                            pix0.writePNG(os.path.join(pic_path, img_name))
                            pix0 = None
if __name__ == '__main__':
    path = values["lujing"]+ '/' + values["wenjian"]
    pic_path = values["lujing"]
    pdf2pic(path, pic_path)
Let's talk about the idea of this code first. Since PDF cannot be extracted by changing the suffix like Excel and Word, PyMuPDF, a module of python, is used here. The process is as follows
- Read the PDF and walk through each page
- Filter useless elements and get pictures with regular expressions
- Generate and save pictures
fitz.open(path) is to open the PDF folder. The path here needs to obtain the user's file storage path and file name in the GUI interface.
for i in range(1, nums):
    text = doc._getXrefString(i)
This is our first step to read and traverse, and put the read string content into text
if ('Width 2550' in text) and ('Height 3300' in text) or ('thumbnail' in text):
 continue
Since the background of each page of PDF is a picture, we can find these background pictures by width and height and eliminate them with continue.
checkXO = r"/Type(?= */XObject)"
checkIM = r"/Subtype(?= */Image)"
isXObject = re.search(checkXO, text)
isImage = re.search(checkIM, text)
if not isXObject or not isImage:
    continue
Through experiments, we found that the string corresponding to the picture is in checkxo and checkIM. Therefore, the search function of re module is used to extract the index in text with regular expression. If it is not these two strings, use continue to eliminate them.
pix = fitz.Pixmap(doc, i)
img_name = "img{}.png".format(imgcount)
if pix.n < 5:
 try:
  pix.writePNG(os.path.join(pic_path, img_name))
  pix = None
 except:
  pix0 = fitz.Pixmap(fitz.csRGB, pix)
  pix0.writePNG(os.path.join(pic_path, img_name))
  pix0 = None
This is the last step to generate and save pictures
"
pix = fitz.Pixmap(doc, i) is a generated image statement. doc represents a PDF file and i represents the index value of each image object.
img_name = "img{}.png".format(imgcount) is a statement that sets the image name and uses the serial number of the extracted image as the naming format.
"
Then, if nested try lines of code are statements that save images. If pix If n < 5, it can be saved as PNG directly. Otherwise, RGB transformation will be carried out and saved.
Finally, pass the parameters and call the function.
After completing the image extraction, the next step is the construction of GUI.
2, Construction of GUI framework
First look at the complete code:
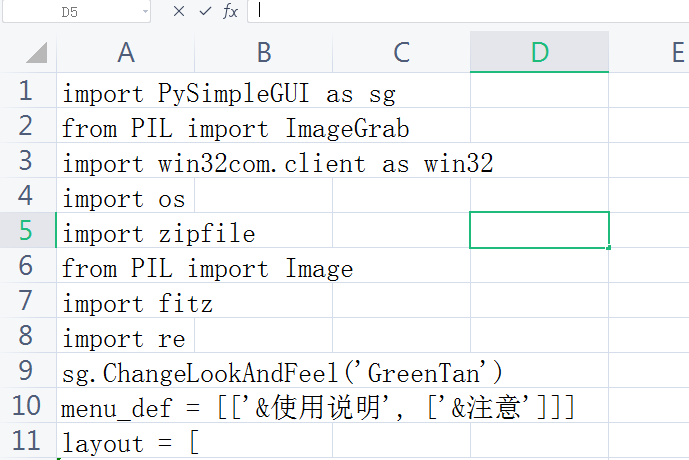
import PySimpleGUI as sg
sg.ChangeLookAndFeel('GreenTan')   #Change theme
menu_def = [['&instructions', ['&be careful']]]
layout = [
    [sg.Menu(menu_def, tearoff=True)],
    [sg.Frame(layout=[
    [sg.Radio('Excel1', "RADIO1",size=(10,1),key="Excel1"),  sg.Radio('Word', "RADIO1",default=True,key="Word")],
    [sg.Radio('Excel2', "RADIO1", enable_events=True, size=(10,1),key="Excel2"), sg.Radio('PDF', "RADIO1",key="PDF")]], title='option',title_color='red', relief=sg.RELIEF_SUNKEN, tooltip='Use these to set flags')],
    [sg.Text('file location', size=(8, 1), auto_size_text=False, justification='right'),
     sg.InputText(enable_events=True,key="lujing"), sg.FolderBrowse()],
    [sg.Text('File name', size=(8, 1), justification='right'),
     sg.InputText(enable_events=True,key="wenjian")],
    [sg.Submit(tooltip='file'), sg.Cancel()]]

window = sg.Window('Picture extractor', layout, default_element_size=(40, 1), grab_anywhere=False)
while True:
    event, values = window.read()
    if event == "Submit":
        if values["Excel2"] == True:
   '''
   Event binding
   '''
            sg.Popup("Extraction succeeded")

        if values["Excel1"] == True:
   '''
   Event binding
   '''
            sg.Popup("Extraction succeeded")
        if values["Word"] == True:
   '''
   Event binding
   '''
            sg.Popup("Extraction succeeded")
        if values["PDF"] == True:
   '''
   Event binding
   '''
            sg.Popup("Extraction succeeded")
    if event == "Cancel" or event == sg.WIN_CLOSED:
        break
    if event == "be careful":
        sg.Popup("Function explanation:",
                 "Excel1 : Resolve all in the selected location Excel File, no need to fill in the file name",
                 "Excel2 : Resolves a single specified in the selected location Excel For documents, fill in the name of the document",
                 "Word :   Resolves a single specified in the selected location docx There is no need to fill in the file name at the end of the document",
                 "PDF :    Resolves a single specified in the selected location PDF For documents, fill in the name of the document")
window.close()
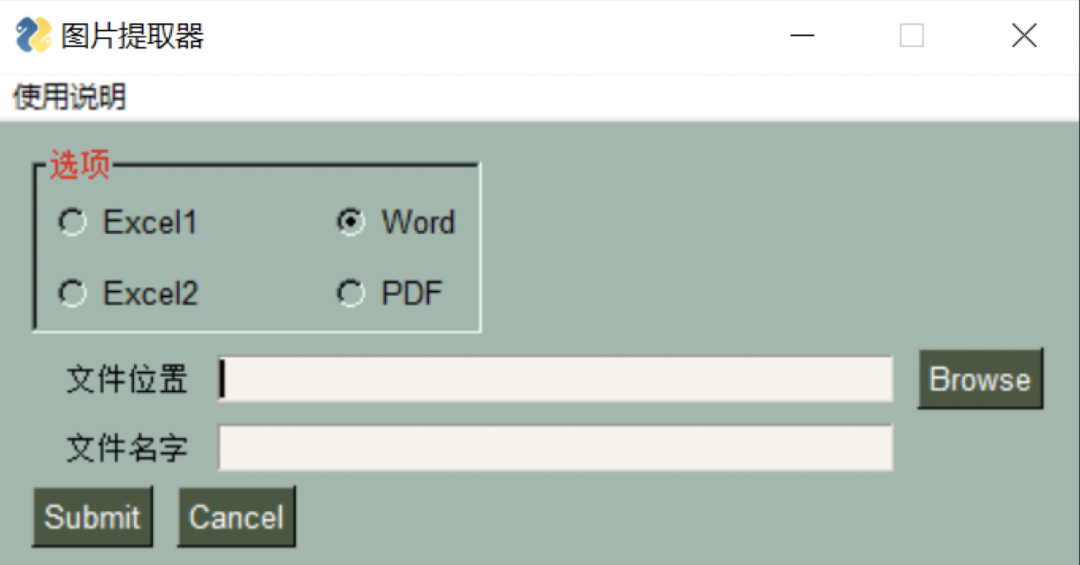
Effect presentation:

Code analysis: do PySimpleGUI or the original step:
Import Create some widgets Create the window Create the event loop
Of course, before making a GUI, I want to know what my graphic interactive page looks like. For example, I draw an outline on paper now, which is more conducive to making pages.
Step 1: reference module
Step 2: add elements (widgets) to the container (layout). Here are the components used:
"
Menu: as the name suggests, this is the menu bar. Each GUI must bring a menu bar to remind users what to do. We use menu here_ Def this layout to complete the menu settings.
Frame: This is exactly the same as the layout layout and works in the same way. They are all container elements. You can see that "options" is a square with grooves, which contains four options. This is the function. Note that the & symbol is used to create menus of the same type. Here, there is only one menu of precautions, so it can be ignored. If readers want to add the same menu, they must add an &. tearoff=True this parameter is the dotted line above each sub option in the menu bar.
Radio: radio button. We can only choose one option on the same id. id refers to "ra-dio1" in the code. The first parameter of each radio function is the text content. Here are the four file formats we want to extract. The "size" is the position, and the same parameter (10, 1) is set at the first of each line. Finally, the key for event binding, in which "enable_events" can not be written, because we just call it instead of generating events for it.
Text: previously, it was said that the content of the text cannot be changed. Similarly, the position parameter (8,1) set here, justification='right 'is a bit similar to the right alignment we usually use in word.
InputText: the text content that needs to be input by the user. Here are two places we need to fill in: file location and file name. You need to set the key here, because we need to call the file storage path and file name in the later event binding, which is mentioned in the first half of the article.
FolderBrowse: a simple operation to open the file path. You don't need to copy the path.
Submit: OK button, which is bound to execute the event of extracting document pictures
Cancel: exit the main program button.
"
Step 3: create a window to accommodate these element layouts.
Step 4: create an event loop. You can see that the code is the same routine: when the user presses the submit button, the system will judge which radio button you press, and then execute the corresponding event. When you press cancel or × When, it is to exit the main program. When you press note in the menu, a dialog box will pop up to tell you how to use the system.
In the event loop, we use the Boolean value of values [] to judge which radio button we choose. Some readers wonder why we don't use event =. Because we use event in the first if, we need to change the judgment method in the second if.
So far, the GUI part is done! Interested readers can continue to add functions above.
3, Integrate code and package
We put the complete code together and install the pyinstaller module
pip install pyinstaller
If your above project code file is named: photo py. Then you need to package with the following command
pyinstaller photo.py
Finally, after the package is successfully packaged, you will see a subfolder of dist in the folder where the py file is located. Go in and find pachong Exe file and run it.
Note that there are many files attached to the folder. You can delete it. Of course, if you feel troublesome, just go straight from photo The PY file is executed in Python.
Write at the end
That's all for today. I hope it can help you. If you need the source code of this article, you can confide in my keyword: PY GUI, and I will share the source code with those in need.
We also welcome all gods to put forward questions and suggestions in the comment area, and hope to make progress with you.