- 👏 About the author: Hello, I'm cabbage ~ ~, a sophomore in school, and a new star creator in the Java field.
- 📝 Personal homepage: Cabbage CSDN blog
- 📕 Series column: This article is written in the SpringBoot column: Explanation of SpringBoot knowledge points
- 📧 If there are mistakes in the knowledge points of the article, please correct them! Learn and make progress with you 👀
- 🔥 If you feel the blogger's article is good, please 👍 Three company support 👍 Check out the blogger
1, Foreword
As explained earlier How to use the SpringBoot configuration file , I believe that the partners have a certain understanding and use of the configuration file. In this blog, we learn how to integrate the four technologies. If you look at it carefully, believe me, you will gain a lot! Through this study, we can feel how cool SpringBoot is~
2, Integrate Junit
It should be noted that: what kind of technology we integrate, we need to import the required dependencies. This must not be forgotten. This is also the principle for the integration of any technology!
Import dependency first
<dependency>
            <groupId>org.springframework.boot</groupId>
            <artifactId>spring-boot-starter-test</artifactId>
            <scope>test</scope>
</dependency>
Test code
@SpringBootTest
class Springboot0202ApplicationTests {
    @Test
    void contextLoads() {
        System.out.println("Hello~");
    }
}
Operation results

Well, I can tell you that this has been successful. Guys might ask, huh? Is this the end? This integration is too fast! Yes, it's so fast to use springboot, which is to simplify development!
Next, let's look at the details of the use of this technology
The configuration class or configuration file loaded by the program is the boot class used by our previous startup program. If you want to specify the boot class manually, there are two ways. The first way is in the form of attributes. Add the classes attribute in the annotation @ SpringBootTest to specify the configuration class
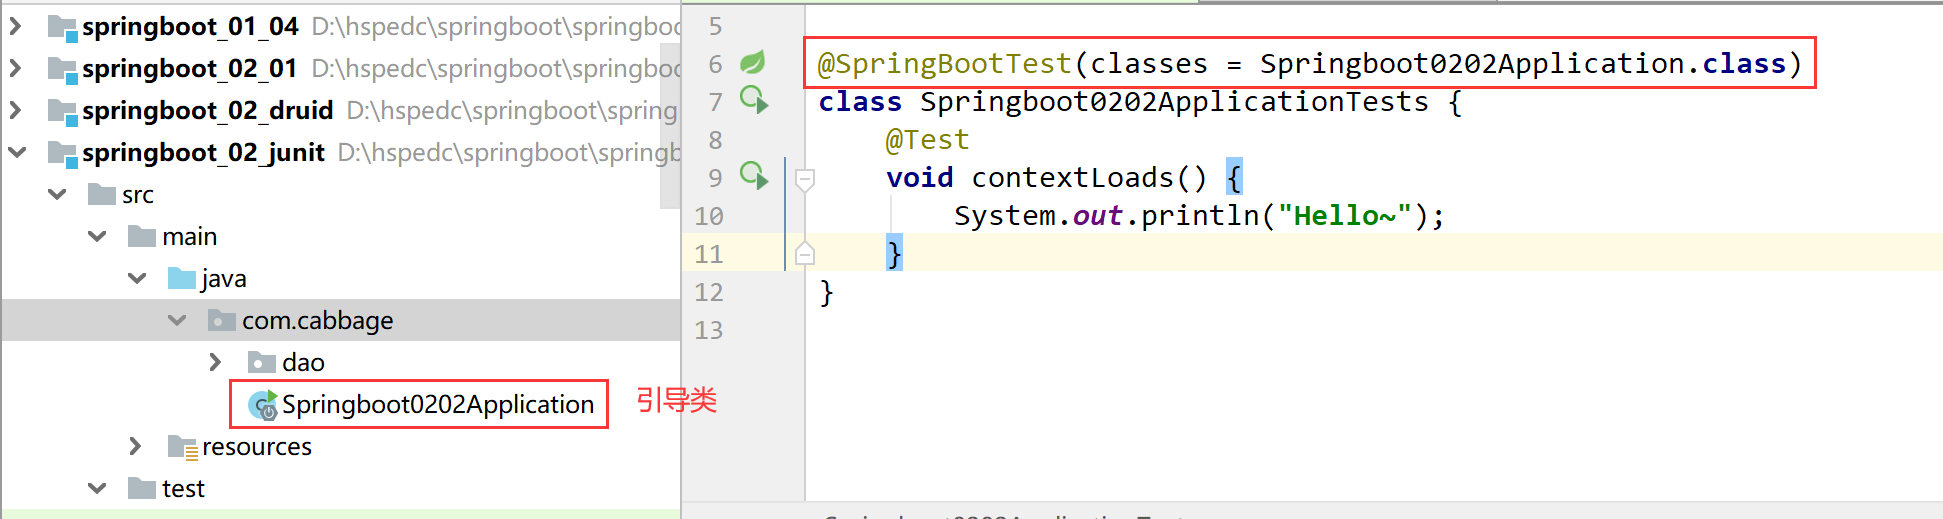
Specific code
@SpringBootTest(classes = Springboot0202Application.class)
class Springboot0202ApplicationTests {
    @Test
    void contextLoads() {
        System.out.println("Hello~");
    }
}
The second way is to return to the original configuration mode and use the @ ContextConfiguration annotation. The effect is the same
Specific code
//@SpringBootTest(classes = Springboot0202Application.class)
@ContextConfiguration(classes = Springboot0202Application.class)
class Springboot0202ApplicationTests {
    @Test
    void contextLoads() {
        System.out.println("Hello~");
    }
}
summary
- Import the starter corresponding to the test
- The test class is decorated with @ SpringBootTest
- If the test class exists in the package or sub package of the boot class, there is no need to specify the boot class
- If the test class does not exist in the package or sub package where the boot class is located, you need to specify the boot class through the classes attribute
3, Integrate MyBatis
Import the required dependencies first
<dependency>
            <groupId>org.mybatis.spring.boot</groupId>
            <artifactId>mybatis-spring-boot-starter</artifactId>
            <version>2.2.2</version>
</dependency>

<dependency>
            <groupId>mysql</groupId>
            <artifactId>mysql-connector-java</artifactId>
            <scope>runtime</scope>
</dependency>
Then configure the data source related information. Without this information, you don't know which database to connect to
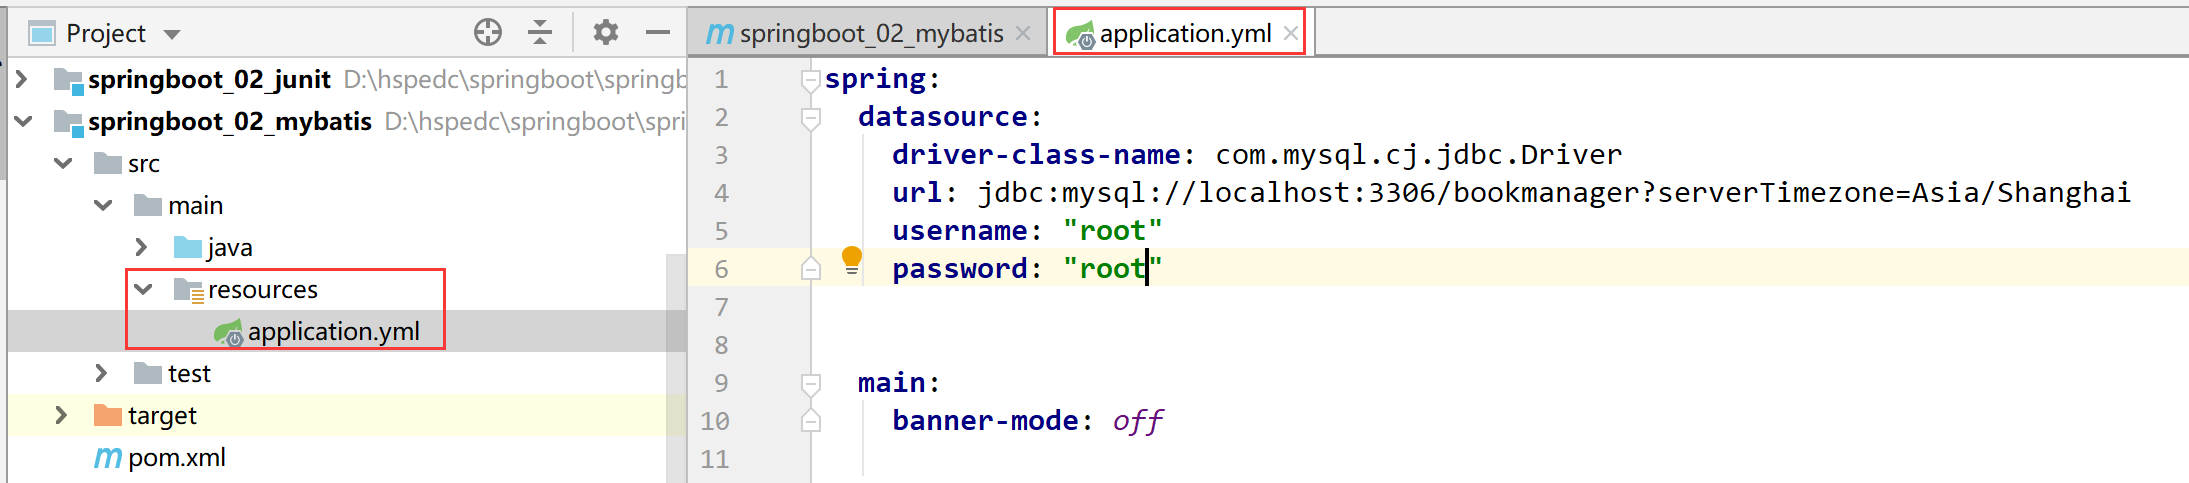
Specific configuration information
spring:
  datasource:
    driver-class-name: com.mysql.cj.jdbc.Driver
    url: jdbc:mysql://localhost:3306/bookmanager?serverTimezone=Asia/Shanghai
    username: "root"
    password: "root"
It's over. That's all. It's gone. Some people wonder, is this over? Yes, that's it. SpringBoot simplifies all possible common configurations in the configuration. Write a Dao required for the operation of MyBatis program, and you can run it
Entity class
@Data
public class Book {
    private Integer id;
    private String type;
    private String name;
    private String description;
}
Mapping interface (Dao)
@Mapper
public interface BookDao {
    @Select("SELECT * FROM book WHERE id = #{id}")
    Book getById(Integer id);
}
Test class
@SpringBootTest
class Springboot02MybatisApplicationTests {
    @Autowired
    private BookDao bookDao;
    @Test
    void contextLoads() {
        Book book = bookDao.getById(2);
        System.out.println(book);
    }
}
Operation results

Check your database and the result is correct!
summary
- The integration operation needs to import the starter corresponding to MyBatis
- Converting database connection related information into configuration
- Database SQL mapping needs to add @ Mapper, which is recognized by the container
- MySQL 8. The X-drive forces the time zone to be set
4, Integrate mybatis plus
Import corresponding dependencies
<dependency>
            <groupId>com.baomidou</groupId>
            <artifactId>mybatis-plus-boot-starter</artifactId>
            <version>3.4.2</version>
</dependency>

<dependency>
            <groupId>mysql</groupId>
            <artifactId>mysql-connector-java</artifactId>
            <scope>runtime</scope>
</dependency>
Configure data source related information
spring:
  datasource:
    driver-class-name: com.mysql.cj.jdbc.Driver
    url: jdbc:mysql://localhost:3306/bookmanager?serverTimezone=Asia/Shanghai
    username: "root"
    password: "root"
Mapping interface (Dao)
Entity class or Book
@Mapper
public interface BookDao extends BaseMapper<Book> {

}
Test class
@SpringBootTest
class Springboot02MybatisPlusApplicationTests {
    @Autowired
    private BookDao bookDao;
    @Test
    void contextLoads() {
        Book book = bookDao.selectById(1);
        System.out.println(book);
    }
}
The running result is also correct!
summary
- Manually add the starter corresponding to mybatis plus
- The data layer interface uses BaseMapper to simplify development
- If the third-party technology to be used cannot be determined by checking, the coordinates need to be added manually
5, Integrate Druid
Three technologies have been integrated using SpringBoot. It is found that the routine is basically the same. Import the corresponding starter and configure it. All partners need to strengthen this idea all the time. Next, we will integrate another technology to further strengthen this idea.
In the previous integration of MyBatis and MyBatisPlus, the data source objects used are the default data source objects of SpringBoot. Let's manually control it and specify a data source object ourselves: Druid
Import required dependencies
<dependency>
            <groupId>com.alibaba</groupId>
            <artifactId>druid-spring-boot-starter</artifactId>
            <version>1.1.10</version>
</dependency>
Modify configuration
spring:
  datasource:
    druid:
      driver-class-name: com.mysql.cj.jdbc.Driver
      url: jdbc:mysql://localhost:3306/bookmanager?serverTimezone=Asia/Shanghai
      username: "root"
      password: "root"
This is the integration scheme of the fourth technology we made, or the two sentences: import the corresponding starter and use the corresponding configuration. No, it's so simple and crude for SpringBoot to integrate other technologies.
summary
- To integrate Druid, you need to import the starter corresponding to Druid
- Configure according to the configuration method provided by Druid
6, Summary
The above is the whole content of technology integration based on springboot. We need to deeply understand what technology to use, and we need to import the idea of dependency. Bloggers are updating articles on springboot multi environment development. If you like, support bloggers~~