Intelligent transportation combination fist - flying paddle realizes vehicle category / license plate / speed detection, cross-border head tracking, traffic flow density detection and retrograde detection
General introduction
All the codes and files of this project have been uploaded to Baidu aistudio. Partners in need can search the following link to find it. All the environment, required files and hardware have been configured there.
https://aistudio.baidu.com/aistudio/projectdetail/3456845?shared=1
The items here are:
1. Traffic flow + congestion
2. License plate detection
3. Vehicle type
4. Vehicle visual speed measurement
This project is the integration and coordinated use of some models of traffic vehicle detection after collecting a large number of aistudio, BML open source projects and official technical documents. Several models and data sets are used here. The models used are all common model architectures of flying oars for training. Please prepare enough computing power time or gpuhhh before starting.
Firstly, these detection, recognition and tracking are in the charge of different models. We need to train multiple models of different detection separately for the purpose of detection, and then coordinate these models reasonably according to a certain priority, so as to realize traffic monitoring. In order to shorten the overall demand for GPU resource computing power, I will read the license plate in paddeocr. In this part, I will use GPU to pre train the whole process training model of the model, and the rest will be developed using paddle's adult model as much as possible to reduce the development of the overall project.
At the same time, these models have their own characteristics and different requirements, so the frequency used in the pipeline is also different. I guess the demand of intelligent transportation is like this according to the detection demand in reality: now there are multiple cameras, which can be recognized across lenses. When the vehicle comes like us, we only need to perform one detection to identify the type, color, driving direction and license plate of the vehicle, and then use the tracking model to deal with the vehicle. At this time, the demand becomes the statistics of vehicle speed measurement and traffic congestion.

If time permits, I will publish the second article, which will export these models into ONNX models through padde2ONNX, and then convert them into IR models through openVINO to realize the detection of multi-channel video streams only in the CPU
For the following six practical situations:
1. Vehicle type identification
2. Vehicle license plate recognition
3. Cross border vehicle density
4. Traffic density detection
5. Retrograde detection
6. Vehicle speed detection
The following four models will be used:
1,PP-Tracking
2,PaddleOC
3,PaddleDetection
4, YOLO v3/2
I believe many friends here will wonder why we don't use these high-precision models such as YOLO4/5, fast RCNN and transformer, and why we use these relatively backward models. The reason is that I consider the actual traffic. Firstly, the performance of YOLO v2/v3 models is fairly good after improvement. Secondly, the real-time requirements of our cameras. A video stream needs to call multiple models to calculate the vehicle image of multiple vehicles.
There are many areas to be improved. Interested friends can also take a look at the following projects and documents I mainly refer to in this process
https://aistudio.baidu.com/aistudio/projectdetail/3022582
https://aistudio.baidu.com/aistudio/projectdetail/2324551
https://aistudio.baidu.com/aistudio/projectdetail/1283019
https://aistudio.baidu.com/aistudio/projectdetail/2312847
https://aistudio.baidu.com/aistudio/projectdetail/2013623
https://aistudio.baidu.com/aistudio/projectdetail/748136
https://aistudio.baidu.com/aistudio/projectdetail/739559
https://aistudio.baidu.com/aistudio/projectdetail/453620
https://keziyi.blog.csdn.net/article/details/121760349
https://keziyi.blog.csdn.net/article/details/122264397
https://keziyi.blog.csdn.net/article/details/121754160
https://keziyi.blog.csdn.net/article/details/122709970
https://ai.baidu.com/ai-doc/AISTUDIO/Tk39ty6ho
Model introduction
1. Introduction to PP tracking
PP tracking is the industry's first open source real-time tracking system based on the propeller deep learning framework. PP tracking has built-in capabilities and industrial applications such as pedestrian and vehicle tracking, cross camera tracking, multi category tracking, small target tracking and traffic counting. It integrates multi-target tracking, target detection and ReID lightweight algorithms in the model to further improve the deployment performance of PP tracking on the server. It also supports python and C + + deployment and adapts to Linux, NVIDIA and Jetson multi platform environment.
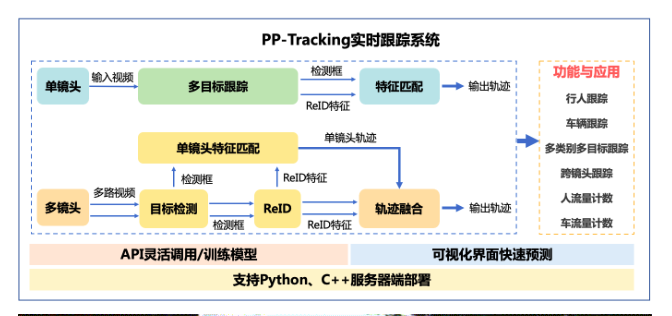
According to the above figure, let me talk about the target detection under the characteristics of multiple cameras. Let's start with a camera. As for a camera, it will track all the dynamic targets in the video stream, and then match these targets with the features we have trained in advance.
If there are multiple cameras, it can be regarded as a combination of multiple single cameras. Each camera performs the above detection, matches the features, and identifies the type of target. Then what we do is find this category in each camera.
For example, the license plate we want to track is 88888. When a camera detects 88888, the vehicle will not stay in one camera. It may appear in each camera, and the track of 88888 may be captured by each camera.
2. PaddleOCR introduction
PaddleOCR is an OCR algorithm suite recently opened by the flying propeller. OCR refers to a kind of model that checks characters, determines its shape by detecting dark and bright patterns, and then translates the shape into computer text by character recognition method. PP OCR includes various mainstream detection and recognition algorithms, such as DB, CRNN, etc., which have excellent detection results.
3. Introduction to paddedetection
Paddedetection is a unified framework for object detection launched by the propeller. Support existing RCNN, SSD, YOLO and other series models, and support backbone networks such as ResNet, ResNet VD, ResNeXt, ResNeXt VD, SENet, MobileNet and DarkNet. For different business scenarios (performance, target size, accuracy, etc.), you can call different parameters (or parameter files) under the framework to realize the task. Compared with the object of tensorflow_ One of the advantages of detection is to integrate YOLO, a fast algorithm for target detection, into the framework.
4. Introduction to YOLO v3/2
YOLO series is the most commonly used algorithm for target detection, with good effect and performance.
Thesis address: https://pjreddie.com/media/files/papers/YOLOv3.pdf
Thesis: YOLOv3: An Incremental Improvement
And interested friends can directly read the author's paper, which has been written in great detail.
Model establishment
1. Cross border traffic density statistics -- PP tracking
The dataset is downloaded here: https://aistudio.baidu.com/aistudio/datasetdetail/119110
- Environment preparation: Download paddedetection
!git clone https://gitee.com/paddlepaddle/PaddleDetection.git -b develop
Let's do the following three steps with three pieces of code
Image upgrade
!pip install --upgrade pip -i https://mirror.baidu.com/pypi/simple
Install paddlepaddle-gpu2 two
!pip install paddlepaddle-gpu==2.2.0rc0.post101 -f https://www.paddlepaddle.org.cn/whl/linux/mkl/avx/stable.html -i https://mirror.baidu.com/pypi/simple
Install the dependencies related to paddedetection
!cd PaddleDetection/ && pip install -r requirements.txt && python setup.py install
1. Download the prediction deployment model. Here, in order to get started quickly and save computing power, we directly use the training model provided by the official. First, we download [wegt] target detection and ReID prediction model, download the address, and then put [mv] in ~ / paddedetection / output_ Under information [CD], then unzip [tar]
!wget https://paddledet.bj.bcebos.com/models/mot/deepsort/ppyolov2_r50vd_dcn_365e_aic21mtmct_vehicle.tar

!wget https://paddledet.bj.bcebos.com/models/mot/deepsort/deepsort_pplcnet_vehicle.tar

!cd ~/PaddleDetection/ && mkdir -p output_inference

!mv ppyolov2_r50vd_dcn_365e_aic21mtmct_vehicle.tar ~/PaddleDetection/output_inference

!mv deepsort_pplcnet_vehicle.tar ~/PaddleDetection/output_inference

!cd ~/PaddleDetection/output_inference && tar -xvf ppyolov2_r50vd_dcn_365e_aic21mtmct_vehicle.tar && tar -xvf deepsort_pplcnet_vehicle.tar
2. Cross mirror tracking and prediction
After downloading the model, you need to modify the mtmct in the paddedetection / deploy / pptracking / Python path_ cfg. YML, this configuration file contains the relevant parameters of trajectory fusion in cross mirror tracking. First, you need to determine the cameras_ The corresponding name in bias corresponds to the input video name; Secondly, in this project, we use the general method in trajectory fusion to set the methods related to zone and camera to False.
The setting parameters are as follows:
# config for MTMCT
MTMCT: True
cameras_bias:
  c003: 0
  c004: 0
# 1.zone releated parameters
use_zone: False #True
zone_path: dataset/mot/aic21mtmct_vehicle/S06/zone
# 2.tricks parameters, can be used for other mtmct dataset
use_ff: True
use_rerank: False #True
# 3.camera releated parameters
use_camera: False #True
use_st_filter: False
# 4.zone releated parameters
use_roi: False #True
roi_dir: dataset/mot/aic21mtmct_vehicle/S06
3. After the configuration is completed, run the following command, and the input video is C004 MP4 and C003 Mp4 camera shooting results from two different perspectives
Cross mirror tracking output video is saved in paddedetection / output / mtmct vis
!wget https://bj.bcebos.com/v1/paddledet/data/mot/demo/mtmct-demo.tar && mv mtmct-demo.tar ~/PaddleDetection && cd ~/PaddleDetection && tar xvf mtmct-demo.tar

!cd ~/PaddleDetection && python deploy/pptracking/python/mot_sde_infer.py --model_dir=output_inference/ppyolov2_r50vd_dcn_365e_aic21mtmct_vehicle/ --reid_model_dir=output_inference/deepsort_pplcnet_vehicle/ --mtmct_dir=./mtmct-demo --device=GPU --mtmct_cfg=deploy/pptracking/python/mtmct_cfg.yml --scaled=True --save_mot_txts --save_images
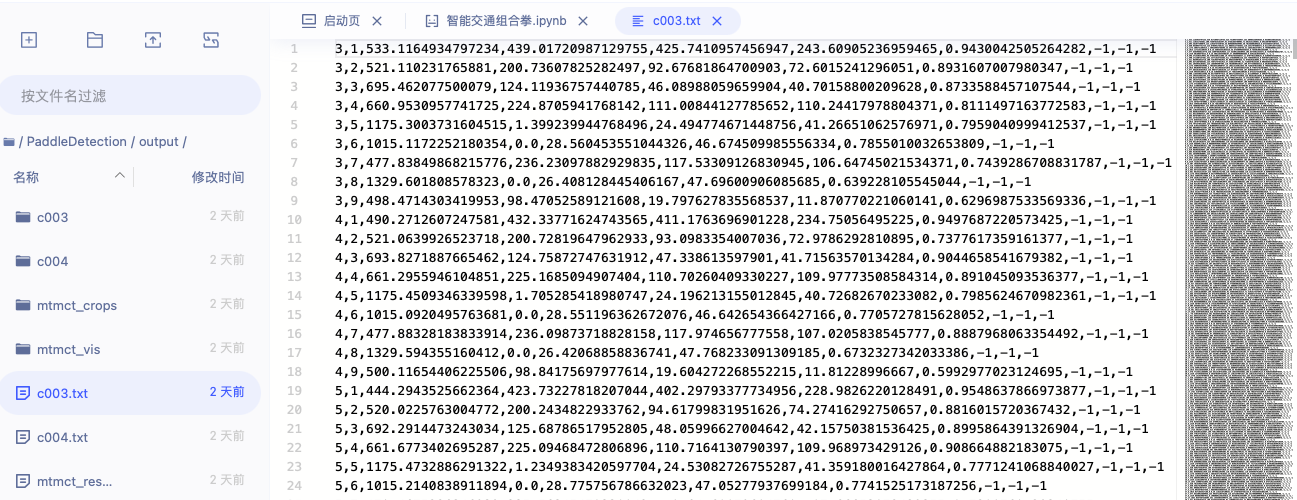
txt file. The results are saved in output/mot_results/img1.txt, the output format is expressed as frame_id (number of frames), ID (number of cars), bbox_left, bbox_top, bbox_width, bbox_height (four coordinates), score (score), x, y, z. it is necessary to master this output. You need to confirm the number of vehicles by outputting the detected ID. you can open it and see the results of the video, as shown in the figure below

In real-time detection, the congestion situation needs to be judged according to the actual lane. The judgment function is given here. The function here is not a visual model, but a congestion judgment model that inputs the number of vehicles and lanes. To detect congestion or not, you need to input the results of the above model and the number of lanes into the following function. For real-time video, you only need to adjust the input format to get congestion automatic test. For example, the following six chapters and pictures represent several situations to substitute into the detection function:
{'index': 1, 'detector_count': 41, 'pic_name': '7.png'},
{'index': 2, 'detector_count': 47, 'pic_name': '4.png'},
{'index': 3, 'detector_count': 19, 'pic_name': '12.png'},
{'index': 4, 'detector_count': 20, 'pic_name': '11.png'},
{'index': 5, 'detector_count': 39, 'pic_name': '1.png'},
{'index': 6, 'detector_count': 1, 'pic_name': '5.png'}
#Threshold setting
#N number of instantaneous vehicles in the observation section, unit: Vehicle
#L number of lanes, the default setting is 4 lanes
L = 4
limit = 10  #Set the maximum number of vehicles per lane in the figure as 10
data_list = [{'index': 1, 'detector_count': 41, 'pic_name': '7.png'}, {'index': 2, 'detector_count': 47, 'pic_name': '4.png'}, {'index': 3, 'detector_count': 19, 'pic_name': '12.png'}, {'index': 4, 'detector_count': 20, 'pic_name': '11.png'}, {'index': 5, 'detector_count': 39, 'pic_name': '1.png'}, {'index': 6, 'detector_count': 1, 'pic_name': '5.png'}]
#Density calculation
def traffic_density(N):
    global L
    K = N / L #Calculation formula
    return K
#Get traffic conditions
def Get_traffic_situation():

    for i in data_list:
        N = i.setdefault('detector_count')
        density = traffic_density(N)
        if density >= limit-5 and density < limit:
            print("index by",i.setdefault('index'),"The traffic flow of the road section is about to cause traffic congestion, which needs to be regulated in time!")
        elif density >= limit:
            print("index by",i.setdefault('index'),"The road is in a traffic jam!")
        else:
            print("index by",i.setdefault('index'),"The traffic condition of the road section is good!")
Get_traffic_situation()

2. paddleOCR training license plate recognition model
Data sets can be downloaded from this channel: https://aistudio.baidu.com/aistudio/datasetdetail/123686 Then download the dataset
!unzip -q /home/work/chepaishibie.zip
Generate label document
The data set used this time is CCPD2019 license plate data set
The data set was collected in the parking lot of Hefei from 7:30 a.m. to 10:00 p.m. The collection personnel in the parking lot take photos of the vehicles in the parking lot with Android POS machine and manually mark the license plate position. The license plate photos taken involve a variety of complex environments, including blur, tilt, rainy days, snowy days and so on. The CCPD dataset contains nearly 300000 images, each of which is 720x1160x3 in size. There are 8 items in total, as follows:

There is no special label file in CCPD dataset, and the file name of each image is the corresponding data label
For example: 025-95_ 113-154&383_ 386&473-386&473_ 177&454_ 154&383_ 363&402-0_ 0_ 22_ 27_ 27_ 33_ 16-37-15. Jpg is divided into several parts by the separator '-'
025 is area
95_ 113 corresponds to two angles, 95 ° horizontal and 113 ° vertical
154&383_ 386-473 corresponding bounding box coordinates: upper left (154, 383), lower right (386, 473)
386&473_ 177&454_ 154&383_ 363-402 corresponds to four corner coordinates
0_ 0_ 22_ 27_ 27_ 33_ 16 is the license plate number, and the mapping relationship is as follows: the first is province 0, corresponding to province dictionary Wan, followed by letters and words. Check ads dictionary If 0 is A, 22 is Y
Only the normal license plate in the dataset, i.e. CCPD, is used_ Base data
import os, cv2
import random
words_list = [
    "A", "B", "C", "D", "E",
    "F", "G", "H", "J", "K",
    "L", "M", "N", "P", "Q",
    "R", "S", "T", "U", "V",
    "W", "X", "Y", "Z", "0",
    "1", "2", "3", "4", "5",
    "6", "7", "8", "9" ]

con_list = [
    "Wan", "Shanghai", "Jin", "Chongqing", "Hope",
    "Jin", "Meng", "Liao", "luck", "black",
    "Soviet", "Zhejiang", "Beijing", "Min", "short name for Jiangxi province",
    "Lu", "Yu", "Hubei", "Hunan", "Guangdong",
    "Cinnamon", "Joan", "Chuan", "expensive", "cloud",
    "west", "Shaanxi", "Sweet", "young", "Rather",
    "new"]

count = 0
total = []
paths = os.listdir('/home/work/chepaishibie')#Real dataset path
#for path in paths:
for item in os.listdir(os.path.join('/home/work/chepaishibie')):#Real dataset path
    if item[-3:] =='jpg':
        new_path = os.path.join('/home/work/chepaishibie', item) #Training image path
        _, _, bbox, points, label, _, _ = item.split('-')
        points = points.split('_')
        points = [_.split('&') for _ in points]
        tmp = points[-2:]+points[:2]
        points = []
        for point in tmp:
            points.append([int(_) for _ in point])
        label = label.split('_')
        con = con_list[int(label[0])]
        words = [words_list[int(_)] for _ in label[1:]]
        label = con+''.join(words)
        line = new_path+'\t'+'[{"transcription": "%s", "points": %s}]' % (' ', str(points))
        line = line[:]+'\n'
        total.append(line)

random.shuffle(total)
#Note: Here's train Txt / dev.txt was not available before. Now you can create a folder to open it
with open('/home/work/data/train.txt', 'w', encoding='UTF-8') as f:
    for line in total[:-200]:
        f.write(line)

with open('/home/work/data/dev.txt', 'w', encoding='UTF-8') as f:
    for line in total[-200:]:
        f.write(line)
Check the two txt files under data

Configuration environment
1. upgrade PaddlePaddle
!pip install paddlepaddle-gpu==2.2.1.post101 -f https://www.paddlepaddle.org.cn/whl/linux/mkl/avx/stable.html
2. Download PaddleOCR
!git clone https://gitee.com/PaddlePaddle/PaddleOCR.git
3. Download the pre training model
!cd /home/work/PaddleOCR
!wget -P ./pretrain_models/ https://paddleocr.bj.bcebos.com/ch_models/ch_det_mv3_db.tar

!wget -P ./pretrain_models/ https://paddleocr.bj.bcebos.com/rec_mv3_tps_bilstm_attn.tar
Note: look where your pre training model folder is. I'm under home/work. I've messed up here and switched the path to other places. Just understand that the following operation is to extract the downloaded pre training file
!cd /home/work/pretrain_models
!tar -xf ch_det_mv3_db.tar && rm -rf ch_det_mv3_db.tar
!tar -xf rec_mv3_tps_bilstm_attn.tar && rm -rf rec_mv3_tps_bilstm_attn.tar
cd switching path
cd /home/work/PaddleOCR
!ls
Install the dependent files related to PaddleOCR 1 Modify the requirements file
Delete opencv contrib python = = 4.4.0.46


2. Execute the following two installation commands:
!pip install -r requirements.txt
!pip install opencv-contrib-python==4.2.0.32
Step 3: modify the yml file of model training
Enter the path PaddleOCR/configs/det/
Open det_mv3_db.yml

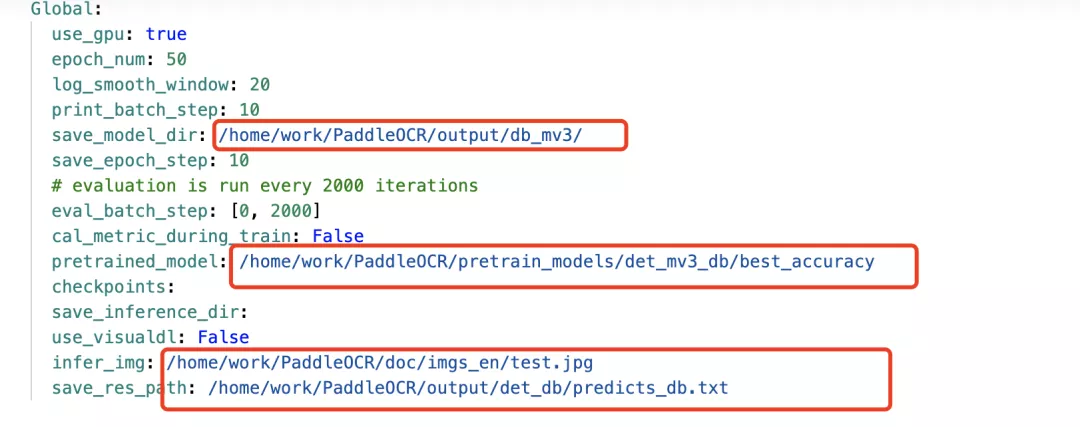
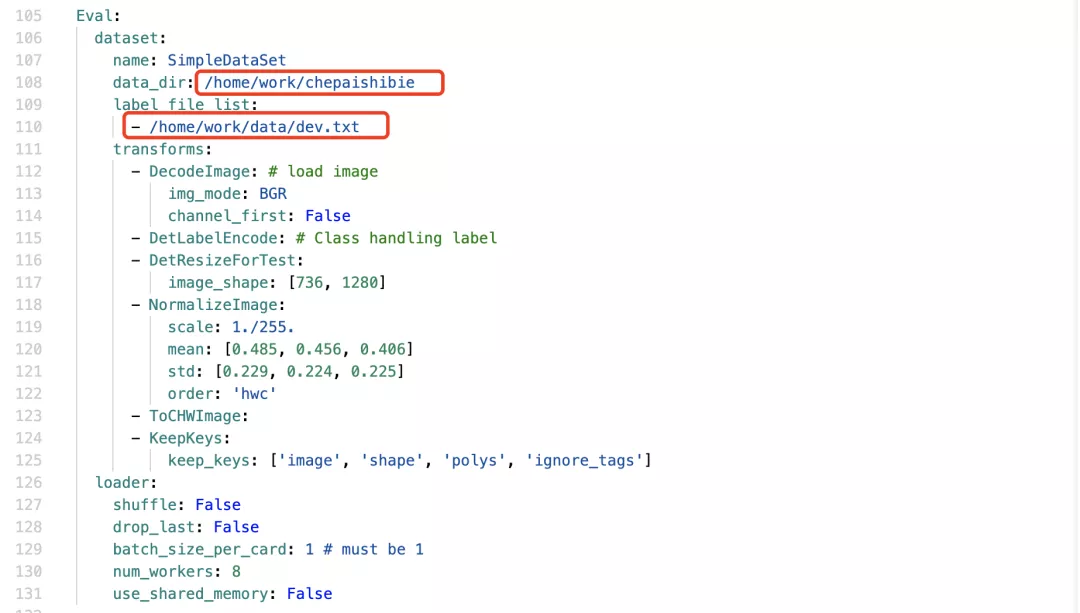
1. Modify model path and save path
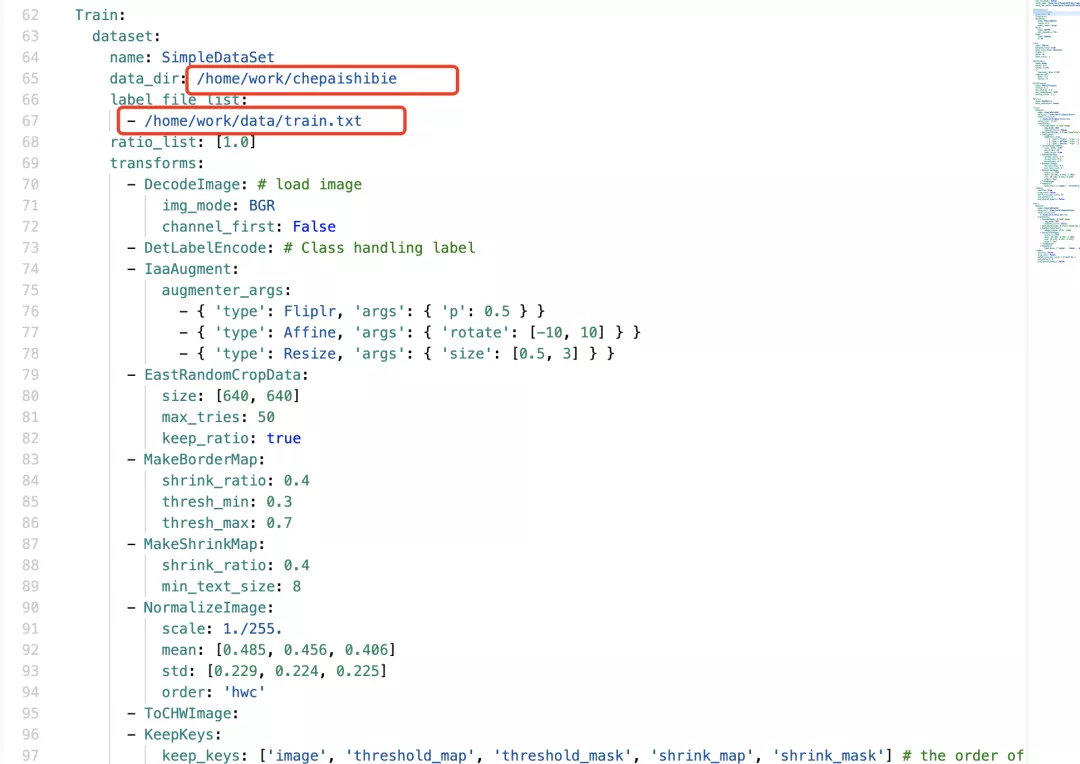
2. Modify the path of training data
Training set:
Validation set:
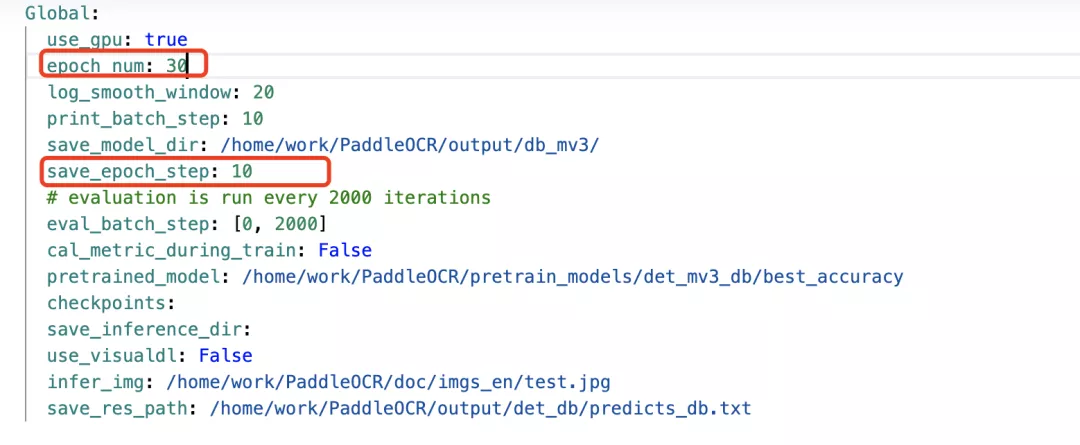
3. Set training parameters
Number of epoch s:
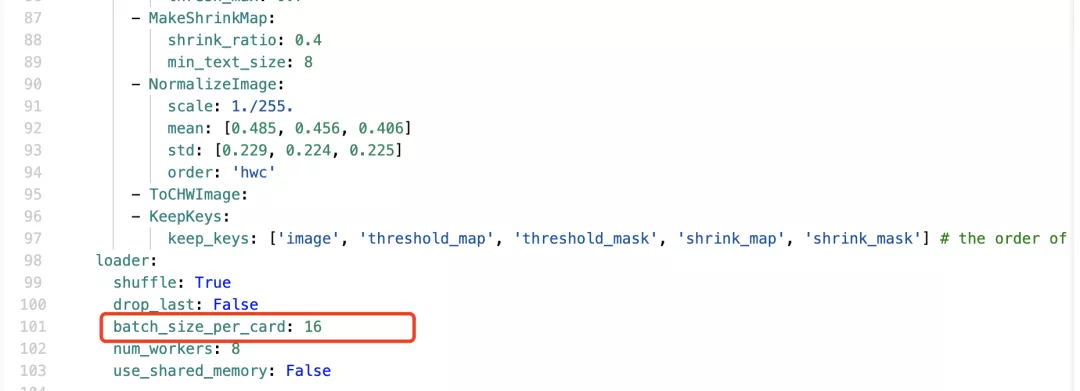
batch_size:
Step 4: model training
The model training here can be completed in about half an hour according to the performance of V100
CUDA_VISIBLE_DEVICES=0
!python3 tools/train.py -c configs/det/det_mv3_db.yml
Step 5: export the text detection model
!python3 /home/work/PaddleOCR/tools/export_model.py \
        -c /home/work/PaddleOCR/configs/det/det_mv3_db.yml \
        -o Global.checkpoints=/home/work/PaddleOCR/output/db_mv3/best_accuracy \
        Global.save_inference_dir=/home/work/PaddleOCR/inference/
Here, the training of a model is completed. Of course, the step of model evaluation is still missing, but the training time of this model configuration is too little, so we know it can't be done without evaluation, so we'll download one next. Step 3: Download and install the character recognition model
!wget https://paddleocr.bj.bcebos.com/dygraph_v2.0/ch/ch_ppocr_server_v2.0_rec_infer.tar
!tar -xf ch_ppocr_server_v2.0_rec_infer.tar -C inference
Step 6: model prediction
1. Upload a license plate picture as a prediction picture

!python /home/work/PaddleOCR/tools/infer/predict_system.py \
    --image_dir="/home/work/test.jpg" \
    --det_model_dir="/home/work/PaddleOCR/inference/" \
    --rec_model_dir="/home/work/PaddleOCR/inference/ch_ppocr_server_v2.0_rec_infer/" \
    --use_gpu False
You can use any picture in the dataset and enter the path yourself to adjust it. The path is test Jpg that

Detect vehicle type, color and driving direction
The environment here is too difficult to configure. After configuration, I simply compress the required environment file into a compressed package. Just unzip the file and put it in the same directory as paddleOCR and paddle Detection. These models are trained models, which can be used after being opened without many GPU resources. This package has been uploaded to my CSDN: https://pan.baidu.com/s/1CQHdYDT2zFj7SbX0TTrnVg Password: zw9v, if the package is lost, you can send me CSDN Personal blog To maintain.
The decompression directory is shown in the figure:

1. Unzip folder
!unzip work1.zip
Import the library we need. As long as what we did in the previous step is correct, there will be no error in this step.
import cv2
from paddle_model_cls.model_with_code.model import x2paddle_net

import argparse
import functools
import numpy as np
import paddle.fluid as fluid
import matplotlib.pyplot as plt
The following is the image preprocessing function: this function is mainly used to standardize the image and zoom the image to 224 × 224 pixels
def process_img(img, image_shape=[3, 224, 224]):

    mean = [0.485, 0.456, 0.406]
    std = [0.229, 0.224, 0.225]

    img = cv2.resize(img, (image_shape[1], image_shape[2]))
    #img = cv2.resize(img,(256,256))
    #img = crop_image(img, image_shape[1], True)

    # RBG img [224,224,3]->[3,224,224]
    img = img[:, :, ::-1].astype('float32').transpose((2, 0, 1)) / 255
    #img = img.astype('float32').transpose((2, 0, 1)) / 255
    img_mean = np.array(mean).reshape((3, 1, 1))
    img_std = np.array(std).reshape((3, 1, 1))
    img -= img_mean
    img /= img_std

    img = img.astype('float32')
    img = np.expand_dims(img, axis=0)

    return img
Define prediction function:
The function is to convert the label represented by one hot into the index of color, orientation and category
def get_predict(output):
    output = np.squeeze(output)
    pred_color = output[:9]
    pred_direction = output[9:11]
    pred_type = output[11:]

    color_idx = np.argmax(pred_color)
    direction_idx = np.argmax(pred_direction)
    type_idx = np.argmax(pred_type)

    return color_idx, direction_idx, type_idx
Define classifier: a class of classifier is defined here, which is used to obtain image input and output prediction; You can see the following_ GPU = false, which means that in the CPU environment, if you use GPU, you can change it to yes
use_gpu = False
class CarClassifier(object):

    def __init__(self):

        self.color_attrs = ['Black', 'Blue', 'Brown',
                            'Gray', 'Green', 'Pink',
                            'Red', 'White', 'Yellow']  # Car body color

        self.direction_attrs = ['Front', 'Rear']  # Shooting position

        self.type_attrs = ['passengerCar', 'saloonCar',
                           'shopTruck', 'suv', 'trailer', 'truck', 'van', 'waggon']  # Vehicle type

        self.init_params()

    def inference(self, img):
        fetch_list = [self.out.name]

        output = self.exe.run(self.eval_program,
                              fetch_list=fetch_list,
                              feed={'image': img})
        color_idx, direction_idx, type_idx = get_predict(np.array(output))

        color_name = self.color_attrs[color_idx]
        direction_name = self.direction_attrs[direction_idx]
        type_name = self.type_attrs[type_idx]

        return color_name, direction_name, type_name

    def init_params(self):

        # Attack graph
        adv_program = fluid.Program()

        # Complete initialization
        with fluid.program_guard(adv_program):
            input_layer = fluid.layers.data(
                name='image', shape=[3, 224, 224], dtype='float32')
            # Set to calculate the gradient
            input_layer.stop_gradient = False

            # model definition
            _, out_logits = x2paddle_net(inputs=input_layer)
            self.out = fluid.layers.softmax(out_logits[0])

            place = fluid.CUDAPlace(0) if use_gpu else fluid.CPUPlace()
            self.exe = fluid.Executor(place)
            self.exe.run(fluid.default_startup_program())

            # Record model parameters
            fluid.io.load_persistables(
                self.exe, './paddle_model_cls/model_with_code/')

        # Create evaluation mode for testing
        self.eval_program = adv_program.clone(for_test=True)

    def predict(self, im):

        im_input = process_img(im)

        color_name, direction_name, type_name = self.inference(im_input)

        label = 'Color:{}\n orientation:{}\n Type:{}'.format(
            color_name, direction_name, type_name)

        return label
%matplotlib inline
I'll change the name of this classifier to make it easier to type it later
classifier = CarClassifier()
Import other packages
Mainly some drawing tools (PIL) and paddedetection tools (ppdet). Don't worry about being too strange here. All the environments are equipped here. You just need to unzip the compressed package and put multiple folders in the same directory of this file
import ppdet.utils.checkpoint as checkpoint
from ppdet.utils.cli import ArgsParser
from ppdet.utils.eval_utils import parse_fetches
from ppdet.core.workspace import load_config, create
from paddle import fluid
import os
import cv2
import glob

from ppdet.utils.coco_eval import bbox2out, mask2out, get_category_info

import numpy as np
from PIL import Image
from PIL import ImageFont, ImageDraw
Define drawing functions
Using PIL library to solve the problem that opencv does not support Chinese
font_path = r'./simsun.ttc' # NSimSun
font = ImageFont.truetype(font_path, 16)


def putText(img, text, x, y, color=(0, 0, 255)):

    img_pil = Image.fromarray(img)
    draw = ImageDraw.Draw(img_pil)
    b, g, r = color
    a = 0
    draw.text((x, y), text, font=font, fill=(b, g, r, a))
    img = np.array(img_pil)
    return img
What does this set of functions do? How is it affected by the type and direction of the car? It's like this. There is a classifier function, which I defined once. Through the detection function, you can detect the color of the vehicle, the model (car, truck, bus, taix, SUV, etc.) and the positive and negative surfaces of the vehicle. If the negative of the vehicle is detected in the forward driving channel, it is a violation.
right_direct = 'Rear'

class new_Det(VehicleDetector):

    def __init__(self):

        self.size = 608

        self.draw_threshold = 0.1

        self.cfg = load_config('./configs/vehicle_yolov3_darknet.yml')

        self.place = fluid.CUDAPlace(
            0) if use_gpu else fluid.CPUPlace()
        # self.place = fluid.CPUPlace()
        self.exe = fluid.Executor(self.place)

        self.model = create(self.cfg.architecture)

        self.classifier = classifier

        self.init_params()


    def init_params(self):

        startup_prog = fluid.Program()
        infer_prog = fluid.Program()
        with fluid.program_guard(infer_prog, startup_prog):
            with fluid.unique_name.guard():
                inputs_def = self.cfg['TestReader']['inputs_def']
                inputs_def['iterable'] = True
                feed_vars, loader = self.model.build_inputs(**inputs_def)
                test_fetches = self.model.test(feed_vars)
        infer_prog = infer_prog.clone(True)

        self.exe.run(startup_prog)
        if self.cfg.weights:
            checkpoint.load_params(self.exe, infer_prog, self.cfg.weights)

        extra_keys = ['im_info', 'im_id', 'im_shape']
        self.keys, self.values, _ = parse_fetches(
            test_fetches, infer_prog, extra_keys)
        dataset = self.cfg.TestReader['dataset']
        anno_file = dataset.get_anno()
        with_background = dataset.with_background
        use_default_label = dataset.use_default_label

        self.clsid2catid, self.catid2name = get_category_info(anno_file, with_background,
                                                              use_default_label)

        is_bbox_normalized = False
        if hasattr(self.model, 'is_bbox_normalized') and \
                callable(self.model.is_bbox_normalized):
            is_bbox_normalized = self.model.is_bbox_normalized()

        self.is_bbox_normalized = is_bbox_normalized

        self.infer_prog = infer_prog

    def process_img(self, img):

        mean = [0.485, 0.456, 0.406]
        std = [0.229, 0.224, 0.225]
        shape = img.shape[:2]

        img = cv2.resize(img, (self.size, self.size))

        # RBG img [224,224,3]->[3,224,224]
        img = img[:, :, ::-1].astype('float32').transpose((2, 0, 1)) / 255
        img_mean = np.array(mean).reshape((3, 1, 1))
        img_std = np.array(std).reshape((3, 1, 1))
        img -= img_mean
        img /= img_std

        img = img.astype('float32')
        img = np.expand_dims(img, axis=0)

        shape = np.expand_dims(np.array(shape), axis=0)
        im_id = np.zeros((1, 1), dtype=np.int64)

        return img, im_id, shape

    def detect(self, img):

        # img = cv2.cvtColor(img, cv2.COLOR_BGR2RGB)
        raw = img.copy()
        img, im_id, shape = self.process_img(img=img)
        outs = self.exe.run(self.infer_prog,
                            feed={'image': img, 'im_size': shape.astype(np.int32), 'im_id': im_id},
                            fetch_list=self.values,
                            return_numpy=False)
        res = {
            k: (np.array(v), v.recursive_sequence_lengths())
            for k, v in zip(self.keys, outs)
        }

        bbox_results = bbox2out(
            [res], self.clsid2catid, self.is_bbox_normalized)

        result = self.draw_bbox(raw, self.catid2name,
                                bbox_results, self.draw_threshold)

        return result
    def draw_bbox(self, image, catid2name, bboxes, threshold):

        raw = image.copy()

        for dt in np.array(bboxes):

            catid, bbox, score = dt['category_id'], dt['bbox'], dt['score']
            if score < threshold or catid == 6:
                # if score < threshold:
                continue

            xmin, ymin, w, h = bbox
            xmin = int(xmin)
            ymin = int(ymin)
            xmax = int(xmin + w)
            ymax = int(ymin + h)
            roi = raw[ymin:ymax, xmin:xmax].copy()
            label = self.classifier.predict(roi)
            if right_direct in label:
                color = (0, 255, 0)
            else:
                color = (0, 0, 255)
                print('Illegal retrograde detected!')

            cv2.rectangle(image, (xmin, ymin), (xmax, ymax), color, 4)
            print(label)
            print()

        return image
When you use it, you can directly copy the above reference code and function code, and then I you only need to use a det to detect the situation of the car.
det = new_Det()
In [8]
im = cv2.imread('./demo.png')
result = det.detect(im)

plt.imshow(result[:, :, [2, 1, 0]])

plt.show()

Visual detection of vehicle speed
1, Install and import the package. If you have installed it according to the previous steps, you can directly reinstall the following libraries and run the supplementary installation. If not, you also need to install paddedetectino and installation environment variables
!pip install --upgrade pip
!pip install paddledet
!pip install cmake
!pip install boost
!pip install dlib
!pip install pycocotools
import os  #File operation Library
import ppdet
import dlib  #Machine learning algorithm library
import time
import threading  #Multithreading Library
import math  #Mathematical Library
import cv2   #Import CV2 library and process pictures or videos. The version number is 3.4.13.47
import paddle
import paddle.fluid as fluid
import numpy as np  #Mathematical function library
from PIL import ImageFont, ImageDraw, Image  #Image library
import fnmatch
import random
Here I provide an example video, which is placed under the work path of the project. You can add the video according to your own path in vediopath, and then OS MKDIR is to create a folder for later work
videopath = '/home/work/test/0831_1.mp4'
os.mkdir('/home/work/test/video1')
os.mkdir('/home/work/test/video2')
os.mkdir('/home/work/test/video2.5')
os.mkdir('/home/work/test/video3')
#Vehicle speed video recognition
#Vehicle speed detection function
#Load vehicle identification file
#Load classifier for vehicle recognition
carCascade = cv2.CascadeClassifier('/home/work/myhaar1.xml')
#Read video file
video = cv2.VideoCapture(videopath)

carWidht = 1.85

# def carNumber(carNum, cID):
	# time.sleep(2)
	# carNum[cID] = 'Car ' + str(cID)

def estimateSpeed(location1, location2, mySpeed,fps):
#Calculate pixel distance
	d_pixels = math.sqrt(math.pow(location2[0] - location1[0], 2) + math.pow(location2[1] - location1[1], 2))
	ppm = location2[2] / carWidht
	d_meters = d_pixels / ppm
	speed = mySpeed + d_meters * fps
	return speed

def trackMultipleObjects():
	rectangleColor = (0, 0, 255)
	currentCarID = 0
	fps = 0
	global frameCounter
	frameCounter = 0

	carTracker = {}
	carNumbers = {}
	carLocation1 = {}
	carLocation2 = {}

	while True:
		start_time = time.time()
        #Read frame
		rc, image = video.read()
		if(frameCounter == 0):  #Read video resolution
			global WIDTH
			global HEIGHT
			WIDTH = len(image[0])
			HEIGHT = len(image)
        #Check whether the end of the video file is reached
		if type(image) == type(None):
			break
		#Convert the size of the frame to speed up processing
		#image = cv2.resize(image, (WIDTH, HEIGHT))
		resultImage = image.copy()

		frameCounter = frameCounter + 1
		#print(frameCounter)
		carIDtoDelete = []
		for carID in carTracker.keys():
			trackingQuality = carTracker[carID].update(image)

			if trackingQuality < 7:
				carIDtoDelete.append(carID)

		for carID in carIDtoDelete:
			#print('Removing carID ' + str(carID) + ' from list of trackers.')
			#print('Removing carID ' + str(carID) + ' previous location.')
			#print('Removing carID ' + str(carID) + ' current location.')
			carTracker.pop(carID, None)
			carLocation1.pop(carID, None)
			carLocation2.pop(carID, None)
		# Execute when frameCounter is a multiple of 10
		if not (frameCounter % 10):
			#Convert image to grayscale image
			gray = cv2.cvtColor(image, cv2.COLOR_BGR2GRAY)
			#Detect the vehicle in the video, and save the coordinates and size of the vehicle with vector (represented by rectangle)
			# x. Y represents the central abscissa and ordinate position of the circumscribed rectangle of the ith moving target in frame n, which can roughly describe the position of the vehicle target.
			# w. H represents the width and length of the circumscribed rectangle of the ith moving target in frame n, which can describe the size of the vehicle target
			cars = carCascade.detectMultiScale(gray, 1.1, 13, 0, (24, 24))
            #Vehicle detection
			for (_x, _y, _w, _h) in cars:
				x = int(_x)
				y = int(_y)
				w = int(_w)
				h = int(_h)

				x_bar = x + 0.5 * w
				y_bar = y + 0.5 * h

				matchCarID = None

				for carID in carTracker.keys():
					trackedPosition = carTracker[carID].get_position()

					t_x = int(trackedPosition.left())
					t_y = int(trackedPosition.top())
					t_w = int(trackedPosition.width())
					t_h = int(trackedPosition.height())

					t_x_bar = t_x + 0.5 * t_w
					t_y_bar = t_y + 0.5 * t_h


					if ((t_x <= x_bar <= (t_x + t_w)) and (t_y <= y_bar <= (t_y + t_h)) and (x <= t_x_bar <= (x + w)) and (y <= t_y_bar <= (y + h))):
						matchCarID = carID

				if matchCarID is None:
					print('Creating new tracker ' + str(currentCarID))
					#Construct tracker
					tracker = dlib.correlation_tracker()
					# Set the initial position of the tracker
					#If the vehicle is identified, it will return to the position of the vehicle in the form of Rect(x,y,w,h), and then we can identify the vehicle with a rectangular grid
					tracker.start_track(image, dlib.rectangle(x, y, x + w, y + h))

					carTracker[currentCarID] = tracker
					# Rectangle used to generate tracker [(startX, startY), (endX, endY)]
					carLocation1[currentCarID] = [x, y, w, h]
					# t = threading.Thread(target = carNum, args = (carNumbers, currentCarID))
					# t.start()

					currentCarID = currentCarID + 1

		for carID in carTracker.keys():
			# Get the current position of the tracker
			trackedPosition = carTracker[carID].get_position()

			t_x = int(trackedPosition.left())
			t_y = int(trackedPosition.top())
			t_w = int(trackedPosition.width())
			t_h = int(trackedPosition.height())
			#print([t_y,t_y+t_h,t_x,t_x+t_w])

			#cv2.rectangle(resultImage, (t_x, t_y), (t_x + t_w, t_y + t_h), rectangleColor, 2)

			# speed estimation

			carLocation2[carID] = [t_x, t_y, t_w, t_h]

			# if carID in carNumbers.keys():
				# cv2.putText(resultImage, carNumbers[carID], (int(t_x + t_w/2), int(t_y)),cv2.FONT_HERSHEY_SIMPLEX, 0.5, (255, 255, 255), 2)
			# else:
				# cv2.putText(resultImage, 'Detecting...', (int(t_x + t_w/2), int(t_y)),cv2.FONT_HERSHEY_SIMPLEX, 0.5, (255, 255, 255), 2)

		end_time = time.time()
		if not (end_time == start_time):
			fps = 1.0/(end_time - start_time)
			#print(fps)
		cv2.putText(resultImage, 'FPS: ' + str(int(fps)), (620, 30),cv2.FONT_HERSHEY_SIMPLEX, 0.75, (0, 0, 255), 2)
		for i in carLocation1.keys():
			if frameCounter % 10 == 0:
				[x1, y1, w1, h1] = carLocation1[i]
				[x2, y2, w2, h2] = carLocation2[i]
				#print ('previous location: ' + str(carLocation1[i]) + ', current location: ' + str(carLocation2[i]))
				carLocation1[i] = [x2, y2, w2, h2]
				#print('new previous location: ' + str(carLocation1[i]))
				if [x1, y1, w1, h1] != [x2, y2, w2, h2]:
					speed = estimateSpeed([x1, y1, w1, h1], [x2, y2, w2, h2], 100, fps)
					#speed = (speed-100)*100
					print('CarID ' + str(i) + ' speed is ' + str("%.2f" % round(speed, 2)) + ' km/h')
					cv2.putText(resultImage, str("%.2f" % round(speed, 2)) + ' km/h' , (t_x, t_y), cv2.FONT_HERSHEY_SIMPLEX, 1, (0, 255, 0), 2)
			else:
				cv2.putText(resultImage, str("%.2f" % round(speed, 2)) + ' km/h' , (t_x, t_y), cv2.FONT_HERSHEY_SIMPLEX, 1, (0,255, 0), 2)

		#%cd /home/aistudio/
		str_name = '/home/work/test/video1/frame'+str(frameCounter)+'.png'
		cv2.imwrite(str_name, resultImage)
		vediowriter =cv2.VideoWriter('/home/work/test/test1.mp4',cv2.VideoWriter_fourcc(*'mp4v'),30,(WIDTH,HEIGHT))
		for i in range(frameCounter):
			i=i+1
			new_image_name = '/home/work/test/video1/frame'+str(i)+'.png'
			img =cv2.imread(new_image_name)
			vediowriter.write(img)


trackMultipleObjects()
You can see CV2 above Videowriter, this is the address where the video is saved. You can adjust and view it according to your needs. I cut a picture

OK, so far we have made all the models that need to be used. You can get the desired output results only by a simple sentence of function and defining the input video stream in advance. How to match these function calls to make an intelligent transportation scheme has to wait until the next project hhh.