https://blog.didispace.com/spring-boot-learning-1x/
1. Unified exception handling of application
Spring Boot provides a default mapping: / error. When an exception is thrown during processing, it will be transferred to the request for processing, and the request has a global error page to display the exception content.
Access a nonexistent URL or modify the processing content, and throw an exception directly, such as:
		<dependency>
			<groupId>org.springframework.boot</groupId>
			<artifactId>spring-boot-starter-thymeleaf</artifactId>
		</dependency>
@RequestMapping("/hello")
public String hello() throws Exception {
    throw new Exception("An error occurred");
}
Like the following error page, this page is the default error mapping page provided by Spring Boot.
Whitelabel Error Page
This application has no explicit mapping for /error, so you are seeing this as a fallback.

Tue Mar 01 11:16:04 CST 2022
There was an unexpected error (type=Internal Server Error, status=500).
1. Unified exception handling class
Exception Interceptor
- Create a global exception handling class: define a unified exception handling class by using @ ControllerAdvice instead of defining it one by one in each Controller.
- @ExceptionHandler is used to define the Exception type targeted by the function, and finally map the Exception object and request URL to error HTML
//Controller section
@ControllerAdvice
class GlobalExceptionHandler {
	// View name
    public static final String DEFAULT_ERROR_VIEW = "error";

    //All exceptions are intercepted
    @ExceptionHandler(value = Exception.class)
    //HttpServletRequest
    public ModelAndView defaultErrorHandler(HttpServletRequest req, Exception e) throws Exception {

        //Create models and views
        ModelAndView mav = new ModelAndView();
        //The exception is placed in the exception object
        mav.addObject("exception", e);
        //Add url
        mav.addObject("url", req.getRequestURL());

        //Name of view
        mav.setViewName(DEFAULT_ERROR_VIEW);

        return mav;
    }

}
Servlet
Britain /ˈsɜːvlɪt/  beautiful /'sɜvlet/  Global(U.S.A)
Concise New Oxford Collins Encyclopedia

n. (especially  Java Small application program (running on the server) in language; Applet
 Professional interpretation of network interpretation
 controller

Controller( Servlet)
Fault page return
- Implement error HTML page display: create error.html in the templates directory HTML, and output the URL of the request and the message of the Exception object.
<!DOCTYPE html>
<html>
    <head lang="en">
        <meta charset="UTF-8" />
        <title>Unified exception handling</title>
    </head>
    <body>
        <h1>Error Handler222</h1>
        <div th:text="${url}"></div>
        <div th:text="${exception.message}"></div>
    </body>
</html>
Start the app and access: http://localhost:8080/hello , you can see the following error prompt page.
Error Handler222
http://localhost:9898/testOne
After realizing the above contents, we only need to throw an Exception in the Controller,
Of course, we may have many different exceptions.
Then, in the @ ControllerAdvice class, match according to the specific Exception type thrown
@Exception types configured in ExceptionHandler to match error mapping and handling.
2. Test the ordinary controller to the index page
@Controller
public class HelloController {

    @RequestMapping("/")
    public String index(ModelMap map) {
        map.addAttribute("host", "http://blog.didispace.com");
        return "index";
    }

}
- src/main/resources/templates/index.html
<!DOCTYPE html>
<html>
    <head lang="en">
        <meta charset="UTF-8" />
        <title></title>
    </head>
    <body>
    <h1>22222222</h1>
    <h1 th:text="${host}">Hello World222</h1>
    </body>
</html>
- page
22222222
http://blog.didispace.com
3. Return JSON format
In essence, just add @ ResponseBody after @ ExceptionHandler to convert the contents of the processing function return to JSON format.
Unified return class
- Create a unified JSON return object,
- code: message type,
- Message: message content,
- url: the url of the request,
- Data: the data returned by the request
public class ErrorInfo<T> {
    public static final Integer OK = 0;
    public static final Integer ERROR = 100;
	//type
    private Integer code;
    //content
    private String message;
    //Request url
    private String url;
    //data
    private T data;

    // Omit getter s and setter s
}
Custom exception
- Create a custom exception to catch the exception and return json
public class MyException extends Exception {

    public MyException(String message) {
        super(message);
    }

}
- Add json mapping in Controller and throw MyException
@Controller
public class HelloController {

    @RequestMapping("/json")
    public String json() throws MyException {
        throw new MyException("Error 2 occurred");
    }

}
exception handling
@ControllerAdvice
public class GlobalExceptionHandler {

    @ExceptionHandler(value = MyException.class)
    @ResponseBody
    public ErrorInfo<String> jsonErrorHandler(HttpServletRequest req, MyException e) throws Exception {
        ErrorInfo<String> r = new ErrorInfo<>();
        r.setMessage(e.getMessage());
        r.setCode(ErrorInfo.ERROR);
        r.setData("Some Data");
        r.setUrl(req.getRequestURL().toString());
        return r;
    }
}
- Start the application and access: http://localhost:8080/json , you can get the following return contents:
{
    code: 100,
    data: "Some Data",
    message: "Error 2 occurred",
    url: "http://localhost:8080/json"
}
2. Integrate MyBatis
Introducing pom
- Here, spring boot starter foundation and spring boot starter test are used for unit testing to verify data access
- Introducing the necessary dependency of mysql connector Java
- The core dependency of integrating MyBatis is spring boot starter is introduced
- The spring boot starter JDBC dependency is not introduced here because it is already included in mybatis spring boot starter
<parent>
	<groupId>org.springframework.boot</groupId>
	<artifactId>spring-boot-starter-parent</artifactId>
	<version>1.3.2.RELEASE</version>
	<relativePath/>
</parent>

<dependencies>

	<dependency>
		<groupId>org.springframework.boot</groupId>
		<artifactId>spring-boot-starter</artifactId>
	</dependency>

	<dependency>
		<groupId>org.springframework.boot</groupId>
		<artifactId>spring-boot-starter-test</artifactId>
		<scope>test</scope>
	</dependency>

	<dependency>
		<groupId>org.mybatis.spring.boot</groupId>
		<artifactId>mybatis-spring-boot-starter</artifactId>
		<version>1.1.1</version>
	</dependency>

	<dependency>
		<groupId>mysql</groupId>
		<artifactId>mysql-connector-java</artifactId>
		<version>5.1.21</version>
	</dependency>

</dependencies>
Configure mysql
spring.datasource.url=jdbc:mysql://localhost:3306/test
spring.datasource.username=root
spring.datasource.password=123456
spring.datasource.driver-class-name=com.mysql.jdbc.Driver
CREATE TABLE `USER`  (
  `id` int(20) NOT NULL AUTO_INCREMENT,
  `name` varchar(255) CHARACTER,
  `age` int(11) NULL DEFAULT NULL,
  PRIMARY KEY (`id`) USING BTREE
);
Using MyBatis
- Create a User table in Mysql, including id(BIGINT), name(INT), age(VARCHAR) fields. At the same time, create the mapping object User
public class User {

    private Long id;
    private String name;
    private Integer age;

    // Omit getter s and setter s

}
UserMapper
@Mapper
public interface UserMapper {

    @Select("SELECT * FROM USER WHERE NAME = #{name}")
    User findByName(@Param("name") String name);

    @Insert("INSERT INTO USER(NAME, AGE) VALUES(#{name}, #{age})")
    int insert(@Param("name") String name, @Param("age") Integer age);

}
@SpringBootApplication
public class Application {
}
Create unit test
- Test logic: insert a record with name=AAA and age=20, then query according to name=AAA and judge whether age is 20
- Roll back the data after the test to ensure that the data environment of each run of the test unit is independent
test
@RunWith(SpringJUnit4ClassRunner.class)
@SpringApplicationConfiguration(classes = Application.class)
public class ApplicationTests {

	@Autowired
	private UserMapper userMapper;

	@Test
	@Rollback
	public void findByName() throws Exception {
		userMapper.insert("AAA", 20);
		User u = userMapper.findByName("AAA");
		Assert.assertEquals(20, u.getAge().intValue());
	}

}
3. MyBatis annotation configuration details
Parameter transmission mode
Several simultaneous interpreting methods are implemented to achieve the insertion operation in the previous paper.
Use @ Param
@Insert("INSERT INTO USER(NAME, AGE) VALUES(#{name}, #{age})")
int insert(@Param("name") String name, @Param("age") Integer age);
@The name defined in Param corresponds to #{name} in SQL
Using Map
The following code uses the map < string, Object > object as the container for passing parameters:
@Insert("INSERT INTO USER(NAME, AGE) VALUES(#{name,jdbcType=VARCHAR}, #{age,jdbcType=INTEGER})")
int insertByMap(Map<String, Object> map);
Because the parameter is Map<String,Object>,So in the parameter, take the type
INSERT INTO USER(NAME, AGE)
VALUES
(
    #{name,jdbcType=VARCHAR},
    #{age,jdbcType=INTEGER}
)
For the parameters required in the Insert statement, we only need to fill in the map with the same name, as shown in the following code:
Map<String, Object> map = new HashMap<>();
map.put("name", "CCC");
map.put("age", 40);
userMapper.insertByMap(map);
Use object
In addition to Map objects, we can also directly use ordinary Java objects as parameters for query conditions. For example, we can directly use User objects:
@Insert("INSERT INTO USER(NAME, AGE) VALUES(#{name}, #{age})")
int insertByUser(User user);
In this way, #{name}, #{age} in the statement correspond to the name and age attributes in the User object respectively.
Add, delete, modify and check
public interface UserMapper {

    @Select("SELECT * FROM user WHERE name = #{name}")
    User findByName(@Param("name") String name);

    @Insert("INSERT INTO user(name, age) VALUES(#{name}, #{age})")
    int insert(@Param("name") String name, @Param("age") Integer age);

    @Update("UPDATE user SET age=#{age} WHERE name=#{name}")
    void update(User user);

    @Delete("DELETE FROM user WHERE id =#{id}")
    void delete(Long id);
}
After completing a set of additions, deletions and modifications, we might as well try the following unit tests to verify the correctness of the above operations:
test
@RunWith(SpringJUnit4ClassRunner.class)
@SpringApplicationConfiguration(classes = Application.class)
@Transactional
public class ApplicationTests {

	@Autowired
	private UserMapper userMapper;

	@Test
	@Rollback
	public void testUserMapper() throws Exception {
		// insert a piece of data and select it for verification
		userMapper.insert("AAA", 20);

		User u = userMapper.findByName("AAA");

		Assert.assertEquals(20, u.getAge().intValue());

		// update a piece of data and select it for verification
		u.setAge(30);
		userMapper.update(u);

		u = userMapper.findByName("AAA");

		Assert.assertEquals(30, u.getAge().intValue());

		// Delete this data and select validation
		userMapper.delete(u.getId());

		u = userMapper.findByName("AAA");

		Assert.assertEquals(null, u);
	}
}
Binding of returned results
For the "query" operation, we often need to perform multi table Association, summary calculation and other operations,
It is often necessary to return a wrapper class different from the database entity,
You can bind through @ Results and @ Result annotations, as follows:
@Results({
    @Result(property = "name", column = "name"),
    @Result(property = "age", column = "age")
})
@Select("SELECT name, age FROM user")
List<User> findAll();
@The property property property in the Result corresponds to the member name in the User object,
- column corresponds to the field name from the SELECT.
- The id attribute is intentionally not found in this configuration,
- Only the name and age objects in the corresponding User are mapped and configured,
- In this way, the following unit test can be used to verify that the found id is null and other properties are not null:
	List<User> userList = userMapper.findAll();
	for(User user : userList) {
		Assert.assertEquals(null, user.getId());
		Assert.assertNotEquals(null, user.getName());
	}
4. Transaction management in spring boot
Exceptions may occur in any step of operation, which will make subsequent operations impossible to complete,
- At this time, because the business logic is not completed correctly, and the previous successful operation data is not reliable, it is necessary to roll back in this case.
The function of transaction is to ensure that every operation of the user is reliable,
- Every step of the transaction must be successfully executed,
- As long as there is an exception, it will fall back to the state where no operation is performed at the beginning of the transaction.
When spring boot starter JDBC or spring boot starter data JPA is dependent, the framework will automatically inject by default
- DataSourceTransactionManager or JpaTransactionManager.
- Therefore, we can use @ Transactional annotation for transactions without any additional configuration.
Spring data JPA is introduced, and User entity and data access object UserRepository are created
test case
@RunWith(SpringJUnit4ClassRunner.class)
@SpringApplicationConfiguration(Application.class)
public class ApplicationTests {

	@Autowired
	private UserRepository userRepository;

	@Test
	public void test() throws Exception {

		// Create 10 records
		userRepository.save(new User("AAA", 10));
        userRepository.save(new User("HHHHHHHHHH", 80));
		userRepository.save(new User("BBB", 20));

		// Omit some subsequent verification operations
	}


}
By defining the length of the User's name attribute as 5, an exception can be triggered if the User entity's name attribute is too long during creation.
@Entity
//@Transactional
public class User {

    @Id
    @GeneratedValue
    private Long id;

    @Column(nullable = false, length = 5)
    private String name;

    @Column(nullable = false)
    private Integer age;

    // Omit constructors, getter s, and setter s

}
The following exception is thrown in the console. The name field is too long:
 SQL Error: 1406, SQLState: 22001
 Data truncation: Data too long for column 'name' at row 1
 SQL Warning Code: 1406, SQLState: HY000
 Data too long for column 'name' at row 1

org.springframework.dao.DataIntegrityViolationException: could not execute statement; SQL [n/a]; nested exception is org.hibernate.exception.DataException: could not execute statement
You can use transactions to make it fallback. It's very simple. We just need to add @ Transactional annotation to the test function.
Rolled back transaction for test

context [DefaultTestContext@1d7a715 testClass = ApplicationTests, testInstance = com.didispace.ApplicationTests@95a785,
testMethod = test@ApplicationTests,
testException = org.springframework.dao.DataIntegrityViolationException: could not execute statement; SQL [n/a];
nested exception is org.hibernate.exception.DataException: could not execute statement,
mergedContextConfiguration = [MergedContextConfiguration@11f39f9 testClass = ApplicationTests,
locations = '{}', classes = '{class com.didispace.Application}', contextInitializerClasses = '[]',
activeProfiles = '{}', propertySourceLocations = '{}', propertySourceProperties = '{}',
contextLoader = 'org.springframework.boot.test.SpringApplicationContextLoader', parent = [null]]].
In the database, there is no User data from AAA to GGG in the User table, and the automatic rollback is successfully realized
Usually, in order to ensure the data independence between each test,
- The @ Rollback annotation is used so that each unit test can be rolled back at the end. And when you're really developing business logic,
- We usually use @ Transactional in the service layer interface to configure transaction management for each business logic, for example:
public interface UserService {

    @Transactional
    User login(String name, String password);

}
Transaction details
(for example, there are multiple data sources). At this time, you need to specify different transaction managers when declaring transactions. For the transaction management configuration of different data sources, see Spring Boot multi data source configuration and use Settings in.
- When declaring a transaction, you only need to specify the configured transaction manager name through the value attribute, for example: @ Transactional(value="transactionManagerPrimary").
In addition to specifying different transaction managers, you can also control the isolation level and propagation behavior of transactions, which are explained in detail below:
Isolation level
Isolation level refers to
- The degree of isolation between several concurrent transactions,
- The main scenes related to our development include: dirty reading, repeated reading and phantom reading.
We can see org springframework. transaction. annotation. Five values representing the isolation level are defined in the isolation enumeration class:
public enum Isolation {
    DEFAULT(-1),
    READ_UNCOMMITTED(1),
    READ_COMMITTED(2),
    REPEATABLE_READ(4),
    SERIALIZABLE(8);
}
-
DEFAULT: This is the DEFAULT value, indicating that the DEFAULT isolation level of the underlying database is used.
- For most databases, this value is usually READ_COMMITTED.
-
READ_UNCOMMITTED: this isolation level indicates that one transaction can read data modified by another transaction but not yet committed.
- This level does not prevent dirty reads and non repeatable reads, so it is rarely used.
-
READ_COMMITTED: this isolation level indicates that one transaction can only read the committed data of another transaction.
- This level can prevent dirty reading, which is also the recommended value in most cases.
-
REPEATABLE_READ: this isolation level indicates that a transaction is in the whole process
- A query can be executed repeatedly, and the records returned each time are the same.
- Even if new data is added between multiple queries to meet the query, these new records will be ignored.
- This level prevents dirty reads and non repeatable reads.
-
SERIALIZABLE: all transactions are executed one by one, so that there is no interference between transactions,
- In other words, this level can prevent dirty reading, non repeatable reading and unreal reading.
- However, this will seriously affect the performance of the program. This level is not normally used.
Specify the method: set by using the isolation property, for example:
@Transactional(isolation = Isolation.DEFAULT)
isolation
Britain /ˌaɪsəˈleɪʃn/  beautiful /ˌaɪsəˈleɪʃn/  Global(britain)
Concise Oxford Webster Collins Encyclopedia
n. Isolation, isolation; Loneliness; Insulation;
Communication behavior
The so-called communication behavior of affairs refers to,
- If a transaction context already exists before starting the current transaction,
- There are several options to specify the execution behavior of a transactional method.
We can see org springframework. transaction. annotation. Six enumeration values representing propagation behavior are defined in the propagation enumeration class:
Propagation
Britain /ˌprɒpəˈɡeɪʃn/  beautiful /ˌprɑːpəˈɡeɪʃn/  Global(U.S.A)
Concise Webster example Encyclopedia
n. (Reproduction, multiplication and of animals and plants,; (the dissemination of ideas, theories, etc.); Transmission (of motion, light, sound, etc)

mandatory
Britain /ˈmændətəri/  beautiful /ˈmændətɔːri/  Global(U.S.A)
Concise Oxford Webster Collins Encyclopedia
adj. Compulsory; obligatory; Appointed by (the former League of Nations)
n. Trustee, agent(=mandatary)

nested
Britain /ˈnestɪd/  beautiful /ˈnestɪd/  Global(britain)
Concise Collins Encyclopedia
adj. Nested, built-in
v. Nesting; Embed( nest Past participle of
public enum Propagation {
    REQUIRED(0), //required
    SUPPORTS(1),//supports support
    MANDATORY(2),//Mandatory mandatory
    REQUIRES_NEW(3),//requires_new I'm new, hang you up
    NOT_SUPPORTED(4),//not supported
    NEVER(5),//never
    NESTED(6);//nested
}
-
REQUIRED: if a transaction currently exists, join the transaction;
- If there is no current transaction, a new transaction is created.
-
SUPPORTS: if a transaction currently exists, join the transaction;
- If there are currently no transactions, continue to run in a non transactional manner.
-
MANDATORY: if a transaction currently exists, join the transaction;
- If there is no current transaction, an exception is thrown.
-
REQUIRES_NEW: create a new transaction,
- If a transaction currently exists, suspend the current transaction.
-
NOT_SUPPORTED: run in non transactional mode,
- If a transaction currently exists, suspend the current transaction.
-
NEVER: run in non transactional mode,
- Throw an exception if a transaction currently exists.
-
NESTED: if a transaction currently exists,
- Create a transaction to run as a nested transaction of the current transaction;
- If there is no transaction at present, this value is equivalent to REQUIRED.
Specify the method: set by using the propagation property, for example:
@Transactional(propagation = Propagation.REQUIRED)

@Transactional(propagation = Propagation.REQUIRED,isolation = Isolation.DEFAULT)
5. Cache support (I) annotation configuration and EhCache use
- You can also use the example of integrating mybatis directly
Often, database query operation will become a bottleneck affecting user experience,
- At this time, using cache is often one of the best ways to solve this problem.
In order to better understand the cache, we first make some simple modifications to the project.
- application. Add spring.com in the properties file jpa. properties. hibernate. show_ sql=true,
- Enable hibernate to print sql statements
- Modify the unit test ApplicationTests, initialize and insert a piece of data with User name AAA and age 10 into the User table. And complete the query twice through findByName function.
@RunWith(SpringJUnit4ClassRunner.class)
@SpringApplicationConfiguration(Application.class)
public class ApplicationTests {

	@Autowired
	private UserRepository userRepository;

	@Before
	public void before() {
		userRepository.save(new User("AAA", 10));
	}

	@Test
	public void test() throws Exception {
		User u1 = userRepository.findByName("AAA");
		System.out.println("First query:" + u1.getAge());

		User u2 = userRepository.findByName("AAA");
		System.out.println("Second query:" + u2.getAge());
	}

}
- After executing the unit test, we can see the following in the console.
Hibernate: insert into user (age, name) values (?, ?)
Hibernate: select user0_.id as id1_0_, user0_.age as age2_0_, user0_.name as name3_0_ from user user0_ where user0_.name=?
First query: 10
Hibernate: select user0_.id as id1_0_, user0_.age as age2_0_, user0_.name as name3_0_ from user user0_ where user0_.name=?
Second query: 10
Before the test case is executed, a User record is inserted. Then, each time findByName is called, a select statement is executed to query the record with User name AAA.
Introducing and configuring caching
<dependency>
    <groupId>org.springframework.boot</groupId>
    <artifactId>spring-boot-starter-cache</artifactId>
</dependency>
Add @ EnableCaching annotation to enable caching
@SpringBootApplication
@EnableCaching
Use cache
- Add cache configuration annotation in the data access interface, such as:
@CacheConfig(cacheNames = "users")
public interface UserRepository extends JpaRepository<User, Long> {

    @Cacheable
    User findByName(String name);

}
- Then execute the following unit tests, and you can output the following contents in the console:
Hibernate: insert into user (age, name) values (?, ?)
Hibernate: select user0_.id as id1_0_, user0_.age as age2_0_, user0_.name as name3_0_ from user user0_ where user0_.name=?
First query: 10
 Second query: 10
From here, we can see that when the findByName function is called for the second time, the select statement is no longer executed, which directly reduces one database read operation.
In order to better observe the cache storage, we can inject cacheManager into the unit test.
@Autowired
private CacheManager cacheManager;
Run the unit test in debug mode, observe the cache set users in the cache manager and the cache of User objects in it, and deepen your understanding.
- Default: ConcurrentMap CacheManager
- Bottom layer: ConcurrentHashMap
Detailed explanation of Cache annotation
- @CacheConfig: mainly used to configure some common cache configurations used in this class.
- Here @ CacheConfig(cacheNames = "users"):
- The contents returned in the configured data access object will be stored in the cache object named users,
- We can also directly configure the name of the cache set through @ Cacheable without using this annotation.
- @Cacheable: the return value of the findByName function configured will be added to the cache. At the same time, when querying, it will be obtained from the cache first. If it does not exist, it will initiate access to the database. The annotation mainly has the following parameters:
- Value and cacheNames: two equivalent parameters (cacheNames is newly added to Spring 4 as the alias of value),
- Used to specify the collection name of the cache store. Due to the new @ CacheConfig in Spring 4,
- Therefore, the value attribute that was originally required in Spring 3 has also become a non required item
- Key: the key value of the cache object stored in the Map set. It is not required. By default, it takes the combination of all parameters of the function as the key value,
- If you configure yourself, you need to use a spiel expression, for example: @ Cacheable(key = "#p0"): use the first parameter of the function as the cached key value. For more details about spiel expressions, please refer to Official documents
- Condition: the condition of the cache object. It is not necessary. It also needs to use the SpEL expression. Only the content that meets the expression condition will be cached,
- For example: @ cacheable (key = "#p0", condition = "#p0. Length() < 3"),
- It means that the first parameter will be cached only when the length is less than 3. If this configuration is made, the AAA user above will not be cached. Readers can try it by themselves.
- unless: another cache condition parameter, which is not required and requires a SpEL expression. What is different from the condition parameter is its judgment timing,
- This condition is judged only after the function is called, so it can be judged by the result.
- keyGenerator: used to specify the key generator, not required.
- If we need to specify a custom key generator, we need to implement org springframework. cache. interceptor. Keygenerator interface and use this parameter to specify.
- Note that this parameter and key are mutually exclusive
- cacheManager: used to specify which cache manager to use. It is not required. Use only when there are multiple
- cacheResolver: used to specify which cache resolver to use, not required.
- Via org springframework. cache. interceptor. Cacheresolver interface to implement its own cache parser and specify it with this parameter.
- Value and cacheNames: two equivalent parameters (cacheNames is newly added to Spring 4 as the alias of value),
In addition to the two annotations used here, there are the following core annotations:
-
@CachePut: it is configured on the function and can be cached according to the parameter definition conditions,
- The difference between @ Cacheable and @ Cacheable is that it actually calls functions every time, so it is mainly used for data addition and modification.
- Its parameters are similar to @ Cacheable. For specific functions, please refer to the analysis of @ Cacheable parameters
-
@CacheEvict: it is configured on the function and is usually used on the deletion method to remove the corresponding data from the cache. Except with
@Cacheable
In addition to the same parameters, it also has the following two parameters:
- allEntries: not required. The default value is false. When true, all data will be removed
- beforeInvocation: not required. The default value is false. The data will be removed after the method is called. When true, the data is removed before the method is called.
entries
Britain /'entrɪs/  beautiful /ˈentriz/  Global(britain)
Concise Collins Encyclopedia
n. get into; An entry (in a dictionary)( entry (plural form of)

invocation
Britain /ˌɪnvəˈkeɪʃn/  beautiful /ˌɪnvəˈkeɪʃn/  Global(U.S.A)
Concise Oxford Webster Collins Encyclopedia
n. (Ask for help and pray from God or authority; a spell; A speech or prayer (at the beginning of a ceremony or assembly); Retrieval of documents (in another case) by the court; (computer) call, enable; Exercise of legal power
Cache configuration
What cache is used in Spring Boot?
In Spring Boot, the @ EnableCaching annotation is used to automatically configure the appropriate cache manager. Spring Boot detects cache providers according to the following order:
- Generic
- JCache (JSR-107)
- EhCache 2.x
- Hazelcast
- Infinispan
- Redis
- Guava
- Simple
In addition to sequential detection, we can also configure the property spring cache. Type to force the specification. We can check the instance of cacheManager object through debug debugging to determine what cache is currently used.
This article will not introduce all caches in detail. Let's take the commonly used EhCache as an example to see how to configure to use EhCache for cache management.
Starting ehcache in Spring Boot is very simple. You only need to add ehcache to the project XML configuration file and in POM Add ehcache dependency in XML. As long as the framework finds the file, it will create the cache manager of ehcache.
- Create: ehcache.exe in src/main/resources directory xml
<ehcache xmlns:xsi="http://www.w3.org/2001/XMLSchema-instance"
         xsi:noNamespaceSchemaLocation="ehcache.xsd">

    <cache name="users"
           maxEntriesLocalHeap="200"
           timeToLiveSeconds="600">
    </cache>

</ehcache>
- In POM Add in XML
<dependency>
    <groupId>net.sf.ehcache</groupId>
    <artifactId>ehcache</artifactId>
</dependency>
After completing the above configuration, run the unit test in the debug mode and observe that the CacheManager is already an EhCacheManager instance, indicating that the EhCache has been opened successfully.
For the configuration file of EhCache, you can also use application Use spring.com in the properties file cache. EhCache. Config attribute, for example:
spring.cache.ehcache.config=classpath:config/another-config.xml
5. Cache support (II) using Redis for centralized caching
EhCache is an in-process caching framework. When in cluster mode,
- The cache between application servers is independent, so there will be cache inconsistencies between processes of different servers.
- Even though EhCache provides a cache synchronization strategy in a cluster environment, synchronization still takes some time, and transient cache inconsistencies still exist.
In some systems and applications that require high consistency (any data change can be queried in time), EhCache can no longer be used to solve it,
- At this time, using centralized caching is a good choice. Therefore, this article will introduce how to use Redis for data caching in the caching support of Spring Boot.
preparation
-
I can also use the project of integrating mybatis
-
Spring data JPA and EhCache are introduced
-
User entity is defined, including id, name and age fields
-
Spring data JPA is used to implement the data access interface UserRepository for User objects
-
The Cache is configured with Cache related annotations
Start transformation
<dependency>
    <groupId>org.springframework.boot</groupId>
    <artifactId>spring-boot-starter-redis</artifactId>
</dependency>
- application.properties
spring.redis.host=localhost
spring.redis.port=6379
spring.redis.pool.max-idle=8
spring.redis.pool.min-idle=0
spring.redis.pool.max-active=8
spring.redis.pool.max-wait=-1
Spring Boot will detect the dependency of Redis and the configuration of Redis is available,
- Initialize the CacheManager using RedisCacheManager.
To this end, we can run our unit test step by step. We can observe that the instance of CacheManager at this time is org springframework. data. redis. cache. Rediscachemanager and obtain the following execution results:
Hibernate: insert into user (age, name) values (?, ?)
Hibernate: select user0_.id as id1_0_, user0_.age as age2_0_, user0_.name as name3_0_ from user user0_ where user0_.name=?
First query: 10
 Second query: 10
Hibernate: select user0_.id as id1_0_0_, user0_.age as age2_0_0_, user0_.name as name3_0_0_ from user user0_ where user0_.id=?
Hibernate: update user set age=?, name=? where id=?
Third query: 10
It can be observed that the select statement is executed at the first query; The second query does not execute the select statement, which indicates that the result is obtained from the cache;
In the third query, we got a wrong result. According to our test logic,
- Before the query, we have updated the age to 20, but the age we get from the cache is still 10.
Attention
Class must be serialized
User implements Serializable {}
The default key value in redis: users~keys
Must have a name: @ CacheConfig(cacheNames = "users")
6. JPA transferred to the author
xml
	<parent>
		<groupId>org.springframework.boot</groupId>
		<artifactId>spring-boot-starter-parent</artifactId>
		<version>1.3.2.RELEASE</version>
		<relativePath/>
	</parent>

<dependencies>
    	boot-starter
		<dependency>
			<groupId>org.springframework.boot</groupId>
			<artifactId>spring-boot-starter</artifactId>
		</dependency>

    	test
		<dependency>
			<groupId>org.springframework.boot</groupId>
			<artifactId>spring-boot-starter-test</artifactId>
			<scope>test</scope>
		</dependency>

    	mysql
		<dependency>
			<groupId>mysql</groupId>
			<artifactId>mysql-connector-java</artifactId>
			<version>5.1.21</version>
		</dependency>

    	jpa
		<dependency>
			<groupId>org.springframework.boot</groupId>
			<artifactId>spring-boot-starter-data-jpa</artifactId>
		</dependency>

    	cache
		<dependency>
			<groupId>org.springframework.boot</groupId>
			<artifactId>spring-boot-starter-cache</artifactId>
		</dependency>

	</dependencies>
properties
@SpringBootApplication
@EnableCaching
spring.datasource.url=jdbc:mysql://localhost:3306/test
spring.datasource.username=root
spring.datasource.password=123456
spring.datasource.driver-class-name=com.mysql.jdbc.Driver

spring.jpa.properties.hibernate.hbm2ddl.auto=create-drop
spring.jpa.properties.hibernate.show_sql=true
User and dao
@Entity
public class User {

    @Id
    @GeneratedValue
    private Long id;

    @Column(nullable = false)
    private String name;

    @Column(nullable = false)
    private Integer age;
}
@CacheConfig(cacheNames = "users")
public interface UserRepository extends JpaRepository<User, Long> {

    @Cacheable(key = "#p0", condition = "#p0.length() < 10")
    User findByName(String name);
}
Test code
@RunWith(SpringJUnit4ClassRunner.class)
@SpringApplicationConfiguration(Application.class)
public class ApplicationTests {

	@Autowired
	private UserRepository userRepository;

	@Autowired
	private CacheManager cacheManager;

	@Before
	public void before() {
		userRepository.save(new User("AAA", 10));
	}

	@Test
	public void test() throws Exception {

		User u1 = userRepository.findByName("AAA");
		System.out.println("First query:" + u1.getAge());

		User u2 = userRepository.findByName("AAA");
		System.out.println("Second query:" + u2.getAge());

		u1.setAge(20);
		userRepository.save(u1);
		User u3 = userRepository.findByName("AAA");
		System.out.println("Third query:" + u3.getAge());

	}

}
Problem thinking
Why is there no problem with the same logic in EhCache, but this problem occurs in Redis?
There is no problem with EhCache caching, mainly because EhCache is an in-process caching framework,
- The results of the first query through select are added to the EhCache cache,
- The object retrieved from EhCache in the second query is actually the same object as the object queried in the first query (you can observe u1==u2 to see whether it is the same object in the project using Chapter4-4-1),
- Therefore, when we update age, we have actually updated the cache object in EhCache.
Redis's cache is independent of our Spring application,
- After updating the data in the database, we didn't inform Redis to update the corresponding content,
- Therefore, we get the unmodified data in the cache, resulting in the inconsistency between the database and the data in the cache.
Therefore, when using the cache, we should pay attention to the cache life cycle and make good use of the notes mentioned in the previous article to update and delete the cache
Further modification
To solve the above problem, we only need to synchronize the data update operation to the cache through @ CachePut when updating the age, as follows:
@CacheConfig(cacheNames = "users")
public interface UserRepository extends JpaRepository<User, Long> {

    @Cacheable(key = "#p0")
    User findByName(String name);

    @CachePut(key = "#p0.name")
    User save(User user);

}
Flush dB in redis cli, clear the previous cache contents, and then perform unit test. The following results can be obtained:
Hibernate: insert into user (age, name) values (?, ?)
First query: 10
 Second query: 10
Hibernate: select user0_.id as id1_0_0_, user0_.age as age2_0_0_, user0_.name as name3_0_0_ from user user0_ where user0_.id=?
Hibernate: update user set age=?, name=? where id=?
Third query: 20
As you can see, our third query obtained the correct results!
- At the same time, our first query is not obtained through select query,
- Because when initializing the data and calling the save method, the data has been added to the redis cache,
- Therefore, subsequent queries are directly obtained from redis.
Pay attention to the control of cache life cycle to prevent data inconsistency.
-
key description of redis
users~keys By default, all should be saved key bar

\xAC\xED\x00\x05t\x00\x03AAA user of name Started key
7. boot 1.5 dynamic modification log
Spring Boot 1.5. A new control endpoint introduced in X: / loggers
Powerful function of dynamically modifying Spring Boot application log level
pom
parent>
	<groupId>org.springframework.boot</groupId>
	<artifactId>spring-boot-starter-parent</artifactId>
	<version>1.5.1.RELEASE</version>
	<relativePath/>
</parent>

<dependencies>
	<dependency>
		<groupId>org.springframework.boot</groupId>
		<artifactId>spring-boot-starter-actuator</artifactId>
	</dependency>
	<dependency>
		<groupId>org.springframework.boot</groupId>
		<artifactId>spring-boot-starter-web</artifactId>
	</dependency>
</dependencies>
Test class
@RestController
@SpringBootApplication
public class DemoApplication {

	private Logger logger = LoggerFactory.getLogger(getClass());

	@RequestMapping(value = "/test", method = RequestMethod.GET)
	public String testLogLevel() {
		logger.debug("Logger Level : DEBUG");
		logger.info("Logger Level : INFO");
		logger.error("Logger Level : ERROR");
		return "";
	}

}
Configure
- For the success of the subsequent test, in application Add a configuration in properties to turn off security authentication verification.
management.security.enabled=false
Otherwise, when accessing the / loggers endpoint, the following error will be reported:
{
  "timestamp": 1485873161065,
  "status": 401,
  "error": "Unauthorized",
  "message": "Full authentication is required to access this resource.",
  "path": "/loggers/com.didispace"
}
Test verification
After completing the above construction, we start the sample application and access the / test endpoint. We can see the following output in the console:
Logger Level : INFO
Logger Level : ERROR
Since the default log level is INFO, the DEBUG level content is not output. Next, we can try to adjust the log level to DEBUG through the / logger endpoint. For example, send a POST request to / loggers / com Didispace endpoint, where the Body content of the request Body is:
{
    "configuredLevel": "DEBUG"
}
Re visit the / test endpoint. We will see the following output in the console. The DEBUG log content defined in the / test endpoint is printed out:
Logger Level : DEBUG
Logger Level : INFO
Logger Level : ERROR
To view the current log level settings through the GET request, for example: Send a GET request to / loggers / com Didispace endpoint, we will GET for com Log level setting of didispace package:
{
  "configuredLevel": "DEBUG",
  "effectiveLevel": "DEBUG"
}
We can also access / loggers directly through GET request to obtain all log level settings without limiting conditions
8. RabbitMq
Using docker
Pull image
docker pull rabbitmq:3-management
Start the image (default user name and password). The default user is guest, and the password is also guest
docker run -d --hostname my-rabbit --name rabbit -p 15672:15672 -p 5672:5672 rabbitmq:3-management

docker run -d
--hostname my-rabbit
--name rabbit
-p 15672:15672
-p 5672:5672
rabbitmq:3-management
Start mirroring (set user name and password)
--name rabbit Add after
-e RABBITMQ_DEFAULT_USER=user
-e RABBITMQ_DEFAULT_PASS=password
Visit after completion: http://localhost:15672/
- If installed, use the following method
docker exec -it c5c4eaf0bfd7 /bin/bash

rabbitmqctl add_user mhlevel mhlevel  #Add a user. The last two parameters are user name and password

rabbitmqctl set_permissions -p / mhlevel ".*" ".*" ".*"  #add permission

rabbitmqctl set_user_tags mhlevel administrator #Modify user role
Message Broker and AMQP
Message Broker is an architecture mode of message verification, transmission and routing. Its design objectives are mainly applied to the following scenarios:
- The message is routed to one or more destinations
- The message is transformed into other expressions
- Perform message aggregation and message decomposition, send the results to their destinations, and then recombine and return them to the message users accordingly
- Call the Web service to retrieve the data
- Response event or error
- Use publish subscribe mode to provide content or topic based message routing
AMQP is the abbreviation of Advanced Message Queuing Protocol. It is an open standard application layer protocol for message oriented middleware. AMQP defines these characteristics:
- Message direction
- Message queue
- Message routing (including point-to-point and publish subscribe modes)
- reliability
- Security
Queuing
Britain /ˈkjuːɪŋ/  beautiful /ˈkjuːɪŋ/  Global(britain)
Encyclopedia of concise examples
n. [number]Queue up; queuing theory

queue
Britain /kjuː/  beautiful /kjuː/  Global(britain)
Concise Oxford Webster Collins Encyclopedia
n. <Britain>(A procession of people, cars, etc;<Britain>(A long queue waiting for an opportunity; a long queue; (computer) queue; Call queue;<ancient>Braid
v. <Britain>Queuing (waiting); Race to (do sth); (computer) queue up
RabbitMQ
RabbitMQ introduced in this paper is a middleware product implemented by AMQP protocol. It can support a variety of operating systems and programming languages, and can cover almost all mainstream enterprise technology platforms.
install
The following is the version description of Erlang and RabbitMQ Server we use:
- Erlang/OTP 19.1
- RabbitMQ Server 3.6.5
Windows setup
- Install Erland through the official download page http://www.erlang.org/downloads Get the exe installation package, open it directly and complete the installation.
- Install RabbitMQ through the official download page https://www.rabbitmq.com/download.html Get the exe installation package.
- After downloading, run the installer directly.
- After RabbitMQ Server is installed, it will automatically register as a service and start with the default configuration.

Mac OS X installation
Using brew tool in Mac OS X, you can easily install the server of RabbitMQ. You only need to follow the following commands:
- Update brew to the latest version and execute: brew update
- Install Erlang, execute: brew install erlang
- Install RabbitMQ Server and execute: brew install rabbitmq
Through the above command, the command of RabbitMQ Server will be installed in / usr/local/sbin and will not be automatically added to the user's environment variable, so we need to bash_profile or Add the following content to the profile file:
PATH=$PATH:/usr/local/sbin
In this way, we can start the server of RabbitMQ through the RabbitMQ server command.
Ubuntu installation
In Ubuntu, we can use APT warehouse for installation
-
Install Erlang and execute apt get install Erlang
-
Execute the following command to add APT warehouse to / etc / APT / sources list. d
echo 'deb http://www.rabbitmq.com/debian/ testing main' | sudo tee /etc/apt/sources.list.d/rabbitmq.list -
Update the package list of APT warehouse and execute sudo APT get update command
-
Install Rabbit Server and execute sudo apt get install rabbit MQ server command
Rabbit management
We can manage it directly through the access to the configuration file or through the access to the Web. Next, we will introduce how to manage through the Web.
- Execute rabbitmq plugins enable rabbitmq_ Management command, open the Web management plug-in, so that we can manage it through the browser.
> rabbitmq-plugins enable rabbitmq_management
The following plugins have been enabled:
  mochiweb
  webmachine
  rabbitmq_web_dispatch
  amqp_client
  rabbitmq_management_agent
  rabbitmq_management

Applying plugin configuration to rabbit@PC-201602152056... started 6 plugins.
- Open a browser and access: http://localhost:15672/ , and log in with the default user guest, and the password is also guest. We can see the management page as shown in the figure below:
For example: Connections, Channels, Exchanges, queues, etc.
Spring Boot integration
pom and configuration
<parent>
    <groupId>org.springframework.boot</groupId>
    <artifactId>spring-boot-starter-parent</artifactId>
    <version>1.3.7.RELEASE</version>
    <relativePath/>
</parent>
<dependencies>
    <dependency>
        <groupId>org.springframework.boot</groupId>
        <artifactId>spring-boot-starter-amqp</artifactId>
    </dependency>
    <dependency>
        <groupId>org.springframework.boot</groupId>
        <artifactId>spring-boot-starter-test</artifactId>
        <scope>test</scope>
    </dependency>
</dependencies>
spring.application.name=rabbitmq-hello

spring.rabbitmq.host=localhost
spring.rabbitmq.port=5672
spring.rabbitmq.username=spring
spring.rabbitmq.password=123456
Create consumer
Create a message producer Sender. By injecting AmqpTemplate interface
A string is generated and sent to the queue named hello.
@Component
public class Sender {

    @Autowired
    private AmqpTemplate rabbitTemplate;

    public void send() {
        String context = "hello " + new Date();
        System.out.println("Sender : " + context);
        this.rabbitTemplate.convertAndSend("hello", context);
    }

}
Create recipient
Create a message consumer Receiver. Define the class's listening to the hello queue through the @ RabbitListener annotation
@Component
@RabbitListener(queues = "hello")
public class Receiver {

    @RabbitHandler
    public void process(String hello) {
        System.out.println("Receiver : " + hello);
    }

}
- Create the configuration class RabbitConfig of RabbitMQ to configure queue, switch, route and other advanced information. Here, we focus on getting started. First, we define the minimum configuration to complete a basic production and consumption process.
Create Mq
@Configuration
public class RabbitConfig {

    @Bean
    public Queue helloQueue() {
        return new Queue("hello");
    }

}
Create unit test class
@RunWith(SpringJUnit4ClassRunner.class)
@SpringApplicationConfiguration(classes = HelloApplication.class)
public class HelloApplicationTests {

    @Autowired
    private Sender sender;

    @Test
    public void hello() throws Exception {
        sender.send();
    }

}
Start the main application class. From the console, we can see the following contents. The program creates a connection to access the springcloud in 127.0.0.1:5672
Created new connection: SimpleConnection@29836d32 [delegate=amqp://springcloud@127.0.0.1:5672/]
Through the control panel of RabbitMQ, you can see that the Connection and Channels contain the entries of the current Connection.
- Running the unit test class, we can see the following output in the console, and the message is sent to the hello queue of RabbitMQ Server.
Sender : hello Sun Sep 25 11:06:11 CST 2016
- Switching to the console of the main application class, we can see the following output. The consumer executes the listener of the hello queue and outputs the received message information.
Receiver : hello Sun Sep 25 11:06:11 CST 2016
9. JavaMailSender sends mail
Introduction and configuration
<dependency>
    <groupId>org.springframework.boot</groupId>
    <artifactId>spring-boot-starter-mail</artifactId>
</dependency>
spring.mail.host=smtp.qq.com
spring.mail.username=user name
spring.mail.password=password
spring.mail.properties.mail.smtp.auth=true
spring.mail.properties.mail.smtp.starttls.enable=true
spring.mail.properties.mail.smtp.starttls.required=true
Test instruction
@RunWith(SpringJUnit4ClassRunner.class)
@SpringApplicationConfiguration(classes = Application.class)
public class ApplicationTests {

	@Autowired
	private JavaMailSender mailSender;

	@Test
	public void sendSimpleMail() throws Exception {
		SimpleMailMessage message = new SimpleMailMessage();
		message.setFrom("dyc87112@qq.com");
		message.setTo("dyc87112@qq.com");
		message.setSubject("Subject: Simple Mail");
		message.setText("Test email content");

		mailSender.send(message);
	}

}
Advanced use
During actual use, we may also bring attachments or use the mail module. At this time, we need to use MimeMessage to set more complex email contents,
Send attachments
Add the following test cases to the above unit test (send an email with attachments through MimeMessageHelper):
@Test
public void sendAttachmentsMail() throws Exception {

	MimeMessage mimeMessage = mailSender.createMimeMessage();

	MimeMessageHelper helper = new MimeMessageHelper(mimeMessage, true);
	helper.setFrom("dyc87112@qq.com");
	helper.setTo("dyc87112@qq.com");
	helper.setSubject("Subject: with attachments");
	helper.setText("Mail with attachments");

	FileSystemResource file = new FileSystemResource(new File("weixin.jpg"));
	helper.addAttachment("enclosure-1.jpg", file);
	helper.addAttachment("enclosure-2.jpg", file);

	mailSender.send(mimeMessage);

}
Embedding static resources
In addition to sending attachments, we may want to embed static resources such as pictures in the email content to make the email get a better reading experience, rather than viewing specific pictures from the attachments. The following test case demonstrates how to embed static resources in the email body through MimeMessageHelper.
@Test
public void sendInlineMail() throws Exception {

	MimeMessage mimeMessage = mailSender.createMimeMessage();

	MimeMessageHelper helper = new MimeMessageHelper(mimeMessage, true);
	helper.setFrom("dyc87112@qq.com");
	helper.setTo("dyc87112@qq.com");
	helper.setSubject("Topic: embedding static resources");
	helper.setText("<html><body><img src=\"cid:weixin\" ></body></html>", true);

	FileSystemResource file = new FileSystemResource(new File("weixin.jpg"));
	helper.addInline("weixin", file);

	mailSender.send(mimeMessage);

}
It should be noted here that the resource name weixin in the addInline function should correspond to cid:weixin in the body
Template mail
Usually, when we use the email service, there will be some fixed scenarios, such as password reset, registration confirmation, etc. only a small part of the content sent to each user may be changed. Therefore, we often use the template engine to set templates for various emails, so we only need to replace the parameters of the changed part when sending.
It is also very easy to use the template engine to realize templated email sending in Spring Boot. Let's take velocity as an example.
Introduce the dependency of velocity module:
Under resources/templates /, create a template page template vm:
<html>
<body>
    <h3>Hello, ${username}, This is a template email!</h3>
</body>
</html>
When developing Web applications in Spring Boot, we mentioned that under the automatic configuration of Spring Boot, the template is located in the resources/templates / directory by default
Finally, we add the test case of sending template email in the unit test, as follows:
@Test
public void sendTemplateMail() throws Exception {

	MimeMessage mimeMessage = mailSender.createMimeMessage();

	MimeMessageHelper helper = new MimeMessageHelper(mimeMessage, true);
	helper.setFrom("dyc87112@qq.com");
	helper.setTo("dyc87112@qq.com");
	helper.setSubject("Subject: template mail");

	Map<String, Object> model = new HashedMap();
	model.put("username", "didi");
	String text = VelocityEngineUtils.mergeTemplateIntoString(
			velocityEngine, "template.vm", "UTF-8", model);
	helper.setText(text, true);

	mailSender.send(mimeMessage);
}
Try to run it and you can receive the content. Hello, didi, this is a template email! Mail. Here, we replace the ${username} variable in the template in the email content by passing in the username parameter.
10. Background running configuration of application
Several operation modes of Spring Boot application:
- Application main class running Spring Boot
- Use Maven's Spring Boot plug-in MVN Spring Boot: run to run
- After the jar package is printed, use Java jar to run
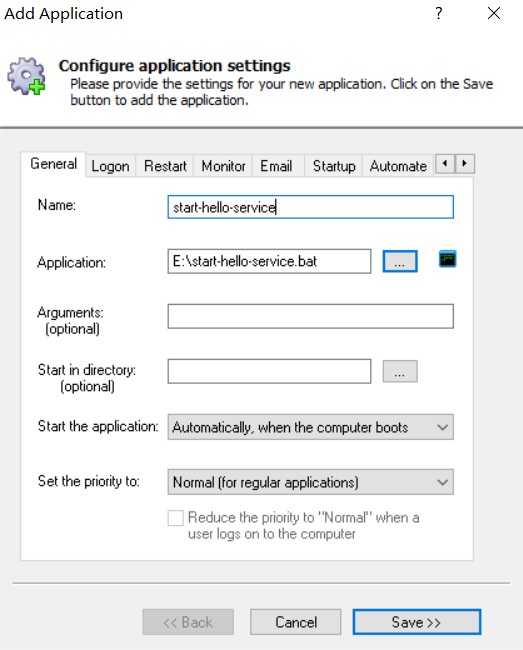
Windows is relatively simple. We can directly use this software: AlwaysUp
We just need to make the Spring Boot application into a jar package through mvn install, and then write a Java - jar yourap Jar. Then open AlwaysUp, click the first button on the toolbar, as shown in the figure below, select the bat file written above, and fill in the service name.
Linux
nohup and Shell
This method is mainly realized by using nohup command
nohup command
Purpose: run commands without hanging up.
Syntax: nohup command [Arg...] [&]
Description: the nohup Command runs the Command specified by the Command parameter and any related Arg parameter, ignoring all hangup signals. After logging off, use the nohup Command to run the program in the background.
To run the nohup command in the background, add & to the end of the command.
Therefore, we only need to use nohup Java - jar yourapp Jar & command, you can make yourap Jar is running in the background.
To facilitate management
Write some scripts to start the application through Shell
- Script to close the application: stop sh
#!/bin/bash
PID=$(ps -ef | grep yourapp.jar | grep -v grep | awk '{ print $2 }')
if [ -z "$PID" ]
then
    echo Application is already stopped
else
    echo kill $PID
    kill $PID
fi

ps -ef | grep yourapp.jar | grep -v grep
grep -v grep Very simple, in order to remove the inclusion grep To avoid affecting the correctness of the final data.

awk '{ print $2 }' Output 1213. If there are multiple lines, output multiple lines.
root        1213       1  0 22:45 ?
- Script to start the application: start sh
#!/bin/bash
nohup java -jar yourapp.jar --server.port=8888 &
- Integrated shutdown and startup scripts: run SH, because it will close the application first and then start the application, it will not cause problems such as port conflict, so it is suitable for repeated calls in the continuous integration system.
#!/bin/bash
echo stop application
source stop.sh
echo start application
source start.sh
system service
The Maven plug-in of Spring Boot also provides the function of building a complete executable program. What does it mean? That is to say, instead of using java jar, we can directly run jar to execute the program. In this way, we can easily create it as a system service and run it in the background. The main steps are as follows:
- In POM Add the plug-in of Spring Boot to XML, and pay attention to setting the executable configuration
<build>
  <plugins>
    <plugin>
      <groupId>org.springframework.boot</groupId>
      <artifactId>spring-boot-maven-plugin</artifactId>
      <configuration>
        <executable>true</executable>
      </configuration>
    </plugin>
  </plugins>
</build>
- After completing the above configuration, use mvn install to package and build an executable jar package
- Create a soft connection to / etc / init D / directory
sudo ln -s /var/yourapp/yourapp.jar /etc/init.d/yourapp

ln -s Soft link
- After the soft connection is created, we can use the following command to Jar application to control start, stop and restart operations
- failed
/etc/init.d/yourapp start | stop | restart