Jump straight to the end Get the complete source code
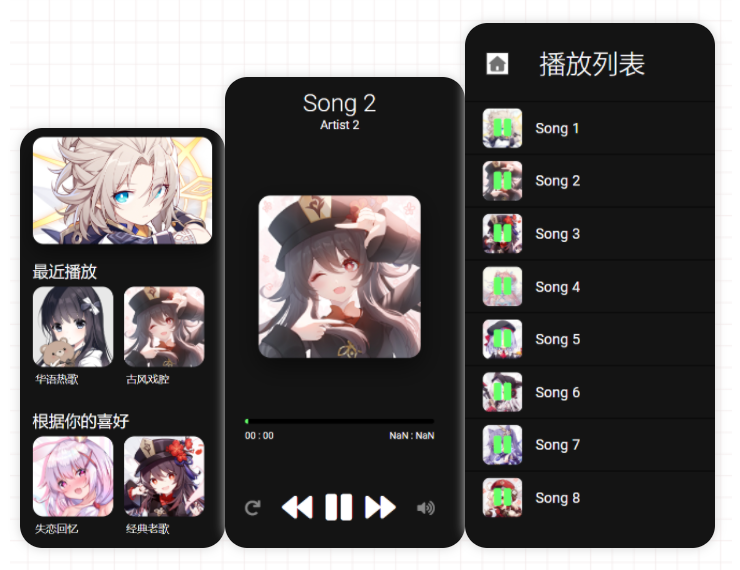
Today, I'll take you to create with HTML, CSS and JS music player , no other libraries are used. Our music player has three parts. Home screen, player section and playlist section. Our home page section has a smooth work slider and horizontal scrolling. The best part of this music player is that it minimizes the music player. Yes, you can minimize and maximize the player itself. Make this project a great music player.
Create an online music player using HTML, CSS, and JS
?? Online presentation address
?? Complete code structure
Before we start writing code. Although it is not a Nodejs application, we should at least see its folder structure.
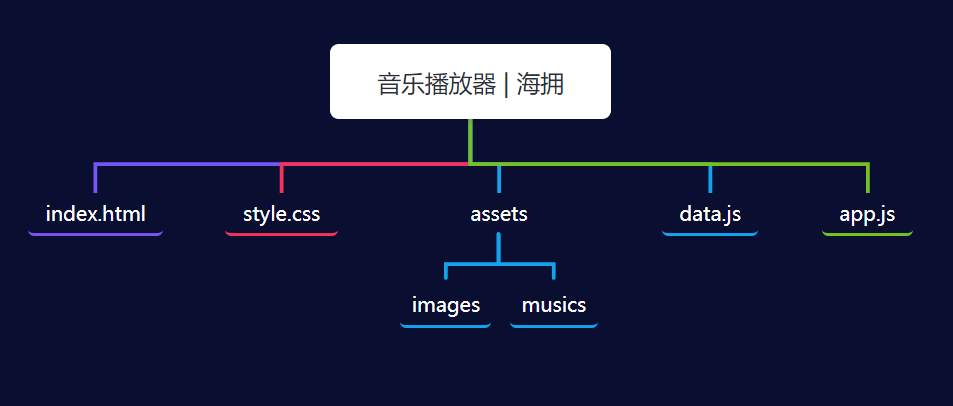
You can see that we have a data JS file, which contains our music related data. You can see it below.
let songs = [
    {
        name: 'song 1',
        path: 'assets/musics/Song 1.mp3',
        artist: 'artist 1',
        cover: 'assets/images/cover 1.png'
    },
    {
        name: 'song 2',
        path: 'assets/musics/Song 2.mp3',
        artist: 'artist 2',
        cover: 'assets/images/cover 2.png'
    },
    // The format of the remaining eight songs is the same as above
]
We store music related data here.
Now let's code the home page section.
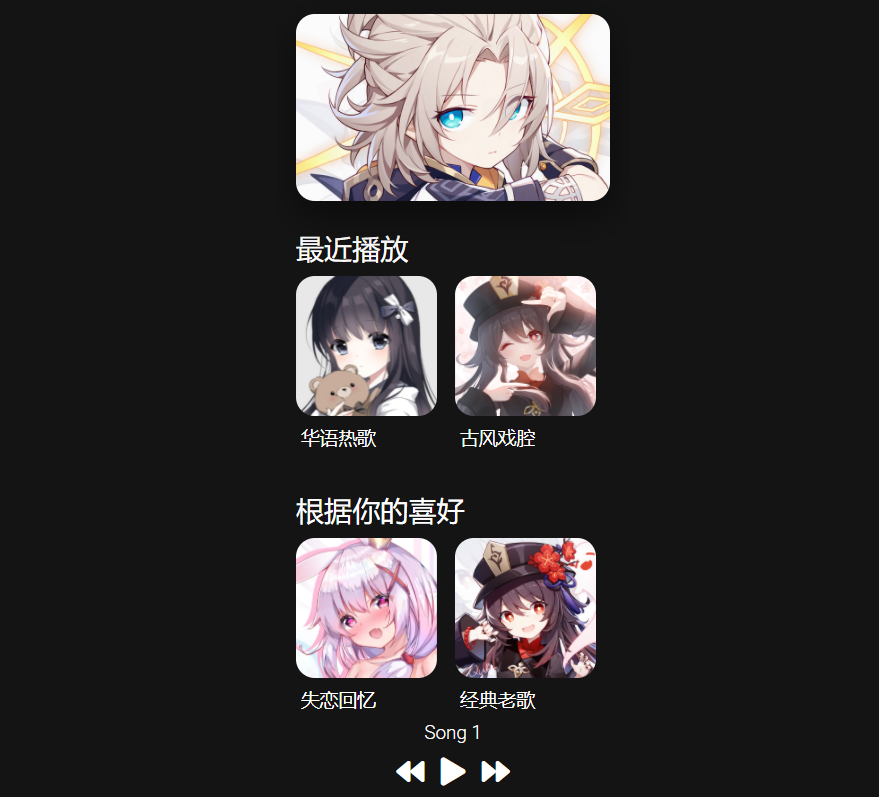
?? Home section
Open index HTML and internal start with writing the basic HTML structure. Also link style CSS and two JS files. Remember data JS in app js. Otherwise, we will not be able to access the data.
After linking all the files, let's create the first thing. Image rotation. Internal body tag code.
<section class="home-section">
    <div class="carousel">
        <img src="assets/images/cover 1.png" class="active" alt="">
        <img src="assets/images/cover 2.png" alt="">
        <img src="assets/images/cover 3.png" alt="">
        <img src="assets/images/cover 4.png" alt="">
        <img src="assets/images/cover 5.png" alt="">
    </div>
</section>
Note - wrap the carousel inside the home section element.
@import url('https://fonts.googleapis.com/css2?family=Roboto:wght@300;400;500;700;900&display=swap');

*{
    margin: 0;
    padding: 0;
    box-sizing: border-box;
}

:root{
    --background: #141414;
    --text-color: #fff;
    --primary-color: #63ff69;
    --secondary-color: #000;
    --alpha-color: rgba(0, 0, 0, 0.5);
    --shadow: 0 15px 40px var(--alpha-color);
}

html{
    background: var(--background);
    display: flex;
    justify-content: center;
}

body{
    width: 100%;
    height: 100vh;
    max-width: 375px;
    position: relative;
    background: var(--background);
    font-family: 'roboto', sans-serif;
    color: var(--text-color);
}

::-webkit-scrollbar{
    display: none;
}

.home-section{
    width: 100%;
    padding: 20px;
    height: 100%;
    padding-bottom: 100px;
    overflow-y: auto;
}

/* carousel */

.carousel{
    width: 100%;
    height: 200px;
    overflow: hidden;
    border-radius: 20px;
    box-shadow: var(--shadow);
    position: relative;
}

.carousel img{
    position: absolute;
    width: 100%;
    height: 100%;
    object-fit: cover;
    opacity: 0;
    transition: 1s;
}

.carousel img.active{
    opacity: 1;
}
You can see that we use CSS variables here, so we can easily change the theme of this music player in the future.
output
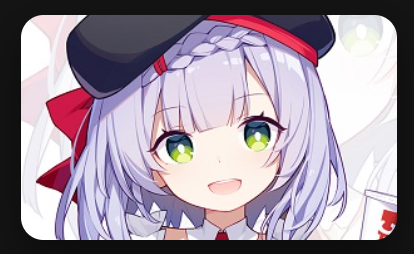
Note that this is designed for mobile view, which is why I use the chrome checker to view it by moving the size.
Now create a horizontal scrolling playlist. Put it in the home section
HTML
<h1 class="heading">Recently played</h1>
<div class="playlists-group">
	<div class="playlist-card">
		<img src="assets/images/cover 9.png" class="playlist-card-img" alt="">
		<p class="playlist-card-name">Chinese hot songs</p>
	</div>
	<div class="playlist-card">
		<img src="assets/images/cover 2.png" class="playlist-card-img" alt="">
		<p class="playlist-card-name">Ancient opera tune</p>
	</div>
	//+3
</div>
<h1 class="heading">According to your preference</h1>
<div class="playlists-group">
	<div class="playlist-card">
		<img src="assets/images/cover 12.png" class="playlist-card-img" alt="">
		<p class="playlist-card-name">Lovelorn memories</p>
	</div>
	<div class="playlist-card">
		<img src="assets/images/cover 12.png" class="playlist-card-img" alt="">
		<p class="playlist-card-name">Classic old songs</p>
	</div>
	//+3
</div>
CSS
.heading{
    margin: 30px 0 10px;
    text-transform: capitalize;
    font-weight: 400;
    font-size: 30px;
}

/* playlists card */

.playlists-group{
    position: relative;
    width: 100%;
    min-height: 200px;
    height: auto;
    display: flex;
    flex-wrap: nowrap;
    overflow-x: auto;
}

.playlist-card{
    flex: 0 0 auto;
    max-width: 150px;
    height: 100%;
    margin-right: 20px;
}

.playlist-card-img{
    width: 100%;
    height: 150px;
    object-fit: cover;
    border-radius: 20px;
}

.playlist-card-name{
    width: 100%;
    text-align: justify;
    font-size: 20px;
    text-transform: capitalize;
    padding: 5px;
}
output
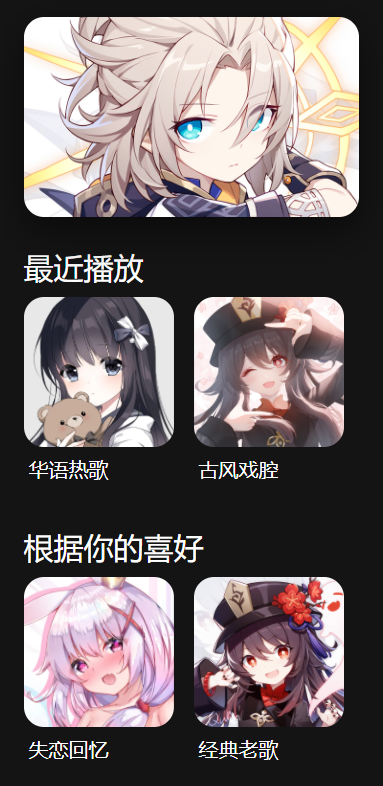
We finished the home section. But our carousel doesn't work yet, so let's use js to make it work. Open app JS file and start coding.
const carousel = [...document.querySelectorAll('.carousel img')];

let carouselImageIndex = 0;

const changeCarousel = () => {
    carousel[carouselImageIndex].classList.toggle('active');

    if(carouselImageIndex >= carousel.length - 1){
        carouselImageIndex = 0;
    } else{
        carouselImageIndex++;
    }

    carousel[carouselImageIndex].classList.toggle('active');
}

setInterval(() => {
    changeCarousel();
}, 3000);
You can see our rotation element, which switches the image active class every 3 seconds.
Now let's make our player part.
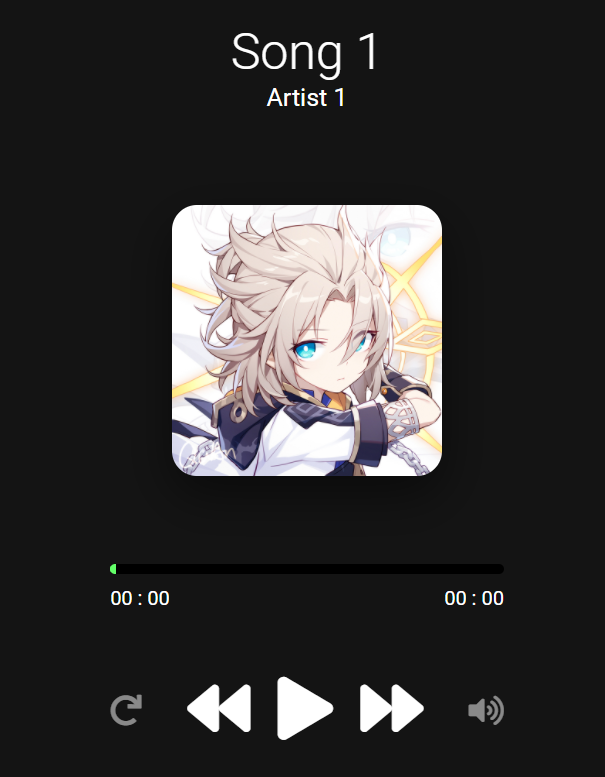
?? Player section
First, minimize the view.
<section class="music-player-section">

    <img src="assets/images/back.png" class="back-btn icon hide" alt="">
    <img src="assets/images/nav.png" class="nav-btn icon hide" alt="">

    <h1 class="current-song-name">song 1</h1>
    <p class="artist-name hide">artist 1</p>

    <img src="assets/images/cover 1.png" class="cover hide" alt="">

    <div class="seek-bar-container">
        <input type="range" class="music-seek-bar" value="0">
        <p class="current-time hide">00 : 00</p>
        <p class="duration hide">00 : 00</p>
    </div>

    <div class="controls">
        <span class="fas fa-redo"></span>
        <div class="main">
            <i class="fas fa-backward active"></i>
            <i class="fas fa-play active"></i>
            <i class="fas fa-pause"></i>
            <i class="fas fa-forward active"></i>
        </div>
        <input type="range" class="volume-slider" max="1" value="1" step="0.1">
        <span class="fas fa-volume-up"></span>
    </div>
</section>
If you see our player structure, you will notice that we have many classes of hide elements. This type of hide indicates that the element will be hidden in the minimized view. We provide the same class for all elements, so we can easily style them in CSS.
.music-player-section{
    width: 100%;
    height: 100px;
    position: fixed;
    bottom: 0;
    left: 0;
    background: var(--alpha-color);
    backdrop-filter: blur(50px);
    transition: 1s;
}

.music-seek-bar{
    -webkit-appearance: none;
    width: 100%;
    position: absolute;
    top: -4px;
    height: 8px;
    background: var(--secondary-color);
    overflow: hidden;
}

.music-seek-bar::-webkit-slider-thumb{
    -webkit-appearance: none;
    height: 10px;
    width: 5px;
    background: var(--primary-color);
    cursor: pointer;
    box-shadow: -400px 0 0 400px var(--primary-color);
}

.current-song-name{
    font-weight: 300;
    font-size: 20px;
    text-align: center;
    margin-top: 5px;
    text-transform: capitalize;
}

.controls{
    position: relative;
    width: 80%;
    margin: auto;
    display: flex;
    justify-content: center;
    align-items: center;
    height: 60px;
    font-size: 30px;
}

.controls span{
    display: none;
    opacity: 0;
    transition: 1s;
}

.music-player-section.active .controls{
    justify-content: space-between;
}

.music-player-section.active .controls span{
    font-size: 25px;
    display: block;
    opacity: 0.5;
}

.music-player-section.active .controls span.active{
    color: var(--primary-color);
    opacity: 1;
}

.controls .main i{
    margin: 0 5px;
    display: none;
}

.controls .main i.active{
    display: inline;
}
Now let's create a style that maximizes the view.
.music-player-section .hide{
    display: none;
    opacity: 0;
    transition: 1s;
}

.music-player-section.active .hide{
    display: block;
    opacity: 1;
}

.music-player-section.active{
    width: 100%;
    height: 100%;
    padding: 30px;
    display: flex;
    flex-direction: column;
}

.music-player-section.active .music-seek-bar{
    position: relative;
    display: block;
    border-radius: 50px;
    margin: auto;
}

.music-player-section.active .current-song-name{
    font-size: 40px;
}

.music-player-section.active .controls{
    width: 100%;
    font-size: 50px;
}

.artist-name{
    text-align: center;
    font-size: 20px;
    text-transform: capitalize;
}

.cover{
    width: 30vh;
    height: 30vh;
    object-fit: cover;
    margin: auto;
    border-radius: 20px;
    box-shadow: var(--shadow);
}

.current-time{
    position: absolute;
    margin-top: 5px;
    left: 30px;
}

.duration{
    position: absolute;
    margin-top: 5px;
    right: 30px;
}

.icon{
    position: absolute;
    top: 60px;
    transform: scale(1.3);
}

.back-btn{
    left: 40px;
}

.nav-btn{
    right: 40px;
}

/* volume button */

.volume-slider{
    -webkit-appearance: none;
    width: 100px;
    height: 40px;
    position: absolute;
    right: -35px;
    bottom: 80px;
    transform: rotate(-90deg);
    border-radius: 20px;
    background: var(--alpha-color);
    overflow: hidden;
    opacity: 0;
    display: none;
}

.volume-slider.active{
    opacity: 1;
    display: block;
}

.volume-slider::-webkit-slider-thumb{
    -webkit-appearance: none;
    height: 40px;
    width: 10px;
    background: var(--primary-color);
    box-shadow: -200px 0 1px 200px var(--primary-color);
}
output
And check these styles. Now add active to the class music player section like this.
<section class="music-player-section active">
...
</section>
output
We will eventually make this player work. Now remove the active from the player section class. Let's create the playlist section.
?? Playlist section playlist section
<section class="playlist active">

    <img src="assets/images/back.png" class="back-btn icon" alt="">

    <h1 class="title">playlist</h1>

    <div class="queue active">
        <div class="queue-cover">
            <img src="assets/images/cover 1.png" alt="">
            <i class="fas fa-pause"></i>
        </div>
        <p class="name">song 1</p>
    </div>
    // +7
</section>
CSS
.playlist{
    width: 100%;
    height: 100%;
    position: fixed;
    top: 0;
    right: -100%;
    padding: 30px 0;
    background: var(--background);
    z-index: 3;
    transition: 1s;
    overflow: auto;
}

.playlist.active{
    right: 0;
}

.title{
    font-weight: 300;
    font-size: 40px;
    text-align: center;
    margin-top: 15px;
    text-transform: capitalize;
    margin-bottom: 30px;
}

.queue{
    width: 100%;
    height: 80px;
    padding: 0 30px;
    display: flex;
    align-items: center;
    border-top: 2px solid var(--alpha-color);
}

.queue-cover{
    width: 60px;
    height: 60px;
    border-radius: 10px;
    overflow: hidden;
    margin-right: 20px;
    position: relative;
}

.queue-cover img{
    width: 100%;
    height: 100%;
    object-fit: cover;
}

.queue-cover i{
    position: absolute;
    top: 50%;
    left: 50%;
    transform: translate(-50%, -50%);
    font-size: 30px;
    color: var(--primary-color);
    display: none;
}

.queue.active i{
    display: block;
}

.queue .name{
    font-size: 22px;
    text-transform: capitalize;
}
output
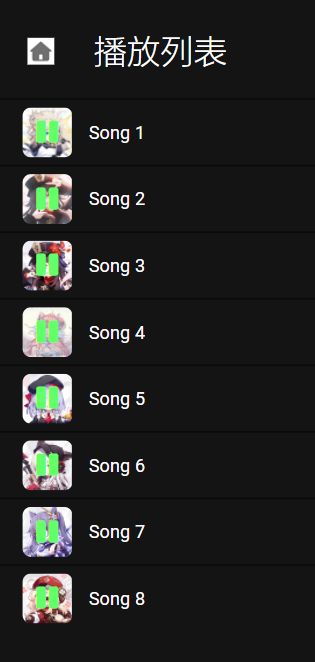
We have finished all the modeling. active also removes classes from the playlist section.
Now let's JS make this music application fully functional.
navigation section
There are three parts in our music player. Therefore, it is very important for us to set up the navigation system for this application. It allows us to easily navigate from one part to another. yes? So code this.
/Navigation

Switch music player
const musicPlayerSection = document.querySelector('.music-player-section');
let clickCount = 1;
musicPlayerSection.addEventListener('click', () => {
    if(clickCount >= 2){
        musicPlayerSection.classList.add('active');
        clickCount = 1;
        return;
    }
    clickCount++;
    setTimeout(() => {
        clickCount = 1;
    }, 250);
})

///Return from music player
const backToHomeBtn = document.querySelector('.music-player-section .back-btn');

backToHomeBtn.addEventListener('click', () => {
    musicPlayerSection.classList.remove('active');
})

///Access playlists
const playlistSection = document.querySelector('.playlist');
const navBtn = document.querySelector('.music-player-section .nav-btn');

navBtn.addEventListener('click', () => {
    playlistSection.classList.add('active');
})
// Return from playlist to music player
const backToMusicPlayer = document.querySelector('.playlist .back-btn');

backToMusicPlayer.addEventListener('click', () => {
    playlistSection.classList.remove('active');
})
//Navigation complete
This is basic JS, and I also added comments to the code. So if you have any questions about this code, please feel free to ask me in the discussion. Our navigation is complete. So let's create our music player.
?? music part
For the music player, we need an audio source in our page, but now we don't. To do this, click index Create an audio element in HTML. Create this element at the beginning of the body tag.
<audio src="" id="audio-source"></audio>
Now we have to create many functions, so let's quickly select all the elements we may need to operate on before we start.
///Music

let currentMusic = 0;

const music = document.querySelector('#audio-source');

const seekBar = document.querySelector('.music-seek-bar');
const songName = document.querySelector('.current-song-name');
const artistName = document.querySelector('.artist-name');
const coverImage = document.querySelector('.cover');
const currentMusicTime = document.querySelector('.current-time');
const musicDuration = document.querySelector('.duration');

const queue = [...document.querySelectorAll('.queue')];

// Select all buttons here

const forwardBtn = document.querySelector('i.fa-forward');
const backwardBtn = document.querySelector('i.fa-backward');
const playBtn = document.querySelector('i.fa-play');
const pauseBtn = document.querySelector('i.fa-pause');
const repeatBtn = document.querySelector('span.fa-redo');
const volumeBtn = document.querySelector('span.fa-volume-up');
const volumeSlider = document.querySelector('.volume-slider');
Now set the music source.
// Music setting function

const setMusic = (i) => {
    seekBar.value = 0;
    let song = songs[i];
    currentMusic = i;

    music.src = song.path;

    songName.innerHTML = song.name;
    artistName.innerHTML = song.artist;
    coverImage.src = song.cover;

    setTimeout(() => {
        seekBar.max = music.duration;
        musicDuration.innerHTML = formatTime(music.duration);
    }, 300);
    currentMusicTime.innerHTML = '00 : 00';
    queue.forEach(item => item.classList.remove('active'));
    queue[currentMusic].classList.add('active');
}

setMusic(0);
You can notice that in order to set the duration, we called formatTime, and now create this.
// Format duration is 00: 00 format

const formatTime = (time) => {
    let min = Math.floor(time / 60);
    if(min < 10){
        min = `0` + min;
    }

    let sec = Math.floor(time % 60);
    if(sec < 10){
        sec = `0` + sec;
    }

    return `${min} : ${sec}`;
}
Now let's add a play / pause event.
// playBtn click event

playBtn.addEventListener('click', () => {
    music.play();
    playBtn.classList.remove('active');
    pauseBtn.classList.add('active');
})

// pauseBtn click event

pauseBtn.addEventListener('click', () => {
    music.pause();
    pauseBtn.classList.remove('active');
    playBtn.classList.add('active');
})
We have finished setting up and playing / pausing the music. Now proceed to the forward / backward event.
//  Forward button

forwardBtn.addEventListener('click', () => {
    if(currentMusic >= songs.length - 1){
        currentMusic = 0;
    } else{
        currentMusic++;
    }
    setMusic(currentMusic);
    playBtn.click();
})

// back button

backwardBtn.addEventListener('click', () => {
    if(currentMusic <= 0){
        currentMusic = songs.length - 1;
    } else{
        currentMusic--;
    }
    setMusic(currentMusic);
    playBtn.click();
})
Almost done. Now create the search bar function.
// Search bar events

setInterval(() => {
    seekBar.value = music.currentTime;
    currentMusicTime.innerHTML = formatTime(music.currentTime);
    if(Math.floor(music.currentTime) == Math.floor(seekBar.max)){
        if(repeatBtn.className.includes('active')){
            setMusic(currentMusic);
            playBtn.click();
        } else{
            forwardBtn.click();
        }
    }
}, 500)

seekBar.addEventListener('change', () => {
    music.currentTime = seekBar.value;
})
After doing this. Create refresh function and volume options.
// Refresh button

repeatBtn.addEventListener('click', () => {
    repeatBtn.classList.toggle('active');
})

// Volume part

volumeBtn.addEventListener('click', () => {
    volumeBtn.classList.toggle('active');
    volumeSlider.classList.toggle('active');
})

volumeSlider.addEventListener('input', () => {
    music.volume = volumeSlider.value;
})
Our player is finished. The last thing we need to do is make our playlist work properly.
queue.forEach((item, i) => {
    item.addEventListener('click', () => {
        setMusic(i);
        playBtn.click();
    })
})
So far, we have completed all the code. Player, navigation bar, playlist, rotation chart, refresh, volume increase and decrease, etc
?? wuhu ! Take off!
I hope that through this article, you have learned how to use HTML, CSS and JS online music players. I've made more types of gadgets Using HTML, CSS and JavaScript before, and you can see these designs if you like.
Simple countdown timer using HTML, CSS, and JS
Random password generator made of HTML, CSS and JavaScript
Make a great weather Web application using HTML, CSS, JS and API s
Are you really proficient in using HTML5? How many of these 10 cool H5 features do you know?
Create responsive and filterable game + tool presentation pages using HTML, CSS and JS
11 lovely Valentine's Day confession games and animations based on HTML/CSS/JS [Valentine's Day theme essay]
I have been writing a technology blog for a long time and mainly published through CSDN. This is my Web online music player tutorial. I like to share technology and happiness through articles. You can visit my blog: https://haiyong.blog.csdn.net/ For more information. I hope you will like it!??
?? You are welcome to put forward your opinions and suggestions in the comment area!??
?? Complete source code download
If you really learn something new from this article, like it, collect it and share it with your little partner.?? Finally, don't forget or?? Support it.
Complete source code: Click here to download (may not be approved)
The free source code can be obtained through the public reply code below???