What is DHCP:
DHCP (Dynamic Host Configuration Protocol) is a LAN network protocol. It refers to a range of IP addresses controlled by the server. When the client logs in to the server, it can automatically obtain the IP address and subnet mask assigned by the server.
DHCP has three mechanisms for assigning IP addresses:
- Automatic Allocation: the DHCP server assigns a permanent IP address to the host. Once the DHCP client successfully rents the IP address from the DHCP server for the first time, it can use the address permanently.
- Dynamic Allocation: the DHCP server assigns an IP address with time limit to the host. When the time expires or the host explicitly gives up the address, the address can be used by other hosts.
- In Manual Allocation, the IP address of the client is specified by the network administrator, and the DHCP server only tells the specified IP address to the client host.
Among the three address allocation methods, only dynamic allocation can reuse addresses that are no longer needed by the client.
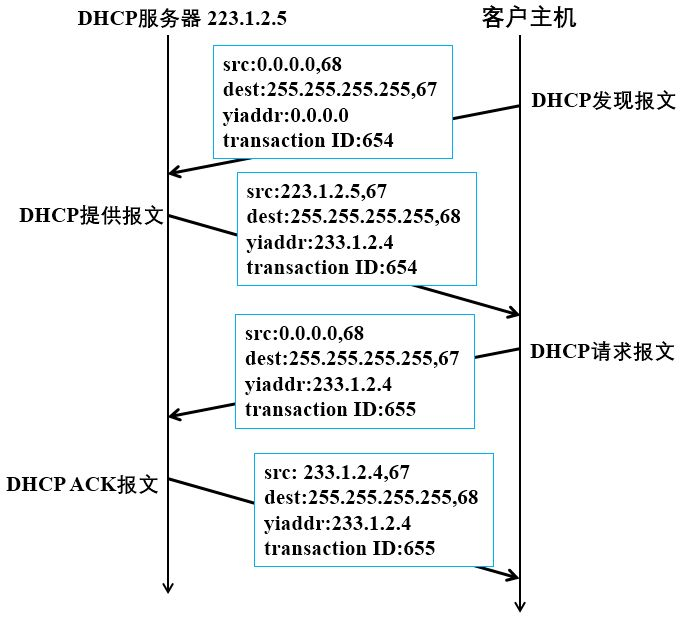
working principle:
The DHCP protocol uses UDP as the transmission protocol. The host sends a request message to port 68 of the DHCP server, and the DHCP server responds to the response message to port 67 of the host.
Experimental information:
Virtual machine operating platform: VMware ® Workstation 15 Pro
Operating system: Centos 7
Topology diagram:
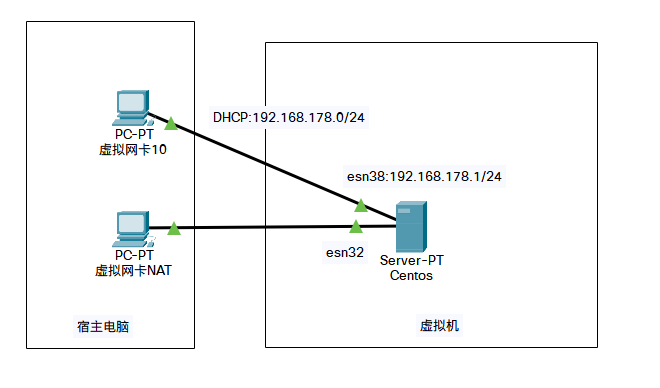
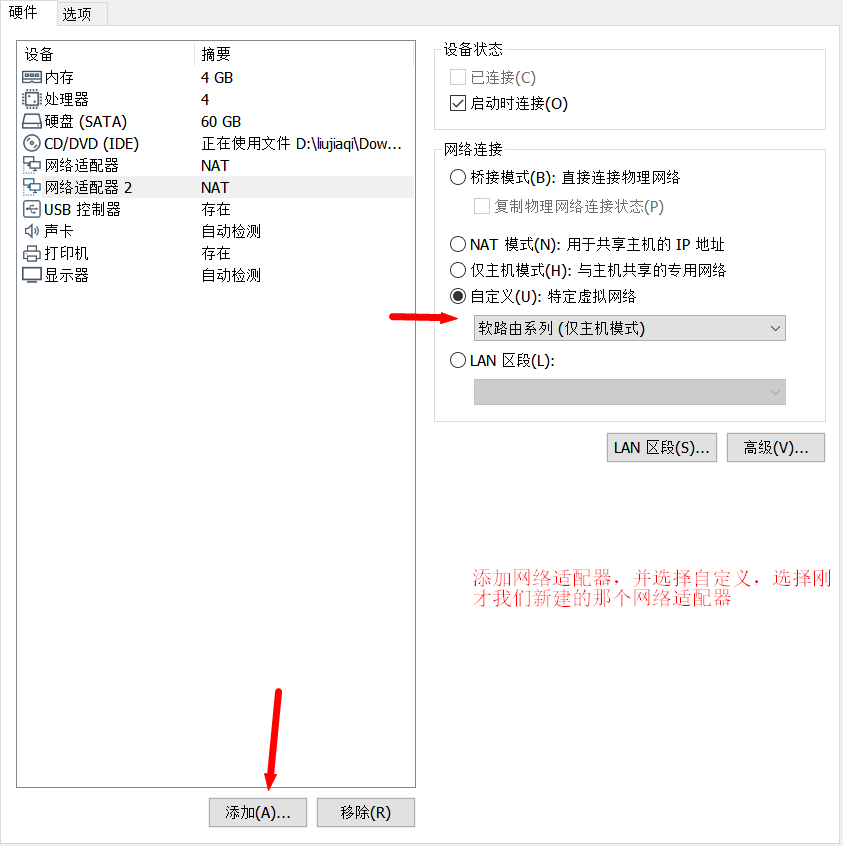
Add a network card for testing DHCP in the virtual machine
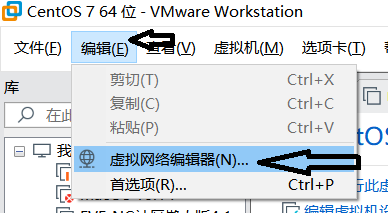
Click the "virtual network editor" option in the "Edit" menu to open the virtual machine network configurator
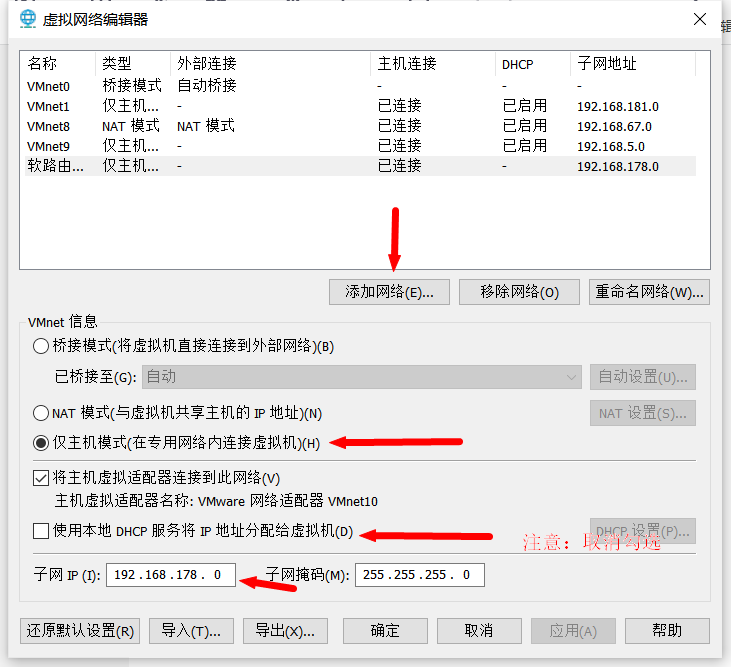
Add a network, set it to "host only mode" and set the IP to 192.168.178.0 (this IP will be used later as the network automatically assigned by DHCP) and turn off the DHCP service
Enter the virtual machine settings and add the network card
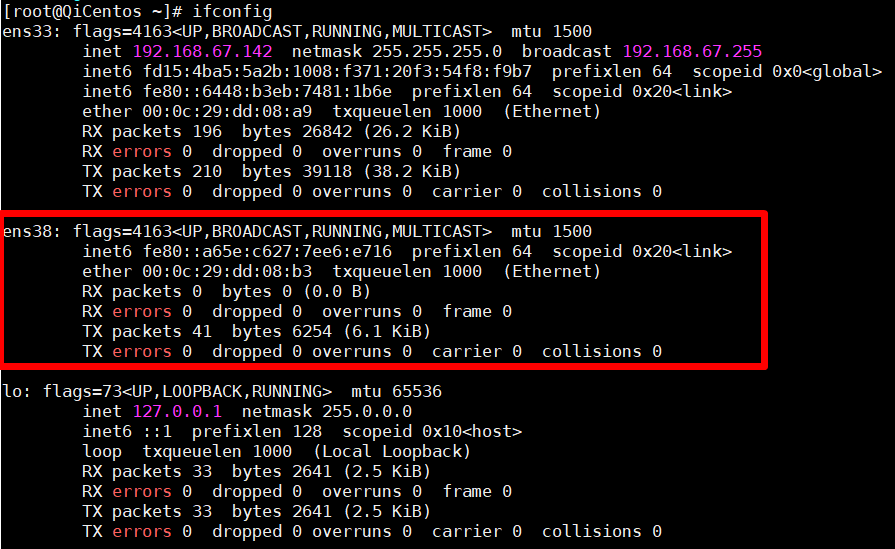
Enter the ifconfig command to see that the network card has been successfully mounted
Next, we need to configure DHCP service on this interface
Configure the IP address of the server
Before installing the DHCP service, you need to configure the server DHCP interface with static IP
CentOS7 default network card device files are stored in / etc / sysconfig / network scripts/
Under the directory, edit ifcfg-ens38 (name the interface according to the ifconfig command result). If not, please create it
TYPE=Ethernet                # Network card type: Ethernet
PROXY_METHOD=none            # Agent mode: closed
BROWSER_ONLY=no                # Browser only: no
BOOTPROTO=static                # Boot protocol of network card: static [Chinese Name: static host configuration protocol]
IPADDR=192.168.178.1         #ip address
NETMASK=255.255.255.0        #Subnet mask
GATEWAY=192.168.178.1          #Default gateway
DEFROUTE=yes                # Default route: Yes, if you don't understand, you can use Baidu keyword 'default route'`
IPV4_FAILURE_FATAL=no        # Yes, do not enable IPV4 fatal error detection: no
IPV6INIT=yes                # Whether IPV6 is automatically initialized: Yes [no impact, IPV6 is not used yet]
IPV6_AUTOCONF=yes            # Whether IPV6 is automatically configured: Yes [no impact, IPV6 is not used yet]
IPV6_DEFROUTE=yes            # Whether IPV6 can be the default route: Yes [no impact, IPV6 has not been used yet]
IPV6_FAILURE_FATAL=no        # Yes do not enable IPV6 fatal error detection: no
IPV6_ADDR_GEN_MODE=stable-privacy            # IPV6 address generation model: stable privacy
NAME=ens38                    # Network card physical device name
UUID=f47bde51-fa78-4f79-b68f-d5dd90cfc698    # Universal unique identification code, each network card will have, can not be repeated, no, two linux only one network card is available
DEVICE=ens38                    # The NAME of the network card device must be the same as the 'NAME' value
ONBOOT=yes                        # Whether to start the network card. If you want to start the network card or control the network card through 'systemctl restart network', you must set it to 'yes'`
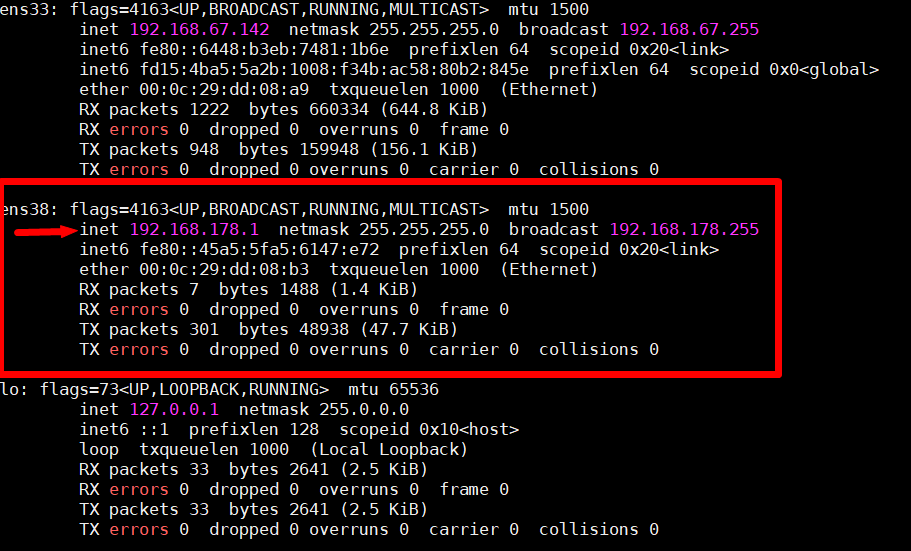
Execute after configuration
systemctl restart network
ifconfig
At this time, you can see that the ens38 interface pin is configured with IP
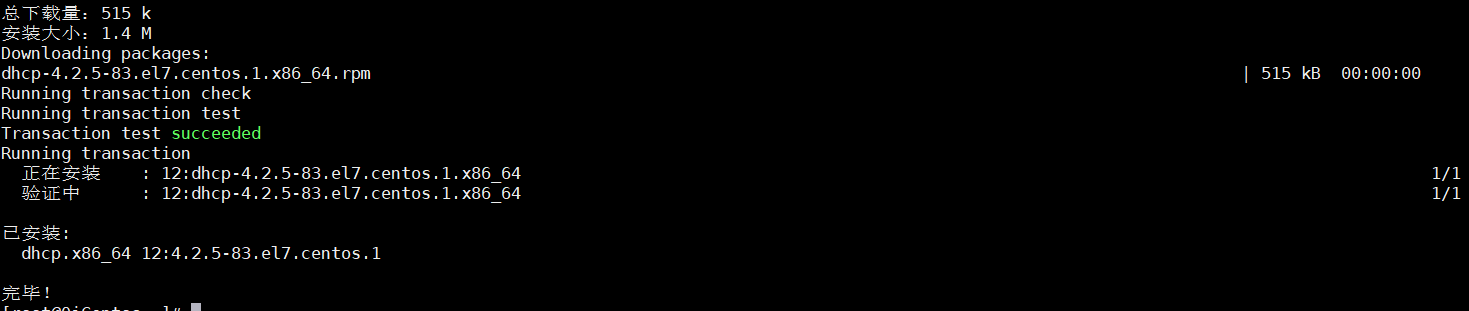
Install DHCP service
yum install -y dhcp
Modify profile
Configure / etc / DHCP / DHCP PD Conf file
Add the following configuration. Note: please set up an existing DNS server. Because I have built a DNS system on this server, I set the DNS server as the address of this server
##Network segment and mask
subnet 192.168.178.0 netmask 255.255.255.0 {
  ##Address range
  range 192.168.178.100 192.168.178.200;
  ## dns server address
  option domain-name-servers 192.168.178.1;
  ##gateway
  option routers 192.168.178.1;
  ##Broadcast address
  option broadcast-address 192.168.178.255;
  ## lease time
  default-lease-time 300;
  ## Maximum lease time
  max-lease-time 7200;
}
Run DHCP service and set automatic startup after startup
systemctl enable dhcpd
systemctl start dhcpd
systemctl status dhcpd

iptables UDP 67 interface
iptables -I INPUT -p tcp --dport 67 -j ACCEPT
service iptables save
Verification results
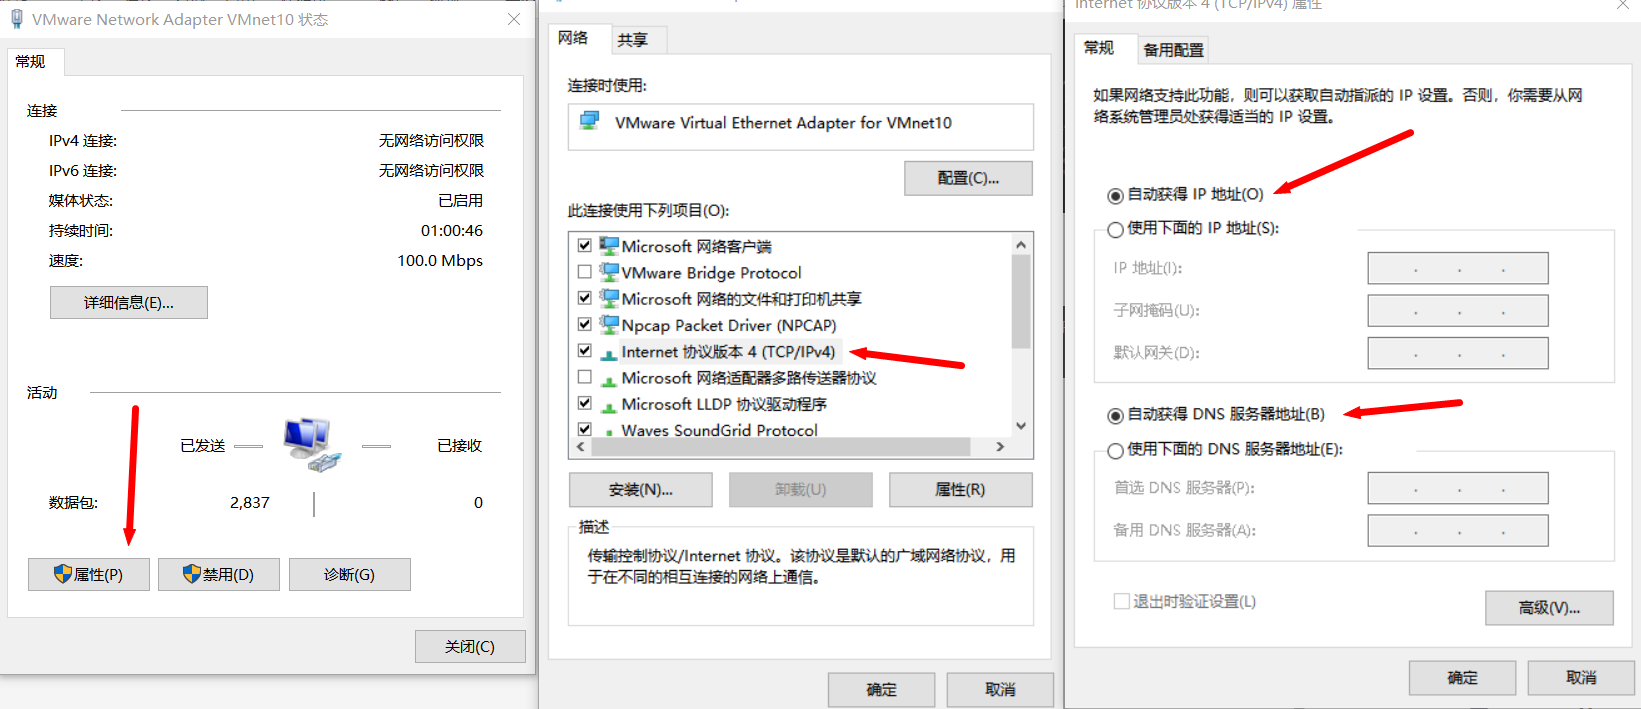
Configure the corresponding network card in the host to DHCP mode
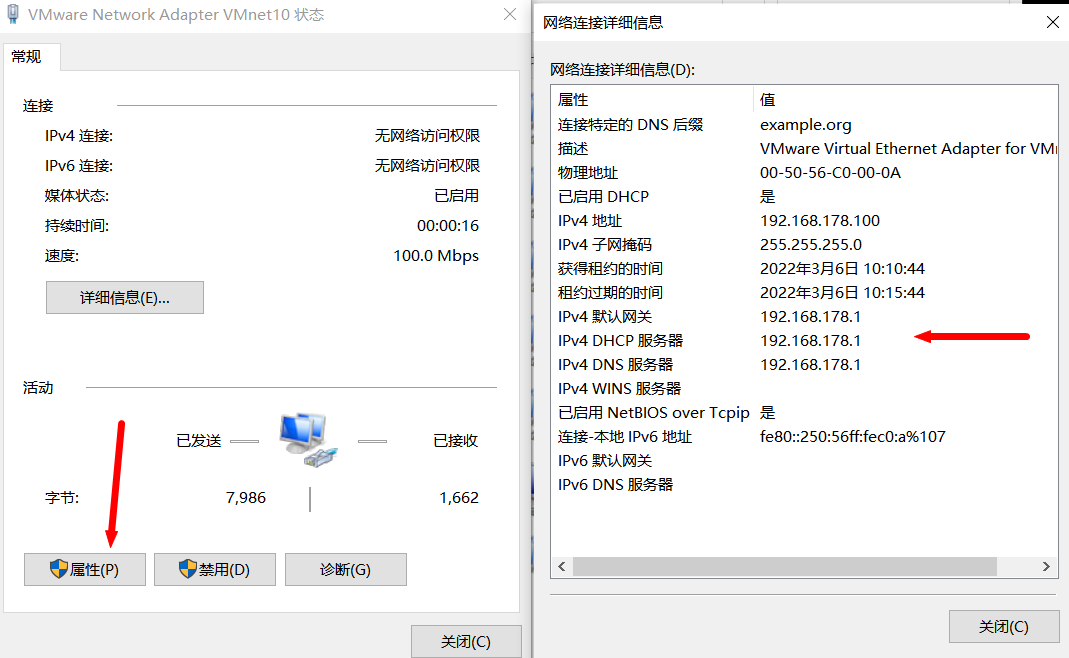
After saving, check the network card information. You can see that the IP address has been successfully pulled
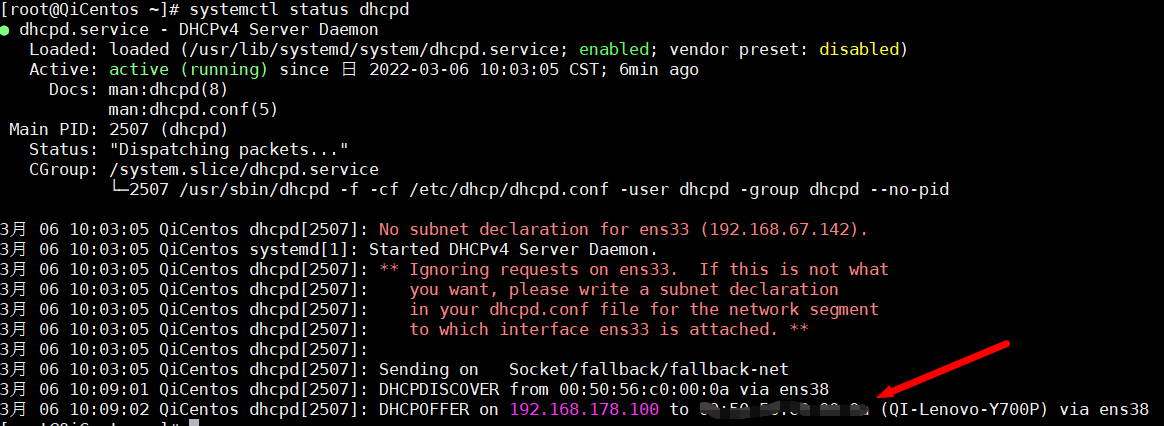
At this point, you can see in the service status that an IP address has been assigned to my host
Remember that the host may not be able to connect to the network after the experiment is completed, otherwise the host may not be able to connect to the network!

Reference documents
Detailed explanation of dhcp service deployment, management and configuration of CentOS 7
Centos7 static ip settings (valid for personal testing)
Setting up DHCP server in CentOS7