Tip: all notes in this series exist in Github , you can directly Github View all notes
Configure interface proxy
In the case of front-end and back-end separation, the most common way for the front-end to request the back-end interface is to use the reverse proxy. The reverse proxy will make the browser think that it is a homologous path, which realizes the cross domain operation.
At present, the popular front-end packers, webpack and vite, have the configuration of reverse proxy in the development mode.
For Nginx server, reverse proxy is also one of the most important functions. The previous gateway implementation method is to use reverse proxy. This article mainly focuses on configuring the interface agent and configuring the Nginx interface agent through the image parameters
Dev test
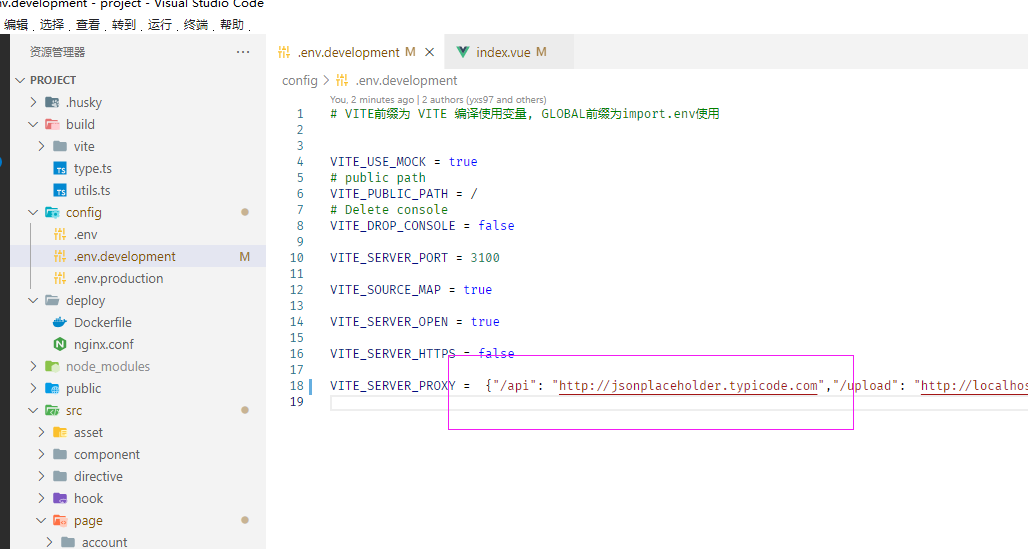
In the currently used web template project, the API proxy and access interface request for the development environment have been set. Just set the configuration address.
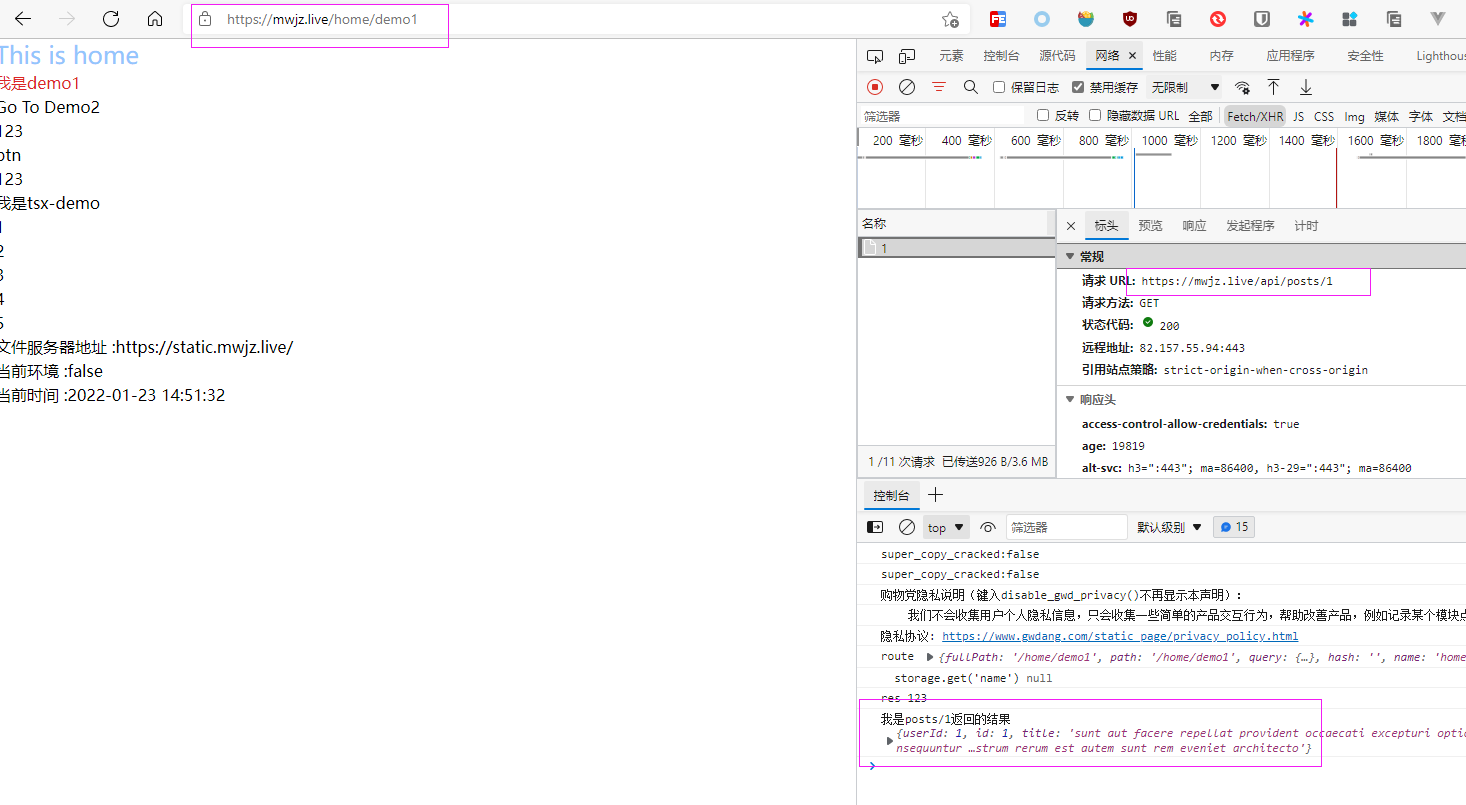
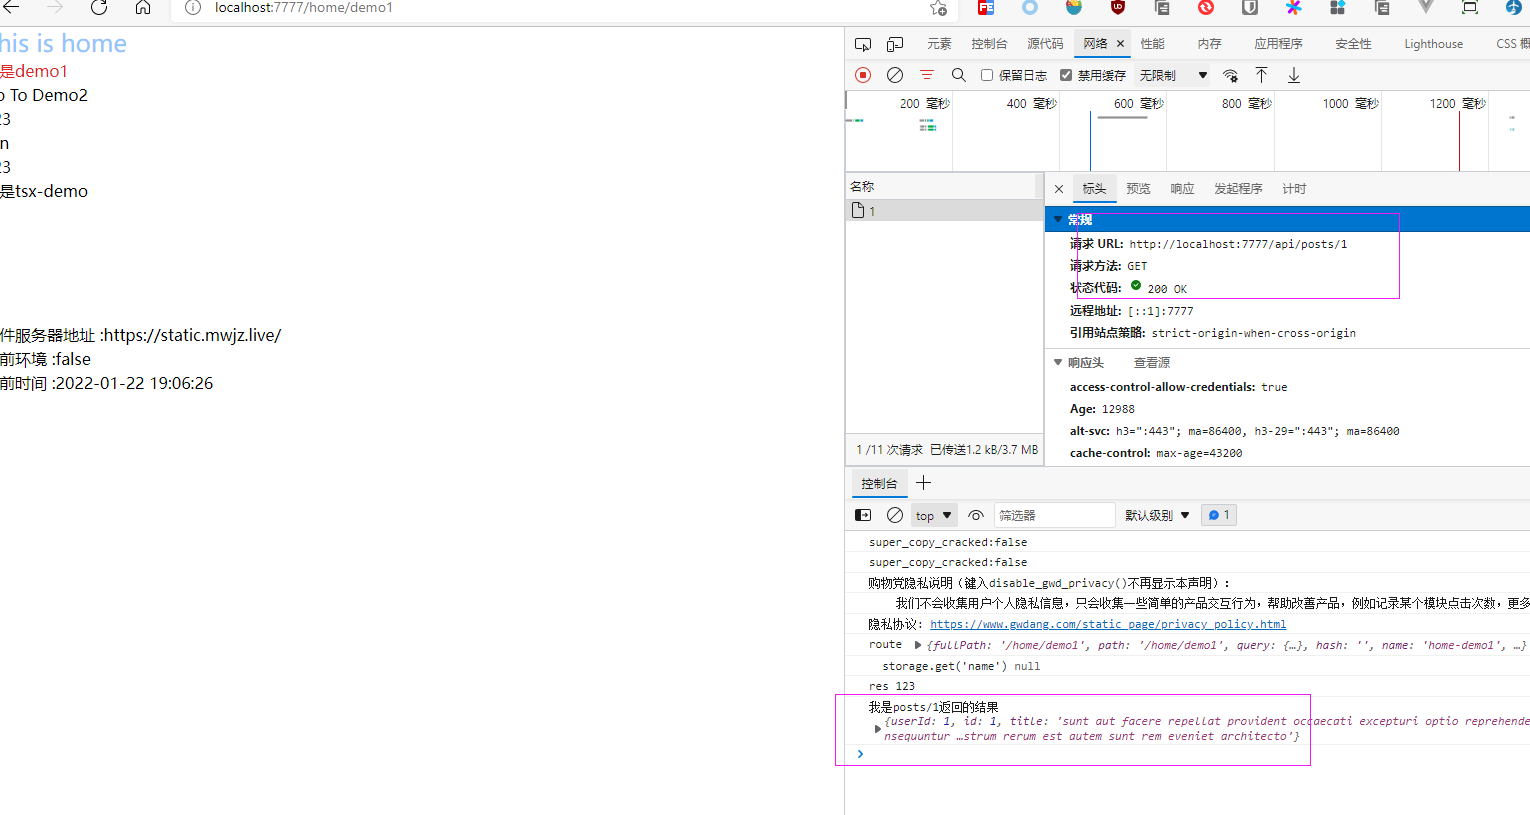
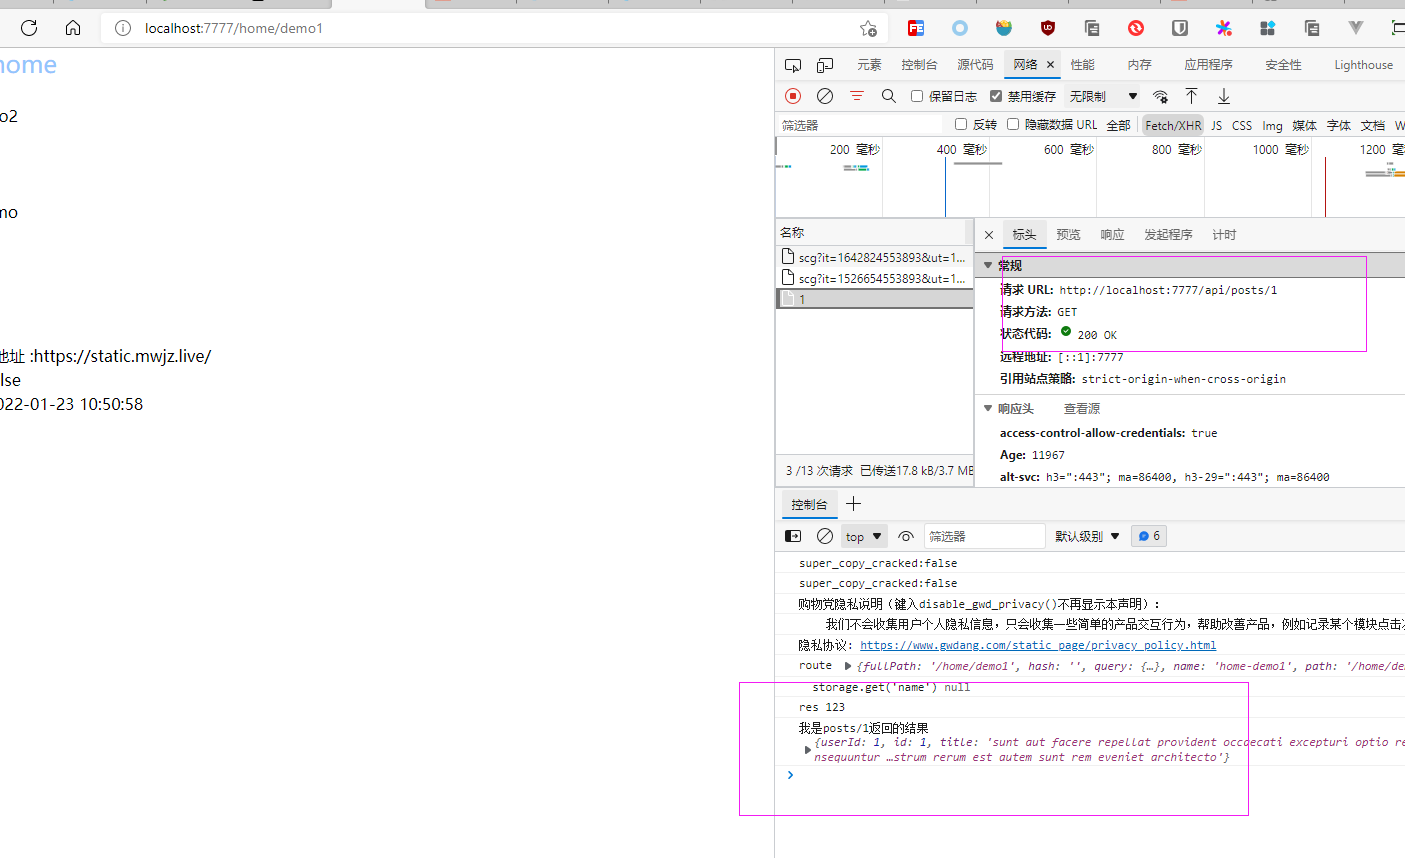
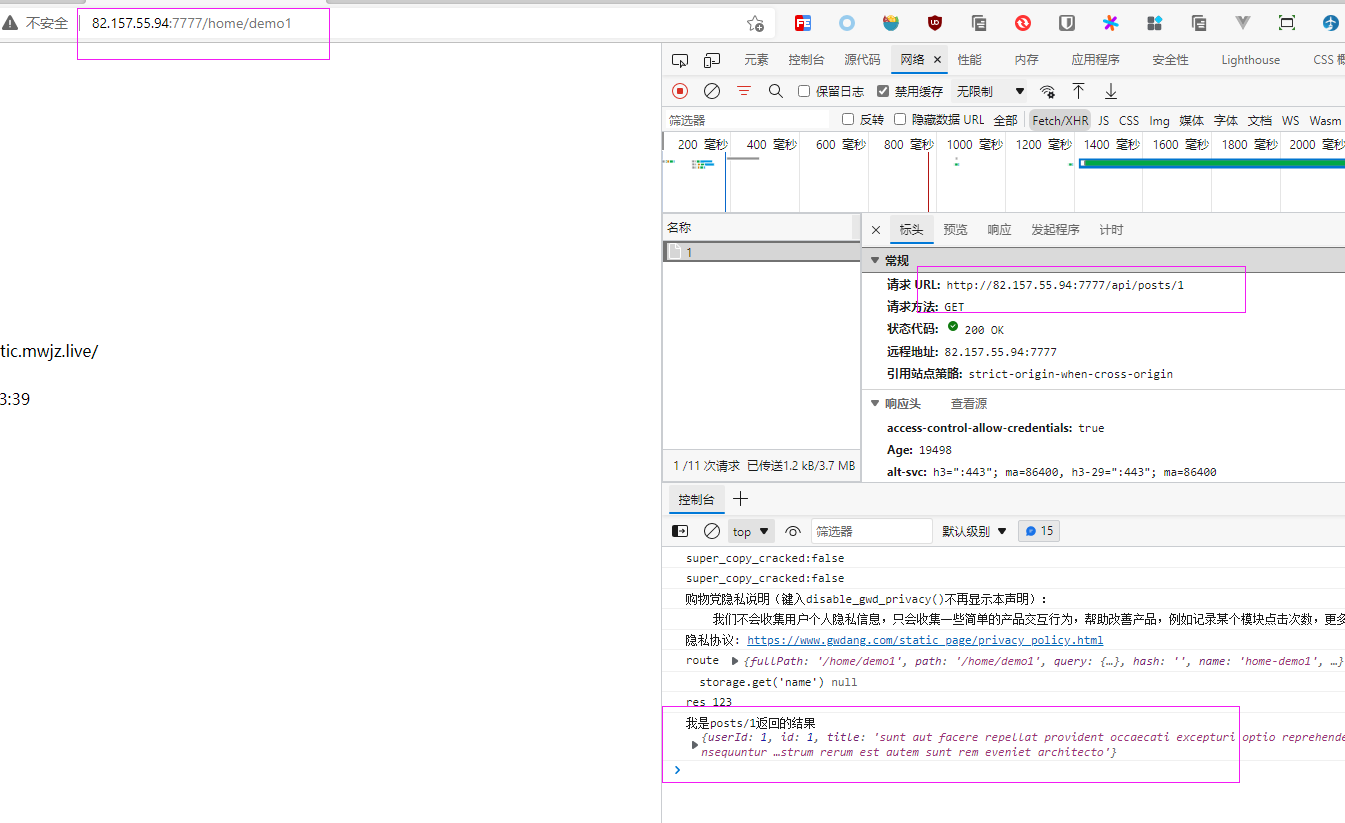
The interface is found on the Internet. The interface address is: http://jsonplaceholder.typicode.com/posts/1
- .env. Configure the proxy domain name and address in the development file
- Request using Http module
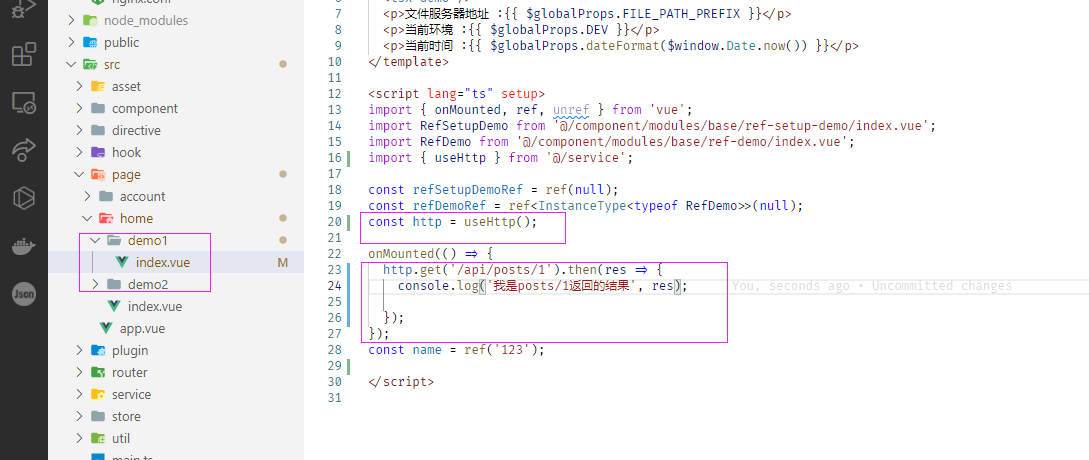
After configuration, run npm run dev to see the request result.

Nginx proxy interface
Using agents in Nginx is also extremely simple. You only need to configure location
events {
    worker_connections 1024;
}

http {
    include mime.types;
    default_type text/html;
    sendfile on;
    keepalive_timeout 65;
    charset utf-8;
    error_log /var/log/nginx/error.log;
    access_log /var/log/nginx/access.log;
    server {
        listen 80;

        location / {
            root /usr/share/nginx/html;
            index index.html index.htm;
            try_files $uri $uri/ /index.html;
        }

        location ~* /api/(.*) {
            resolver 8.8.8.8;
            proxy_set_header Host $proxy_host;
            proxy_set_header X-Real-IP $remote_addr;
            proxy_set_header X-Forwarded-For $proxy_add_x_forwarded_for;
            proxy_set_header X-NginX-Proxy true;
            proxy_pass http://jsonplaceholder.typicode.com/$1$is_args$args;
        }
    }
}
The second location is to configure the API interface proxy.
location is configured to listen for request routes starting with / api. Forward the request route starting with / api to proxy_pass property value
Regular matching and proxy are used to monitor routing_ $1 in the pass attribute value is a match in the location listening route (. *).
be careful:
- When using a domain name as a reverse proxy address, you need to add resolver resolution. https://developer.aliyun.com/article/486252
- When using domain name access, the Host request header needs to be changed, otherwise 403 will be reported. https://blog.csdn.net/liyyzz33/article/details/95340765
After adding successfully, you can repackage the image and then deploy the test locally. Under normal conditions, it can be accessed normally as shown in the figure below.
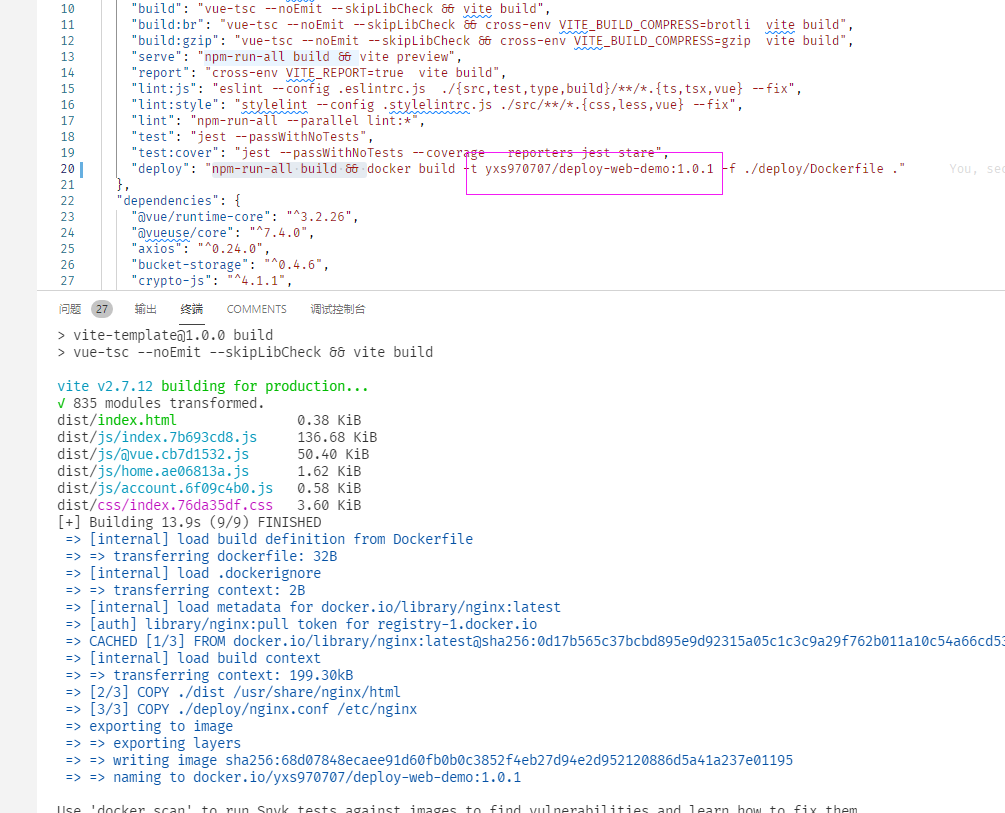
The image version is changed to 1.0.1
Proxy address parameterization
Next, complete an operation: change the API proxy address to the startup container parameterized configuration.
Parameterization can separate the API proxy address from the image as a variable. It has better scalability.
Parameterization of proxy address
The operation of proxy address parameterization can be divided into two steps
Using Nginx variables
The first step is to add proxy in Nginx_ The pass attribute value is variable. Variables are supported in the Nginx configuration, and the variable definition starts with $.
Nginx itself has many variables, such as $host. Nginx also supports custom variables. You can use set to define variables and use variables to set attribute values.
proxy_ The value of the pass property can be set to $server using a variable_ URL.
    location ~* /api/(.*) {
            resolver 8.8.8.8;
            proxy_set_header Host $proxy_host;
            proxy_set_header X-Real-IP $remote_addr;
            proxy_set_header X-Forwarded-For $proxy_add_x_forwarded_for;
            proxy_set_header X-NginX-Proxy true;
            proxy_pass $SERVER_URL/$1$is_args$args;
        }
$SERVER_ How is the URL variable defined?
Nginx supports defining variables in configuration files and in a file, nginx Conf uses include to introduce files that define variables.
A file (/ etc/nginx/conf.d/*.variable) can be referenced in the configuration file, and then variables can be defined in this file.
    server {
        listen 80;
        include /etc/nginx/conf.d/*.variable;

        location / {
            root /usr/share/nginx/html;
            index index.html index.htm;
            try_files $uri $uri/ /index.html;
        }

        location ~* /api/(.*) {
            resolver 8.8.8.8;
            proxy_set_header Host $proxy_host;
            proxy_set_header X-Real-IP $remote_addr;
            proxy_set_header X-Forwarded-For $proxy_add_x_forwarded_for;
            proxy_set_header X-NginX-Proxy true;
            proxy_pass $SERVER_URL/$1$is_args$args;
        }
    }
Define Nginx variables
The second step is to define and create / etc / nginx / conf.d / * Variable file logic This logic needs to be defined in Dockerfile. It can be written directly in Dockerfile.
Here I define one sh file, which is defined and executed in Dockerfile sh file.
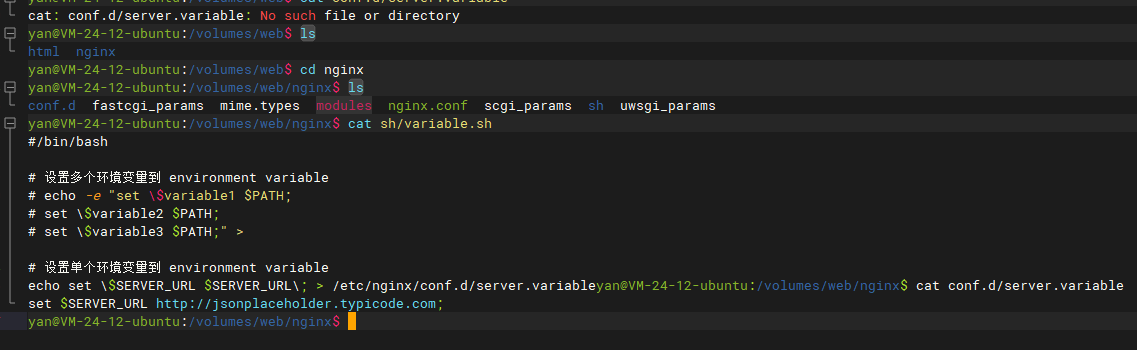
#/bin/bash

# Set multiple environment variables to environment variable
# echo -e "set \$variable1 $PATH;
# set \$variable2 $PATH;
# set \$variable3 $PATH;" >

# Set a single environment variable to environment variable
echo set \$SERVER_URL $SERVER_URL\; > /etc/nginx/conf.d/server.variable
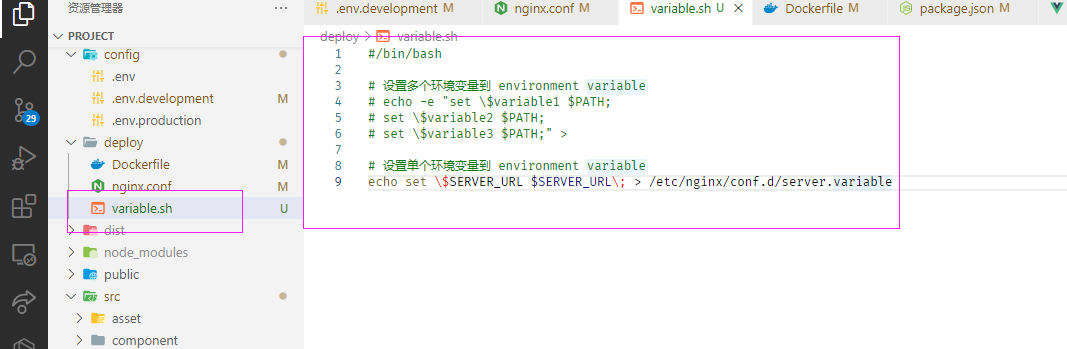
Create a variable in the deploy directory SH file, in which the creation variable file is written
The echo command writes the setting variable to / etc / nginx / conf.d/server Variable file.
First server_ The URL is the name of the Nginx variable and the second SERVER_URL is the value of Nginx variable, which is a variable provided by Docker.
This sh execution configuration is written in Dockerfile
FROM nginx:latest

COPY ./dist /usr/share/nginx/html

COPY ./deploy/nginx.conf /etc/nginx

# Create a directory to store sh files
RUN mkdir /etc/nginx/sh

# copy the sh file into the image file
COPY ./deploy/variable.sh /etc/nginx/sh


# Set initial value of environment variable
ENV SERVER_URL=http://jsonplaceholder.typicode.com

# Set variable SH execution permission
RUN chmod a+x /etc/nginx/sh/variable.sh

# Execute sh file
RUN ["sh", "/etc/nginx/sh/variable.sh"]

# Container application port
EXPOSE 80
Added in Dockerfile file
- Created the storage sh directory.
- Set varibale Copy the SH file to the image
- Use the ENV command to provide a default value for an environment variable
- Set sh execution permission
- RUN command execution sh file
The new command is to write the sh file to the image for execution. And set the initial value of the environment variable.
Proxy address parameterized deployment
Test deployment
At this time, you can build an image for local testing, and directly post the test results here.
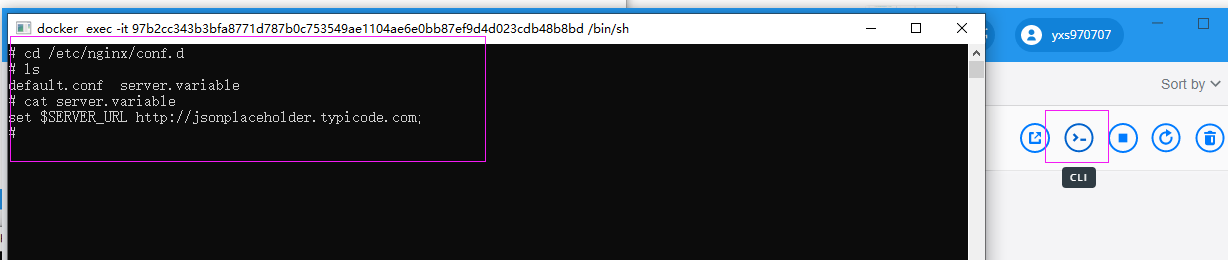
Go inside the container and check / etc / nginx / conf.d/server Variable file has been written successfully.
When the container is started, the default value is - e, which is not set when the container is started. You can specify environment variables when you start the container. Interested friends can change the default value to other values for testing.
docker run --name web -p 7777:80 -itd -e SERVER_URL=http://jsonplaceholder.typicode.com yxs970707/deploy-web-demo:1.0.1
Server deployment
After the test is successful, push the image to the Docker Hub for redeployment
Note: clean the original container and Volume before redeployment to keep them clean
version: '3.9'

volumes:
  web-html:
    name: web-html
    driver: local
    driver_opts:
      o: bind
      type: none
      device: /volumes/web/html
  web-nginx:
    name: web-nginx
    driver: local
    driver_opts:
      o: bind
      type: none
      device: /volumes/web/nginx

services:
  nginx:
    image: yxs970707/deploy-web-demo:1.0.1
    container_name: web
    restart: always
    ports:
      - 7777:80
    volumes:
      - web-html:/usr/share/nginx/html
      - web-nginx:/etc/nginx
    environment:
      SERVER_URL: http://jsonplaceholder.typicode.com
The above is the new YMAL configuration file, A new Volume is added to the configuration file to expose the / etc/ninx directory file in the container.
When server is configured_ URL environment variable.
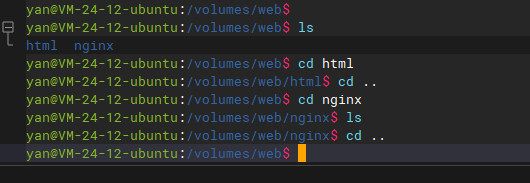
PS: you need to create / volumes/web/nginx and / volumes/web/html directories
Use this file to start and access it after successful startup.
Because Volume is used to mount / etc/nginx, it can be viewed in the host directory sh and variable file
Set gateway
After deploying the web project, set the gateway of this service.
The current service is to be deployed to the primary domain name.
First step
Apply for and upload the server SSL certificate, and create the / volumes/gateway/logs/web directory

Step two
Configure the web project in the gateway (Nginx) file and proxy to port 7777.
events {
    worker_connections 1024;
}

http {
    include mime.types;
    default_type text/html;
    sendfile on;
    keepalive_timeout 65;
    charset utf-8;

    # Turn on compression
    gzip on;
    # File compression type
    gzip_types text/plain text/css application/javascript application/json application/xml;
    #Set compression ratio
    gzip_comp_level 5;

    server {
        #The SSL access port number is 443
        listen 443 ssl http2;
        #Fill in the domain name of the binding certificate
        server_name mwjz.live;
        #journal
        error_log /var/log/nginx/web/error.log;
        access_log /var/log/nginx/web/access.log;
        #Certificate file
        ssl_certificate /etc/nginx/conf.d/ssl/mwjz/mwjz.live_bundle.crt;
        #Certificate key file
        ssl_certificate_key /etc/nginx/conf.d/ssl/mwjz/mwjz.live.key;

        ssl_ciphers SHA256:ECDHE:ECDH:AES:HIGH:!NULL:!3DES:!aNULL:!MD5:!ADH:!RC4;
        ssl_protocols TLSv1 TLSv1.1 TLSv1.2;
        ssl_prefer_server_ciphers on;
        location / {
            proxy_pass http://10.0.24.12:7777;
        }
    }

    server {
        #The SSL access port number is 443
        listen 443 ssl http2;
        #Fill in the domain name of the binding certificate
        server_name portainer.mwjz.live;
        #journal
        error_log /var/log/nginx/portainer/error.log;
        access_log /var/log/nginx/portainer/access.log;
        #Certificate file
        ssl_certificate /etc/nginx/conf.d/ssl/portainer/portainer.mwjz.live_bundle.crt;
        #Certificate key file
        ssl_certificate_key /etc/nginx/conf.d/ssl/portainer/portainer.mwjz.live.key;

        ssl_ciphers SHA256:ECDHE:ECDH:AES:HIGH:!NULL:!3DES:!aNULL:!MD5:!ADH:!RC4;
        ssl_protocols TLSv1 TLSv1.1 TLSv1.2;
        ssl_prefer_server_ciphers on;
        location / {
            proxy_pass http://10.0.24.12:9000;
        }
    }
    server {
        listen 80;
        return 307 https://$host$request_uri;
    }
}
Step 3
Upload the configuration file and reload the configuration file
docker exec -it gateway nginx -s reload
After reloading the gateway (Nginx) configuration, you can use the domain name to access.