Tip: all notes in this series exist in Github , you can directly Github View all notes
Aiming at the problem of private image warehouse, Docker officially provides the image service of building warehouse service: registry , private warehouses can be deployed using this image.
However, the service provided by the official is particularly lightweight, and even there is no UI management page, which brings high management and maintenance costs.
To solve this problem, there are many open source communities registry Projects that provide UI management are also based on registry , secondary development project
The representative project of secondary development based on registry is Harbor It is also one of the common solutions in enterprise level
Harbor
Harbor overview
Harbor project is based on registry In addition, it provides the functions required by enterprise users such as management UI, role-based access control, AD/LDAP integration and audit logging. At the same time, it supports Chinese.
It can be said that Harbor provides a complete management system to make up for the deficiency of registry.
Harbor is also relatively small in terms of resource occupation.
Harbor deployment
Harbor Download
Harbor is Github Two deployment methods are provided in
- Offline installation
- Online installation
Both deployment methods are based on Docker Compose. The difference is that the offline installation package includes the image used for deployment.
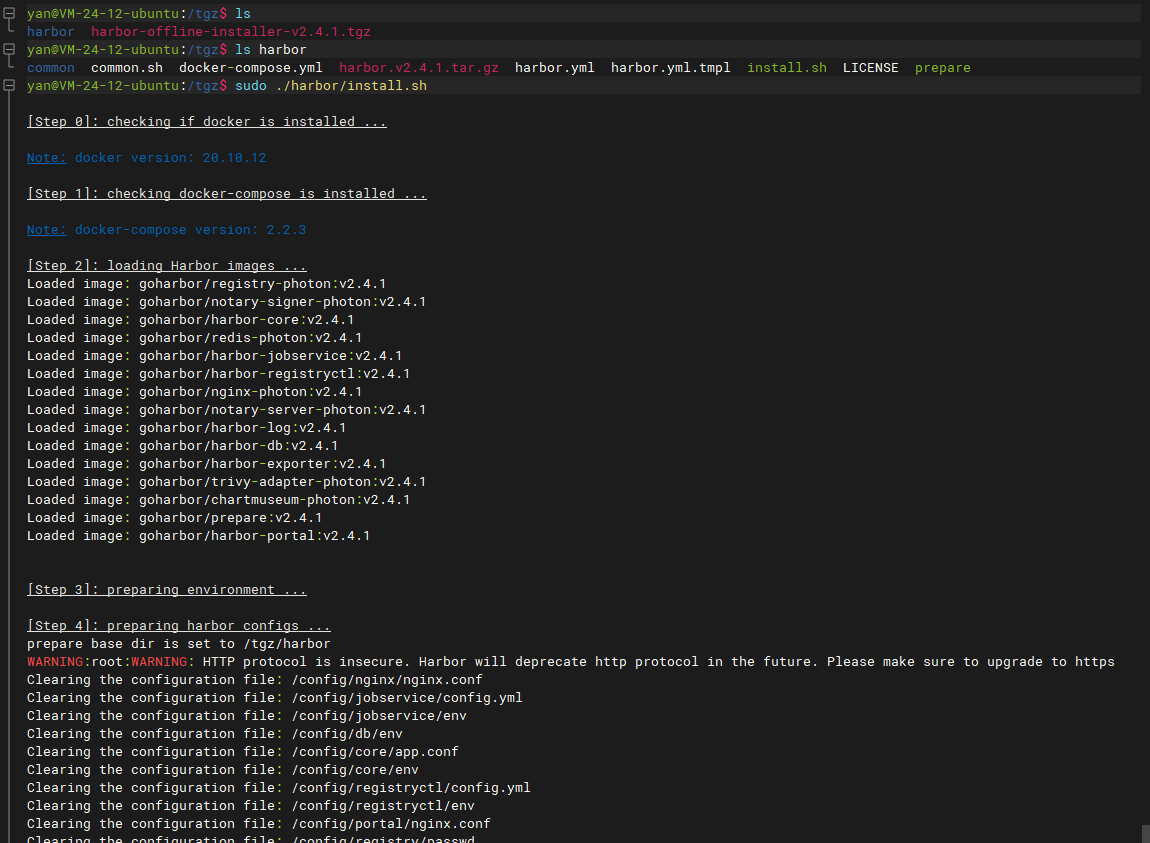
It is recommended to download the offline version locally and upload it to the server for decompression and deployment.
sudo tar xf /tgz/harbor-offline-installer-v2.4.1.tgz
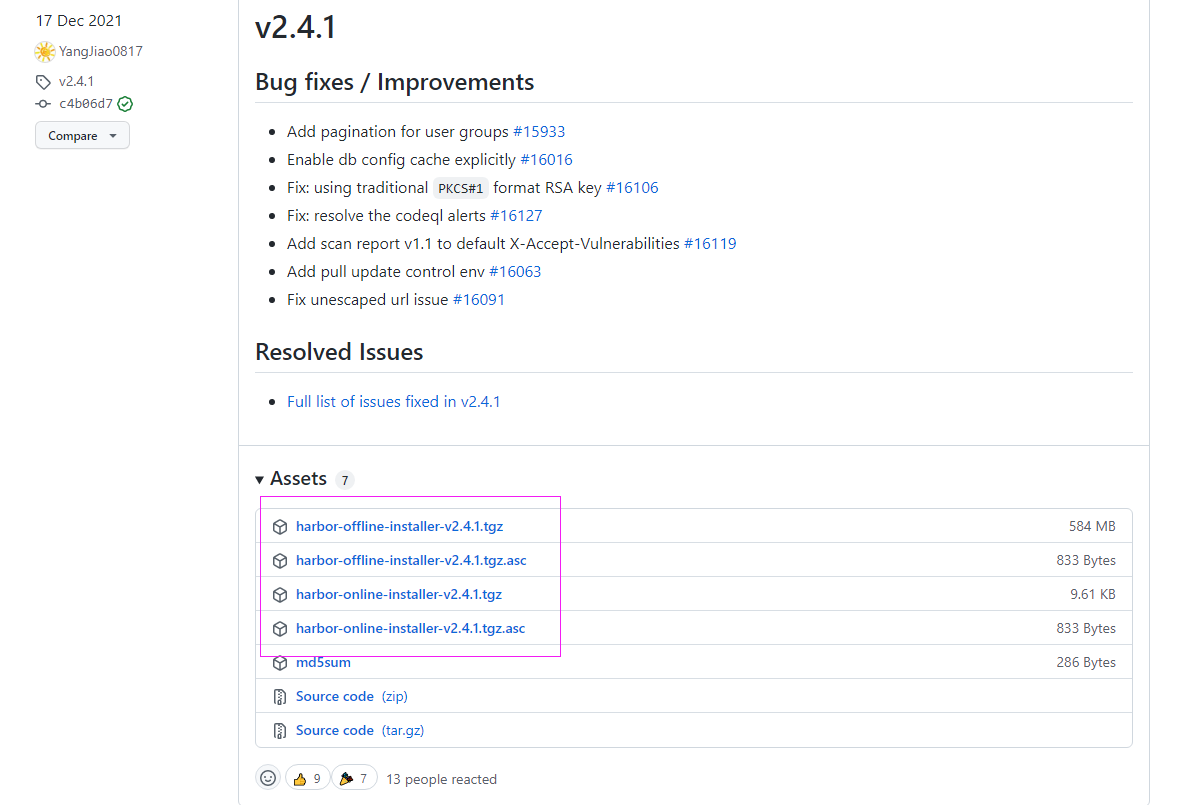

PS: pay attention to the version number
Harbor deployment configuration
Two key files in the harbor directory are: Harbor yml. TML and install sh.
harbor.yml.tml is a configuration file template, which needs to be changed to harbor YML, harbor. Com will be used during deployment YML configuration file.
install.sh is the execution file, which can be deployed.

harbor. There are many default attributes in the YML configuration file, which can be modified.
Only the changed attributes are listed here.
# To set the access address, you can use ip and domain name, but not 127.0.0.1 or localhost.
# Access address
hostname: docker.mwjz.live

# HTTP access protocol settings
http:
  # http access port number
  port: 8433

# Disable HTTPS protocol access
#https:
# https port for harbor, default is 443
#  port: 443
# The path of cert and key files for nginx
#  certificate: /your/certificate/path
#  private_key: /your/private/key/path

# admin user password
harbor_admin_password: XXXXXXX

# Database settings
database:
  # Database password
  password: XXXXXX

# Harbor data mount directory
data_volume: /volumes/harbor
The page access, pull, push and other operations of Harbor application use the hostname attribute value in the configuration file, so the gateway agent is set in place in this step.
PS: Harbor recommends using HTTPS protocol. The gateway is used here, so only HTTP protocol is set
configure gateway
The gateway only needs to configure the Nginx attribute.
server {
    #The SSL access port number is 443
    listen 443 ssl http2;
    #Fill in the domain name of the binding certificate
    server_name docker.mwjz.live;
    #Upload size limit
    client_max_body_size 3000M;
    #journal
    error_log /var/log/nginx/docker/error.log;
    access_log /var/log/nginx/docker/access.log;
    #Certificate file
    ssl_certificate /etc/nginx/conf.d/ssl/docker/docker.mwjz.live_bundle.crt;
    #Certificate key file
    ssl_certificate_key /etc/nginx/conf.d/ssl/docker/docker.mwjz.live.key;

    ssl_ciphers SHA256:ECDHE:ECDH:AES:HIGH:!NULL:!3DES:!aNULL:!MD5:!ADH:!RC4;
    ssl_protocols TLSv1 TLSv1.1 TLSv1.2;
    ssl_prefer_server_ciphers on;
    location / {
        proxy_pass http://10.0.24.12:8433;
    }
}

Restart gateway service
docker exec -it gateway nginx -s reload
Execute deployment
At this point, you can execute install SH file for deployment
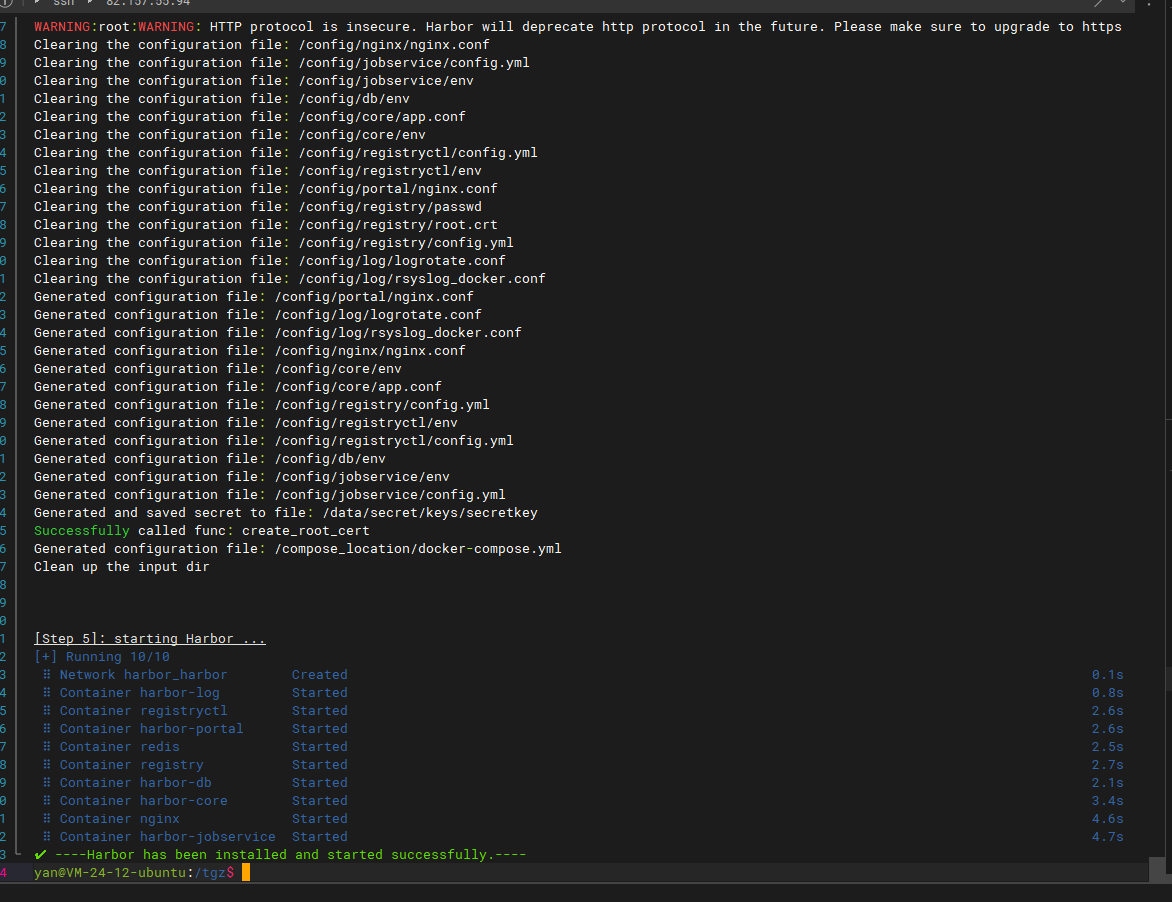
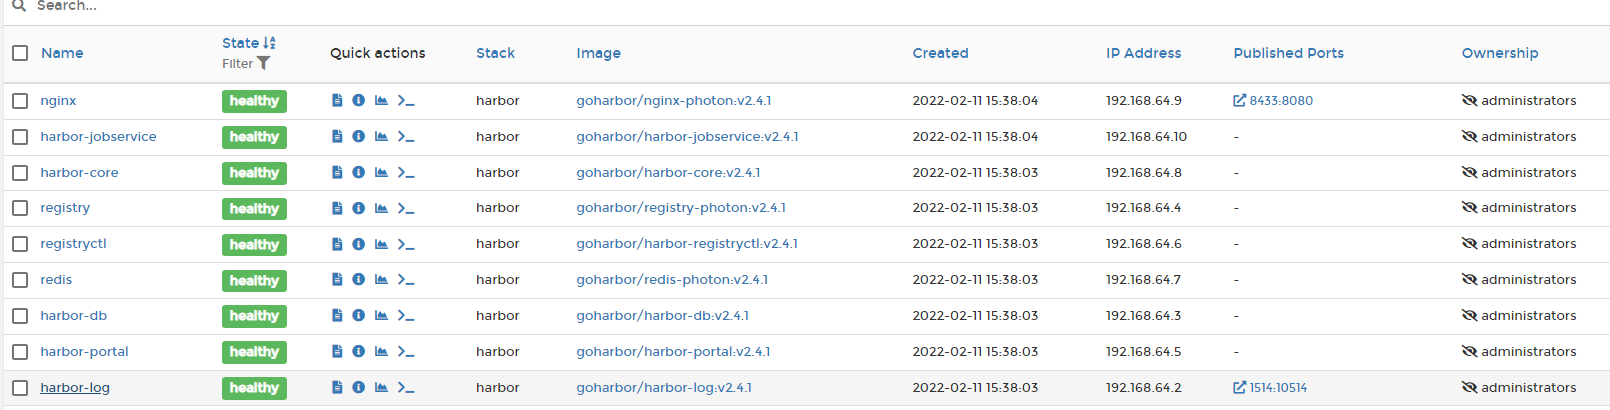
After deployment, harbor will create a Docker Compose named harbor
And 9 container services will be started.
Adding a prefix to a container is a headache for people with obsessive-compulsive disorder...
After deployment, visit Harbor and jump to the login page to log in with the administrator account.
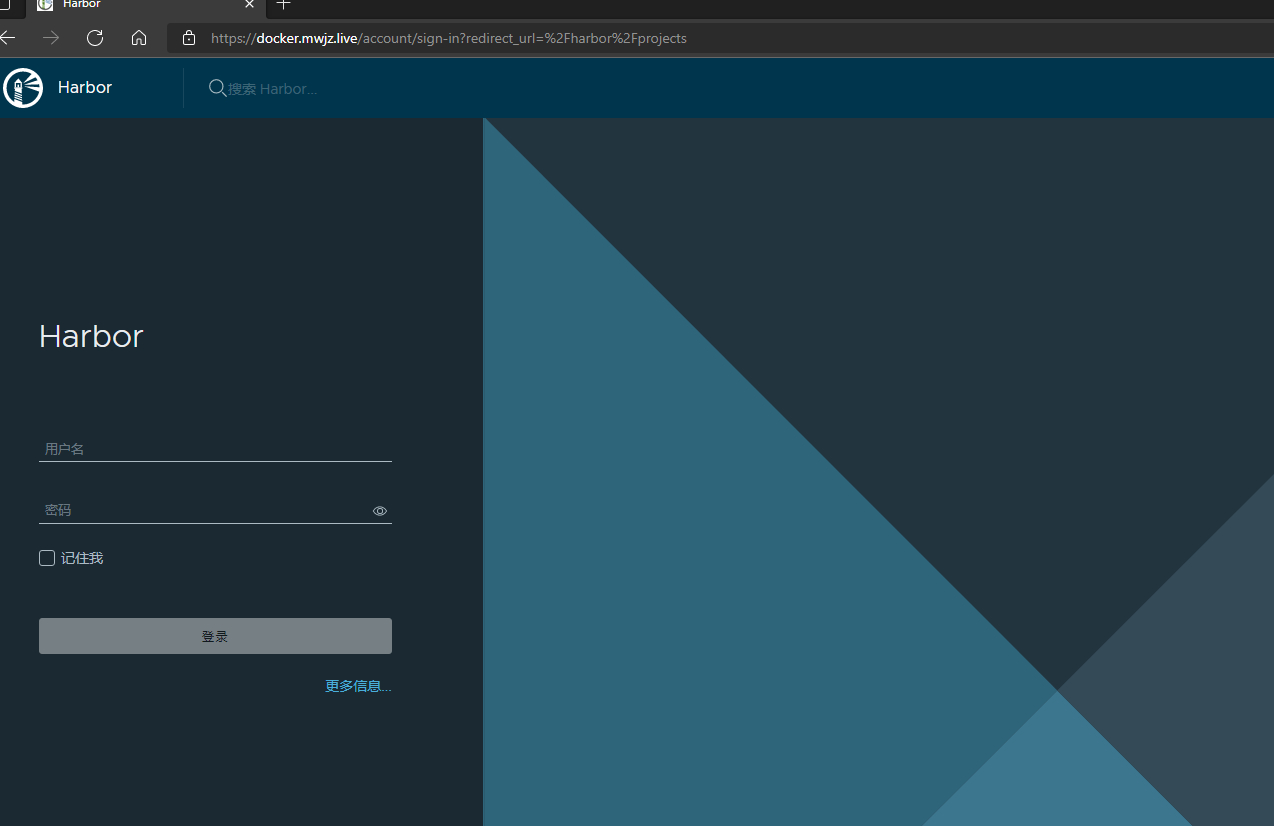
Harbor page
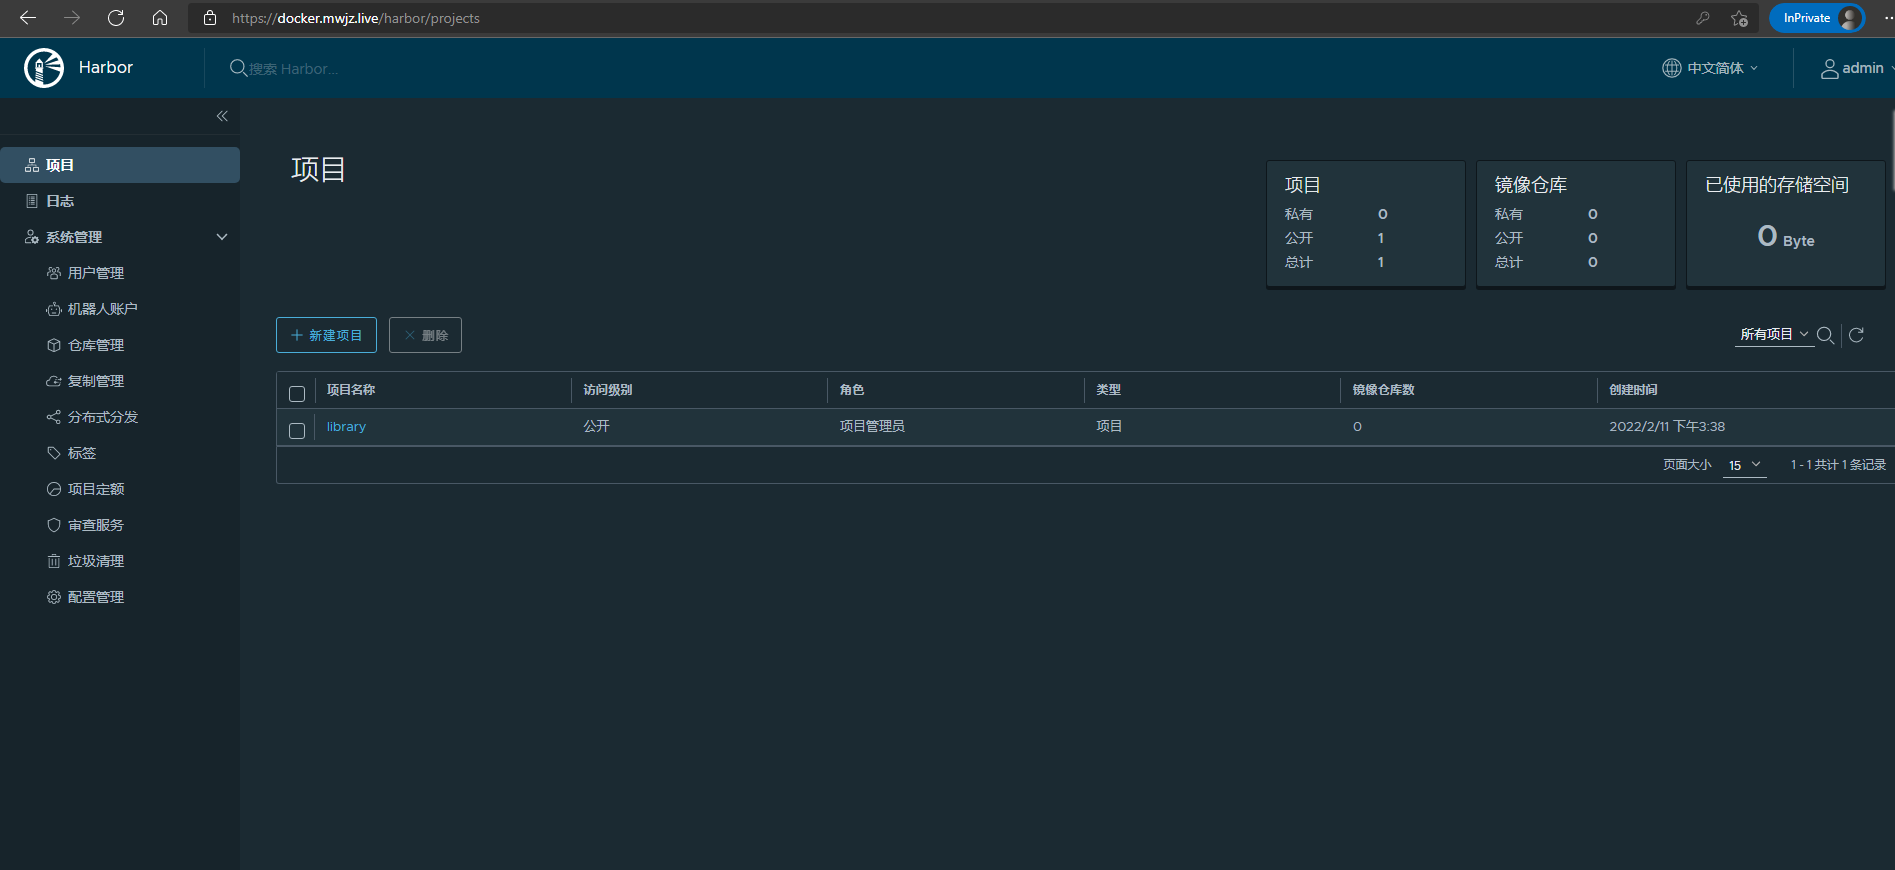
The main page of Harbor is the project module.
A project is a mirror group. Multiple mirrors can be stored in a project.
Harbor creates a public project called library by default.
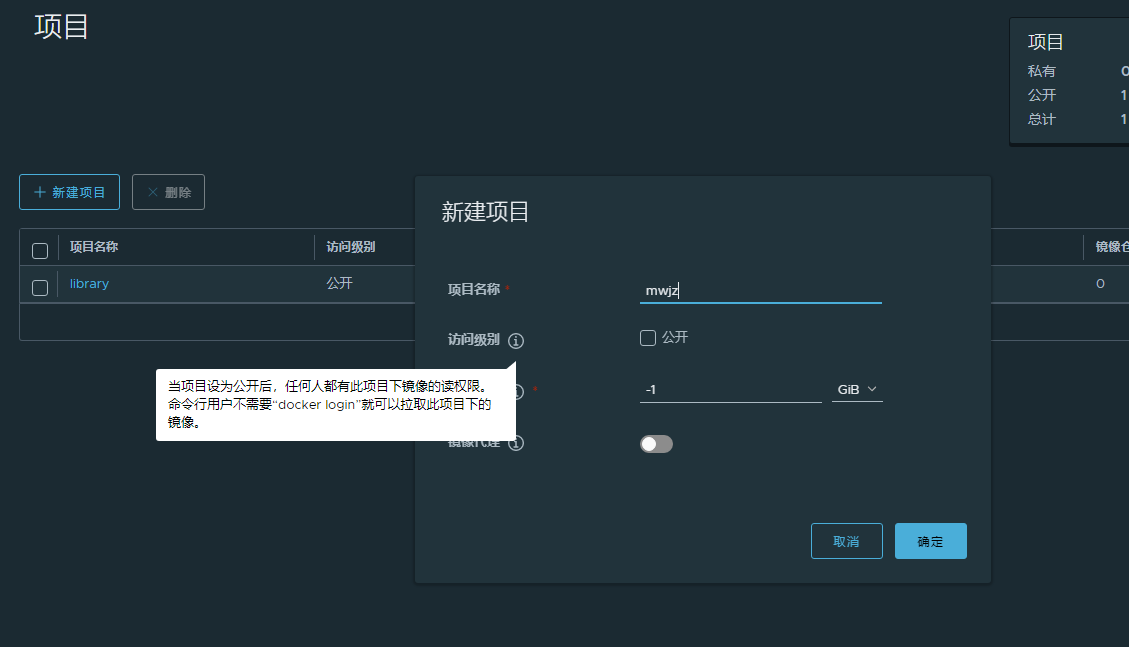
You can create your own project according to the actual situation
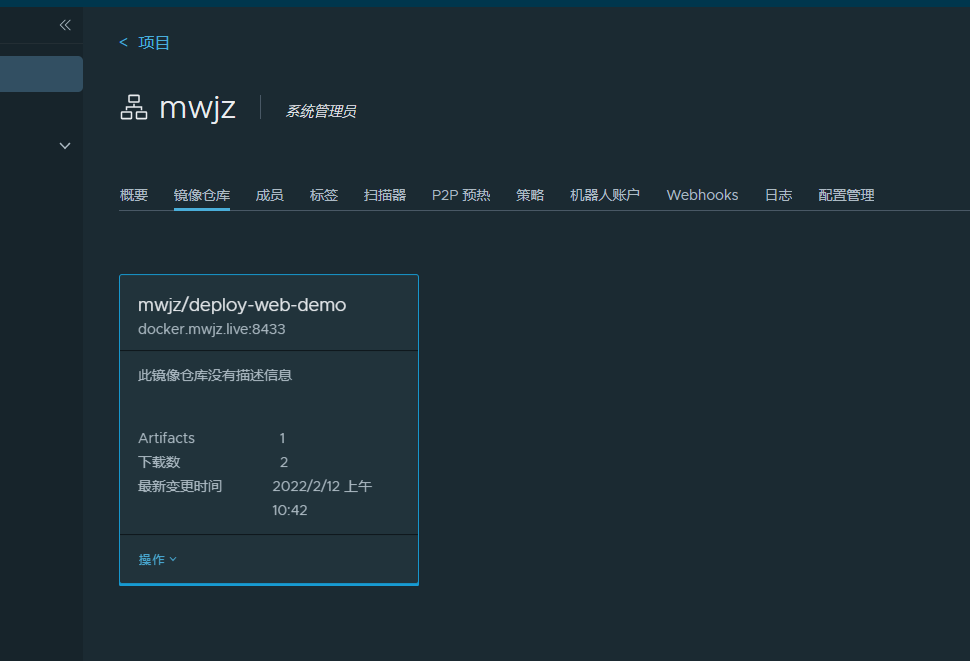
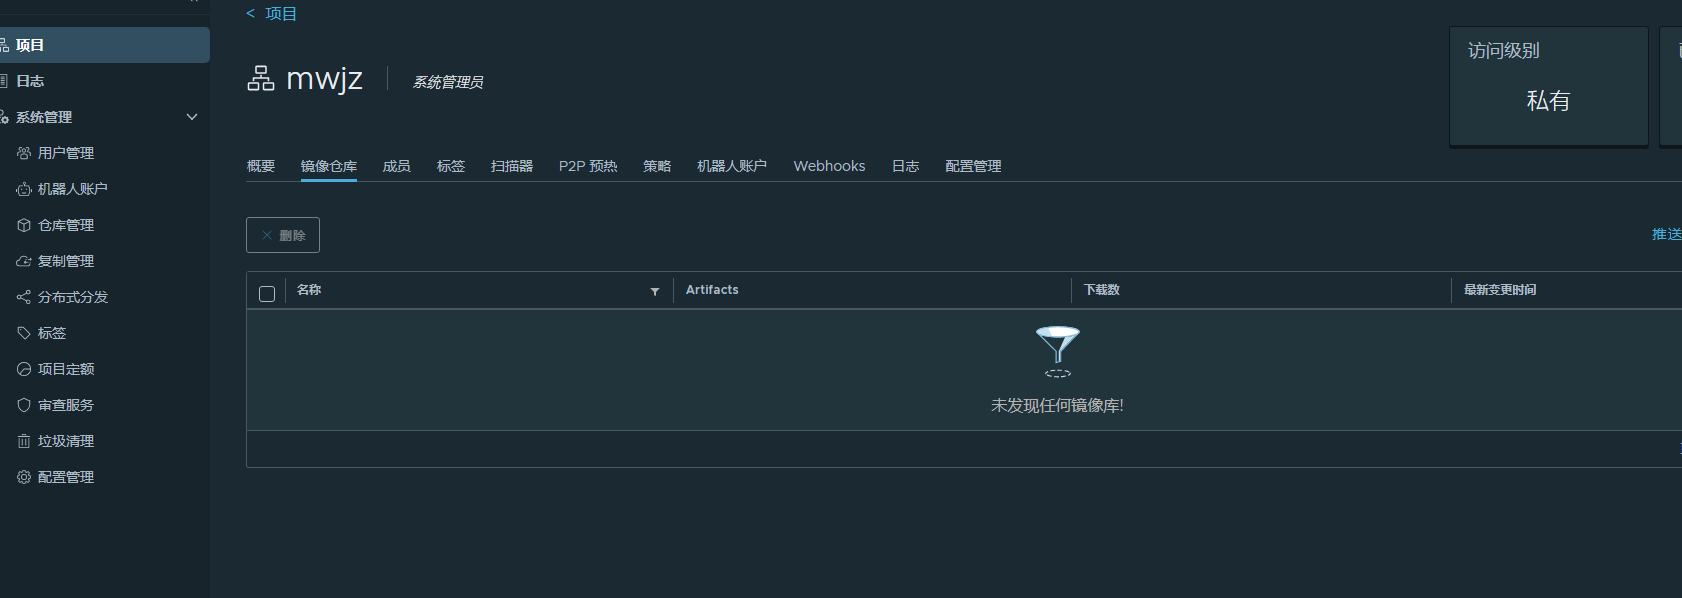
Create a private project named mwjz here to store the deploy web demo image
PS: other modules can be viewed by themselves
Harbor continuous integration
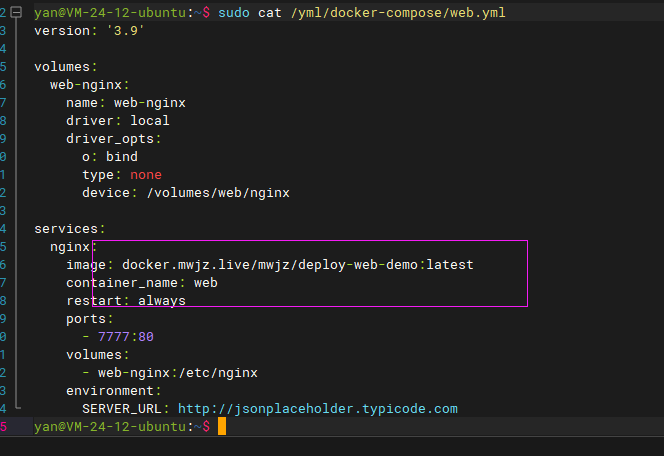
The rules for pulling and pushing Harbor images are host name / project / image name
That is, the address of the mwjz project deploy web demo image pull and push is docker mwjz. live/mwjz/deploy-web-demo
Server configuration
Update Docker Compose
The image address pulled from the Docker Compose file of the web project should be changed to the Harbor warehouse address.
Log in to Harbor
Harbor warehouse mwjz is a private project, which can only be pulled and pushed after login.
Test the pull operation in the server. If you don't log in, you will directly return the no permission error.

When using Docker to log in Harbor warehouse, please note that sudo or root user must be used to log in, otherwise other users cannot use this login certificate
Note: you must use sudo or root to log in, otherwise other users cannot use this login certificate
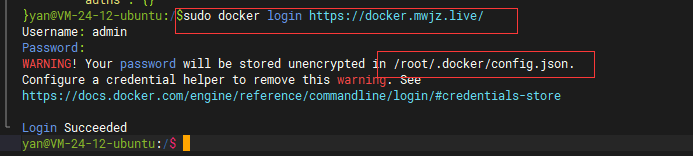
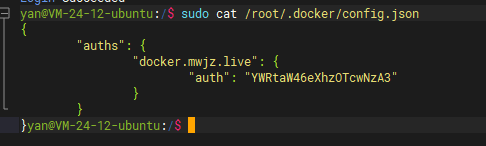
After the Harbor warehouse is successfully logged in, Docker will be in / root / Docker/config. Add the login credentials of the current warehouse to the JSON file.
This login credential is required for Drone continuous integration.

Drone configuration
Secret configuration
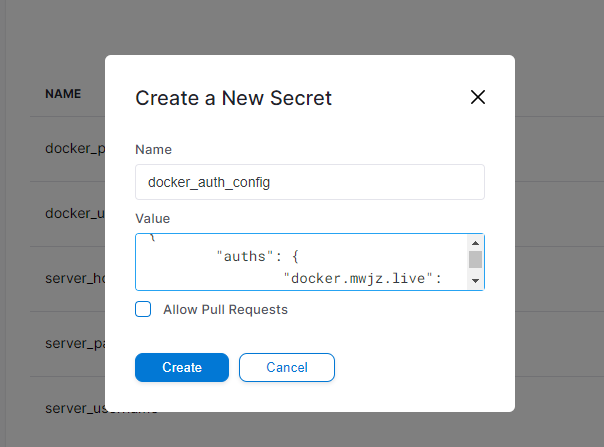
- Image pull login credentials The container in the Drone engine is a pure running environment, which cannot directly use the login credentials of the server to pull the private warehouse image. To solve this problem, Drone predefined an image_pull_secrets attribute, image_pull_secrets will read the warehouse login credentials from Secret and execute the login operation. That is, you need to configure the warehouse login credential information in Secret: docker_auth_config, the attribute value is / root / docker/config. JSON file content.
PS: note that the login credentials must be logged in by sudo or root user, otherwise they do not have the permission to pull
- Image push account Set docker_username, docker_ The two Secret attribute values of password are changed to the account password of Harbor warehouse.
.drone.yml configuration
.drone. The main change points of YML file are the image name and warehouse address
- Build image steps: Set the repo property value to docker mwjz. live/mwjz/deploy-web-demo, And add the registry attribute with the value of docker mwjz. Live (Harbor warehouse hostname)
- Deploy project steps Change the image pull address to docker mwjz. live/mwjz/deploy-web-demo
- deploy pipeline: The private warehouse login credential key attribute needs to be set in the deploy pipeline: image_pull_secrets
kind: pipeline # Define a pipe
type: docker # Define pipe type
name: build # Define pipe name
steps:
- name: build-image # Step name
image: plugins/docker # Use mirror
depends_on: [build-tags, build-project] # Dependent steps
settings: # Current settings
username: # Account name
from_secret: docker_username
password: # Account password
from_secret: docker_password
dockerfile: deploy/Dockerfile # Dockerfile address. Note that it is a relative address
registry: docker.mwjz.live # Private image warehouse address
repo: docker.mwjz.live/mwjz/deploy-web-demo # Image name
---
kind: pipeline
type: docker
name: deploy
image_pull_secrets: # Private image pull certificate key
- docker_auth_config
steps:
- name: deploy-project
image: appleboy/drone-ssh
settings:
host:
from_secret: server_host
user:
from_secret: server_username
password:
from_secret: server_password
port: 22
# Secure: false if the pulled image address uses the http protocol, set this property to true
command_timeout: 3m
script:
- echo ====Start deployment=======
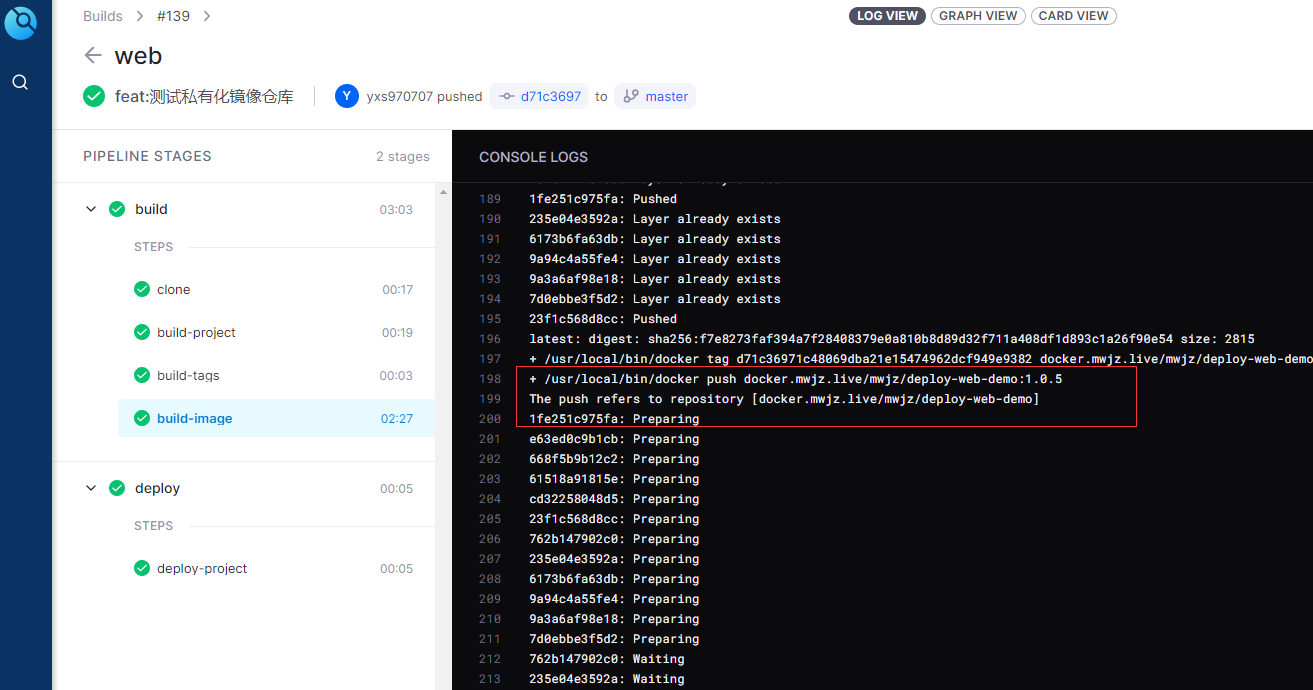
- docker pull docker.mwjz.live/mwjz/deploy-web-demo:latest
- docker-compose -p web down
- docker volume rm web-nginx
- docker-compose -f /yml/docker-compose/web.yml -p web up -d
- docker rmi $(docker images | grep deploy-web-demo | grep none | awk '{print $3}')
- echo ====Deployment successful=======Perform test
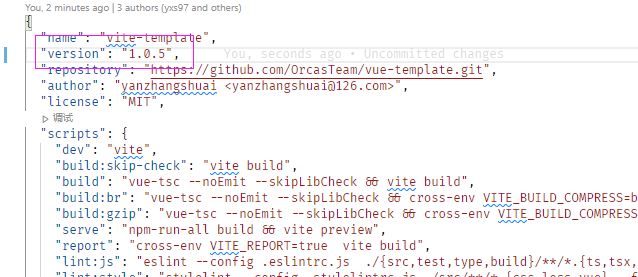
After all preparations are completed, the project version number can be modified for test construction.
There may be other problems during construction, but they are generally small problems that can be solved by checking the configuration or querying Google.
It can't be solved. You can leave a message.