In the last post, we had a simple understanding and a general understanding of vue components.When we first learned about the project structure, we created a folder for components in the / src directory, which is used today to place our custom components.
Making header.vue components
In the components folder, create a header.vue file and fill in the following:
<template>
    <header class="header">
        <h1 class="logo">Vue Demo by May you stay forever young</h1>
    </header>
</template>
In this way, our header component has been simply made.
Making footer.vue components
Also in the components folder, create a footer.vue file and fill in the following:
<template>
    <footer class="copy">
        Copy © May you stay forever young
    </footer>
</template>
Very simple.Now that we've finished making the components, we're going to use them on the first page.
Write index.vue file
Say nothing but open the / src/pages/Index.vue file and fill in the following code:
<template>
  <div>
    <Header></Header>
    <div class="article_list">
      <ul>
        <li v-for="i in list">
          <time v-text="i.create_at"></time>
          <router-link :to="'/content/' + i.id">
            {{ i.title }}
          </router-link>
        </li>
      </ul>
    </div>
    <Footer></Footer>
  </div>
</template>
<script>
import Header from '../components/header.vue'
import Footer from '../components/footer.vue'
export default {
  components: { Header, Footer },
  data () {
    return {
      list: []
    }
  },
  created () {
    this.getData()
  },
  methods: {
    getData () {
      		var v = this
		v.$api.get('topics', null, function (r) {
		  v.list = r.data
		})
    }
  }
}
</script>
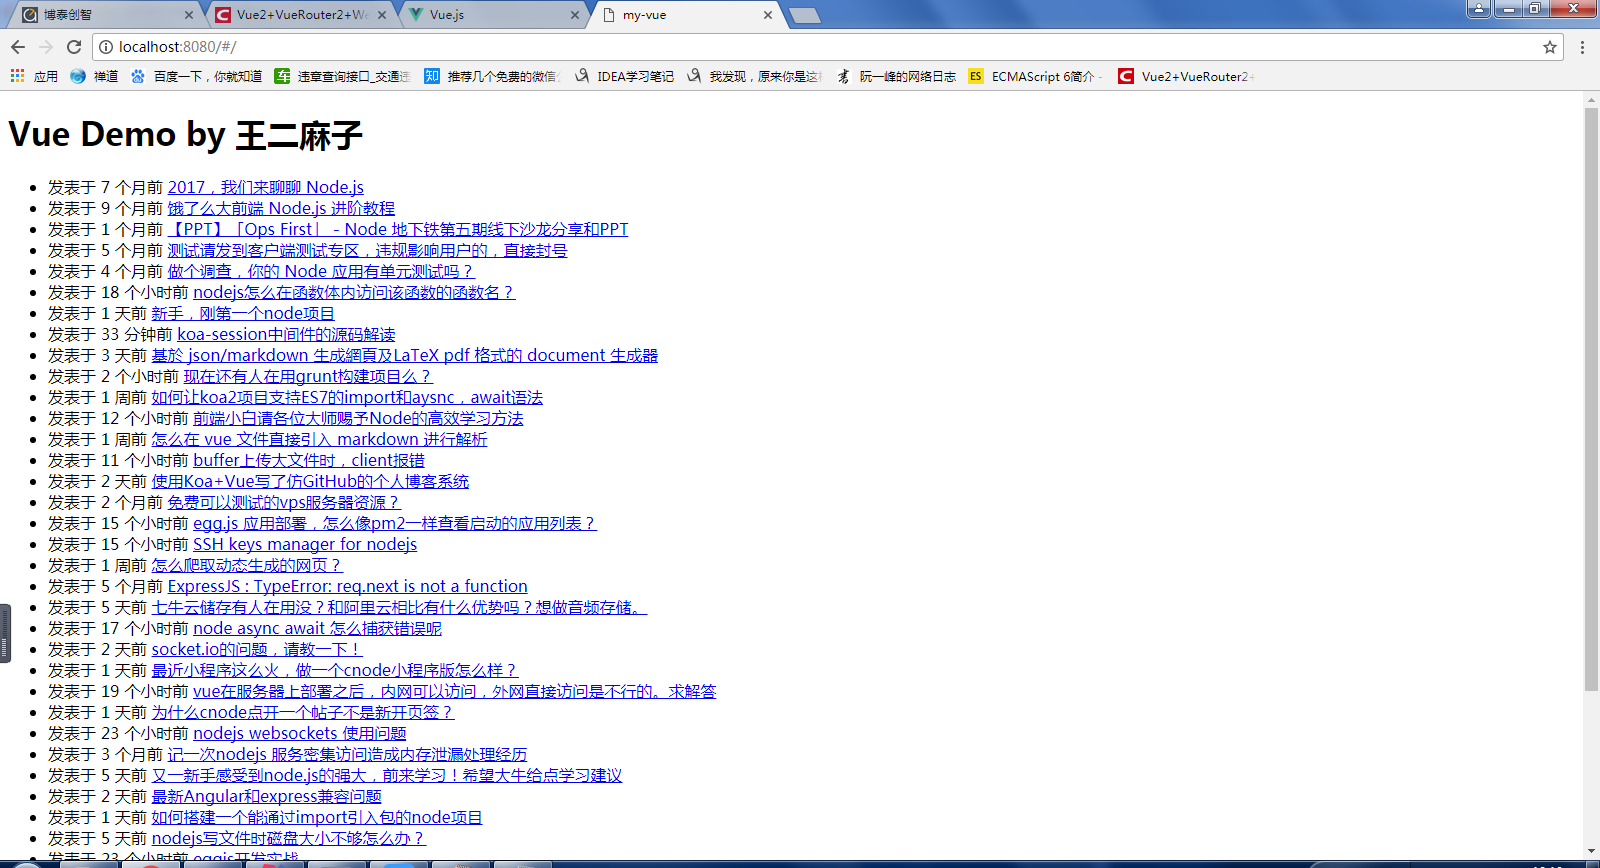
Here we render the list.Let's see the actual effect:

The previous article has given us a simple understanding of vue components, which will not be repeated here. The next analysis will only focus on some key points.
vue directive
As follows, I first used a v-for loop to loop the data, and then v-text in the time tag, which are instructions from vue.
<li v-for="i in list">
    <time v-text="i.create_at"></time>
    <router-link :to="'/content/' + i.id">
        {{ i.title }}
    </router-link>
</li>
router-link is the term VueRouter2 Declarative Navigation. When it is actually converted to an html tag, it is converted to <a></a>, the to attribute inside is equivalent to the href attribute of A.
For more information on the vue directive, see: https://cn.vuejs.org/v2/api/#directive
For more information on declarative navigation, see: https://router.vuejs.org/zh-cn/essentials/get-started.html
get data
We get r.data data data from the interface, let's define this.list to be equal to that data, and then we can render it in the template with a list.This highlights the two-way data binding of vue.
var v = this
v.$api.get('topics', null, function (r) {
  v.list = r.data
})
Time Processing Tool Functions
We use the time tag in the code above to render time, but for now, our time is a standard time format and is not ideal for the user experience.So we need to take care of it.To share a tool all the time for the entire project, we'll write a / src/utils/index.js file.
Code directly:
export default {
	goodTime (str) {
		let now = new Date().getTime()
		let oldTime = new Date(str).getTime()
		let difference = now - oldTime
		let result = ''
		let minute = 1000 * 60
		let hour = minute * 60
		let day = hour * 24
		let month = day * 30
		let year = month * 12
		let _year = difference / year
		let _month = difference / month
		let _week = difference / (7 * day)
		let _day = difference / day
		let _hour = difference / hour
		let _min = difference / minute

		if (_year >= 1) {
		  result = 'Published in ' + ~~(_year) + ' last year'
		} else if (_month >= 1) {
		  result = 'Published in ' + ~~(_month) + ' Months ago'
		} else if (_week >= 1) {
		  result = 'Published in ' + ~~(_week) + ' Weeks ago'
		} else if (_day >= 1) {
		  result = 'Published in ' + ~~(_day) + ' Days ago'
		} else if (_hour >= 1) {
		  result = 'Published in ' + ~~(_hour) + ' An hour ago'
		} else if (_min >= 1) {
		  result = 'Published in ' + ~~(_min) + ' Minutes ago'
		} else {
		  result = 'just'
		}
		return result
	}
}
After writing the code, we save the file.But at this point, we cannot use our method function.We must bind our method functions to main.js.The following code:
// Reference Tool File
import utils from './utils/index.js'
// Bind tool methods globally
Vue.prototype.$utils = utils
Remember how we previously bound our interface request function?This is the same approach.In this way, the function we write can be called at will.Let's modify the code in index.vue above to adjust the time to:
<time v-text="$utils.goodTime(i.create_at)"></time>
Then let's look at the actual effect:
I don't know if you find that we are referencing a function in the script area using code like this.getData or this.list.But in template, we don't add this.There are many papers on this in js, which I will not go into here.You just need to remember to use this.The list is already rendered.