In the previous section, we talked about LinearLayout, which is also the first layout you learned. It supports multiple views in a linear manner (horizontal or vertical) combination. The most practical one is the weight attribute. Using weight well can make your linear layout more flexible and beautiful. However, in the example in the previous section, we found that if you need to layout in multiple directions, you need to nest multiple linearlayouts. It can be imagined that if our UI is complex enough, it will be difficult in terms of workload and performance A nightmare. So here we need to introduce another layout method, RelativeLayout (relative layout). Many times, you need to nest multiple linearlayouts to achieve the layout, which can be completed by using one layer of RelativeLayout. Is it really so magical? You'll know after learning.
1. RelativeLayout features
As the name suggests, relative layout is to let the internal View determine its placement position and size according to the position of other views or parents.
For example, when you buy a sofa, you tell the master to put the sofa in the living room, face the TV, parallel to the tea table and placed against the wall. The sofa is our target View, the living room is the Parent, and the TV and coffee table are other views. In this way, you can accurately determine the position you want to place.
This is how RelativeLayout works, We can specify the placement position of a View relative to its brother View (for example, 10 dp on the left or 25 dp on the top of TextView), or specify its parent layout (RelativeLayout). RelativeLayout is the most commonly used layout in Android GUI design. Next, let's learn the specific usage of RelativeLayout.
2. Alignment of relativelayout
Since many general properties have been introduced in LinearLayout, if you are not clear, you can check the contents in section 7.2. Here, we will not repeat the setting items of Layout, but focus on the special setting properties in RelativeLayout.
Note: to facilitate learning and demonstration, the examples in this section set the length and width of RelativeLayout to match by default_ Parent, that is, the display area of the whole screen is RelativeLayout.
2.1 central layout
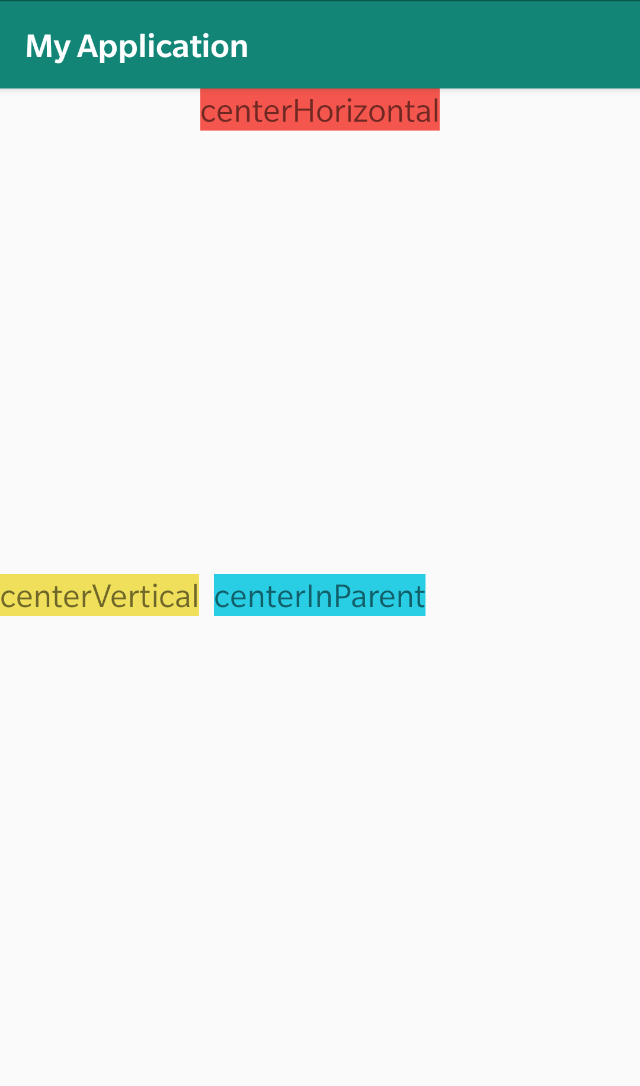
When you want the View to be centered in the parent layout, you can choose from the following three properties:
- android:layout_centerHorizontal="true":
This property will center your View horizontally in the parent layout, as shown in the red View in the above figure. Because the RelativeLayout occupies the full screen, it will eventually be centered in the horizontal direction of the screen. - android:layout_centerVertical="true":
This property will center your View vertically in the parent layout, as shown in the Yellow View in the above figure. It will eventually be centered in the vertical direction of the screen. - android:layout_centerInParent="true"
See here, smart you should be able to guess that the next step is to center the display in two directions. Yes, this property enables you to center the parent layout as a whole, as shown in the blue View above. It will eventually be placed in the center of the screen.
Reference codes are as follows:
<?xml version="1.0" encoding="utf-8"?>
<RelativeLayout xmlns:android="http://schemas.android.com/apk/res/android"
    xmlns:tools="http://schemas.android.com/tools"
    android:layout_width="match_parent"
    android:layout_height="match_parent"
    tools:context=".MainActivity">

    <TextView
        android:layout_width="wrap_content"
        android:layout_height="wrap_content"
        android:layout_centerHorizontal="true"
        android:background="#F75549"
        android:text="centerHorizontal"
        android:textSize="20sp" />

    <TextView
        android:layout_width="wrap_content"
        android:layout_height="wrap_content"
        android:layout_centerVertical="true"
        android:background="#F1E14D"
        android:text="centerVertical"
        android:textSize="20sp" />

    <TextView
        android:layout_width="wrap_content"
        android:layout_height="wrap_content"
        android:layout_centerInParent="true"
        android:background="#14CEE6"
        android:text="centerInParent"
        android:textSize="20sp" />
</RelativeLayout>
2.2 align with parent layout
The following properties can fix the View at a fixed distance from any edge of the parent layout.
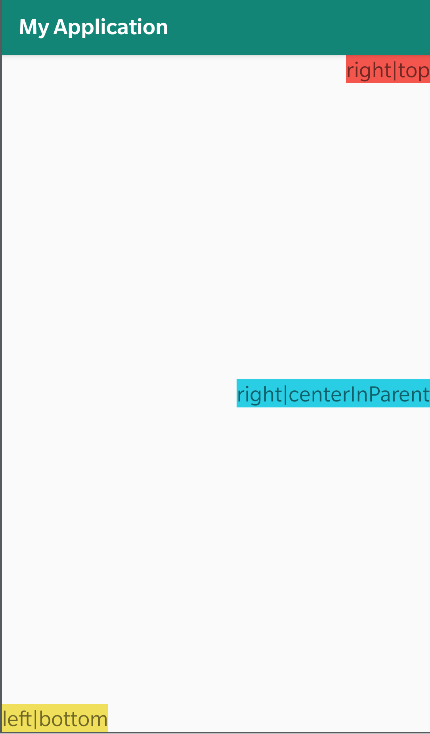
- android:layout_alignParentTop="true":
Using layout_ The alignparenttop property can align your View with the top of the parent layout, and because the length and width of RelativeLayout match_parent, so the final effect is displayed at the top of the screen. - android:layout_alignParentBottom="true":
Using layout_ The alignparentbottom property can align your View with the bottom of the parent layout, and the final effect is to display it at the bottom of the screen. - android:layout_alignParentLeft="true":
Using layout_ The alignparentbottom property can align your View with the left side of the parent layout, and the final effect is to display it on the far left side of the screen. - android:layout_alignParentRight="true":
Using layout_ The alignparentright property can align your View with the right side of the parent layout, and the final effect is to display it on the far right side of the screen.
Note: the above alignment attributes can be used in combination. For example, the views in the above figure are aligned on the top right, aligned on the bottom left, and aligned on the middle right
Reference codes are as follows:
<?xml version="1.0" encoding="utf-8"?>
<RelativeLayout xmlns:android="http://schemas.android.com/apk/res/android"
    xmlns:tools="http://schemas.android.com/tools"
    android:layout_width="match_parent"
    android:layout_height="match_parent"
    tools:context=".MainActivity">

    <TextView
        android:layout_width="wrap_content"
        android:layout_height="wrap_content"
        android:layout_alignParentTop="true"
        android:layout_alignParentRight="true"
        android:background="#F75549"
        android:text="right|top"
        android:textSize="20sp" />

    <TextView
        android:layout_width="wrap_content"
        android:layout_height="wrap_content"
        android:layout_alignParentLeft="true"
        android:layout_alignParentBottom="true"
        android:layout_centerVertical="true"
        android:background="#F1E14D"
        android:text="left|bottom"
        android:textSize="20sp" />

    <TextView
        android:layout_width="wrap_content"
        android:layout_height="wrap_content"
        android:layout_alignParentRight="true"
        android:layout_centerInParent="true"
        android:layout_centerVertical="true"
        android:background="#14CEE6"
        android:text="right|centerInParent"
        android:textSize="20sp" />
</RelativeLayout>
2.3 add View to the relative position of a sibling layout
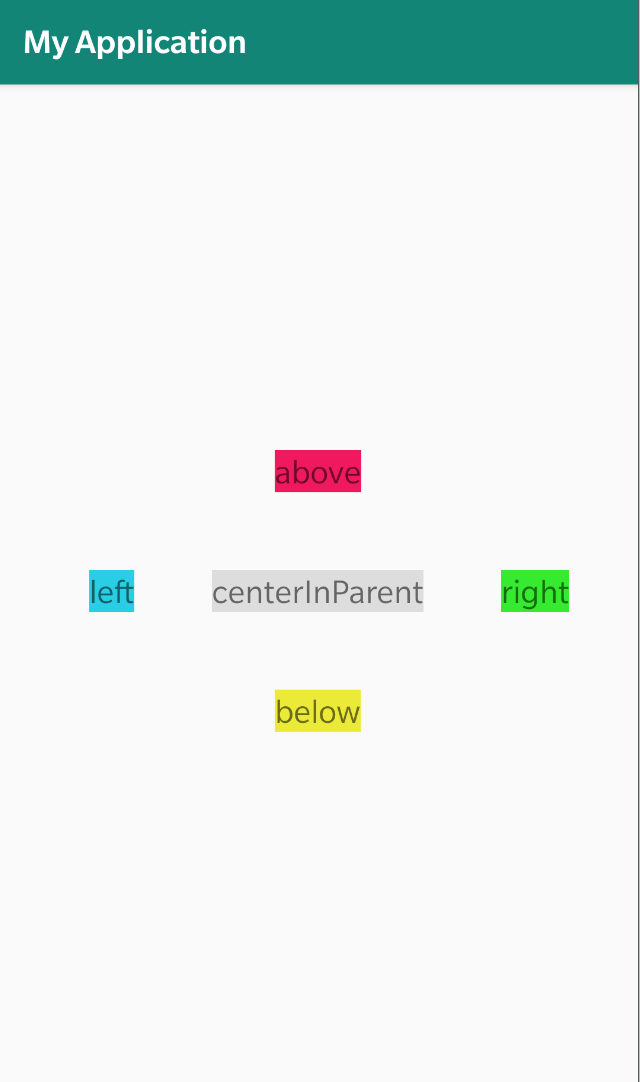
The above is to set the relative position between the View and the parent layout. When there is a View in the RelativeLayout, we can also set the position relationship between the View and other brother views.

- android:layout_above="@id/center":
This property sets the current View to be placed above the View with id center. - android:layout_below="@id/center":
Set the current View to be placed below the View with id center. - android:layout_toLeftOf="@id/center":
Set the current View to be placed on the left of the View with id center. - android:layout_toRightOf="@id/center":
Set the current View to be placed on the right of the View with id center.
Note: you can see that this attribute needs to specify an id, so we need to give an id to the dependent brother View. However, it should be noted that different from "+ id" when giving id, "+ id" does not need to be written when specifying brother View, that is, the id can be written directly.
Reference codes are as follows:
<?xml version="1.0" encoding="utf-8"?>
<RelativeLayout xmlns:android="http://schemas.android.com/apk/res/android"
    xmlns:tools="http://schemas.android.com/tools"
    android:layout_width="match_parent"
    android:layout_height="match_parent"
    tools:context=".MainActivity">

    <TextView
        android:id="@+id/center"
        android:layout_width="wrap_content"
        android:layout_height="wrap_content"
        android:layout_centerInParent="true"
        android:background="#FFdddddd"
        android:text="centerInParent"
        android:textSize="20sp" />

    <TextView
        android:layout_width="wrap_content"
        android:layout_height="wrap_content"
        android:layout_above="@id/center"
        android:layout_centerInParent="true"
        android:background="#F30C5D"
        android:text="above"
        android:textSize="20sp" />

    <TextView
        android:layout_width="wrap_content"
        android:layout_height="wrap_content"
        android:layout_below="@id/center"
        android:layout_centerInParent="true"
        android:background="#ECEC18"
        android:text="below"
        android:textSize="20sp" />

    <TextView
        android:layout_width="wrap_content"
        android:layout_height="wrap_content"
        android:layout_centerInParent="true"
        android:layout_toLeftOf="@id/center"
        android:background="#14CEE6"
        android:text="left"
        android:textSize="20sp" />

    <TextView
        android:layout_width="wrap_content"
        android:layout_height="wrap_content"
        android:layout_centerInParent="true"
        android:layout_toRightOf="@id/center"
        android:background="#25EC0F"
        android:text="right"
        android:textSize="20sp" />
</RelativeLayout>
2.4 align View with sibling View
Similar to the alignment with the parent layout, you can use the following properties to align the View with an existing sibling View.
- android:layout_alignTop="@id/center":
Set the View to align with the top of the View with id center. - android:layout_alignBottom="@id/center"
Set the View to align with the bottom of the View with id center. - android:layout_alignLeft="@id/center"
Set the View to align with the left side of the View with id center. - android:layout_alignRight="@id/center"
Set the View to align with the right side of the View with id center. - android:layout_alignBaseLine="@id/center"
Set the View to align with the baseline of the View with id center.
3. Relative distance of relativelayout
In the above example, we can find that we can set the relative position between View and View and between View and parent layout through properties, but we find that views are pasted together or close to edges, which is not beautiful. In fact, RelativeLayout not only can set the relative position and alignment, but also can set the spacing between two views and the parent layout. The setting spacing is the same as that of LinearLayout layout:
- layout_margin: set the spacing between the element and other surrounding elements. Similarly, you can also set the spacing on one side:
- layout_marginRight
- layout_marginTop
- layout_marginLeft
- layout_marginBottom
Note: margin can be negative. Interested students can test the effect by themselves
After we add the above four kinds of up, down, left and right spacing in the example of Section 2.3, the effect is as shown in the figure:
4. Summary
This section introduces a more flexible layout method - RelativeLayout. Its core is that you can set the alignment and relative position between View and parent layout, View and View, and set the relative distance from the target based on it. In most actual combat scenarios, we will use LinearLayout and RelativeLayout in combination, Often produce unexpected results.