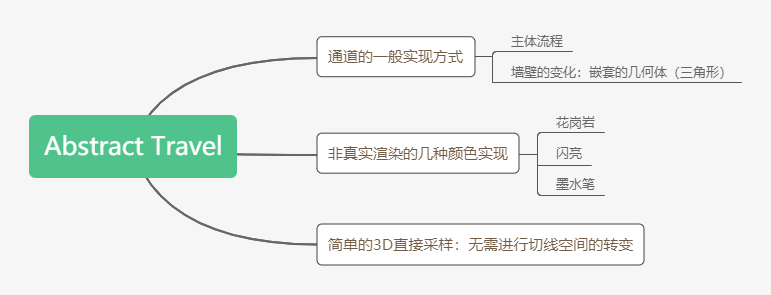
Abstract Travel
Author: Shane, website: https://www.shadertoy.com/view/MlXSWX
Tags: Noise,tunnel,triangle,abstract
Introduction: using the triangular noise idea of Shadertoy user Nimitz and its curvature function to forge the mesh appearance of an abstract, plane shadow and point light source.
Personal gain:
Image
Firstly, the conventional coordinate transformation and the setting of the starting position and target position of the camera are carried out. Then, two point light sources are set in front of and behind the camera, and then the Z values of these values are used to disturb their XY plane: the disturbance function path here uses the 2D sine wave that changes with time. The embodiment of the effect is also relatively easy to get: the path of periodic left-right swing.
// The path is a 2D sinusoid that varies over time, depending upon the frequencies, and amplitudes.
vec2 path(in float z){ float s = sin(z/24.)*cos(z/12.); return vec2(s*12., 0.); }
///code in Image
...
lookAt.xy += path(lookAt.z);
camPos.xy += path(camPos.z);
light_pos.xy += path(light_pos.z);
light_pos2.xy += path(light_pos2.z);
...
Then calculate the unit ray direction vector. And flip the camera in the XY plane when turning.
float FOV = PI/3.; // FOV - Field of view.
vec3 forward = normalize(lookAt-camPos);
vec3 right = normalize(vec3(forward.z, 0., -forward.x ));
vec3 up = cross(forward, right);
// rd - Ray direction.
vec3 rd = normalize(forward + FOV*uv.x*right + FOV*uv.y*up);
//Deflection camera
rd.xy = rot2( path(lookAt.z).x/32. )*rd.xy;
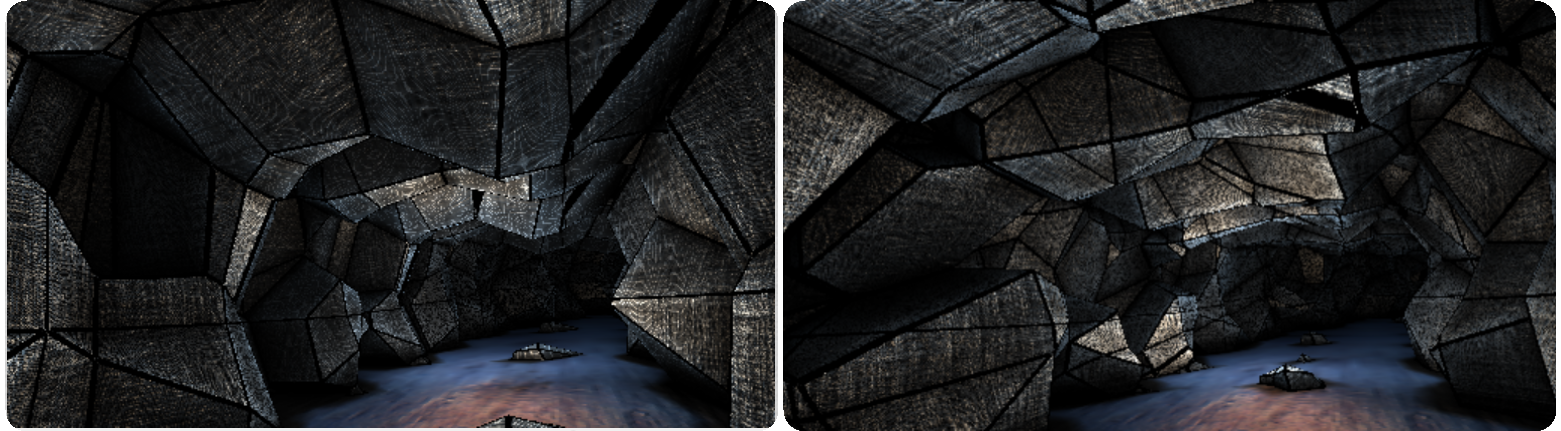
Then there is the standard Ray Marching process: some disturbances are added to the standard tunnel distance function. A floor was also added. A tunnel is a pipe. When you cross it longitudinally, the center of the pipe moves smoothly. The wall of the tube is disturbed by a very cheap 3D surface function.
#define FH 1.0 // Floor height.  Setting 2.0 can remove the floor
float map(vec3 p){

    float sf = surfFunc(p - vec3(0, cos(p.z/3.)*.15, 0));
    // For a square tunnel, use the Chebyshev(?) distance: max(abs(tun.x), abs(tun.y))
    vec2 tun = abs(p.xy - path(p.z))*vec2(0.5, 0.7071);
    float n = 1. - max(tun.x, tun.y) + (0.5 - sf);
    return min(n, p.y + FH);
}
//code in image
...
float t = 0.0, dt;
for(int i=0; i<128; i++){
	dt = map(camPos + rd*t);
	if(dt<0.005 || t>150.){ break; }
	t += dt*0.75;
}
...
-
The first line of code calls the SurfFunc function: it is used to disturb the wall - based on the triangle function to provide a subtle sawtooth. Although not very fancy, it is surprisingly good at laying the foundation for sharp rock surfaces. Tri function is a trigonometric function used by Shadertoy user Nimitz in trigonometric noise demonstration. First, as for the input parameter, whether to subtract the vector whose Y component is the cosine function has no effect on the actual effect. Then enter the function: the subject is a dot product. In terms of effect and analysis, the constant of the right multiplier represents the degree of prominence. The greater the value, the greater the concave convex degree of the wall and the more sharp stones; The left multiplier is a nested tri call. Through personal experiments, it determines the complexity of the wall triangle. The greater the nesting degree, the more complex the sharp stones are. As for the constant multiplier of p, it is obvious: the higher the nesting degree, the smaller the value - the degree of detail; as for. yzx is to remove the symmetry and increase the randomness of the cave. The following figure shows the effects of different levels of tri nesting.
vec3 tri(in vec3 x){return abs(x-floor(x)-.5);} // Triangle function.
float surfFunc(in vec3 p){

	return dot(tri(p*0.5 + tri(p*0.25).yzx), vec3(0.666));
}
[the external chain image transfer fails, and the source station may have anti-theft chain mechanism. It is recommended to save the image and upload it directly (img-zfns3vA6-1623378744922)(C:\Users\ZoroD\Desktop\IQ – master\ShaderToy excellent code reading and analysis \ Abstract Travel code analysis. assets\ac_tri.png)]
-
Then the calculation is to calculate the variable tun. This line of code seems to be general (in the actual website code, there are also annotated circular, square and circular channels, and their Tun calculation is the same). First of all, why should we subtract path(z) from Abs function? My understanding here is that because we have added and offset paths on the equivalent of RayPos and LightPos before, we should make the opposite offset on the establishment of the channel. For example, if our view point moves to the left, then when we continue to move, the channel should move to the right to form a turning effect, Otherwise, it will collide with the wall from time to time, resulting in "die threading" error. Then we need to multiply a vector to scale the channel in the XY direction to achieve a good enough channel reflection effect.
vec2 tun = abs(p.xy - path(p.z))*vec2(0.5, 0.7071);
-
Then calculate n, which is divided into three parts. The Max function is responsible for generating a square channel (in the actual website, the circular channel is the length of the call), and then distorting the wall with the calculated SF (as for the specific value, it doesn't matter. I think adding SF directly can achieve good results and easy to understand).
float n = 1. - max(tun.x, tun.y) + (0.5 - sf);
-
Finally, min is used to combine the wall and floor, and FH is used to control the floor height.
After analyzing the Map function, return to the main function. After the ray approach is completed, the intersection position and normal are calculated, and then we conduct texture based bump mapping. In this part, we fine tune the normal and add details. By sampling the color texture, taking the gray level, calculating the gradient and adjusting the normal, what is not understood is the function and principle of tex3D (why not directly sample). Later, think carefully. Direct sampling is not transformed from tangent space, so direct sampling is not feasible. Therefore, the function of tex3D here should be to rationalize sampling
// Tri planar hybrid function. Based on an old Nvidia tutorial
vec3 tex3D( sampler2D tex, in vec3 p, in vec3 n ){

    n = max((abs(n) - 0.2)*7., 0.001); // max(abs(n), 0.001), etc.
    n /= (n.x + n.y + n.z );
	return (texture(tex, p.yz)*n.x + texture(tex, p.zx)*n.y + texture(tex, p.xy)*n.z).xyz;
}
// Grayscale
float getGrey(vec3 p){ return p.x*0.299 + p.y*0.587 + p.z*0.114; }
// Texture bump mapping. Four tri-planar lookups, or 12 texture lookups in total.
vec3 doBumpMap( sampler2D tex, in vec3 p, in vec3 nor, float bumpfactor){

    const float eps = 0.001;
    float ref = getGrey(tex3D(tex,  p , nor));
    vec3 grad = vec3( getGrey(tex3D(tex, vec3(p.x - eps, p.y, p.z), nor)) - ref,
                      getGrey(tex3D(tex, vec3(p.x, p.y - eps, p.z), nor)) - ref,
                      getGrey(tex3D(tex, vec3(p.x, p.y, p.z - eps), nor)) - ref )/eps;

    grad -= nor*dot(nor, grad);
    return normalize( nor + grad*bumpfactor );

}
...
vec3 sp = t * rd+camPos;
vec3 sn = getNormal(sp);
if (sp.y<-(FH-0.005)) sn = doBumpMap(iChannel1, sp*tSize1, sn, 0.025); // Floor.
else sn = doBumpMap(iChannel0, sp*tSize0, sn, 0.025); // Walls.
...
Then calculate AO. This is a common calculation method in IQ code - Sampling in the normal direction in turn (the farther away from the starting point, the smaller the weight).
// Based on original by IQ.
float calculateAO(vec3 p, vec3 n){

    const float AO_SAMPLES = 5.0;
    float r = 0.0, w = 1.0, d;

    for (float i=1.0; i<AO_SAMPLES+1.1; i++){
        d = i/AO_SAMPLES;
        r += w*(d - map(p + n*d));
        w *= 0.5;
    }

    return 1.0-clamp(r,0.0,1.0);
}
Then the attenuation coefficient, ambient light, diffuse reflection coefficient and highlight coefficient are calculated in turn. These calculations are conventional and simple.
float atten = min(1./(distlpsp) + 1./(distlpsp2), 1.);
// Ambient light.
float ambience = 0.25;
// Diffuse lighting.
float diff = max( dot(sn, ld), 0.0);
float diff2 = max( dot(sn, ld2), 0.0);
// Specular lighting.
float spec = pow(max( dot( reflect(-ld, sn), -rd ), 0.0 ), 8.);
float spec2 = pow(max( dot( reflect(-ld2, sn), -rd ), 0.0 ), 8.);
Then calculate the curvature?, According to the note: Cool curve function, provided by Shadertoy user Nimitz. Is it related to the discrete finite difference approximation of continuous Laplacian differential operators? Either way, it can provide a scalar curvature value for an object's signed distance function, which is very convenient. Original Use?: https://www.shadertoy.com/view/Xts3WM . What's the use of this curvature? I don't know at present. Let's look at the back.
float curve(in vec3 p, in float w){

    vec2 e = vec2(-1., 1.)*w;

    float t1 = map(p + e.yxx), t2 = map(p + e.xxy);
    float t3 = map(p + e.xyx), t4 = map(p + e.yyy);

    return 0.125/(w*w) *(t1 + t2 + t3 + t4 - 4.*map(p));
}
...
// code in image
// Curvature
float crv = clamp(curve(sp, 0.125)*0.5 + 0.5, .0, 1.);
...
Then calculate the Fresnel term. Suitable for reflecting light to the surface.
float fre = pow( clamp(dot(sn, rd) + 1., .0, 1.), 1.);
Then sample different texture colors by wall and ground
vec3 texCol;
if (sp.y<-(FH - 0.005)) texCol = tex3D(iChannel1, sp*tSize1, sn); // Floor.
else texCol = tex3D(iChannel0, sp*tSize0, sn); // Walls.
Shadertoy doesn't appear to have anisotropic filtering turned on... although, I could be wrong. Texture-bumped objects don't appear to look as crisp. Anyway, this is just a very lame, and not particularly well though out, way to sparkle up the blurry bits. It's not really that necessary.
vec3 aniso = (0.5 - hash33(sp))*fre*0.35;
texCol = clamp(texCol + aniso, 0., 1.);
Then darken the gap. That is, the so-called shadow of cheap and incorrect science.
float shading = crv*0.5 + 0.5;
Calculate illumination
sceneCol = getGrey(texCol)*((diff + diff2)*0.75 + ambience*0.25) + (spec + spec2)*texCol*2. + fre*crv*texCol.zyx*2.;
Other combinations:
Shiny:
sceneCol = texCol*((diff + diff2)*vec3(1.0, 0.95, 0.9) + ambience + fre*fre*texCol) + (spec + spec2);
Abstract pen and ink:
float c = getGrey(texCol)*((diff + diff2)*1.75 + ambience + fre*fre) + (spec + spec2)*0.75;
sceneCol = vec3(c*c*c, c*c, c);
Finally, draw the lines on the wall. This annotation can be made into the effect of granite corridor.
// Shading.
sceneCol *= atten*shading*ao;
// Drawing the lines on the walls. Comment this out and change the first texture to
// granite for a granite corridor effect.
sceneCol *= clamp(1.-abs(curve(sp, 0.0125)), .0, 1.);