For the deployment of Squid services, you can refer to the blog: Installation and deployment of Squid proxy server
For Squid Service Configuration Proxy Server, you can refer to the blog: Using Squid to Construct Traditional Agent and Transparent Agent
ACL Access Control of Squid Service
Squid provides a powerful proxy control mechanism. By setting ACL (access control list) reasonably and restricting it, it can filter the source address, target address, access URL path, access time and other conditions.
In the configuration file squid.conf, ACL access control is implemented in two steps:
-
Use acl configuration items to define the conditions that need to be controlled.
- Use the http_access configuration item to "allow" or "reject" the list that has been defined.
1. Define access control lists
Each row of acl configuration can define an access control list in the following format:
Among them:
The "list name" is designated by the administrator to identify the control conditions.
"List type" must use Squid predefined values, corresponding to different categories of control conditions;
"List content" is the specific object to control. Different types of lists have different contents and can have multiple values (separated by spaces, or the relationship between "or").
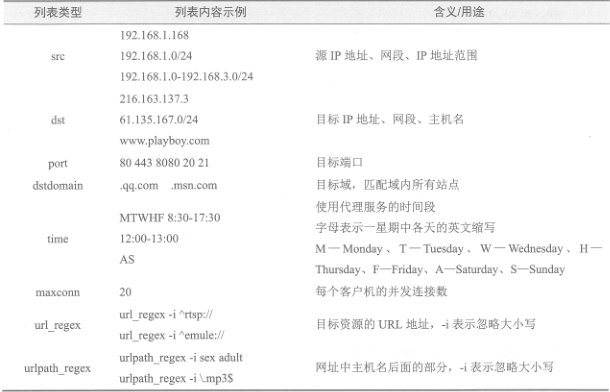
When defining access control lists, the key is to select "list type" and set specific conditional objects. There are many predefined types of Squid, such as:
In defining access control list, it is necessary to correctly analyze users'access requirements and define the control conditions for using proxy services in the light of the current network environment. For example:
First, create a file that holds the blacklist of domain names:
[root@www ~]# vim /etc/squid/dmblock.list
.qq.com
.msn.com
//Define the file to store the domain name, of course, you can also create a file to store the IP address. In the configuration file, you can refer to it in the same format as the reference address file.
[root@www ~]# vim /etc/squid.conf
                            ..................                          //Omit part of content
acl MYLAN src 192.168.1.0/24
//The definition list is named MYLAN and the source address is 192.168.1.0 segment.
acl MEDIAFILE urlpath_regex -i \.3gp$ \.mp4$ \.f4v$ \.mkv$ \.rmvb$ \.avi$
//The list of definitions is called MEDIAFILE, and the URL path ends with. 3gp,. mp4,. f4v,. mkv,. rmvb,. avi
acl DMBLOCK dstdomain  "/etc/squid/dmblock.list"
//The definition list is named DMBLOCK, and the target domain is stored in the etc/squid/dmblock.list file.
acl deny10 src 192.168.1.10
//The list of definitions is deny10 and the source address is 192.168.1.10.
acl WORKTIME time MWTHF 08:30-17:30
//Define the list name WORKTIME from 8:30 to 17:30 Monday to Friday
2. Setting Access Permissions
After defining various access control lists, you need to use the http_access configuration item to control. It must be noted that the http_access configuration navigation must be placed after the corresponding acl configuration line. Each line of http_access configuration determines an access control rule. Grammatical Format:
http_access statement usage instructions:
-
Each http_access rule can contain multiple control lists at the same time, separated by spaces, which is the relationship between "and";
-
When you take the negative condition, use it! ____________ Symbol;
- http_access must be placed after acl.
[root@www ~]# vim /etc/squid.conf
         ..................               //Omit part of content
http_access deny deny10
//Prohibited list deny10
http_access allow MYLAN WORKTIME Safe_ports !MEDIAFILE !DMBLOCK
//Allow lists MYLAN, WORKTIME, Safe_ports lists and contrary to MEDIAFILE and DMBLOCK list conditions
http_access deny all
//Proxy is prohibited by default for all clients
Restart Squid service after setup is complete
[root@www ~]# squid -k reconfigure
With regard to the implementation process of the rules:
-
Find a rule that no longer searches backwards.
-
When no rules are configured, the squid service will reject the client's request.
- There are rules but no matching items: squid will have permissions that are contrary to the last rule. That is, if the last rule is allow, the client's request is rejected, otherwise the request is allowed.
Usually, the most commonly used control rules are put in front to reduce Squid load. In terms of the overall strategy of early access control, it is suggested to adopt the way of "first reject then allow" or "first allow then reject", and the last rule is set as the default rule.
3. Verify the effect of access control
(1) Test access restriction (client in traditional proxy) self-validation!
(2) Test file download restrictions
Create a file larger than 10M under the web server web page root directory:
[root@localhost ~]# if=/dev/zero of=/var/www/html/dltest.data bs=1M count=15
(2) Edit the configuration file on the squid proxy server, and add the following lines:
[root@www ~]# vim /etc/squid.conf
           ..................               //Omit part of content
reply_body_max_size  10 MB
//Limit maximum website files to 10MB
[root@www ~]# squid -k reconfigure
//Restart Squid Service
Client testing (do not use 192.168.1.10 for access) self-validation
Squid Log Analysis
SARG is a Squid log analysis tool. It uses HTML format to list the site information, time occupancy, ranking, number of connections, visits and so on.
1. Install GD library locally in squid
[root@www ~]# yum -y install gd
2. Installation of SARG
sarg Software Package Network Disk Download Link: https://pan.baidu.com/s/1WItXGVlvrLQ9TijB7CWLmQ
Extraction code: zh41
[root@www ~]# tar zxf sarg-2.3.7.tar.gz -C /usr/src
[root@www ~]# cd /usr/src/sarg-2.3.7/
[root@www sarg-2.3.7]#  ./configure --prefix=/usr/local/sarg --sysconfdir=/etc/sarg \
--enable-extraprotection && make && make install
Configuration items mean the following:
- prefix=/usr/local/sarg: specify the installation directory;
sysconfdir=/etc/sarg: Configuration file directory, if not specified, defaults to / usr/local/etc;
enable-extraprotection: Adding additional security protection
3. Configuration
[root@www sarg-2.3.7]# vim /etc/sarg/sarg.conf
         ......................
#If only the basic functions are realized, the following three items can be configured:
access_log /usr/local/squid/var/logs/access.log            #Specify the access log file for squid
output_dir /var/www/html/sarg                        #The output directory of the sarg report, pointing to the root directory of the website
www_document_root /var/www/html               #Web page root directory

#The rest of the optimized configuration items are as follows, which can be changed according to the requirements.
title "Squid User Access Reports"                            #Page Title
user_ip no                                    #Display with username
exclude_hosts /usr/local/sarg/noreport                     #Specify site list files that are not sorted
topuser_sort_field connect BYTES reverse
#In top ranking, specify the number of connections and bytes accessed, use descending order, ascending order will be reverse d to normal.
user_sort_field connect reverse                   #For user access records, the number of connections is in descending order
overwrite_report no                                #When that date report already exists, does it cover the report?
mail_utility mailq.postfix                              #Commands to send mail reports
charset utf-8                                     #Using Character Sets
weekdays 0-6                                    #Specify the cycle for top sorting, 0 being Sunday.
hours 7-12,14,16,18-20                      #Specifies the time period for top sorting.
4. Operation
[root@www sarg-2.3.7]# touch /usr/local/sarg/noreport
//The above configuration items add sites that are not included in the ranking, and need to exist in this file.
//Domain names added to this file will not be displayed in the sorting.
[root@www sarg-2.3.7]# ln -s /usr/local/sarg/bin/sarg /usr/local/bin
[root@www sarg-2.3.7]# sarg//start sarg
SARG: Documentation: 21, reading: 100.00%
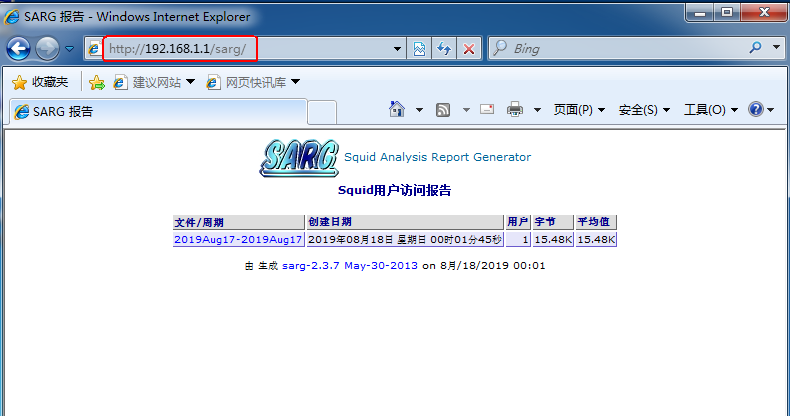
SARG: Successful report generation in /var/www/html/sarg/2019Aug17-2019Aug18
[root@localhost sarg]# systemctl start httpd                 #Start the httpd service. If there is no such service, it must be installed by itself.
5. Verification
