Activiti7
1, Workflow introduction
1.1 concept
Workflow is the automatic execution and management of business processes through computers. It mainly solves "the process of automatically transferring documents, information or tasks among multiple participants according to some predefined rules, so as to achieve an expected business goal or promote the realization of this goal".
1.2 workflow system
A software system has the function of workflow. We call it workflow system. What is the function of workflow in a system? It is to automatically manage the business process of the system, so workflow is based on business process. Therefore, the core of a software system is still the business process of the system, and workflow only assists in business process management. Even if there is no workflow, the business system can be developed and run, but with workflow, the business process can be better managed and the scalability of the system can be improved.
1.3 applicable industries
Consumer goods industry, manufacturing industry, telecommunications service industry, banking and securities insurance and other financial service industries, logistics service industry, property service industry, property management, large and medium-sized import and export trade companies, government institutions, research institutes and educational service industries, especially large multinational enterprises and group companies.
1.4 specific application
1. Key business processes: order, quotation processing, contract review, customer telephone processing, supply chain management, etc
2. Administrative management: business trip application, overtime application, leave application, vehicle application, various office supplies application, purchase application, daily and weekly report and other administrative forms that were originally processed manually.
3. Personnel management: employee training arrangement, performance evaluation, position change processing, employee file information management, etc.
4. Finance related categories: payment request, accounts receivable processing, daily reimbursement processing, business trip reimbursement, budget and plan application, etc.
5. Customer service: customer information management, customer complaints, request handling, after-sales service management, etc.
6. Special services: ISO series corresponding processes, quality management corresponding processes, product data information management, customs declaration processing of trading companies, cargo tracking processing of logistics companies and other tasks completed through gradual manual flow of forms can be implemented automatically and standardized by workflow software.
1.5 implementation mode
Before there was no special workflow engine, in order to realize process control, we usually used the value of the status field to track the changes of the process. In this way, users without roles can determine whether records are displayed through the value of the status field.
For records that can be viewed with permission, the current user decides whether to approve or not according to his role. If qualified, set a value in the status field to represent qualified; Of course, if it is unqualified, you also need to set a value to represent the unqualified situation.
This is the most primitive way. Although process control is achieved through the status field, when our process changes, the code written in this way should also be adjusted.
So is there a professional way to realize workflow management? Moreover, after the business process changes, our program can not be changed. If this effect can be achieved, the adaptability of our business system has been greatly improved.
2, Activiti7 overview
2.1 introduction
Alfresco software announced the official launch of the activiti business process management (BPM) open source project on May 17, 2010. Its chief architect is Tom Baeyens, an expert in Business Process Management BPM. Tom Baeyens is the architect of the original jbpm, which is a very famous workflow engine. Of course, activiti is also a workflow engine.
Activiti is a workflow engine. Activiti can extract complex business processes from business systems and use a special modeling language BPMN2 0, and the business process is executed according to the pre-defined process, which realizes that the system process is managed by activiti, and reduces the workload of system upgrading and transformation of the business system due to process change, so as to improve the robustness of the system and reduce the cost of system development and maintenance.
Official website: https://www.activiti.org/

2.1.1 BPM
BPM (Business Process Management), that is, business process management, is a standardized construction of end-to-end business processes to continuously improve the business efficiency of the organization. BPM is included in common business management education, such as EMBA and MBA.
2.1.2 BPM software
BPM software is an IT tool that promotes the integration and adjustment between people, between people and systems, and between systems according to the changes of business environment in enterprises.
Through BPM software, the whole life cycle of internal and external business processes of the enterprise is modeled, automated, managed, monitored and optimized, so that the cost of the enterprise is reduced and the profit is greatly improved.
BPM software is widely used in enterprises. Where there are business processes, BPM software can be used for management, such as enterprise personnel office management, procurement process management, document approval process management, financial management, etc.
2.1.3 BPMN
BPMN (business process model and notation) - business process models and symbols are a set of standard business process modeling symbols developed by BPMI (business process management initiative). Business processes can be created using the symbols provided by BPMN.
BPMN1.0 was released in May 2004 0 specification BPMI was incorporated into OMG (The Object Management Group) in September 2005. OMG released BPMN2.0 in January 2011 The final version of 0.
The specific development history is as follows:
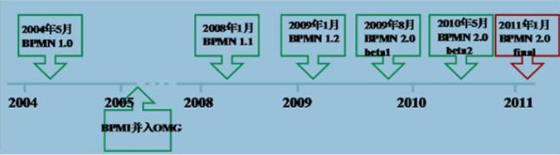
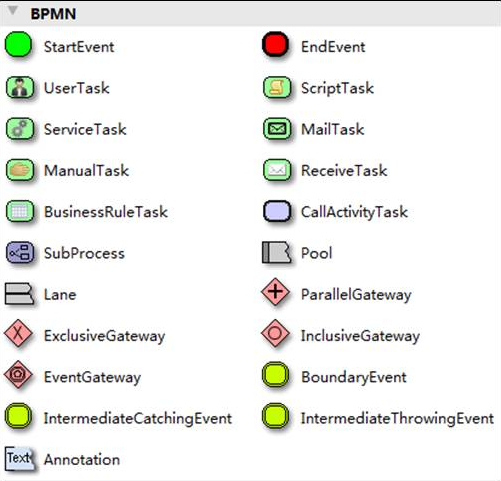
BPMN is a BPM standard widely accepted by BPM manufacturers. Activiti uses BPMN 2.0 for process modeling and process execution management. It includes many modeling symbols, such as:
Event
Represented by a circle, it is what happens during the running of the process.

Activities are represented by rounded rectangles. A process consists of one or more activities
bpmn graphics actually represent business processes through xml The bpmn file is opened using a text editor:
<?xml version="1.0" encoding="UTF-8"?>
<definitions xmlns="http://www.omg.org/spec/BPMN/20100524/MODEL" xmlns:xsi="http://www.w3.org/2001/XMLSchema-instance" xmlns:xsd="http://www.w3.org/2001/XMLSchema" xmlns:activiti="http://activiti.org/bpmn" xmlns:bpmndi="http://www.omg.org/spec/BPMN/20100524/DI" xmlns:omgdc="http://www.omg.org/spec/DD/20100524/DC" xmlns:omgdi="http://www.omg.org/spec/DD/20100524/DI" typeLanguage="http://www.w3.org/2001/XMLSchema" expressionLanguage="http://www.w3.org/1999/XPath" targetNamespace="http://www.activiti.org/test">
  <process id="myProcess" name="My process" isExecutable="true">
    <startEvent id="startevent1" name="Start"></startEvent>
    <userTask id="usertask1" name="Create a leave form"></userTask>
    <sequenceFlow id="flow1" sourceRef="startevent1" targetRef="usertask1"></sequenceFlow>
    <userTask id="usertask2" name="Reviewed by Department Manager"></userTask>
    <sequenceFlow id="flow2" sourceRef="usertask1" targetRef="usertask2"></sequenceFlow>
    <userTask id="usertask3" name="Personnel review"></userTask>
    <sequenceFlow id="flow3" sourceRef="usertask2" targetRef="usertask3"></sequenceFlow>
    <endEvent id="endevent1" name="End"></endEvent>
    <sequenceFlow id="flow4" sourceRef="usertask3" targetRef="endevent1"></sequenceFlow>
  </process>
  <bpmndi:BPMNDiagram id="BPMNDiagram_myProcess">
    <bpmndi:BPMNPlane bpmnElement="myProcess" id="BPMNPlane_myProcess">
      <bpmndi:BPMNShape bpmnElement="startevent1" id="BPMNShape_startevent1">
        <omgdc:Bounds height="35.0" width="35.0" x="130.0" y="160.0"></omgdc:Bounds>
      </bpmndi:BPMNShape>
      <bpmndi:BPMNShape bpmnElement="usertask1" id="BPMNShape_usertask1">
        <omgdc:Bounds height="55.0" width="105.0" x="210.0" y="150.0"></omgdc:Bounds>
      </bpmndi:BPMNShape>
      <bpmndi:BPMNShape bpmnElement="usertask2" id="BPMNShape_usertask2">
        <omgdc:Bounds height="55.0" width="105.0" x="360.0" y="150.0"></omgdc:Bounds>
      </bpmndi:BPMNShape>
      <bpmndi:BPMNShape bpmnElement="usertask3" id="BPMNShape_usertask3">
        <omgdc:Bounds height="55.0" width="105.0" x="510.0" y="150.0"></omgdc:Bounds>
      </bpmndi:BPMNShape>
      <bpmndi:BPMNShape bpmnElement="endevent1" id="BPMNShape_endevent1">
        <omgdc:Bounds height="35.0" width="35.0" x="660.0" y="160.0"></omgdc:Bounds>
      </bpmndi:BPMNShape>
      <bpmndi:BPMNEdge bpmnElement="flow1" id="BPMNEdge_flow1">
        <omgdi:waypoint x="165.0" y="177.0"></omgdi:waypoint>
        <omgdi:waypoint x="210.0" y="177.0"></omgdi:waypoint>
      </bpmndi:BPMNEdge>
      <bpmndi:BPMNEdge bpmnElement="flow2" id="BPMNEdge_flow2">
        <omgdi:waypoint x="315.0" y="177.0"></omgdi:waypoint>
        <omgdi:waypoint x="360.0" y="177.0"></omgdi:waypoint>
      </bpmndi:BPMNEdge>
      <bpmndi:BPMNEdge bpmnElement="flow3" id="BPMNEdge_flow3">
        <omgdi:waypoint x="465.0" y="177.0"></omgdi:waypoint>
        <omgdi:waypoint x="510.0" y="177.0"></omgdi:waypoint>
      </bpmndi:BPMNEdge>
      <bpmndi:BPMNEdge bpmnElement="flow4" id="BPMNEdge_flow4">
        <omgdi:waypoint x="615.0" y="177.0"></omgdi:waypoint>
        <omgdi:waypoint x="660.0" y="177.0"></omgdi:waypoint>
      </bpmndi:BPMNEdge>
    </bpmndi:BPMNPlane>
  </bpmndi:BPMNDiagram>
</definitions>
2.2 use steps
Deploy activiti
Activiti is a workflow engine (actually a bunch of jar package API s). The business system accesses (operates) the interface of activiti, which can easily operate process related data, so as to integrate the workflow environment with the business system environment.
Process definition
Use the activiti process modeling tool (activity designer) to define the business process (. bpmn file).
The. bpmn file is the business process definition file, which defines the business process through xml.
Process definition deployment
activiti deploys the business process definition (. bpmn file).
Use the api provided by activiti to store the process definition content, and you can query the defined content during the execution of activiti
Activiti execution stores the process definition content in the database
Start a process instance
Process instances are also called processinstances
Starting a process instance means starting a business process run.
After the employee leave process definition deployment is completed, if Zhang San wants to leave, you can start a process instance. If Li Si wants to leave, you can also start a process instance. The execution of the two processes does not affect each other.
User query to-do task
Because now the business process of the system has been managed by activiti, activiti can query where the current process has been executed and what tasks the current user needs to handle. These activiti can help us manage them without the need for developers to write queries in sql statements.
User handling tasks
After you query a to-do task, you can handle a task. If this task is completed, other users need to handle it. For example, after the purchase order is created, it is reviewed by the Department Manager. This process is also completed by activiti.
End of process
When the task processing is completed and there is no next task node, the process instance is completed.
3, Activiti environment
3.1 development environment
Jdk1.8 or above
Mysql 5 and above
Tomcat8.5
IDEA
Note: activiti's process definition tool plug-in can be installed under IDEA or Eclipse tool
3.2 Activiti environment
We use: activiti7 0.0. Beta1 supports spring 5 by default
3.2.1 download activiti7
Activiti download address: http://activiti.org/download.html , Maven's dependencies are as follows:
<dependencyManagement>
   <dependencies>
       <dependency>
           <groupId>org.activiti</groupId>
           <artifactId>activiti-dependencies</artifactId>
           <version>7.0.0.Beta1</version>
           <scope>import</scope>
           <type>pom</type>
       </dependency>
   </dependencies>
</dependencyManagement>
1) Database:
activiti needs database support to run. The supported databases include H2, mysql, Oracle, Postgres, MSSQL and DB2.
3.2.2 installation of process designer under IDEA
Find the submenu "Settings" in the File menu of IDEA, and then select the "plugins" menu on the left, as shown in the following figure:
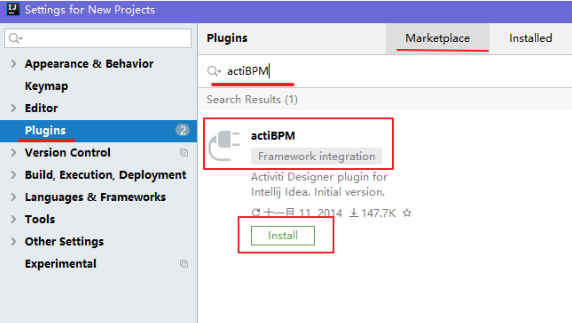
At this point, we can search the actiBPM plug-in, which is the IDEA version of Activiti Designer. We click Install to install it.
After installation, the page is as follows:
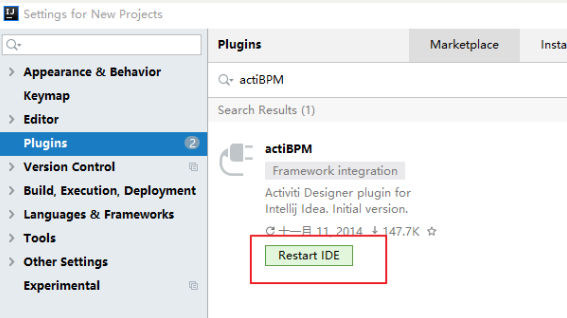
When prompted that idea needs to be restarted, click restart.
After restarting, open Plugins under Settings again, click Installed on the right, and see actiBPM in the list, which indicates that the installation has been successful, as shown in the following figure:
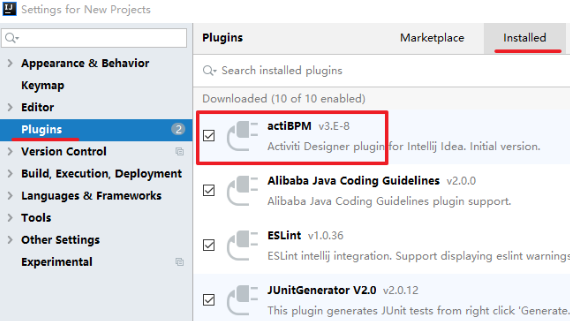
In later courses, we will use this process designer to design the process of Activiti.
3.3 database support of activiti
Activiti needs the support of the database at runtime. It uses 25 tables to read the content of the process definition node into the database table for subsequent use.
3.3.1 database supported by activiti
activiti supports the following databases and versions:
| Database type | edition | JDBC connection example | explain |
|---|---|---|---|
| h2 | 1.3.168 | jdbc:h2:tcp://localhost/activiti | Default configured database |
| mysql | 5.1.21 | jdbc:mysql://localhost:3306/activiti?autoReconnect=true | Using MySQL connector java to drive the test |
| oracle | 11.2.0.1.0 | jdbc:oracle:thin:@localhost:1521:xe | |
| postgres | 8.1 | jdbc:postgresql://localhost:5432/activiti | |
| db2 | DB2 10.1 using db2jcc4 | jdbc:db2://localhost:50000/activiti | |
| mssql | 2008 using sqljdbc4 | jdbc:sqlserver://localhost:1433/activiti |
3.3.2 generating tables in MySQL
3.3.2.1 create database
Create mysql database activiti (any name):
CREATE DATABASE activiti DEFAULT CHARACTER SET utf8;
3.3.2.2 generating tables using java code
1) Create java project
Create java maven project with idea, named activiti01.
2) Add maven dependent coordinates (jar package)
First, add the jar package required by ProcessEngine to the java project, including:
-
activiti-engine-7.0.0.beta1.jar
-
jar packages that activiti depends on: mybatis, alf4j, log4j, etc
-
spring package that activiti depends on
-
mysql database driver
-
Third party data connection pool dbcp
-
Unit test junit-4.12 jar
We use maven to build the project, so we should import the coordinates corresponding to these jar s into POM XML file.
The complete dependencies are as follows:
<properties>
    <slf4j.version>1.6.6</slf4j.version>
    <log4j.version>1.2.12</log4j.version>
    <activiti.version>7.0.0.Beta1</activiti.version>
</properties>
<dependencies>
    <dependency>
        <groupId>org.activiti</groupId>
        <artifactId>activiti-engine</artifactId>
        <version>${activiti.version}</version>
    </dependency>
    <dependency>
        <groupId>org.activiti</groupId>
        <artifactId>activiti-spring</artifactId>
        <version>${activiti.version}</version>
    </dependency>
    <!-- bpmn Model processing -->
    <dependency>
        <groupId>org.activiti</groupId>
        <artifactId>activiti-bpmn-model</artifactId>
        <version>${activiti.version}</version>
    </dependency>
    <!-- bpmn transformation -->
    <dependency>
        <groupId>org.activiti</groupId>
        <artifactId>activiti-bpmn-converter</artifactId>
        <version>${activiti.version}</version>
    </dependency>
    <!-- bpmn json data conversion -->
    <dependency>
        <groupId>org.activiti</groupId>
        <artifactId>activiti-json-converter</artifactId>
        <version>${activiti.version}</version>
    </dependency>
    <!-- bpmn layout -->
    <dependency>
        <groupId>org.activiti</groupId>
        <artifactId>activiti-bpmn-layout</artifactId>
        <version>${activiti.version}</version>
    </dependency>
    <!-- activiti Cloud support -->
    <dependency>
        <groupId>org.activiti.cloud</groupId>
        <artifactId>activiti-cloud-services-api</artifactId>
        <version>${activiti.version}</version>
    </dependency>
    <!-- mysql drive -->
    <dependency>
        <groupId>mysql</groupId>
        <artifactId>mysql-connector-java</artifactId>
        <version>5.1.40</version>
    </dependency>
    <!-- mybatis -->
    <dependency>
        <groupId>org.mybatis</groupId>
        <artifactId>mybatis</artifactId>
        <version>3.4.5</version>
    </dependency>
    <!-- Link pool -->
    <dependency>
        <groupId>commons-dbcp</groupId>
        <artifactId>commons-dbcp</artifactId>
        <version>1.4</version>
    </dependency>
    <dependency>
        <groupId>junit</groupId>
        <artifactId>junit</artifactId>
        <version>4.12</version>
    </dependency>
    <!-- log start -->
    <dependency>
        <groupId>log4j</groupId>
        <artifactId>log4j</artifactId>
        <version>${log4j.version}</version>
    </dependency>
    <dependency>
        <groupId>org.slf4j</groupId>
        <artifactId>slf4j-api</artifactId>
        <version>${slf4j.version}</version>
    </dependency>
    <dependency>
        <groupId>org.slf4j</groupId>
        <artifactId>slf4j-log4j12</artifactId>
        <version>${slf4j.version}</version>
    </dependency>
</dependencies>
3) Add log4j log configuration
We use log4j log package to configure logs
Create log4j under resources properties
# Set root category priority to INFO and its only appender to CONSOLE.
#log4j.rootCategory=INFO, CONSOLE debug info warn error fatal
log4j.rootCategory=debug, CONSOLE, LOGFILE
# Set the enterprise logger category to FATAL and its only appender to CONSOLE.
log4j.logger.org.apache.axis.enterprise=FATAL, CONSOLE
# CONSOLE is set to be a ConsoleAppender using a PatternLayout.
log4j.appender.CONSOLE=org.apache.log4j.ConsoleAppender
log4j.appender.CONSOLE.layout=org.apache.log4j.PatternLayout
log4j.appender.CONSOLE.layout.ConversionPattern=%d{ISO8601} %-6r[%15.15t] %-5p %30.30c %x - %m\n
# LOGFILE is set to be a File appender using a PatternLayout.
log4j.appender.LOGFILE=org.apache.log4j.FileAppender
log4j.appender.LOGFILE.File=f:\act\activiti.log
log4j.appender.LOGFILE.Append=true
log4j.appender.LOGFILE.layout=org.apache.log4j.PatternLayout
log4j.appender.LOGFILE.layout.ConversionPattern=%d{ISO8601} %-6r[%15.15t] %-5p %30.30c %x - %m\n
4) Add activiti profile
We use the default method provided by activiti to create mysql tables.
The default requirement is to create activiti under resources cfg. XML file. Note: the default directory and file name cannot be modified, because it has been set in activiti's source code. Go to a fixed directory to read the file with a fixed file name.
<?xml version="1.0" encoding="UTF-8"?>
<beans xmlns="http://www.springframework.org/schema/beans"
xmlns:xsi="http://www.w3.org/2001/XMLSchema-instance"
xmlns:context="http://www.springframework.org/schema/context"
xmlns:tx="http://www.springframework.org/schema/tx"
xsi:schemaLocation="http://www.springframework.org/schema/beans
                    http://www.springframework.org/schema/beans/spring-beans.xsd
http://www.springframework.org/schema/contex
http://www.springframework.org/schema/context/spring-context.xsd
http://www.springframework.org/schema/tx
http://www.springframework.org/schema/tx/spring-tx.xsd">
</beans>
5) In activiti cfg. XML
The default method is in activiti cfg. The name of the bean in XML is processEngineConfiguration, which cannot be modified
There are two configuration methods: one is to configure the data source separately, and the other is not to configure the data source separately
1. Directly configure processEngineConfiguration
processEngineConfiguration is used to create a ProcessEngine. When creating a ProcessEngine, it will perform database operations.
<?xml version="1.0" encoding="UTF-8"?>
<beans xmlns="http://www.springframework.org/schema/beans"
       xmlns:xsi="http://www.w3.org/2001/XMLSchema-instance"
       xmlns:context="http://www.springframework.org/schema/context"
       xmlns:tx="http://www.springframework.org/schema/tx"
       xsi:schemaLocation="http://www.springframework.org/schema/beans
                    http://www.springframework.org/schema/beans/spring-beans.xsd
http://www.springframework.org/schema/contex
http://www.springframework.org/schema/context/spring-context.xsd
http://www.springframework.org/schema/tx
http://www.springframework.org/schema/tx/spring-tx.xsd">
    <!-- default id The corresponding value is processEngineConfiguration -->
    <!-- processEngine Activiti New process engine -->
    <bean id="processEngineConfiguration"
          class="org.activiti.engine.impl.cfg.StandaloneProcessEngineConfiguration">
        <property name="jdbcDriver" value="com.mysql.jdbc.Driver"/>
        <property name="jdbcUrl" value="jdbc:mysql:///activiti"/>
        <property name="jdbcUsername" value="root"/>
        <property name="jdbcPassword" value="123456"/>
        <!-- activiti Database table processing strategy -->
        <property name="databaseSchemaUpdate" value="true"/>
    </bean>
</beans>
2. After configuring the data source, reference it in processEngineConfiguration
First configure the data source
<?xml version="1.0" encoding="UTF-8"?>
<beans xmlns="http://www.springframework.org/schema/beans"
       xmlns:xsi="http://www.w3.org/2001/XMLSchema-instance"
       xmlns:context="http://www.springframework.org/schema/context"
       xmlns:tx="http://www.springframework.org/schema/tx"
       xsi:schemaLocation="http://www.springframework.org/schema/beans
                    http://www.springframework.org/schema/beans/spring-beans.xsd
http://www.springframework.org/schema/contex
http://www.springframework.org/schema/context/spring-context.xsd
http://www.springframework.org/schema/tx
http://www.springframework.org/schema/tx/spring-tx.xsd">

    <!-- Link pools can be used here dbcp-->
    <bean id="dataSource" class="org.apache.commons.dbcp.BasicDataSource">
        <property name="driverClassName" value="com.mysql.jdbc.Driver" />
        <property name="url" value="jdbc:mysql:///activiti" />
        <property name="username" value="root" />
        <property name="password" value="123456" />
        <property name="maxActive" value="3" />
        <property name="maxIdle" value="1" />
    </bean>

    <bean id="processEngineConfiguration"
          class="org.activiti.engine.impl.cfg.StandaloneProcessEngineConfiguration">
        <!-- The reference data source has been set-->
        <property name="dataSource" ref="dataSource" />
        <!-- activiti Database table processing strategy -->
        <property name="databaseSchemaUpdate" value="true"/>
    </bean>
</beans>
6) java class program generation table
Create a test class, call activiti's tool class, and generate the database tables required by acitivti.
If you directly use the tool class ProcessEngines provided by activiti, the activiti.com under the classpath will be read by default cfg. XML file, read the database configuration in it, create a ProcessEngine, and automatically create a table when creating a ProcessEngine.
The code is as follows:
package com.itheima.activiti01.test;

import org.activiti.engine.ProcessEngine;
import org.activiti.engine.ProcessEngineConfiguration;
import org.junit.Test;

public class TestDemo {
    /**
     * Generate database tables for activiti
     */
    @Test
    public void testCreateDbTable() {
        //Use activiti. Under classpath cfg. Create a processEngine from the configuration in XML
		ProcessEngine processEngine = ProcessEngines.getDefaultProcessEngine();
		System.out.println(processEngine);
    }
}
explain:
1. Run the above program segment to complete the creation of activiti table by changing activiti cfg. The value of the databaseSchemaUpdate parameter in XML implements different data table processing strategies.
2. The above method getDefaultProcessEngine method is executed from activiti cfg. Fixed name processEngineConfiguration not found in XML.
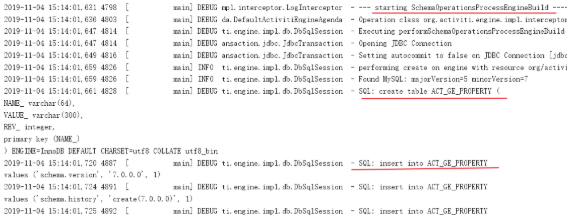
During the execution of the test program, the console of idea will output a log indicating that the program is creating a data table, similar to the following. Note the red line:
After execution, we checked the database and created 25 tables. The results are as follows:
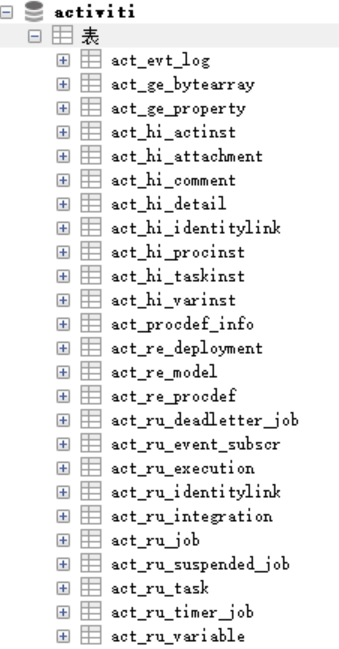
At this point, we will complete the creation of databases and tables required for activiti operation.
Table 3.4 structure introduction
3.4.1 naming rules and functions of tables
When we see the table just created, we find that all Activiti tables are represented by ACT_ start.
The second part is a two letter identification indicating the purpose of the table. The purpose also corresponds to the API of the service.
ACT_RE:'RE 'means repository. The prefix table contains process definitions and process static resources (images, rules, etc.).
ACT_RU: 'RU' means runtime. These runtime tables contain running data such as process instances, tasks, variables, asynchronous tasks, etc. Activiti only saves these data during the execution of the process instance, and these records will be deleted at the end of the process. In this way, the runtime table can always be small and fast.
ACT_HI: 'HI' indicates history. These tables contain historical data, such as historical process instances, variables, tasks, and so on.
ACT_GE: GE stands for general. General data for different scenarios
3.4.2 introduction to activiti data sheet
| Table classification | Table name | explain |
|---|---|---|
| General data | ||
| [ACT_GE_BYTEARRAY] | Common process definitions and process resources | |
| [ACT_GE_PROPERTY] | System related properties | |
| Process history | ||
| [ACT_HI_ACTINST] | Historical process instances | |
| [ACT_HI_ATTACHMENT] | Historical process attachments | |
| [ACT_HI_COMMENT] | Historical explanatory information | |
| [ACT_HI_DETAIL] | Details of historical process operation | |
| [ACT_HI_IDENTITYLINK] | User relationship during historical process operation | |
| [ACT_HI_PROCINST] | Historical process instances | |
| [ACT_HI_TASKINST] | Historical task instances | |
| [ACT_HI_VARINST] | Variable information in historical process operation | |
| Process definition table | ||
| [ACT_RE_DEPLOYMENT] | Deployment unit information | |
| [ACT_RE_MODEL] | Model information | |
| [ACT_RE_PROCDEF] | Deployed process definitions | |
| Run instance table | ||
| [ACT_RU_EVENT_SUBSCR] | Runtime events | |
| [ACT_RU_EXECUTION] | Runtime process execution instance | |
| [ACT_RU_IDENTITYLINK] | The runtime user relationship information stores the relevant information of task nodes and participants | |
| [ACT_RU_JOB] | Runtime job | |
| [ACT_RU_TASK] | Runtime tasks | |
| [ACT_RU_VARIABLE] | Runtime variable table |
4, Activiti class diagram
Above, we have completed the generation of Activiti database table. In the java code, we call the tool class of Activiti. Let's understand the class relationship of Activiti
4.1 class diagram

In the new version, we can find through experiments that IdentityService and FormService have been deleted.
So we won't explain these two services later, but there are still these two services in the old version. Students need to know about them
4.2 activiti.cfg.xml
activiti's engine configuration file includes the definition of process engine configuration, data source definition, transaction manager, etc. This file is actually a spring configuration file.
4.3 process engine configuration class
The configuration class of the process engine (ProcessEngineConfiguration). The workflow engine procecengine can be created through ProcessEngineConfiguration. The two common methods are as follows:
4.3.1 StandaloneProcessEngineConfiguration
The standalone process engine configurationactiviti can be run separately to create a process engine, and the Activiti will handle transactions by itself.
Configuration file mode:
Usually in activiti cfg. Define a bean with id processEngineConfiguration in the XML configuration file
The method is as follows:
<bean id="processEngineConfiguration"
          class="org.activiti.engine.impl.cfg.StandaloneProcessEngineConfiguration">
        <!--Configuration database related information-->
        <!--Database driven-->
        <property name="jdbcDriver" value="com.mysql.jdbc.Driver"/>
        <!--Database link-->
        <property name="jdbcUrl" value="jdbc:mysql:///activiti"/>
        <!--Database user name-->
        <property name="jdbcUsername" value="root"/>
        <!--Database password-->
        <property name="jdbcPassword" value="123456"/>
        <!--actviti Strategy of database table generation  true - If the corresponding table already exists in the database, it can be used directly. If it does not exist, it will be created-->
        <property name="databaseSchemaUpdate" value="true"/>
    </bean>
You can also join the connection pool:
<?xml version="1.0" encoding="UTF-8"?>
<beans xmlns="http://www.springframework.org/schema/beans"
       xmlns:xsi="http://www.w3.org/2001/XMLSchema-instance"
       xmlns:context="http://www.springframework.org/schema/context"
       xmlns:tx="http://www.springframework.org/schema/tx"
       xsi:schemaLocation="http://www.springframework.org/schema/beans
                    http://www.springframework.org/schema/beans/spring-beans.xsd
http://www.springframework.org/schema/contex
http://www.springframework.org/schema/context/spring-context.xsd
http://www.springframework.org/schema/tx
http://www.springframework.org/schema/tx/spring-tx.xsd">
    <bean id="dataSource" class="org.apache.commons.dbcp.BasicDataSource">
        <property name="driverClassName" value="com.mysql.jdbc.Driver"/>
        <property name="url" value="jdbc:mysql:///activiti"/>
        <property name="username" value="root"/>
        <property name="password" value="123456"/>
        <property name="maxActive" value="3"/>
        <property name="maxIdle" value="1"/>
    </bean>
    <!--In default mode bean of id  Fixed as processEngineConfiguration-->
    <bean id="processEngineConfiguration"
          class="org.activiti.engine.impl.cfg.StandaloneProcessEngineConfiguration">
        <!--Introduce the link pool configured above-->
        <property name="dataSource" ref="dataSource"/>
        <!--actviti Strategy of database table generation  true - If the corresponding table already exists in the database, it can be used directly. If it does not exist, it will be created-->
        <property name="databaseSchemaUpdate" value="true"/>
    </bean>
</beans>
4.3.2 SpringProcessEngineConfiguration
Via org activiti. spring. Spring process engine configuration is integrated with spring.
To create a spring and activiti integration profile:
activity-spring.cfg.xml (name can be modified)
<beans xmlns="http://www.springframework.org/schema/beans"
   xmlns:xsi="http://www.w3.org/2001/XMLSchema-instance" xmlns:mvc="http://www.springframework.org/schema/mvc"
xmlns:context="http://www.springframework.org/schema/context"
   xmlns:aop="http://www.springframework.org/schema/aop" xmlns:tx="http://www.springframework.org/schema/tx"
xsi:schemaLocation="http://www.springframework.org/schema/beans
      http://www.springframework.org/schema/beans/spring-beans-3.1.xsd
      http://www.springframework.org/schema/mvc
      http://www.springframework.org/schema/mvc/spring-mvc-3.1.xsd
      http://www.springframework.org/schema/context
       http://www.springframework.org/schema/context/spring-context-3.1.xsd
      http://www.springframework.org/schema/aop
      http://www.springframework.org/schema/aop/spring-aop-3.1.xsd
      http://www.springframework.org/schema/tx
      http://www.springframework.org/schema/tx/spring-tx-3.1.xsd ">
   <!-- Workflow engine configuration bean -->
   <bean id="processEngineConfiguration" class="org.activiti.spring.SpringProcessEngineConfiguration">
      <!-- data source -->
      <property name="dataSource" ref="dataSource" />
      <!-- use spring Transaction manager -->
      <property name="transactionManager" ref="transactionManager" />
      <!-- Database policy -->
      <property name="databaseSchemaUpdate" value="drop-create" />
      <!-- activiti Scheduled task closed -->
     <property name="jobExecutorActivate" value="false" />
   </bean>
   <!-- Process engine -->
   <bean id="processEngine" class="org.activiti.spring.ProcessEngineFactoryBean">
      <property name="processEngineConfiguration" ref="processEngineConfiguration" />
   </bean>
   <!-- Resource services service -->
   <bean id="repositoryService" factory-bean="processEngine"
      factory-method="getRepositoryService" />
   <!-- Process operation service -->
   <bean id="runtimeService" factory-bean="processEngine"
      factory-method="getRuntimeService" />
   <!-- task management service -->
   <bean id="taskService" factory-bean="processEngine"
      factory-method="getTaskService" />
   <!-- Historical management service -->
   <bean id="historyService" factory-bean="processEngine" factory-method="getHistoryService" />
   <!-- user management  service -->
   <bean id="identityService" factory-bean="processEngine" factory-method="getIdentityService" />
   <!-- Engine management service -->
   <bean id="managementService" factory-bean="processEngine" factory-method="getManagementService" />
   <!-- data source -->
   <bean id="dataSource" class="org.apache.commons.dbcp.BasicDataSource">
      <property name="driverClassName" value="com.mysql.jdbc.Driver" />
      <property name="url" value="jdbc:mysql://localhost:3306/activiti" />
      <property name="username" value="root" />
      <property name="password" value="mysql" />
      <property name="maxActive" value="3" />
      <property name="maxIdle" value="1" />
   </bean>
   <!-- Transaction manager -->
   <bean id="transactionManager"
    class="org.springframework.jdbc.datasource.DataSourceTransactionManager">
      <property name="dataSource" ref="dataSource" />
   </bean>
   <!-- notice -->
   <tx:advice id="txAdvice" transaction-manager="transactionManager">
      <tx:attributes></tx:attributes>
          <!-- Communication behavior -->
          <tx:method name="save*" propagation="REQUIRED" />
          <tx:method name="insert*" propagation="REQUIRED" />
          <tx:method name="delete*" propagation="REQUIRED" />
          <tx:method name="update*" propagation="REQUIRED" />
          <tx:method name="find*" propagation="SUPPORTS" read-only="true" />
          <tx:method name="get*" propagation="SUPPORTS" read-only="true" />
       </tx:attributes>
   </tx:advice>
   <!-- Slice, modify the tangent point configuration according to the specific project -->
   <aop:config proxy-target-class="true">
      <aop:advisor advice-ref="txAdvice"  pointcut="execution(* com.itheima.ihrm.service.impl.*.(..))"* />
  </aop:config>
</beans>
Create processEngineConfiguration
ProcessEngineConfiguration configuration = ProcessEngineConfiguration.createProcessEngineConfigurationFromResource("activiti.cfg.xml")
The code above requires activiti cfg. XML must have a bean of processEngineConfiguration
You can also use the following method to change the bean Name:
ProcessEngineConfiguration.createProcessEngineConfigurationFromResource(String resource, String beanName);
4.4 workflow engine creation
The workflow engine is equivalent to a facade interface. The process engine is created through the process engine configuration, and each service interface is created through the process engine.
4.4.1 default creation method
Set activiti cfg. The XML file name and path are fixed, and activiti cfg. There is the configuration of processEngineConfiguration in the XML file. You can use the following code to create processEngine:
//Directly use the tool class ProcessEngines, and use activiti. Com under the classpath cfg. Create a processEngine from the configuration in XML
ProcessEngine processEngine = ProcessEngines.getDefaultProcessEngine();
System.out.println(processEngine);
4.4.2 general creation method
//Build ProcessEngineConfiguration first
ProcessEngineConfiguration configuration = ProcessEngineConfiguration.createProcessEngineConfigurationFromResource("activiti.cfg.xml");
//Create a ProcessEngine through ProcessEngineConfiguration, and the database will be created
ProcessEngine processEngine = configuration.buildProcessEngine();
4.5 Servcie service interface
Service is a service interface provided by the workflow engine for workflow deployment, execution and management. We can use these interfaces to operate the data table corresponding to the service
4.5.1 Service creation method
Create Service through ProcessEngine
The method is as follows:
RuntimeService runtimeService = processEngine.getRuntimeService();
RepositoryService repositoryService = processEngine.getRepositoryService();
TaskService taskService = processEngine.getTaskService();
4.5.2 Service overview
| service name | service role |
|---|---|
| RepositoryService | activiti's resource management class |
| RuntimeService | activiti's process operation management class |
| TaskService | activiti's task management class |
| HistoryService | activiti's history management class |
| ManagerService | activiti's engine management class |
Brief introduction:
RepositoryService
Is the resource management class of activiti, which provides operations for managing and controlling process publishing packages and process definitions. The business process diagram designed with the workflow modeling tool needs to use this service to deploy the content of the process definition file to the computer.
In addition to deploying process definitions, you can also: query the publishing package and process definitions in the engine.
Pause or activate the release package, corresponding to all and specific process definitions. Pause means that they can no longer perform any operation, and activation is the corresponding reverse operation. Obtain a variety of resources, such as files contained in the distribution package, or flow charts automatically generated by the engine.
Get the pojo version of the process definition, which can be used to parse the process through java instead of xml.
RuntimeService
Activiti's process operation management class. You can get a lot of information about process execution from this service class
TaskService
Activiti's task management class. You can get the information of the task from this class.
HistoryService
Activiti's history management class can query historical information. When executing a process, the engine will save a lot of data (according to the configuration), such as the start time of the process instance, the participants of the task, the time to complete the task, the execution path of each process instance, and so on. This service mainly obtains these data through the query function.
ManagementService
Activiti's engine management class provides the management and maintenance functions of activiti process engine. These functions are not used in workflow driven applications, but mainly used for the daily maintenance of activiti system.
5, Getting started with Activiti
In this chapter, we will create an Activiti workflow and start the process.
Creating an Activiti workflow mainly includes the following steps:
1. Define the process. According to the BPMN specification, use the process definition tool to describe the whole process with process symbols
2. Deploy the process, load the drawn process definition file into the database and generate the data of the table
3. Start the process and use java code to manipulate the contents of the database table
5.1 process symbols
BPMN 2.0 is an abbreviation for business process modeling notation 2.0.
It was founded and developed by the Business Process Management Initiative, a non-profit association. As an identifier, BPMN 2.0 is a set of symbol specifications that use some symbols to clarify the business process design flowchart. It can improve the communication efficiency in business modeling.
Currently BPMN2 0 is the latest version, which is used for layout and visual communication in the context of BPM.
Next, let's understand the common symbols in process design.
BPMN2. The basic compliance of 0 mainly includes:
Event event

Activity
Activity is a general term for work or task. An activity can be a task or a sub process of the current process; Second, you can specify different types of activities. Common activities are as follows:

GateWay gateway
Gateways are used to process decisions. There are several common gateways to understand:

Exclusive gateway (x)
——Only one path will be selected. When the process is executed to the gateway, it is calculated one by one according to the order of the output flow. When the calculation result of the condition is true, continue to execute the output flow of the current gateway;
If the calculation result of multiple lines is true, the first line with the value of true will be executed. If the calculation result of all gateways is not true, the engine will throw an exception.
The exclusive gateway needs to be used in combination with the conditional sequential flow. The default attribute specifies the default sequential flow. When all conditions are not met, the default sequential flow will be executed.
Parallel gateway (+)
——All paths will be selected at the same time
Split - all output sequential streams are executed in parallel, and a parallel execution line is created for each sequential stream.
Merge - all lines split and executed from the parallel gateway wait here until all lines are executed.
Containment gateway (+)
——Multiple lines can be executed at the same time, or conditions can be set on the gateway
Split - calculate the expression on each line. When the expression calculation result is true, create a parallel line and continue execution
Merge - all lines split and executed from the parallel gateway wait here until all lines are executed.
Event gateway (+)
——It is specially set for intermediate capture events, allowing multiple output streams to point to multiple different intermediate capture events. After the process is executed to the event gateway, the process is in a waiting state. You need to wait for an event to be thrown to convert the waiting state to an active state.
Flow direction
A flow is a connection connecting two process nodes. Common flow directions include the following:

5.2 use of process designer
Activiti designer uses
Palette (Sketchpad)
You can use it by installing plug-ins in idea. The drawing board includes the following nodes:
Connection - connection
Event - event
Task - task
Gateway - gateway
Container - container
Boundary event - boundary event
Intermediate event -- intermediate event
After the flowchart is designed, save and generate it bpmn file
New process (IDEA tool)
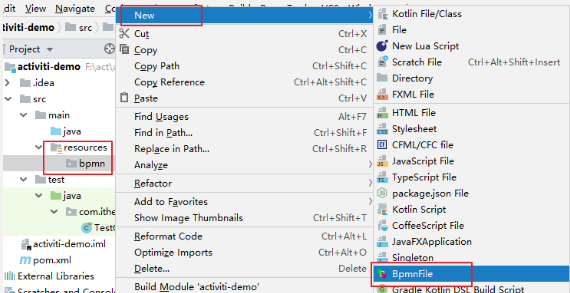
First, select the directory where the graphics are stored (select the bpmn directory under resources), and click the menu: New - > bpmnfile, as shown in the figure:
In the pop-up box as shown in the figure below, enter event to indicate the travel approval process:
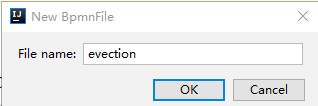
After the name evention (the default extension is bpmn), you can see the process design page, as shown in the figure:
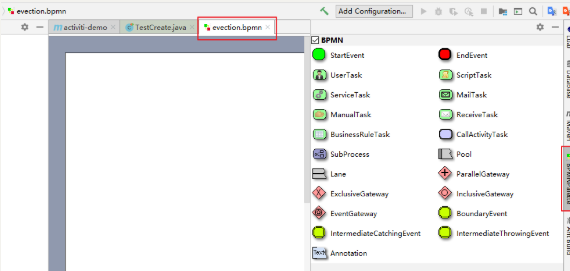
The left area is the drawing area and the right area is the palette area
Click the element of the drawing board first to draw on the left
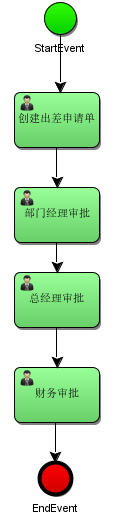
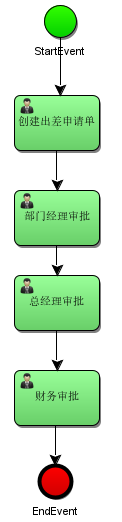
Drawing process
Use the skateboard to draw the process. Drag the icon from the right to the drawing board on the left. The final effect is as follows:
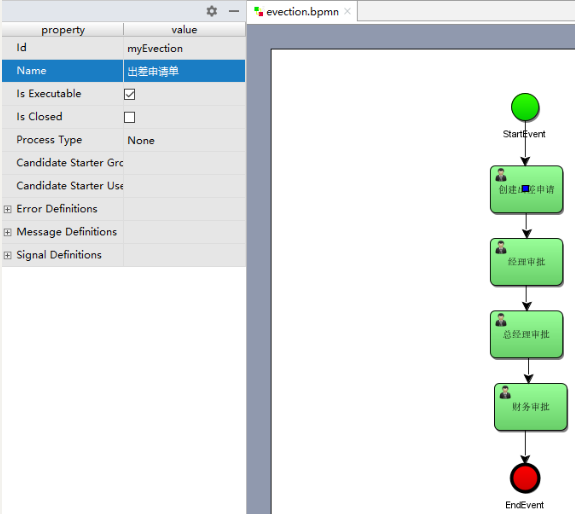
Specify process definition Key
The process definition key is the ID of the process definition. View the process key in the properties view
Designated task leader
Specify the person in charge of each task node in the properties view, for example, the person in charge of filling in the travel application is zhangsan
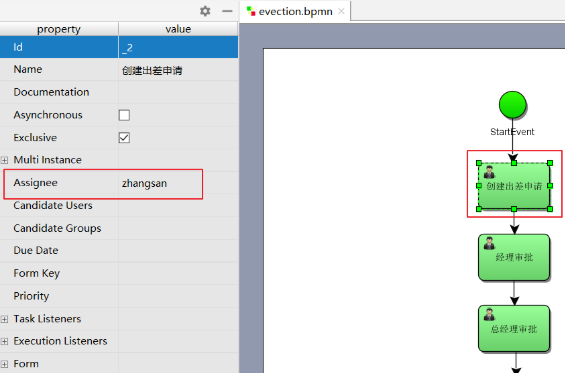
The manager's approval leader is jerry
The general manager's approval leader is jack
The person in charge of financial approval is rose
6, Process operation
6.1 process definition
summary
The process definition is offline according to BPMN2 0 standard to describe business processes, usually using plug-ins in idea to model business processes.
Use the designer designer under idea to draw the process and generate two files: bpmn and png
. bpmn file
Using activiti desinger to design business processes will generate bpmn file. We have created the bpmn file above
The BPMN 2.0 root node is the definitions node. Multiple process definitions can be defined in this element (however, we recommend that each file contain only one process definition, which can simplify the maintenance difficulty in the development process). Note that the definitions element must contain at least the declarations of xmlns and targetNamespace. TargetNamespace can be any value and is used to classify process instances.
Process definition part: defines the description of each node of the process and the process flow between nodes.
Process layout definition: defines the location coordinates and other information of each process node on the flowchart.
Generate png picture file
Operation mode in IDEA tool
1. Modify the file suffix to xml
First, set evention The BPMN file is renamed evention XML, as shown below:
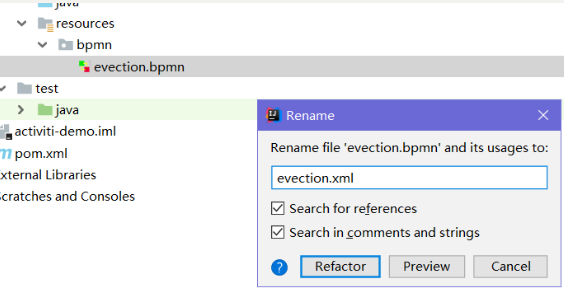
evection. The bpmn file before XML modification has the following effects:
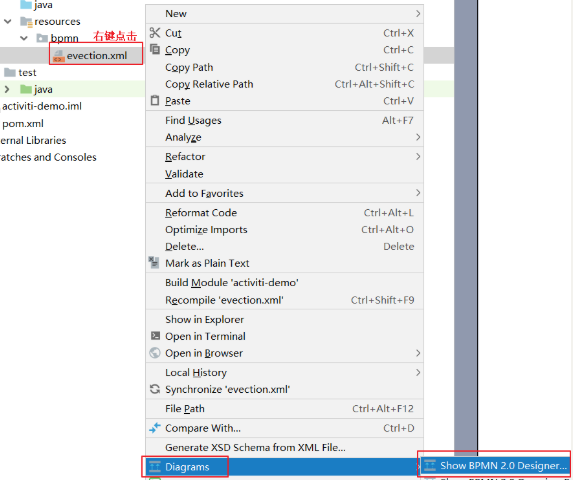
2. Open using designer designer xml file
In evention On the XML file, right-click and select the Diagrams menu, and then select Show BPMN2 0 Designer…
3. View open files
After opening, there is garbled code
4. Solve Chinese garbled code
1. Open Settings, find file encoding, and select UTF-8 for all encoding options
2. Open the IDEA installation path and find the following installation directory
According to the version installed by myself, I use 64 bit idea, so in idea 64 exe. A command is appended to the last line of the vmoptions file: - dfile encoding=UTF-8
Be sure not to have spaces, otherwise you will not be able to open it when restarting the IDEA, and then restart the IDEA.
Here, solve the problem of garbled code
5. Export as picture file
Click the small icon of Export To File to open the following window, pay attention to fill in the file name and extension, and select the location to save the picture:
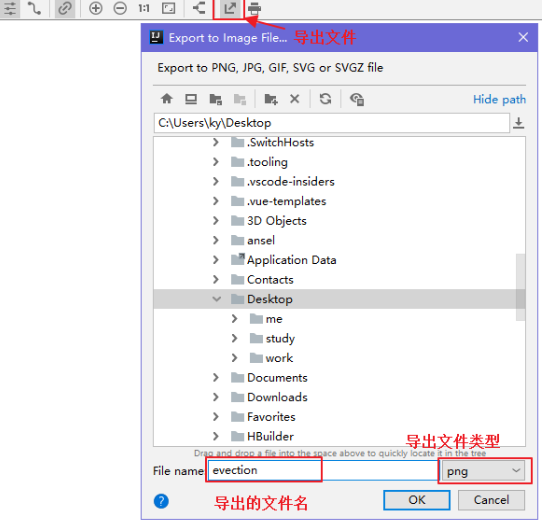
Then, we copy the png file to the BPMN directory under resources, and put evention XML is renamed evention. XML bpmn.
6.2 process definition and deployment
summary
Deploying the process defined in the designer to the activiti database is the process definition deployment.
The bpmn and png files of the process definition can be added and deployed to activiti one by calling the api of activiti. You can also zip the two files for deployment.
Single file deployment mode
Deploy the bpmn file and png image file respectively.
package com.itheima.test;

import org.activiti.engine.ProcessEngine;
import org.activiti.engine.ProcessEngines;
import org.activiti.engine.RepositoryService;
import org.activiti.engine.repository.Deployment;
import org.junit.Test;

public class ActivitiDemo {
    /**
     * Deployment process definition
     */
    @Test
    public void testDeployment(){
//        1. Create ProcessEngine
        ProcessEngine processEngine = ProcessEngines.getDefaultProcessEngine();
//        2. Get the RepositoryService instance
        RepositoryService repositoryService = processEngine.getRepositoryService();
//        3. Deploy using repository service
        Deployment deployment = repositoryService.createDeployment()
                .addClasspathResource("bpmn/evection.bpmn") // Add bpmn resource
                .addClasspathResource("bpmn/evection.png")  // Add png resource
                .name("Travel application process")
                .deploy();
//        4. Output deployment information
        System.out.println("Process deployment id: " + deployment.getId());
        System.out.println("Process deployment Name:" + deployment.getName());
    }
}
After this operation, activiti will save the bpm file and picture file specified in the above code in the activiti database.
Compressed package deployment method
Set evention BPMN and evention PNG is compressed into a zip package.
@Test
	public void deployProcessByZip() {
		// Define zip input stream
		InputStream inputStream = this
				.getClass()
				.getClassLoader()
				.getResourceAsStream(
						"bpmn/evection.zip");
		ZipInputStream zipInputStream = new ZipInputStream(inputStream);
		// Get repositoryService
		RepositoryService repositoryService = processEngine
				.getRepositoryService();
		// Process deployment
		Deployment deployment = repositoryService.createDeployment()
				.addZipInputStream(zipInputStream)
				.deploy();
		System.out.println("Process deployment id: " + deployment.getId());
		System.out.println("Process deployment Name:" + deployment.getName());
	}
After this operation, activiti will save the bpm file and picture file specified in the above code in the activiti database.
Operation data sheet
The three tables of process definition post deployment operation activiti are as follows:
act_ re_ The deployment process defines the deployment table, and one record is added for each deployment
act_re_procdef process definition table. A record will be added in this table when deploying each new process definition
act_ge_bytearray process resource table
Next, let's see what data is written:
SELECT * FROM act_re_deployment #The process definition deployment table records the process deployment information
result:

SELECT * FROM act_re_procdef #The process definition table records the process definition information
result:
Note that the KEY field is used to uniquely identify different processes

SELECT * FROM act_ge_bytearray #Resource table
result:

be careful:
act_re_deployment and act_re_procdef has a one to many relationship. One record is generated in the process deployment table when deployed at one time, but multiple process definitions can be deployed at one time. Each process definition generates one record in the process definition table. Each process is defined in act_ge_bytearray will have two resource records, bpmn and png.
Suggestion: deploy one process at a time, so that the deployment table and the process definition table have a one-to-one relationship, which is convenient to read the process deployment and process definition information.
6.3 start up process example
After the process definition is deployed in activiti, the business process can be managed through workflow, that is, the travel application process deployed above can be used.
For this process, starting a process means launching a new travel application form, which is equivalent to the relationship between java classes and java objects. After the class is defined, you need to create a new object for use. Of course, you can create multiple new objects. For the travel application process, Zhang San needs to start a process instance when initiating a travel application form, and a process instance when initiating a travel application form.
The code is as follows:
    /**
     * Start process instance
     */
    @Test
    public void testStartProcess(){
//        1. Create ProcessEngine
        ProcessEngine processEngine = ProcessEngines.getDefaultProcessEngine();
//        2. Get RunTimeService
        RuntimeService runtimeService = processEngine.getRuntimeService();
//        3. Start the process according to the process definition Id
        ProcessInstance processInstance = runtimeService
                .startProcessInstanceByKey("myEvection");
//        Output content
        System.out.println("Process definition id: " + processInstance.getProcessDefinitionId());
        System.out.println("Process instance id: " + processInstance.getId());
        System.out.println("current activity Id: " + processInstance.getActivityId());
    }
Operation data sheet
act_hi_actinst process instance execution history
act_ hi_ History information of participating users in the identitylink process
act_hi_procinst process instance history information
act_hi_taskinst process task history information
act_ru_execution process execution information
act_ ru_ Participating user information of identitylink process
act_ru_task task information
6.4 task query
After the process is started, the person in charge of the task can query the tasks he / she currently needs to process. All the queried tasks are the user's to-do tasks.
/**
     * Query the tasks to be performed by the current individual
      */
    @Test
    public void testFindPersonalTaskList() {
//        Task leader
        String assignee = "zhangsan";
        ProcessEngine processEngine = ProcessEngines.getDefaultProcessEngine();
//        Create TaskService
        TaskService taskService = processEngine.getTaskService();
//        Query tasks according to process key and task leader
        List<Task> list = taskService.createTaskQuery()
                .processDefinitionKey("myEvection") //Process Key
                .taskAssignee(assignee)//Query only the tasks of the task owner
                .list();

        for (Task task : list) {

            System.out.println("Process instance id: " + task.getProcessInstanceId());
            System.out.println("task id: " + task.getId());
            System.out.println("Task leader:" + task.getAssignee());
            System.out.println("Task name:" + task.getName());

        }
    }
The output results are as follows:
Process instance id: 2501
 task id: 2505
 Task leader: zhangsan
 Task name: create travel application
6.5 process task processing
The task leader queries the to-do task, selects the task for processing, and completes the task.
// Complete the task
    @Test
    public void completTask(){
//        Get engine
        ProcessEngine processEngine = ProcessEngines.getDefaultProcessEngine();
//        Get taskService
        TaskService taskService = processEngine.getTaskService();

//        Query the task according to the process key and the person in charge of the task
//        Returns a task object
        Task task = taskService.createTaskQuery()
                .processDefinitionKey("myEvection") //Process Key
                .taskAssignee("zhangsan")  //Person in charge to query
                .singleResult();

//        Complete task, parameter: task id
        taskService.complete(task.getId());
    }
6.6 process definition information query
Query process related information, including process definition, process deployment and process definition version
    /**
     * Query process definition
     */
    @Test
    public void queryProcessDefinition(){
        //        Get engine
        ProcessEngine processEngine = ProcessEngines.getDefaultProcessEngine();
//        repositoryService
        RepositoryService repositoryService = processEngine.getRepositoryService();
//        Get ProcessDefinitionQuery object
        ProcessDefinitionQuery processDefinitionQuery = repositoryService.createProcessDefinitionQuery();
//          Query all current process definitions
//          Condition: processdefinitionkey = event
//          orderByProcessDefinitionVersion sorts by version
//        desc flashback
//        list returns a collection
        List<ProcessDefinition> definitionList = processDefinitionQuery.processDefinitionKey("myEvection")
                .orderByProcessDefinitionVersion()
                .desc()
                .list();
//      Output process definition information
        for (ProcessDefinition processDefinition : definitionList) {
            System.out.println("Process definition id="+processDefinition.getId());
            System.out.println("Process definition name="+processDefinition.getName());
            System.out.println("Process definition key="+processDefinition.getKey());
            System.out.println("Process definition Version="+processDefinition.getVersion());
            System.out.println("Process deployment ID ="+processDefinition.getDeploymentId());
        }

    }
Output results:
Process definition id: myEvection:1:4
 Process definition name: travel application form
 Process definition key: myEvection
 Process definition version: 1
6.7 process deletion
public void deleteDeployment() {
		// Process deployment id
		String deploymentId = "1";

    ProcessEngine processEngine = ProcessEngines.getDefaultProcessEngine();
    // Obtain repositoryService through process engine
		RepositoryService repositoryService = processEngine
				.getRepositoryService();
		//Delete a process definition. If the process definition already has a process instance started, an error occurs during deletion
		repositoryService.deleteDeployment(deploymentId);
		//Set true to cascade delete the process definition. Even if the process has a process instance started, it can be deleted. Set false to non level deletion method. If the process
		//repositoryService.deleteDeployment(deploymentId, true);
	}
explain:
-
use repositoryService If you delete a process definition, the history table information will not be deleted
-
If there is no running process under the process definition, it can be deleted with normal.
If there are already running processes under the process definition, an error is reported by using normal deletion, and the cascade deletion method can be used to delete all processes and related records.
First delete the unfinished process nodes, and finally completely delete the process definition information
The deletion of project development intermediate links is generally only available to super administrators
6.8 process resource download
Now our process resource files have been uploaded to the database. If other users want to view these resource files, they can download the resource files locally from the database.
Solutions include:
1. jdbc reads blob type and clob type data and saves them to the file directory
2. It is implemented using activiti's api
Use commons io Jar to solve IO operations
Introduce commons IO dependency package
<dependency>
    <groupId>commons-io</groupId>
    <artifactId>commons-io</artifactId>
    <version>2.6</version>
</dependency>
Obtain process definition resources and bpmn and png through process definition objects
import org.apache.commons.io.IOUtils;

@Test
    public void deleteDeployment(){
//        Get engine
        ProcessEngine processEngine = ProcessEngines.getDefaultProcessEngine();
//        Get repositoryService
        RepositoryService repositoryService = processEngine.getRepositoryService();
//        Delete the deployment information according to the deployment id. if you want to cascade deletion, you can add a second parameter, true
        repositoryService.deleteDeployment("1");
    }

    public void  queryBpmnFile() throws IOException {
//        1. Get engine
        ProcessEngine processEngine = ProcessEngines.getDefaultProcessEngine();
//        2. Get repositoryService
        RepositoryService repositoryService = processEngine.getRepositoryService();
//        3. Get the querier: ProcessDefinitionQuery, set the query conditions and get the desired process definition
        ProcessDefinition processDefinition = repositoryService.createProcessDefinitionQuery()
                .processDefinitionKey("myEvection")
                .singleResult();
//        4. Get the deployment ID through the process definition information
        String deploymentId = processDefinition.getDeploymentId();
//        5. Through the method of repository service, the image information and bpmn information can be read
//        png picture stream
        InputStream pngInput = repositoryService.getResourceAsStream(deploymentId, processDefinition.getDiagramResourceName());
//        Stream of bpmn file
        InputStream bpmnInput = repositoryService.getResourceAsStream(deploymentId, processDefinition.getResourceName());
//        6. Construct OutputStream stream
        File file_png = new File("d:/evectionflow01.png");
        File file_bpmn = new File("d:/evectionflow01.bpmn");
        FileOutputStream bpmnOut = new FileOutputStream(file_bpmn);
        FileOutputStream pngOut = new FileOutputStream(file_png);
//        7. Conversion of input stream and output stream
        IOUtils.copy(pngInput,pngOut);
        IOUtils.copy(bpmnInput,bpmnOut);
//        8. Close flow
        pngOut.close();
        bpmnOut.close();
        pngInput.close();
        bpmnInput.close();
    }
explain:
-
deploymentId Deploy for process ID
-
resource_name by act_ge_bytearray In the table NAME_The value of the column
-
use repositoryService of getDeploymentResourceNames Method to obtain the names of all files under the specified deployment
-
use repositoryService of getResourceAsStream Method incoming deployment ID And resource picture name can obtain the input stream of the file with the specified name under the deployment
Finally, output the picture resources in the input stream.
6.9 viewing process history information
Even if the process definition has been deleted, the process execution history information is still saved in the activity of activiti through the previous analysis_ hi_* Related tables. Therefore, we can still query the process execution history information and view the relevant history through the HistoryService.
    /**
     * View historical information
     */
    @Test
    public void findHistoryInfo(){
//      Get engine
        ProcessEngine processEngine = ProcessEngines.getDefaultProcessEngine();
//        Get HistoryService
        HistoryService historyService = processEngine.getHistoryService();
//        Gets the query object of the actinst table
        HistoricActivityInstanceQuery instanceQuery = historyService.createHistoricActivityInstanceQuery();
//        Query the actinst table. Condition: query by InstanceId
//        instanceQuery.processInstanceId("2501");
//        Query the actinst table. Condition: query according to the DefinitionId
        instanceQuery.processDefinitionId("myEvection:1:4");
//        Add sorting operation. orderByHistoricActivityInstanceStartTime sorts asc ascending according to the start time
        instanceQuery.orderByHistoricActivityInstanceStartTime().asc();
//        Query all content
        List<HistoricActivityInstance> activityInstanceList = instanceQuery.list();
//        output
        for (HistoricActivityInstance hi : activityInstanceList) {
            System.out.println(hi.getActivityId());
            System.out.println(hi.getActivityName());
            System.out.println(hi.getProcessDefinitionId());
            System.out.println(hi.getProcessInstanceId());
            System.out.println("<==========================>");
        }
    }