catalogue
Experimental environment
Experimental environment:
1,win10,vmwrokstation Virtual machine;
2,k8s Cluster: 3 sets centos7.6 1810 Virtual machine, 1 master node,2 individual node node
   k8s version: v1.22.2
   containerd://1.5.5
Experimental software
Link: https://pan.baidu.com/s/1WOur –I9x2cfJugqPGzq1g?pwd=4kyi
Extraction code: 4kyi
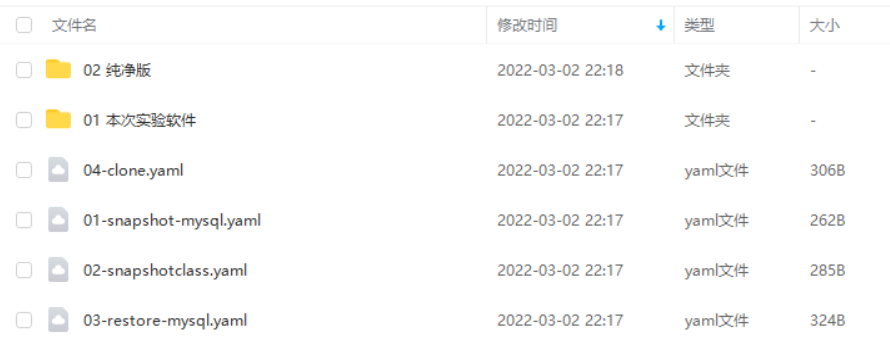
2022.3.2-48.CSI volume management - experiment code
1. CSI volume management
As mentioned above, we can snapshot, backup and restore volumes through Longhorn UI. In addition, we can manage volumes through Kubernetes. For example, we can enable CSI snapshot and clone support on the cluster.

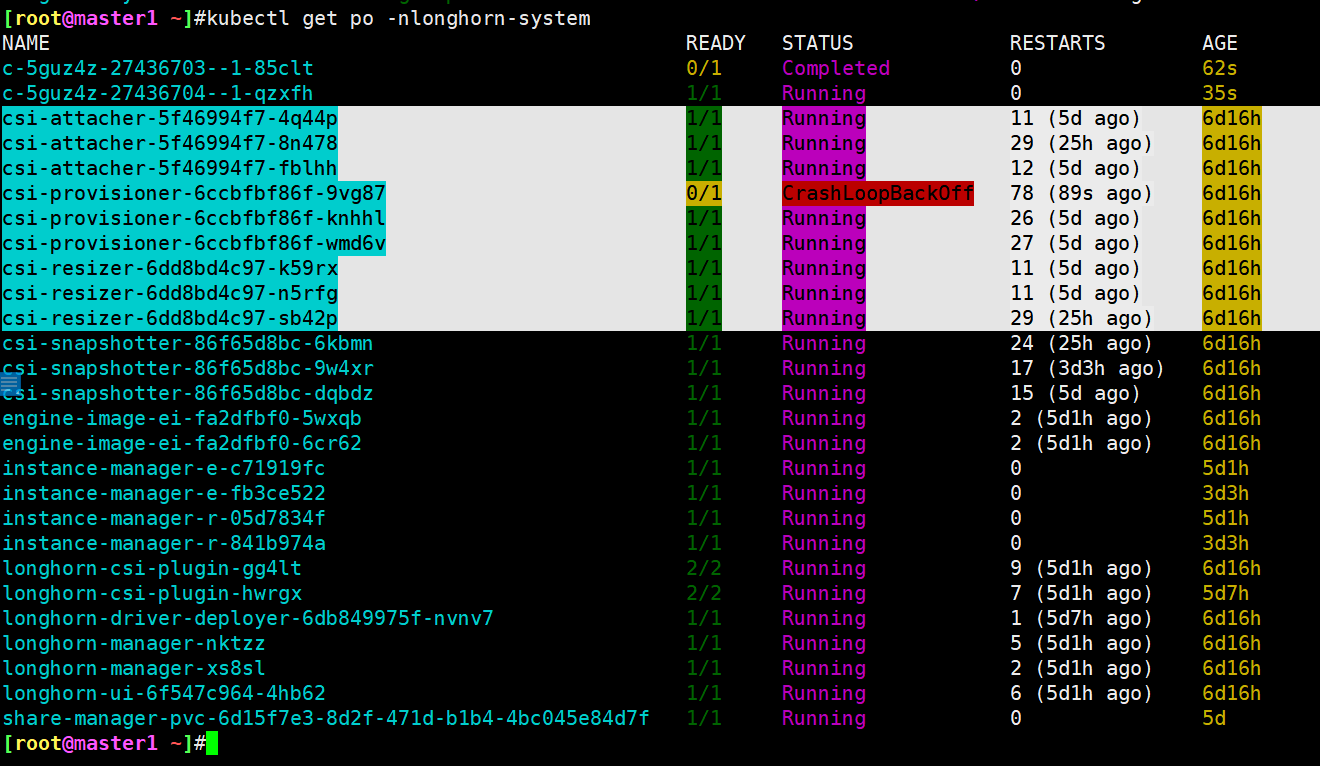
#remarks
csi-attacher-5f46994f7-4q44p :Attach volume to pod upper
csi-provisioner-6ccbfbf86f-9vg87: Provides the of the volume
csi-resizer-6dd8bd4c97-k59rx: Volume expansion
csi-snapshotter-86f65d8bc-6kbmn: Take volume snapshots
1.CSI volume snapshot
Kubernetes has introduced the storage volume snapshot function since version 1.12 and entered the Beta version in version 1.17. Similar to PV and PVC resource objects, kubernetes provides three resource objects: VolumeSnapshotContent, VolumeSnapshot and VolumeSnapshotClass for volume snapshot management.
(1) Concept
Volumesnaphotcontent is a snapshot created based on a PV, similar to the resource concept of PV; VolumeSnapshot is the user's request for volume snapshot, which is similar to the concept of persistent declaration; The VolumeSnapshotClass object can be used to set the characteristics of snapshots, mask the details of VolumeSnapshotContent, and provide dynamic management for VolumeSnapshot binding, just like the "class" concept of StorageClass.
The volume snapshot capability provides Kubernetes users with a standard way to copy the contents of the volume at a specified point in time without creating a new volume. For example, the database administrator can backup the database before performing modifications such as editing or deletion.
However, when using this function, you should pay attention to the following points:
-
VolumeSnapshot, volumesnaphotcontent and volumesnaphotclass resource objects are CRDs and do not belong to the core API.
-
VolumeSnapshot support is only available for CSI drivers.
-
As part of the VolumeSnapshot deployment process, Kubernetes team provides a snapshot controller deployed on the control plane and a Sidecar container called CSI snapshot, which is deployed together with CSI driver (it is also possible to find that it is not deployed together during actual deployment), The snapshot controller will listen to VolumeSnapshot and volumesnaphotcontent objects, and is responsible for creating and deleting volumesnaphotcontent objects. CSI snapshot listens to the volumesnaphotcontent object and triggers the operations of CreateSnapshot and DeleteSnapshot for CSI endpoints to complete the creation or deletion of snapshots.

-
The CSI driver may or may not implement the volume snapshot function. The CSI driver may use CSI snapshot to provide support for volume snapshot. See CSI driver documentation.
The life cycle of volumesnaphotcontents and volumesnaphots includes various stages, such as resource supply, resource binding, protection mechanism for using PVC and resource deletion. These two objects will follow these life cycles.
1. Resource supply: similar to PV resource supply, volumesnaphotcontent can supply resources in both static and dynamic ways.
- Static provisioning: the Cluster Administrator will create a set of volumesnaphotcontent resources in advance, which is similar to creating PV manually
- Dynamic provisioning: Based on the VolumeSnapshotClass resource, the VolumeSnapshotContent is automatically created when the user creates a VolumeSnapshot application, similar to the dynamic creation of PV by StorageClass
2. Resource binding: the snapshot controller is responsible for binding VolumeSnapshot to an appropriate VolumeSnapshotContent, including static and dynamic supply. VolumeSnapshot and VolumeSnapshotContent are also bound one-to-one, and there will be no one to many. Protection mechanism for PVC in use: when the storage snapshot VolumeSnapshot is being created and has not been completed, the relevant PVC will be marked as in use. If the user deletes the PVC, the system will not delete the PVC immediately to avoid data loss due to incomplete snapshot, The deletion operation is delayed until the VolumeSnapshot creation is completed (readyToUse state) or terminated (aborted state).
3. Resource deletion: when deleting a VolumeSnapshot, the deletion of its bound backend VolumeSnapshotContent will be determined based on the settings of the deletion policy DeletionPolicy. The deletion policies that can be configured are:
- Delete: automatically delete the volumesnaphotcontent resource object and the contents of the snapshot.
- Retain: both the volumesnaphotcontent resource object and the contents of the snapshot will be retained and need to be cleaned manually.
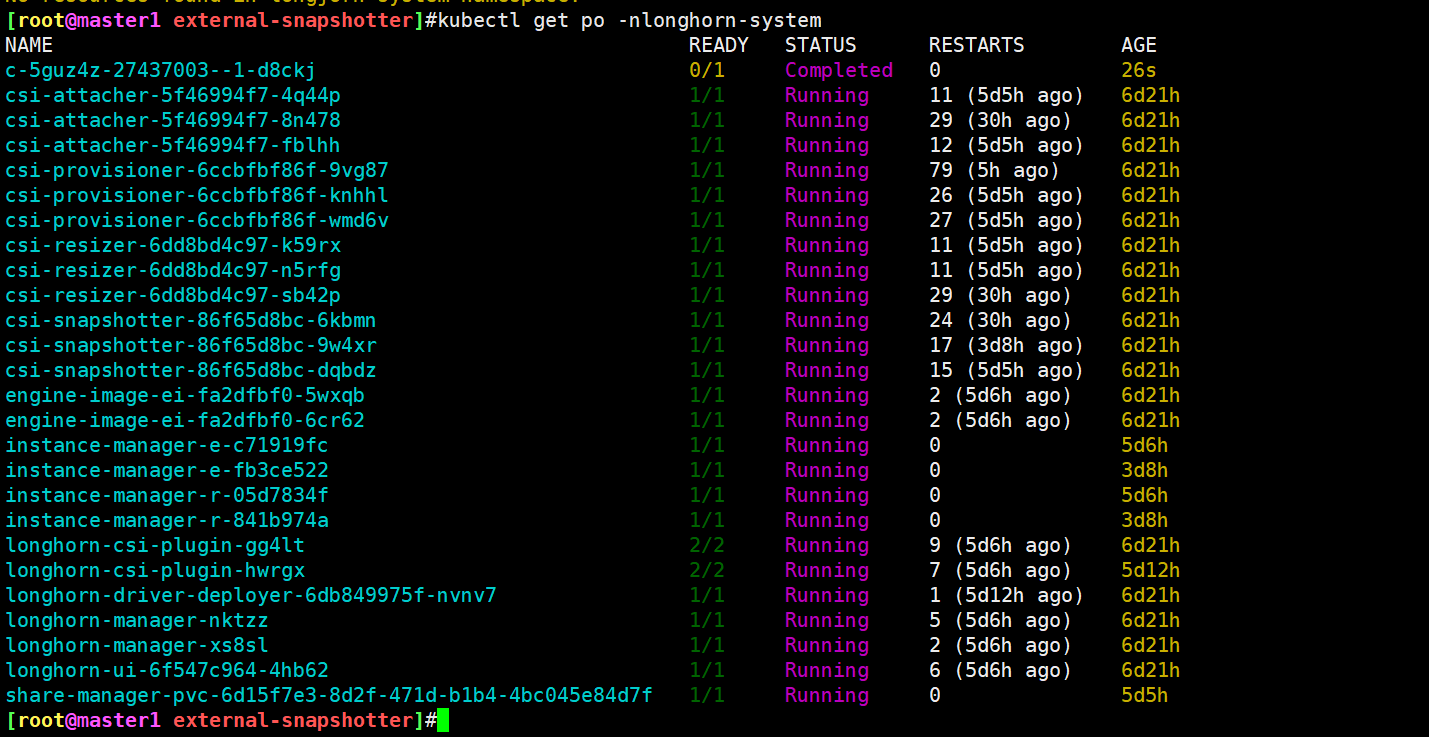
Our Longhorn system has created three CSI snapshot pods after deployment:
$kubectl get pods -n longhorn-system
NAME                                                     READY   STATUS      RESTARTS       AGE
csi-snapshotter-86f65d8bc-6kbmn                          1/1     Running     24 (25h ago)    6d16h
csi-snapshotter-86f65d8bc-9w4xr                          1/1     Running     17 (3d4h ago)   6d16h
csi-snapshotter-86f65d8bc-dqbdz                          1/1     Running     15 (5d1h ago)   6d16h
......
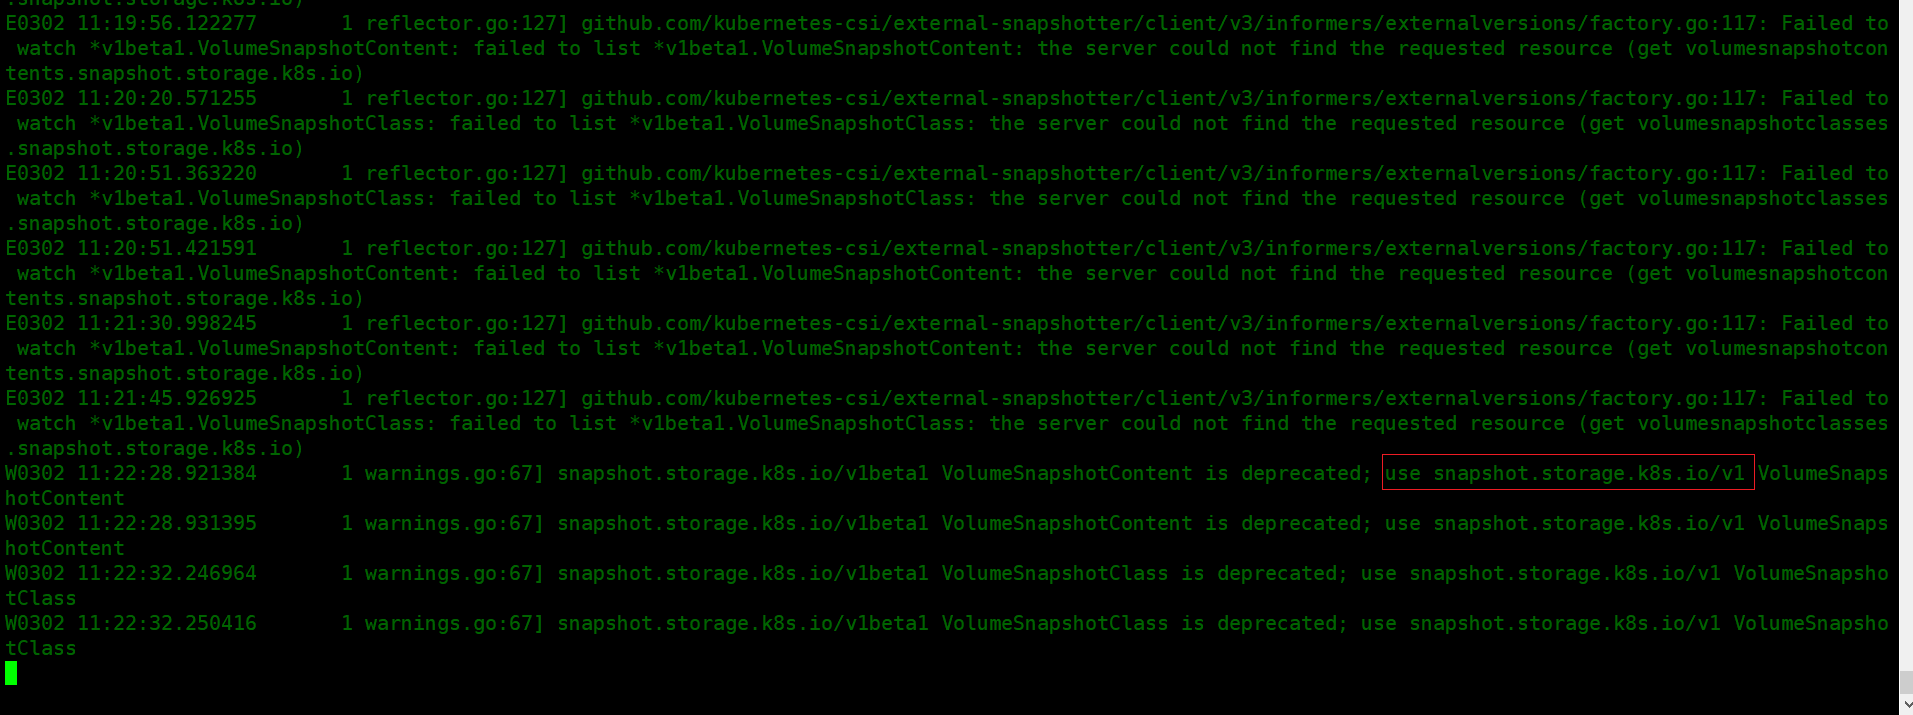
In fact, these are three copies of the startup. At the same time, only one Pod provides services. The master selection and high availability is realized through leader selection. For example, the current service here is csi-snapshot-86f65d8bc-dncwv. We can view the corresponding log information:
➜ kubectl logs -f csi-snapshotter-86f65d8bc-dncwv -n longhorn-system
......
E0223 04:36:33.570567       1 reflector.go:127] github.com/kubernetes-csi/external-snapshotter/client/v3/informers/externalversions/factory.go:117: Failed to watch *v1beta1.VolumeSnapshotClass: failed to list *v1beta1.VolumeSnapshotClass: the server could not find the requested resource (get volumesnapshotclasses.snapshot.storage.k8s.io)
E0223 04:37:03.773447       1 reflector.go:127] github.com/kubernetes-csi/external-snapshotter/client/v3/informers/externalversions/factory.go:117: Failed to watch *v1beta1.VolumeSnapshotContent: failed to list *v1beta1.VolumeSnapshotContent: the server could not find the requested resource (get volumesnapshotcontents.snapshot.storage.k8s.io)
You can see the prompt that there are no VolumeSnapshotClass and VolumeSnapshotContent resources. This is because these two resources are CRDs and are not built-in resource objects of Kubernetes, and we did not install these two CRDs when installing Longhorn, so we can't find them.
(2) 💘 Actual combat demonstration: csi volume snapshot experiment (successful test)
1. Install CRDs
🍀 You can install the CRI function from the volume through the snapshot external-snapshotter From the project:
$ git clone https://github.com/kubernetes-csi/external-snapshotter
$ cd external-snapshotter && git checkout v5.0.1
$ kubectl kustomize client/config/crd | kubectl create -f -
Now there is a problem: the teacher's latest version was V5 0.1, and now v4 zero point one
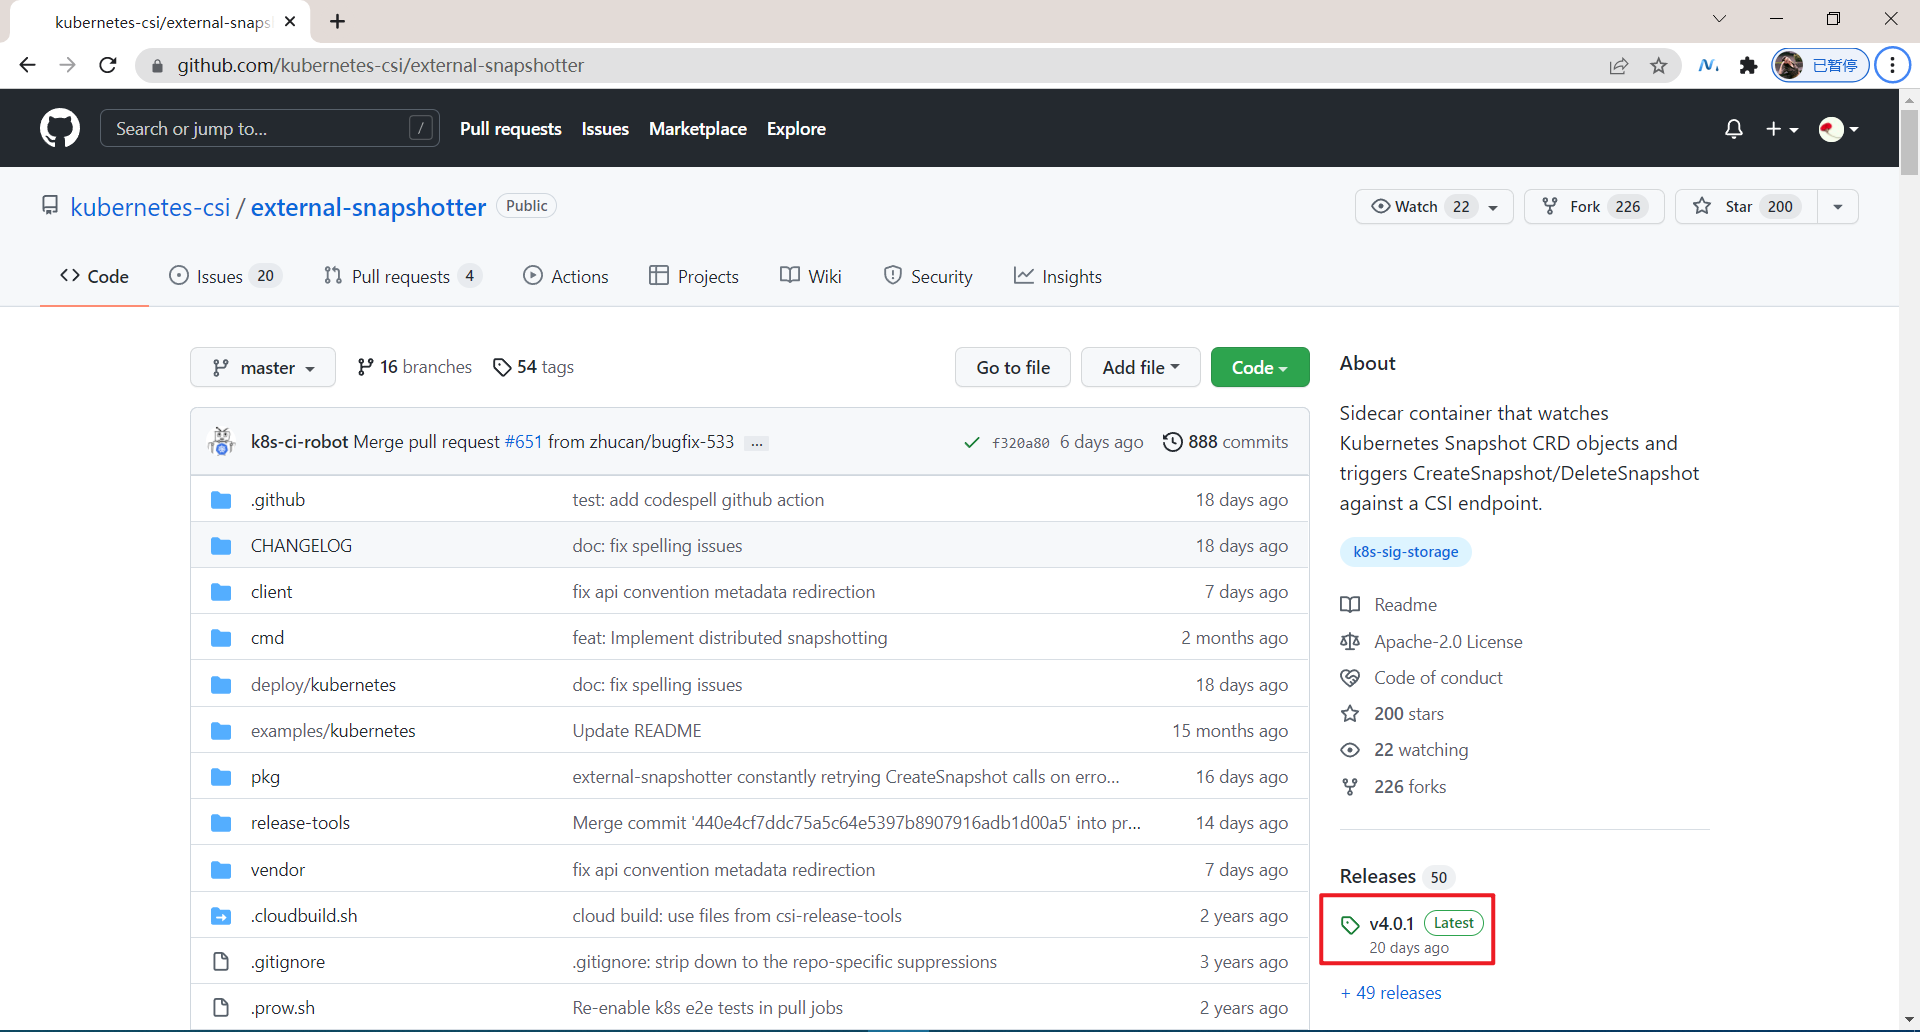
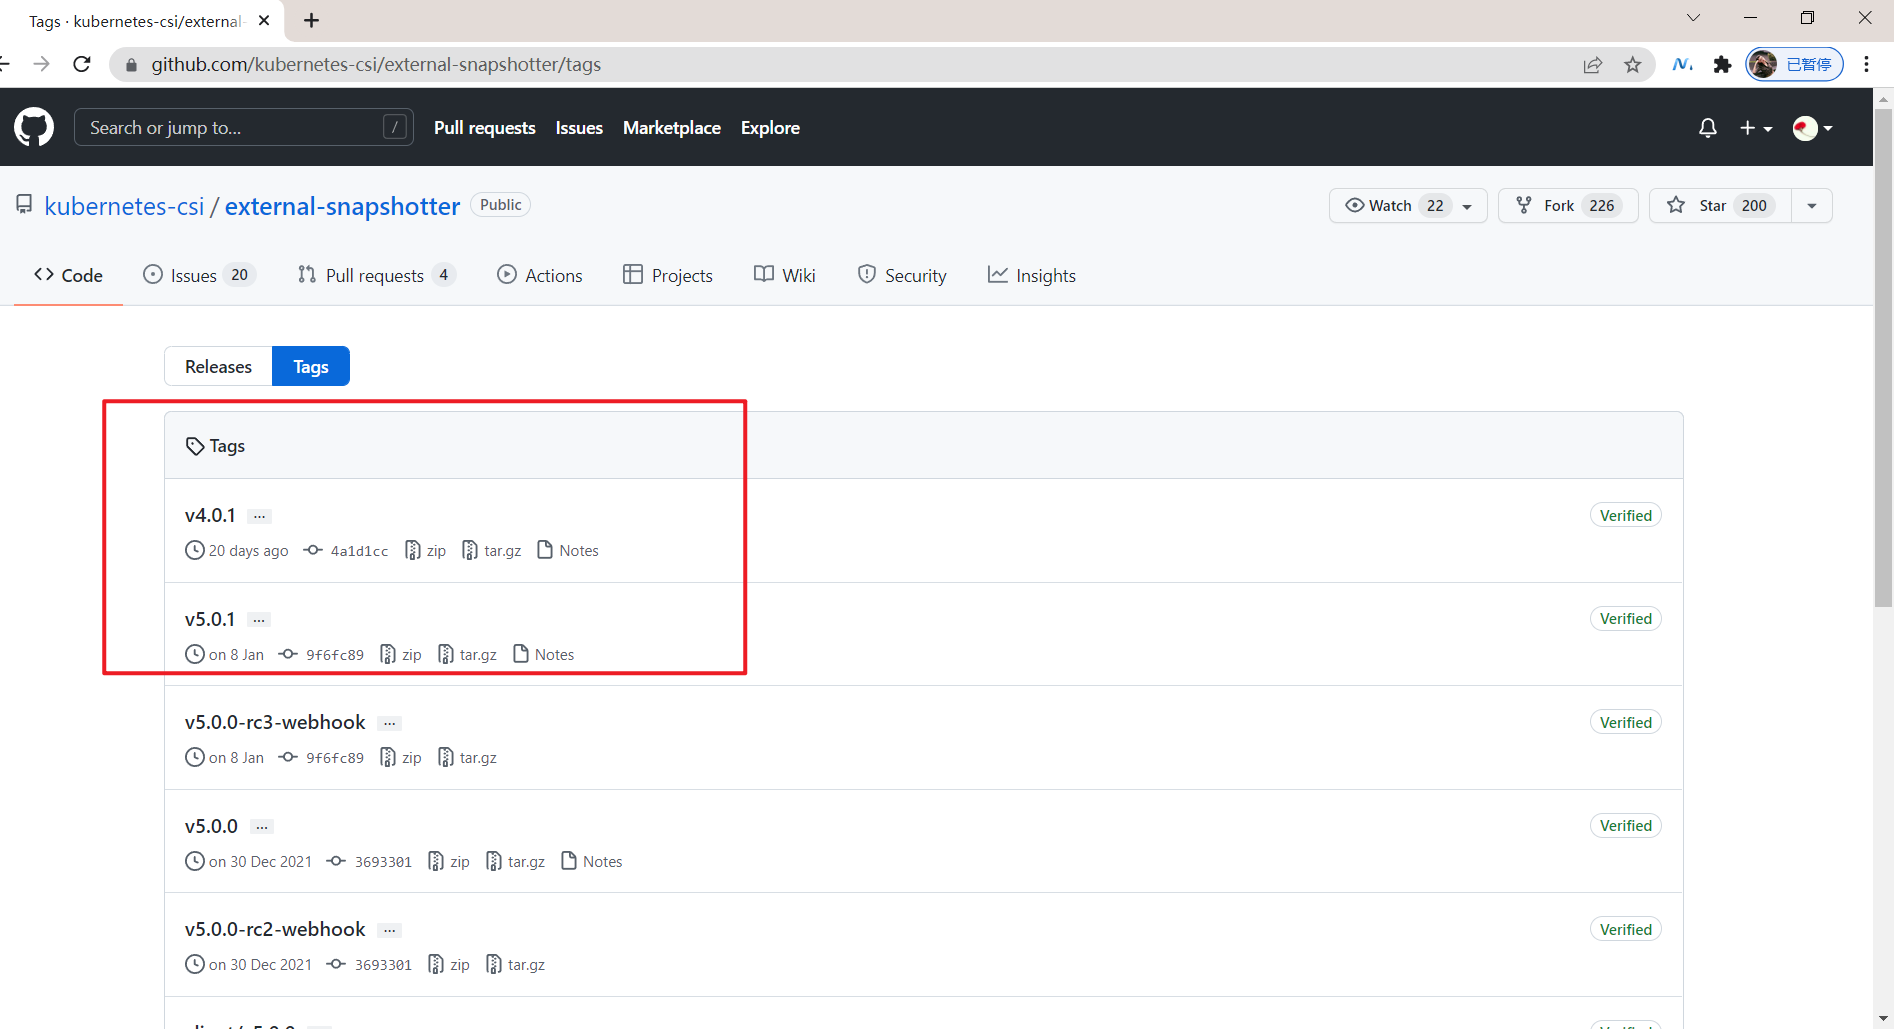
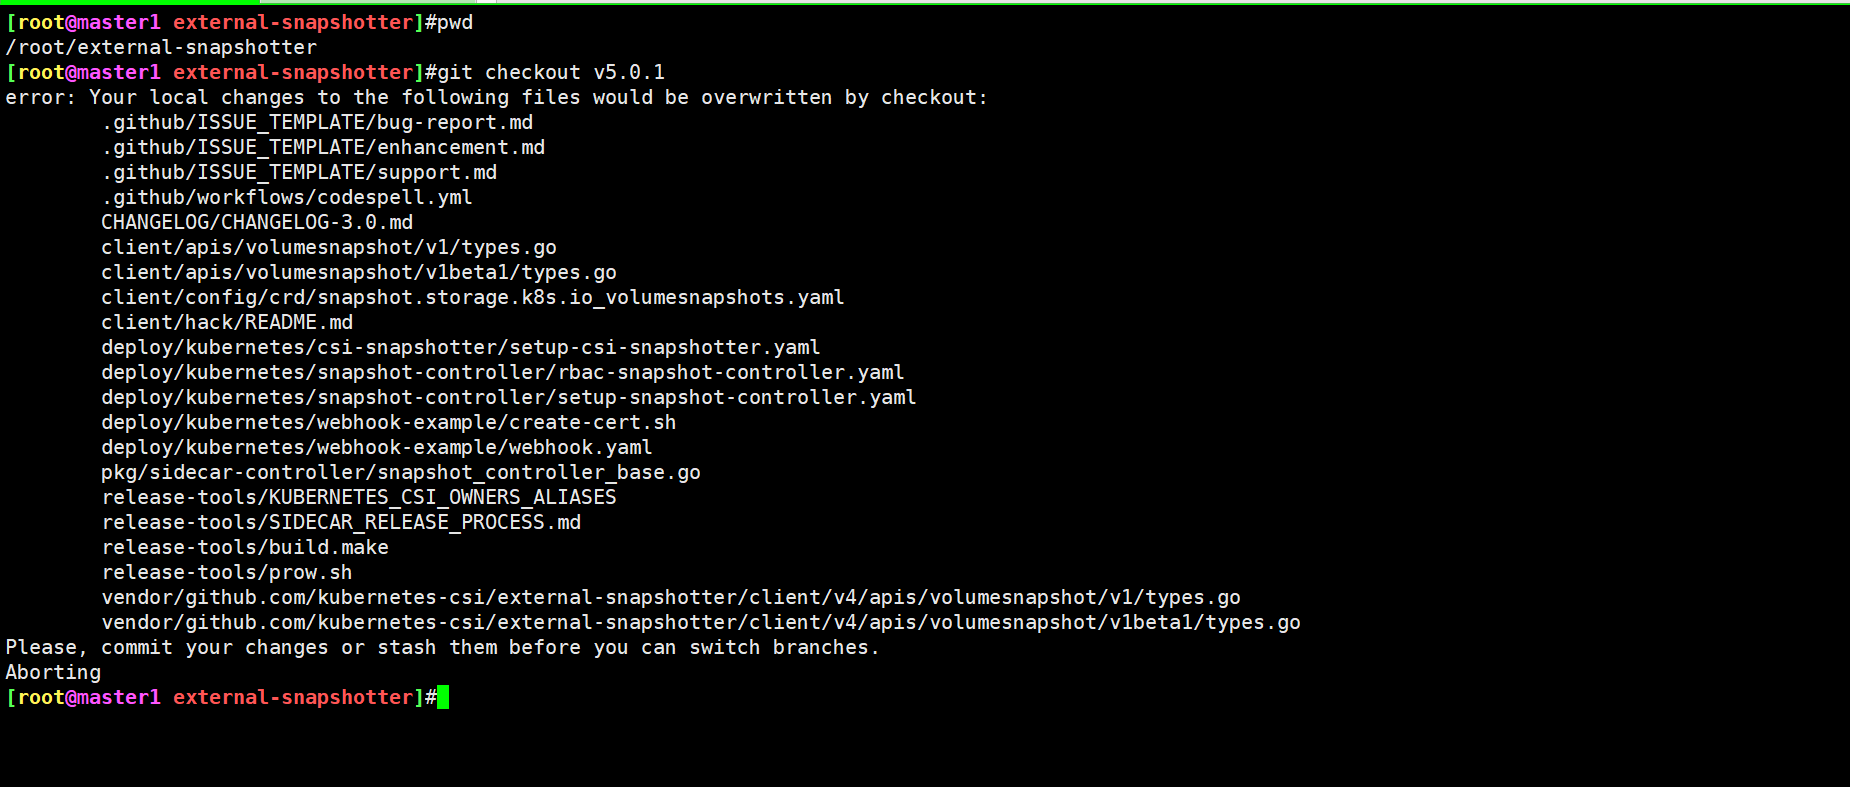
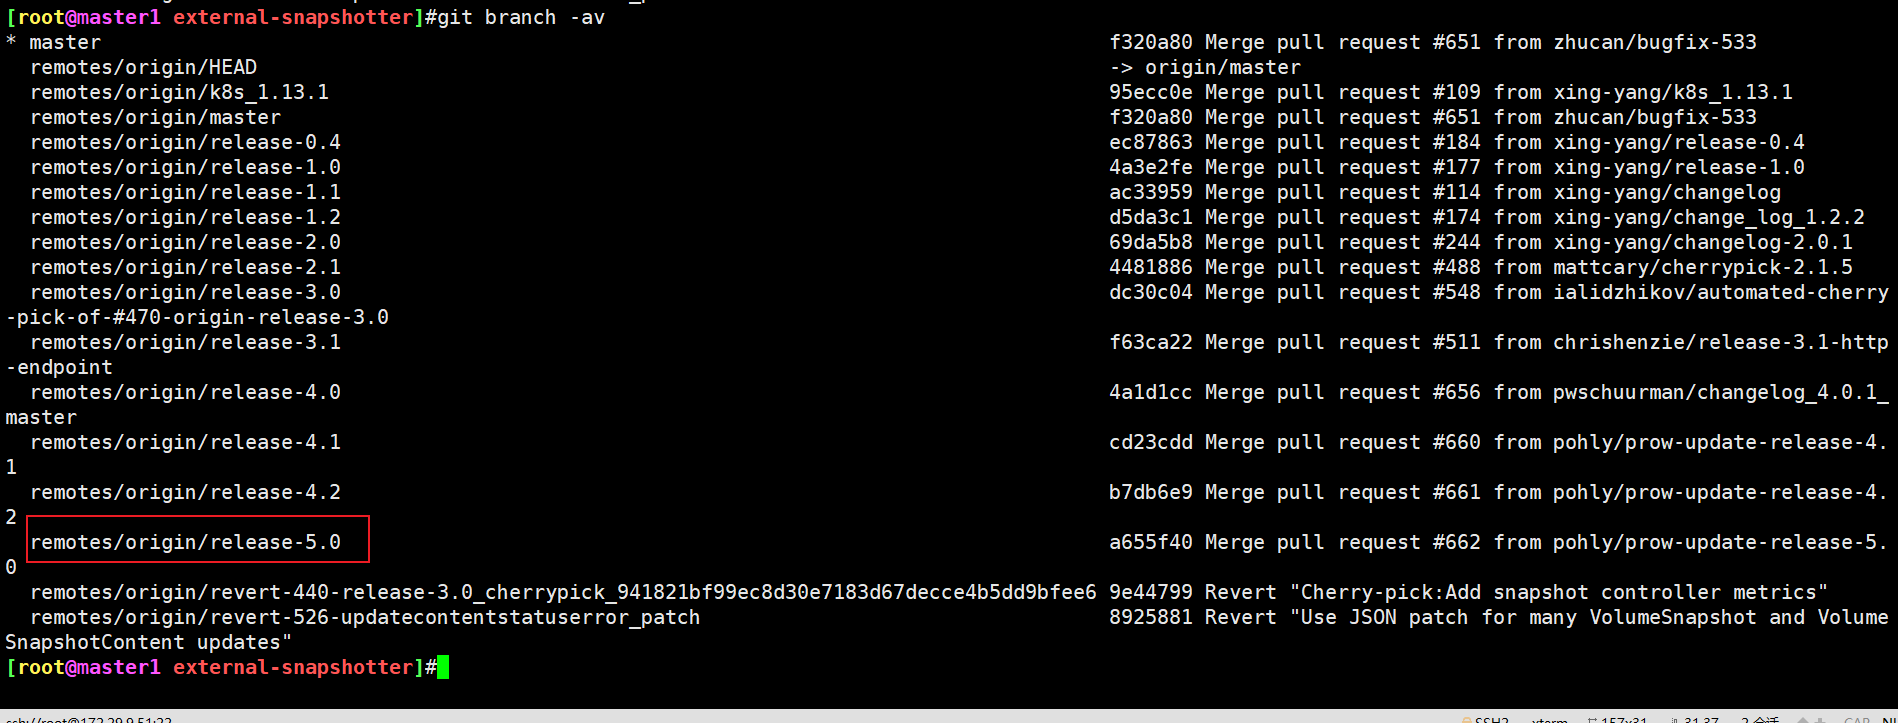
Instead of switching directly, install directly. You should be able to...
Direct deployment:
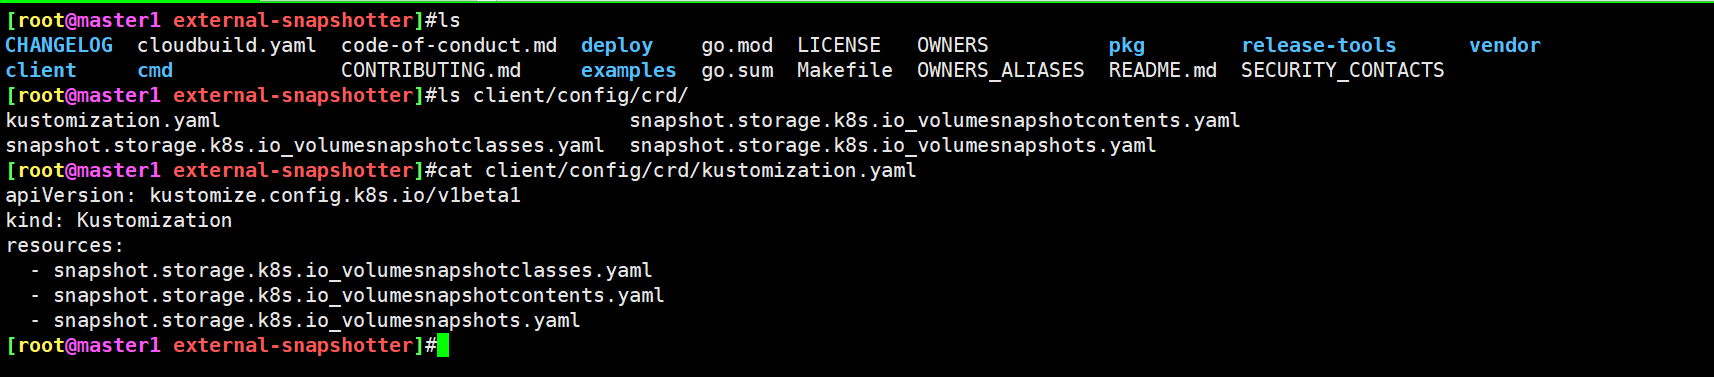
[root@master1 external-snapshotter]#pwd
/root/external-snapshotter
[root@master1 external-snapshotter]#ls
CHANGELOG  cloudbuild.yaml  code-of-conduct.md  deploy    go.mod  LICENSE   OWNERS          pkg        release-tools      vendor
client     cmd              CONTRIBUTING.md     examples  go.sum  Makefile  OWNERS_ALIASES  README.md  SECURITY_CONTACTS
[root@master1 external-snapshotter]#kubectl kustomize client/config/crd | kubectl create -f -
The above command will install the three Snapshot CRDs mentioned above:
[root@master1 external-snapshotter]#kubectl get crd|grep snapshot
volumesnapshotclasses.snapshot.storage.k8s.io    2022-03-02T11:22:12Z
volumesnapshotcontents.snapshot.storage.k8s.io   2022-03-02T11:22:12Z
volumesnapshots.snapshot.storage.k8s.io          2022-03-02T11:22:12Z
After the installation is completed, it is normal to check the Pod log related to CSI snapshot above.
2. Installing the snapshot controller
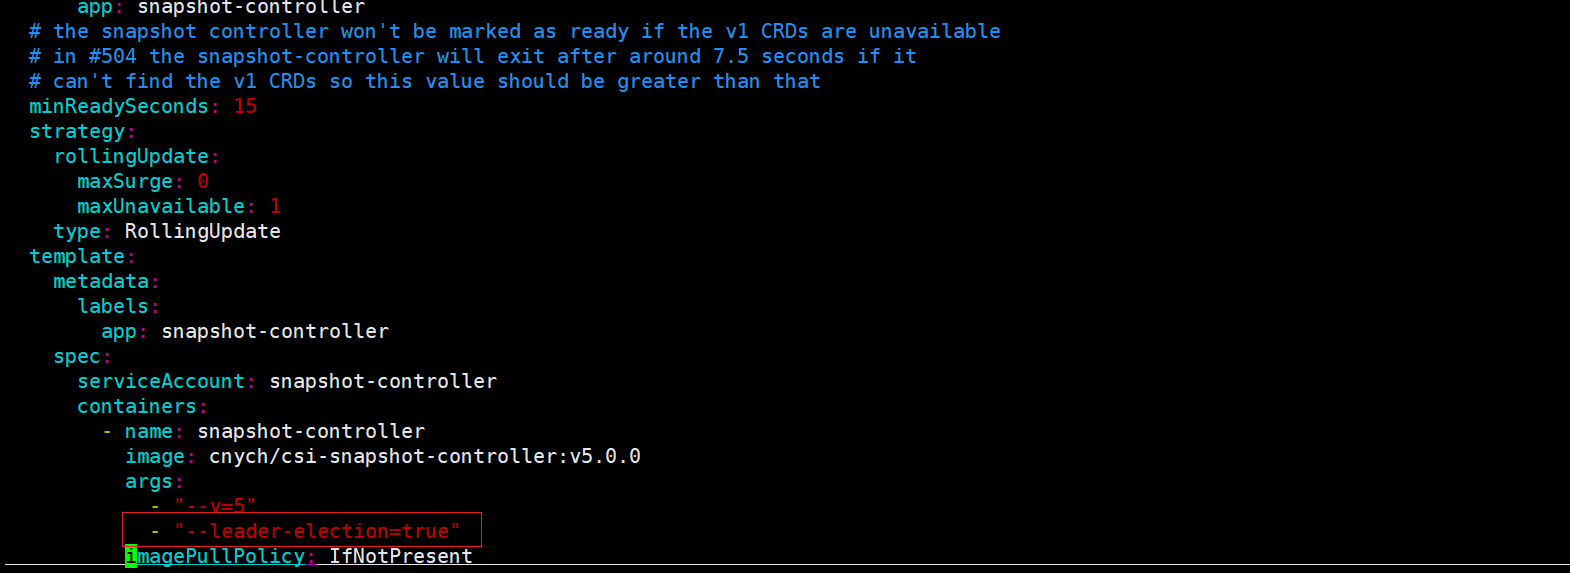
🍀 After CRDs is installed, it is not enough. We also need a snapshot controller to listen to VolumeSnapshot and volumesnaphotcontent objects. Similarly, a Common Snapshot Controller is also provided in the external snapshot project. Execute the following command for one click installation:

#The following modifications are required
[root@master1 external-snapshotter]#vim deploy/kubernetes/snapshot-controller/setup-snapshot-controller.yaml
# Modify deploy / kubernetes / snapshot controller / setup snapshot controller Yaml image address is cnych / CSI snapshot controller: V5 0.0, the default is gcr image

[root@master1 external-snapshotter]#kubectl -n kube-system kustomize deploy/kubernetes/snapshot-controller | kubectl create -f -
serviceaccount/snapshot-controller created
role.rbac.authorization.k8s.io/snapshot-controller-leaderelection created
clusterrole.rbac.authorization.k8s.io/snapshot-controller-runner created
rolebinding.rbac.authorization.k8s.io/snapshot-controller-leaderelection created
clusterrolebinding.rbac.authorization.k8s.io/snapshot-controller-role created
deployment.apps/snapshot-controller created
[root@master1 external-snapshotter]#
You can also see that the two pod s are also leader selection:
Here, we install the snapshot controller into the Kube system namespace and start two replicas. Similarly, only one Pod provides services at the same time:
[root@master1 external-snapshotter]#kubectl get pods -n kube-system -l app=snapshot-controller
NAME                                   READY   STATUS    RESTARTS   AGE
snapshot-controller-677b65dc6c-nzp8k   1/1     Running   0          3m25s
snapshot-controller-677b65dc6c-zpxjq   1/1     Running   0          3m25s
At this point, the environment for configuring snapshots using CSI is ready.
3. Testing
Let's still take the MySQL PVC volume as an example to illustrate how to use the volume snapshot function:
[root@master1 ~]#kubectl get pvc mysql-pvc
NAME        STATUS   VOLUME                                     CAPACITY   ACCESS MODES   STORAGECLASS   AGE
mysql-pvc   Bound    pvc-52031b79-4905-47be-b8fc-09629c25de1f   1Gi        RWO            longhorn       6d11h
1. Create a VolumeSnapshot resource manifest file
🍀 To create a MySQL PVC snapshot application, first create a VolumeSnapshot object:
vim 01-snapshot-mysql.yaml
# 01-snapshot-mysql.yaml
apiVersion: snapshot.storage.k8s.io/v1
kind: VolumeSnapshot
metadata:
  name: mysql-snapshot-demo
spec:
  volumeSnapshotClassName: longhorn
  source:
    persistentVolumeClaimName: mysql-pvc
    # volumeSnapshotContentName: test-content
There are two main configuration parameters:
- If you do not need to specify a parameter of the snapshot volume parameter to create a snapshot manually, you can specify a snapshot volume name corresponding to the snapshot volume parameter.
- persistentVolumeClaimName: Specifies the PVC name of the data source.
- Volumesnaphotcontentname: if you are applying for a static storage snapshot, you need to specify a volumesnaphotcontent through this parameter.
2. Create a VolumeSnapshotClass resource manifest file
🍀 We have specified a storage snapshot class longhorn above. Of course, we need to create this object:
vim 02-snapshotclass.yaml
# 02-snapshotclass.yaml
apiVersion: snapshot.storage.k8s.io/v1
kind: VolumeSnapshotClass
metadata:
  name: longhorn
  # annotations:  # If you want to specify as the default snapshot class
  #   snapshot.storage.kubernetes.io/is-default-class: "true"
driver: driver.longhorn.io
deletionPolicy: Delete
Each VolumeSnapshotClass contains driver, deletionPolicy and parameters fields, which are used when the VolumeSnapshot belonging to this class needs to be dynamically configured.
-
Driver: indicates the name of the CSI storage plug-in driver. Here we use the Longhorn plug-in named driver Longhorn. io

-
deletionPolicy: the deletion policy can be set to Delete or Retain. If the deletion policy is Delete, the underlying storage snapshot will be deleted together with the VolumeSnapshotContent object. If the deletion policy is Retain, the underlying snapshot and VolumeSnapshotContent object will be retained.
-
Parameters: store the parameters to be configured by the plug-in. The CSI driver provides specific configuration parameters.
If you want to set the current snapshot class as the default, you need to add a snapshot storage. kubernetes. IO / is default class: annotations such as "true".
3. Deploy and view
🍀 Now let's directly create the above two resource objects:
[root@master1 2022.3.2-48.CSI Volume management-Experimental code]#kubectl apply -f 02-snapshotclass.yaml
volumesnapshotclass.snapshot.storage.k8s.io/longhorn created
[root@master1 2022.3.2-48.CSI Volume management-Experimental code]#kubectl apply -f 01-snapshot-mysql.yaml
volumesnapshot.snapshot.storage.k8s.io/mysql-snapshot-demo created

[root@master1 2022.3.2-48.CSI Volume management-Experimental code]#kubectl get volumesnapshotclass
NAME       DRIVER               DELETIONPOLICY   AGE
longhorn   driver.longhorn.io   Delete           26s
[root@master1 2022.3.2-48.CSI Volume management-Experimental code]#kubectl get volumesnapshot
NAME                  READYTOUSE   SOURCEPVC   SOURCESNAPSHOTCONTENT   RESTORESIZE   SNAPSHOTCLASS   SNAPSHOTCONTENT                                    CREATIONTIME   AGE
mysql-snapshot-demo   true         mysql-pvc                           1Gi           longhorn        snapcontent-2338699d-d08d-42f8-8173-dfa6cb660522   17s            35s
🍀 At this time, a volumesnaphotcontent object will be dynamically created for us:
[root@master1 2022.3.2-48.CSI Volume management-Experimental code]#kubectl get volumesnapshotcontent
NAME                                               READYTOUSE   RESTORESIZE   DELETIONPOLICY   DRIVER               VOLUMESNAPSHOTCLASS   VOLUMESN
snapcontent-2338699d-d08d-42f8-8173-dfa6cb660522   true         1073741824    Delete           driver.longhorn.io   longhorn              mysql-sn
The contents of the automatically created volumesnaphotcontent object are as follows:
[root@master1 2022.3.2-48.CSI Volume management-Experimental code]#kubectl get volumesnapshotcontent -oyaml
apiVersion: v1
items:
- apiVersion: snapshot.storage.k8s.io/v1
  kind: VolumeSnapshotContent
  metadata:
    creationTimestamp: "2022-03-02T12:02:13Z"
    finalizers:
    - snapshot.storage.kubernetes.io/volumesnapshotcontent-bound-protection
    generation: 1
    name: snapcontent-2338699d-d08d-42f8-8173-dfa6cb660522
    resourceVersion: "1667159"
    uid: 13307ef0-792f-4079-83ad-d7766949fad3
  spec:
    deletionPolicy: Delete
    driver: driver.longhorn.io
    source:
      volumeHandle: pvc-52031b79-4905-47be-b8fc-09629c25de1f
    volumeSnapshotClassName: longhorn
    volumeSnapshotRef:
      apiVersion: snapshot.storage.k8s.io/v1
      kind: VolumeSnapshot
      name: mysql-snapshot-demo
      namespace: default
      resourceVersion: "1667035"
      uid: 2338699d-d08d-42f8-8173-dfa6cb660522
  status:
    creationTime: 1646222535000000000
    readyToUse: true
    restoreSize: 1073741824
    snapshotHandle: bs://pvc-52031b79-4905-47be-b8fc-09629c25de1f/backup-fce2251f2b234844
kind: List
metadata:
  resourceVersion: ""
  selfLink: ""
Source The value of the volumehandle field is the unique identifier of the Volume created on the back-end storage and returned by the CSI driver during the creation of the storage Volume. This field is required in the dynamic provisioning mode. It specifies the source Volume information of the snapshot. The following is the relevant information of the associated VolumeSnapshot object.
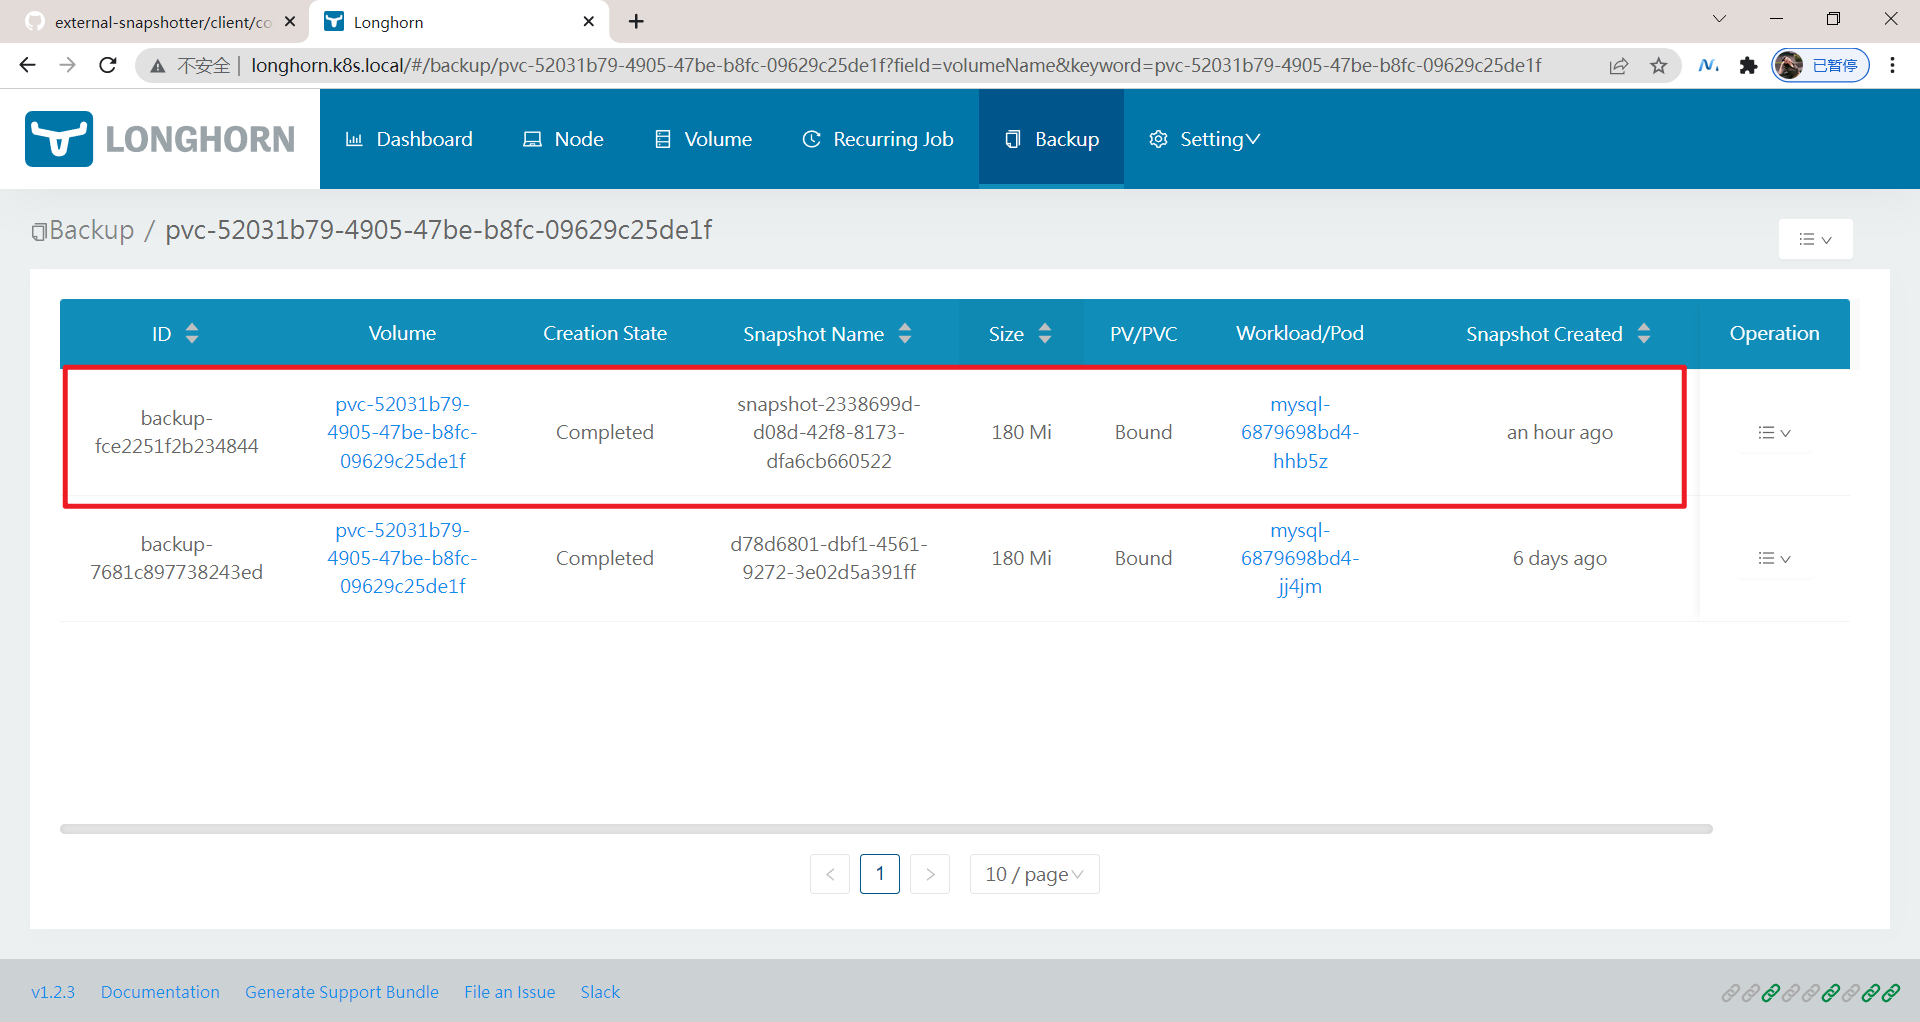
🍀 Of course, at this time, we can also see the snapshot we created above on the Longhorn UI interface. The snapshot name is snapcontent-2338699d-d08d-42f8-8173-dfa6cb660522, and the subsequent ID is consistent with the above VolumeSnapshotContent Name:
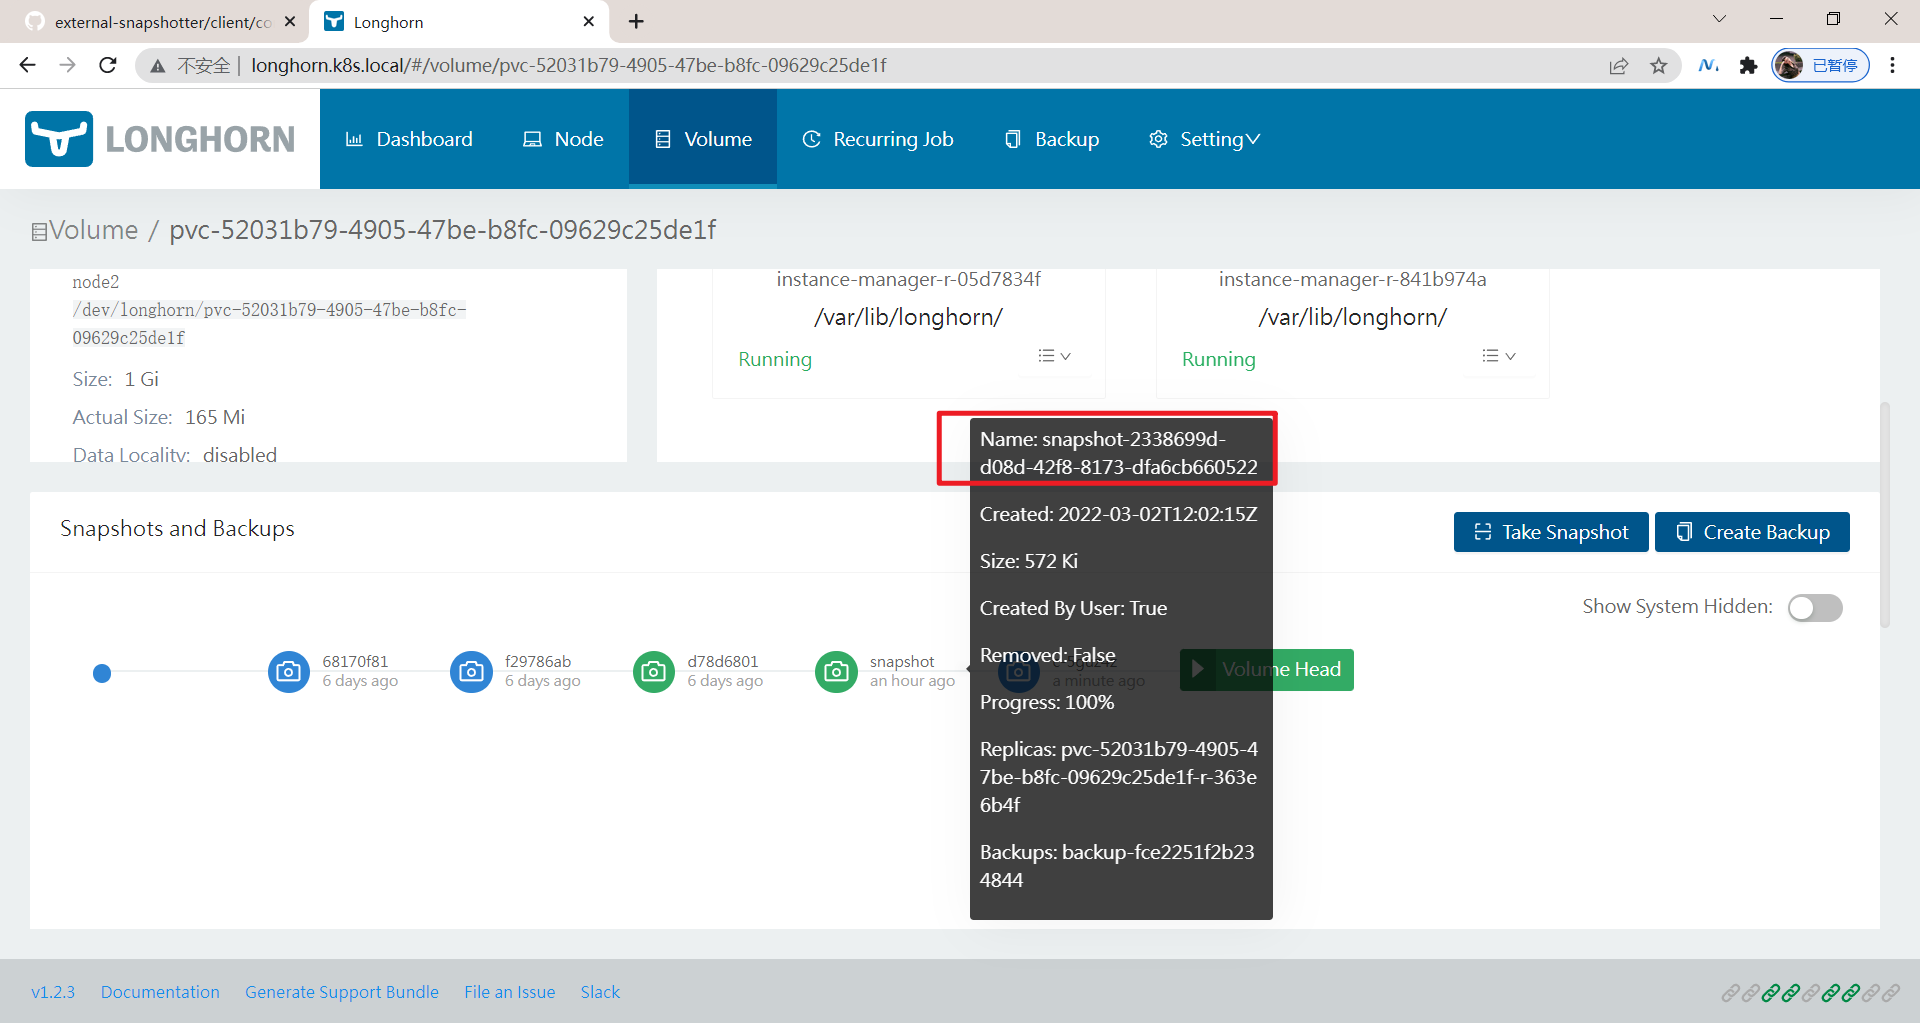
A corresponding Backup operation will also be performed. The Backup information is specified through the snapshotHandle. The format is BS: / / Backup - < volume > / Backup - < name >:
In this way, we have completed the snapshot management function of volumes through CSI.
The experiment is over, perfect. 😘
2. Create new PVC based on snapshot (restore)
Kubernetes updated the snapshot based storage volume to Beta version in version 1.17. To enable this feature, you need to enable -- feature gates =..., in the feature gates of Kube apiserver, Kube controller manager and kubelet, Volumesnapshotdatasource (our version 1.22 is enabled by default), and then you can create a new PVC storage volume based on a snapshot.
💘 Practical demonstration: create new PVC (recovery) based on snapshot (successful test)
1. Create new pvc based on snapshot
🍀 For example, now let's create a new PVC based on the MySQL snapshot demo object created above:
vim 03-restore-mysql.yaml
# 03-restore-mysql.yaml
apiVersion: v1
kind: PersistentVolumeClaim
metadata:
  name: mysql-restore-pvc
spec:
  storageClassName: longhorn
  accessModes:
  - ReadWriteOnce
  resources:
    requests:
      storage: 1Gi
  dataSource:
    apiGroup: snapshot.storage.k8s.io
    kind: VolumeSnapshot
    name: mysql-snapshot-demo
The above PVC objects are basically the same as we usually declare. The only difference is that they are created based on a storage snapshot named MySQL snapshot demo through a dataSource field.
2. Deploy and test
🍀 After creating the above resource object, a PV will also be automatically created and bound to it:
$kubectl apply -f 03-restore-mysql.yaml

[root@master1 2022.3.2-48.CSI Volume management-Experimental code]#kubectl get pvc
NAME                STATUS   VOLUME                                     CAPACITY   ACCESS MODES   STORAGECLASS   AGE
html                Bound    pvc-6d15f7e3-8d2f-471d-b1b4-4bc045e84d7f   1Gi        RWX            longhorn       5d8h
mysql-pvc           Bound    pvc-52031b79-4905-47be-b8fc-09629c25de1f   1Gi        RWO            longhorn       6d13h
mysql-restore-pvc   Bound    pvc-1b89ddf4-8647-41d1-b334-ec1c9dac658d   1Gi        RWO            longhorn       20m
nfs-csi-sc-pvc      Bound    pvc-628c2b7d-6c51-4a4c-ac0d-87bea6ef89be   20Gi       RWX            nfs-csi        7d12h
Er, er, I waited for a while before I landed successfully...

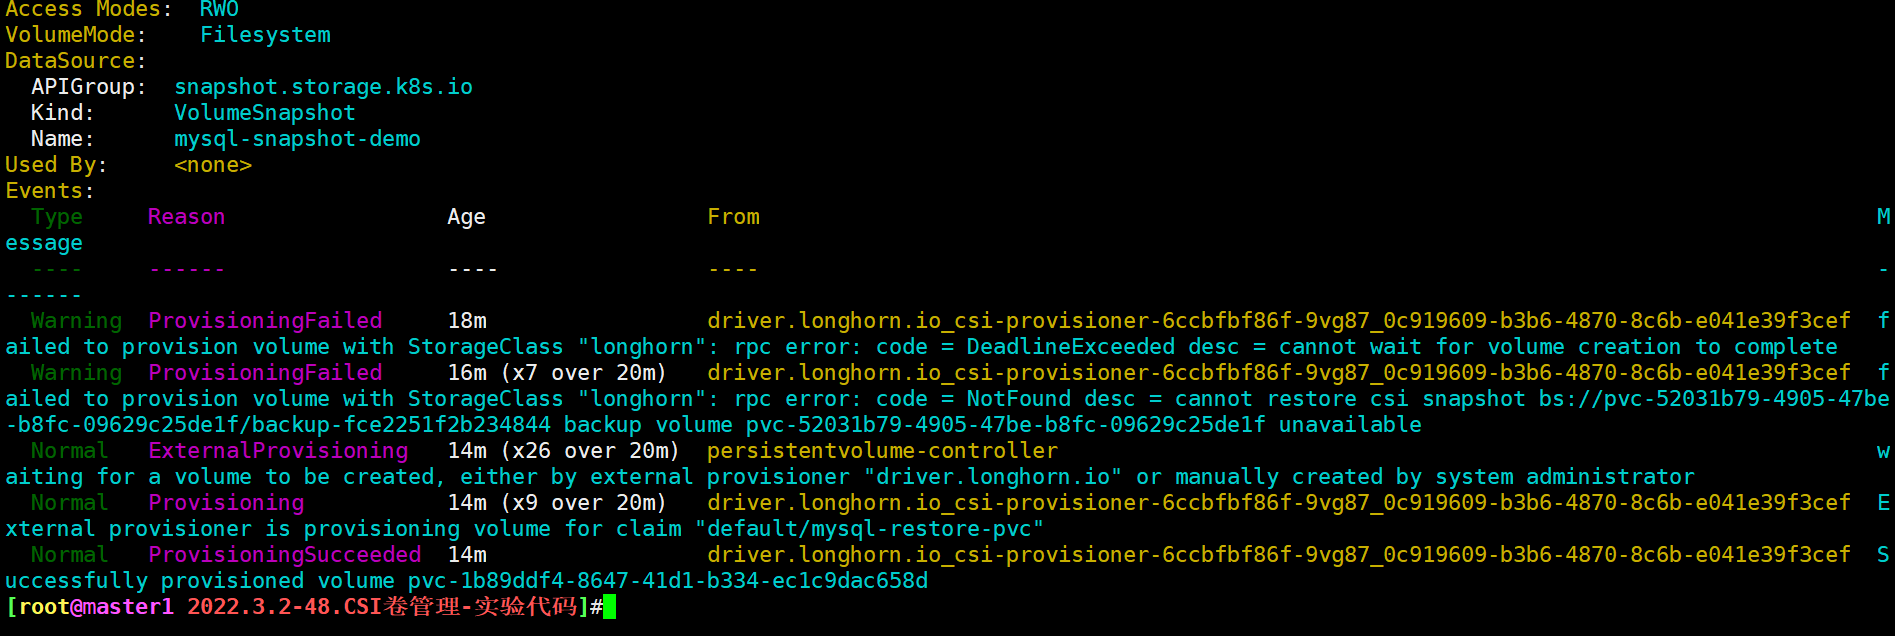
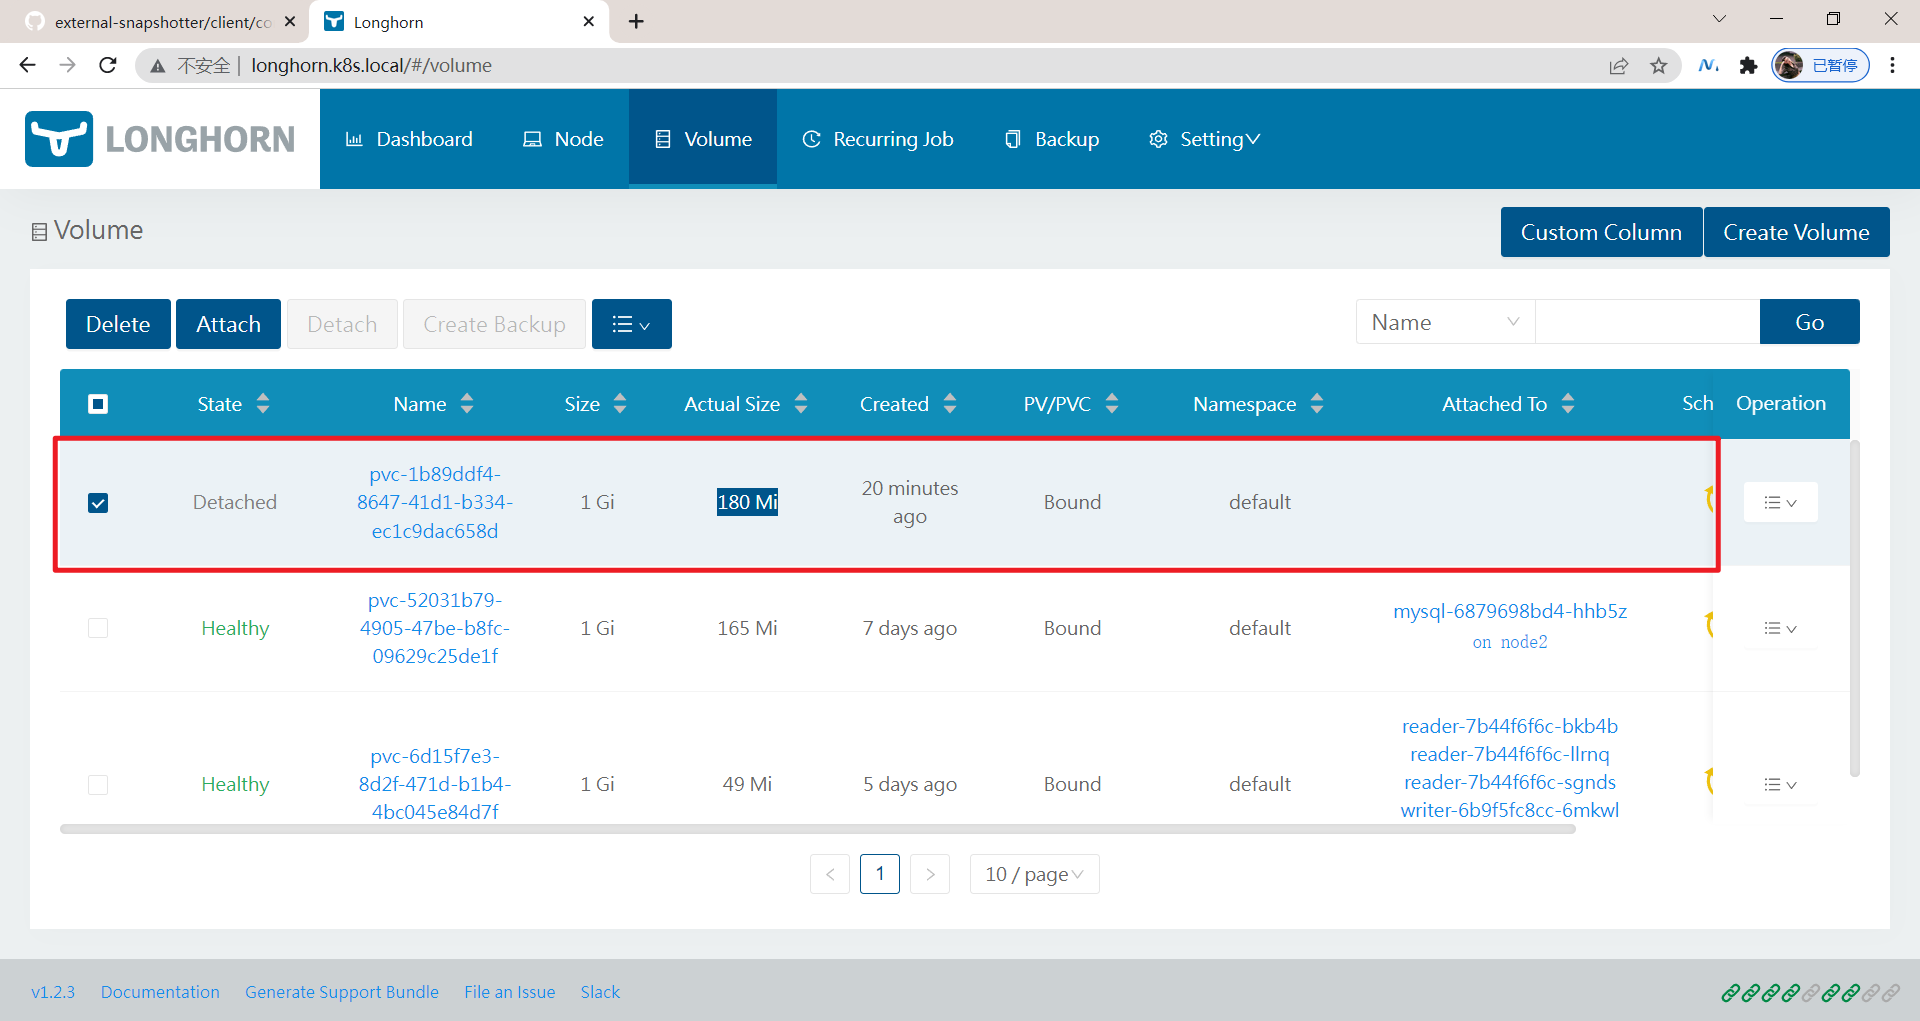
When you view the volume in Longhorn UI, you can see that the actual size of the volume is not 0. This is because we created it from the snapshot, which is equivalent to the data recovered from the snapshot above:
The experiment is over. 😘
3. Volume cloning
In addition to creating new PVC objects based on snapshots, CSI type storage also supports the cloning function of storage. You can clone a new PVC based on the existing PVC. The implementation method is also realized by setting the source PVC in the dataSource field.
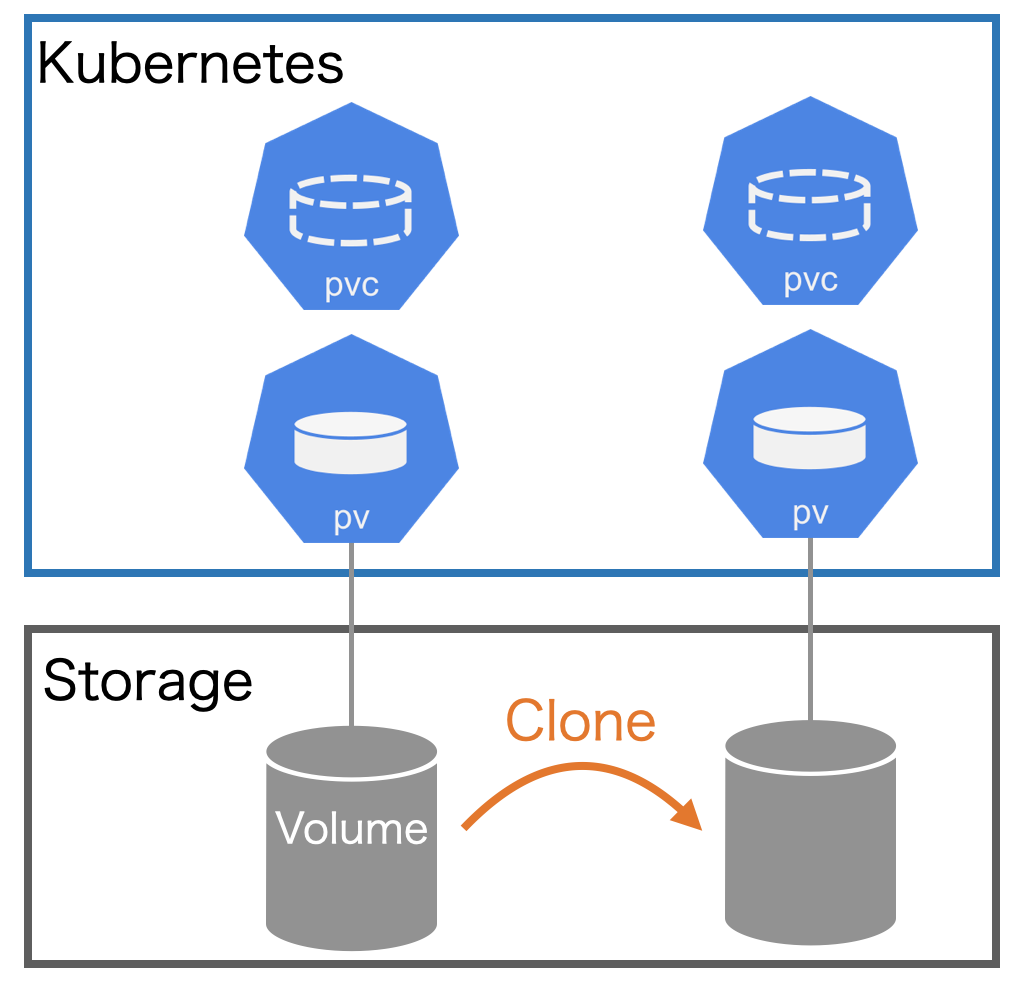
Cloning a PVC is actually creating a copy of the existing storage volume. The only difference is that when the system provides back-end storage resources for the cloned PVC, it does not create an empty PV, but copies a PV exactly the same as the original PVC bound PV.
From the perspective of Kubernetes API, the implementation of cloning only adds the ability to specify an existing PVC as the data source when creating a new PVC. The source PVC must be bound and available.
When using this function, users should pay attention to the following matters:
- Cloning is only available for CSI drivers
- Cloning is only available for dynamic provisioning
- The cloning function depends on whether the specific CSI driver realizes this function
- It is required that the target PVC and the source PVC must be in the same namespace
- Only supported in the same StorageClass (you can use the default)
- The storage mode of the two storage volumes should be consistent
💘 Practical demonstration: Volume cloning (successful test)
1. Create PVC yaml
The corresponding PVC declaration is as follows:
vim 04-clone.yaml
#04-clone.yaml
apiVersion: v1
kind: PersistentVolumeClaim
metadata:
  name: mysql-clone-pvc
spec:
  accessModes:
  - ReadWriteOnce
  storageClassName: longhorn
  resources:
    requests:
      storage: 1Gi  # Must be greater than or equal to the value of the source
  dataSource:
    kind: PersistentVolumeClaim
    name: mysql-pvc
The PVC has the same configuration as the source PVC declaration. The only difference is that the name of the source PVC is specified through the dataSource and the resource object is directly created. As a result, the new PVC MySQL clone PVC has the same data as the source MySQL PVC.
2. Deploy and test
[root@master1 2022.3.2-48.CSI Volume management-Experimental code]#kubectl apply -f 04-clone.yaml
persistentvolumeclaim/mysql-clone-pvc created

[root@master1 2022.3.2-48.CSI Volume management-Experimental code]#kubectl get pvc mysql-clone-pvc
NAME              STATUS   VOLUME                                     CAPACITY   ACCESS MODES   STORAGECLASS   AGE
mysql-clone-pvc   Bound    pvc-51e9f6cf-51e2-4ea9-953b-af8ebbb72301   1Gi        RWO            longhorn       36s
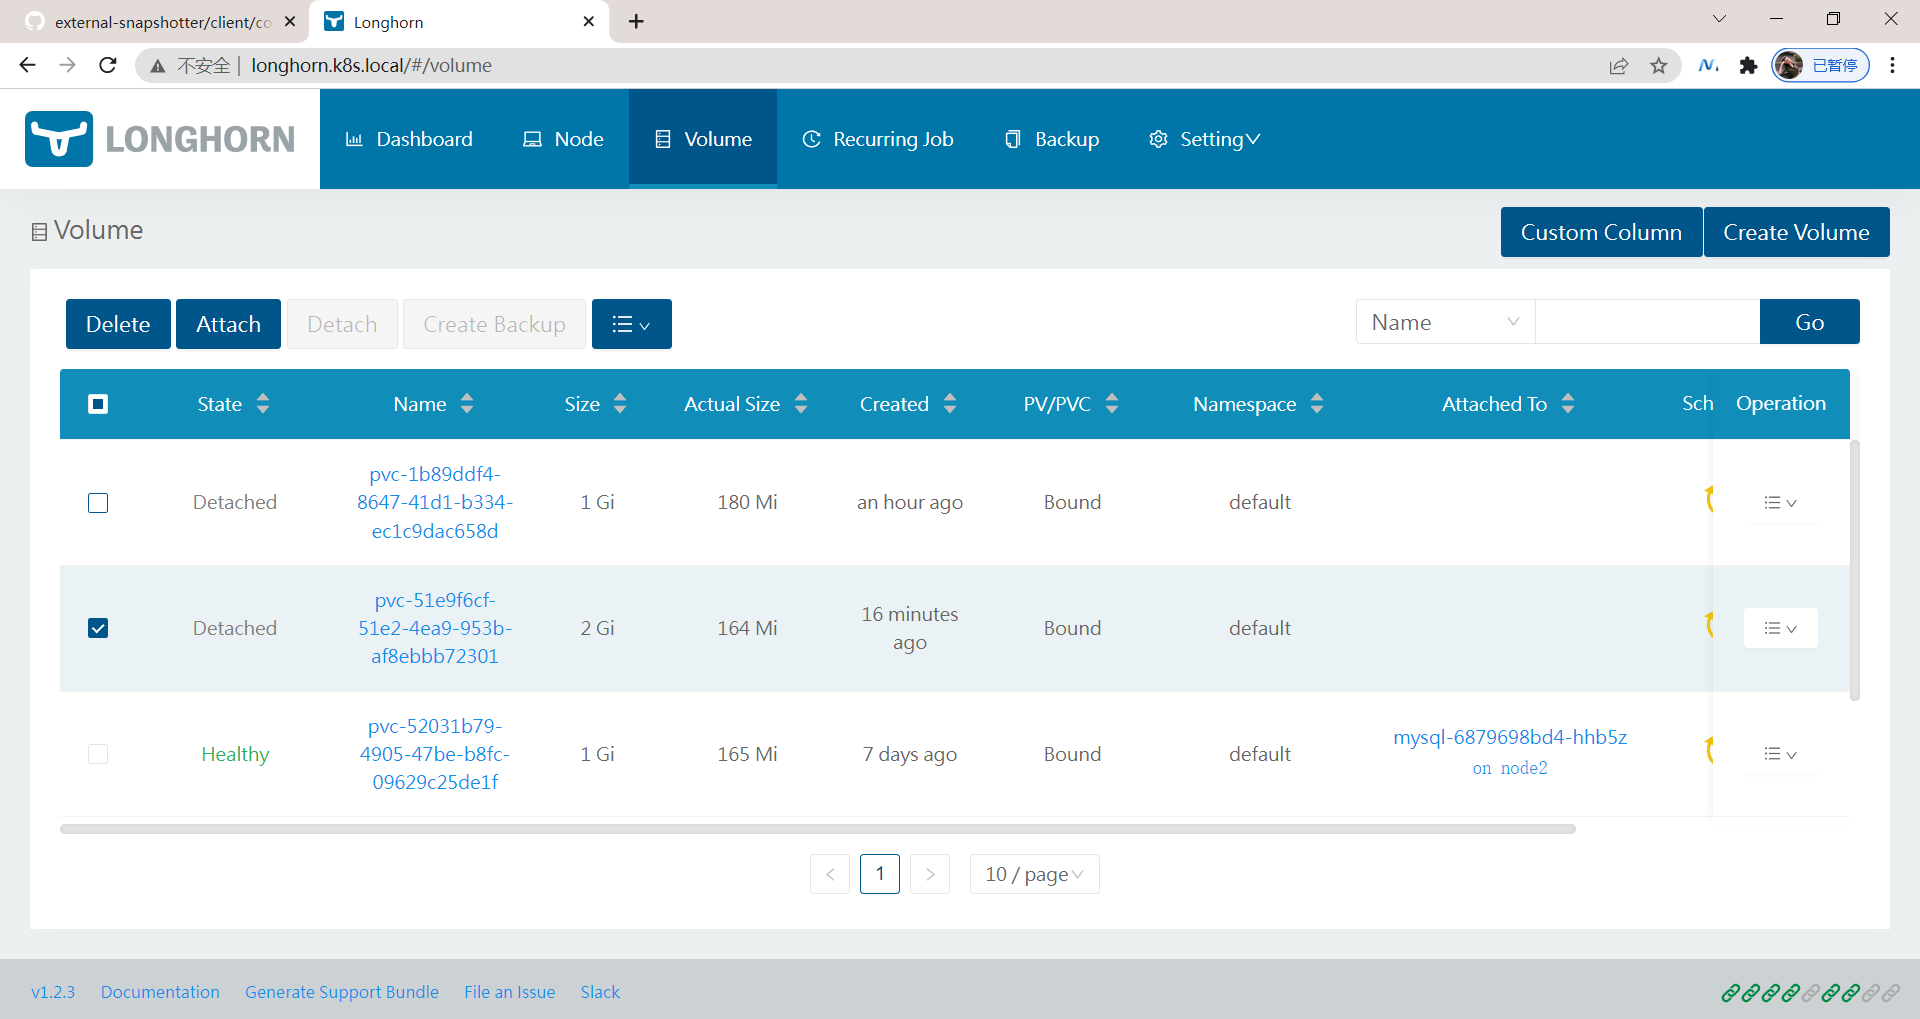
You can also see the corresponding volume on the Longhorn UI page:

Once the new PVC is available, the cloned PVC can be used like other PVC, and it can also be cloned, snapshot, deleted and other operations.
The experiment is over. 😘
4. Volume dynamic expansion
We know that capacity expansion is a very medium demand for storage. Dynamic capacity expansion of volumes in Kubernetes is also a basic function required. To expand PV, the underlying storage needs to support this operation. The underlying Longhorn supports volume expansion, but the expanded volumes must be in the detached state, There are two ways to expand Longhorn volumes: modify PVC and use Longhorn UI.
💘 Actual combat demonstration: dynamic volume expansion (successful test)
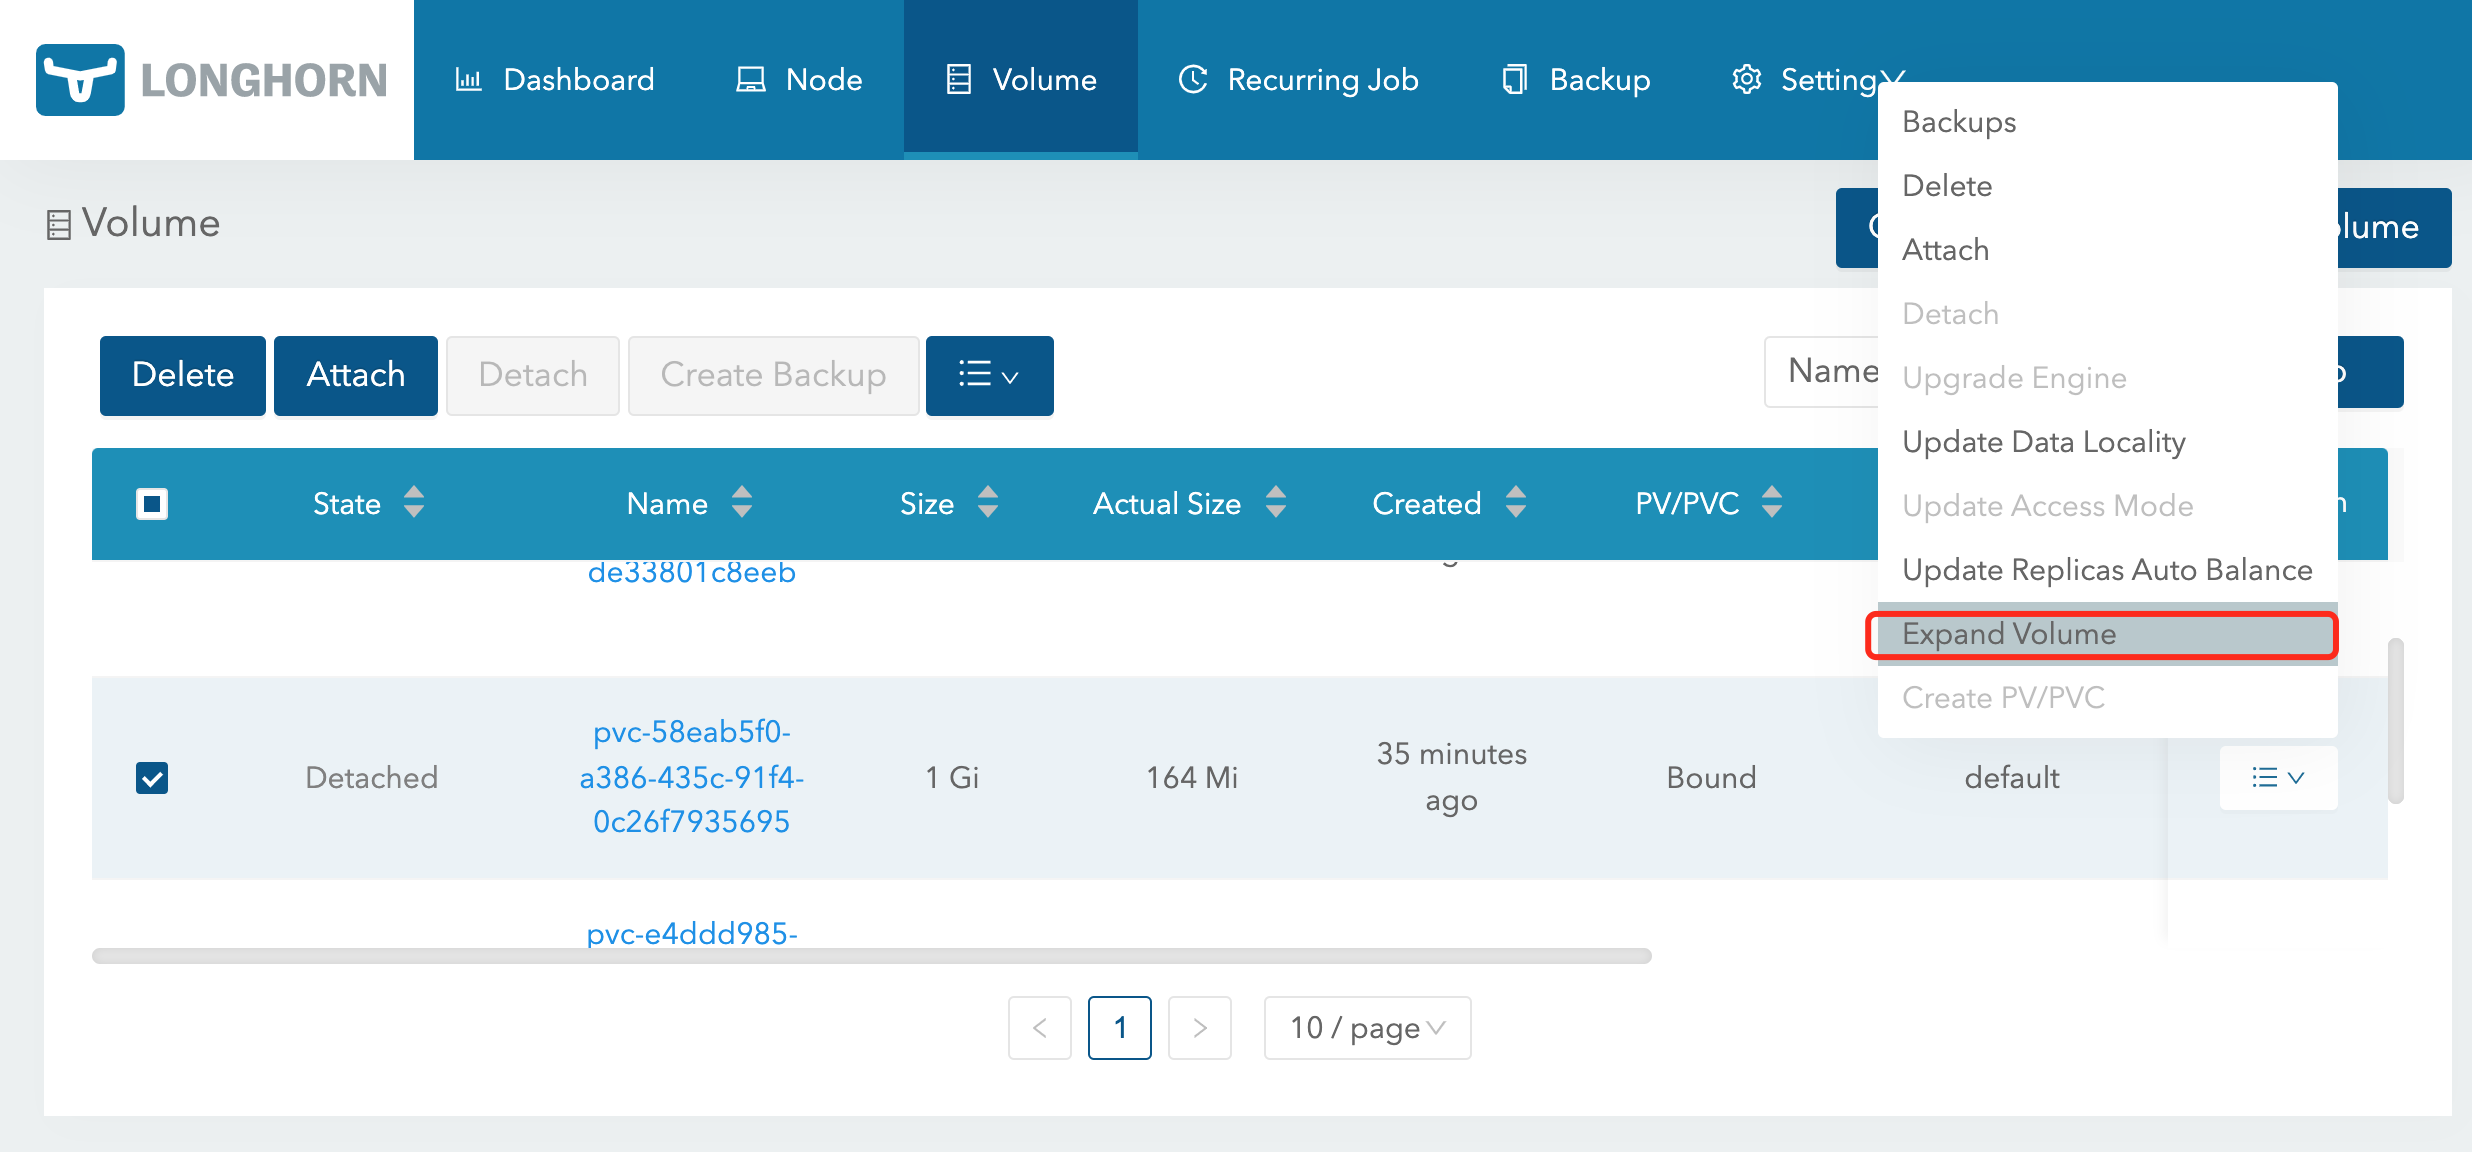
1. Using Longhorn UI
Through Longhorn UI, the operation is relatively simple. Directly select the volume to be expanded in the page, and select Expand Volume in the operation to operate:
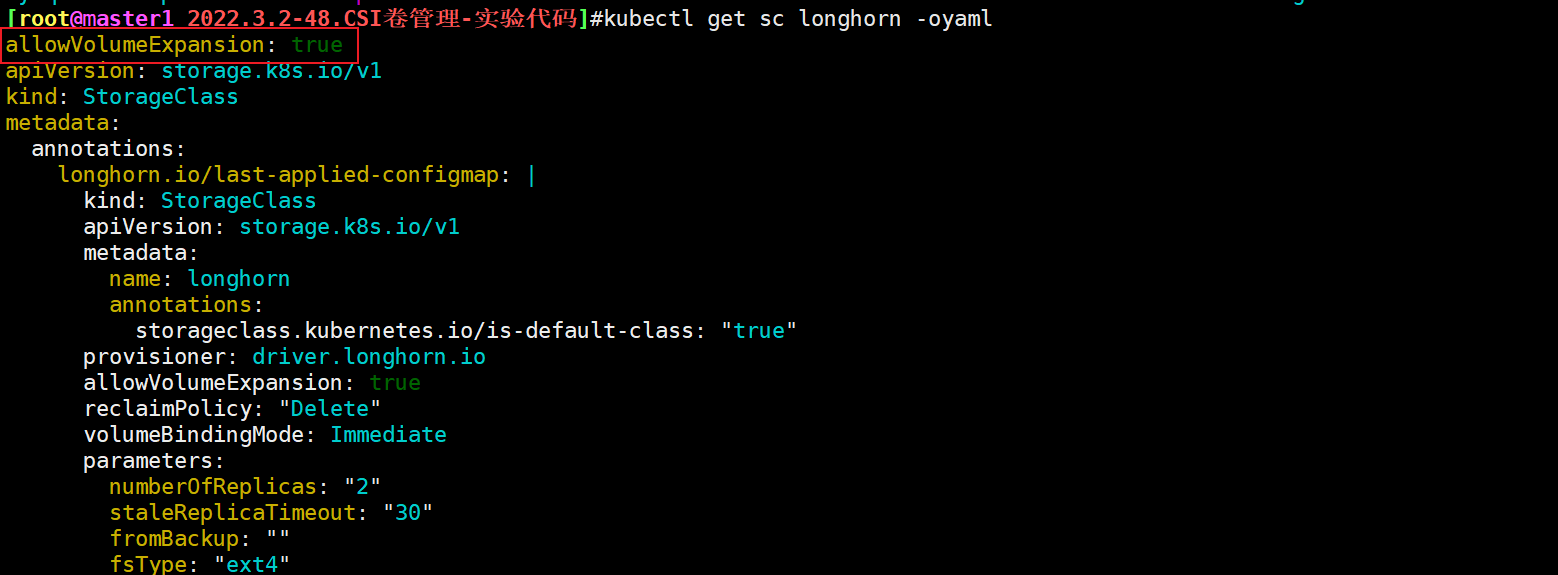
2. Modify PVC
To expand capacity through PVC, first, PVC needs to be dynamically supplied by Longhorn StorageClass, and the allowVolumeExpansion attribute in StorageClass is set to true.
This method is recommended because PVC and PV will be updated automatically and will be consistent after capacity expansion.
For example, the longhorn StorageClass used by the MySQL clone PVC volume (in the detached state) above has been configured with allowVolumeExpansion: true, and then directly modify the spec.resources requests. Storage value:
[root@master1 2022.3.2-48.CSI Volume management-Experimental code]#kubectl get pvc mysql-clone-pvc
NAME              STATUS   VOLUME                                     CAPACITY   ACCESS MODES   STORAGECLASS   AGE
mysql-clone-pvc   Bound    pvc-51e9f6cf-51e2-4ea9-953b-af8ebbb72301   1Gi        RWO            longhorn       14m


[root@master1 2022.3.2-48.CSI Volume management-Experimental code]#kubectl patch pvc mysql-clone-pvc -p '{"spec":{"resources":{"requests":{"storage":"2Gi"}}}}}'
persistentvolumeclaim/mysql-clone-pvc patched
After modification, you can view the events information of the PVC:
➜ kubectl describe pvc mysql-clone-pvc
......
Events:
  Type     Reason                  Age                From                                                                                      Message
  ----     ------                  ----               ----                                                                                      -------
  ......
  Normal   Resizing                14s                external-resizer driver.longhorn.io                                                       External resizer is resizing volume pvc-58eab5f0-a386-435c-91f4-0c26f7935695
  Warning  ExternalExpanding       14s                volume_expand                                                                             Ignoring the PVC: didn't find a plugin capable of expanding the volume; waiting for an external controller to process this PVC.
  Normal   VolumeResizeSuccessful  2s                 external-resizer driver.longhorn.io                                                       Resize volume succeeded
You can see that the Resize operation is realized through the external Resizer component. Check the size verification of PVC and PV:
[root@master1 2022.3.2-48.CSI Volume management-Experimental code]#kubectl get pvc mysql-clone-pvc
NAME              STATUS   VOLUME                                     CAPACITY   ACCESS MODES   STORAGECLASS   AGE
mysql-clone-pvc   Bound    pvc-51e9f6cf-51e2-4ea9-953b-af8ebbb72301   2Gi        RWO            longhorn       15m
[root@master1 2022.3.2-48.CSI Volume management-Experimental code]#kubectl get pv pvc-51e9f6cf-51e2-4ea9-953b-af8ebbb72301
NAME                                       CAPACITY   ACCESS MODES   RECLAIM POLICY   STATUS   CLAIM                     STORAGECLASS   REASON   AGE
pvc-51e9f6cf-51e2-4ea9-953b-af8ebbb72301   2Gi        RWO            Delete           Bound    default/mysql-clone-pvc   longhorn                15m
You can see that the capacity in PVC and PV has become 2Gi, which proves that the expansion is successful. You can also see that the volume expansion is successful through Longhorn UI:
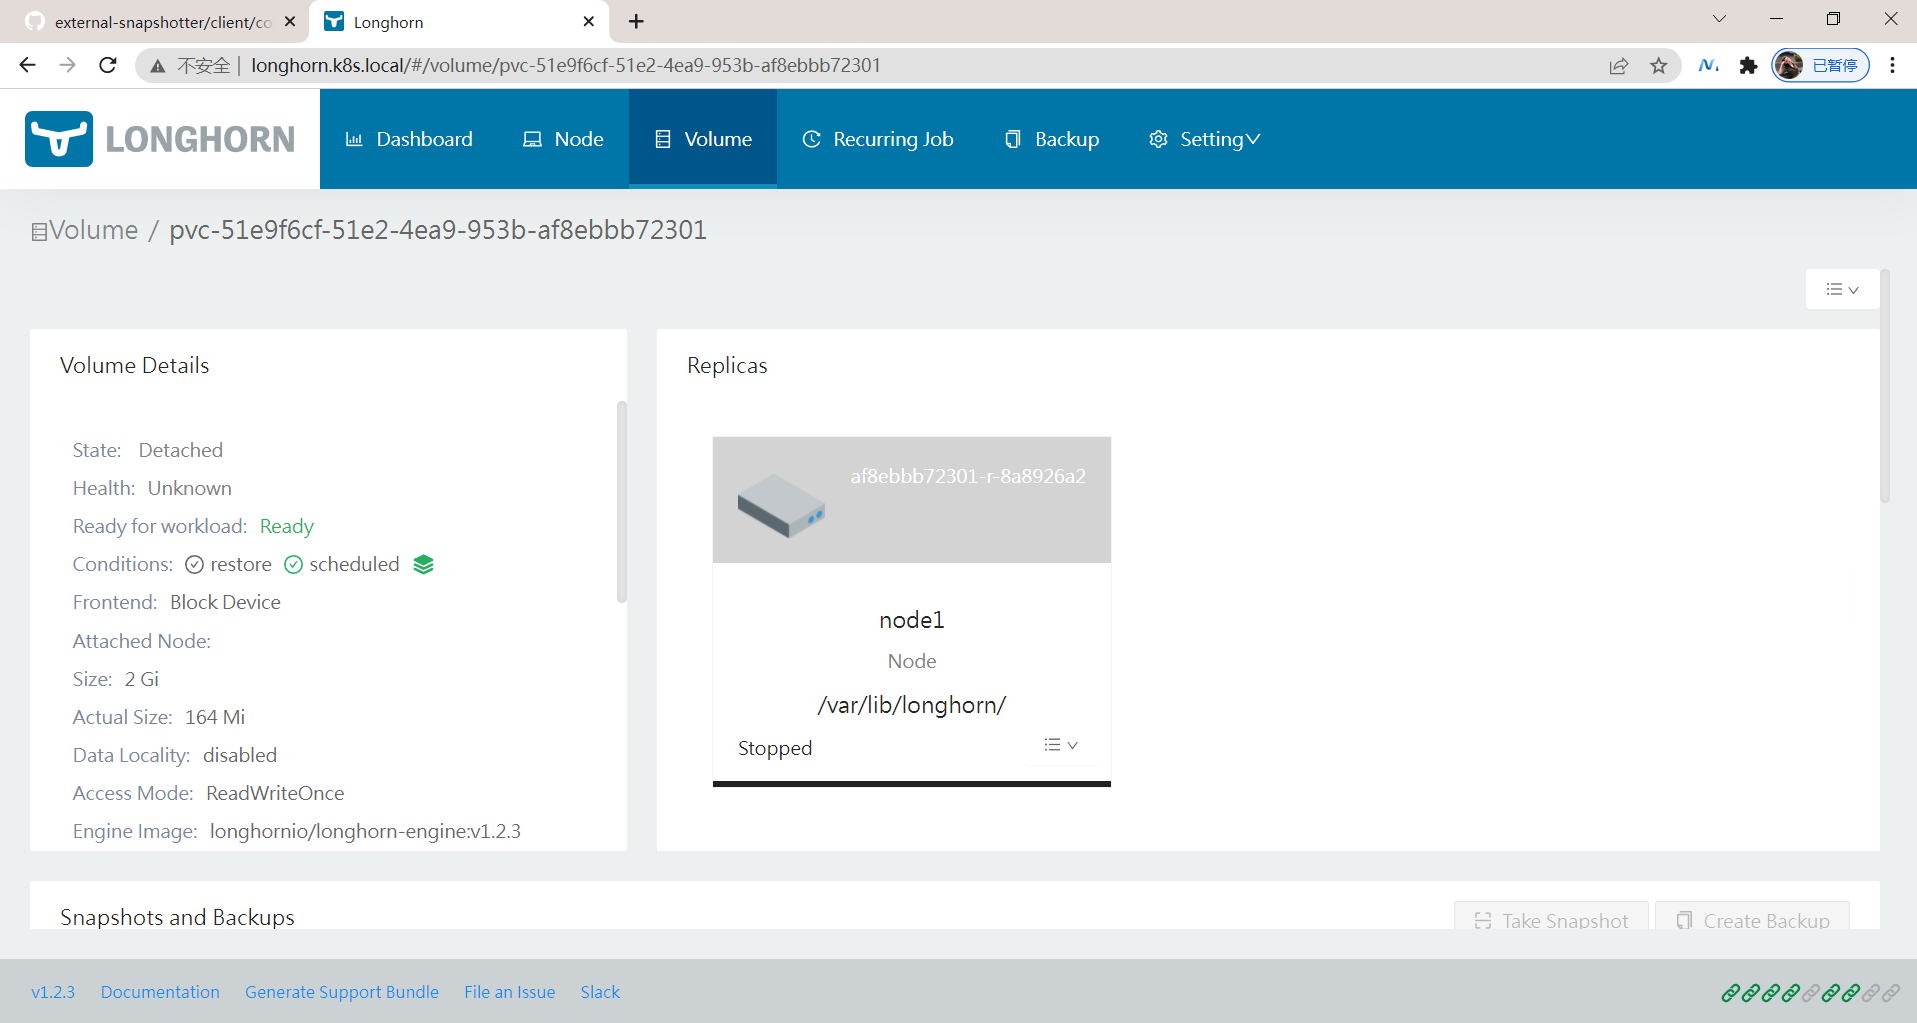
The experiment is over. 😘
About me
Theme of my blog: I hope everyone can make experiments with my blog, first do the experiments, and then understand the technical points in a deeper level in combination with theoretical knowledge, so as to have fun and motivation in learning. Moreover, the content steps of my blog are very complete. I also share the source code and the software used in the experiment. I hope I can make progress with you!
If you have any questions during the actual operation, you can contact me at any time to help you solve the problem for free:
-
Personal wechat QR Code: x2675263825 (shede), qq: 2675263825.

-
Personal blog address: www.onlyonexl.com cn
-
Personal WeChat official account: cloud native architect real battle

-
Personal csdn
https://blog.csdn.net/weixin_39246554?spm=1010.2135.3001.5421

-
Personal dry goods 😘
name link 01 actual combat: create a king cloud note: typera + nut cloud + Alibaba cloud oss https://www.jianguoyun.com/p/DXS6qiIQvPWVCRiS0qoE 02 actual combat: customize the most beautiful typora theme skin in the universe https://www.jianguoyun.com/p/DeUK9u0QvPWVCRib0qoE 03 play with vscode https://www.jianguoyun.com/p/DZe8gmsQvPWVCRid0qoE 04 Chen Guo's happiness philosophy course https://www.jianguoyun.com/p/Db0kM7gQvPWVCRj2q6YE
last
Well, that's all for the CSI volume management experiment. Thank you for reading. Finally, paste the photo of my goddess. I wish you a happy life and a meaningful life every day. See you next time!