
This is the second article in the Android biometric authentication series, Last article By comparing the traditional authentication methods of user name and password with biometric authentication methods, and introducing different encryption methods of biometric encryption, this paper shows developers why biometric authentication technology needs to be used in applications.
In order to expand the traditional login authorization process to support biometric authentication, you can prompt the user to enable biometric authentication after the user successfully logs in. Figure 1A shows a typical login process that you may already be familiar with. When the user clicks the login button and the application obtains the userToken returned by the server, the user will be prompted whether to enable it, as shown in Figure 1B. Once enabled, the application should automatically pop up the biometric authentication dialog box every time the user needs to log in, as shown in Figure 2.

△ figure 1A: typical login interface
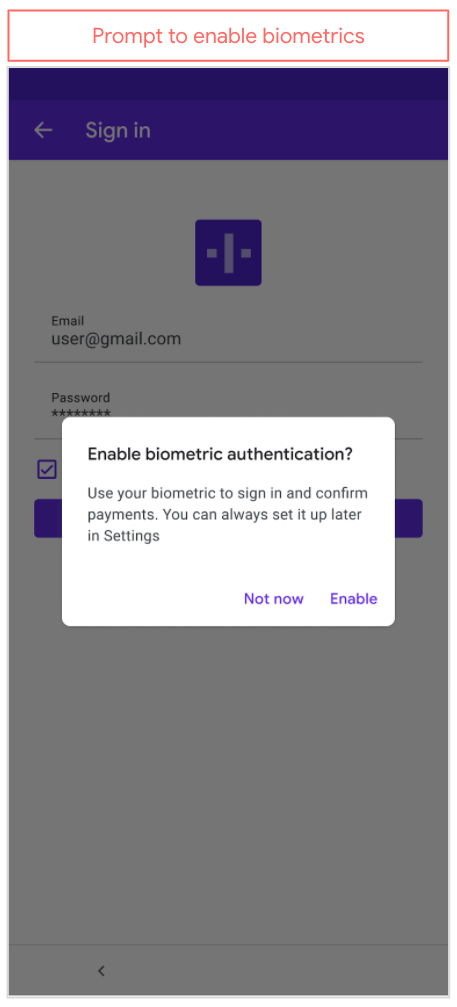
△ figure 1B: enable biometric authentication
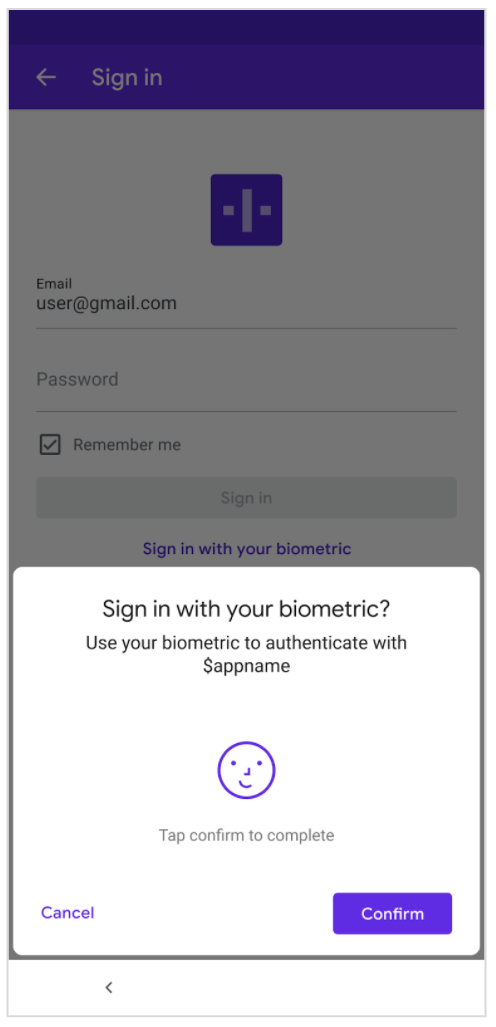
△ Figure 2: confirm login using biometric authentication
The interface in Figure 2 has an OK button, which is actually optional. For example, if you are developing a restaurant application, it is recommended to display this button, because you can use biometric authentication to let customers pay for meals. For sensitive transactions and payments, we recommend that you ask users for confirmation. To include this confirmation button in the interface, you can BiometricPrompt.PromptInfo Call setConfirmationRequired(true) when. Note here that if you do not call setConfirmationRequired(true) , the system will set it to true by default.
Design process of access biometric
The code in the example uses an encrypted version of BiometricPrompt with a CryptoObject instance.
If your application needs authentication, you should create a special LoginActivity component as the login interface of the application. No matter how often the application requires authentication, you should do so as long as authentication is required. If the user has been authenticated before, LoginActivity will call the finish() method to let the user continue to use. If the user has not been authenticated, you should check that biometric authentication is enabled.
There are many ways to check whether biometric is enabled. Instead of dealing with various alternatives, let's delve directly into a special method: directly check whether the custom property ciphertextwrapper is null. After the user enables biometric authentication in your application, you can create a ciphertextwrapper data class to store the encrypted userToken (that is, ciphertext) in SharedPreferences or Room Such persistent storage. Therefore, if the ciphertextWrapper is not null, it is equivalent to that you have the encrypted userToken required to access the remote service, which also means that the current biometric is enabled.
if (ciphertextWrapper != null) {
   // User has biometric enabled
} else {
    // Biometric not enabled
}
If biometric is not enabled, the user can click (as shown in Figure 1B) to enable it. At this time, you will show the biometric authentication prompt box to the user, as shown in Figure 3.
In the following code example, showBiometricPromptForEncryption() shows how to set the encryption key associated with BiometricPrompt. In essence, it is to initialize a Cipher from a String, and then pass the Cipher to CryptoObject. Finally, CryptoObject is passed to the biometricPrompt.authenticate(promptInfo, cryptoObject) method.
binding.useBiometrics.setOnClickListener {
   showBiometricPromptForEncryption()
}
....
private fun showBiometricPromptForEncryption() {
   val canAuthenticate = BiometricManager.from(applicationContext).canAuthenticate()
   if (canAuthenticate == BiometricManager.BIOMETRIC_SUCCESS) {
       val secretKeyName = SECRET_KEY_NAME
       cryptographyManager = CryptographyManager()
       val cipher = cryptographyManager.getInitializedCipherForEncryption(secretKeyName)
       val biometricPrompt =
           BiometricPromptUtils.createBiometricPrompt(this, ::encryptAndStoreServerToken)
       val promptInfo = BiometricPromptUtils.createPromptInfo(this)
       biometricPrompt.authenticate(promptInfo, BiometricPrompt.CryptoObject(cipher))
   }
}

△ Figure 3: Tips for activating biometrics
In the scenarios shown in Figure 2 and figure 3, the application only has userToken data. However, unless the user needs to enter a password every time he opens the application, the userToken needs to be persisted for subsequent sessions. However, if you store an unencrypted userToken directly, an attacker may invade the device to read the plaintext userToken and then use it to obtain data from the remote server. Therefore, it is better to encrypt the userToken before saving it locally, which is the role of BiometricPrompt in Figure 3. After the user uses biometric to authenticate, your goal is to use the BiometricPrompt unlock key (either auth per use key or time bound key), then use the key to encrypt the userToken generated by the server, and then save it locally. Since then, when users need to log in, they can use biometric authentication (i.e. biometric authentication - > unlock key - > decrypt userToken for data access).
Here, we should pay attention to distinguish whether the user enables biometric for the first time or logs in using biometric. When biometrics is enabled, the application calls the showBiometricPromptForEncryption() method, which initializes a Cipher to encrypt userToken. On the other hand, if the user is logging in using biometrics, the showBiometricPromptForDecryption() method should be called. It will initialize a Cipher for decryption, and then use the Cipher to decrypt the userToken.
After enabling biometrics, the next time the user returns to the application, he will authenticate through the biometric authentication dialog box, as shown in Figure 4. Please note that since Figure 4 is used to log in the application and Figure 2 is used to determine the transaction, there is no confirm button in Figure 4 because the login behavior is passive and easy to reverse recovery.

△ Figure 4
If you want to implement this process for your users, when your LoginActivity completes the authentication process, you will decrypt the userToken with the encrypted object successfully unlocked by BiometricPrompt authentication, and then call the finish() method in LoginActivity.
override fun onResume() {
   super.onResume()

   if (ciphertextWrapper != null) {
       if (SampleAppUser.fakeToken == null) {
           showBiometricPromptForDecryption()
       } else {
           // The user has successfully logged in, so go directly to the next application process
           // After that, it's up to the developer to complete it
           updateApp(getString(R.string.already_signedin))
       }
   }
}
....
private fun showBiometricPromptForDecryption() {
   ciphertextWrapper?.let { textWrapper ->
       val canAuthenticate = BiometricManager.from(applicationContext).canAuthenticate()
       if (canAuthenticate == BiometricManager.BIOMETRIC_SUCCESS) {
           val secretKeyName = getString(R.string.secret_key_name)
           val cipher = cryptographyManager.getInitializedCipherForDecryption(
               secretKeyName, textWrapper.initializationVector
           )
                      biometricPrompt =
               BiometricPromptUtils.createBiometricPrompt(
                   this,
                   ::decryptServerTokenFromStorage
               )
           val promptInfo = BiometricPromptUtils.createPromptInfo(this)
           biometricPrompt.authenticate(promptInfo, BiometricPrompt.CryptoObject(cipher))
       }
   }
}
private fun decryptServerTokenFromStorage(authResult: BiometricPrompt.AuthenticationResult) {
   ciphertextWrapper?.let { textWrapper ->
       authResult.cryptoObject?.cipher?.let {
           val plaintext =
               cryptographyManager.decryptData(textWrapper.ciphertext, it)
           SampleAppUser.fakeToken = plaintext
           // Now that you have a token, you can query other data on the server
           // We call this fakeToken because it is not really obtained from the server
           // In a real scenario, you will get the token data from the server
           // At this point, it can be regarded as a real token
           updateApp(getString(R.string.already_signedin))
       }
   }
}
Complete blueprint
Figure 5 shows a complete engineering design flow chart, which is also our recommended process. Since you may deviate from this process in many places in the actual coding process, for example, in the encryption solution you use, the unlocking key may only be used for encryption rather than decryption, but here we still hope to provide such a complete example to help developers who may need it.
Where the key is mentioned in the figure, you can use auth per use key or time bound key as required. In addition, the "storage system in application" mentioned in the figure can also be understood as your preferred structured storage: SharedPreferences,Room Or any other storage solution. Finally, for userToken, you can understand it as a token. With it, you can access the protected user data on the server. The server usually uses this token as evidence that the caller has been authorized.
The arrow of "Encrypt userToken" in the figure is likely to point to "login completed" rather than back to "LoginActivity". Nevertheless, we still point it to "LoginActivity" in the figure to remind everyone that after the user clicks "activate biometric", an additional Activity (such as enablebiometricactivity) can be used to make the code more modular and readable. Alternatively, you can create a LoginActivity with two Fragments: one Fragment is used for the actual authentication process, and the other is used to respond to the user's click on "enable biometrics".
In addition to the flow chart below, we also released a design guide, which you can refer to when designing applications. In addition, we Sample code on Github I hope it can also help you better understand how to use biometric authentication technology.

△ Figure 5: complete blueprint for obtaining authorization with biometric server
summary
In this article, we introduce:
- How to extend UI to support biometric authentication;
- For the biometric authentication process, what are the key points your application should focus on;
- How to design your code to deal with different scenarios of biometric authentication;
- Log in the complete engineering drawing of the process.
Have a nice coding!