Bowen catalogue
1, Linux directory structure
2, Linux view file content basic command
3, Compress and decompress files
4, vi text editor
1, Linux directory structure
Linux directory structure adopts tree structure, including root directory and subdirectory.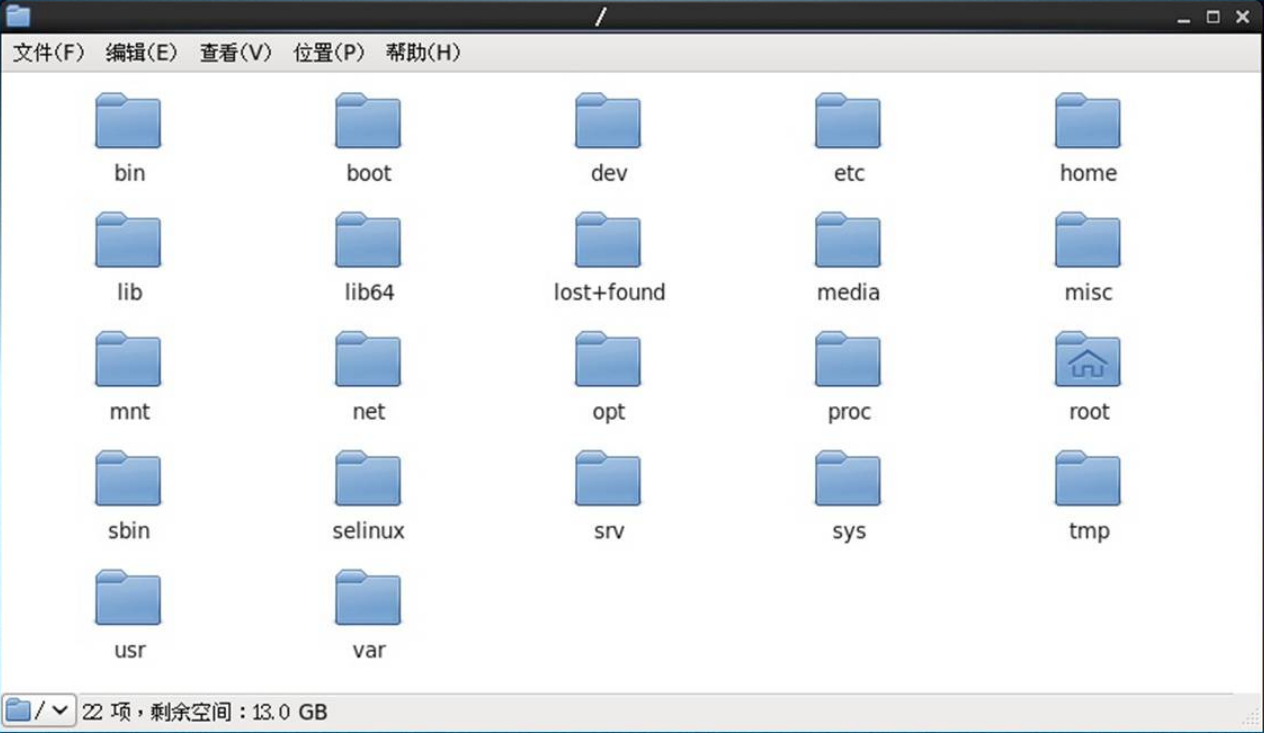
1. Root directory
The location starting point of all partitions, directories, files, etc. is represented by an independent "/" in the whole tree directory structure.
2. Subdirectory
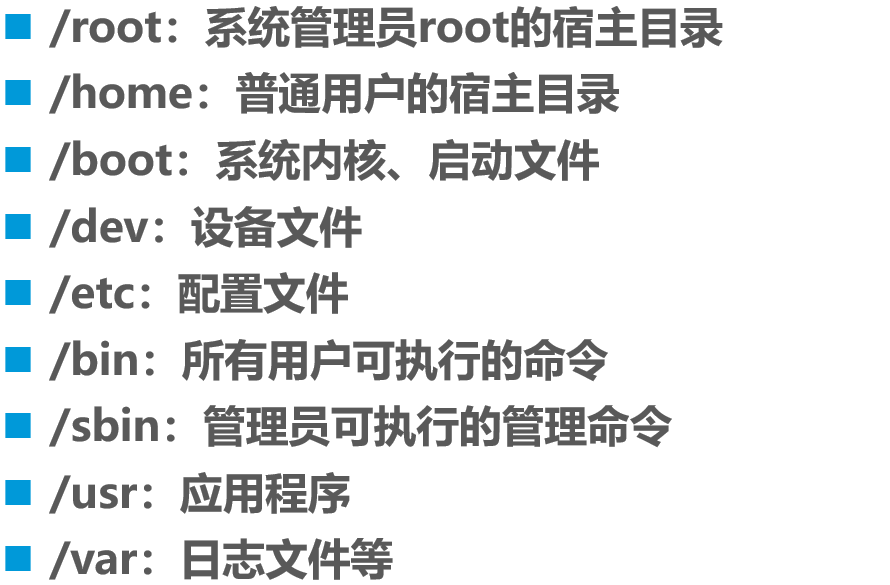
Common subdirectories such as / root, / bin, / boot, / dev, / etc, / home, / var, / usr, / sbin.
3. The role of subdirectories
2, Linux view file content basic command
1. cat -- view file content
cat is used to display all the contents of the file at one time. The basic syntax format is as follows:
Application examples:
[root@centos01 ~]# cat /etc/hosts
127.0.0.1   localhost localhost.localdomain localhost4 localhost4.localdomain4
::1         localhost localhost.localdomain localhost6 localhost6.localdomain6
[root@centos01 ~]# cat /etc/sysconfig/network
# Created by anaconda
[root@centos01 ~]# cat /etc/sysconfig/network /etc/hosts
# Created by anaconda
127.0.0.1   localhost localhost.localdomain localhost4 localhost4.localdomain4
::1         localhost localhost.localdomain localhost6 localhost6.localdomain6
2. more - view file content
more is used to display the contents of the file in full screen mode. The basic syntax format is as follows:
Interactive operation method:
-
Press Enter to scroll down line by line;
-
Press the space bar to scroll down one screen;
- Press q to exit;
Application examples:
[root@centos01 ~]# more /etc/httpd/conf/httpd.conf
#
# This is the main Apache HTTP server configuration file.  It contains the
# configuration directives that give the server its instructions.
# See <URL:http://httpd.apache.org/docs/2.4/> for detailed information.
# In particular, see
# <URL:http://httpd.apache.org/docs/2.4/mod/directives.html>
--More--(2%)
3. less - view file content
The less command has the same function as the more command, but it has more extended functions. The basic syntax format is as follows:
Interactive operation method:
-
Page Up: Page Up;
-
Page Down: Page Down;
-
"/" key: find key content;
-
"n": find the next key content;
- "N": find the last key content;
Other functions are basically similar to the more command;
4. head, tail -- view the contents of the file
The basic syntax format of the head and tail commands is as follows:

-
head: view the part at the beginning of the file (the default is 10 lines);
- tail: view part of the content at the end of the file (the default is 10 lines);
Application examples:
[root@centos01 ~]# Head - 2 / var / log / messages <! -- display the first 2 lines of the file -- >
Jan 10 20:20:01 centos01 systemd: Started Session 9 of user root.
Jan 10 20:20:01 centos01 systemd: Starting Session 9 of user root.
[root@centos01 ~]#
[root@centos01 ~]# Tail - 3 / var / log / messages <! -- display the last three lines of the file -- >
Jan 10 23:10:01 centos01 systemd: Starting Session 30 of user root.
Jan 10 23:20:01 centos01 systemd: Started Session 31 of user root.
Jan 10 23:20:01 centos01 systemd: Starting Session 31 of user root.
[root@centos01 ~]#
[root@centos01 ~]# tail -f /var/log/messages
     <!--Dynamically track the content at the end of the file for real-time monitoring of changes in the content of the file
(Press Ctrl+c Key combination termination)-->
Jan 10 23:01:01 centos01 systemd: Starting Session 29 of user root.
Jan 10 23:03:19 centos01 yum[11583]: Installed: httpd-tools-2.4.6-67.el7.centos.x86_64
Jan 10 23:03:19 centos01 yum[11583]: Installed: mailcap-2.1.41-2.el7.noarch
Jan 10 23:03:20 centos01 systemd: Reloading.
Jan 10 23:03:20 centos01 yum[11583]: Installed: httpd-2.4.6-67.el7.centos.x86_64
Jan 10 23:03:20 centos01 journal: g_dbus_interface_skeleton_unexport: assertion 'interface_->priv->connections != NULL' failed
Jan 10 23:10:01 centos01 systemd: Started Session 30 of user root.
Jan 10 23:10:01 centos01 systemd: Starting Session 30 of user root.
Jan 10 23:20:01 centos01 systemd: Started Session 31 of user root.
Jan 10 23:20:01 centos01 systemd: Starting Session 31 of user root.
5. wc - contents of statistical documents
wc is used to count the number of words, (Word Count), lines, bytes, etc. in a file. The basic syntax format is as follows:
Common options of wc are as follows:
-
-l: Count the number of lines;
-
-w: Count the number of words;
- -c: Count the number of bytes;
Application examples:
[root@centos01 ~]# WC - L / etc / passwd <! -- count file lines -- >
41 /etc/passwd
[root@centos01 ~]# WC - w / etc / passwd <! -- count the number of words in the file -- >
81 /etc/passwd
[root@centos01 ~]# WC - C / etc / passwd <! -- count bytes in file -- >
2104 /etc/passwd
[root@centos01 ~]# wc /etc/passwd
   <!--The order of statistics without options is 43 lines, 85 words and 2223 bytes-->
  43   85 2223 /etc/passwd
[root@centos01 ~]# find /etc -name "*.conf" | wc -l
     <!--Statistics/etc How many are there*.conf Number of files with suffix-->
437
6. grep -- retrieve and filter file content
The grep command is used to find and display lines in a file that contain the specified string. The basic syntax format is as follows:
The common options of grep command are as follows:
-
-i: Ignore case when searching;
- -v: Reverse search, output the row that does not match the condition;
grep search criteria settings:
-
The string to be searched is enclosed in double quotation marks;
-
"^...": means to find a string starting with;
-
"... $": indicates to find a string ending in;
- "^ $": indicates to find an empty line;
Application examples:
[root@centos01 ~]# grep -i "SSHD" /etc/passwd
          <!--query sshd User ignore case display-->
sshd:x:74:74:Privilege-separated SSH:/var/empty/sshd:/sbin/nologin
[root@centos01 ~]# grep "ftp" /etc/passwd
                <!--query ftp User display-->
ftp:x:14:50:FTP User:/var/ftp:/sbin/nologin
[root@centos01 ~]# grep -v "^#" /etc/yum.conf | grep -v "^$"
                <!--filter/etc/yum.conf Comment lines and empty lines in-->
[main]
cachedir=/var/cache/yum/$basearch/$releasever
keepcache=0
debuglevel=2
logfile=/var/log/yum.log
exactarch=1
obsoletes=1
gpgcheck=1
plugins=1
installonly_limit=5
bugtracker_url=http://bugs.centos.org/set_project.php?project_id=23&ref=http://bugs.centos.org/bug_report_page.php?category=yum
distroverpkg=centos-release
3, Compress and decompress files
1. gzip, gunzip -- compression and decompression
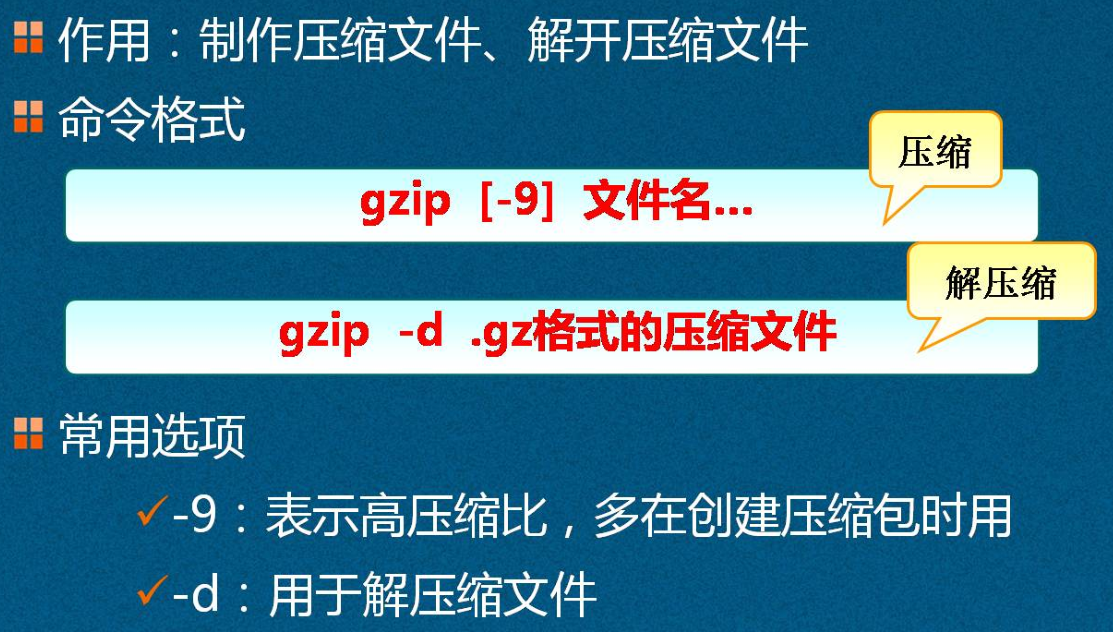
Application examples:
<!--Compression and decompression method 1(“-9"Option for high compression)-->
[root@centos01 ~]# ls
anaconda-ks.cfg  CentOS-7.4-x86_64-1708.iso  initial-setup-ks.cfg
[root@centos01 ~]# gzip -9 initial-setup-ks.cfg
[root@centos01 ~]# ls
anaconda-ks.cfg  CentOS-7.4-x86_64-1708.iso  initial-setup-ks.cfg.gz
[root@centos01 ~]# gzip -d initial-setup-ks.cfg.gz
[root@centos01 ~]# ls
anaconda-ks.cfg  CentOS-7.4-x86_64-1708.iso  initial-setup-ks.cfg

<!--Compression and decompression method 2 (compression without options, decompression using gunzip Command)-->
[root@centos01 ~]# ls
anaconda-ks.cfg  CentOS-7.4-x86_64-1708.iso  initial-setup-ks.cfg
[root@centos01 ~]# gzip initial-setup-ks.cfg
[root@centos01 ~]# ls
anaconda-ks.cfg  CentOS-7.4-x86_64-1708.iso  initial-setup-ks.cfg.gz
[root@centos01 ~]# gunzip initial-setup-ks.cfg.gz
[root@centos01 ~]# ls
anaconda-ks.cfg  CentOS-7.4-x86_64-1708.iso  initial-setup-ks.cfg
2. bzip2, bunzip2 -- compression and decompression
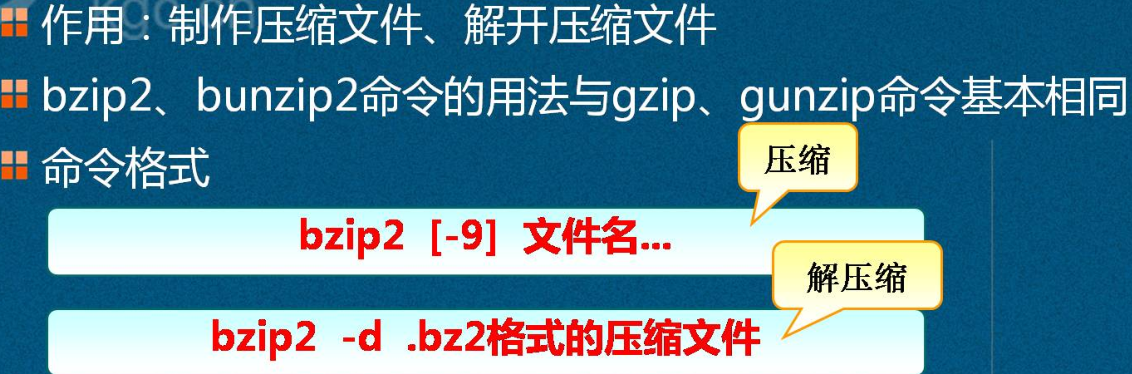
Application examples:
<!--Method 1-->
[root@centos01 ~]# ls
anaconda-ks.cfg  CentOS-7.4-x86_64-1708.iso  initial-setup-ks.cfg
[root@centos01 ~]# Bzip2 - 9 initial setup ks.cfg <! -- high speed compression -- >
[root@centos01 ~]# ls
anaconda-ks.cfg  CentOS-7.4-x86_64-1708.iso  initial-setup-ks.cfg.bz2
[root@centos01 ~]# Bzip2 - D initial setup ks.cfg.bz2 <! -- unzip -- >
[root@centos01 ~]# ls
anaconda-ks.cfg  CentOS-7.4-x86_64-1708.iso  initial-setup-ks.cfg

<!--Method two-->
[root@centos01 ~]# ls
anaconda-ks.cfg  CentOS-7.4-x86_64-1708.iso  initial-setup-ks.cfg
[root@centos01 ~]# Bzip2 initial setup ks.cfg <! -- compression -- >
[root@centos01 ~]# ls
anaconda-ks.cfg  CentOS-7.4-x86_64-1708.iso  initial-setup-ks.cfg.bz2
[root@centos01 ~]# Bunzip2 initial-setup-ks.cfg.bz2 <! -- unzip -- >
[root@centos01 ~]# ls
anaconda-ks.cfg  CentOS-7.4-x86_64-1708.iso  initial-setup-ks.cfg
3. tar -- archive command
The tar command makes and releases archives. The basic syntax format is as follows:
The common options of tar command are as follows:
-
-c: Create a package file in. tar format;
-
-x: Unpack the package file in. tar format;
-
-v: Output details;
-
-f: Indicates the use of archived documents;
-
-p: Keep the permissions of original files and directories during packaging;
-
-t: List the files in the package;
-
-C: Specify the destination folder to release when unpacking;
-
-z: Call gzip program to compress or decompress;
- -j: Call bzip2 program to compress or decompress;
Application examples:
[root@centos01 ~]# Tar zcvf yun.gz Yun / <! -- use the tar command to call gzip to archive Yun as yun.gz -- >
yun/
[root@centos01 ~]# ls
1.txt  anaconda-ks.cfg  initial-setup-ks.cfg  www  yun  yun.gz
[root@centos01 ~]# tar zxvf yun.gz -C /usr/src/
         <!--File will be compressed yun.gz Unzip to/usr/src Directory-->
yun/
[root@centos01 ~]# cd /usr/src/
[root@centos01 src]# ls
debug  kernels  yun
[root@centos01 ~]# tar jcvf yun.bz2 ./yun
      <!--Use tar Command call bzip take yun Catalog data compression-->
[root@centos01 ~]# tar jxvf yun.bz2 -C /usr/src/
    <!--take yun.bz2 Extract the compressed file to/usr/src/Directory-->
./yun/
[root@centos01 ~]# cd /usr/src/
[root@centos01 src]# ls
debug  kernels  yun
4. dd command compression and backup
Options and parameters:
-
if: input file can also be a device;
-
of: output file can also be a device;
-
bs: the size of a planned block (block). If not specified, the default is 512Bytes (bytes);
- count: how many pieces do you mean.
Application examples:
[root@centos01 ~]# dd if=/dev/zero of=/usr/src/1.iso bs=30M count=10
 <! -- copy the information in the / dev/zero file to the / usr/src directory to create a 1.iso file, 30M at a time, 10 times -- >
Recorded 10 + 0 reads
 It records the writing of 10 + 0
 314572800 bytes (315 MB) copied, 0.212995 seconds, 1.5 GB / S
[root@centos01 ~]# cd /usr/src/
[root@centos01 src]# ls
1.iso  debug  kernels
4, vi text editor
1. The function of text editor
Create or modify text files and maintain various configuration files in Linux system.
2. The most commonly used text editor in Linux
-
vi: the default text editor in Unix like system;
- vim: the enhanced version of vi editor, which is also used to be vi;
3. Working mode of vi editor
Command mode, input mode and last line mode. The switching between different modes is as follows: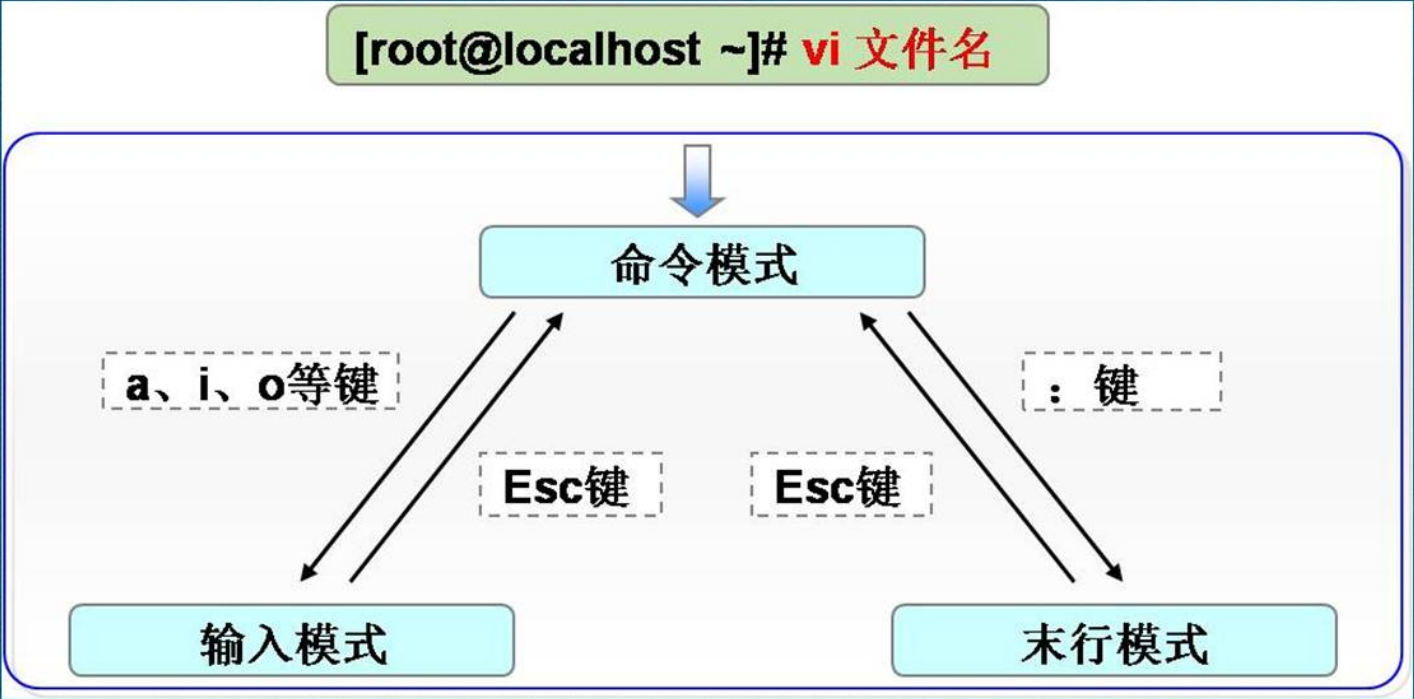
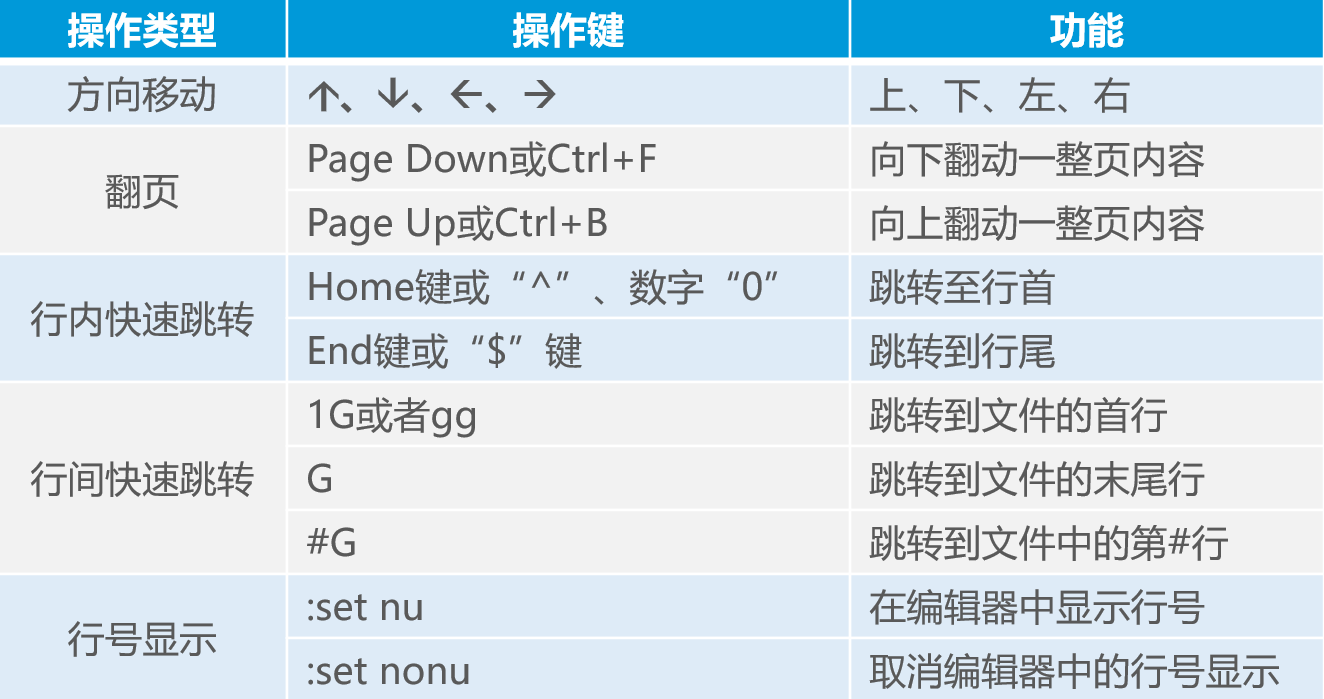
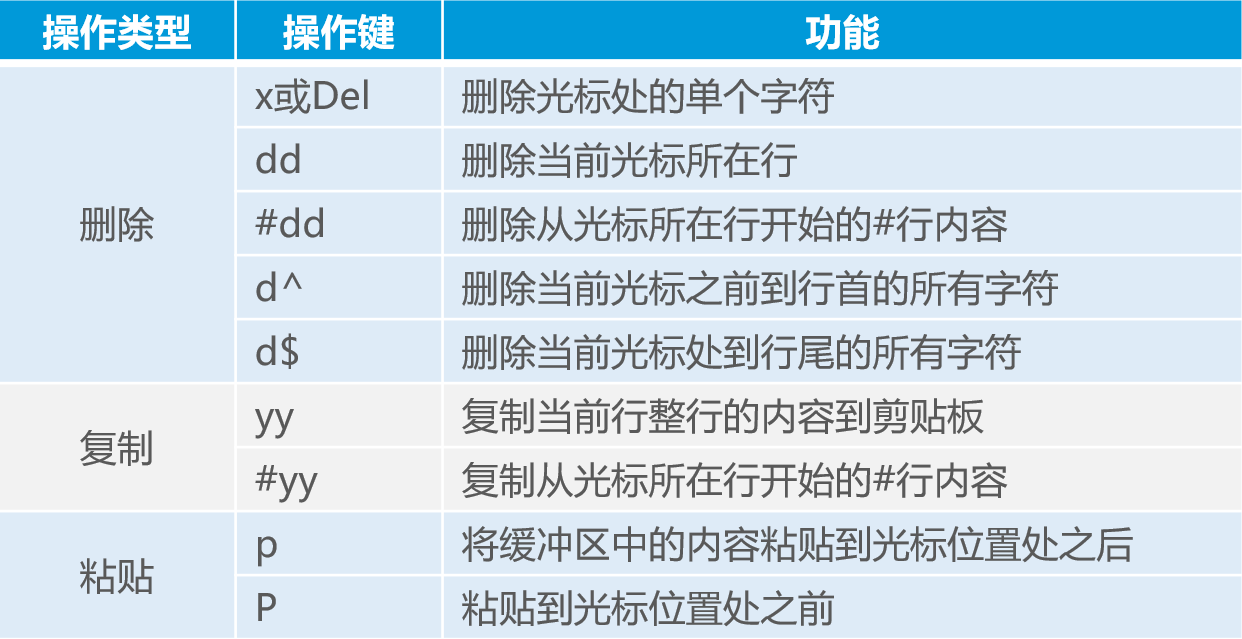
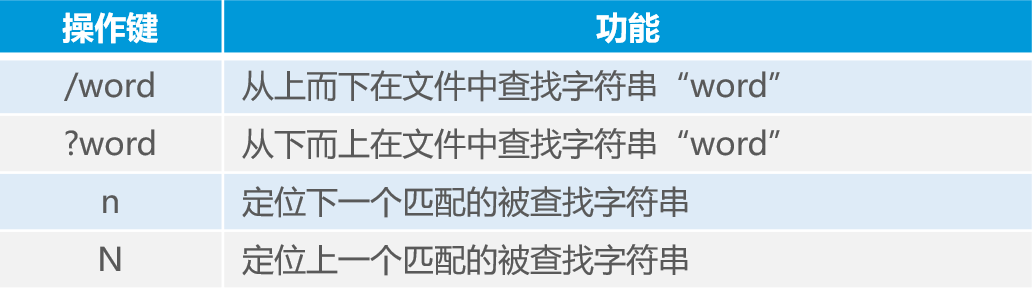
4. Common operations in command mode
1) Cursor movement
2) Copy, paste, delete
3) File content search
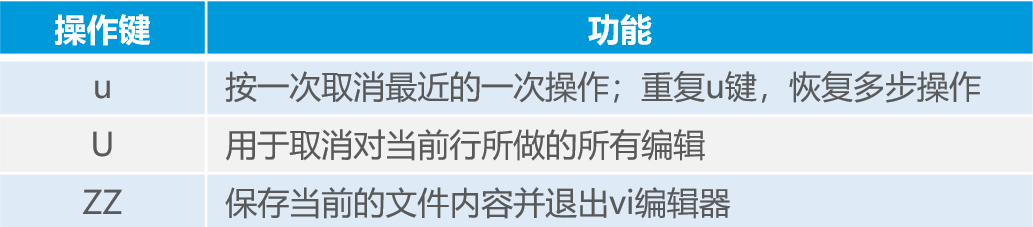
4) Undo edit and save exit
5. Basic operation of last line mode
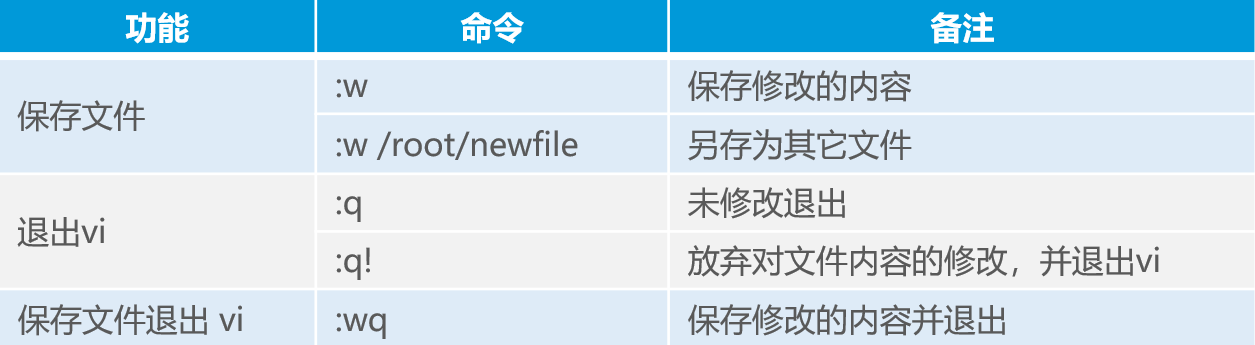
1) Save file and exit vi editor
2) Open a new file or read in other file contents

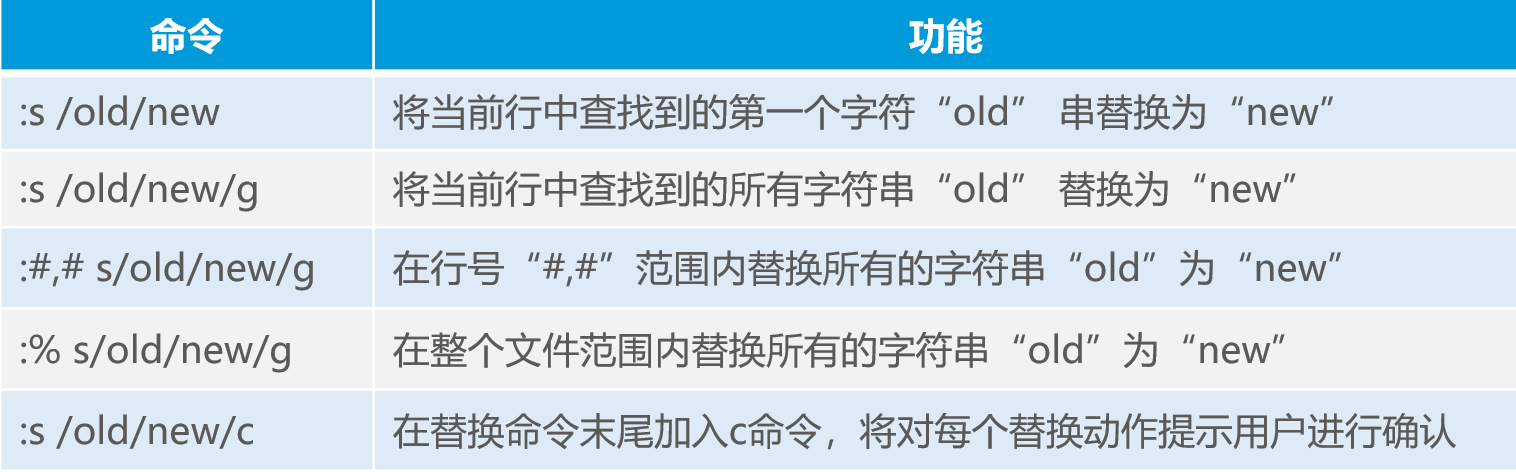
3) File content replacement
————————Thank you for reading————————