As you know, @ symbol is the syntax sugar of decorator, and the function behind @ symbol is the protagonist of our article: decorator.
The decorator is placed at the beginning of a function definition, and it's like a hat on the function's head. Bind to this function. When we call this function, the first thing is not to execute this function, but to pass this function as an argument to the hat on its head, which we call the decorator.
Once, in an interview when I was just changing my career to become a programmer, I was asked two questions by the interviewer:
1. What functions have you used decorators to achieve?
2. How to write a decorator that can transfer parameters?
For me, who had very limited practical experience at that time, the first question could only answer some very simple usages, while the second question could not be answered.
At that time, with these two questions, I began to systematically learn all the contents of decorators. These have been collated in their own blog, and today they have carried out a lot of supplement and Corrigendum, published here to share with you. I hope it can provide some reference for the new and advanced friends.
01. Hello, decorator
The use of decorators is very fixed
Define a decorator (HAT) first
Define your business function or class (person)
Finally, put the decorator (HAT) on the head of this function (person)
It's like this
def decorator(func):
    def wrapper(*args, **kw):
        return func()
    return wrapper

@decorator
def function():
    print("hello, decorator")
In fact, decorators are not necessary for coding, that is to say, you can do without decorators. Their appearance should make our code
More elegant, clearer code structure
Encapsulate the specific function code into a decorator, improve code reuse rate and code readability
Next, I will explain with examples how to write various simple and complex decorators.
02. Getting started: log printer
The first is the log printer.
Implemented functions:
Before function execution, print a line of log to inform the owner that I want to execute the function.
After the function is executed, you can't leave without patting your bottom. We are polite code, and then print a line of log to inform the owner that I'm finished.
# This is the decorator function. The parameter func is the decorated function.
def logger(func):
    def wrapper(*args, **kw):
        print('Master, I'm ready to start:{} Function:'.format(func.__name__))

        # What's really going on is this line.
        func(*args, **kw)

        print('Master, I'm done.')
    return wrapper
If, my business function is to calculate the sum of two numbers. When it's done, put a hat on it.
@logger
def add(x, y):
    print('{} + {} = {}'.format(x, y, x+y))
Then execute the add function.
add(200, 50)
Let's see what the output is.
Master, I'm ready to execute the add function:
200 + 50 = 250
 Master, I'm done.
03. Getting started: time timer
Let's take a look at the time counter.
Implementation function: as the name implies, it is to calculate the execution time of a function.
# This is the decoration function.
def timer(func):
    def wrapper(*args, **kw):
        t1=time.time()
        # This is where the function actually executes
        func(*args, **kw)
        t2=time.time()

        # Calculate the lower duration
        cost_time = t2-t1
        print("Time spent:{}second".format(cost_time))
    return wrapper
Suppose our function is to sleep for 10 seconds. In this way, we can better see whether the calculation time is reliable or not.
import time

@timer
def want_sleep(sleep_time):
    time.sleep(sleep_time)

want_sleep(10)
Let's see the output, as expected, for 10 seconds.
Time spent: 10.007380086975098 seconds
04. Advanced: function decorator with parameters
Through the above two simple examples, you should be able to understand the working principle of the decorator.
However, the use of ornaments is far more than that. There are still many articles in the study. Let's learn this knowledge together today.
Looking back at the example above, the decorator cannot accept parameters. Its usage can only be applied to some simple scenes. The decorator without parameters can only execute fixed logic for the decorated function.
The decorator itself is a function. As a function, if parameters cannot be passed, the function of this function will be very limited, and only fixed logic can be executed. This means that if the execution of the logic code of the decorator needs to be adjusted according to different scenarios, if the parameters cannot be passed, we will write two decorators, which is obviously unreasonable.
For example, if we want to implement a task that can send mail regularly (one email per minute), and a task that can synchronize time regularly (once a day), we can implement a decorator of periodic task by ourselves. This decorator can receive the parameter of a time interval and how often to execute the task.
You can write it like this. Because this function code is complex and not conducive to learning, it will not be pasted here.
@periodic_task(spacing=60)
def send_mail():
     pass

@periodic_task(spacing=86400)
def ntp()
    pass
Let's create a fake scene by ourselves. We can pass in a parameter in the decorator, specify the nationality, and say hello in our native language before the function is executed.
# Xiaoming, Chinese
@say_hello("china")
def xiaoming():
    pass

# jack, American
@say_hello("america")
def jack():
    pass
What if we implement this decorator so that it can realize parameter passing?
It will be more complex and requires two levels of nesting.
def say_hello(contry):
    def wrapper(func):
        def deco(*args, **kwargs):
            if contry == "china":
                print("Hello!")
            elif contry == "america":
                print('hello.')
            else:
                return

            # Where functions are actually executed
            func(*args, **kwargs)
        return deco
    return wrapper
Let's do it
xiaoming()
print("------------")
jack()
Look at the output.
Hello!
------------
hello.
05. High level: decorator without parameters
All of the above are function based decorators. When reading other people's code, you can often find that there are also class based decorators.
Based on the implementation of class decorator, two built-in functions "call" and "init" must be implemented.
init: receive decorated function
call: implement decoration logic.
Take the simple example of log printing.
class logger(object):
    def __init__(self, func):
        self.func = func

    def __call__(self, *args, **kwargs):
        print("[INFO]: the function {func}() is running..."
            .format(func=self.func.__name__))
        return self.func(*args, **kwargs)

@logger
def say(something):
    print("say {}!".format(something))

say("hello")
Run it and see the output
[INFO]: the function say() is running...
say hello!
06. High order: class decorator with parameters
In the above example without parameters, you can only print the INFO level logs. Normally, we need to print the DEBUG WARNING level logs. You need to pass in parameters to the class decorator and assign levels to this function.
Class decorators with and without parameters are quite different.
__init: no longer receives the decorated function, but receives the incoming parameter.
__call: receive the decorated function and implement the decoration logic.
class logger(object):
    def __init__(self, level='INFO'):
        self.level = level

    def __call__(self, func): # Acceptance function
        def wrapper(*args, **kwargs):
            print("[{level}]: the function {func}() is running..."
                .format(level=self.level, func=func.__name__))
            func(*args, **kwargs)
        return wrapper  #Return function

@logger(level='WARNING')
def say(something):
    print("say {}!".format(something))

say("hello")
Let's specify the WARNING level and run it to see the output.
[WARNING]: the function say() is running...
say hello!
07. Using partial functions and classes to implement decorators
Most decorators are based on functions and closures, but this is not the only way to make decorators.
In fact, Python has only one requirement on whether an object can be used as a decorator (@ decorator): the decorator must be a "callable" object.
For this callable object, we are most familiar with functions.
In addition to functions, a class can also be a callable object, as long as you implement the call function (the above examples have been touched on).
In fact, the partial functions that are easy to be ignored are also callable objects.
Next, let's talk about how to use a combination of classes and partial functions to implement a different decorator.
As shown below, DelayFunc is a class that implements "call" and delay returns a partial function, where delay can be used as a decorator. (the following code is from Python Craftsman: Tips for using decorators)
import time
import functools

class DelayFunc:
    def __init__(self,  duration, func):
        self.duration = duration
        self.func = func

    def __call__(self, *args, **kwargs):
        print(f'Wait for {self.duration} seconds...')
        time.sleep(self.duration)
        return self.func(*args, **kwargs)

    def eager_call(self, *args, **kwargs):
        print('Call without delay')
        return self.func(*args, **kwargs)

def delay(duration):
    """
    //Decorator: delays the execution of a function.
    //At the same time, the. Eager call method is provided for immediate execution.
    """
    # Python learning exchange QQ group: 857662006
    # To avoid defining additional functions,
    # Directly use functools.partial to help construct the DelayFunc instance
    return functools.partial(DelayFunc, duration)
//Our business function is very simple, that is, adding

@delay(duration=2)
def add(a, b):
    return a+b
Take a look at the execution process
>>> add    # So add becomes an instance of Delay.
<__main__.DelayFunc object at 0x107bd0be0>
>>>
>>> add(3,5)  # Call the instance directly and enter "call".__
Wait for 2 seconds...
8
>>>
>>> add.func # Implementation example method
<function add at 0x107bef1e0>
08. How to write ornaments that can be decorated?
There are three common ways to write singleton mode in Python. One of them is realized by decorators.
Here is a single example of my own decorator version.
instances = {}

def singleton(cls):
    def get_instance(*args, **kw):
        cls_name = cls.__name__
        print('===== 1 ====')
        if not cls_name in instances:
            print('===== 2 ====')
            instance = cls(*args, **kw)
            instances[cls_name] = instance
        return instances[cls_name]
    return get_instance

@singleton
class User:
    _instance = None

    def __init__(self, name):
        print('===== 3 ====')
        self.name = name
You can see that we use the decoration function singleton to decorate the User class. Decorators are not very common when they are used in classes, but as long as they are familiar with the implementation process of decorators, it is not difficult to realize the decoration of classes. In the above example, the decorator is just to control the generation of class instances.
In fact, you can refer to the debugging process here to understand the process of instantiation.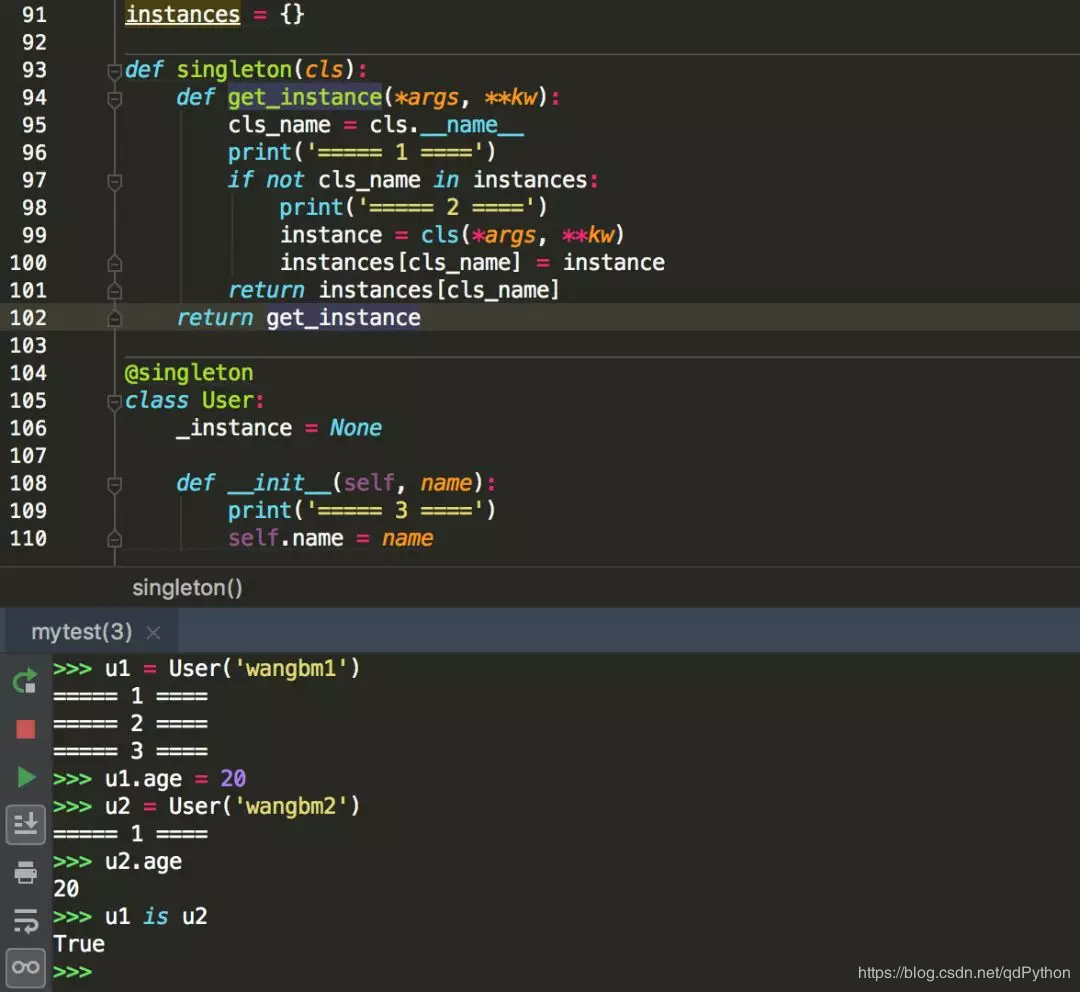
09. What's the use of wraps decorators?
There is a wraps decorator in the functools standard library. You should have seen it often. What's the use of it?
Let's start with an example.
def wrapper(func):
    def inner_function():
        pass
    return inner_function

@wrapper
def wrapped():
    pass

print(wrapped.__name__)
#inner_function
Why is that? Shouldn't func be returned?
This is not hard to understand, because the upper execution of func is equivalent to the lower decorator(func), so the upper function is equivalent to the lower decorator(func). (name), of course, the name is inner function.
def wrapper(func):
    def inner_function():
        pass
    return inner_function

def wrapped():
    pass

print(wrapper(wrapped).__name__)
#inner_function
How to avoid this situation? The method is to use functools. Wrap decorator. Its function is to assign some attribute values of the wrapped function to the wrapper function, and finally make the attribute display more intuitive.
from functools import wraps

def wrapper(func):
    @wraps(func)
    def inner_function():
        pass
    return inner_function

@wrapper
def wrapped():
    pass

print(wrapped.__name__)
# wrapped
To be exact, wraps is actually a partial object. The source code is as follows
def wraps(wrapped,
          assigned = WRAPPER_ASSIGNMENTS,
          updated = WRAPPER_UPDATES):
    return partial(update_wrapper, wrapped=wrapped,
                   assigned=assigned, updated=updated)
It can be seen that wraps is actually a function called update ﹣ wrapper. After we know the principle, we can rewrite the above code. Without using wraps, we can also make wrapped. ﹣ name ﹣ print out wrapped. The code is as follows:
from functools import update_wrapper

WRAPPER_ASSIGNMENTS = ('__module__', '__name__', '__qualname__', '__doc__',
                       '__annotations__')

def wrapper(func):
    def inner_function():
        pass

    update_wrapper(inner_function, func, assigned=WRAPPER_ASSIGNMENTS)
    return inner_function

@wrapper
def wrapped():
    pass

print(wrapped.__name__)
10. Built in decorator: property
All of the above are custom decorators.
In fact, Python language itself has some decorators. For example, property is a built-in decorator that we are familiar with.
It usually exists in a class. You can define a function as an attribute. The value of the attribute is the content of the return function.
Usually we bind properties to instances like this
class Student(object):
    def __init__(self, name, age=None):
        self.name = name
        self.age = age

# instantiation
xiaoming = Student("Xiao Ming")

# Add attribute
xiaoming.age=25

# Query attribute
xiaoming.age

# Delete attribute
del xiaoming.age
However, a little experienced developer can see that it can directly expose the attribute. Although it's very simple to write, it can't restrict the validity of the attribute value. In order to achieve this function, we can write like this.
class Student(object):
    def __init__(self, name):
        self.name = name
        self.name = None

    def set_age(self, age):
        if not isinstance(age, int):
            raise ValueError('Illegal entry: age must be a numeric value!')
        if not 0 < age < 100:
            raise ValueError('Illegal input: age range must be 0-100')
        self._age=age

    def get_age(self):
        return self._age

    def del_age(self):
        self._age = None


xiaoming = Student("Xiao Ming")

# Add attribute
xiaoming.set_age(25)

# Query attribute
xiaoming.get_age()

# Delete attribute
xiaoming.del_age()
Although the above code design can define variables, it can be found that both the acquisition and assignment (through functions) are different from what we usually see.
According to our thinking habits, it should be like this.
# assignment
xiaoming.age = 25

# Obtain
xiaoming.age
So how can we achieve this way? Look at the code below.
class Student(object):
    def __init__(self, name):
        self.name = name
        self.name = None

    @property
    def age(self):
        return self._age

    @age.setter
    def age(self, value):
        if not isinstance(value, int):
            raise ValueError('Illegal entry: age must be a numeric value!')
        if not 0 < value < 100:
            raise ValueError('Illegal input: age range must be 0-100')
        self._age=value

    @age.deleter
    def age(self):
        del self._age

xiaoming = Student("Xiao Ming")

# set a property
xiaoming.age = 25

# Query attribute
xiaoming.age

# Delete attribute
del xiaoming.age
Functions decorated with @ property will define a function as a property, and the value of the property is the content of the return function. At the same time, this function becomes another decorator. Just like the @ age.setter and @ age. Delete we used later.
- @age.setter allows us to assign values directly using XiaoMing.age = 25.
- @age.deleter allows us to delete attributes in a way like del XiaoMing.age.
The underlying implementation mechanism of property is descriptors, for which I wrote an article.
Let's also introduce here, just to string all these seemingly scattered articles together.
As follows, I wrote a class in which I used property to change math into the property of class instance.
class Student:
    def __init__(self, name):
        self.name = name

    @property
    def math(self):
        return self._math

    @math.setter
    def math(self, value):
        if 0 <= value <= 100:
            self._math = value
        else:
            raise ValueError("Valid value must be in [0, 100]")
Why is the underlying property protocol based on descriptors? Click PyCharm to enter the source code of property. Unfortunately, it's just a pseudo source code similar to the document, with no specific implementation logic.
However, from the magic function structure of this pseudo source code, you can roughly know its implementation logic.
Here, I implement the class property feature myself by imitating its function structure and combining with the descriptor protocol.
The code is as follows:
class TestProperty(object):

    def __init__(self, fget=None, fset=None, fdel=None, doc=None):
        self.fget = fget
        self.fset = fset
        self.fdel = fdel
        self.__doc__ = doc

    def __get__(self, obj, objtype=None):
        print("in __get__")
        if obj is None:
            return self
        if self.fget is None:
            raise AttributeError
        return self.fget(obj)

    def __set__(self, obj, value):
        print("in __set__")
        if self.fset is None:
            raise AttributeError
        self.fset(obj, value)

    def __delete__(self, obj):
        print("in __delete__")
        if self.fdel is None:
            raise AttributeError
        self.fdel(obj)


    def getter(self, fget):
        print("in getter")
        return type(self)(fget, self.fset, self.fdel, self.__doc__)

    def setter(self, fset):
        print("in setter")
        return type(self)(self.fget, fset, self.fdel, self.__doc__)

    def deleter(self, fdel):
        print("in deleter")
        return type(self)(self.fget, self.fset, fdel, self.__doc__)
Then we change the Student class to the following
class Student:
    def __init__(self, name):
        self.name = name

    # It's the only way to change
    @TestProperty
    def math(self):
        return self._math

    @math.setter
    def math(self, value):
        if 0 <= value <= 100:
            self._math = value
        else:
            raise ValueError("Valid value must be in [0, 100]")
In order to make you less confused, here are two points:
With TestProperty decoration, math is no longer a function, but an instance of TestProperty class. So the second math function can be decorated with math.setter, which is essentially to call TestProperty.setter to generate a new TestProperty instance to assign to the second math.
The first and second math are two different TestProperty instances. But they all belong to the same descriptor class (TestProperty). When you assign a value to the math pair, you will enter TestProperty. Set. When you value the math, you will enter TestProperty. get. Take a closer look. In fact, the final access is the Student instance's "math" attribute.
Having said so much, it's better to run it. It's more intuitive.
# After running, this line will be printed directly. This is when TestProperty is instantiated and assigned to the second math.
in setter
>>>
>>> s1.math = 90
in __set__
>>> s1.math
in __get__
90
If you have any questions about the operation principle of the above code, please be sure to understand it in combination with the above two instructions, which are very important.
11. Other decorators: practical operation of decorators
After reading and understanding the above content, you can say that you are a Python expert. Don't doubt, be confident, because many people don't know how to use decorators.
In my opinion, using decorators can achieve the following purposes:
Make the code more readable and more compelling;
The code structure is clearer and the code redundancy is lower.
I also have a scene recently, which can be well implemented with decorators. Let's take a look at it for the moment.
This is a decorator to realize the timeout of control function. If it times out, a timeout exception is thrown.
You can have a look if you are interested.
import signal

class TimeoutException(Exception):
    def __init__(self, error='Timeout waiting for response from Cloud'):
        Exception.__init__(self, error)


def timeout_limit(timeout_time):
    def wraps(func):
        def handler(signum, frame):
            raise TimeoutException()

        def deco(*args, **kwargs):
            signal.signal(signal.SIGALRM, handler)
            signal.alarm(timeout_time)
            func(*args, **kwargs)
            signal.alarm(0)
        return deco
    return wraps
All of the above is my sharing of decorators.